
A snowman is just three circles, right? Olaf breaks that rule with a head that swells out at the bottom, a goofy grin with one big tooth and a carrot nose that pokes sideways. Below I show you how to draw Olaf step by step, starting from three stacked ovals and ending with a colored snowman waving both twig arms. This is my own simple fan-art version for practice, not official artwork, so treat it as a friendly warm-up rather than a copy of the film.
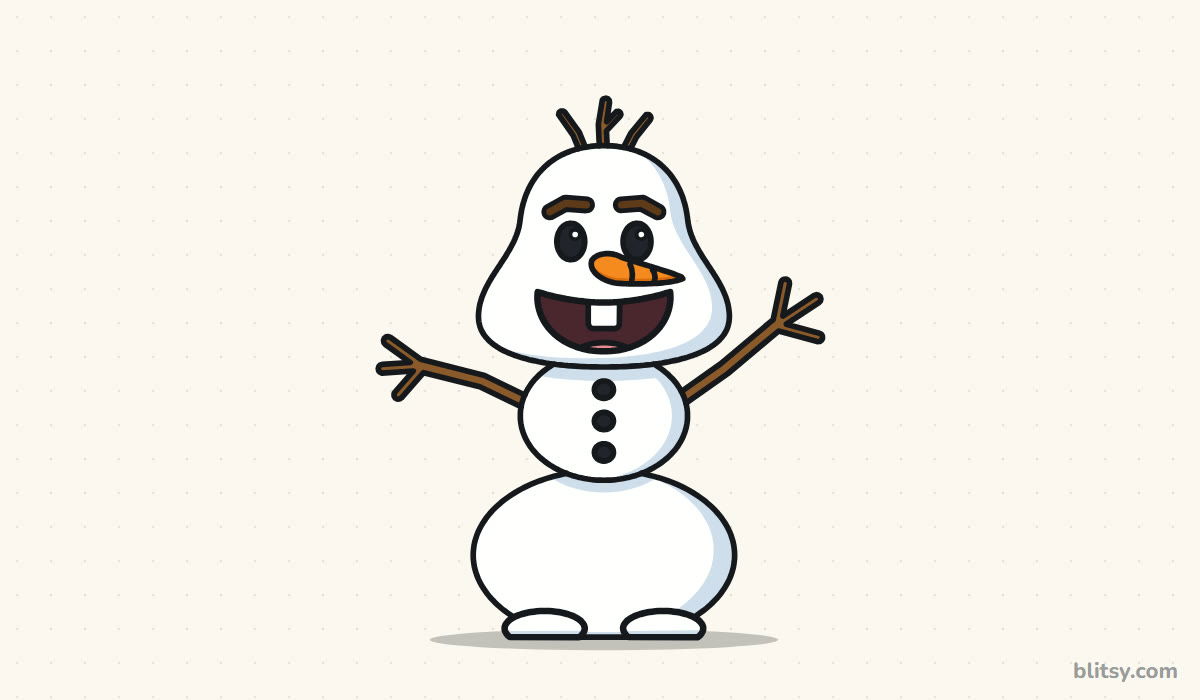
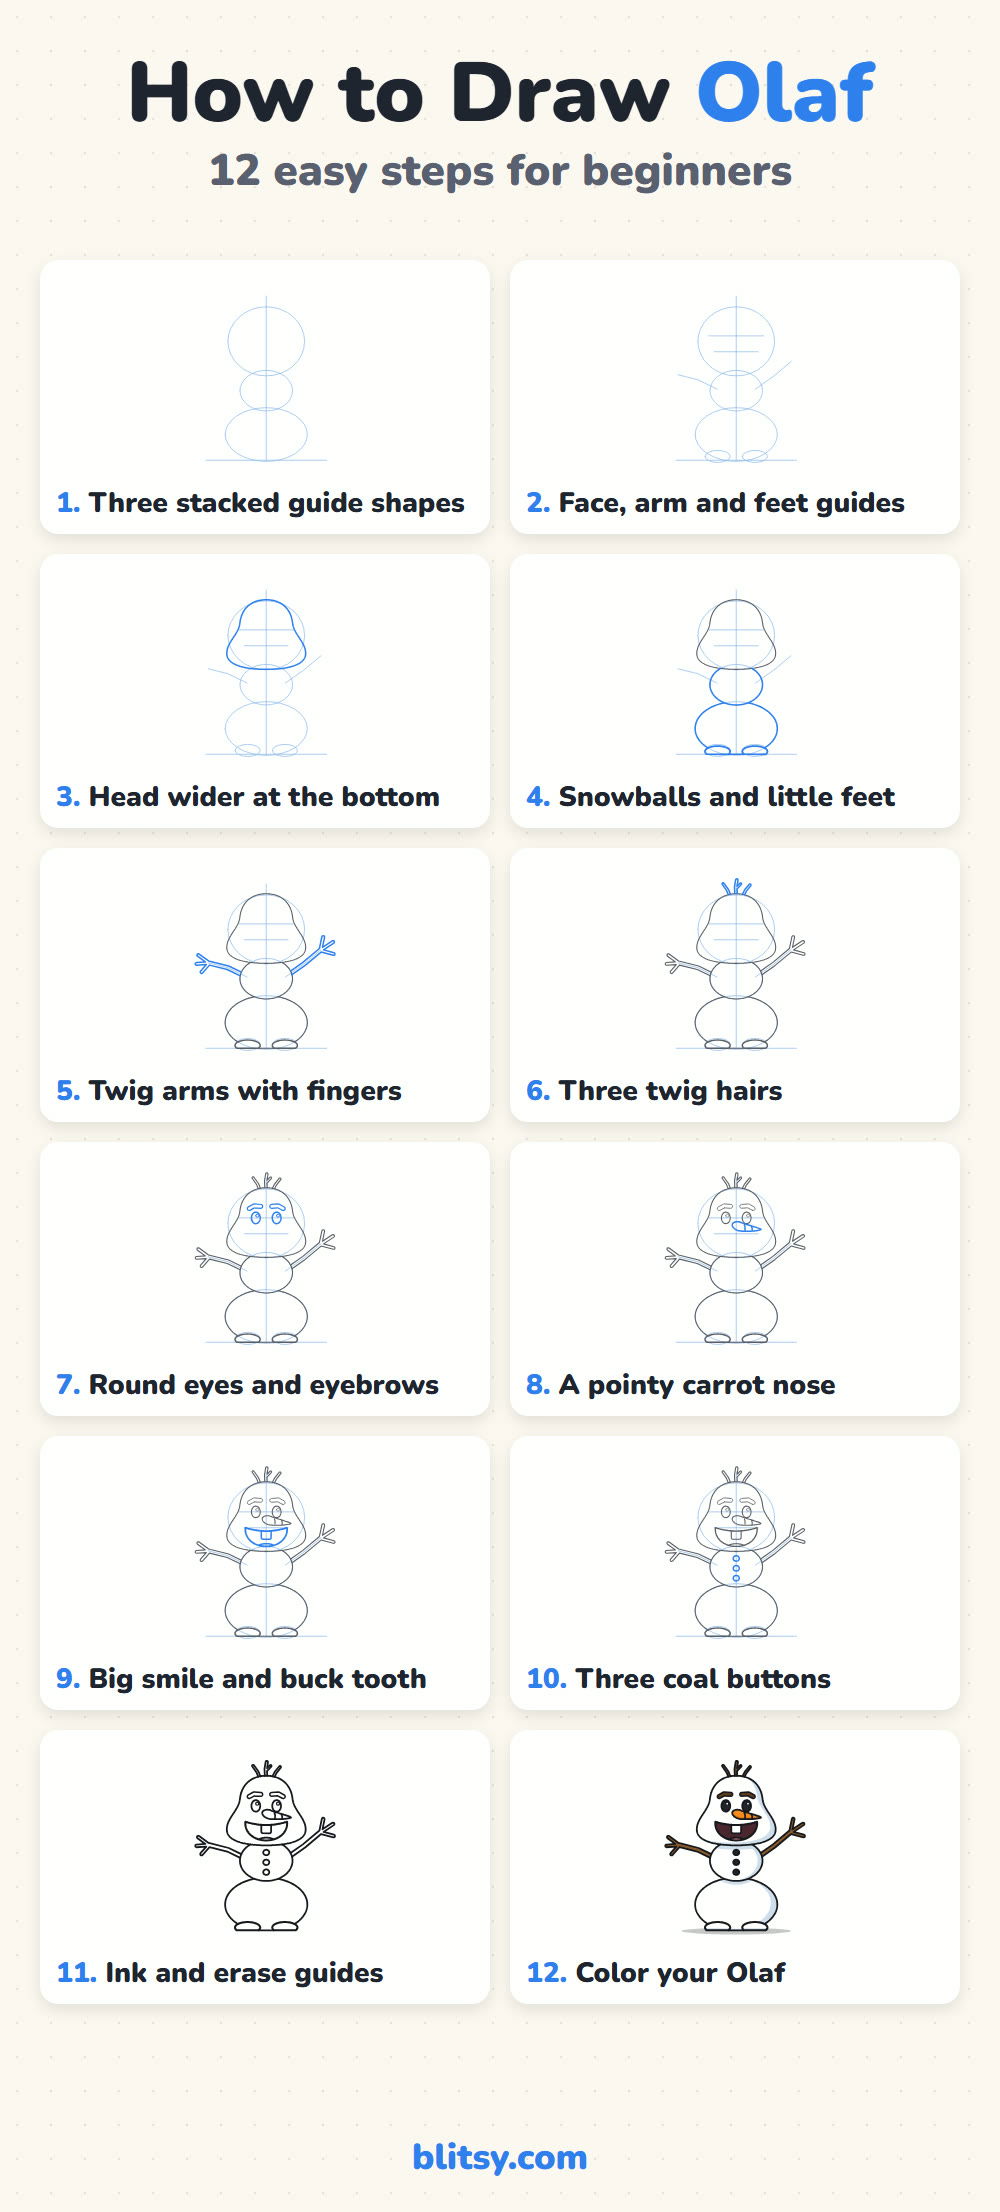
New lines show up in blue in every picture, and everything from earlier steps turns gray. Copy only the blue part each time.
Quick overview
⏱️ Time: around 25 to 30 minutes with coloring
🎯 Level: easy, fine for kids aged 5 and up
✏️ Steps: 12
⛄ You'll draw: a smiling snowman waving his twig arms
A Short Supply List for Snow Day Sketching
- A regular pencil
- A soft eraser
- A black fineliner or thin marker
- Colored pencils: orange, brown, black, pink
- A pale blue or light gray pencil for the snow shadows
- White or cream paper
You won't need white at all, since the paper already does that job for the snow.
How to Draw Olaf Step by Step
Step 1: Stack three guide shapes
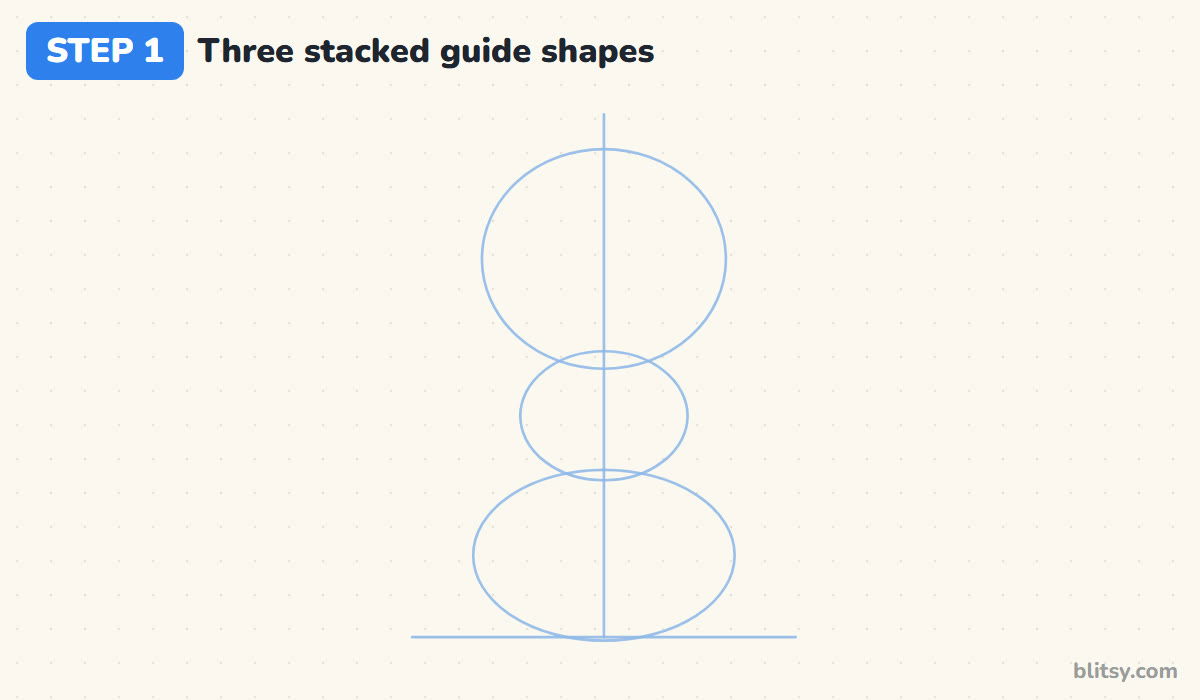
Draw a flat ground line near the bottom of the page and a straight line up through the middle. Stack three ovals on that line: a big one for the head, a small one for the middle and a wide one at the bottom resting on the ground. Let them overlap a little. The head oval should be noticeably bigger than the middle one, because Olaf is mostly head.
💡 Tip: Hold the pencil further back from the tip. Your lines come out lighter without trying.
Step 2: Mark where the face and limbs go
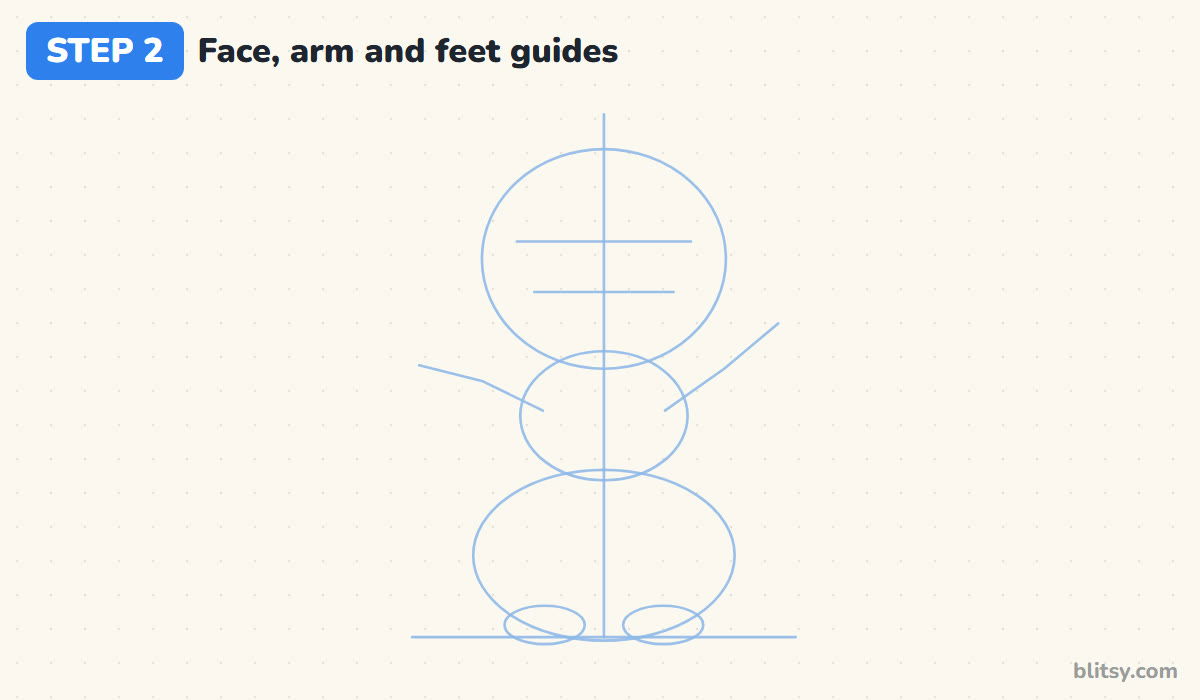
Inside the head, draw two short lines across: the upper one for the eyes and a lower one where the mouth begins. Then sketch two bent lines out from the sides of the middle oval. The left one points out, the right one climbs up for a wave. Finish with two small flat ovals at the bottom for the feet.
💡 Tip: Put the eye line a little above the middle of the head oval, not right on it.
Step 3: Shape a head wider at the bottom
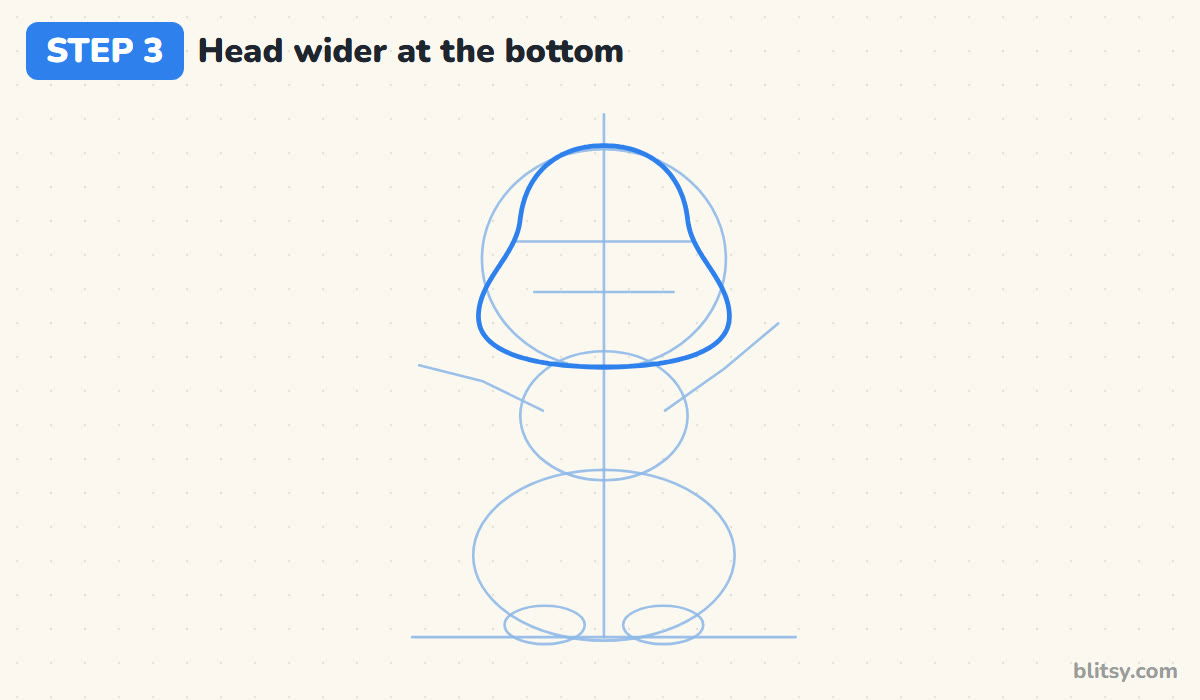
This step decides whether he looks like Olaf or a regular snowman. Start at the top with a narrow, rounded dome. As you come down the sides, curve inward slightly, then swing out into wide, round cheeks below the mouth line. Close it with a gently curved chin. When I teach this, I tell kids to think of an upside-down pear.


💡 Tip: Draw one side, then the other, and compare the cheek bulges before you move on.
Step 4: Draw the snowballs and little feet
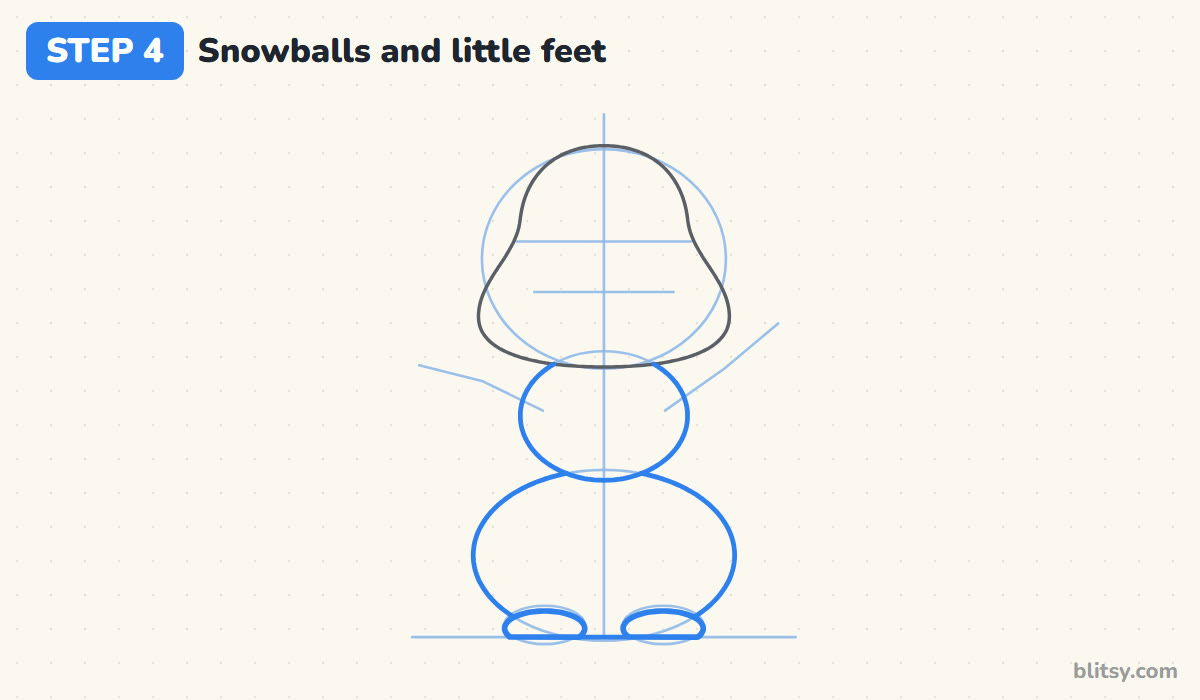
Trace the middle oval, but stop where it meets the chin. The head sits in front, so the top of the middle ball stays hidden. Do the same with the bottom snowball, letting the middle ball cover its top edge. Then add two flat little feet sitting on the ground line, slightly in front of the bottom ball.
💡 Tip: Leave out every line that would cross a shape in front. It saves erasing later.
Step 5: Add twig arms with three fingers
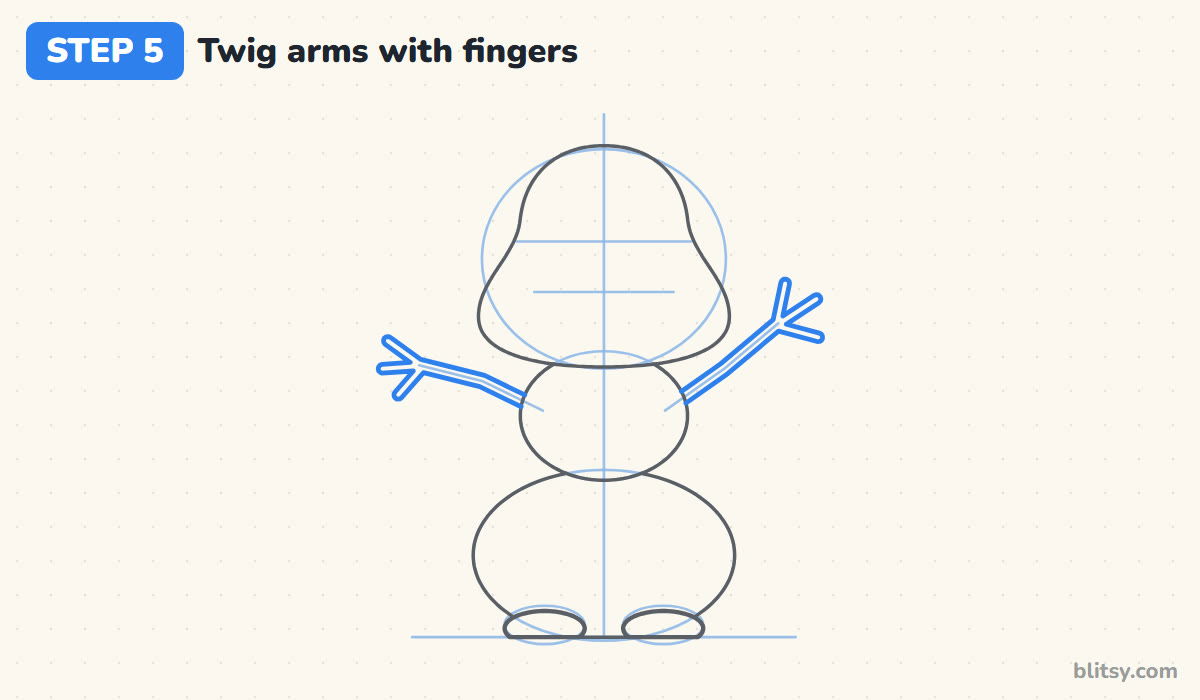
Each arm is a thin stick with a slight bend at the elbow. Draw two close parallel lines along each arm guide, starting from the edge of the middle ball. At the end, split the stick into three short fingers that spread like a fork. Most beginners make the arms too thick, and then they look like logs.
💡 Tip: Keep the two lines of each twig as close as a pencil tip. Thin reads as twig.
Step 6: Give him three twig hairs
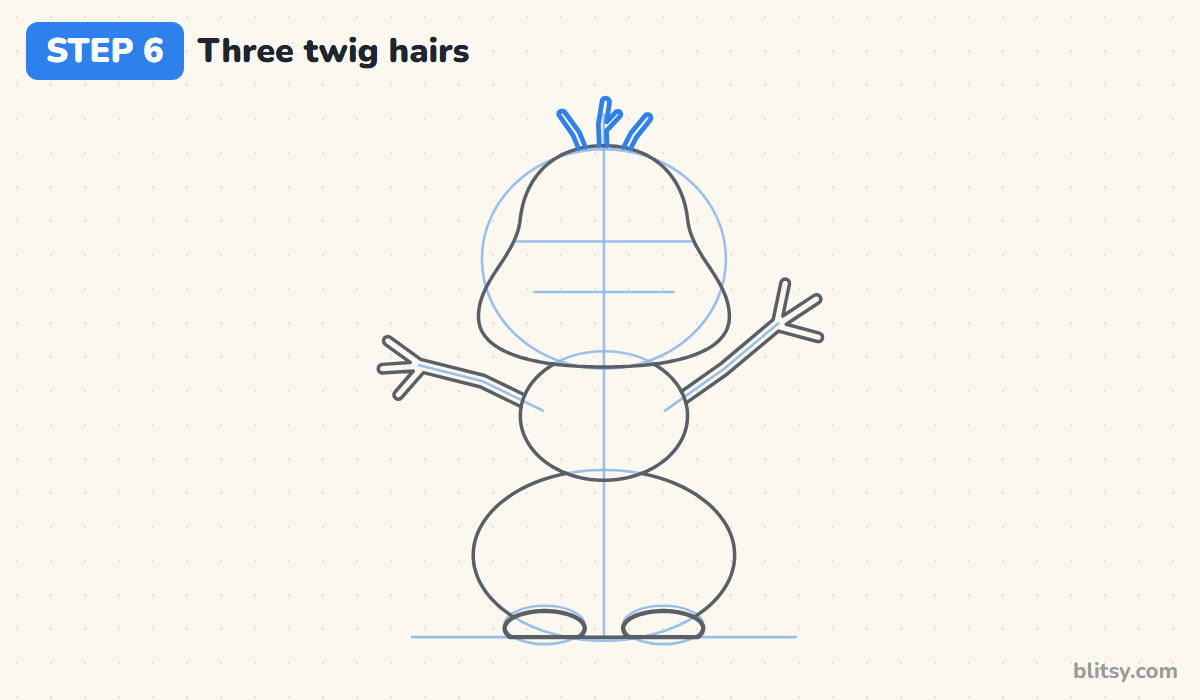
On top of the head, draw three thin twigs sticking up. The middle one goes straight up with a tiny side branch, and the outer two lean away from it. Start each twig right at the head line so it looks planted in the snow. I keep them short, since long hairs pull the eye away from the face.
💡 Tip: Little kids can draw each hair as one single line and skip the double outline.
Step 7: Draw round eyes and thick eyebrows
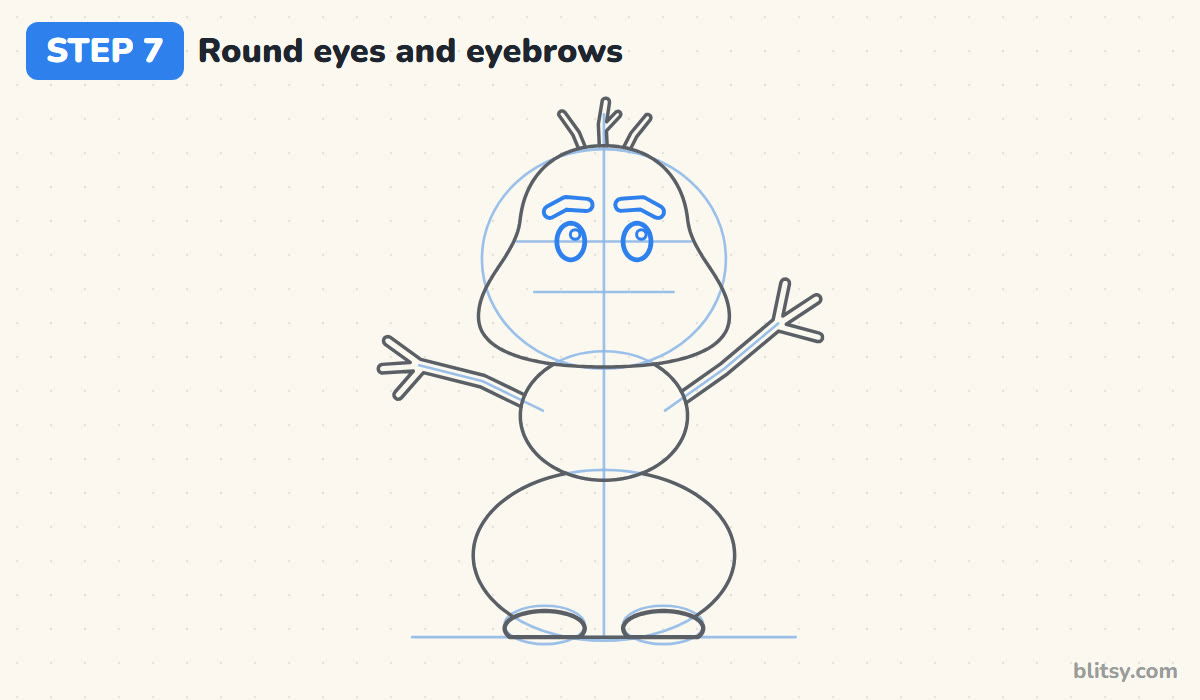
Place two upright ovals on the eye line, one on each side of the center line, with a gap about one eye wide between them. Add a small shine circle near the top of each. Above them, draw thick eyebrows that arch up a bit at the outer ends. Raised brows make him look cheerful instead of cross.

💡 Tip: Draw both shines on the same side of the eyes, so the light comes from one place.
Step 8: Add a pointy carrot nose
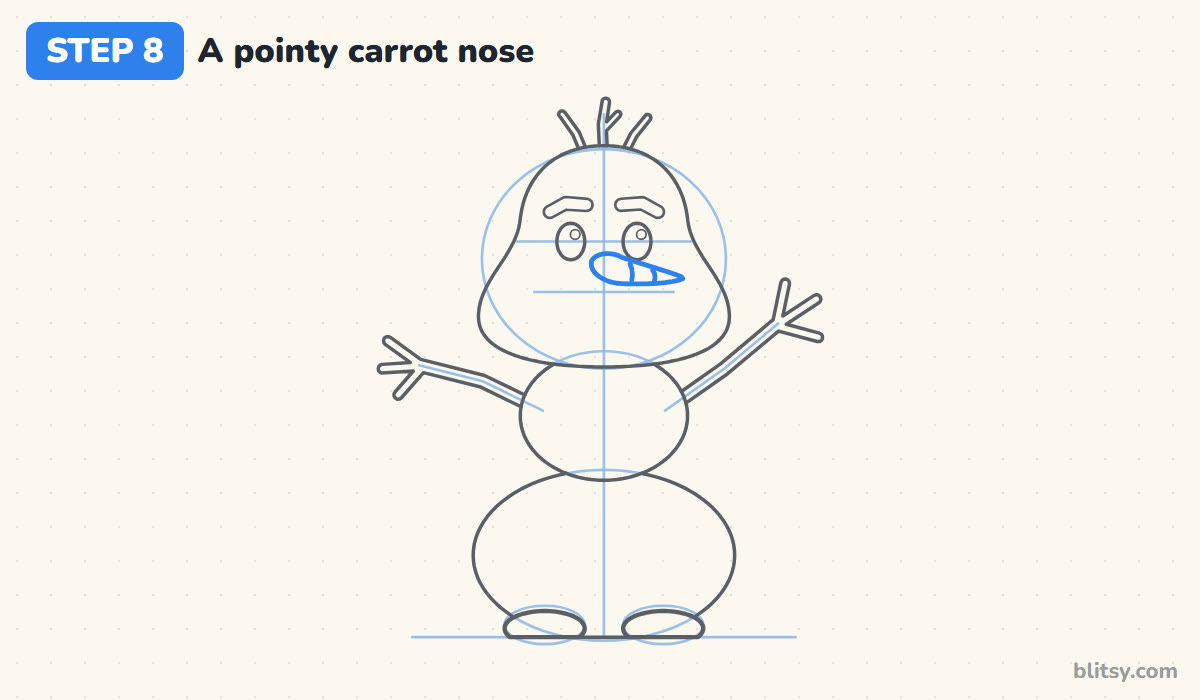
Right under the eyes, start a rounded end on the center line and stretch a long cone out to the right, ending in a point. It should reach almost to the edge of the head. Two small curved lines across the carrot make it look like a real vegetable. Pointing it sideways is a big part of what makes this character recognizable.
💡 Tip: Draw the top edge of the carrot first, then the bottom, and meet at the tip.
Step 9: Draw a big smile with a buck tooth
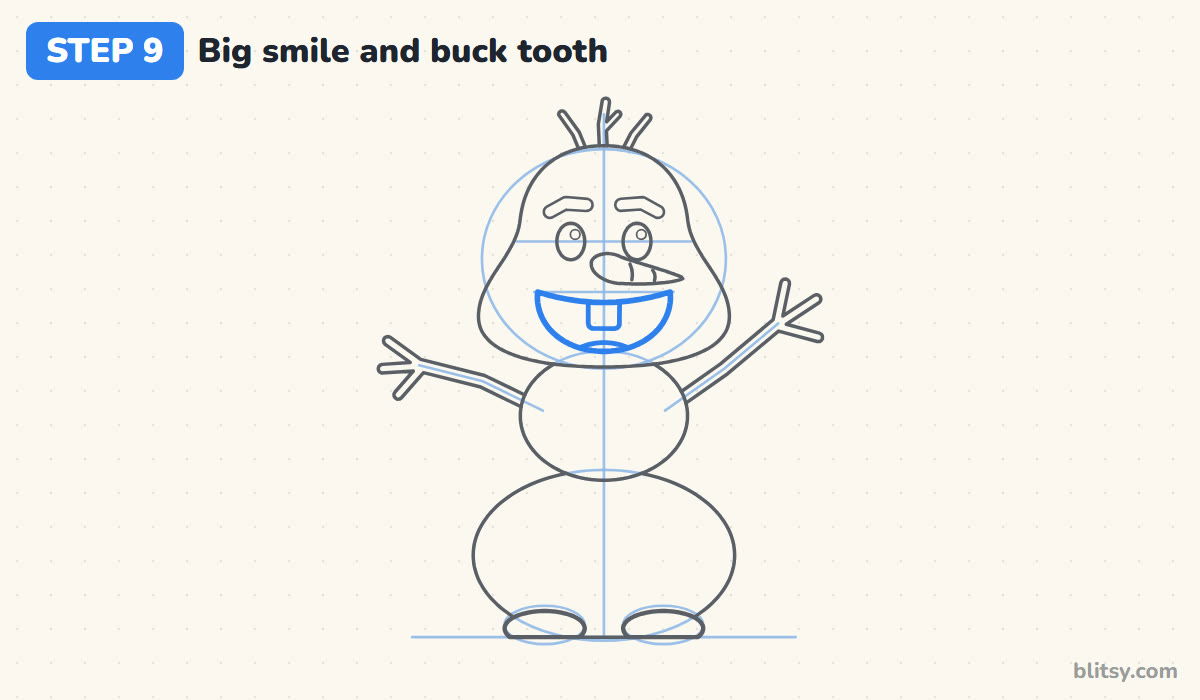
His grin is huge. Draw a long, nearly flat top edge across the mouth line, then a deep U underneath that reaches close to the chin. Hanging from the middle of the top edge, add one square tooth with rounded corners. A small curve at the bottom of the mouth becomes the tongue. That single tooth is honestly the most fun part of the whole drawing.
💡 Tip: Keep the tooth centered. Off to one side, it starts to look like a gap instead.
Step 10: Add three coal buttons
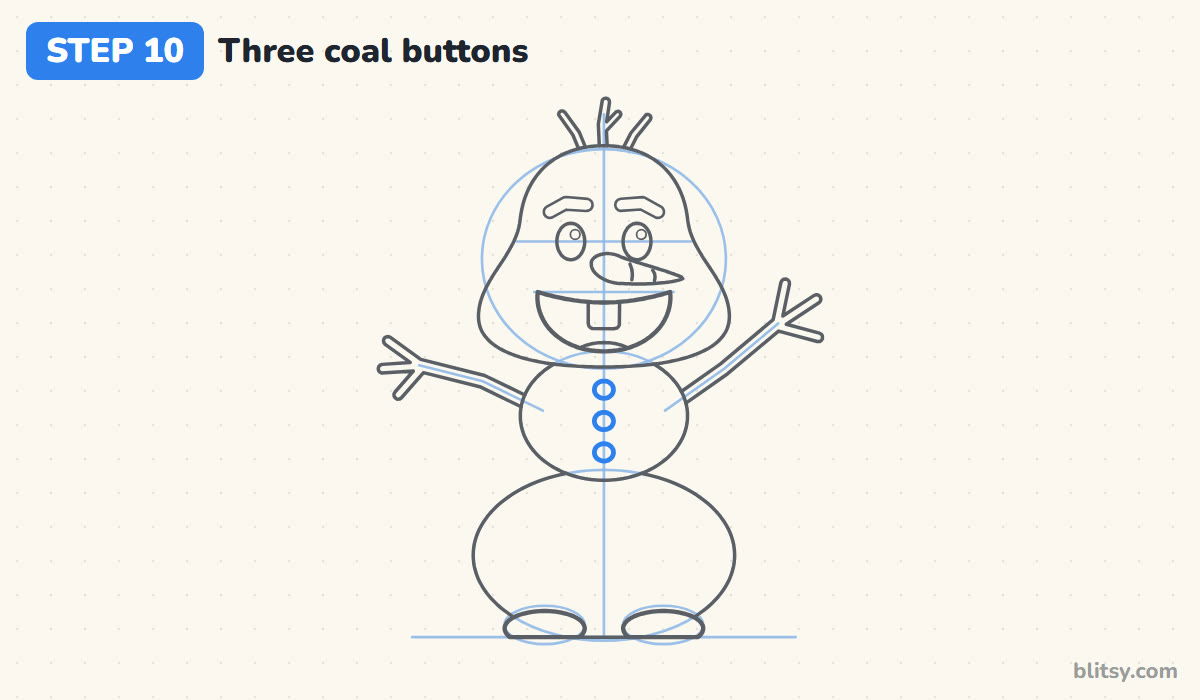
Down the center line of the middle snowball, draw three small circles, evenly spaced. The top one sits just under the chin and the bottom one just above the bottom snowball. Make them all the same size. They look like lumps of coal once they're colored black.
💡 Tip: Mark three tiny dots first to check the spacing, then turn them into circles.
Step 11: Ink the lines and erase the guides
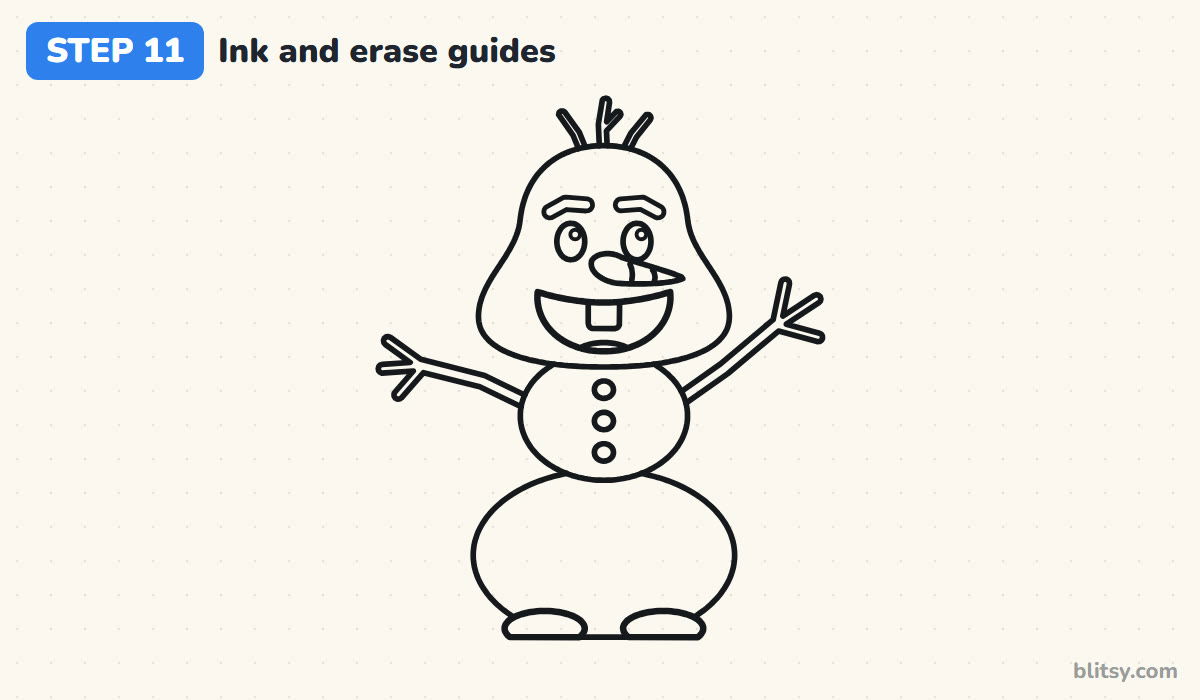
Go over every final line with your fineliner. I ink the face first while my hand is fresh, then the body and the twigs. Wait a minute for the ink to dry. After that, erase the ovals, the center line and the other guides, and the clean snowman appears.
💡 Tip: Ink the twigs with quick strokes. Slow lines wobble and make the sticks look bent.
Step 12: Color your Olaf
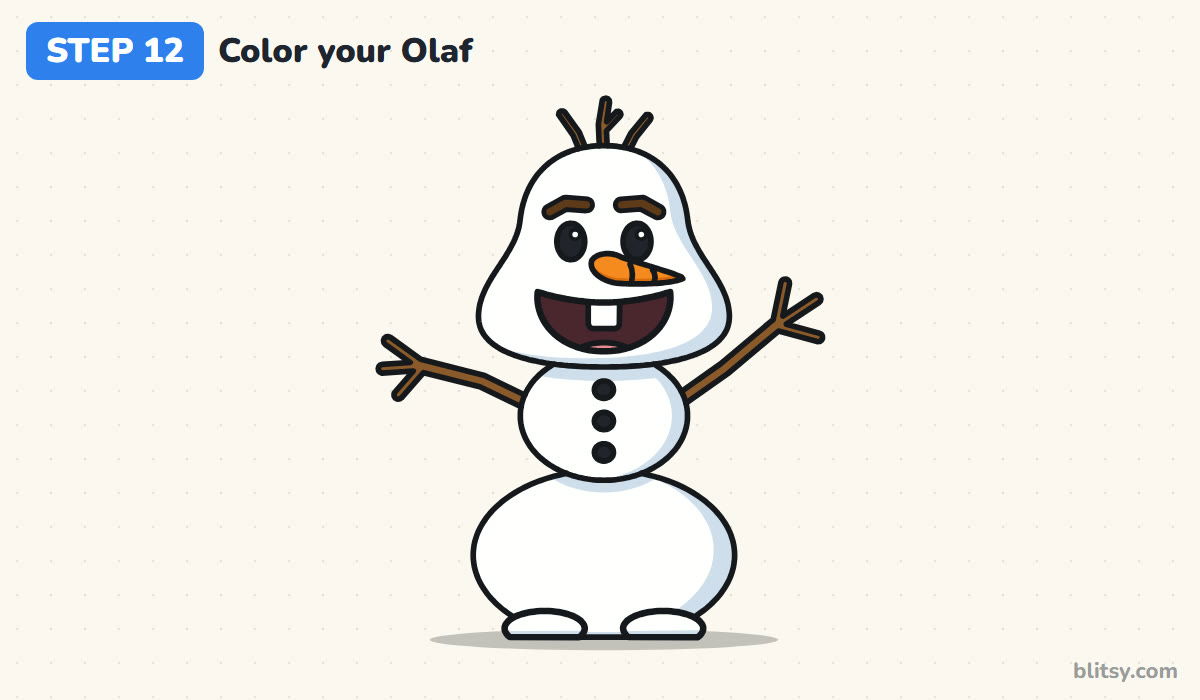
Leave the snow white and add pale blue along the right side of each snowball and just under the head, so the white shapes stand out on the page. Color the arms, hair and eyebrows brown, and the nose orange with a darker strip along the bottom. Eyes and buttons are black. The mouth gets dark red with a pink tongue, and the tooth stays white.
💡 Tip: Press very gently with the pale blue. A soft shadow looks like snow, a heavy one like ice.
Snowman Slip-Ups That Turn Olaf Into Someone Else
- A perfectly round head. A circle gives you a plain snowman. Pull the cheeks out wide at the bottom so the head looks heavier below the eyes.
- A tiny mouth. Olaf's grin takes up most of the lower face. Make it wider than both eyes put together.
- Snowballs all the same size. If the middle ball matches the bottom one, he looks stiff. Keep the middle one small and the bottom one wide.
- Coloring the snow gray all over. Heavy shading makes him look dirty. Shade only the edges and leave most of the paper white.
- Forgetting the tooth. Without it the smile could belong to anyone. One square tooth in the middle fixes that.
Fresh Poses and Props for Your Snowman Pal
Once the basic version feels easy, try changing his mood. Tilt the eyebrows up in the middle and shrink the mouth for a shy look, or lift both arms over the head as if he's catching snowflakes. You could give him a scarf, a flower to sniff, or a little cloud of snow floating over his head. If you'd like to try a classic snowman with a hat, the easy snowman drawing tutorial is a nice next page, and the Disney character drawing tutorial is good practice for another studio favorite.
Print an Olaf Coloring Page and a PDF Step Guide
The Olaf coloring page shows a colored example and a small color key at the top, with a big outline underneath for your own coloring. The step-by-step PDF guide puts all 12 steps with pictures and tips onto a few printable pages. Both fit Letter or A4 paper.
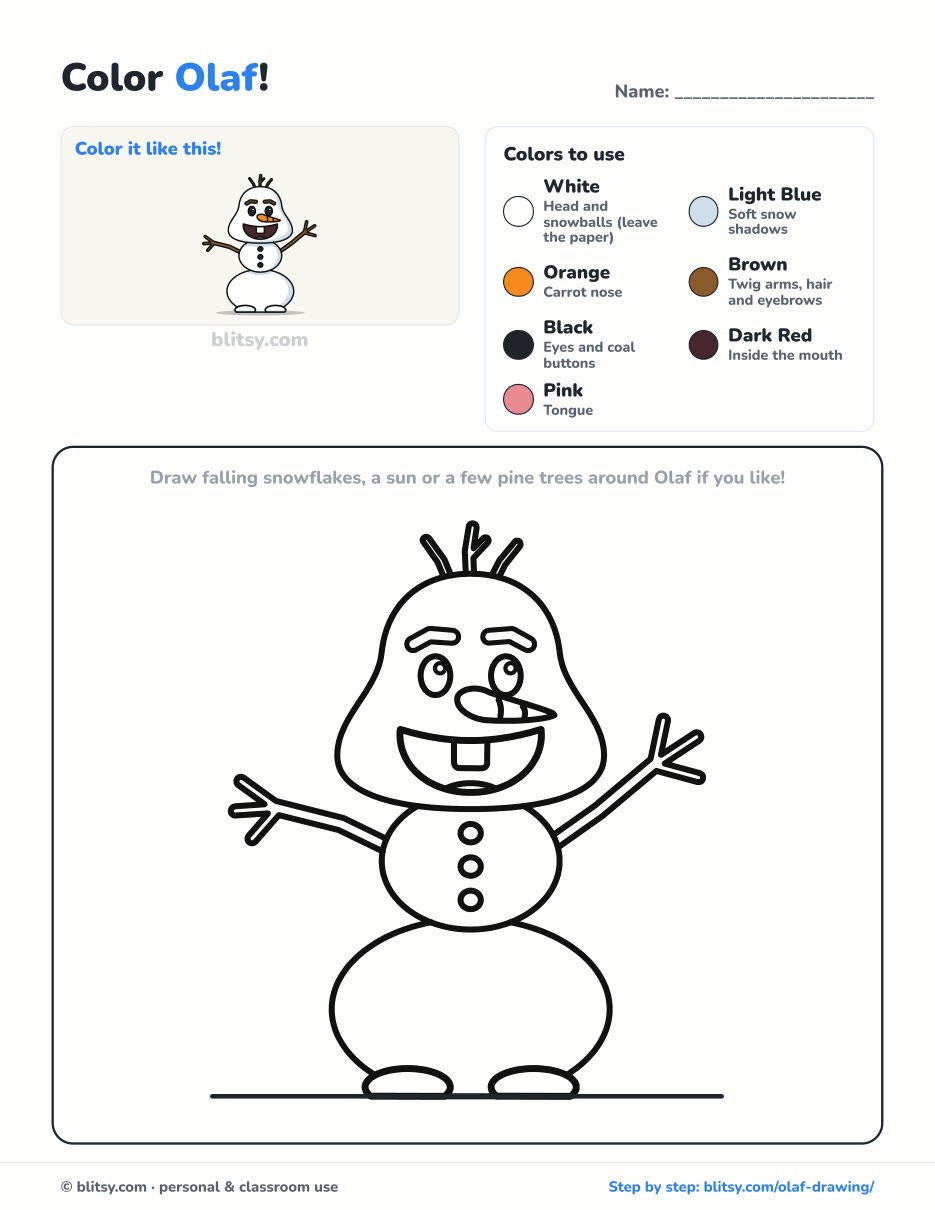
Black outlines with a colored example and the color names at the top. Ready to print and color.
⬇️ Download Coloring PageEvery step picture with its instructions and tips, to keep beside your paper while you draw.
⬇️ Download Drawing Guide📱 On a phone? Tap a download button, then open the file and choose Share → Save to Files or Print. On a computer, the PDF opens or saves straight to your Downloads folder.
Keep Olaf on Your Pinterest Board
Olaf Needs Company: Characters to Draw Next
Every link here is a step-by-step tutorial, mostly friendly characters, drawn in small steps like the snowman you just finished.
- Wonder Woman Drawing: Hands on her hips and lasso ready, a chibi hero waits in the how to draw Wonder Woman lesson.
- Fortnite Drawing: Draw the piñata llama from the game with this Fortnite llama drawing tutorial.
- Mario Drawing: The Mario drawing step by step guide ends with a chibi Mario, mustache bushy and one glove waving.
- Raccoon Drawing: Learn how to draw a raccoon with its mask on and tail up in 12 steps.
- Todoroki Drawing: Ice on one side and fire on the other make this Todoroki drawing tutorial a fun color study.
- Rosa Parks Drawing: Try a calm portrait with soft glasses and a gold brooch in the Rosa Parks drawing step by step lesson.
- Chalk Art: Take your drawing outside with the how to do chalk art guide, a hopscotch and a rainbow on the sidewalk.
- Care Bear Drawing: The Care Bear drawing tutorial draws a pink bear with a rainbow between two clouds on its tummy.
- Scarecrow Drawing: A patched, smiling scarecrow grows from a T and a circle in this scarecrow drawing step by step lesson.
- Ariana Grande Drawing: Draw a chibi with a swinging ponytail and a little cloud using the Ariana Grande drawing tutorial.
- Princess Drawing: The how to draw a princess step by step guide ends with a lavender ball gown, a crown and a star wand.
- Phoenix Drawing: From snow to flames: the phoenix drawing tutorial draws a fire bird with wings raised.
- Luffy Drawing: Straw hat, scar and a huge grin are the goal of the Luffy drawing step by step lesson.
- Cerberus Drawing: Give each of three heads its own mood in this cute Cerberus drawing tutorial.
- Master Chief Drawing: Draw a little Spartan with fists on hips and a gleaming visor with the how to draw Master Chief guide.
- Family Drawing: Four people, a puppy and a red balloon share one simple portrait in the family drawing step by step tutorial.
Olaf Drawing Questions Kids Often Ask
What is the easiest way to draw Olaf?
Stack three ovals first, then reshape the top one so it gets wider at the bottom. After that, the face, the twigs and the buttons are all small, simple shapes.
How do you draw Olaf for kids?
Keep it simple. Draw the twigs as single lines, skip the lines on the carrot, and use a thick marker for the outline so coloring inside it is easier.
How long does it take to draw Olaf?
About 20 minutes for the drawing and another 10 for coloring. The head shape and the smile need the most care.
What colors do you need to color Olaf?
Orange for the nose, brown for the twigs and eyebrows, black for the eyes and buttons, and dark red and pink for the mouth. A pale blue adds soft shadows to the white snow.
Grab that pencil, give your snowman the widest grin you can, and maybe draw a few snowflakes falling around him. ⛄✏️
Related posts:
 How to Draw a Car Step by Step (Easy Drawing for Beginners)
 How to Draw a Whale Step by Step (Easy for Beginners)
 How to Draw a Rat Step by Step (Easy for Beginners)
 How to Draw an Arctic Fox Step by Step (Easy for Beginners)
 How to Draw a Lion Step by Step (Easy for Beginners)
 How to Draw a Ladybug Step by Step (Easy for Beginners)
 How to Draw a Dog Step by Step (Easy Side View for Beginners)
 How to Draw a Butterfly Step by Step (Easy for Beginners)
 How to Draw a Leopard Step by Step (Easy for Beginners)
 How to Draw a Light Bulb Step by Step (Easy for Beginners)
 How to Draw a Crow Step by Step (Easy for Beginners)
 How to Draw an Eagle Step by Step (Easy for Beginners)

