
Nine sharp points on top of a yellow box. Get those right and almost anyone will name the character before you've added a face. In this lesson I'll show you how to draw Bart Simpson step by step, starting from a plain rectangle and finishing with his orange-red shirt and blue shorts. It's my own simple fan-art version, made for drawing practice and not taken from the show's official artwork.
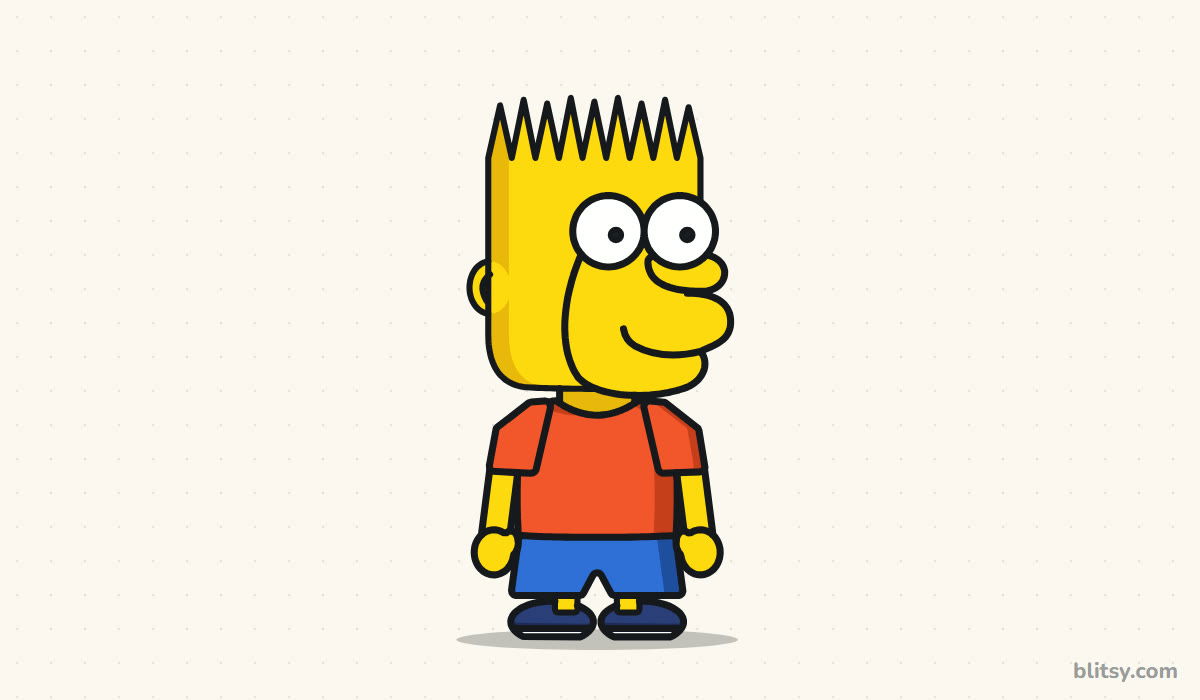
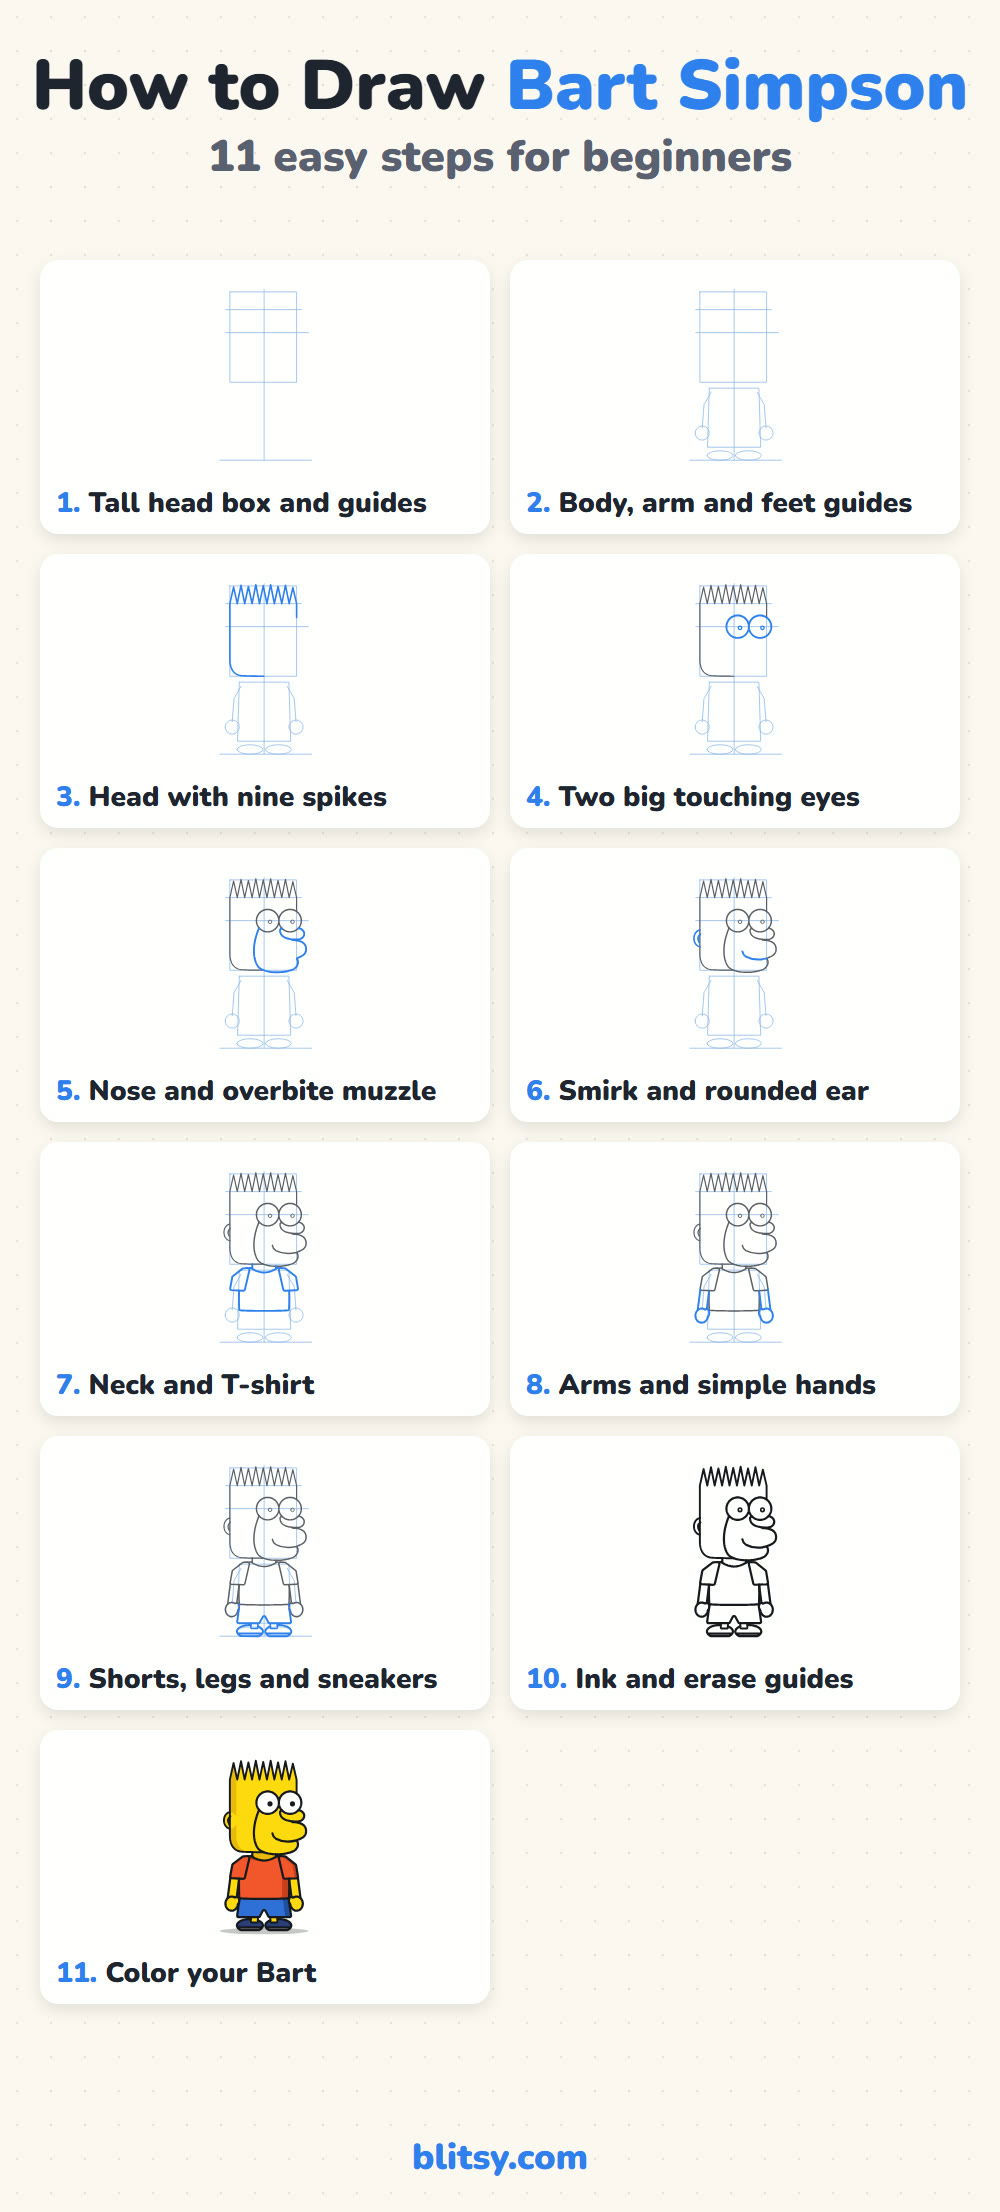
In every picture, blue marks the lines that step adds. Anything gray was drawn before, and the faint blue helper shapes disappear when you ink.
Quick overview
⏱️ Time: roughly 25 to 35 minutes with coloring
🎯 Level: easy; kids from about 7 can manage it
✏️ Steps: 11
🛹 You'll draw: Bart standing, head turned a little to the right
Gear for a Spiky-Haired Sketch
- An HB pencil, held loosely for the guide box
- An eraser that lifts graphite without tearing the page
- A black felt-tip or fineliner for the final outline
- Colored pencils or markers: yellow plus orange-red, with two shades of blue
- A sheet of plain paper in portrait direction, since Bart is tall and narrow
One bright yellow is all the skin needs; a slightly deeper yellow is handy for the shadow side of his head.
How to Draw Bart Simpson Step by Step
Step 1: Draw a tall box for the head
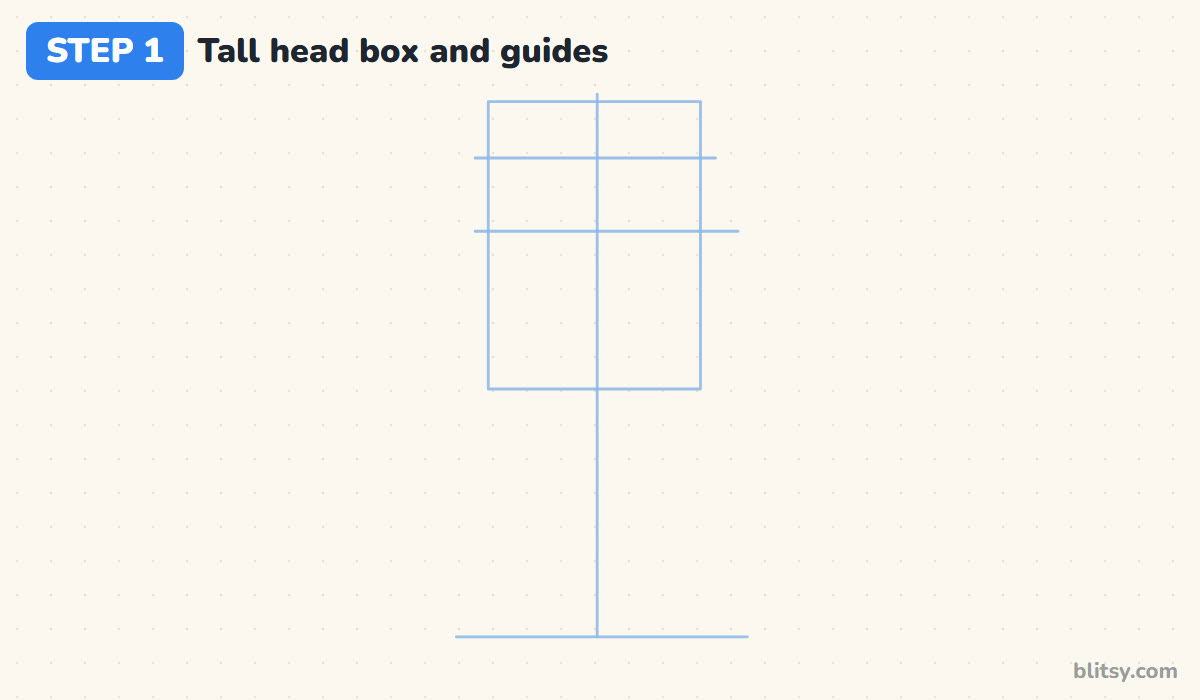
Start with a light vertical center line and a flat ground line near the bottom of the page. Above the middle, sketch a rectangle that is taller than it is wide; this box holds the whole head. Add two level lines across it: one near the top where the spikes begin, and one a little above the middle for the eyes.
💡 Tip: Leave space on the right of the box, because the eyes and nose will poke out past it later.
Step 2: Block in the body with arm and foot guides
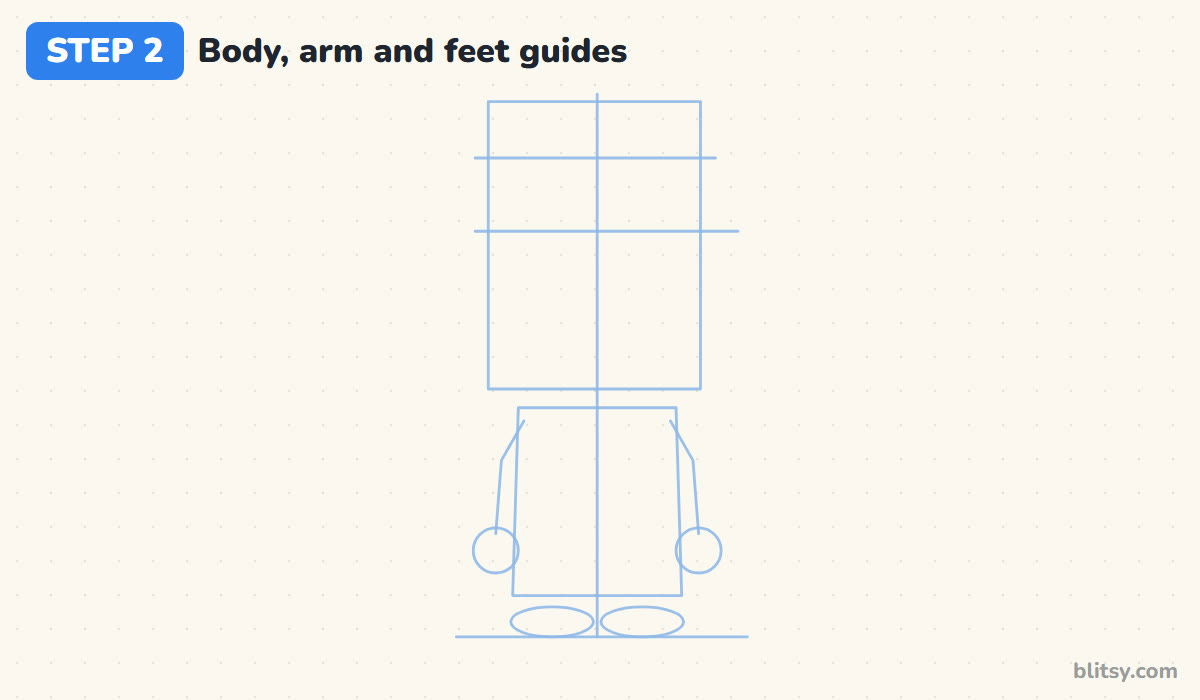
Bart is short, so his body is only about as tall as his head. Draw a second box under the head for the shirt and shorts together. Add slanted stick lines for both arms, a circle at the end of each for the hands, and two flat ovals sitting on the ground line for the sneakers.
💡 Tip: Keep a small gap between the head box and the body box; that gap becomes his neck.
Step 3: Outline the head and its nine spikes
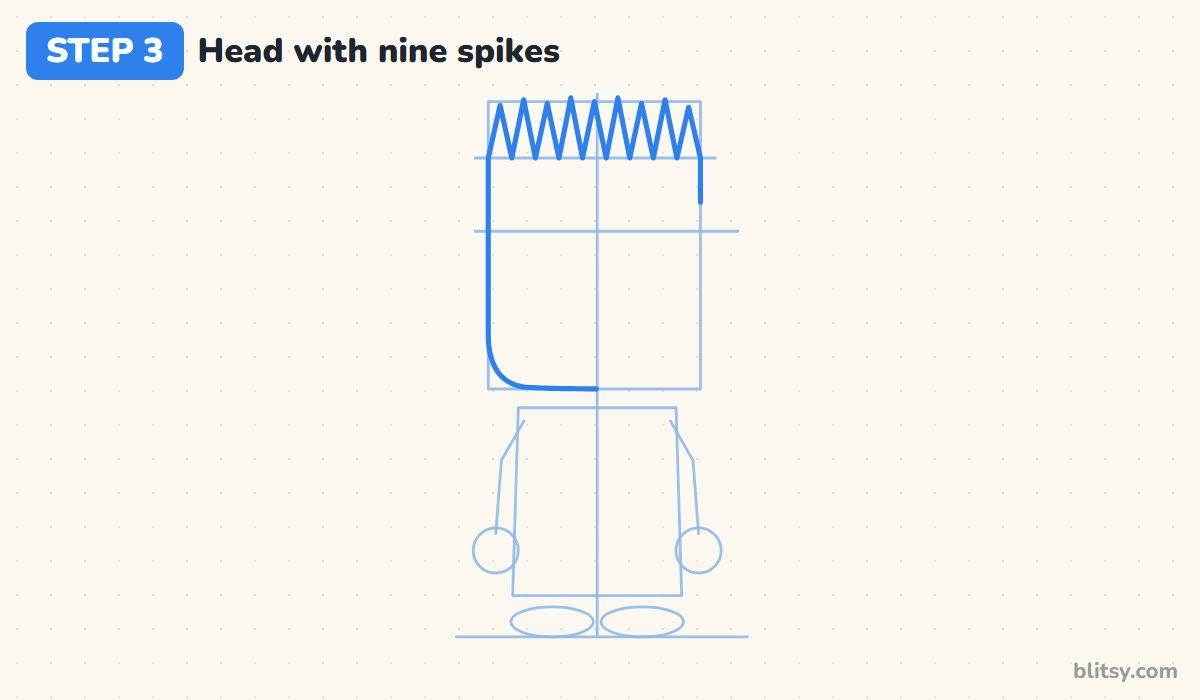
Now the real lines begin. Across the top line of the box, draw a zig-zag of nine sharp triangles, all close to the same height. Run the outline straight down the left side and round the bottom corner. On the right, stop at the eye line. I leave that side open on purpose, because the eyes and muzzle will close it.

💡 Tip: Count the spikes out loud as you draw them; nine points is what makes it look like Bart.
Step 4: Add two big eyes that touch
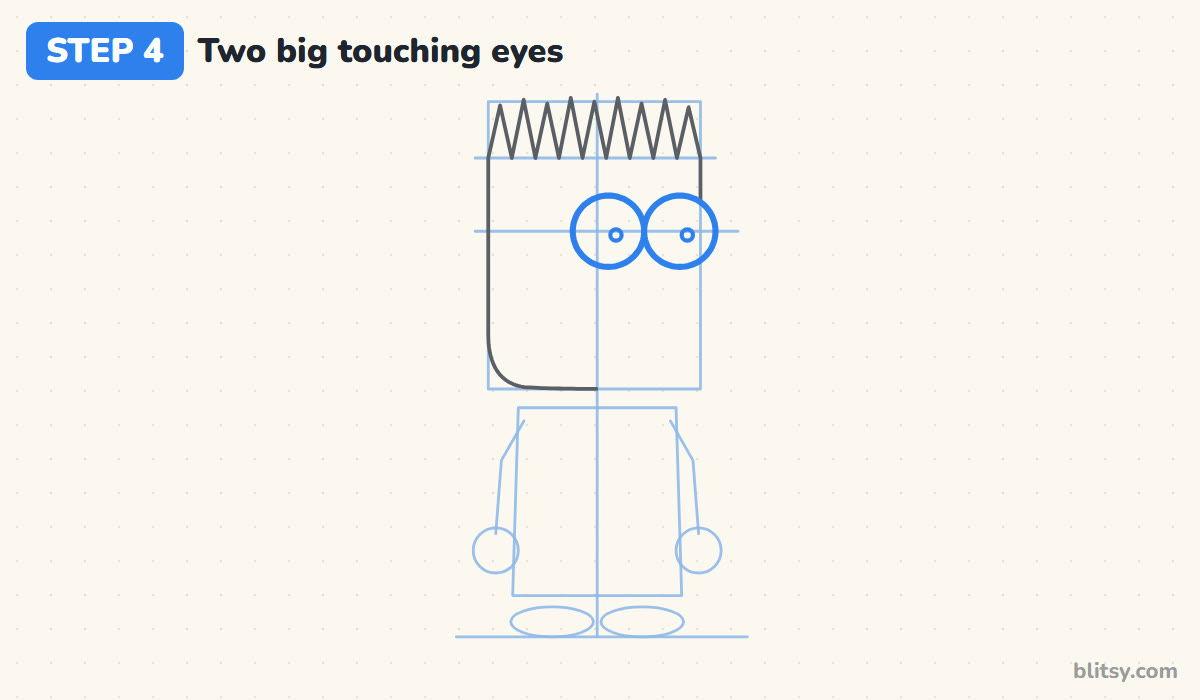
Draw two large circles on the eye line, side by side so they just touch in the middle. Shift them toward the right half of the head, and let the right circle stick out past the head edge. That bulge gives the little head turn. Put a small black dot in each eye, both nudged to the right.
💡 Tip: Trace around a coin if your circles keep coming out uneven.
Step 5: Draw the nose and the overbite muzzle
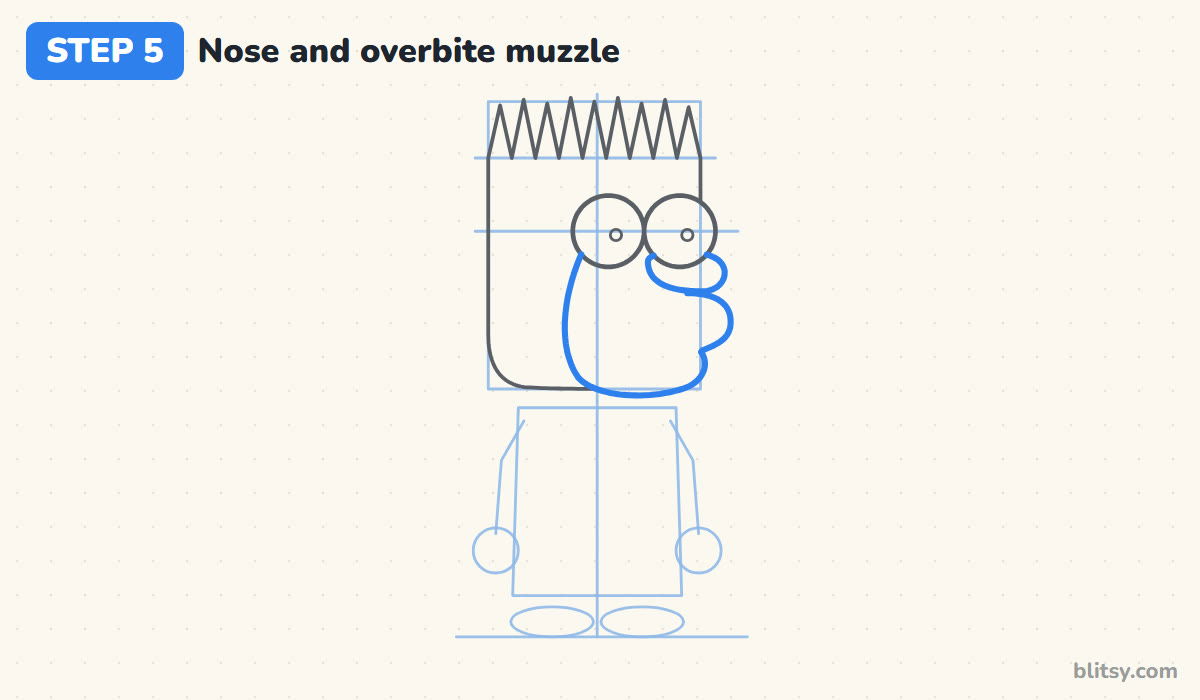
Under the eyes, add a short rounded nose that points to the right like a stubby thumb. Below it comes the muzzle, the part that really sells the character. Start a curve at the bottom of the left eye, swing it down past the chin, then push it forward into a big rounded upper lip with a small notch under it.
💡 Tip: Make the upper lip stick out farther than the chin; that overbite is half of his attitude.
Step 6: Give him a smirk and an ear
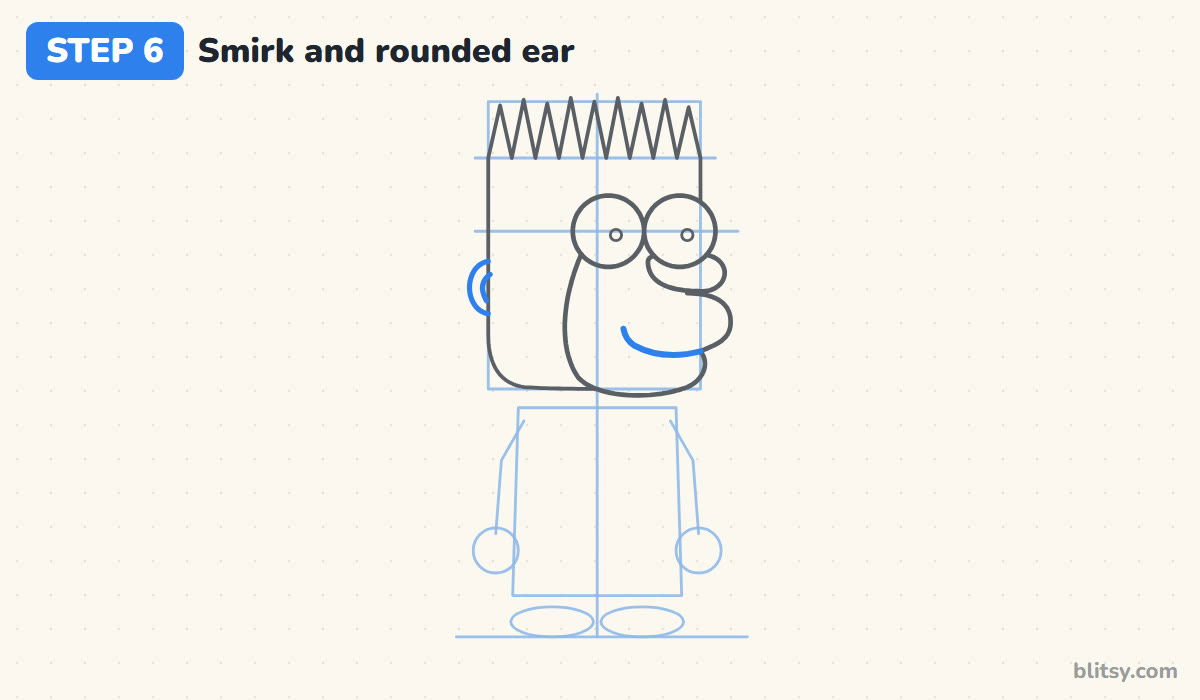
Start the mouth line at the notch and curve it back into the muzzle, then flick the far end upward. One raised corner reads as a smirk; two would turn it into a polite smile. On the left side of the head, roughly level with the nose, draw a half-circle ear with a small curl inside.
💡 Tip: Draw the ear smaller than you think. A large one pulls attention away from the face.
Step 7: Draw the neck and the T-shirt
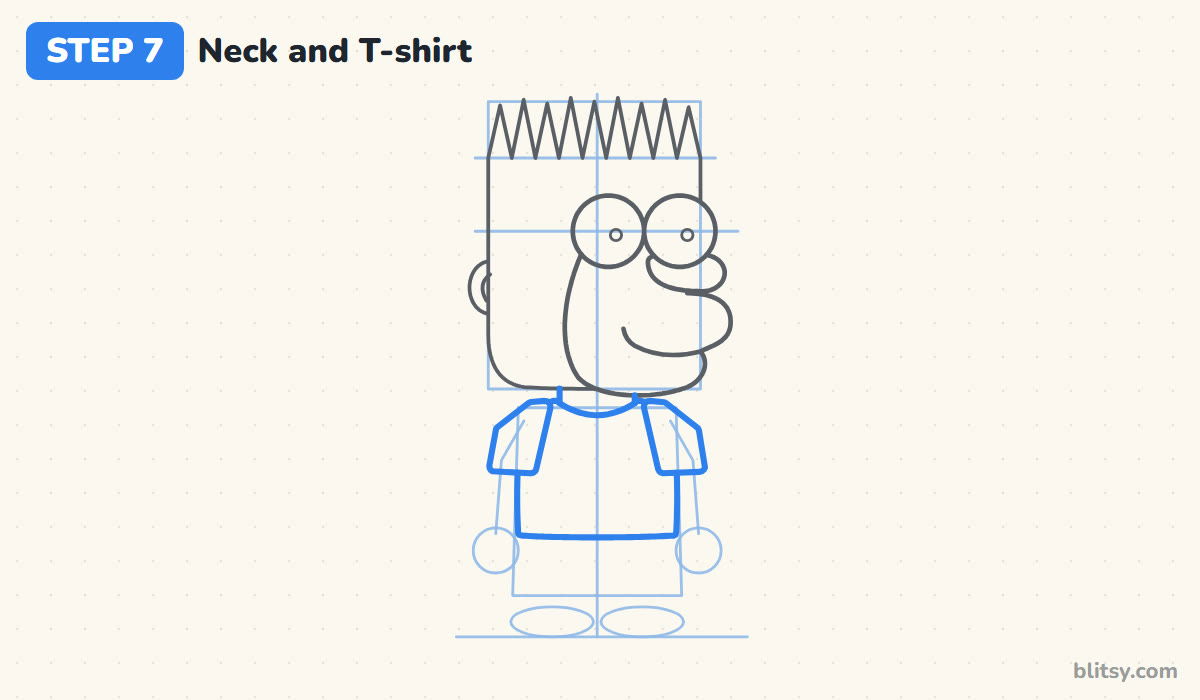
A short neck connects the bottom of the head to a round collar. From the collar, draw the shirt as a simple box with slightly sloped shoulders and a straight hem. Add two short sleeves that angle outward, ending around the middle of the shirt.

💡 Tip: Curve the collar down like a shallow U; a flat collar makes the shirt look like a box lid.
Step 8: Add the arms and simple hands
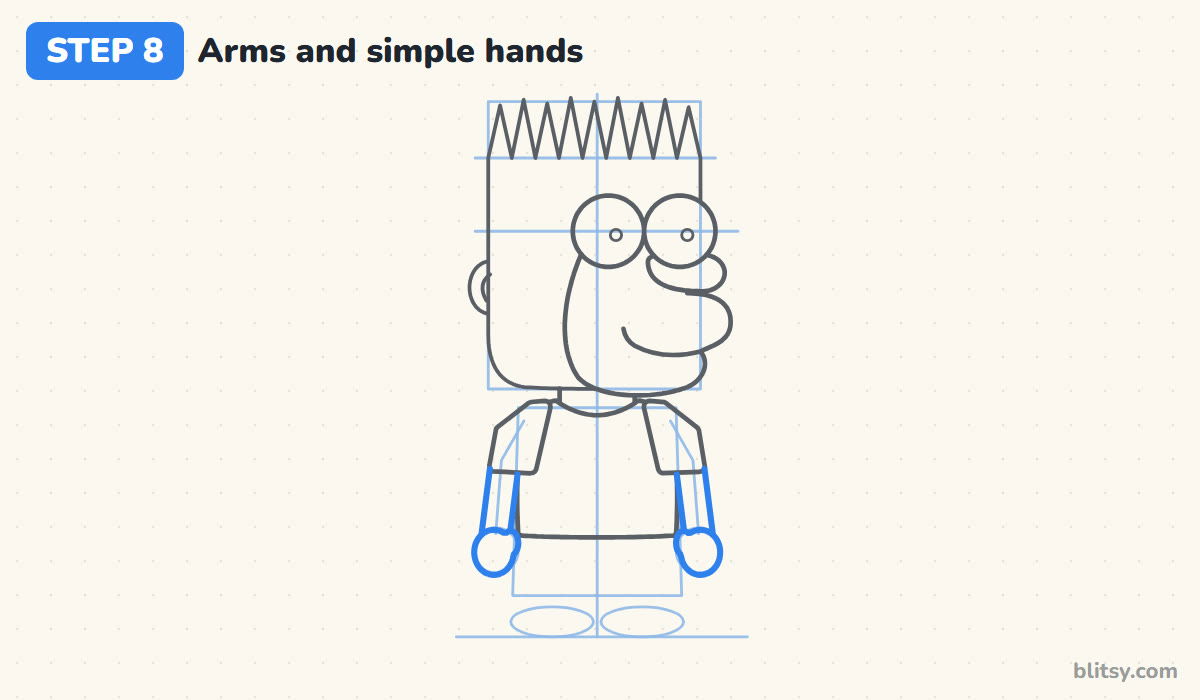
Each arm is a thin tube coming out of the sleeve and running down along the guide line. Finish it with a round mitten hand and a small thumb bump on the inside. Most beginners make cartoon arms too thick, so check that each one is narrower than the sleeve opening.
💡 Tip: Let the hands hang a little lower than the shirt hem so they don't disappear behind it.
Step 9: Finish with the shorts and sneakers
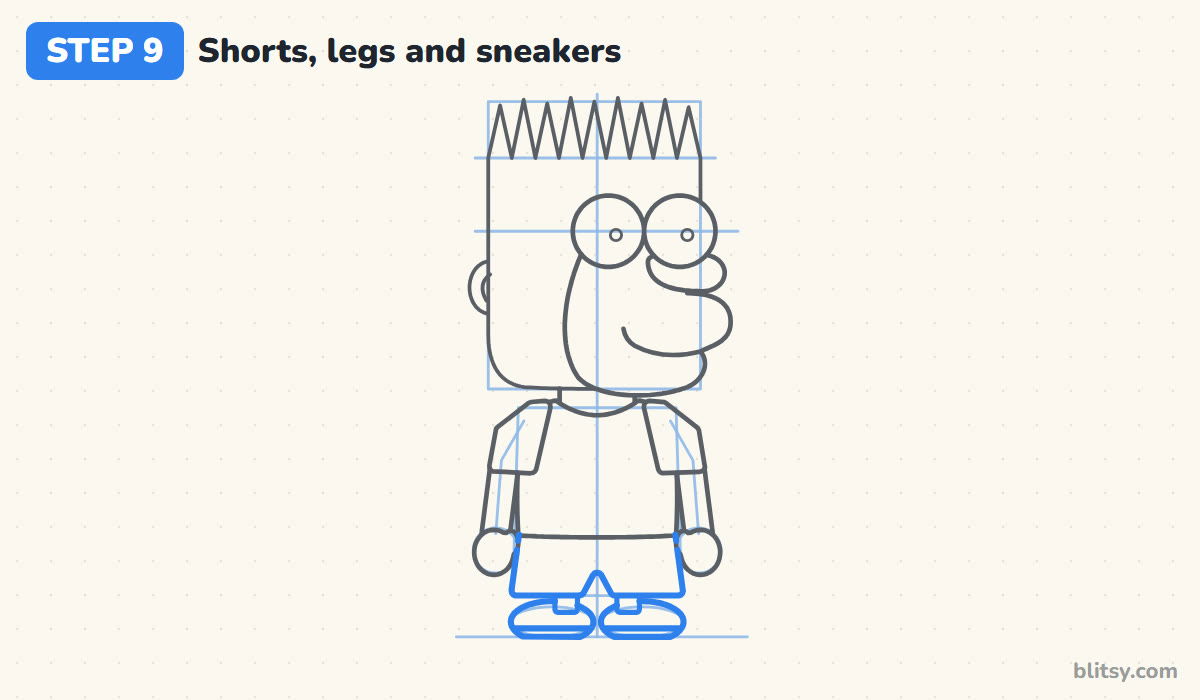
The shorts start right under the shirt hem and stop well above the ground. Draw them as one wide shape with a small upside-down V between the legs. Below, two short thin legs lead to rounded sneakers whose toes point slightly outward. A straight line near the bottom of each shoe marks the sole.
💡 Tip: Keep the legs very short. Long legs change the whole character into somebody older.
Step 10: Ink the outline and erase the guides
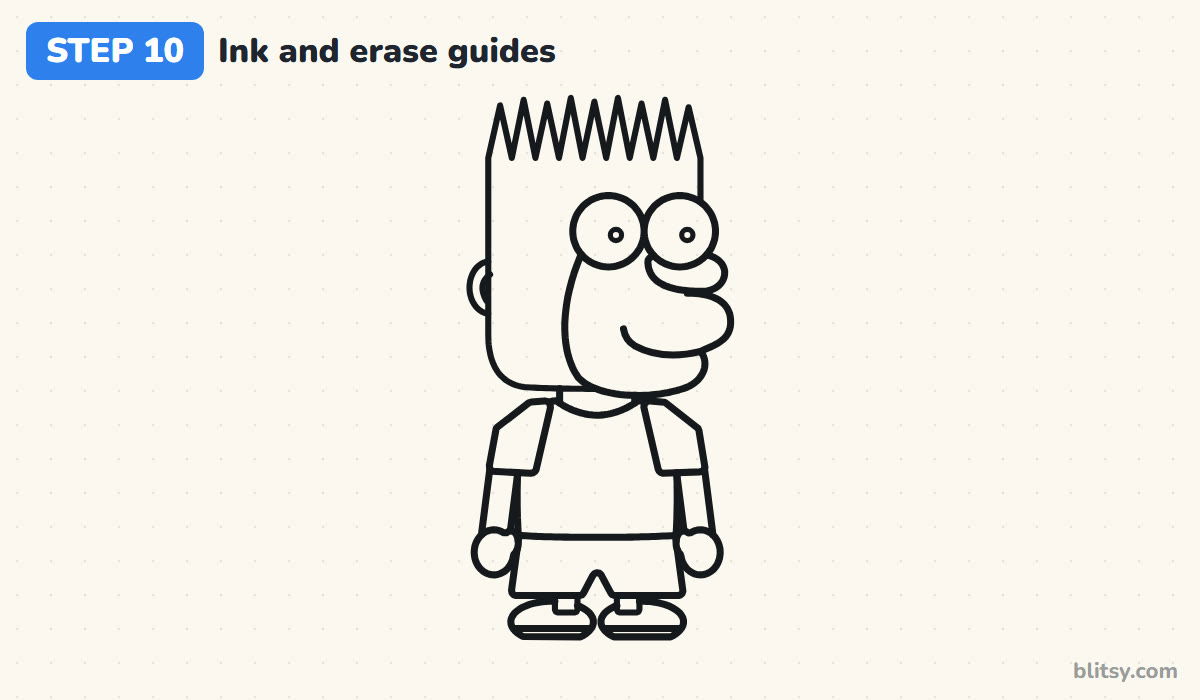
Trace every keeper line with the black pen. I ink the face first while my hand is fresh, then the spikes, then work down to the shoes. Skip the helper boxes and stick lines. Once the ink has dried for a minute, erase all the pencil underneath.
💡 Tip: Turn the paper as you ink the spikes so every stroke pulls toward you.
Step 11: Color your Bart
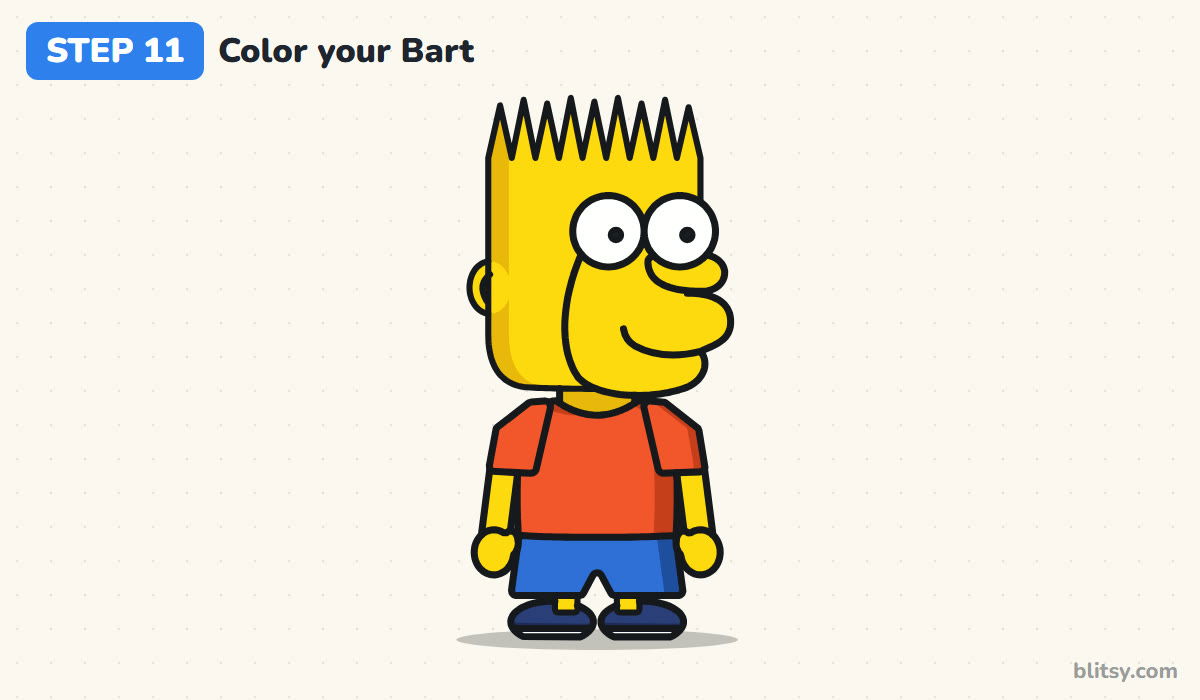
Yellow goes on all the skin: head, ear, neck, then the arms and legs. The shirt is orange-red, the shorts are a medium blue and the sneakers are a darker blue with white soles. Leave the eyes white with black pupils. A deeper yellow down the back of the head and a darker orange on one side of the shirt add a bit of depth.

💡 Tip: Color the big yellow areas with small overlapping circles, which hides streaky pencil marks.
Why a Bart Drawing Can Look Off
- The eyes float apart. When there's a gap between the circles, the face stops looking like his. Let them touch in the middle.
- Spikes of random sizes. Uneven spikes look like messy hair rather than his signature top. Keep all nine close to the same height and width.
- A small muzzle. If the mouth area sits flat inside the head, he loses his cheeky look. Swing the curve forward so the upper lip juts out past the head.
- A round head. Bart's head has straight sides and a square top. Draw the box first and follow its edges.
- Pupils that look in two directions. Place both dots on the same side of their circles so he looks one way.
Skateboards, Waves and Other Bart Twists
When the basic pose feels easy, try one change at a time. Put a skateboard under his sneakers, raise one hand in a wave, or swap the smirk for a wide-open grin. Small kids can leave out the ear curl and the sole lines. To practice other cartoon kids, try the boy drawing tutorial, and for another famous character with a simple shape language, look at how to draw Mickey Mouse.
Bart Simpson Coloring Page and a Printable Guide
Prefer to color first? The free Bart Simpson coloring page has his inked outline, a small colored version to copy and a short color list. The printable step-by-step guide puts all 11 steps and tips on a few pages that print fine on Letter or A4.
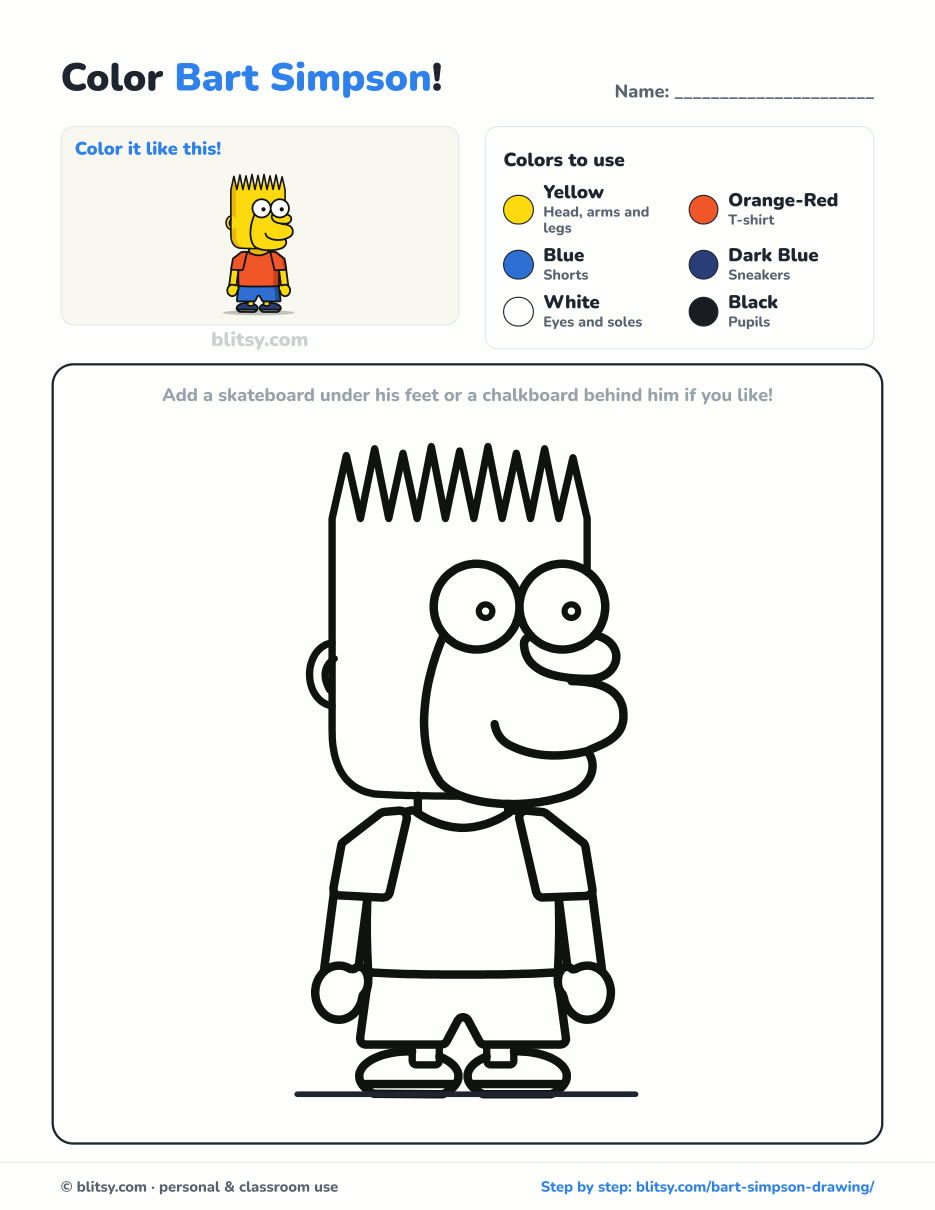
Black outlines with a colored example and the color names at the top. Ready to print and color.
⬇️ Download Coloring PageEvery step picture with its instructions and tips, to keep beside your paper while you draw.
⬇️ Download Drawing Guide📱 On a phone? Tap a download button, then open the file and choose Share → Save to Files or Print. On a computer, the PDF opens or saves straight to your Downloads folder.
All 11 Bart Steps on One Pin
Bart Simpson Sketched? More Cartoon Tutorials
Each link below opens a step-by-step tutorial, from cartoon heroes to hands and faces.
- Anime Drawing: Spiky blue hair and a wide grin on one plain circle: the anime drawing tutorial.
- Woman Drawing: Learn body proportions with how to draw a woman step by step, starting from six head lengths.
- Cerberus Drawing: The Cerberus drawing tutorial draws a three-headed pup, each head with its own mood.
- Hands Drawing: Practice an open palm with five fingers in the hands drawing step by step lesson.
- Ghost Drawing: Learn how to draw a ghost from one circle, then add a baby ghost and a pumpkin.
- Master Chief Drawing: Draw a chibi Spartan with fists on hips in the Master Chief drawing tutorial.
- Mickey Mouse Drawing: Ears up and one glove in the air, Mickey Mouse drawing step by step ends in twelve steps.
- Sharingan Drawing: The how to draw Sharingan lesson focuses on a single anime eye with three tomoe.
- Iron Man Drawing: Build a chibi hero with a glowing reactor in the Iron Man drawing tutorial.
- Kurama Drawing: Chibi Kurama and his nine tails come together in how to draw Kurama step by step.
- Disney Drawing: Draw Nemo with his bubbles in the easy Disney drawing tutorial.
- Juice WRLD Drawing: The Juice WRLD drawing tutorial is a quiet tribute portrait in soft colors.
Questions People Ask About Drawing Bart
What is the easiest way to draw Bart Simpson?
Draw a tall rectangle for the head first, then add the nine spikes and two touching eyes. Those three features carry the character, so the body can stay very simple.
How many spikes does Bart Simpson have?
He's usually drawn with nine spikes on top of his head. Try to make them all about the same size.
What colors do I need for Bart Simpson?
Yellow for his skin, orange-red for the T-shirt, blue for the shorts and a darker blue for the sneakers. Add black for the pupils and keep the eyes white.
Is drawing Bart Simpson good for kids?
Yes. He's built from simple boxes and circles plus one zig-zag, shapes that suit children around 7 and up. Younger kids may want help with the muzzle curve.
Nine spikes are waiting. Draw the tall box and see how fast your Bart starts smirking back at you. ✏️🛹
Related posts:
 How to Draw a Tank Step by Step (Easy Cartoon Tank)
 How to Draw a Bee Step by Step (Easy Cartoon Bee)
 How to Draw a Boy Step by Step (Easy Full-Body Cartoon)
 How to Draw a Mermaid Step by Step (Easy Cartoon for Kids)
 How to Draw a Family Step by Step (Easy Cartoon Portrait)
 How to Draw a Princess Step by Step (Easy Ball Gown Cartoon)
 How to Draw a Cowboy Step by Step (Easy Cartoon Kid)
 How to Draw a Whale Step by Step (Easy for Beginners)
 How to Draw Lungs Step by Step (Easy Science Diagram)
 How to Draw a Pineapple Step by Step (Easy Crown and Slice)
 How to Draw Iron Man Step by Step (Easy Chibi for Kids)
 How to Draw a Hoodie Step by Step (Front and Back View)

