
A family picture is one of the first things kids want to draw, and one of the first that goes wrong, because everybody ends up the same size. In this lesson I'll show you how to draw a family step by step using one simple recipe for every person: a round head, a rounded body and tube arms and legs. The only thing that changes is how many heads tall each one is, so the grown-ups, the kid and the toddler all look right next to each other.
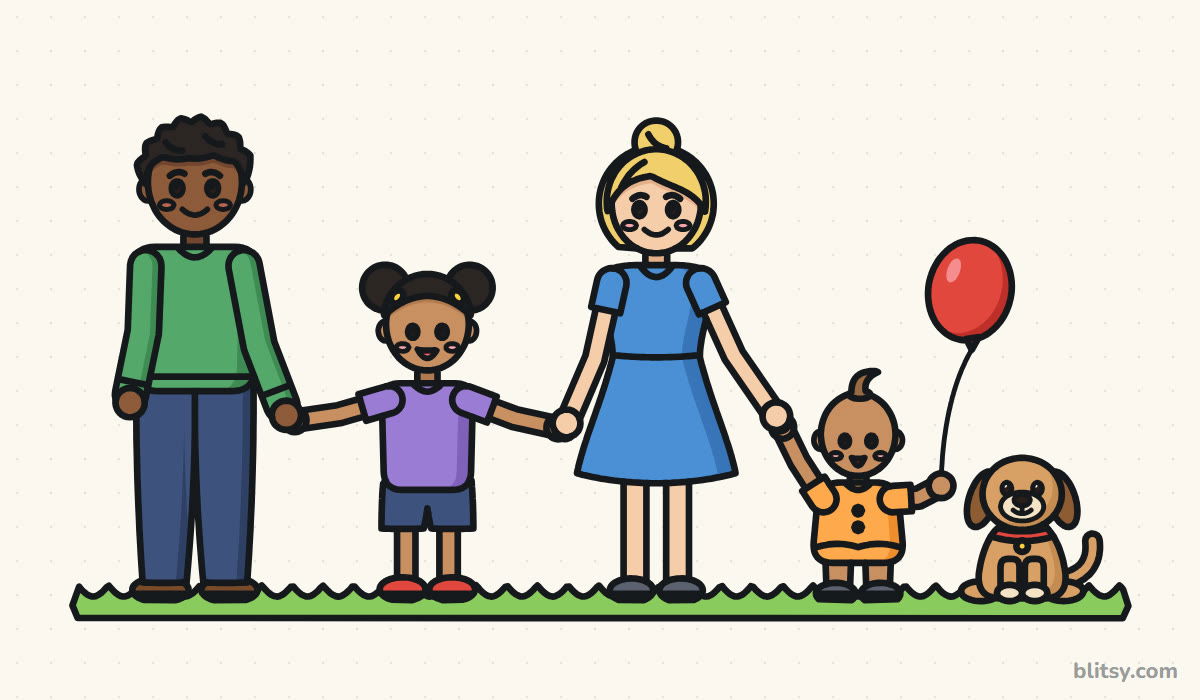
Follow the color code as you go: fresh lines for the current step are blue. Older lines turn gray, and the pale measuring lines hang around until step 11 erases them.
Quick overview
⏱️ Time: about 40 to 50 minutes, coloring included
🎯 Level: beginner, a good next step after drawing one person
✏️ Steps: 12
👨👩👧👦 You'll draw: two parents, a child and a toddler holding hands, plus a puppy and a balloon
Supplies for a Family Portrait on Paper
- A pencil you can press lightly, such as an HB
- A clean eraser
- A black fineliner or thin marker
- Colored pencils or markers, including a few skin tones
- A ruler for the ground line (optional)
- Paper turned sideways, so the whole row fits
Swap in your own family's colors; the steps stay exactly the same.
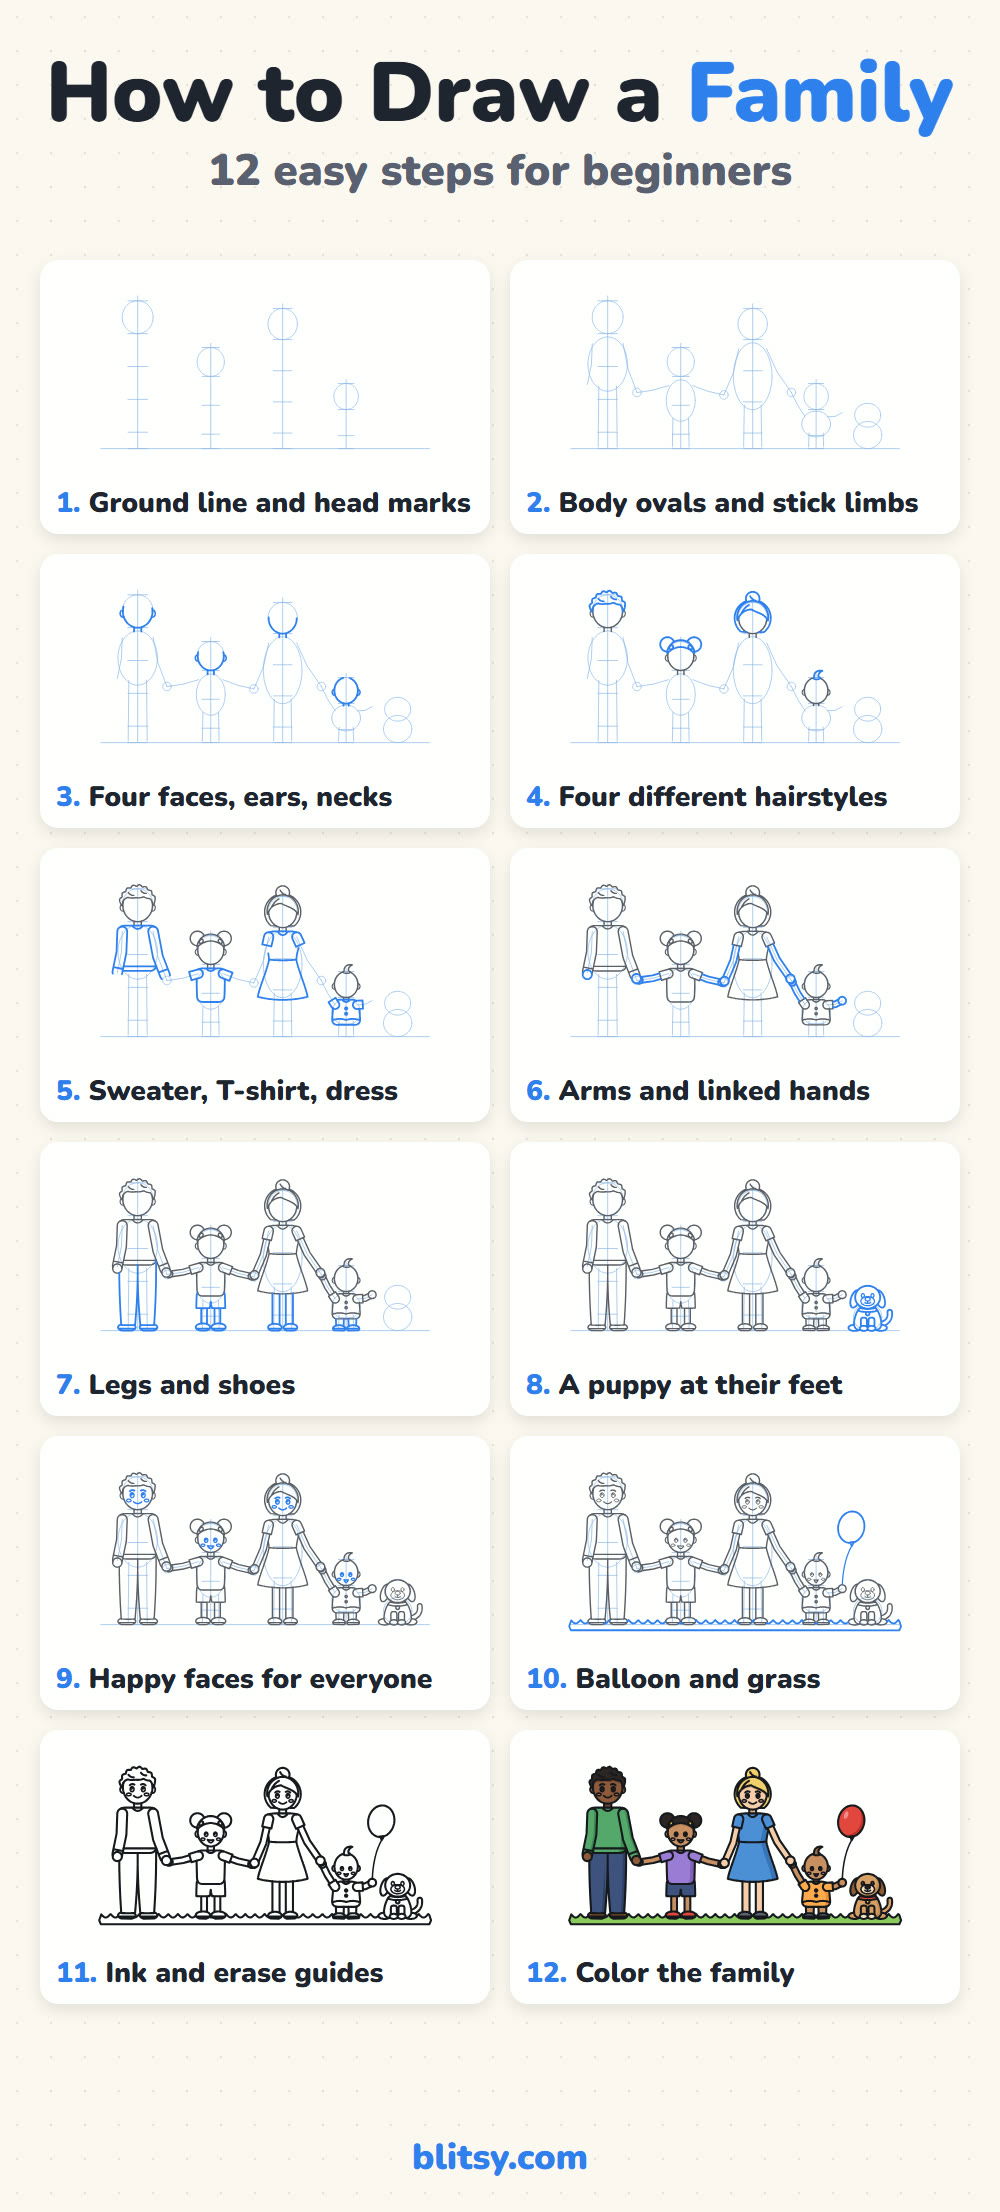
How to Draw a Family Step by Step
Step 1: Draw a ground line, four head circles and head marks
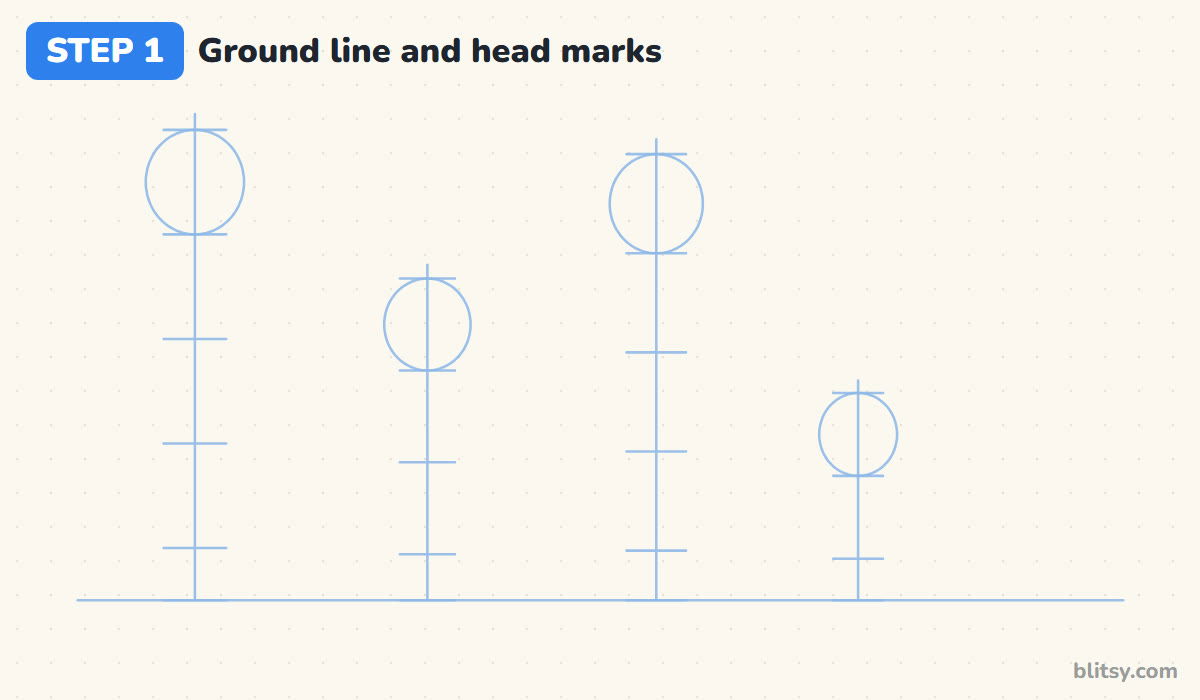
Draw one long flat line near the bottom of the page. Above it, spread out four vertical lines, one for each person. Put a circle at the top of each line and use its height as that person's ruler: mark it down the line until you touch the ground. The two parents get four and a half heads, the child three and a half, and the toddler only two and a half.
💡 Tip: Space the people about two parent-heads apart; they need room to reach for each other's hands.
Step 2: Sketch body ovals and stick arms and legs
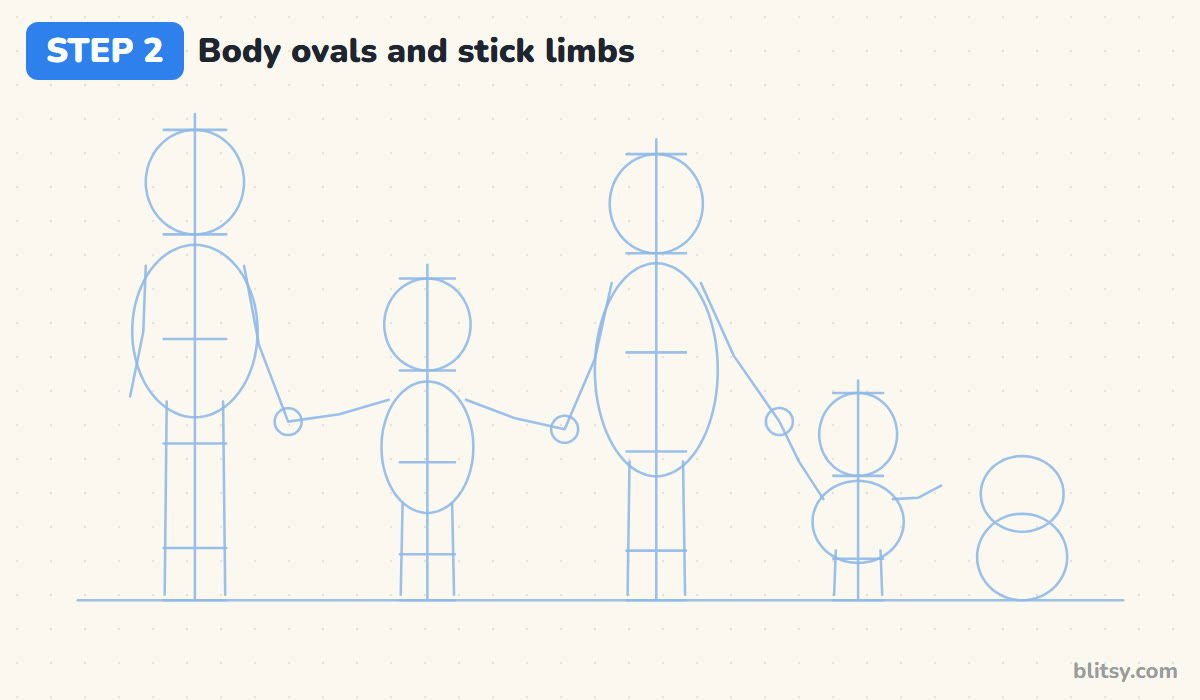
Hang an oval under each head for the body. The parents' ovals reach a little past the third mark, while the toddler's oval is short and round. Now draw stick arms. Where two people hold hands, both arms run to the same spot, so I draw a small circle there first and aim both sticks at it. Add two stick legs per person and two stacked ovals for the puppy on the right.
💡 Tip: Draw the hand circles before the arms; it's much easier to aim two lines at one dot.
Step 3: Draw the faces and necks
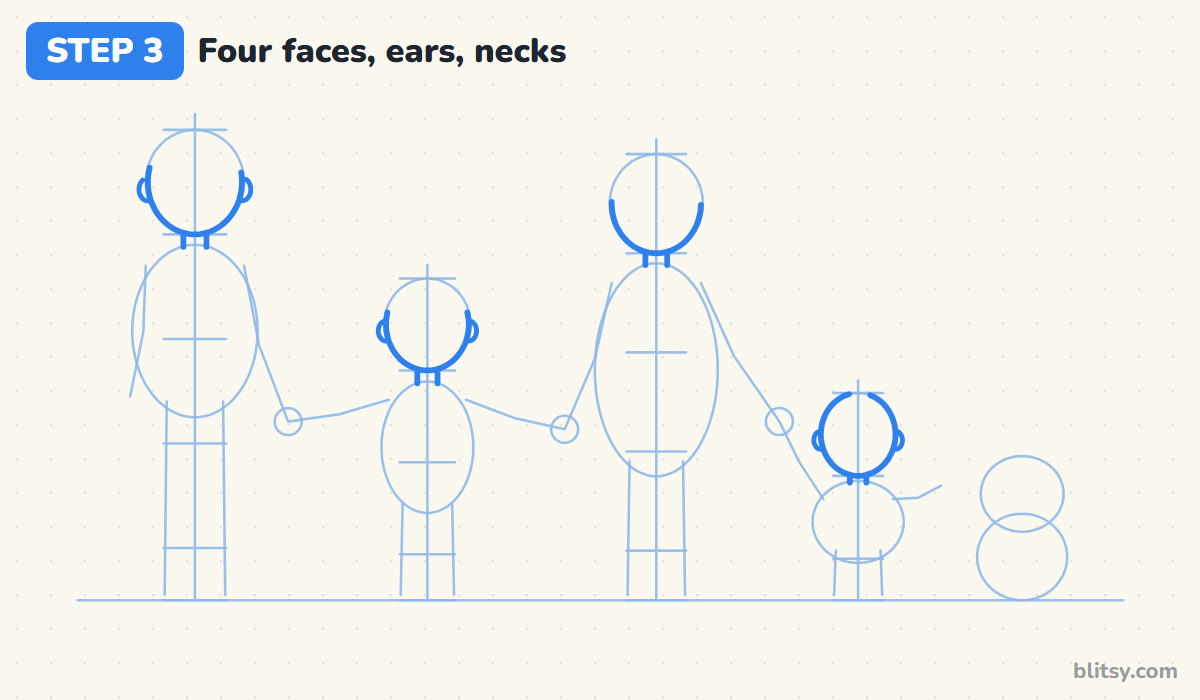
Go over the lower half of each head circle with a firmer line for the cheeks and chin. Skip the top, since hair will cover it there. Add a small C-shaped ear on each side for three of the four, then two short neck lines under each chin. The toddler barely has a neck, which helps him look little.


💡 Tip: Keep the ears level with the middle of the face; ears placed high make heads look stretched.
Step 4: Give everyone a different hairstyle
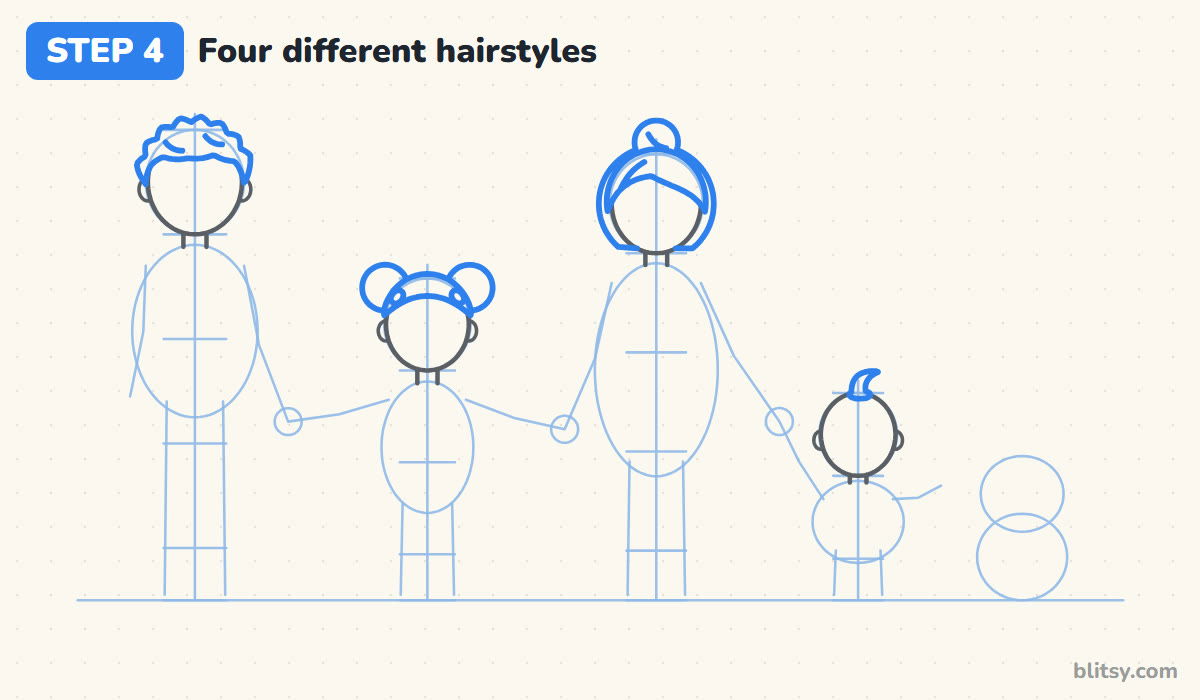
Hair is the quickest way to tell people apart. The parent on the left gets short curly hair, drawn as a bumpy line just above the head. The other parent has a smooth bob with side-swept bangs and a round bun on top. The child gets two round puffs, and the toddler just one curl sticking up.
💡 Tip: Draw curly hair as small bumps of slightly different sizes; even bumps look like a cloud.
Step 5: Draw the tops for all four
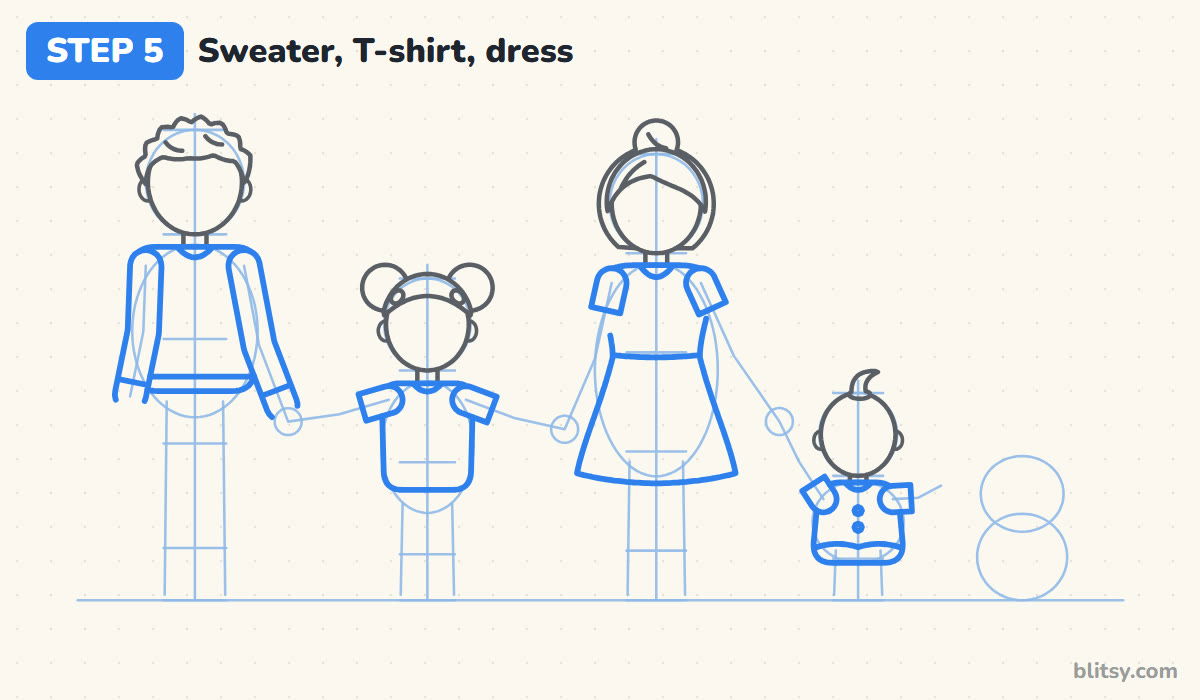
Each top follows its body oval. The left parent wears a long sweater with a ribbed band at the bottom and sleeves running all the way to the wrists. The child's T-shirt and the toddler's romper have short puffy sleeves. For the dress, draw a fitted top, a waist line and a skirt that flares out like a bell down to the knees.
💡 Tip: Round every corner of the clothes a little; sharp corners make cartoon people look stiff.
Step 6: Add the arms and the linked hands
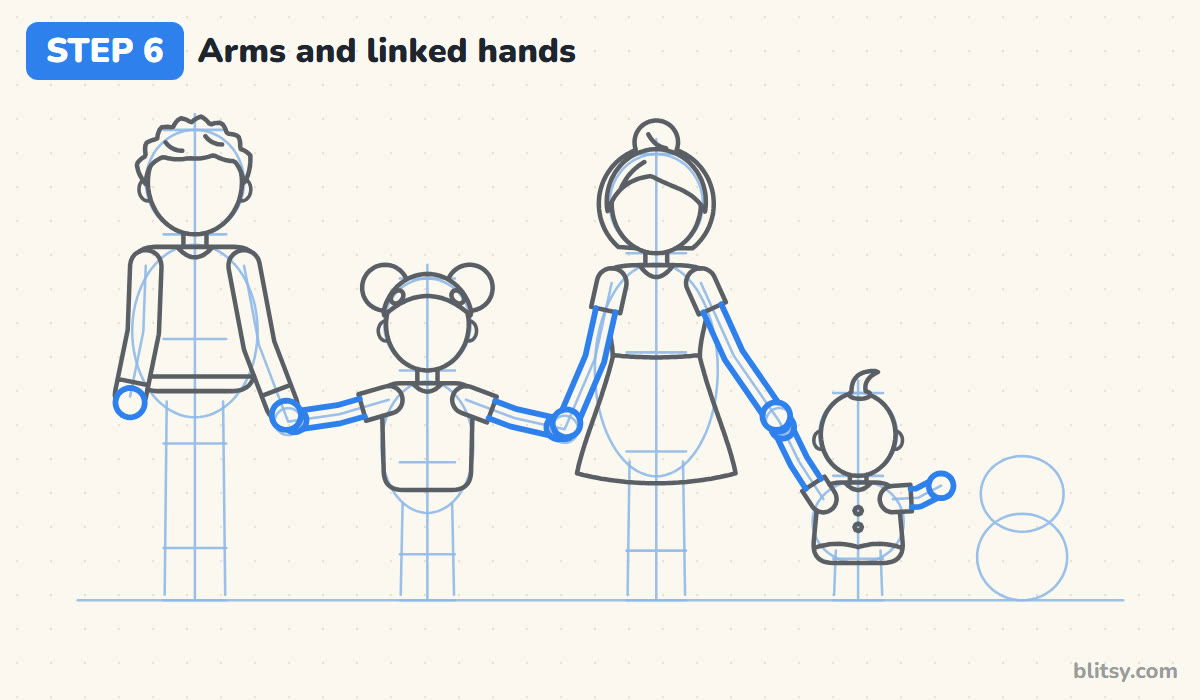
Thicken each stick arm into a tube, a bit wider at the shoulder. For the hands, I use plain circles, like little mittens. Where two people hold hands, draw the grown-up's hand first, then let the child's hand peek out from behind it. That small overlap is what tells the eye that their hands are holding.
💡 Tip: Overlap the two hand circles by about a third; less looks like a high five, more looks like one hand.
Step 7: Draw the legs and shoes
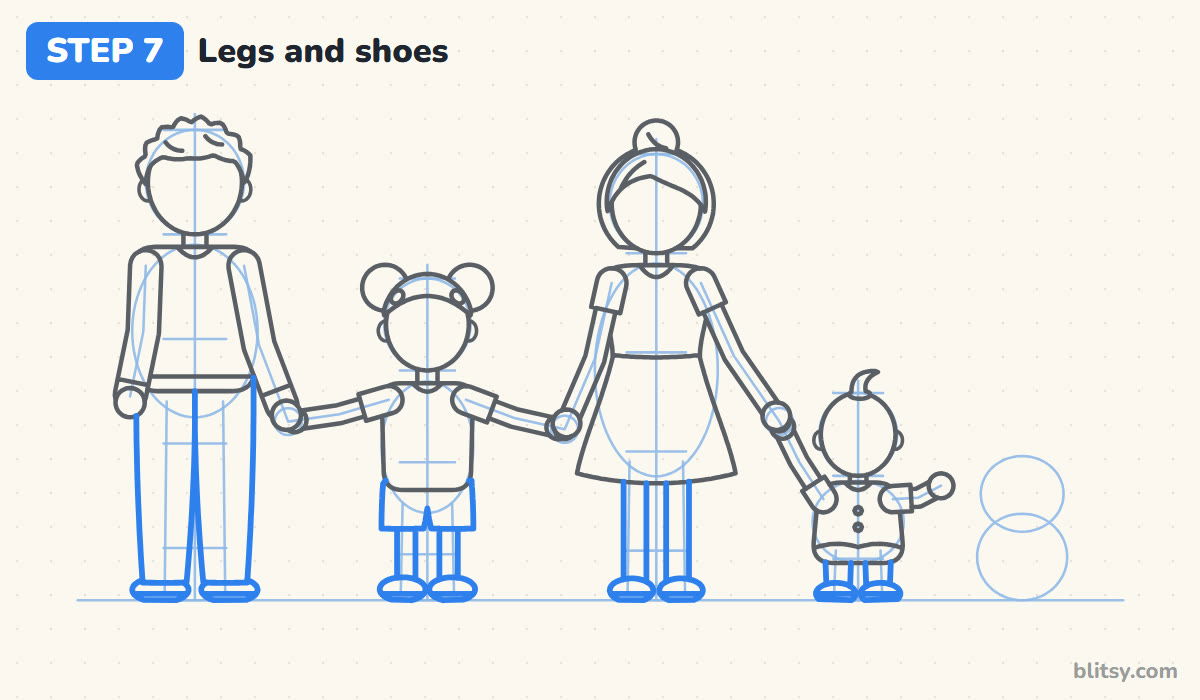
Trousers are two long tubes that start under the sweater and split into a narrow gap between the legs. The child wears shorts, so her legs show below them. Below the dress, two simple leg tubes run straight down. Finish with rounded shoes that sit flat on the ground line.


💡 Tip: Check that every sole touches the same ground line, or someone will look like they're floating.
Step 8: Add a puppy at the end of the row
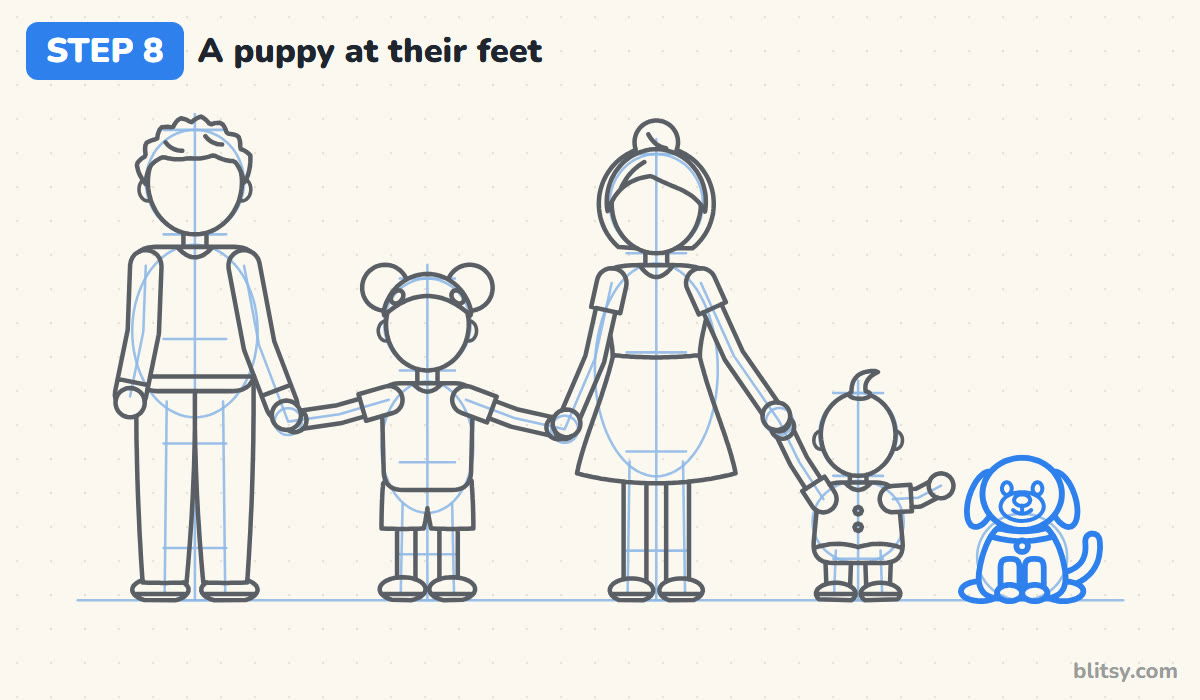
Use the two stacked ovals from step two. The top one becomes a round head with long floppy ears hanging down both sides. The bottom one becomes a pear-shaped sitting body with two front legs, a back foot peeking out on each side and a curled tail. Put a small oval muzzle low on the face, a nose and a little curved smile.
💡 Tip: Keep the puppy's head almost as wide as its body; a big head is what makes it look young.
Step 9: Draw happy faces for everyone
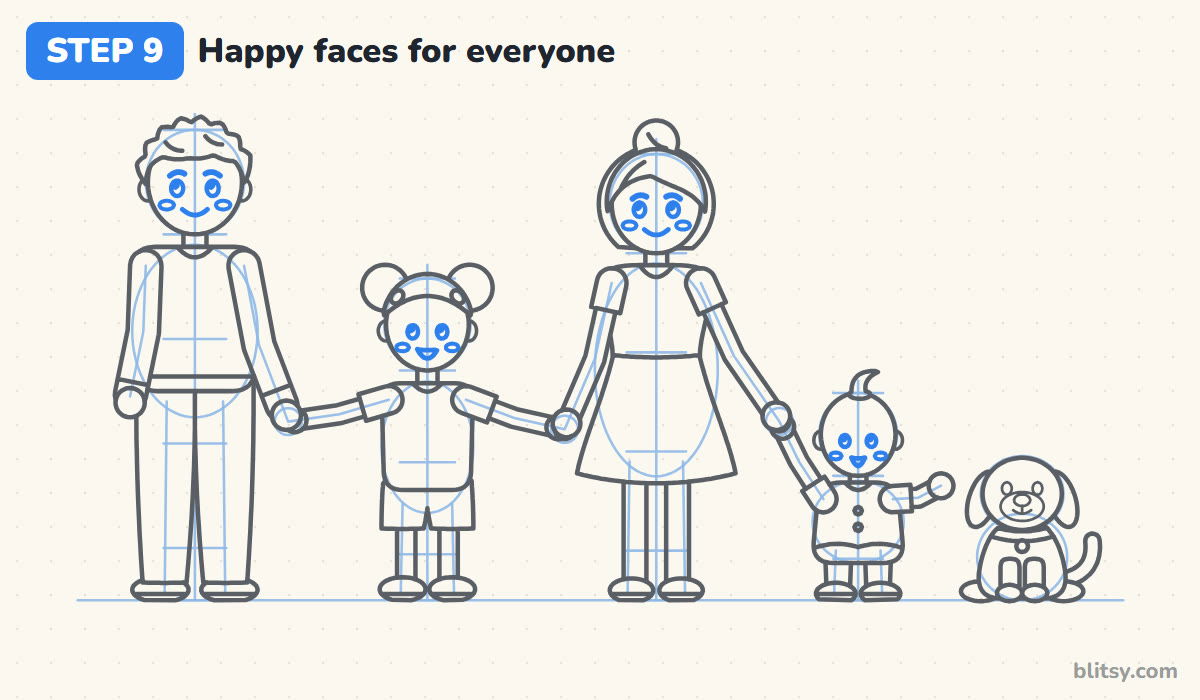
Put two small dark ovals on each face, just below the middle, with a white dot of shine in each. Grown-ups get short eyebrows and a curved smile. The kids get open smiles, which makes them look excited, plus two cheek ovals each.
💡 Tip: Put the shine dots on the same side in every eye so the whole family looks the same way.
Step 10: Add the balloon and a strip of grass
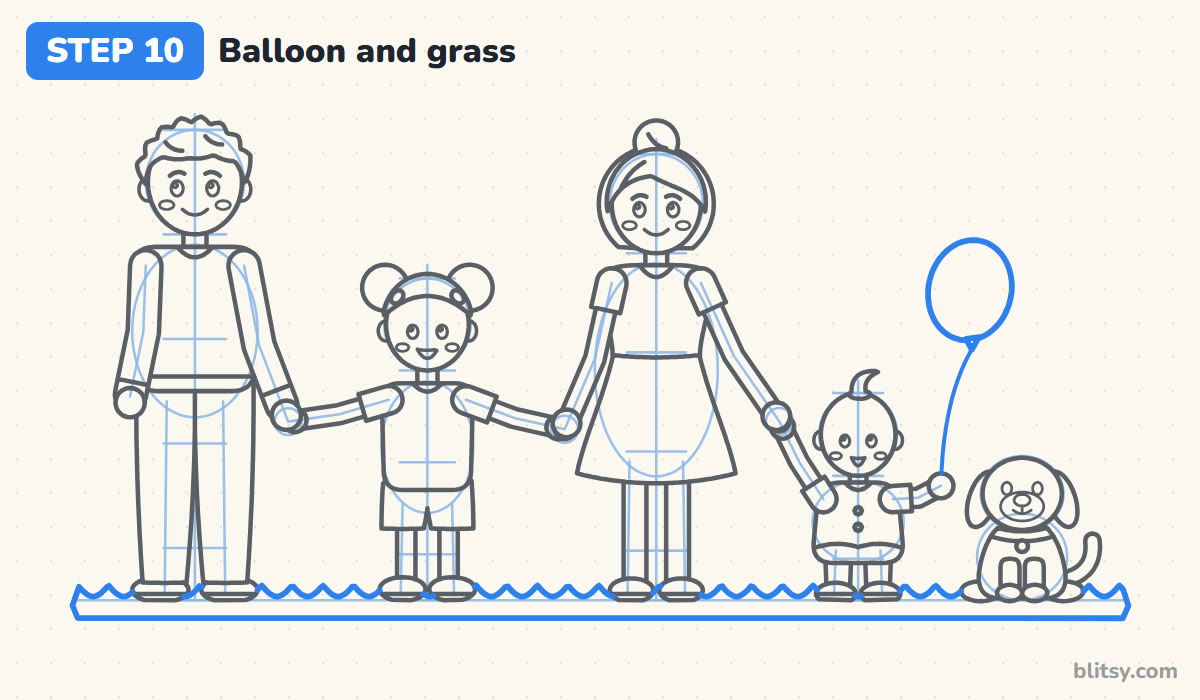
Above the toddler's free hand, draw a tall oval balloon with a tiny triangle knot at the bottom. Let a thin curved string fall from the knot to the hand. Under everyone's feet, draw a strip of grass with a zigzag top edge, and stop the zigzag wherever a shoe covers it.
💡 Tip: Curve the balloon string gently; a ruler-straight string looks like a stick.
Step 11: Ink the outlines and erase the guides
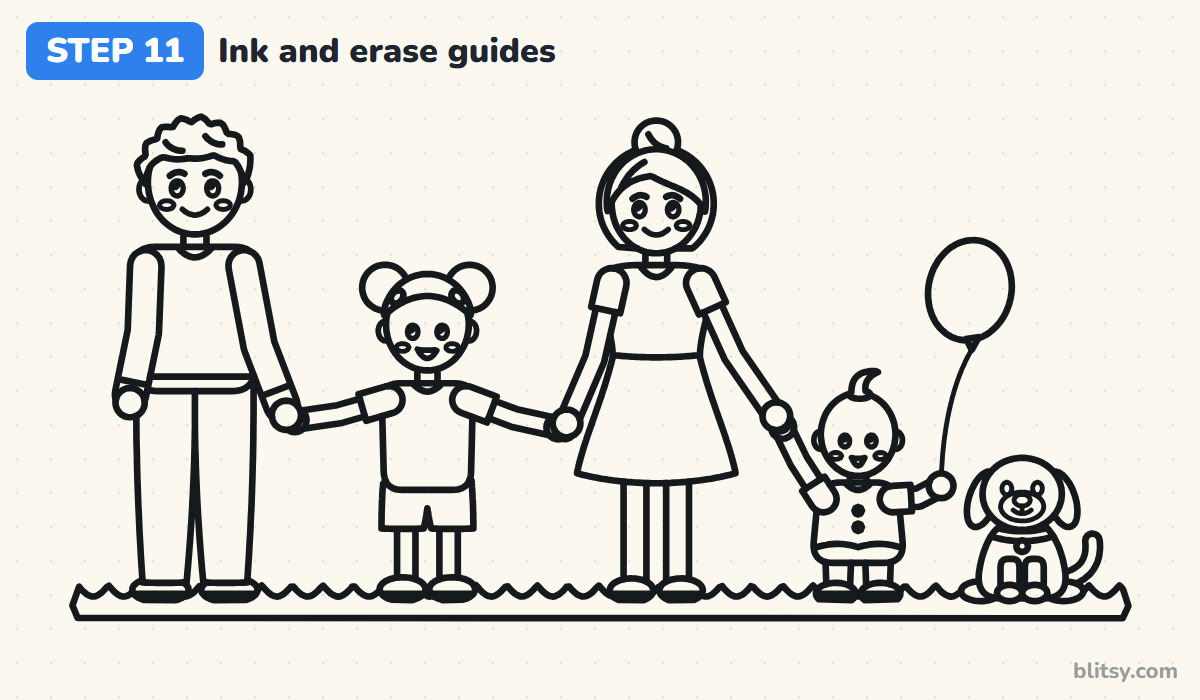
Trace every line you want to keep with your black pen. Skip the head marks, the body ovals and the stick limbs. I ink from left to right when I'm right-handed, so my hand never drags across fresh ink. Wait a minute for it to dry, then erase all the pencil lines underneath.



💡 Tip: Ink long lines like the trousers in one steady pull; short dashes leave a wobbly edge.
Step 12: Color in your family
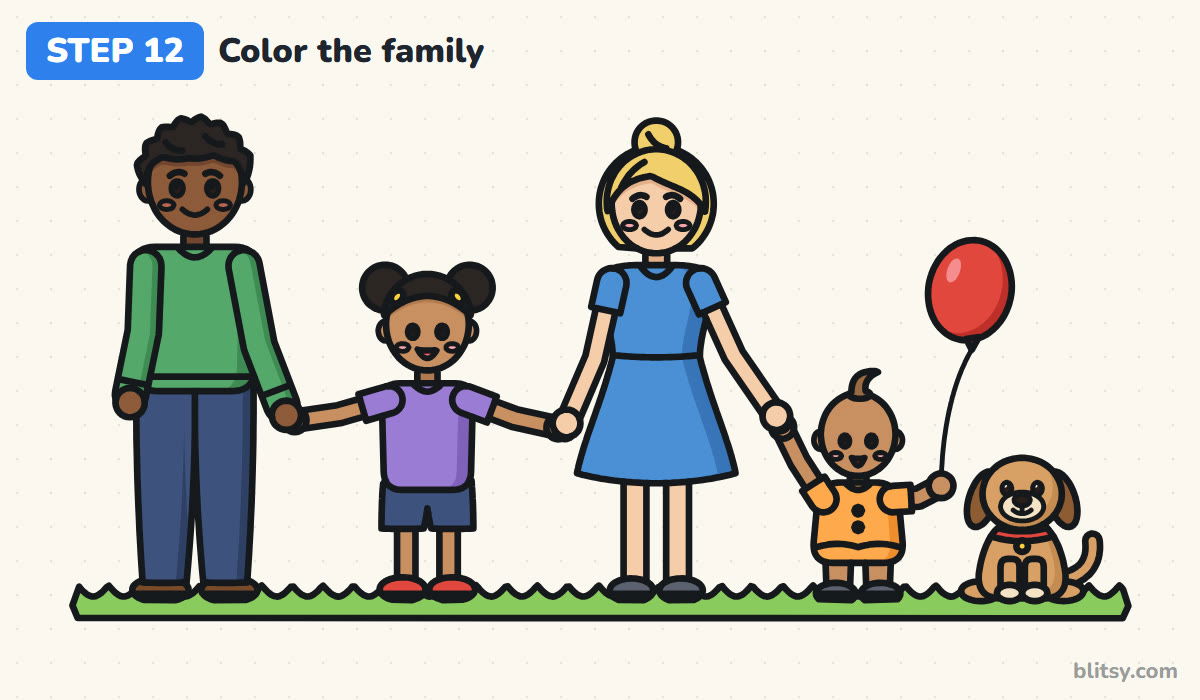
Start with skin tones, since they touch everything else. Then do the hair. The sweater is green, the trousers and shorts dark blue, the T-shirt purple, the dress blue and the romper orange. Finish with a red balloon, a light brown puppy and green grass, and add a darker shade on one side of each outfit.
💡 Tip: Shade the right side of every person, so the light seems to come from the left.
Why Family Drawings Often Look Off
- Everyone is the same height. The row then reads as friends, not a family. Measure each person with their own head marks.
- Kids drawn as tiny adults. Shrinking a grown-up doesn't make a child. Give kids bigger heads compared to their bodies and shorter legs.
- Hands that miss each other. If the arms stop short, the people look like they're about to wave. Aim both arms at one hand circle.
- Feet on different levels. One person floating breaks the whole picture. Draw the ground line first and land every shoe on it.
- Matching faces and hair. A row of clones is hard to read. Change the hairstyle and clothes color for each person.
Swap In Your Own Relatives
Count the people in your home and add or remove figures; a grandparent is drawn exactly like a parent, just with gray hair. A baby in arms works too: draw a small oval bundle against a parent's chest instead of a standing toddler. If you'd like to practice two people first, the mother and daughter drawing tutorial is a good warm-up, and the puppy drawing tutorial helps if your pet looks different.
Family Coloring Page and Printable Step Guide
The free family coloring page has the full outline, a small colored example and a key showing which color goes where. The step-by-step guide PDF puts all 12 steps with their tips on a few pages for Letter or A4 paper.
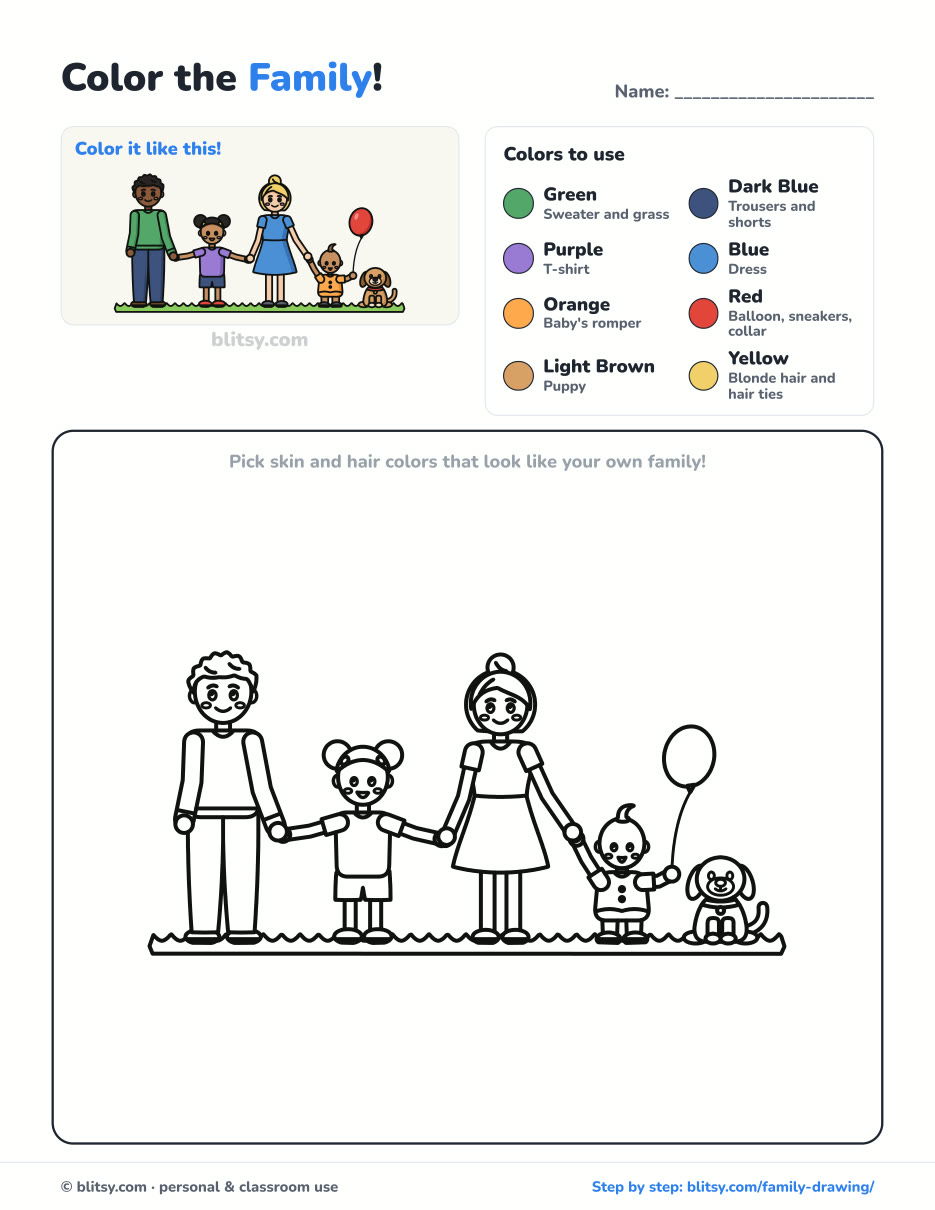
Black outlines with a colored example and the color names at the top. Ready to print and color.
⬇️ Download Coloring PageEvery step picture with its instructions and tips, to keep beside your paper while you draw.
⬇️ Download Drawing Guide📱 On a phone? Tap a download button, then open the file and choose Share → Save to Files or Print. On a computer, the PDF opens or saves straight to your Downloads folder.
Pin the Family Drawing Steps
Drawing a Family: Questions From Beginners
What is the easiest way to draw a family?
Draw a ground line and one head circle per person first, then measure each body in heads. Clothes and faces are easy once the sizes are right.
How do you make a child look younger than an adult in a drawing?
Use fewer heads for the body: about four and a half for a grown-up, three and a half for a child, two and a half for a toddler. Shorter legs help too.
How do you draw people holding hands?
Put a small circle where the hands meet and run both arms to it. Then draw one hand slightly in front of the other so they overlap.
Can kids follow this family drawing?
Yes, most children from about 6 or 7 can manage it, maybe over two sittings. Younger kids can leave out the puppy and the balloon and draw just two or three people.
Draw the people you live with, give each one their real hair color, and you've made a picture worth keeping on the fridge. 🏡✏️
Related posts:
 How to Draw Rosa Parks Step by Step (Easy Portrait)
 How to Draw Juice WRLD Step by Step (Easy Tribute Portrait)
 How to Draw Abraham Lincoln Step by Step (Easy Portrait)
 How to Draw Bart Simpson Step by Step (Easy Cartoon)
 How to Draw a Tank Step by Step (Easy Cartoon Tank)
 How to Draw a Bee Step by Step (Easy Cartoon Bee)
 How to Draw a Boy Step by Step (Easy Full-Body Cartoon)
 How to Draw a Mermaid Step by Step (Easy Cartoon for Kids)
 How to Draw a Princess Step by Step (Easy Ball Gown Cartoon)
 How to Draw a Cowboy Step by Step (Easy Cartoon Kid)
 How to Draw a Whale Step by Step (Easy for Beginners)
 How to Draw Lungs Step by Step (Easy Science Diagram)

