
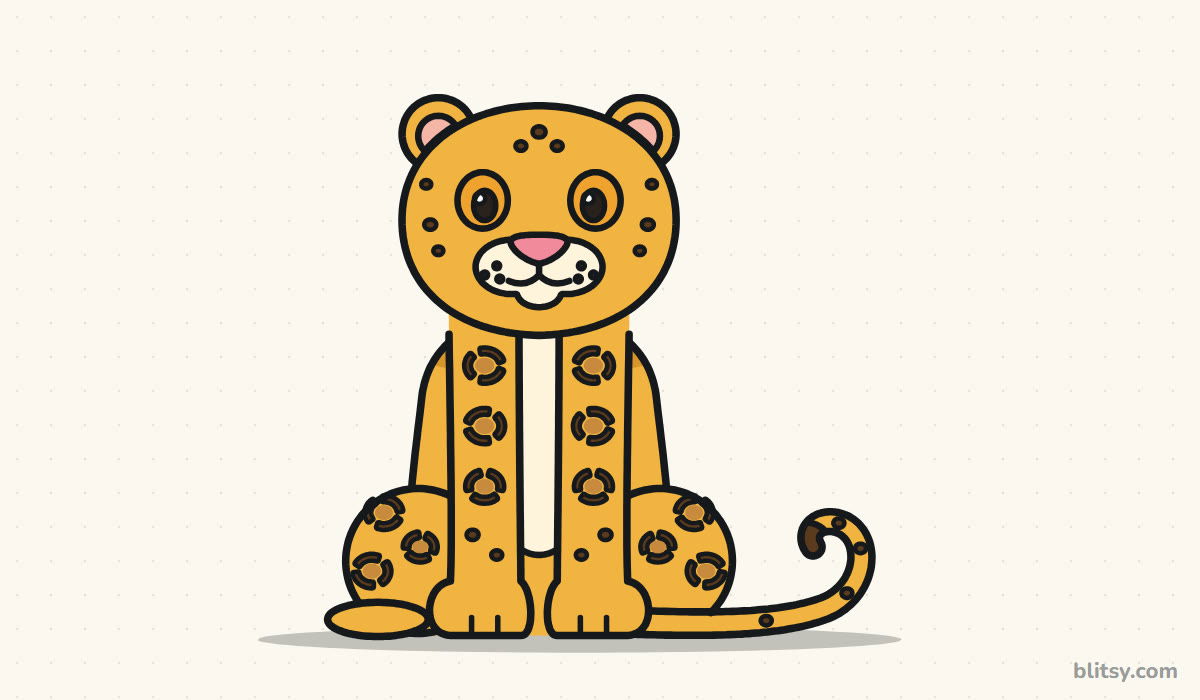
Spots are the part everyone worries about, and they are actually the easy part once the body is in place. In this lesson you'll learn how to draw a leopard step by step, starting with a circle and an oval and ending with a cheerful little leopard sitting up straight, tail curled along the ground. I kept the markings to a small, even set so the drawing stays clean instead of turning into a mess of dots.
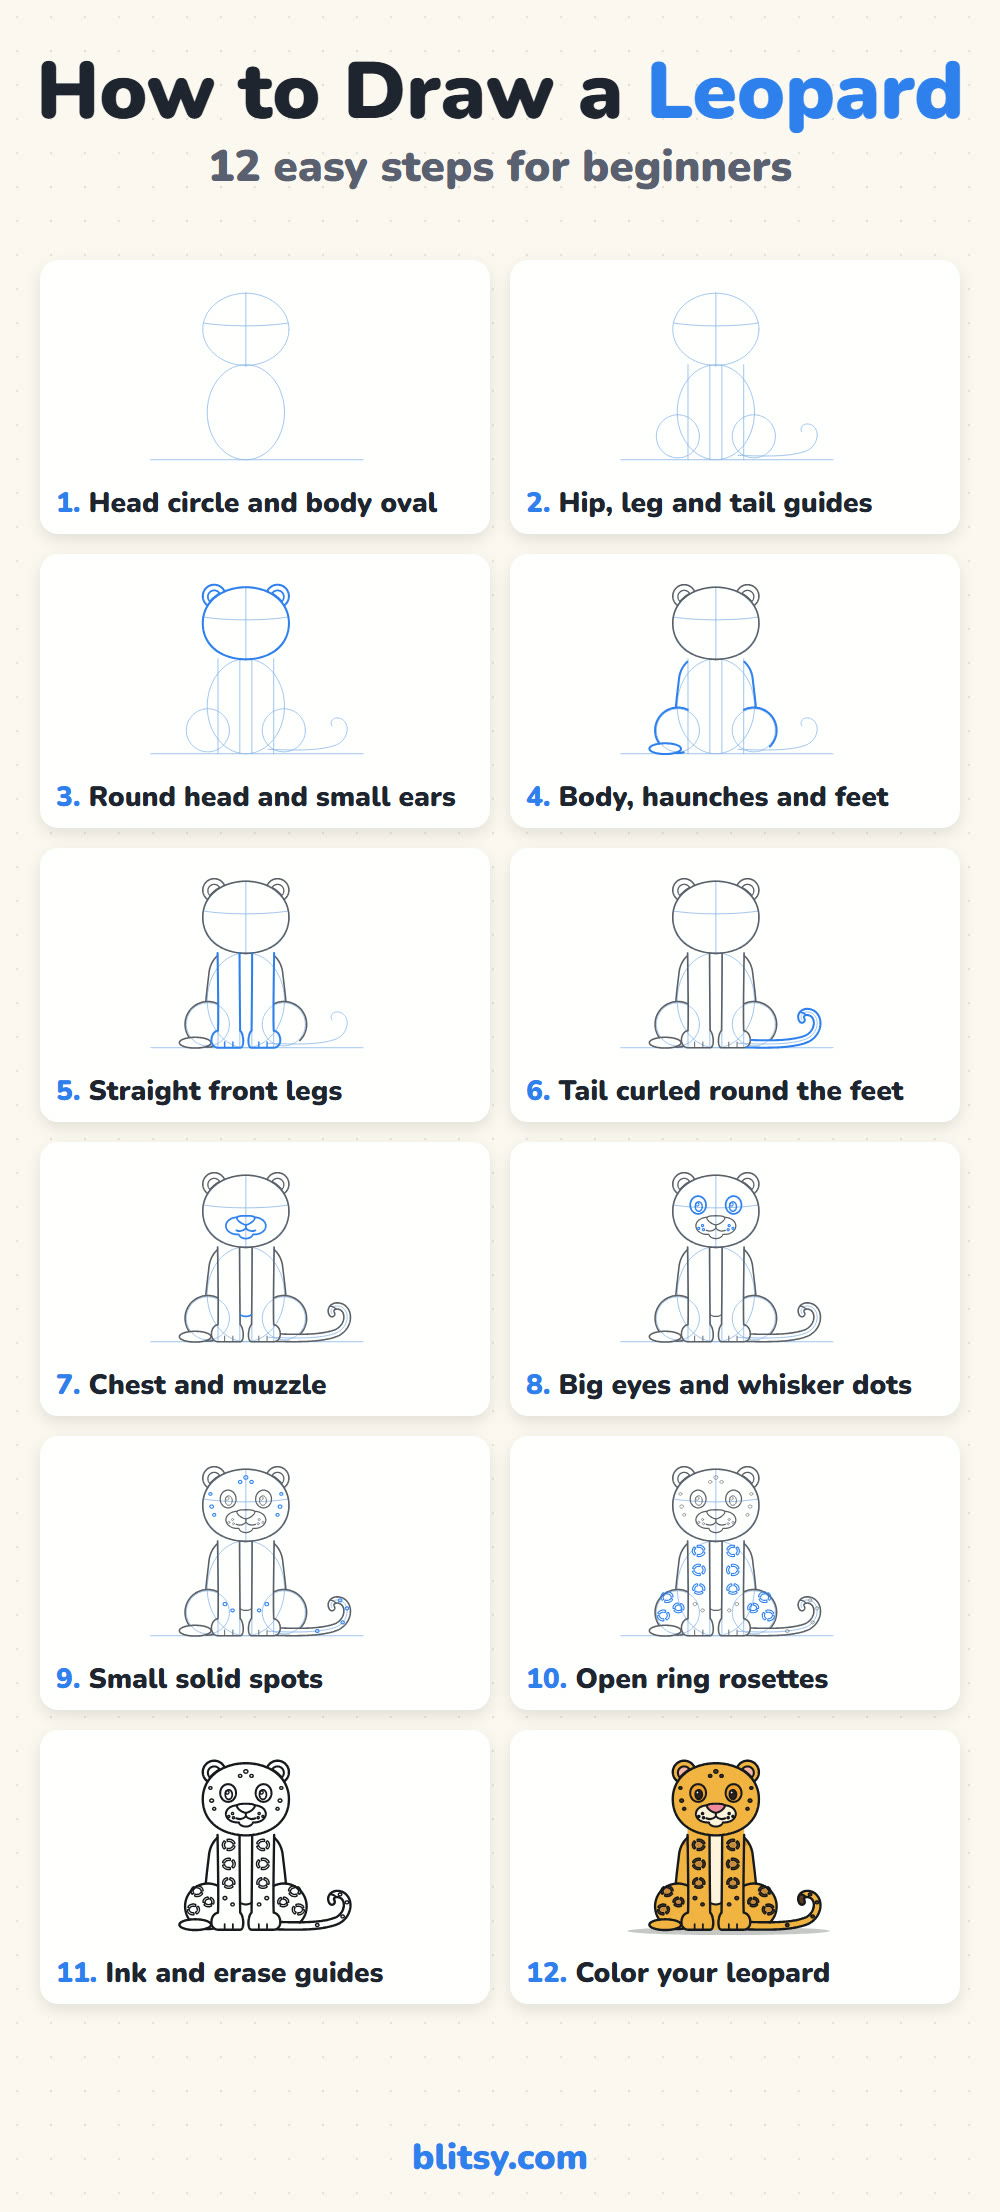
Only copy what changed: every picture shows the new lines in blue, while gray shows the work from earlier steps.
Quick overview
⏱️ Time: around 30 to 40 minutes, coloring included
🎯 Level: easy; the rosettes need a little patience
✏️ Steps: 12
🐆 You'll draw: a cartoon leopard sitting upright, seen from the front
Supplies for a Sitting Leopard Sketch
- A soft pencil for light sketching (HB or 2B)
- An eraser that doesn't smudge
- A black fineliner or thin marker for the final outline
- Colored pencils or markers: golden yellow and dark brown, plus cream, tan, pink and orange
- Plain white paper, printer paper is fine
If you only have a yellow and a brown, that's enough for a very good leopard.
How to Draw a Leopard Step by Step
Step 1: Sketch a head circle and a tall body oval
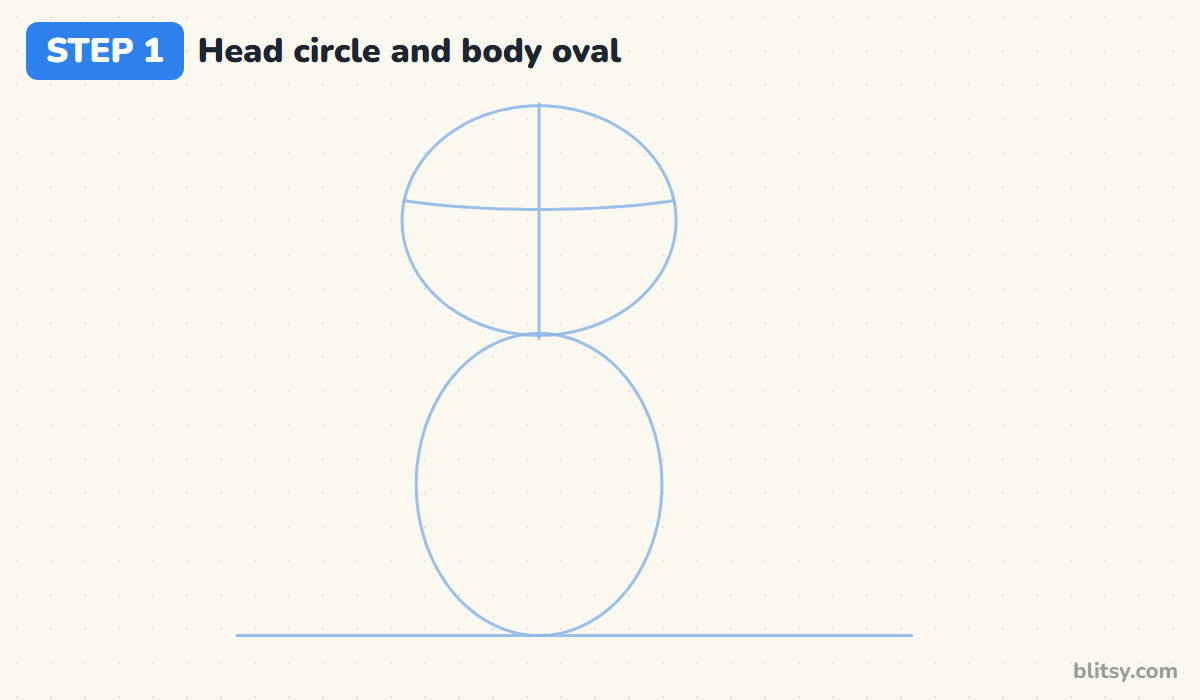
Draw a flat ground line near the bottom of the page. Stack a tall oval on it for the body, then a wide circle on top for the head, just touching the oval. I make the head almost as wide as the body, since a big head is what makes a cartoon animal look young. Add a vertical line through the head and a curved line across it, a bit below the middle, for the eyes.
💡 Tip: Hold the pencil far back from the tip. Your lines will come out lighter without trying.
Step 2: Add hip circles, leg lines and a tail guide
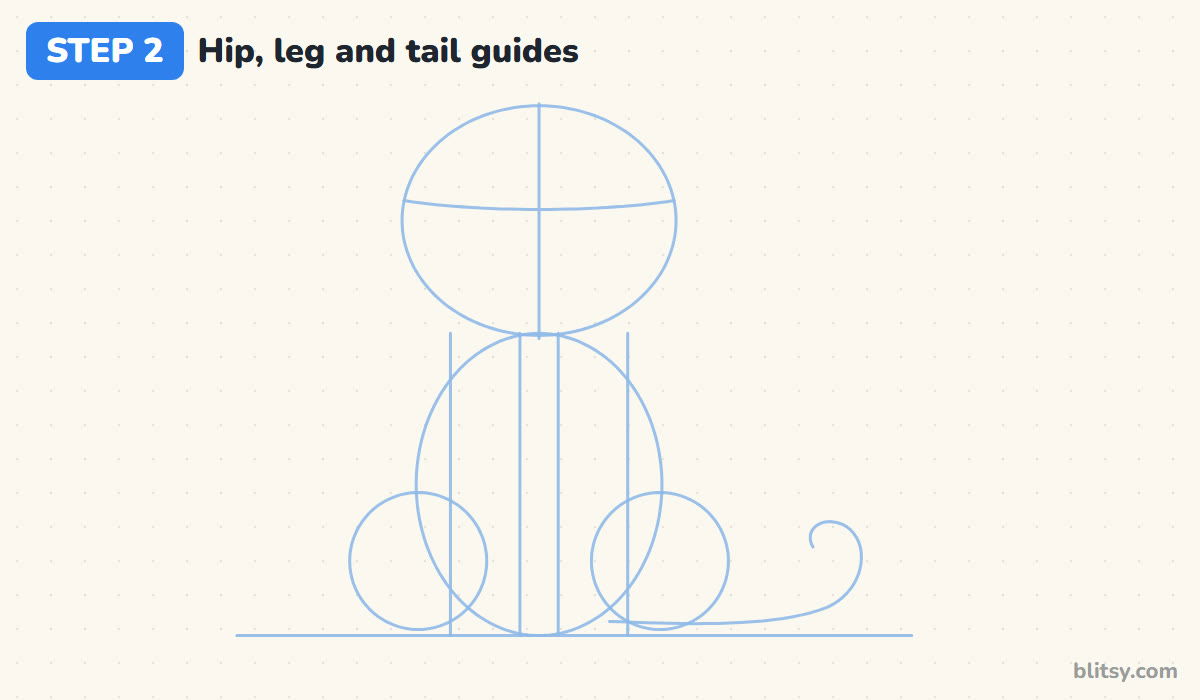
Put a circle at each bottom corner of the body oval, resting on the ground line, for the back haunches. Drop two pairs of straight lines from under the head to the ground, close to the middle, for the front legs. Finish with one long curve from the right that runs along the ground and hooks up at the end. That's the tail's path.
💡 Tip: Keep the two leg pairs the same distance from the center line so the pose stays balanced.
Step 3: Outline the round head and small ears
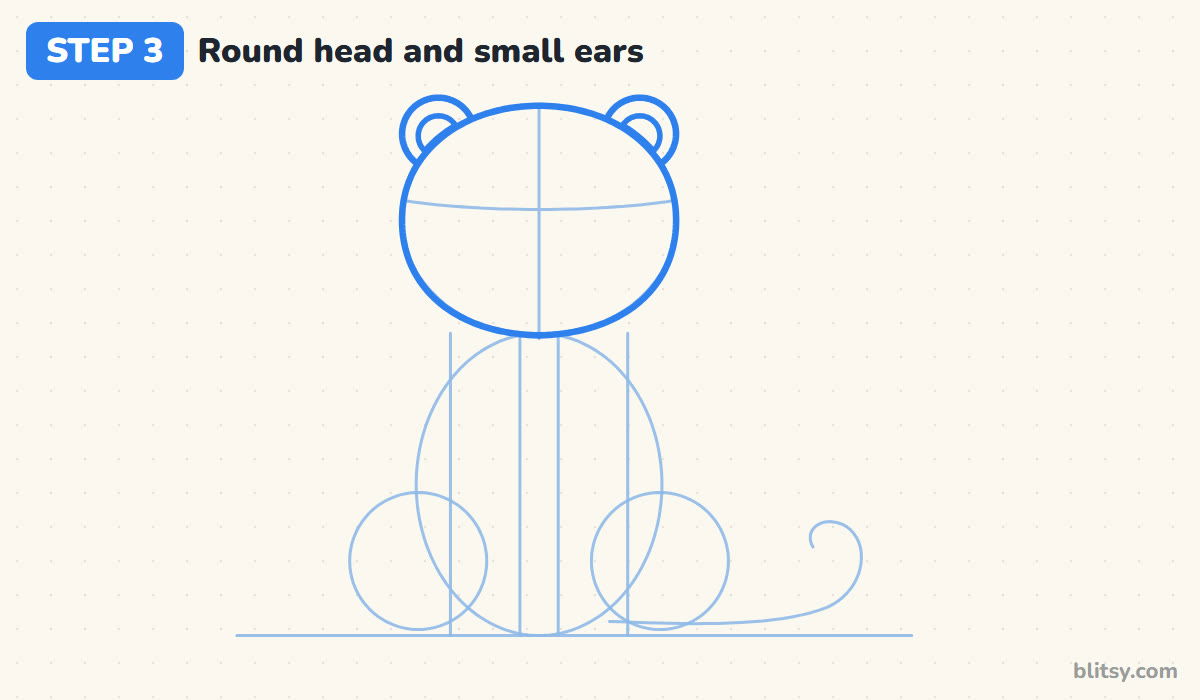
Go over the head circle with a firmer line, widening the cheeks slightly so the bottom is a little broader than the top. Two small round ears sit on the top corners, each with a smaller circle inside. I keep leopard ears small and round on purpose. Pointed ears quickly turn the drawing into a house cat or a fox.



💡 Tip: Draw the inner ear circles slightly lower than center, it makes the ears look tilted forward.
Step 4: Draw the body sides, haunches and one back foot
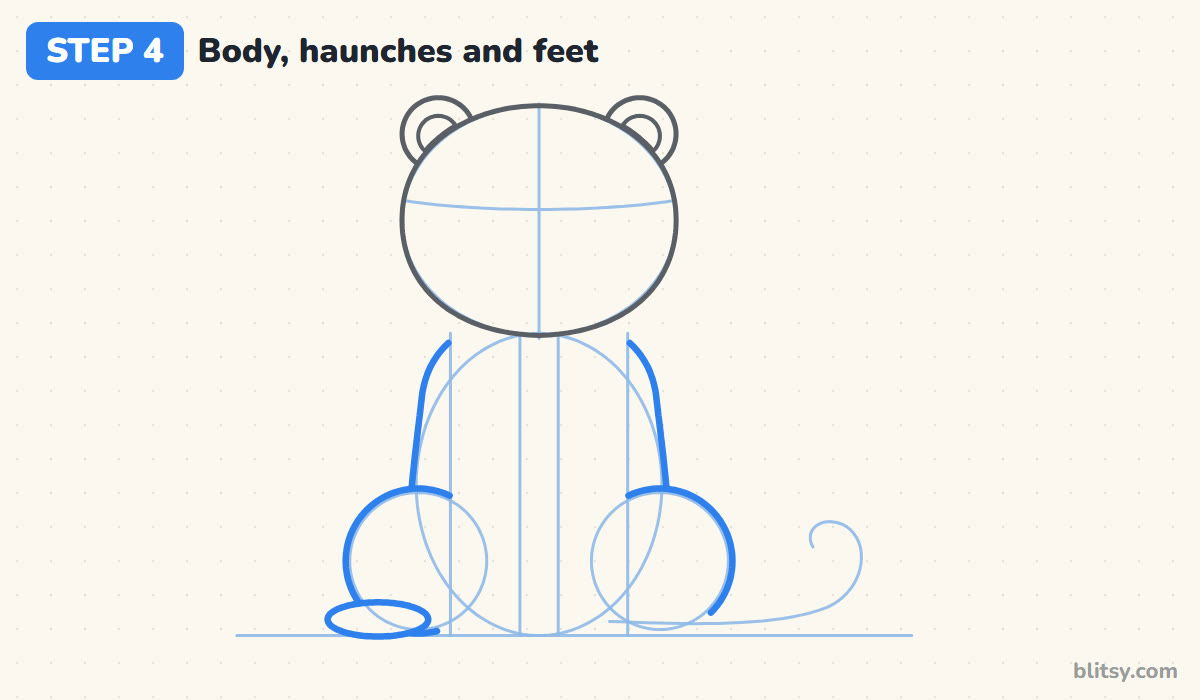
From under each cheek, bring a curved line down and out for the shoulders, stopping at a hip circle. Trace the outer part of both haunches so they look round. On the left, add a flat oval on the ground for a back foot. I skip the right foot, because the tail covers it later.
💡 Tip: Let the body lines lean outward a little as they go down. A sitting cat is widest at the hips.
Step 5: Add two straight front legs with round paws
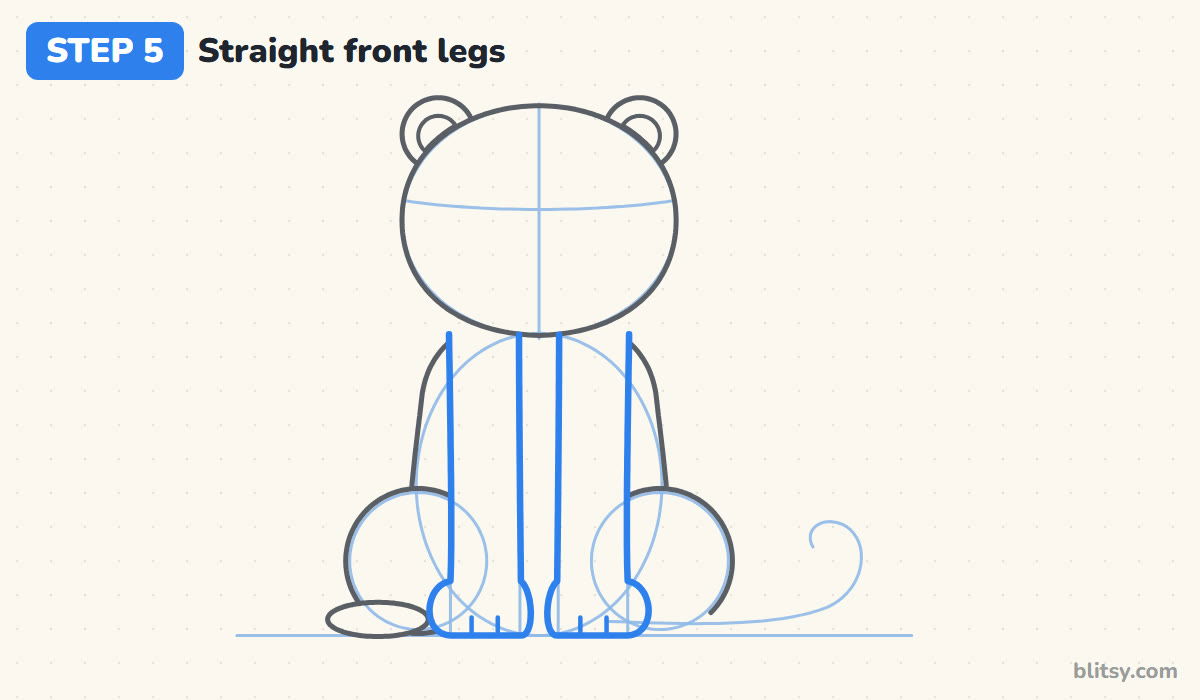
Follow the leg guides with firm lines from under the chin straight down. Near the ground, swell each leg outward into a rounded paw that's a bit wider than the leg, then draw two short toe lines at the bottom of each paw. Leave a narrow gap between the legs. That gap becomes the cream chest.
💡 Tip: Draw the outer edge of both legs first, then the inner edges, to keep them equally wide.
Step 6: Curl the long tail along the ground
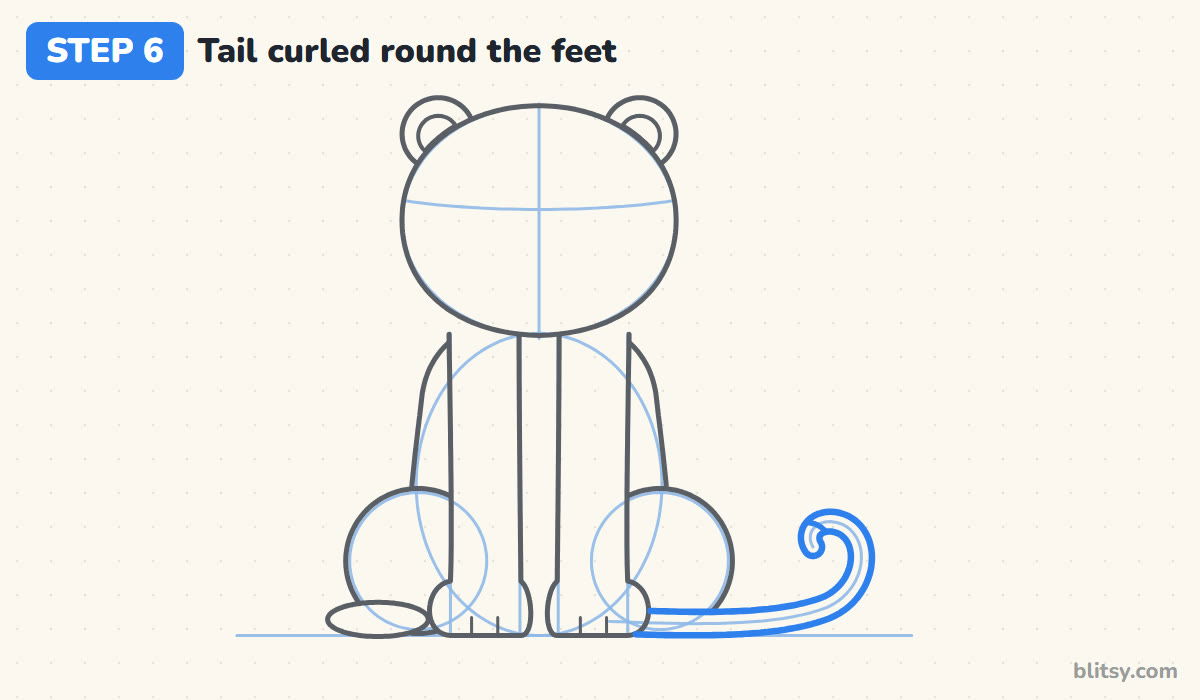
Start the tail from behind the right front paw. Use two lines about a fingertip apart that run along the ground in front of the back foot, then sweep up and curl back at the end. A short curved line across the tail near the tip marks a darker end. Leopards use their long tails for balance when they climb, so don't make it stubby.
💡 Tip: Turn your paper sideways for the curl. Curves are smoother when your wrist pulls the pencil.
Step 7: Draw the chest and muzzle with a pink nose
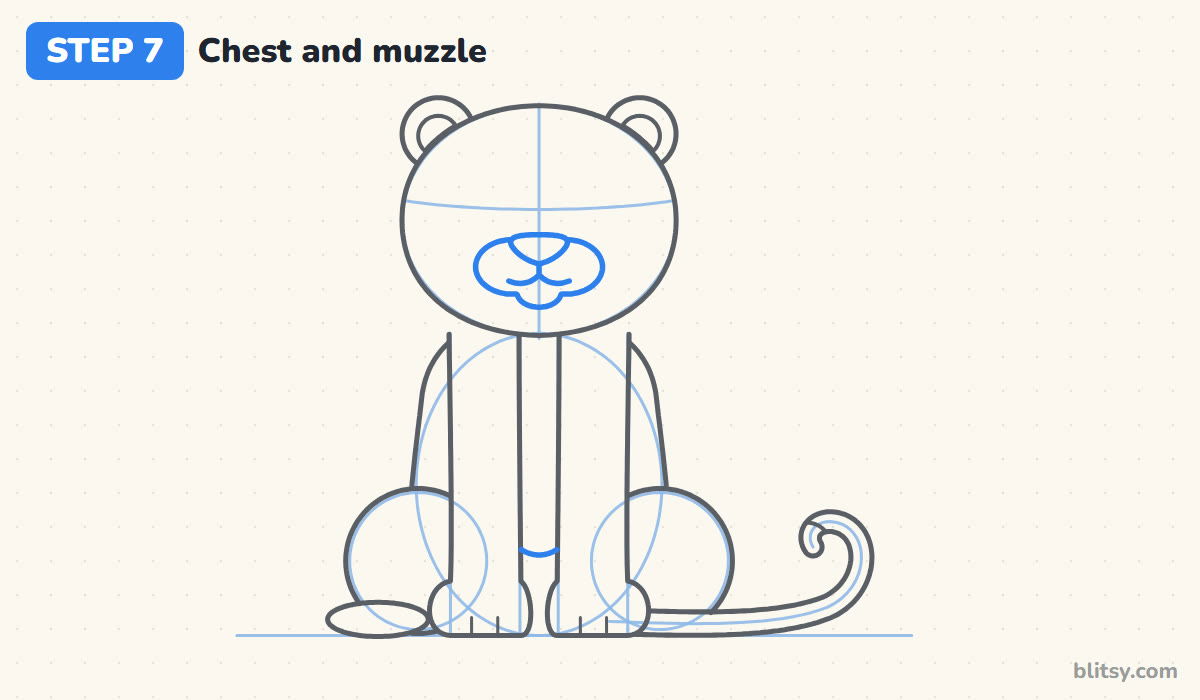
Between the front legs, draw one small curve near the bottom to close off the chest patch. Low in the face, draw two puffy cheek shapes side by side with a tiny chin bump under them. A small rounded triangle nose sits where the cheeks meet, with a short line below it that splits into two smiling curves.


💡 Tip: Keep the muzzle low in the face. If it rides up, the eyes run out of room.
Step 8: Add big eyes and whisker dots
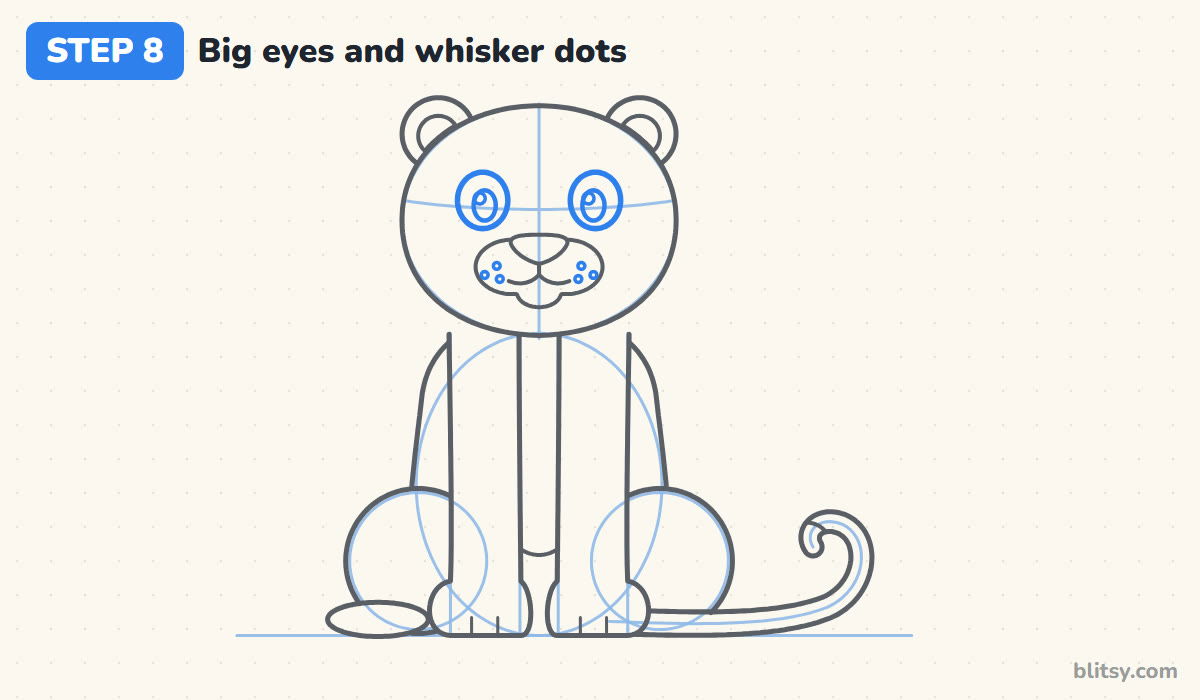
Place two large ovals on the curved cross line, leaving about a nose width between them. Inside each, draw a taller dark pupil and a small shine circle in the upper left. Big eyes with a shine keep this leopard friendly rather than fierce. Finish with three tiny dots on each cheek puff.
💡 Tip: Put both shine circles in the same corner. Mismatched shines make the eyes look crossed.
Step 9: Dot in the small solid spots
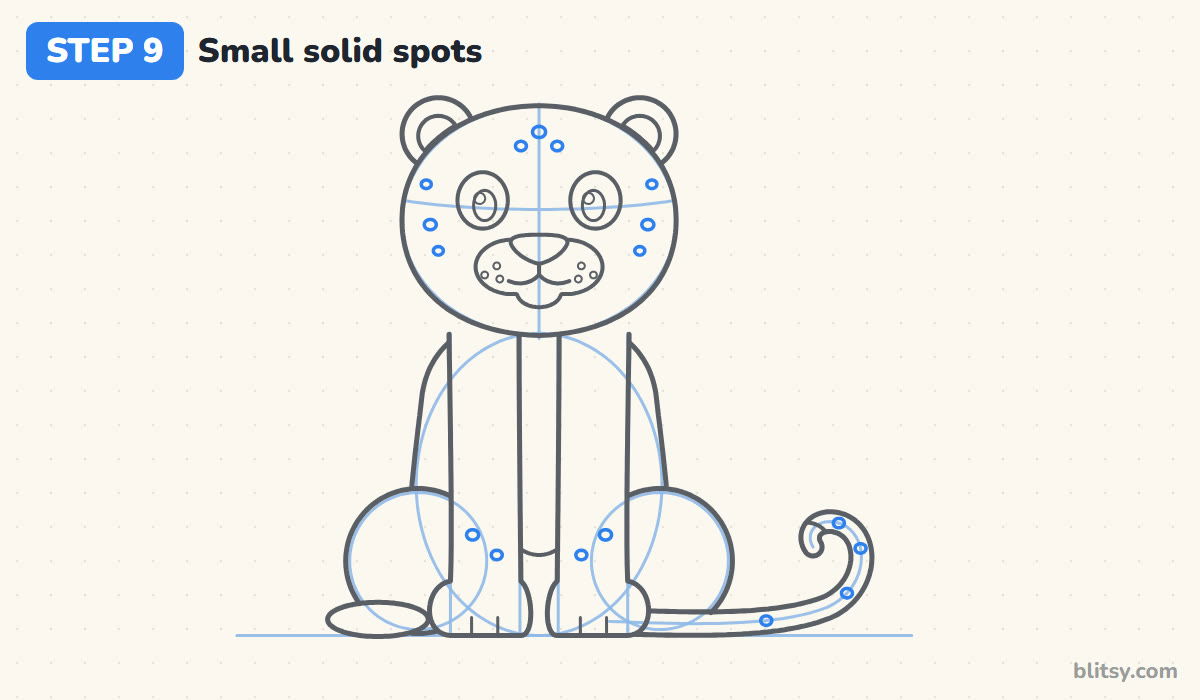
Real leopards have small, solid spots on the head and lower legs, while the open rosettes cover the body. Put three spots in a little triangle on the forehead and three on each side of the face beside the eyes. Add two spots low on each front leg and a few evenly spaced along the tail.
💡 Tip: Space the spots out like stepping stones. If two touch, they read as one blob.
Step 10: Draw open ring rosettes
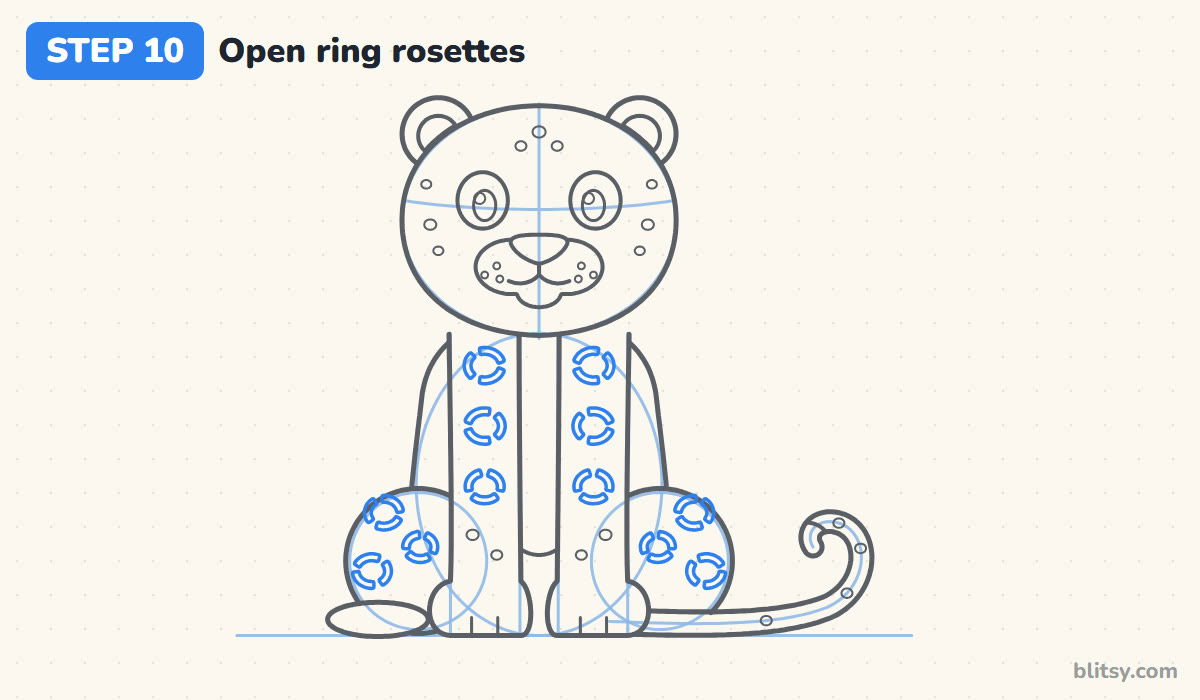
A rosette is a ring broken into pieces. Picture a small oval, then mark only three short curved dashes around it, leaving gaps. I settled on twelve for this leopard: three down each front leg and three on each haunch. That's enough to say leopard without crowding the drawing.
💡 Tip: Draw one rosette on the left, then its twin on the right, so both sides stay matched.
Step 11: Ink the outline and erase the guides
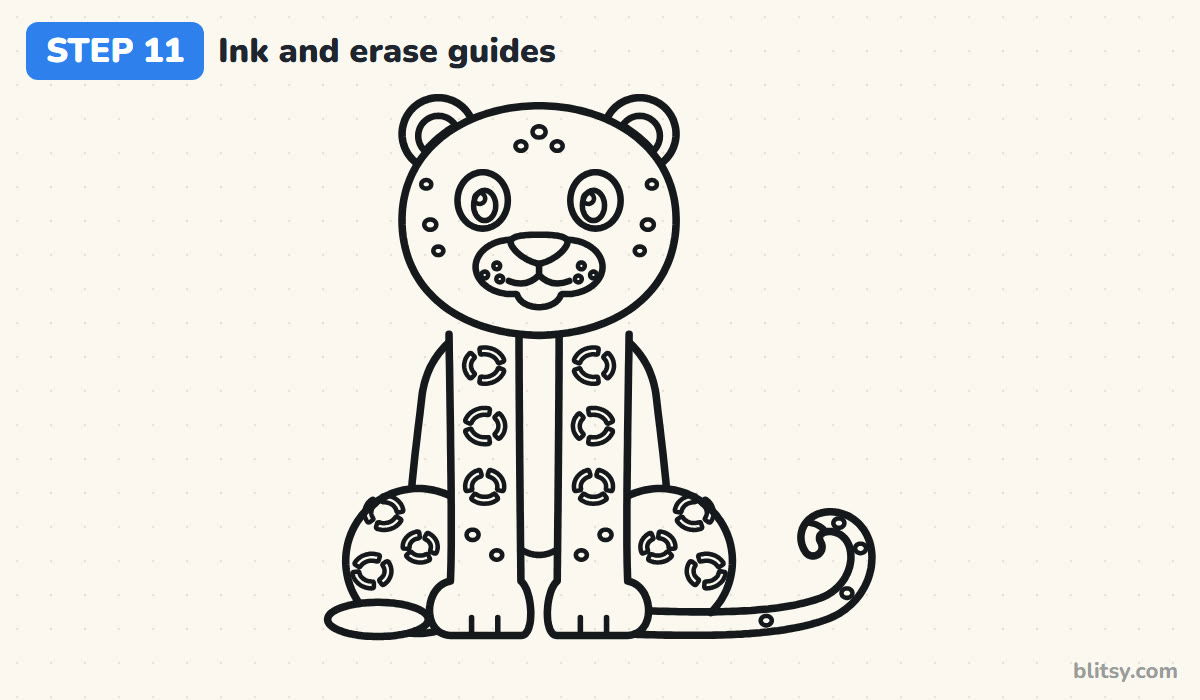
Trace every keeper line with your fineliner. Start at the face, since that's where a shaky line shows most, and do the tiny rosette dashes last with short, slow strokes. Let the ink dry for a minute. Then erase all the circles and guide lines underneath.
💡 Tip: Rest the side of your hand on a scrap of paper while inking so you don't smear the face.
Step 12: Color your leopard
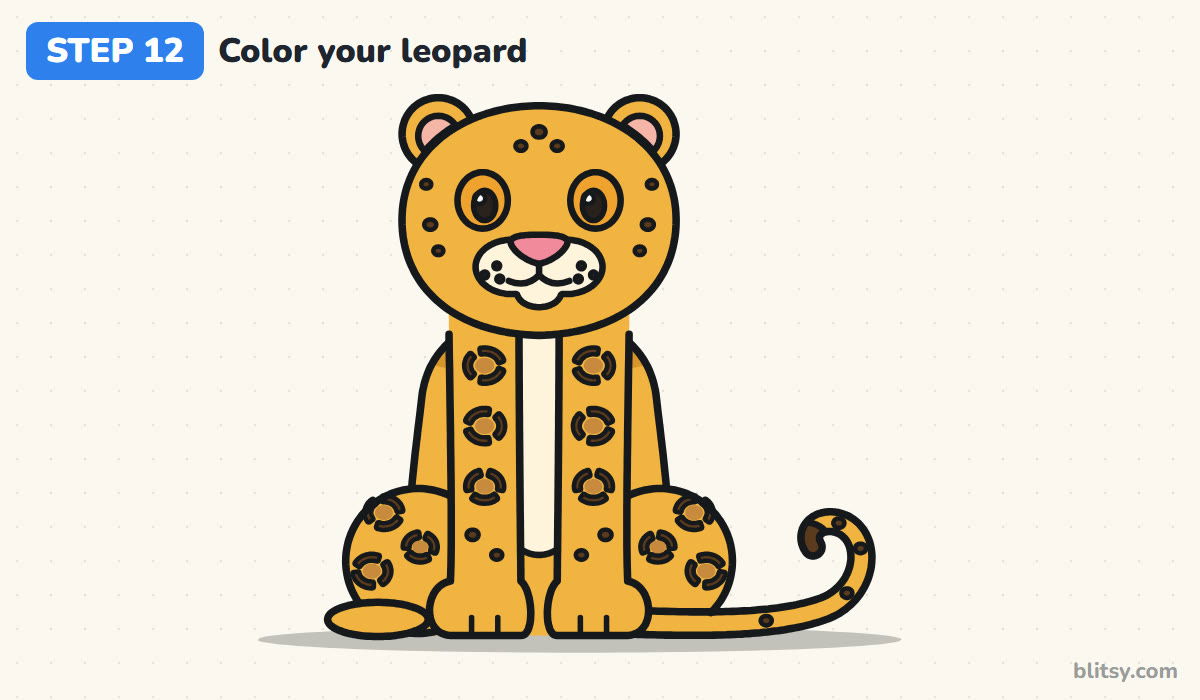
Golden yellow covers the fur, from the head down to the tail. Use cream for the chest and muzzle, pink for the nose and inner ears, and orange for the eyes, keeping the pupils black and the shine white. Fill each rosette center with tan, then go over the dashes and spots in dark brown, along with the tail tip. A deeper yellow just under the chin adds a soft shadow.
💡 Tip: Color the tan centers before the brown dashes, so the dark color doesn't get dragged around.
Spots That Turn a Leopard into a Cheetah
- Solid round spots all over the body. That's a cheetah pattern. Leopards wear open rosettes on the body and save the solid dots for the head and legs.
- Too many rosettes. Fifty little rings make the drawing busy and hard to color. A dozen tidy ones still read as a leopard.
- Closed rings instead of broken ones. A full circle looks like a donut. Break each ring into three dashes with gaps.
- Tall, pointy ears. They change the animal. Keep them small and round, set on the top corners of the head.
- A tiny head on a big body. For a cute cartoon, the head should be nearly as wide as the body.
New Spins on This Spotted Cat
Color the fur almost black with darker rosettes for a black panther, which is really a leopard with a dark coat. For a cub, I shrink the body and make the eyes even bigger. Little kids can skip the rosettes entirely and use solid spots. You can also compare patterns with this snow leopard drawing tutorial, or switch spots for stripes with how to draw a tiger step by step.
Leopard Coloring Page and Printable Drawing Steps
The free leopard coloring page has a finished, colored leopard at the top to copy from, a color key that names each part, and a large clean outline below with space to add a background. The step-by-step PDF guide holds all 12 steps with their pictures and tips. Both fit on Letter or A4 paper.
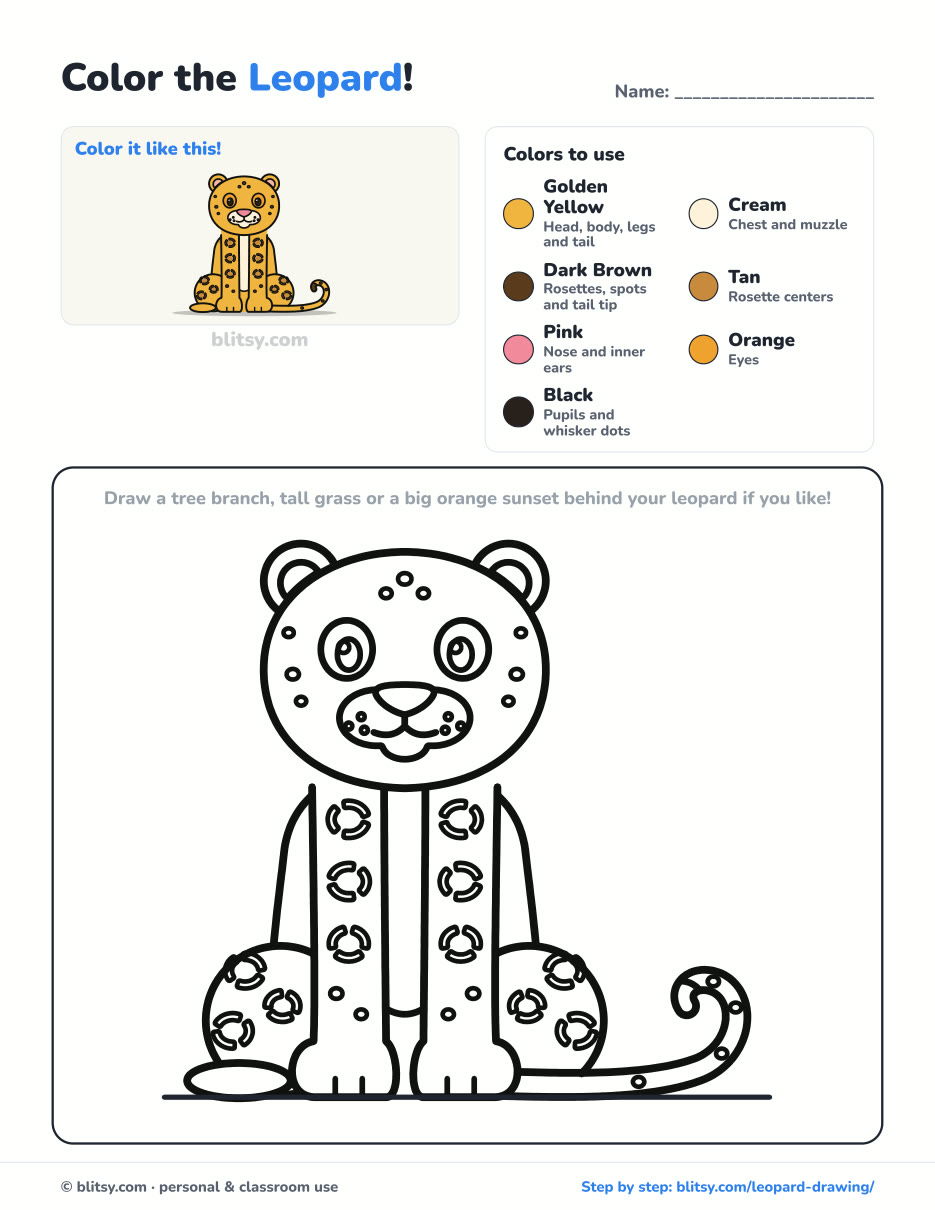
Black outlines with a colored example and the color names at the top. Ready to print and color.
⬇️ Download Coloring PageEvery step picture with its instructions and tips, to keep beside your paper while you draw.
⬇️ Download Drawing Guide📱 On a phone? Tap a download button, then open the file and choose Share → Save to Files or Print. On a computer, the PDF opens or saves straight to your Downloads folder.
Pin the Leopard Lesson for Later
Leopard Spots Done? More Animals to Draw
Each one below is a step-by-step tutorial, so pick an animal and follow along.
- Mouse Drawing: Learn how to draw a mouse sitting up with a piece of cheese.
- Alligator Drawing: Spikes up and smiling, the alligator drawing step by step lesson takes 12 steps.
- Simba Drawing: Stay with big cats in the Simba drawing tutorial, a lion cub drawn from two ovals.
- Cat Face Drawing: Draw a gray tabby looking straight at you in how to draw a cat face step by step.
- Gorilla Drawing: The gorilla drawing tutorial ends with a calm silverback holding a banana.
- Bunny Drawing: A sitting bunny eyeing its carrot: bunny drawing step by step.
- Chalk Art: The chalk art tutorial takes your drawing outside with hopscotch and a rainbow.
- Peppa Pig Drawing: Twelve steps give you Peppa and her puddle in the Peppa Pig drawing tutorial.
- Polar Bear Drawing: Learn how to draw a polar bear sitting on the ice with its paws up.
- Parrot Drawing: The parrot drawing tutorial draws a scarlet macaw with a tail longer than its body.
- Family Drawing: Fit four people and a puppy on one page with the family drawing step by step guide.
- Peacock Drawing: Draw a proud peacock with its tail open in the peacock drawing tutorial.
Leopard Drawing Questions Kids Often Ask
What is the easiest way to draw a leopard?
Begin with a circle for the head and an oval for the body, then add simple straight legs and a curled tail. Leave the spots until the very end, once the shape looks right.
How do you draw leopard spots?
Body spots are rosettes: three short curved dashes around an imaginary oval, with a lighter center. On the head and legs, use small solid dots instead.
What is the difference between leopard and cheetah spots?
Cheetahs have solid round black spots. Leopards have rosettes, broken rings with a tan center, plus small solid spots on the head and legs.
How long does it take to draw a leopard?
Around half an hour for the drawing and a little more for coloring. The rosettes take the longest, so go slowly there.
Grab a pencil, start with one light circle, and see where your leopard decides to sit. 🐆✏️
Related posts:
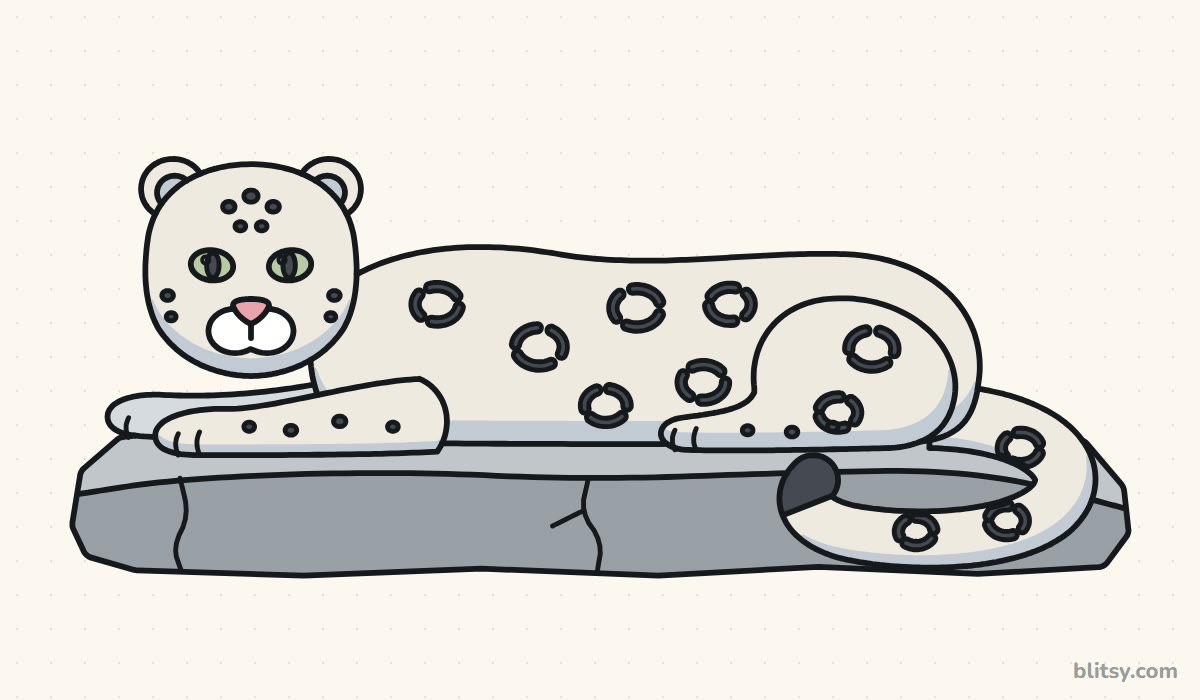 How to Draw a Snow Leopard Step by Step (Easy Guide)
 How to Draw a Car Step by Step (Easy Drawing for Beginners)
 How to Draw Godzilla Step by Step (Easy Kaiju for Beginners)
 How to Draw a Whale Step by Step (Easy for Beginners)
 How to Draw a Rat Step by Step (Easy for Beginners)
 How to Draw an Arctic Fox Step by Step (Easy for Beginners)
 How to Draw a Shark Step by Step (Easy for Beginners)
 How to Draw a Chicken Step by Step (Easy for Beginners)
 How to Draw a Fish Step by Step (Easy Goldfish for Beginners)
 How to Draw a Light Bulb Step by Step (Easy for Beginners)
 How to Draw a Crow Step by Step (Easy for Beginners)
 How to Draw an Eagle Step by Step (Easy for Beginners)

