
Food drawings win kids over fast, and a taco is a favorite because it's basically a smile you can fill with toppings. This lesson shows you how to draw a taco step by step, beginning with a half moon and a flat oval. We'll stack the fillings in a sensible order so nothing gets tangled. By the end your taco has a happy face of its own, plus a lime wedge and a little bowl of salsa for company.
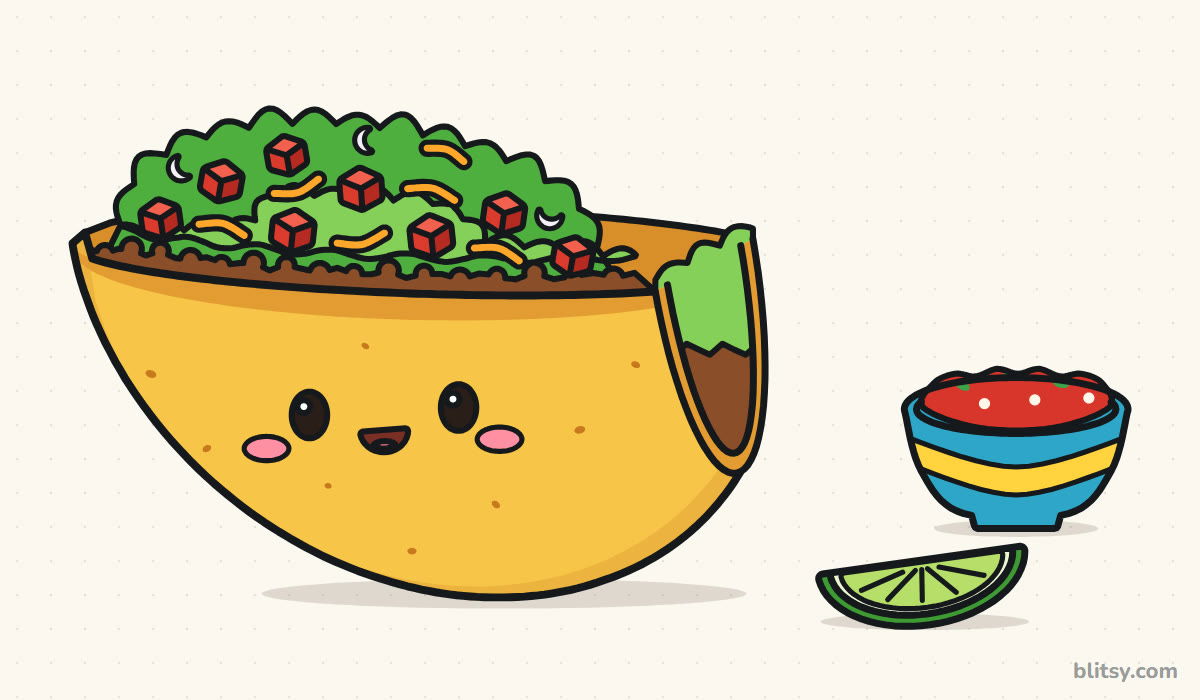
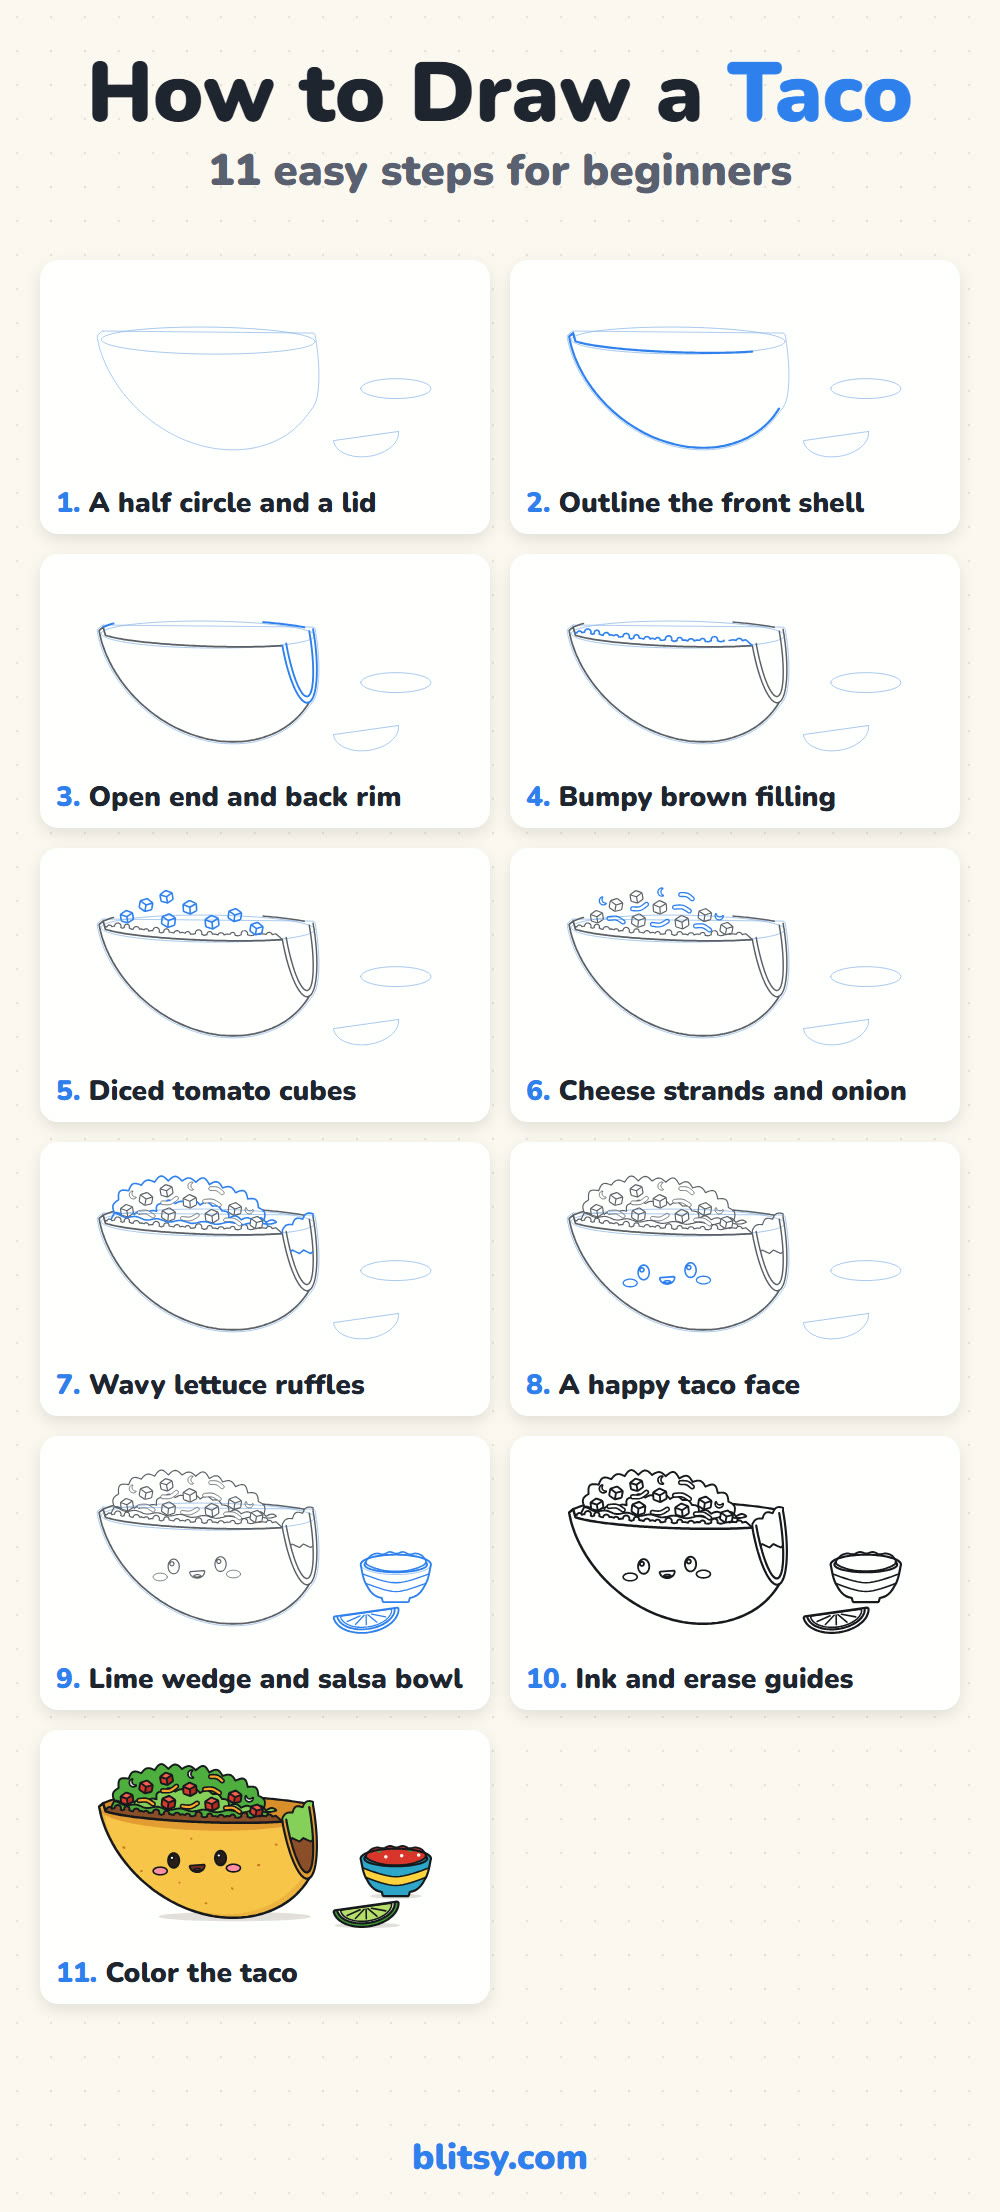
Each taco picture marks that step's lines in blue, while gray lines are the ones already on your paper. Pale blue shapes are only helpers, so sketch them very lightly. They disappear in step 10.
Quick overview
⏱️ Time: about 30 minutes with coloring
🎯 Level: easy to medium, good for ages 7 and up
✏️ Steps: 11
🌮 You'll draw: a kawaii hard-shell taco with a lime wedge and a bowl of salsa
Taco Night Art Supplies
- A pencil you can press softly
- An eraser that won't smudge
- A black fineliner or felt-tip pen for inking
- Colored pencils or markers in yellow, orange, two greens, red, brown and blue
- A sheet of plain paper turned sideways
- A brown pencil for the toasted speckles (optional)
Two greens make the lettuce look layered, but one green is perfectly fine if that's all you have.
How to Draw a Taco Step by Step
Step 1: Sketch a half moon and a lid
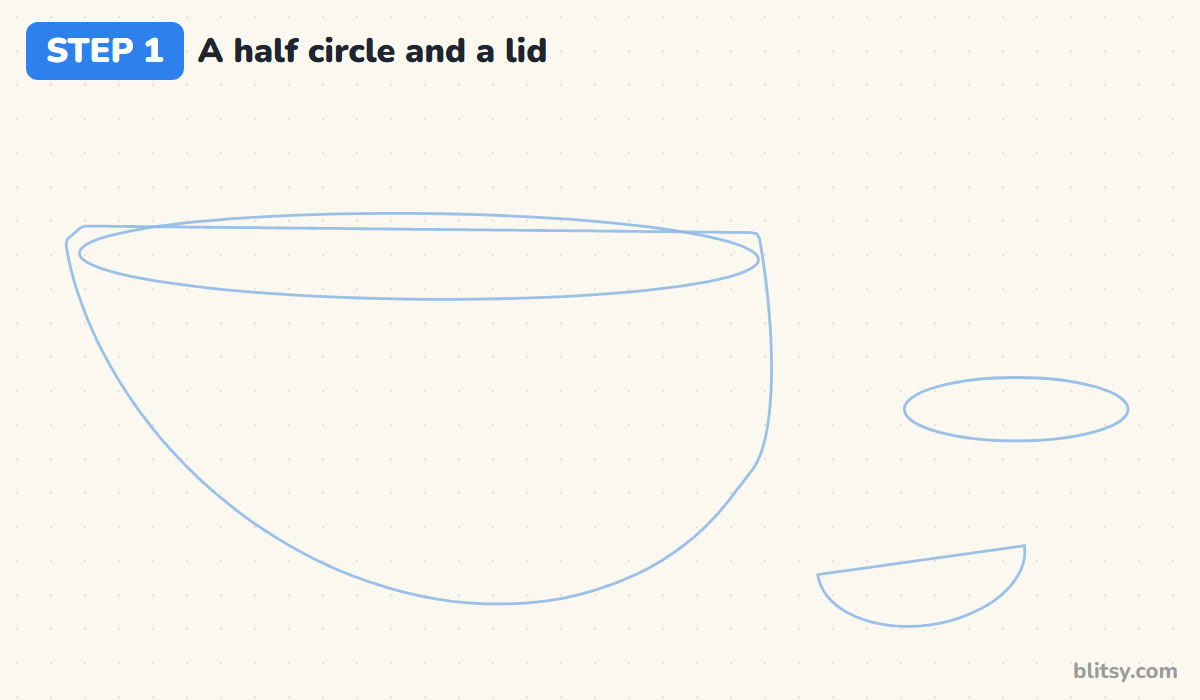
Lightly draw a big half circle with its flat side on top, a little left of the middle of your page. Lay a long, flat oval over that flat side so it pokes out a bit at both ends: that's the opening of the taco. On the right, add a small oval for the salsa bowl and a half circle below it for the lime. I keep these shapes faint, since they only mark where things go.
💡 Tip: Make the half moon about twice as wide as it is tall. Any rounder and it starts to look like a bowl.
Step 2: Outline the front of the shell
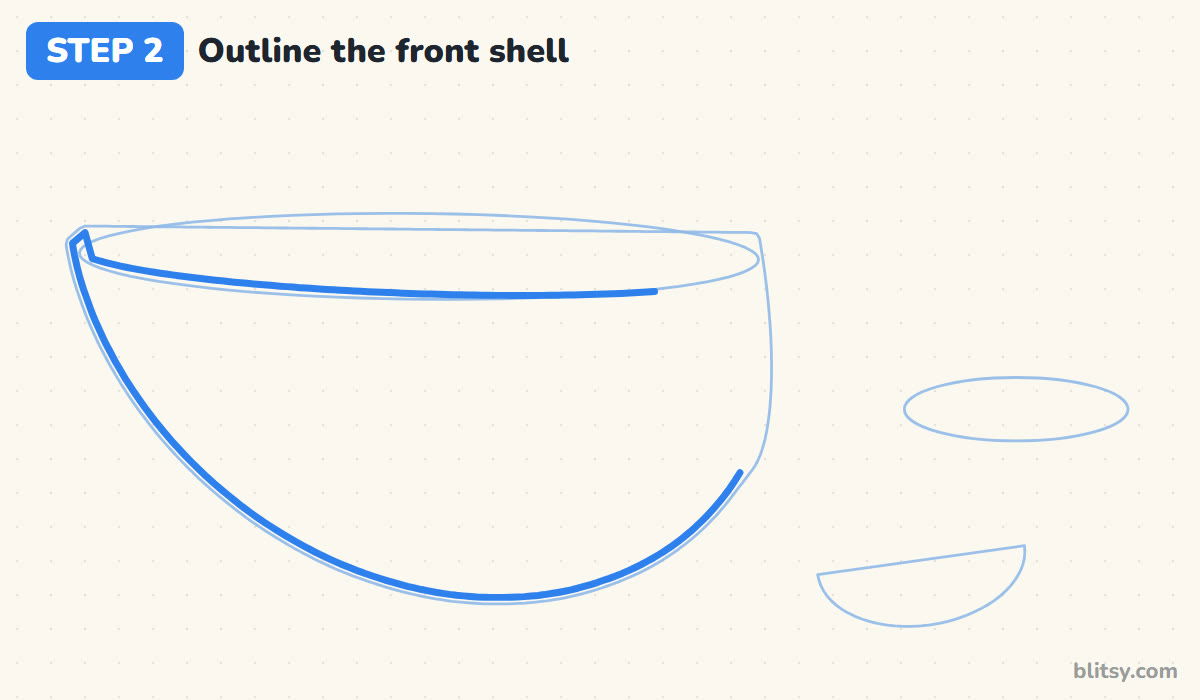
Trace the front edge of the shell along the lower side of the oval, letting it sag just slightly in the middle. Then follow the guide down and around the curved bottom, but stop before you reach the right end. I never skip that small sag: it shows you're looking down at the taco a little, so the shell reads as round.
💡 Tip: Draw the long bottom curve in one smooth sweep, turning the paper if your hand runs out of room.
Step 3: Show the open end and the back rim
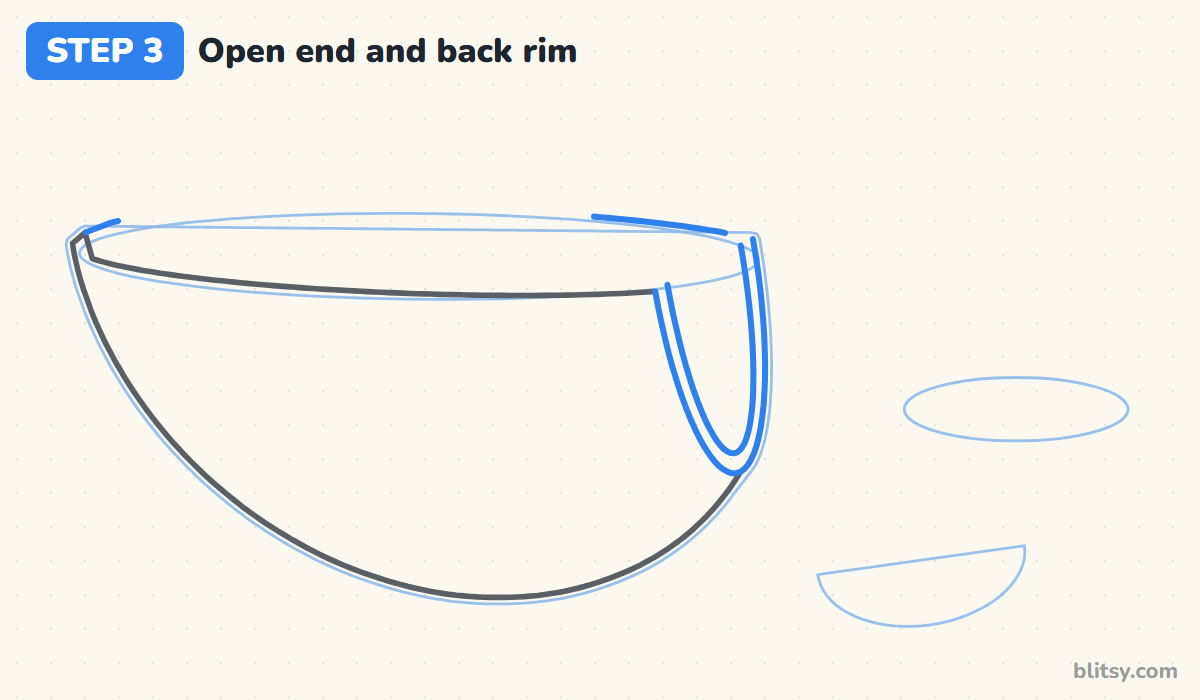
At the right end, draw a narrow U that hangs down from the front edge, then a second U just inside it. The space between the two lines is the thickness of the crunchy shell. Next, draw short pieces of the back rim along the top of the oval: one at the far left tip and a longer one on the right. Leave the middle empty, because lettuce will cover it later.




💡 Tip: Keep both U lines the same distance apart all the way around, about the width of a pencil tip.
Step 4: Add the bumpy brown filling
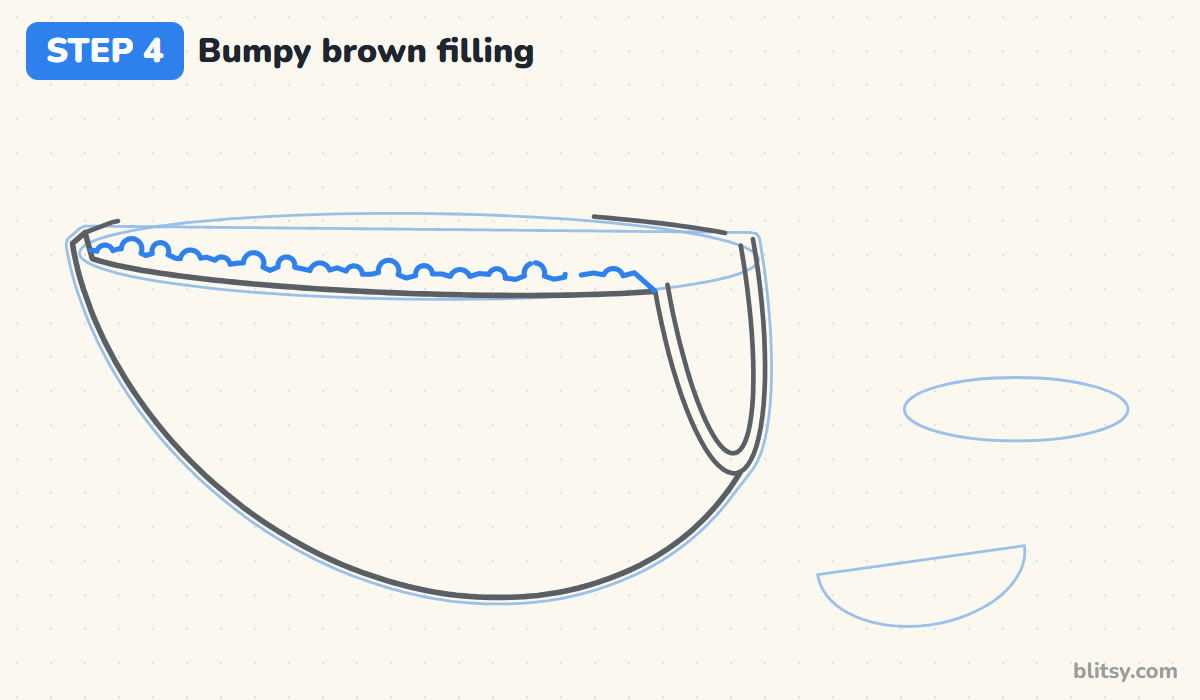
Just above the front edge, draw a row of small, tight bumps from the left tip almost to the open end. This is the seasoned filling peeking out under everything else. I often see bumps drawn too big, and then the filling turns into a cloud. Small, uneven crumbs look like real seasoned meat.
💡 Tip: Vary the bump sizes a little. A perfectly even row looks like a lace border.
Step 5: Place the tomato cubes
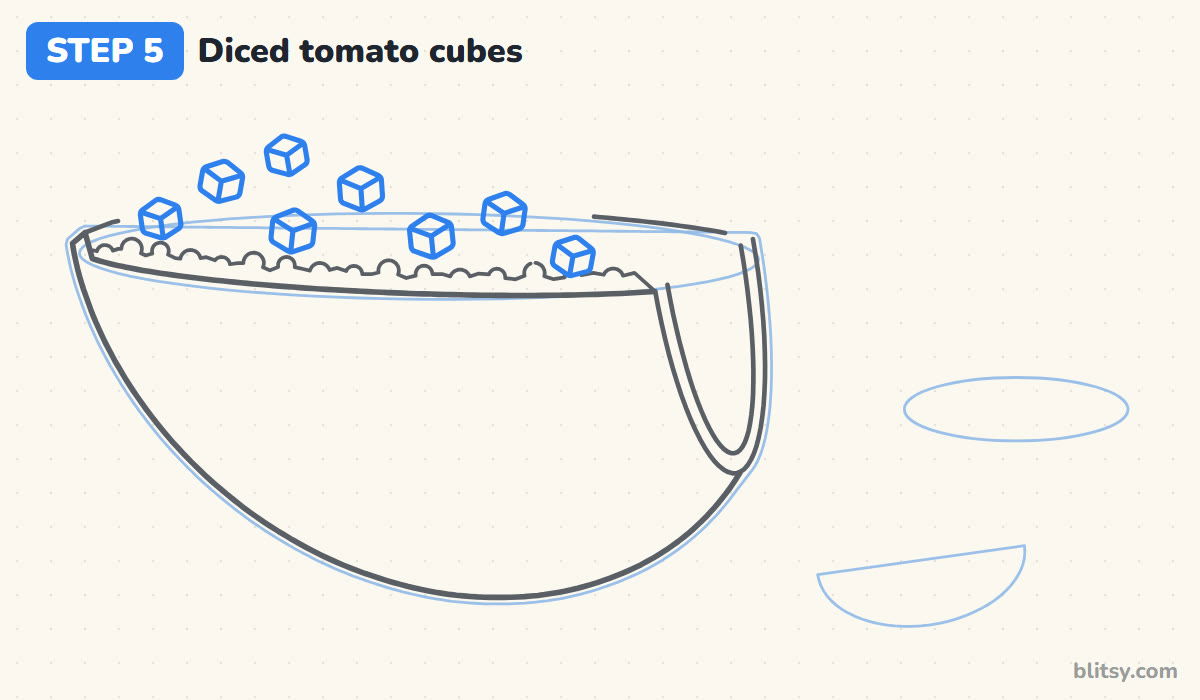
Above the filling, draw seven or eight little cubes scattered in two loose rows, with one more cube near the top. Each cube is a rounded six-sided shape with a Y inside it, which splits it into a top face and two side faces. They will look like they're floating for now. That's on purpose: drawing the front toppings first means the lettuce can wrap around them without any erasing.
💡 Tip: Tilt a few cubes left and a few right so they don't look stamped on.
Step 6: Sprinkle cheese strands and onion bits
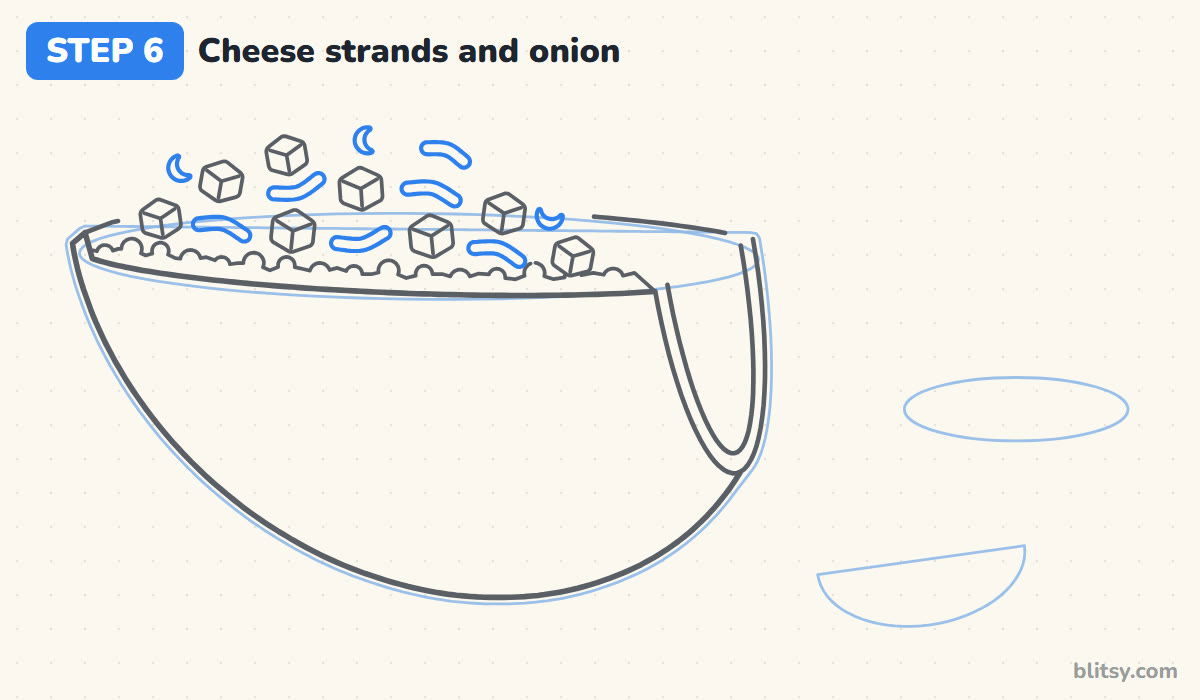
In the gaps between the tomatoes, draw short curved strips for shredded cheese, each about as long as two cubes are wide. Give every strip rounded ends and a gentle bend. Then add a couple of tiny crescent shapes for chopped onion. I leave a little space around every piece so the lettuce shows through.
💡 Tip: Point the cheese strips in different directions. Parallel strips look like a fence.
Step 7: Wrap the lettuce around everything
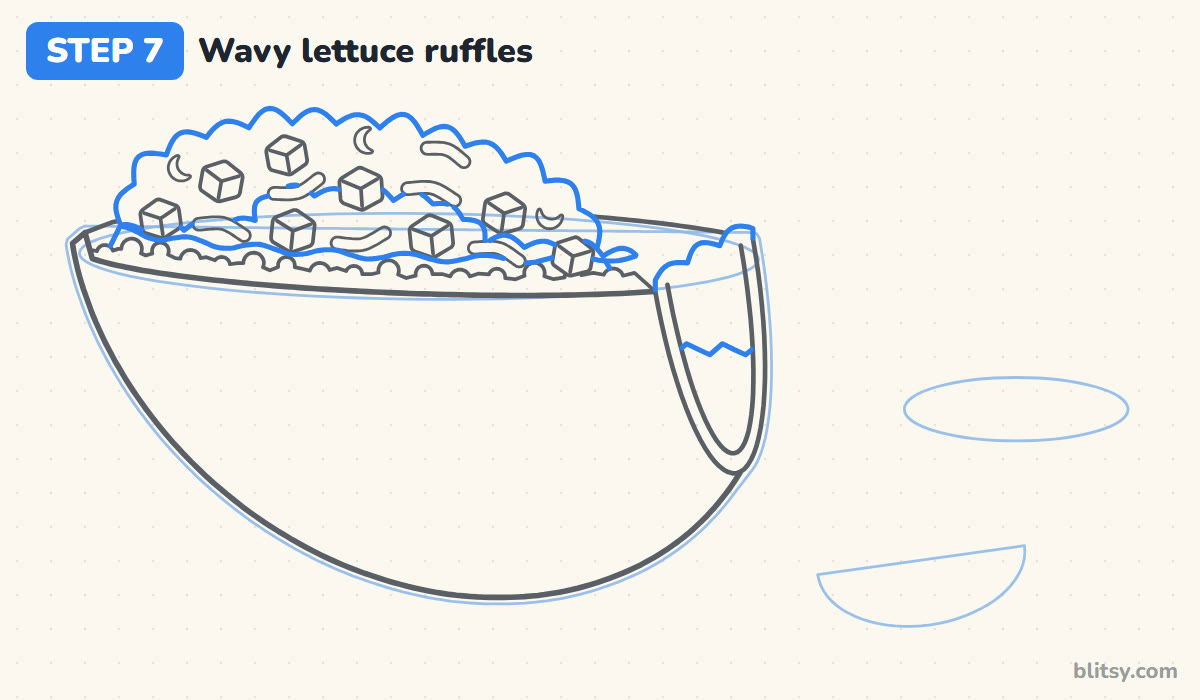
Draw a low, wavy band of lettuce that starts just above the brown filling and weaves between the toppings. Behind it, draw a taller mound of ruffles that rises above the back rim in the middle. Each ruffle is a soft bump, so think of a row of scallops rather than zigzags. Add a few ruffles inside the open end, with a wavy line under them.




💡 Tip: Stop each lettuce line where it meets a tomato or cheese strip, then pick it up again on the other side.
Step 8: Give the taco a happy face
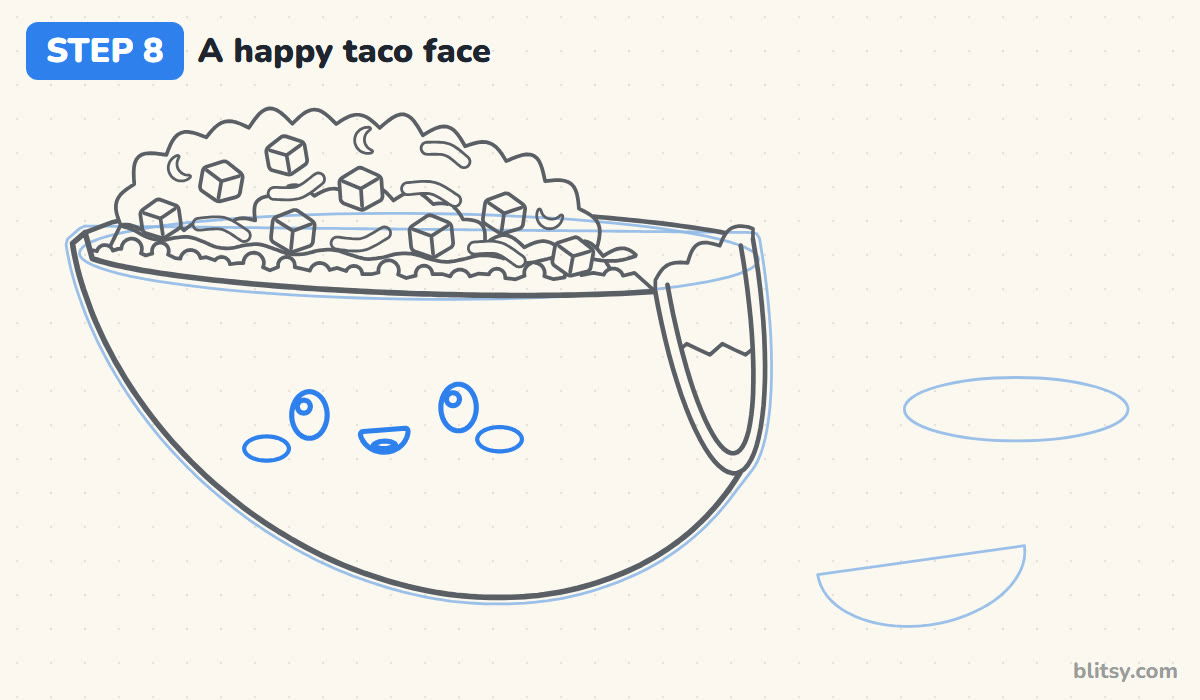
On the shell, a little below the middle, draw two tall oval eyes with a small circle in each for the sparkle. Between them and slightly lower, add a tiny open smile with a tongue. Then place a flat oval cheek under each eye, toward the outside. I keep the eyes fairly close together, since wide eyes on a long shape make the face look surprised.
💡 Tip: Put both sparkles on the same side of the eyes so the light seems to come from one place.
Step 9: Draw the lime wedge and salsa bowl
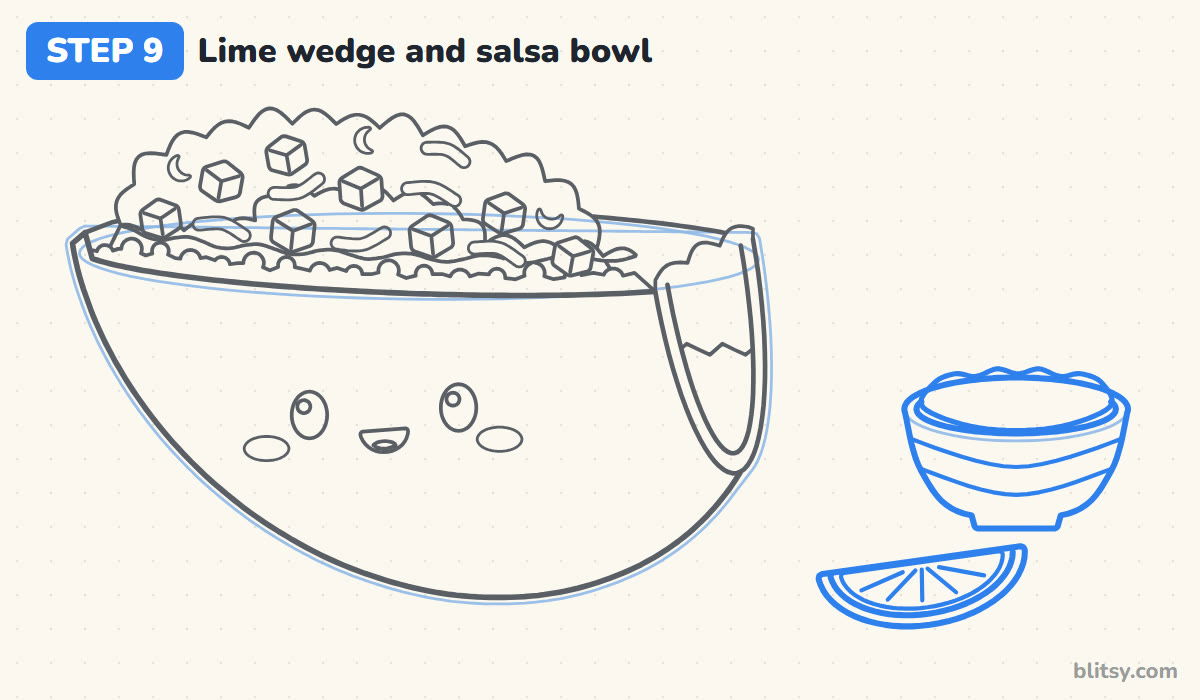
Over the half circle guide, draw the lime wedge with a rounded rind, a thin pale line inside it, and the juicy part with five short lines fanning out like spokes. Above it, turn the small oval into a bowl: a rim, a rounded body, a flat foot and two curved stripes. Fill the top with a lumpy line for the salsa.
💡 Tip: Leave a clear gap between the taco and the bowl so the three objects don't merge.
Step 10: Ink the keeper lines and erase guides
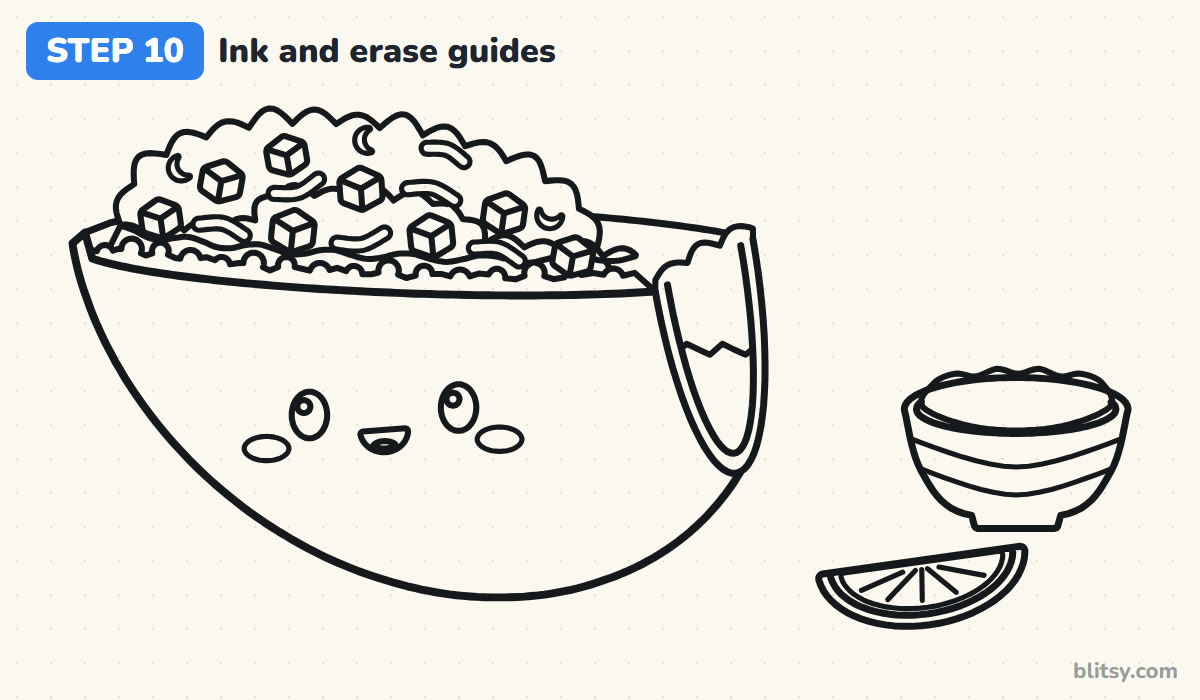
Go over every line you want to keep with the black pen: shell, open end, filling, toppings, lettuce, face, lime and bowl. Give the ink a minute to dry. Then erase the half moon, the oval and the other light helpers. Take your time on the long shell curve.
💡 Tip: Ink the small toppings with lighter pressure than the shell outline, which keeps the big shape strong.
Step 11: Color your taco
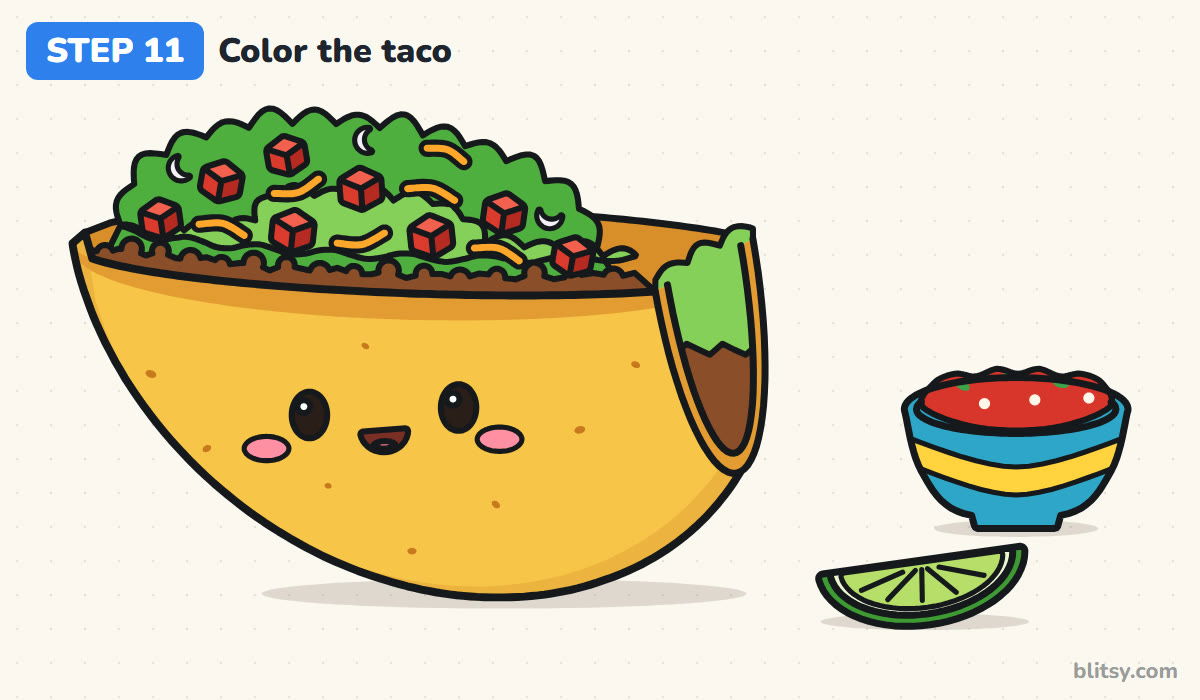
Color the shell golden yellow and run orange along the top edge and the open end to show where it toasted. The inside of the back rim gets a slightly darker orange. Use a bright green for the tall lettuce and a lighter green for the front ruffles. Then make the filling brown, the tomatoes red with one darker side, the cheese yellow orange, the bowl blue and the lime green. Finish with pink cheeks and a few brown speckles on the shell.




💡 Tip: Color the big light areas first and the small dark details last, so nothing gets smeared.
Where Taco Drawings Tend to Wobble
- A shell that looks like a bowl. If the half moon is too round, it reads as soup. Stretch it wide and let the left end come to a narrow tip.
- Lettuce drawn as zigzags. Sharp points turn lettuce into grass. Use soft, rounded ruffles instead.
- Toppings stacked on top of each other. Overlapping cubes and strips turn into a tangle once inked. Leave a little gap around every piece.
- Forgetting the shell thickness. A single line at the open end makes the shell look paper thin. Two lines with a narrow gap give it that crunchy look.
- The face jammed under the rim. Features squeezed near the top fight with the fillings. Keep the face in the lower middle of the shell.
Fill Your Taco Your Own Way
Once the shell feels easy, change what's inside. Swap the tomatoes for sliced black olives, add a white swirl of sour cream on top, or draw a few green jalapeño rings for a spicy version. If you want another food to practice next, try this pizza drawing tutorial, or keep the Mexican theme going with how to draw an avocado step by step.
Printable Taco Coloring Page and Step Guide
Want a screen-free taco break? The taco coloring page has a small colored example and a color key at the top, with a big bold outline of the taco, the lime and the salsa bowl underneath. The step-by-step guide PDF holds all 11 steps with their tips, so you can draw at the kitchen table. Both print on Letter or A4 paper.
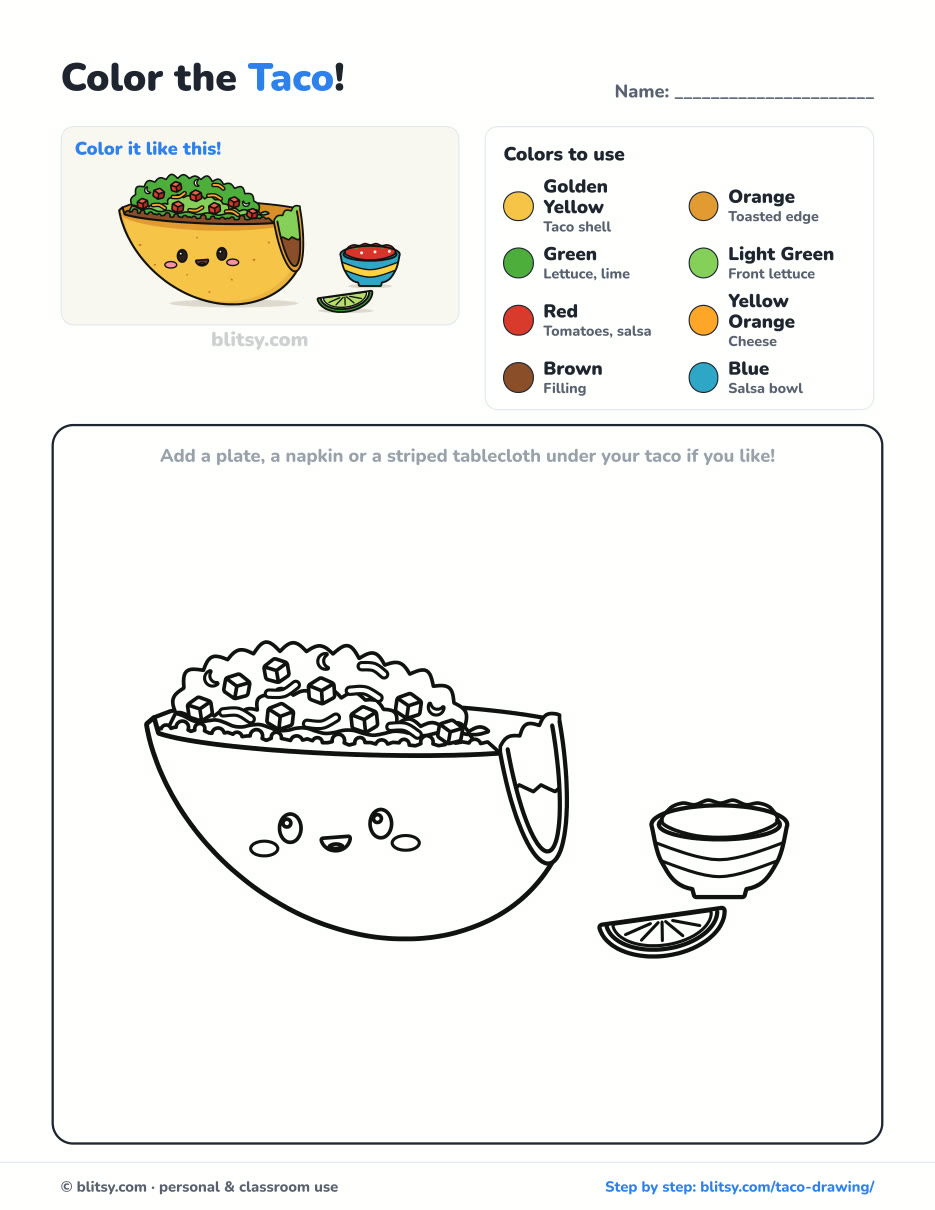
Black outlines with a colored example and the color names at the top. Ready to print and color.
⬇️ Download Coloring PageEvery step picture with its instructions and tips, to keep beside your paper while you draw.
⬇️ Download Drawing Guide📱 On a phone? Tap a download button, then open the file and choose Share → Save to Files or Print. On a computer, the PDF opens or saves straight to your Downloads folder.
Keep the Taco Steps on Pinterest
Taco Drawing Questions, Answered
What is the easiest way to draw a taco?
Draw a wide half circle with the flat side up, then add a wavy line of lettuce along the top. A few red squares and yellow strips turn it into a taco in minutes.
Where do tacos come from?
Tacos come from Mexico, where they're traditionally made with soft corn tortillas. The crunchy U-shaped hard shell drawn here is especially popular in the United States.
How long does it take to draw this taco?
Around 30 minutes with coloring. Leave out the lime and the salsa bowl and you can finish in about 20.
Can young kids draw this taco?
Yes. Children around 7 can follow every step, and younger kids can skip the open end and draw fewer toppings.
Draw a whole row of tacos with different toppings and see which one your family would order first. 🌮
Related posts:
 How to Draw a Cupcake Step by Step (Easy Kawaii Cupcake)
 How to Draw a Whale Step by Step (Easy for Beginners)
 How to Draw Lungs Step by Step (Easy Science Diagram)
 How to Draw a Pineapple Step by Step (Easy Crown and Slice)
 How to Draw Iron Man Step by Step (Easy Chibi for Kids)
 How to Draw a Dress Step by Step (Easy Party Dress)
 How to Draw a Chicken Step by Step (Easy for Beginners)
 How to Draw a UFO Step by Step (Cute Alien Saucer)
 How to Draw Flames Step by Step (Easy Campfire Drawing)
 How to Draw a Moon Step by Step (Sleepy Crescent + Phases)
 How to Draw a Sunflower Step by Step (Big and Bright)
 How to Draw a Fall Leaf Step by Step (Maple, Oak and Birch)

