
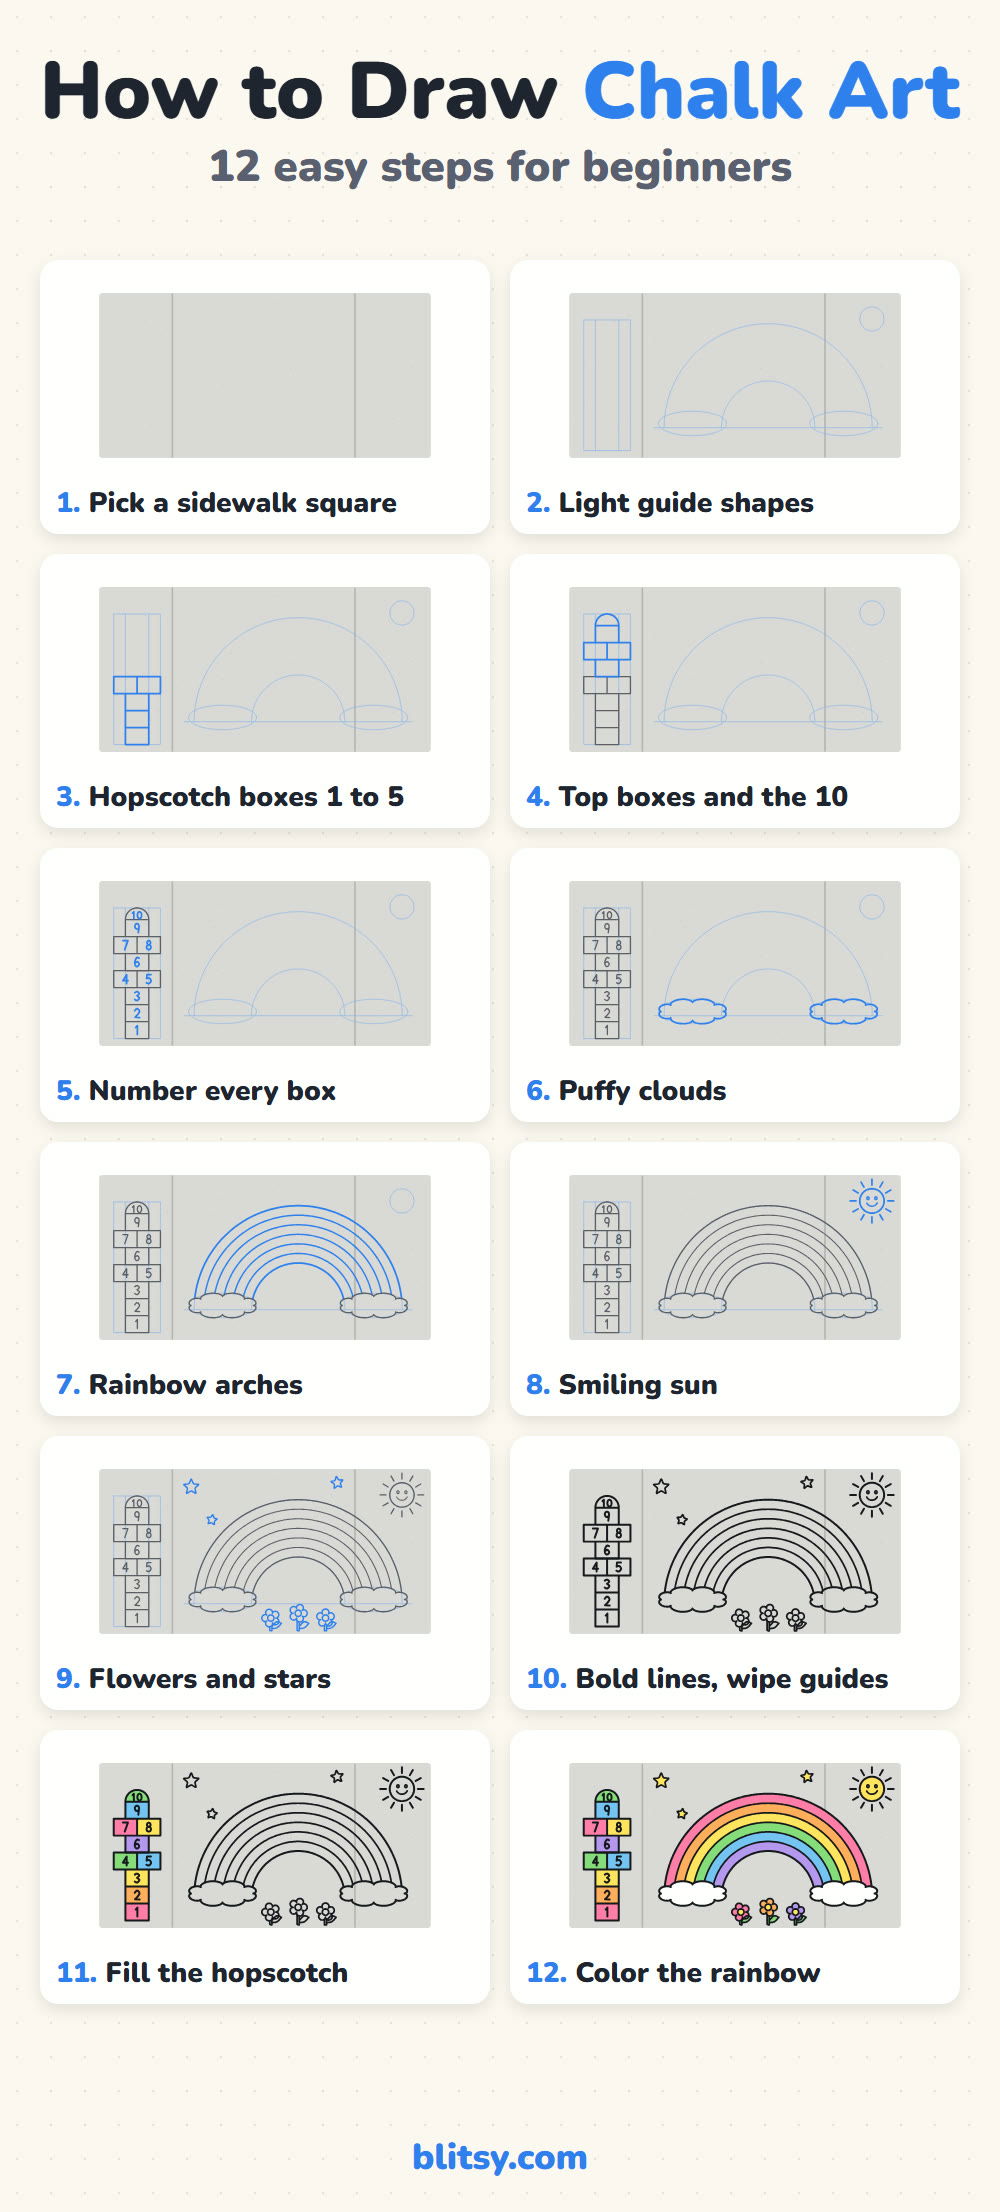
A box of sidewalk chalk and a sunny afternoon can turn a plain gray square of concrete into a playground. Here you'll learn how to do chalk art step by step with the scene I come back to most often: a numbered hopscotch grid next to a big rainbow. Kids can play on the hopscotch the minute it's done, and the rainbow teaches the main chalk skills, from filling with the side of the stick to blending with a fingertip.
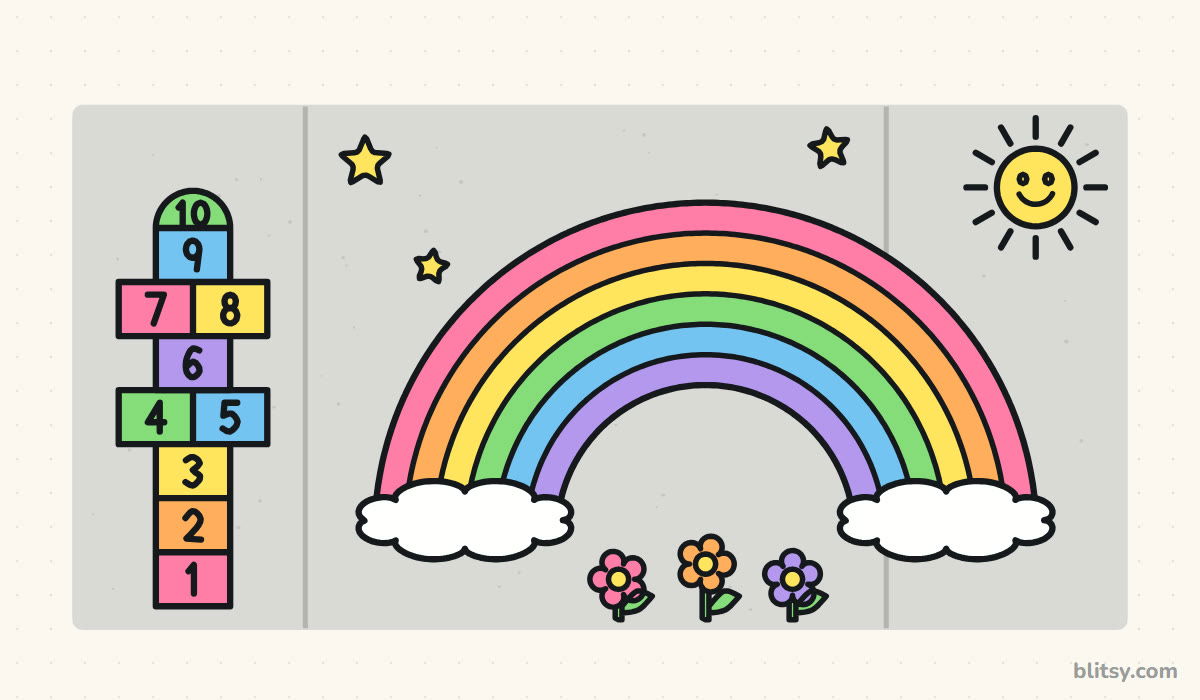
Each picture shows a patch of sidewalk. Anything new in a step is blue, and everything you've already drawn turns gray. The pale blue lines are light sketch marks made with a soft chalk; they get covered or wiped away later, so don't press on them.
Quick overview
⏱️ Time: about 45 to 75 minutes, depending on how big you go
🎯 Level: beginner, great for kids 5 and up with an adult nearby
✏️ Steps: 12
🌈 You'll draw: a hopscotch grid, a rainbow with clouds, a sun, flowers and stars
Chalk Box Basics for a Sidewalk Scene
- Thick sidewalk chalk in bright colors (the chunky kind, not thin chalkboard sticks)
- A white or pale yellow piece for light sketch lines
- A darker chalk, like purple or dark blue, for bold outlines
- A cup of water and an old paintbrush for wet chalk
- A damp sponge or old rag for blending and wiping
- A kneeling pad or folded towel for your knees
- A clear patch of pavement an adult has said is OK
Any brand of sidewalk chalk works; cheaper sets just need a little more pressure to look bright.
How to Do Chalk Art Step by Step
Step 1: Choose a safe, shady square
Before any chalk comes out, ask an adult where you're allowed to draw. A driveway, patio or quiet path at home is ideal; streets and spots where cars back out are not. I also look for shade, because hot concrete burns knees and dries wet chalk before you can blend it. Sweep away grit first.
💡 Tip: The lines between sidewalk slabs make handy borders. Fit each part of the scene inside one slab.
Step 2: Sketch light guide shapes
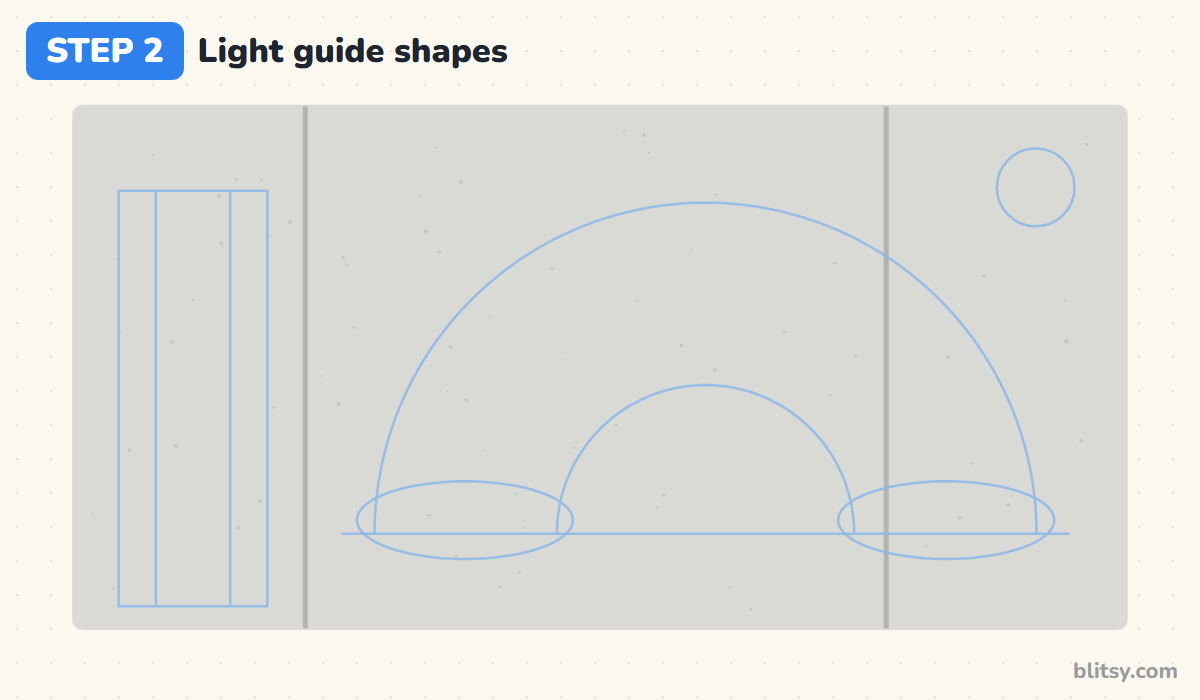
With white or pale yellow chalk and very light pressure, mark a tall rectangle on the left for the hopscotch. Add two half circles for the rainbow on one flat line, a circle in the corner for the sun and two flat ovals where the rainbow ends. Light chalk vanishes under the colors later, so mistakes cost nothing.
💡 Tip: Stand up and look at your sketch from a few steps away. Sizes on the ground are hard to judge from your knees.
Step 3: Outline hopscotch boxes 1 to 5
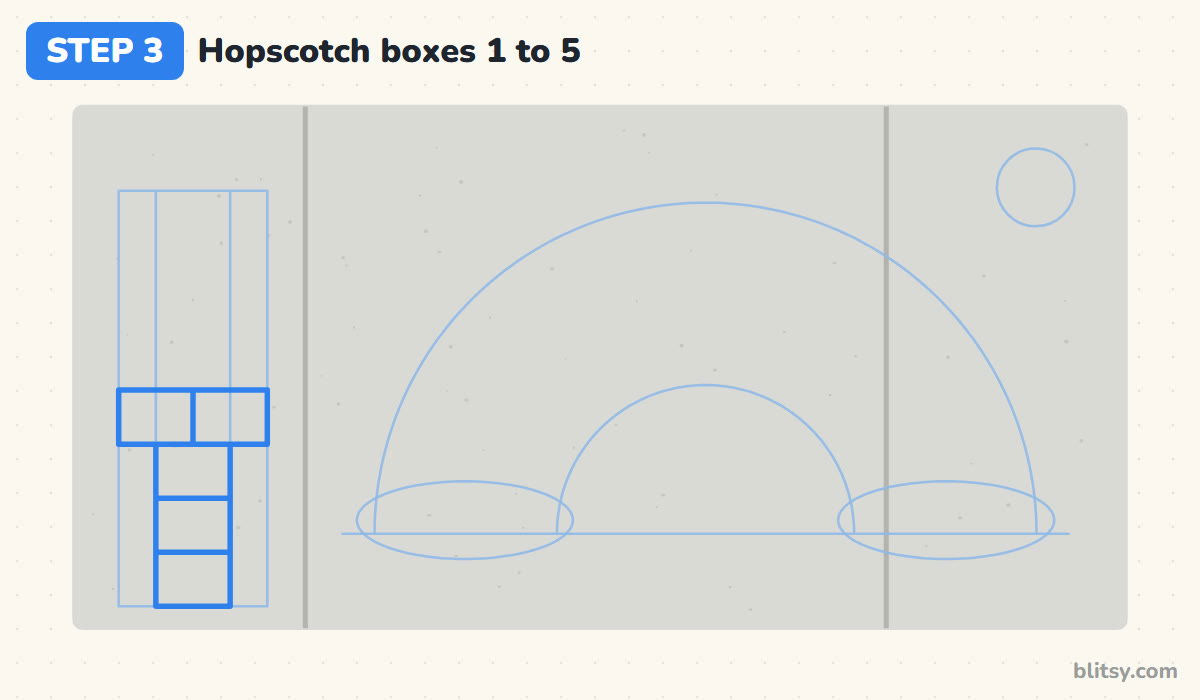
Start at the bottom with three single boxes stacked up, then two side by side for 4 and 5. Real boxes need room for a child's foot, so about a foot and a half across works well. Press firmly and keep the lines straight; a wobbly edge makes it hard to tell who stepped on the line.




💡 Tip: Use a jump rope or a long stick as a ruler and run the chalk along it.
Step 4: Add the top boxes and the 10
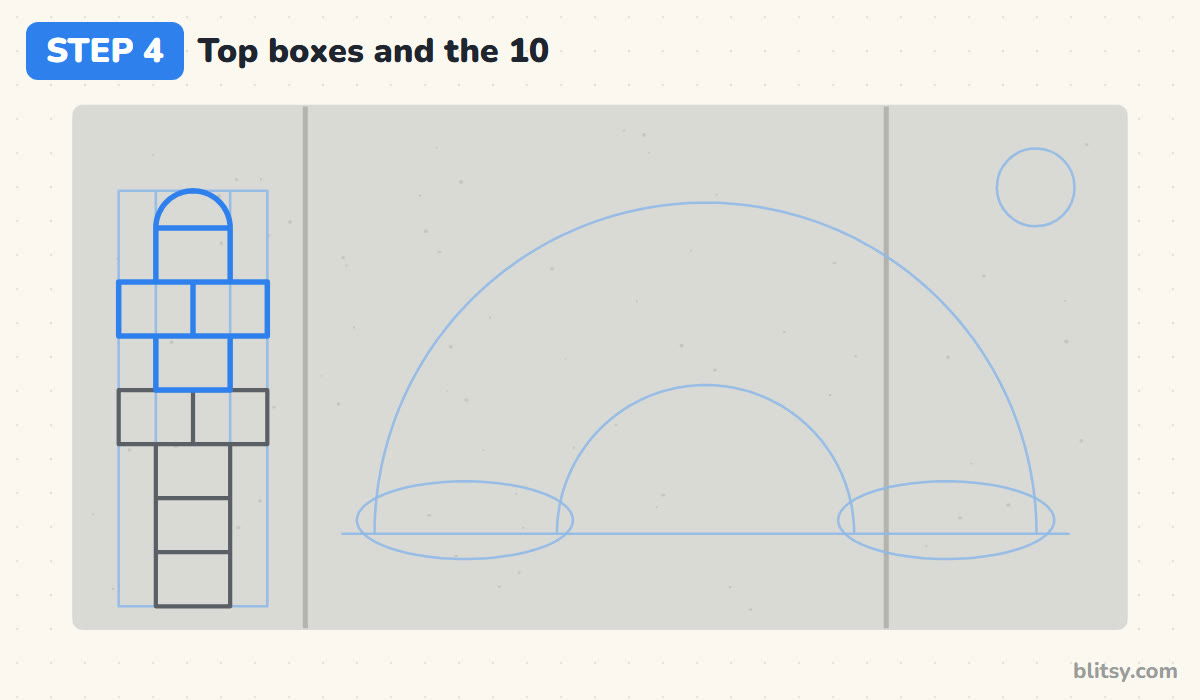
Above the pair, draw a single box for 6, a pair for 7 and 8, and a single box for 9. Cap it with a half circle for 10, often called home, where players turn around. Most beginners let the top boxes shrink, which makes the last jumps cramped, so match the size of the ones below.
💡 Tip: Count the boxes out loud as you draw. It's easy to skip a pair when you're kneeling.
Step 5: Number every box
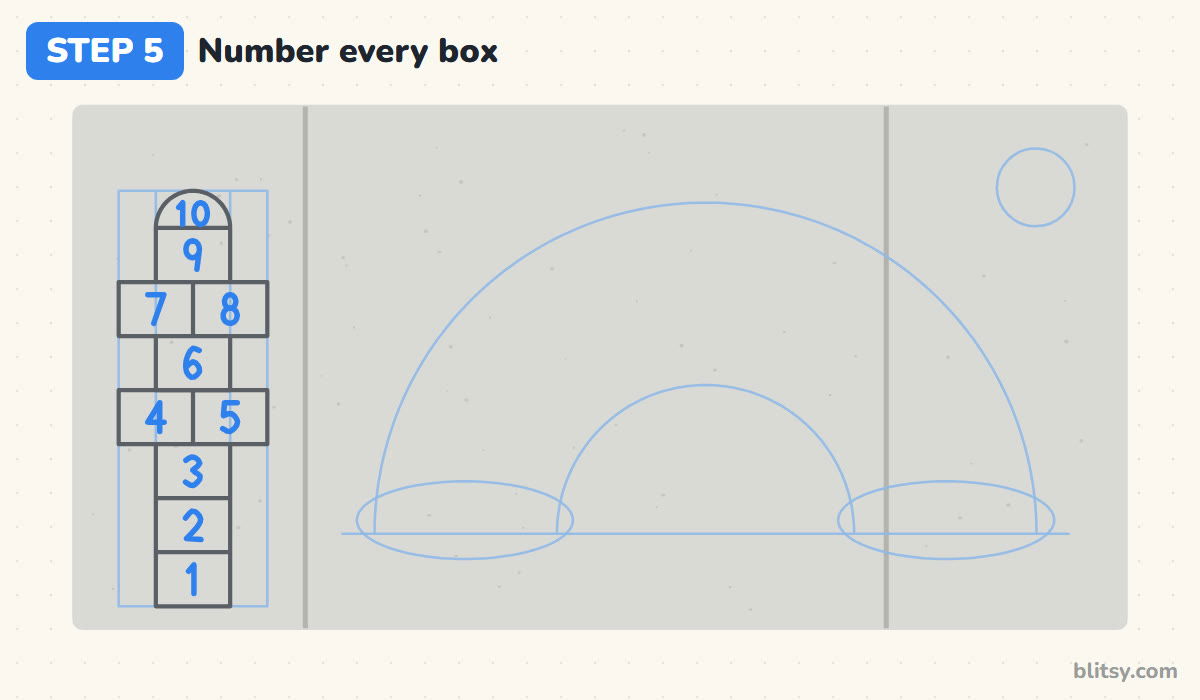
Write 1 to 10 in the middle of each box, starting at the bottom. Make the numbers big and simple so they read from standing height. Leave a small gap between each number and the box lines, because numbers touching the edges blur once the boxes are colored.
💡 Tip: Kids learning their numbers can trace over yours with a second chalk color.
Step 6: Draw two puffy clouds
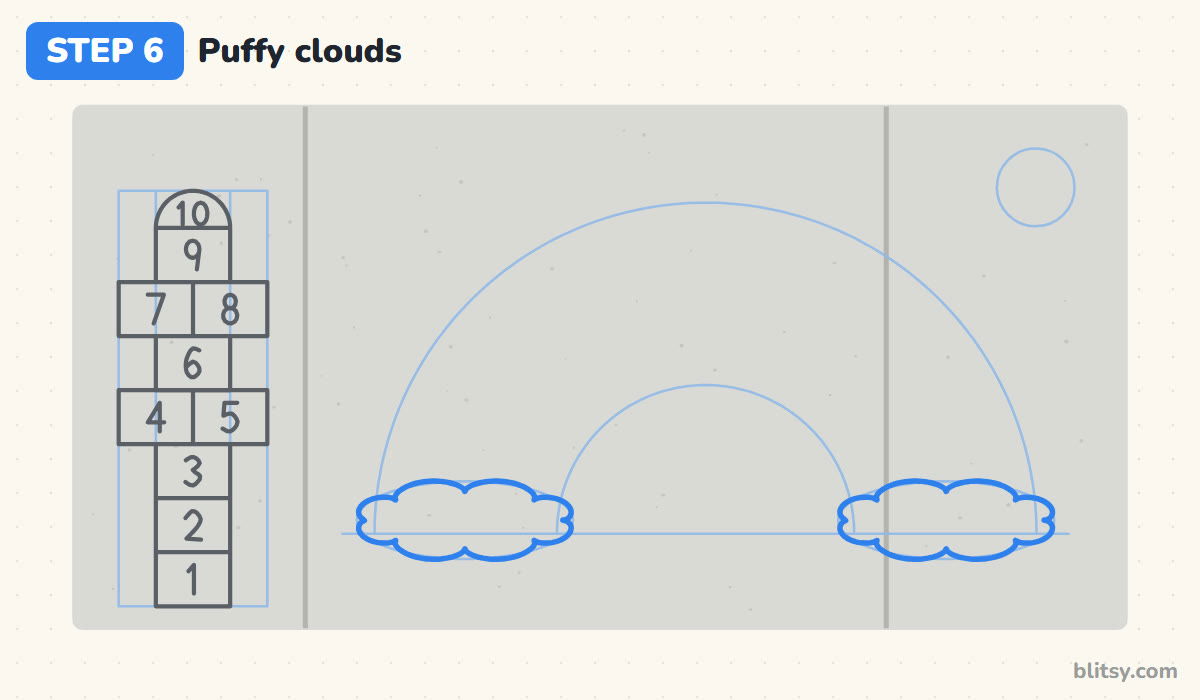
Go over the oval guides with a bumpy line, like joined half circles. The clouds sit in front of the rainbow, so I draw them first. That way you know exactly where each rainbow line stops, and you won't scrub out arcs that run behind them.
💡 Tip: Odd numbers of bumps look more natural. Six identical bumps start to look like a caterpillar.
Step 7: Draw the rainbow arches
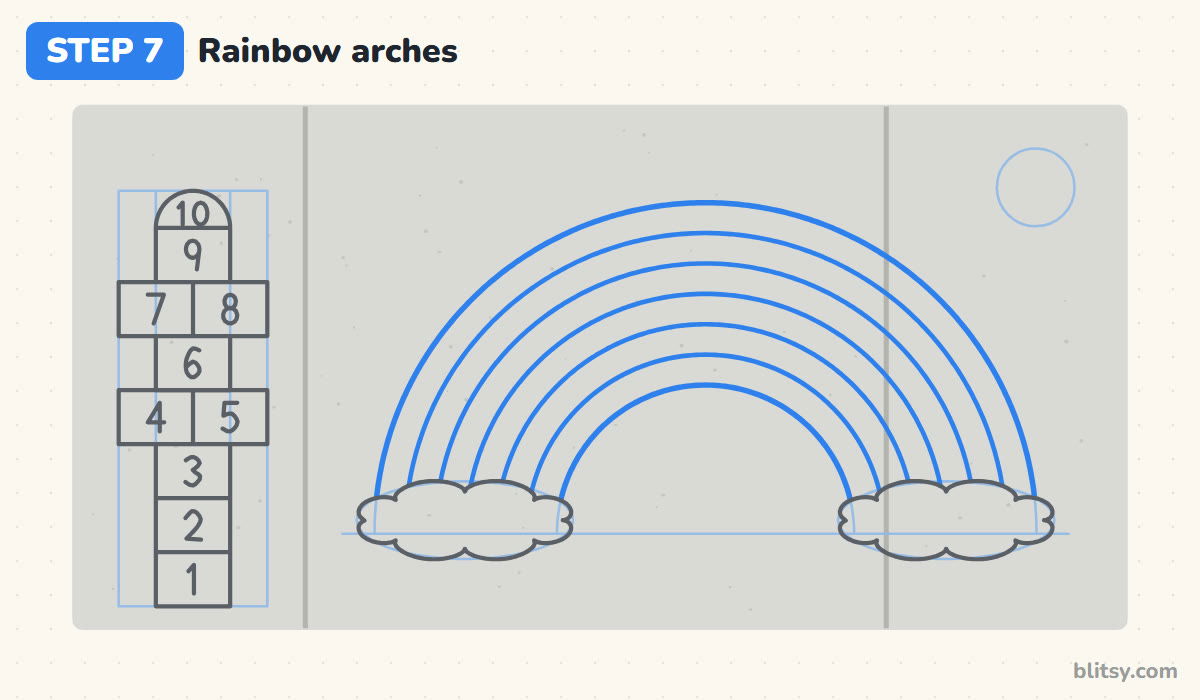
Follow the big guide with your first arch, stopping at each cloud. Fit five more inside it, evenly spaced, until the last lands on the small guide, giving six bands. I sweep each arch with my whole arm in one slow motion, because short choppy strokes leave a bumpy curve.




💡 Tip: Mark the spacing with small dots on both ends before you draw. Even bands look far tidier.
Step 8: Add a smiling sun
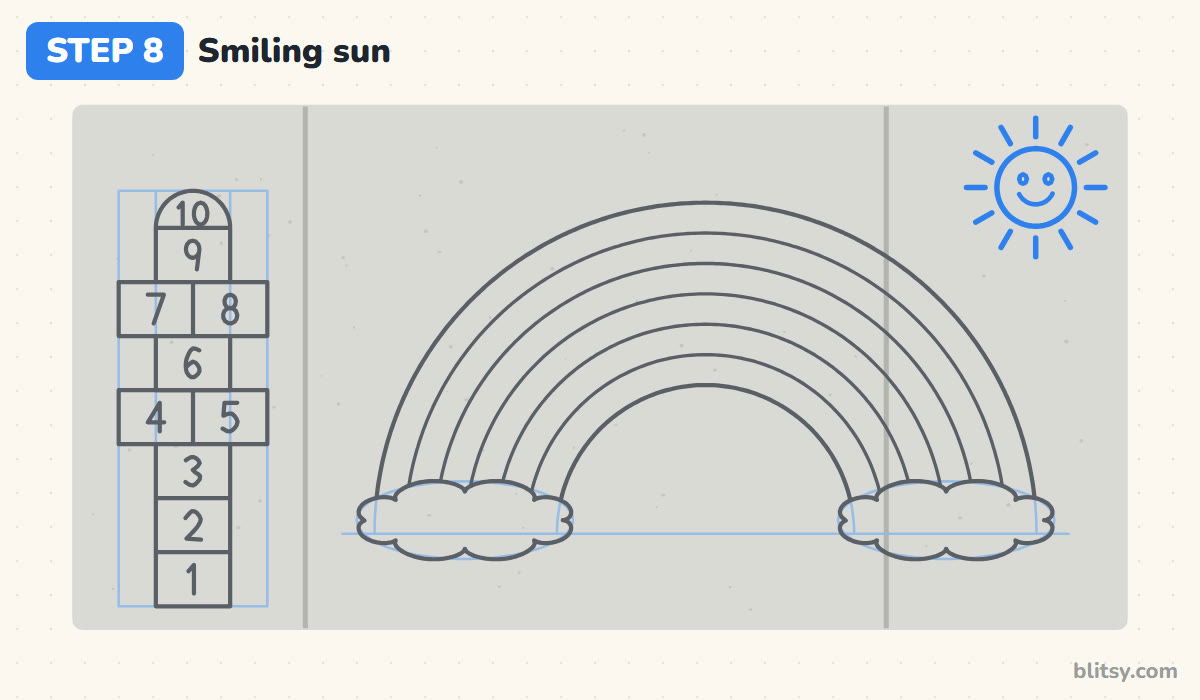
Trace the sun circle, then draw short rays all around it with a small gap before each ray. Add two oval eyes and a wide smile. Keep the face small and high; a mouth that reaches the edge makes the sun look like it's shouting.
💡 Tip: Draw the four main rays first, up, down, left and right, then fill in between them.
Step 9: Add flowers and a few stars
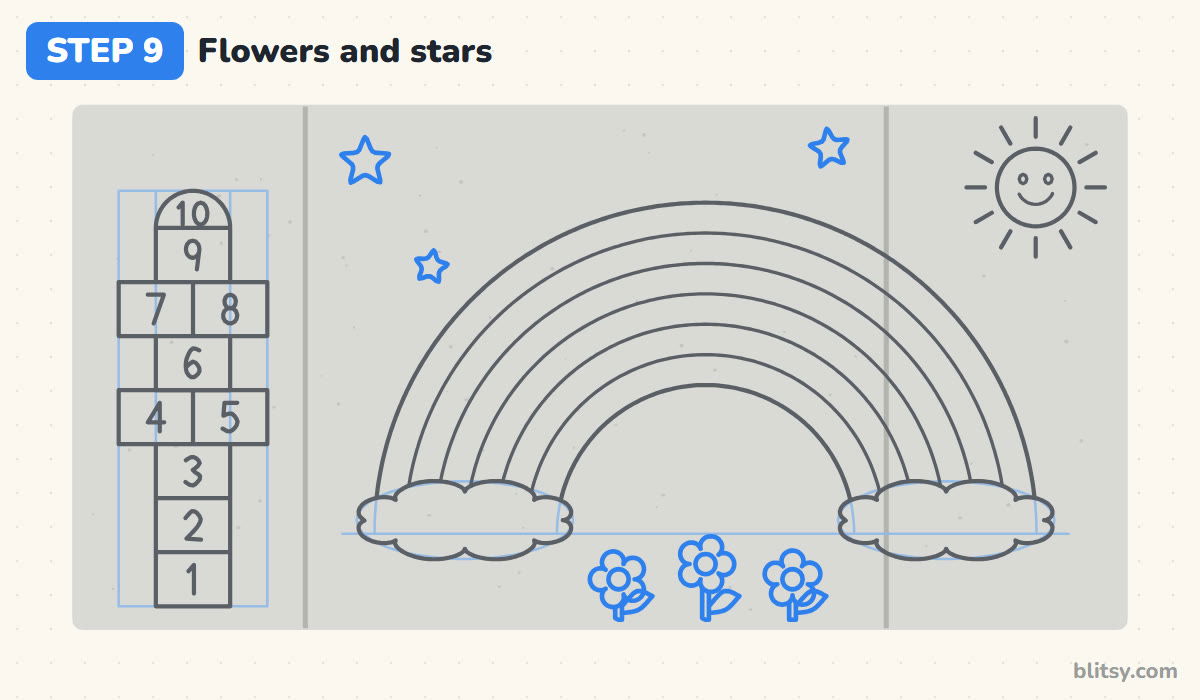
Under the rainbow, draw three small flowers, each a wavy five-petal shape around a round center, on a short stem with one leaf. Sprinkle three stars of different sizes in the empty pavement above. These extras fill the bare gray gaps so the scene feels finished.
💡 Tip: Draw stars as one continuous line without lifting the chalk, then round off the points with your finger.
Step 10: Go bold and wipe the guides
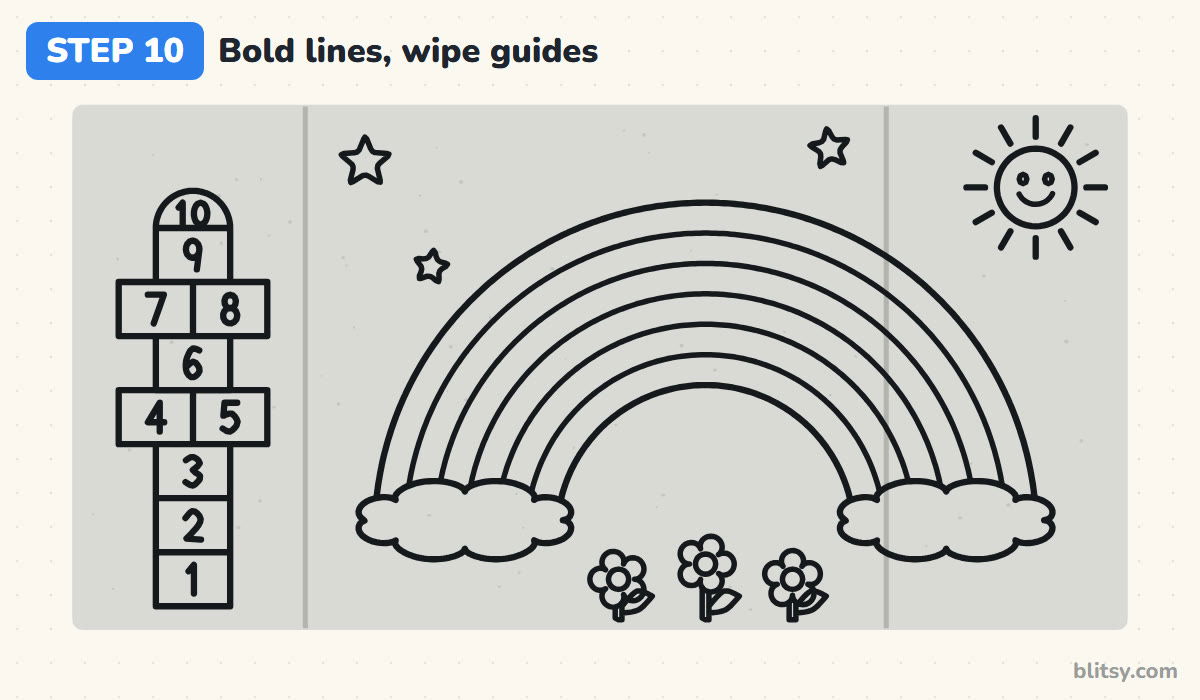
Trace every keeper line with a dark chalk, pressing hard so the outline stays crisp under the color. The pictures use black for clarity, but on pavement I like dark purple or navy. Wipe stray guide marks outside the shapes with a dry rag or a barely damp sponge.
💡 Tip: Dip the outline chalk in water first. A wet tip gives a darker, smoother line that grips rough concrete.
Step 11: Fill the hopscotch boxes
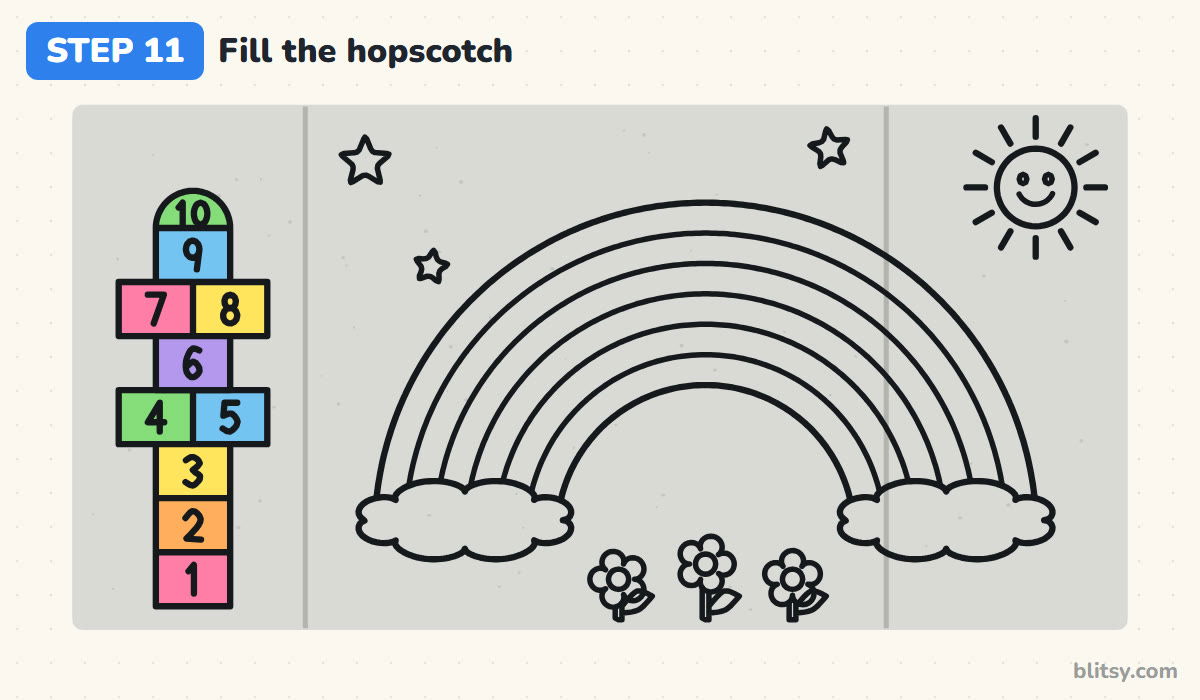
Snap a chalk stick in half, lay it on its side and rub it back and forth inside a box. The flat side covers ground quickly and fills the little holes in the concrete. Give each box its own color and work from the top down, so your knees don't smear finished boxes.




💡 Tip: Go over each box twice in two directions. The second pass fills the speckles the first one skipped.
Step 12: Color the rainbow and the sky
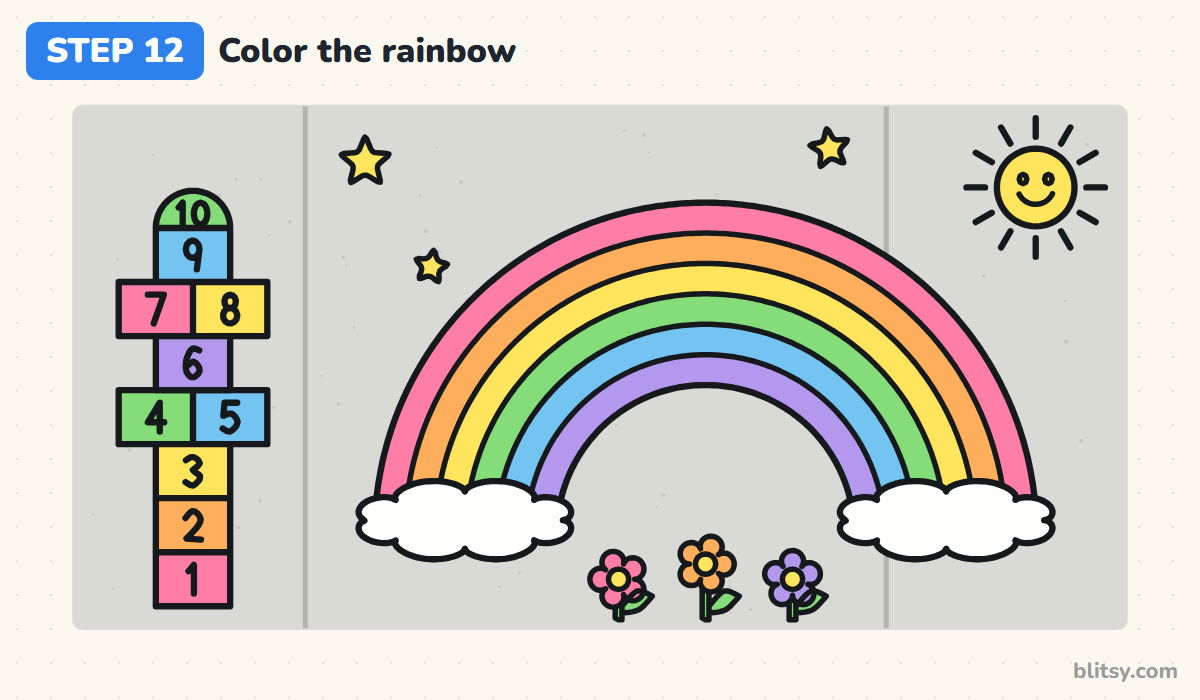
Fill the bands from the outside in: pink, orange, yellow, green, blue, then purple. Where two bands meet, rub the seam with a fingertip, or dab it with a damp sponge for a smoother blend. Color the sun and stars yellow and the clouds white. Brushing water over a dry layer makes the colors pop even more.
💡 Tip: Wipe your blending finger on a rag before each new band, or the purple will sneak into the yellow.
Where Sidewalk Chalk Scenes Go Wrong
- Drawing too small. Tiny drawings get lost on a big sidewalk. Plan the scene to fill at least one whole slab, and stand up often to check it.
- Coloring with the chalk tip. The point wears down fast and leaves streaky lines. Save the tip for outlines and use the long side for filling.
- Starting in the hot sun. Wet chalk dries in seconds and blending gets patchy. Pick a shady spot or wait for late afternoon.
- Kneeling on finished parts. One knee can wipe out a whole box. Plan a path so you finish the far side first and work toward your feet.
- Drawing near traffic. Streets and driveway exits are not safe places to sit. Only draw where an adult has said it's OK, and stay where drivers can see you.
More Pavement Projects After the Hopscotch
Swap the rainbow for a giant butterfly with open wings and a gap in the middle, so a kid can lie between them for a photo. Or turn the hopscotch into a snail shape that spirals inward. To practice the flowers on paper first, try the flower drawing tutorial, and the butterfly drawing tutorial makes a good warm-up for the wings.
Hopscotch and Rainbow Coloring Page for Indoor Days
Rainy day, or want to plan the colors first? Print the chalk art coloring page. The small colored example shows which color goes where, and the big outline below is ready for crayons, markers or even chalk on heavy paper. The step-by-step guide PDF has all 12 steps with tips, two on each page, so you can carry it outside.
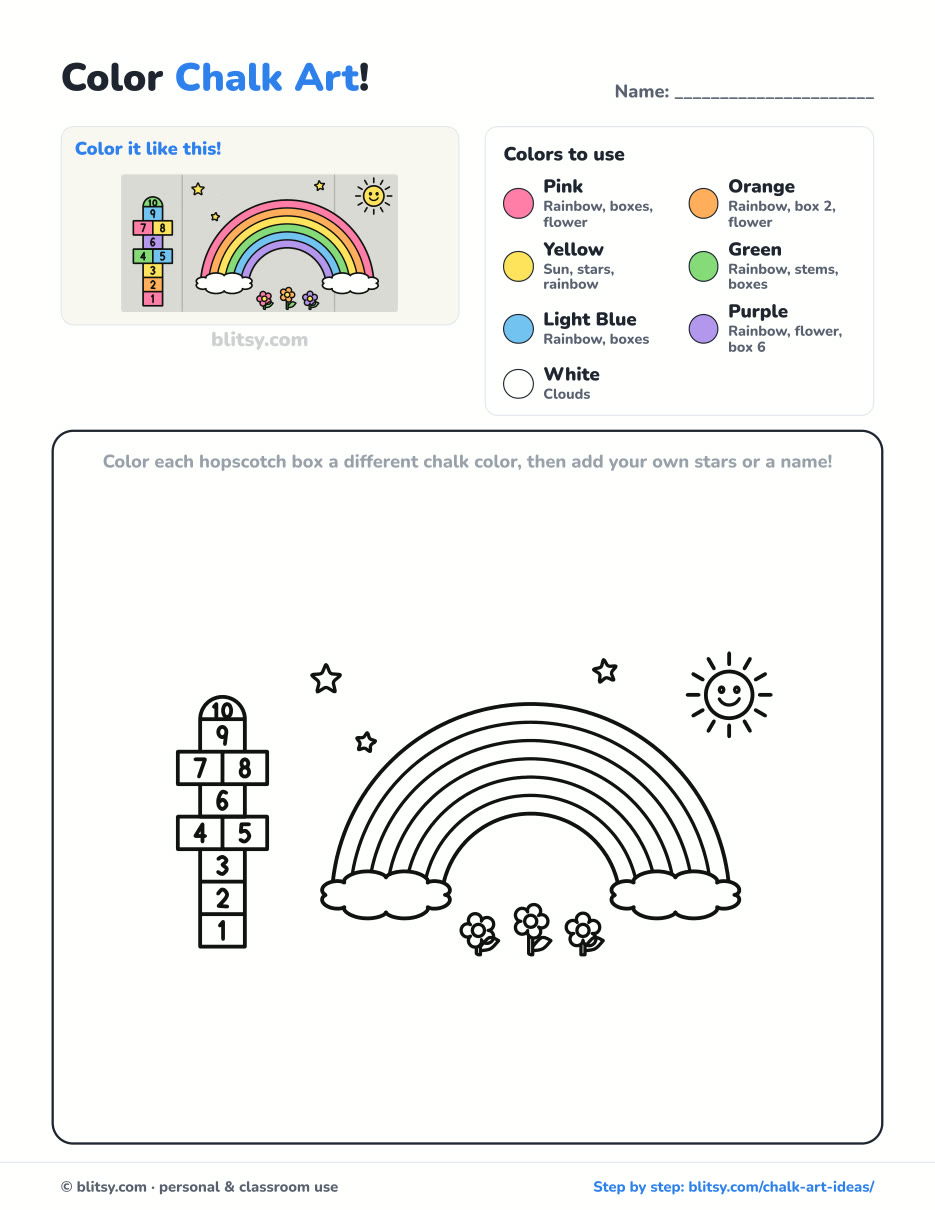
Black outlines with a colored example and the color names at the top. Ready to print and color.
⬇️ Download Coloring PageEvery step picture with its instructions and tips, to keep beside your paper while you draw.
⬇️ Download Drawing Guide📱 On a phone? Tap a download button, then open the file and choose Share → Save to Files or Print. On a computer, the PDF opens or saves straight to your Downloads folder.
A Tall Hopscotch Rainbow Pin for Sunny Days
Sidewalk Chalk Questions Kids and Parents Ask
How do you make sidewalk chalk colors brighter?
Dip the chalk in water before drawing, or brush water over a dry chalk layer. Wet chalk goes on thick and creamy, and it usually dries brighter than dry chalk.
How do you blend sidewalk chalk?
Lay two colors next to each other with the side of the chalk, then rub the seam with a fingertip. A damp sponge dabbed along the line gives a smoother blend on rough concrete.
How big should hopscotch squares be?
Big enough for a child's foot with room to land, about a foot to a foot and a half across. Keep all the boxes the same size so the jumps stay even.
How do you clean up sidewalk chalk?
Rain usually does it for you. To clean sooner, spray the pavement with a hose and scrub with a stiff broom. Chalk on clothes and hands washes out with soap and water.
Once the colors are dry, grab a pebble, toss it on the 1 and take the first hop on your own rainbow sidewalk. 🌈
Related posts:
 How to Draw the Fortnite Llama Step by Step (Easy Fan Art)
 How to Draw Ariana Grande Step by Step (Cute Chibi Fan Art)
 How to Draw a Care Bear Step by Step (Cute Fan Art for Kids)
 String Art Patterns (40 Free Printable Templates)
 How to Draw a Whale Step by Step (Easy for Beginners)
 How to Draw Lungs Step by Step (Easy Science Diagram)
 How to Draw a Pineapple Step by Step (Easy Crown and Slice)
 How to Draw Iron Man Step by Step (Easy Chibi for Kids)
 How to Draw a Dress Step by Step (Easy Party Dress)
 How to Draw a Chicken Step by Step (Easy for Beginners)
 How to Draw a UFO Step by Step (Cute Alien Saucer)
 How to Draw Flames Step by Step (Easy Campfire Drawing)

