
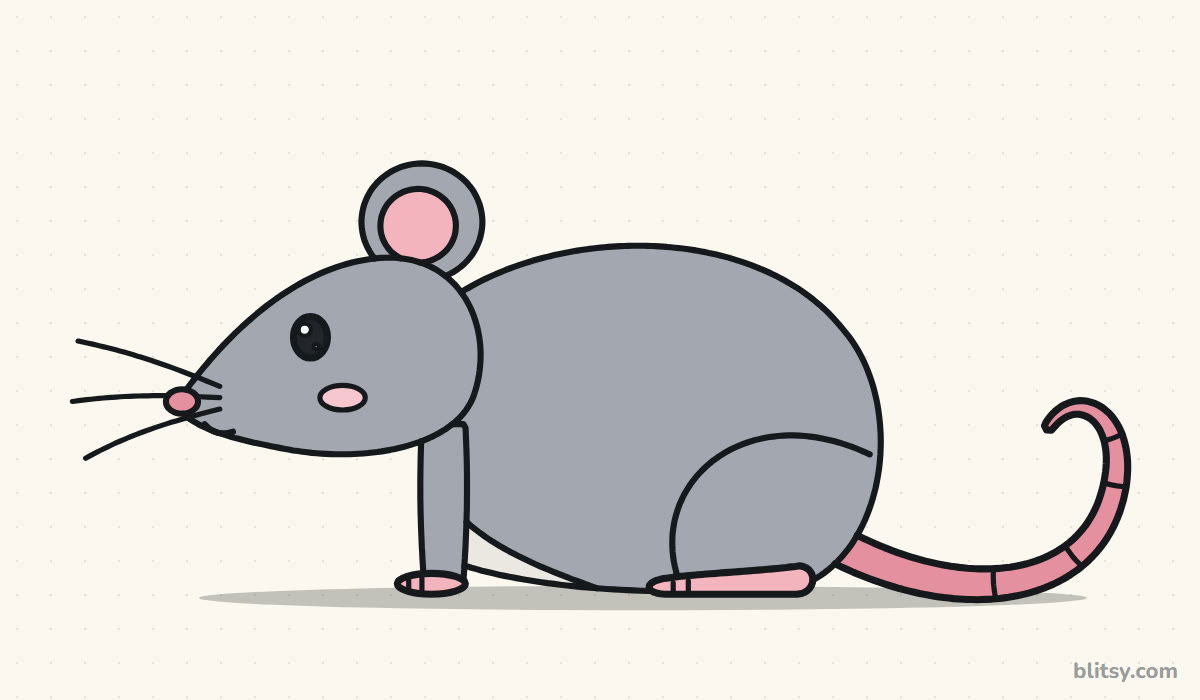
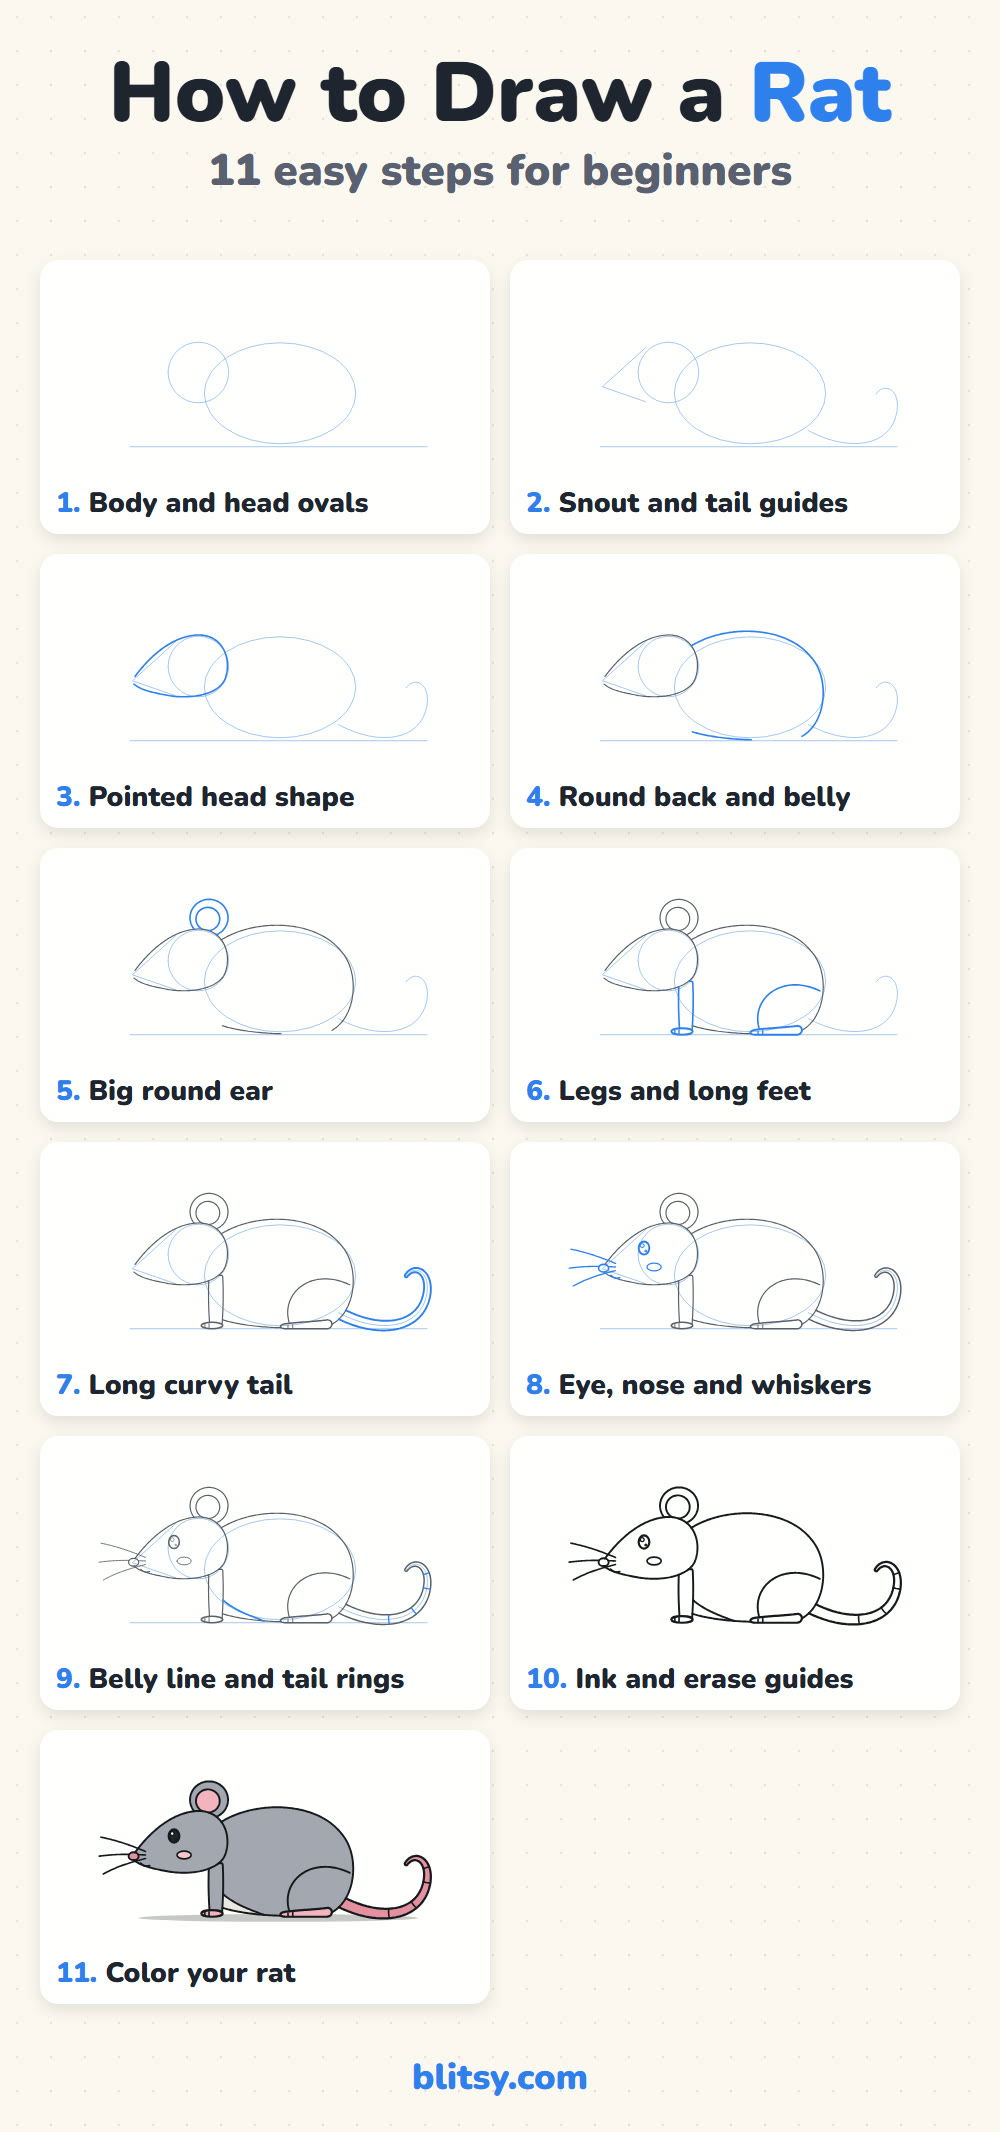
Rats get a bad name, but on paper they're one of the friendliest animals you can draw. Seen from the side, a rat is just a pointed head, a round body and a very long tail. In this lesson I'll show you how to draw a rat step by step, from two light guide shapes to a soft gray rat with pink feet and a curly tail. If you can draw a circle and a smooth curve, you're ready.
Look for the blue lines in each picture. Those are the only lines you add in that step, while everything gray was drawn before. The pale blue shapes at the start are construction guides, so keep them faint; they disappear in the inking step.
Quick overview
⏱️ Time: roughly 20 to 30 minutes
🎯 Level: easy, suits kids from about age 6
✏️ Steps: 11
🐀 You'll draw: a gray cartoon rat in side view, walking to the left
Rat Sketching Kit for Today
- A pencil with a soft point (HB or 2B)
- A clean eraser
- A black fineliner or thin marker for the final lines
- Colored pencils or markers in gray, pink, dark pink and black
- A sheet of paper turned sideways
The tail is longer than you'd expect, so start the rat a little left of the middle of your page.
How to Draw a Rat Step by Step
Step 1: Sketch a body oval and a head circle
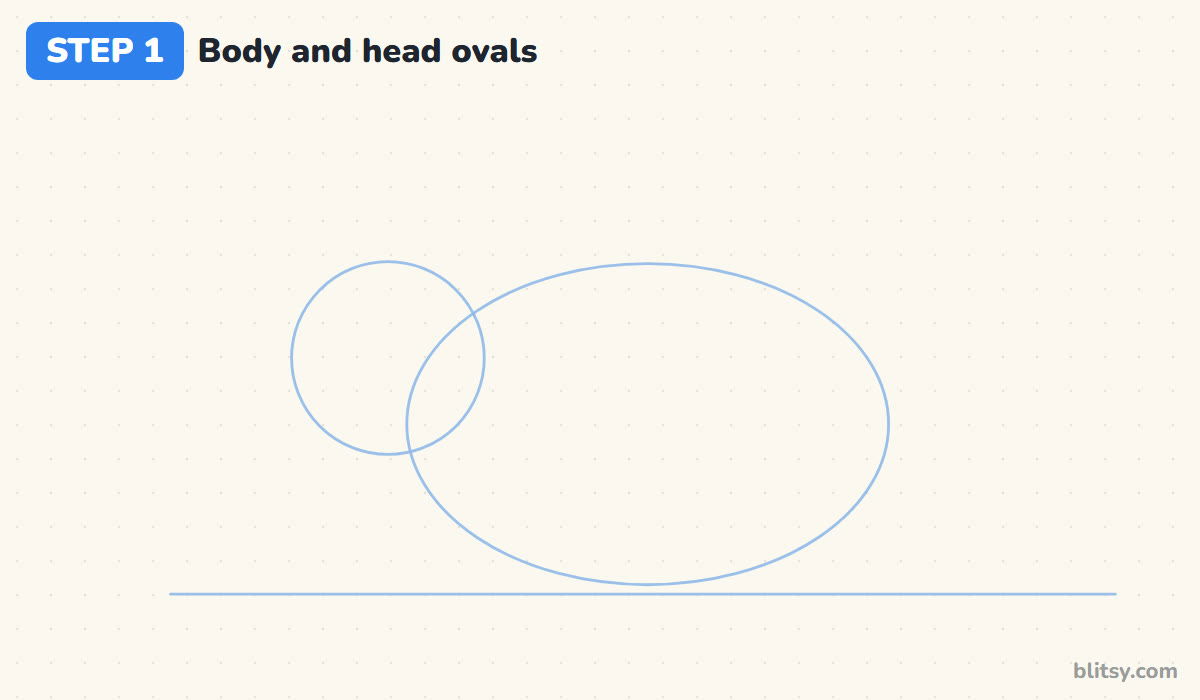
Draw a light ground line near the bottom of the page. Sitting just above it, sketch a wide oval for the body, about one and a half times as wide as it is tall. Then add a head circle on the upper left, overlapping the oval a little. I keep the circle roughly half as tall as the oval; any bigger and you'll end up with a mouse.
💡 Tip: Sketch with loose, quick passes. Two or three faint ovals stacked together are fine at this stage.
Step 2: Add guide lines for the snout and tail
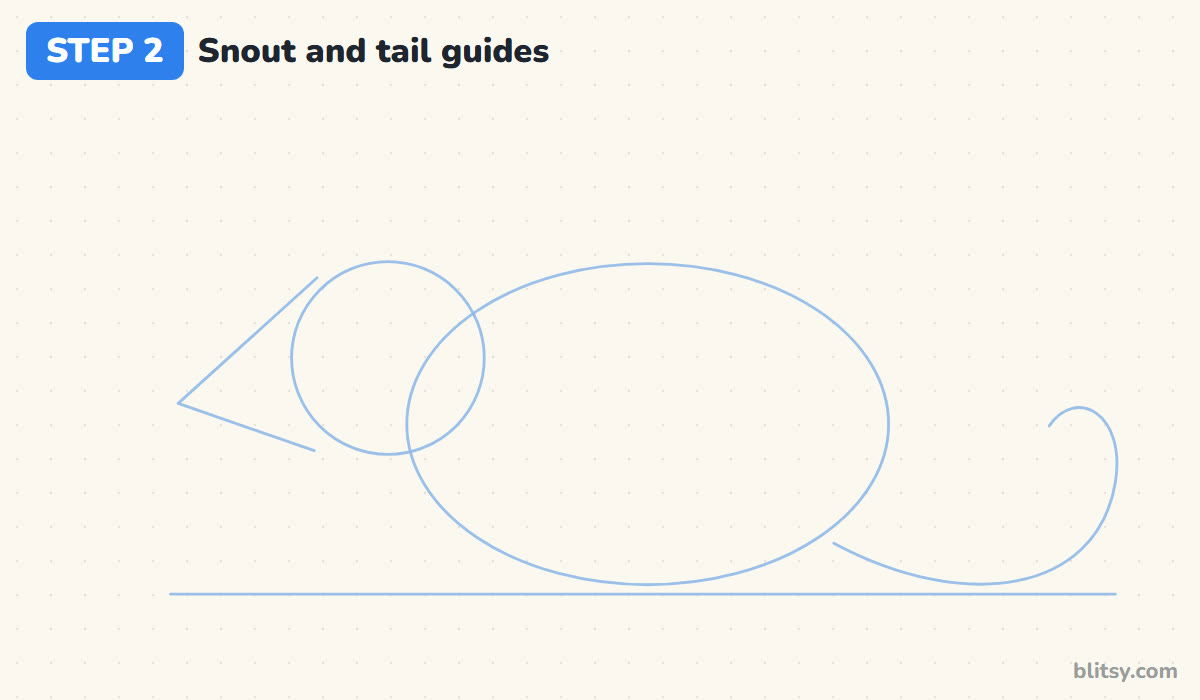
From the top and bottom of the head circle, draw two straight lines that meet at a point out to the left. This triangle sets the snout length. On the right, start a curved line at the back of the body, let it dip along the ground, then swing it up and curl the end over. The tail is about as long as the body, so give it room.
💡 Tip: Keep the snout point level with the lower half of the head circle, not the middle.
Step 3: Draw the pointed head
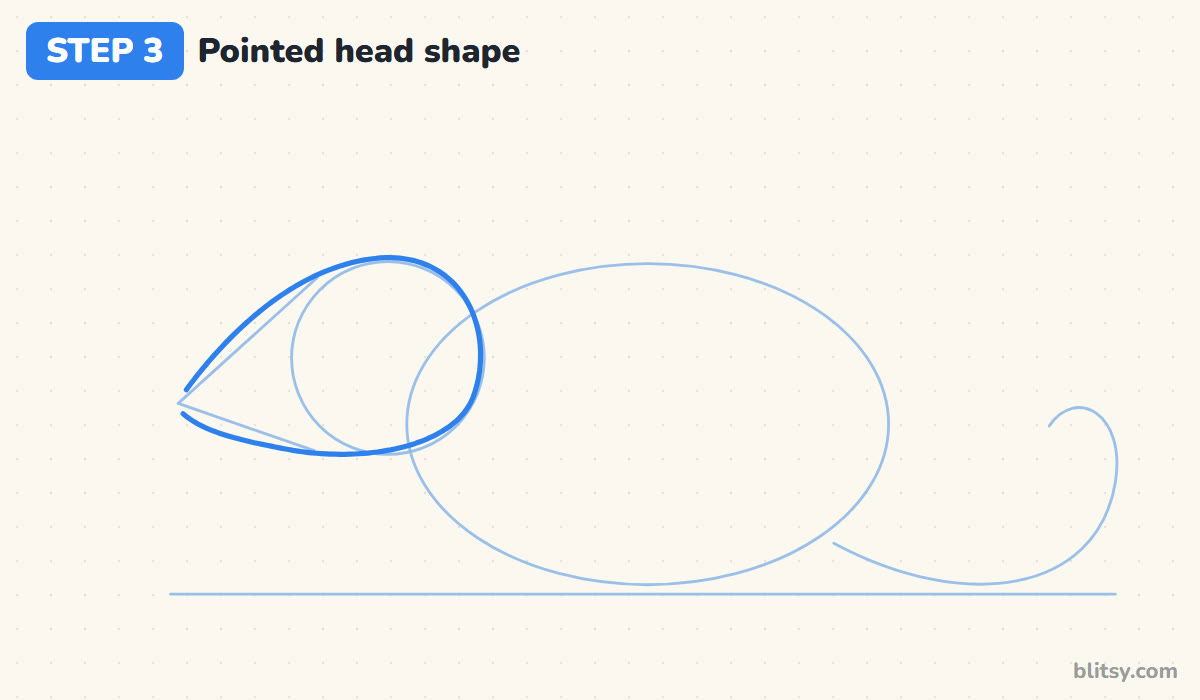
Now outline the real head. Start at the snout point, curve up and over the top of the circle, round the back of the head, then come along underneath and taper into the snout again. I picture a teardrop lying on its side. The top line is fuller than the bottom one, because a rat's forehead slopes while the chin stays fairly flat.



💡 Tip: Stop just short of the very tip. A tiny gap there gets covered by the nose later.
Step 4: Shape the round back and belly
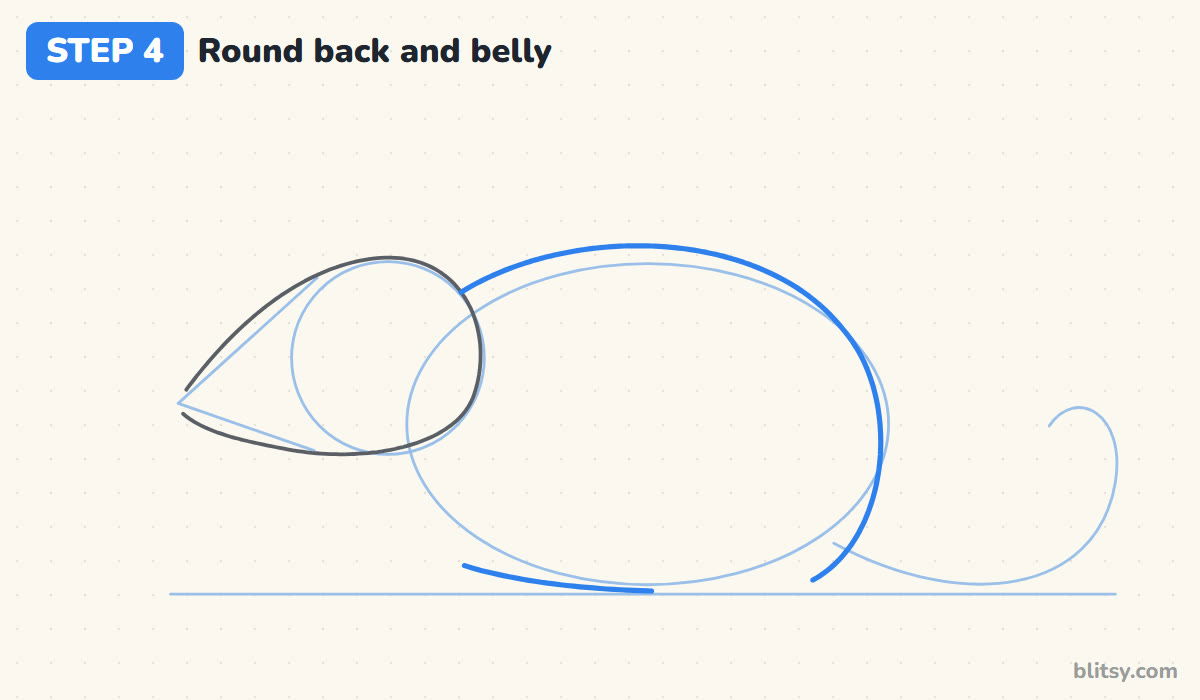
Begin the back where it meets the head and curve it up into a high, rounded hump, higher than the head. Bring it down over the rump and along the bottom, close to the ground line. I leave the chest open under the head, since the front leg fills that gap later. That high back is what makes the animal read as a rat instead of a sausage.
💡 Tip: Push the highest point of the back toward the rear half. Rats carry their weight behind.
Step 5: Add the big round ear
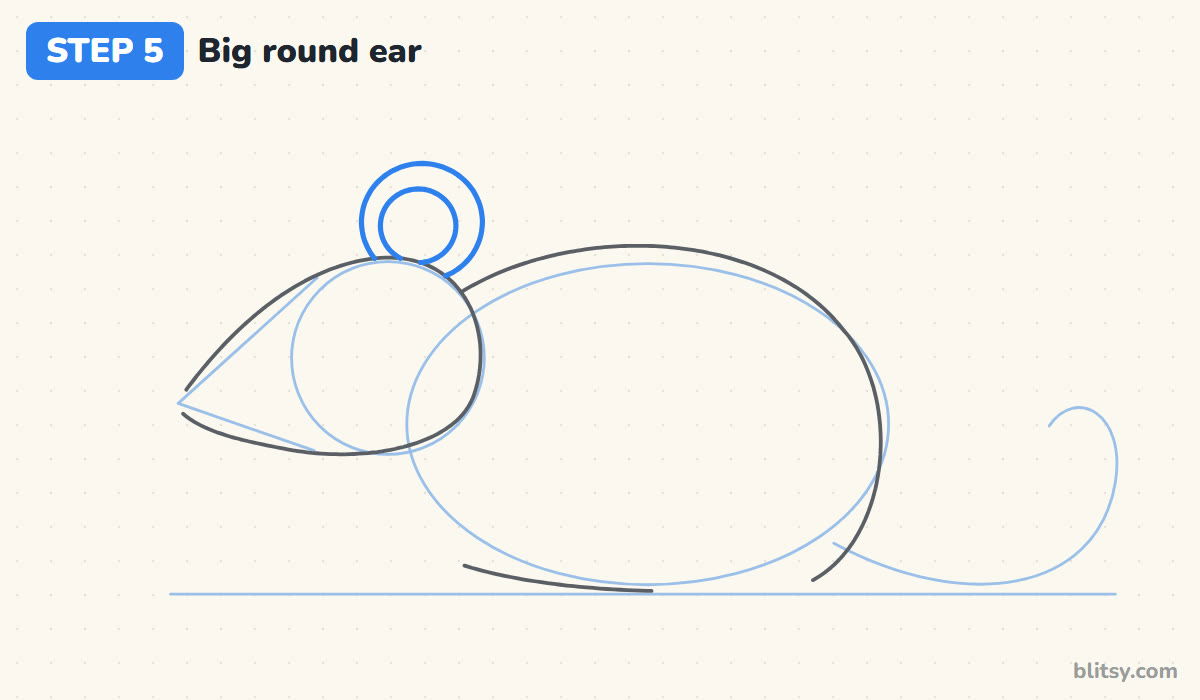
Rats have large, thin ears. On the top of the head, toward the back, draw a circle that sits mostly above the head line. Its bottom part disappears behind the head, so only draw the part you can see. Inside it, add a smaller circle for the pink part, leaving an even rim of gray between the two.
💡 Tip: Use a coin or bottle cap as a circle stencil if your round shapes come out lumpy.
Step 6: Draw the legs and long feet
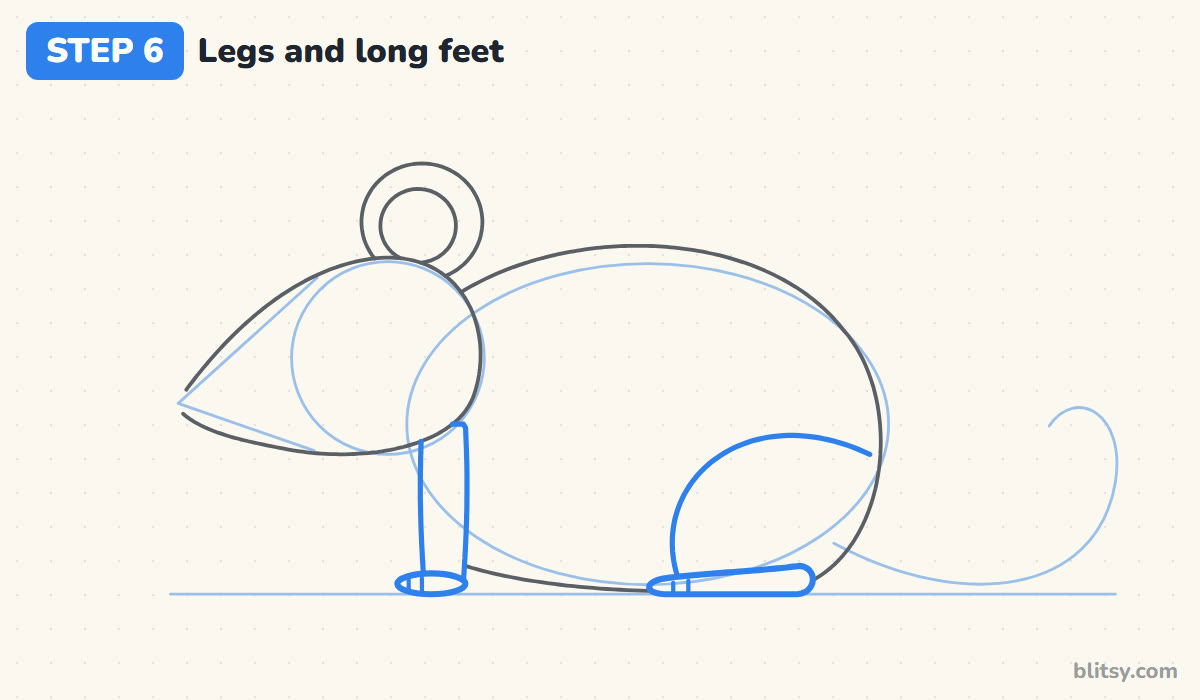
Under the head, drop a narrow front leg straight down and finish it with a flat oval paw. At the back, draw a big curve for the haunch, like an upside-down U that fades into the back. Below it, draw a long, thin hind foot pointing forward, plus two tiny toe lines on each foot. Rat hind feet are surprisingly long, and showing that helps a lot.
💡 Tip: Rest the front paw and the back foot on the same ground line so the rat doesn't tilt.
Step 7: Outline the long, curvy tail
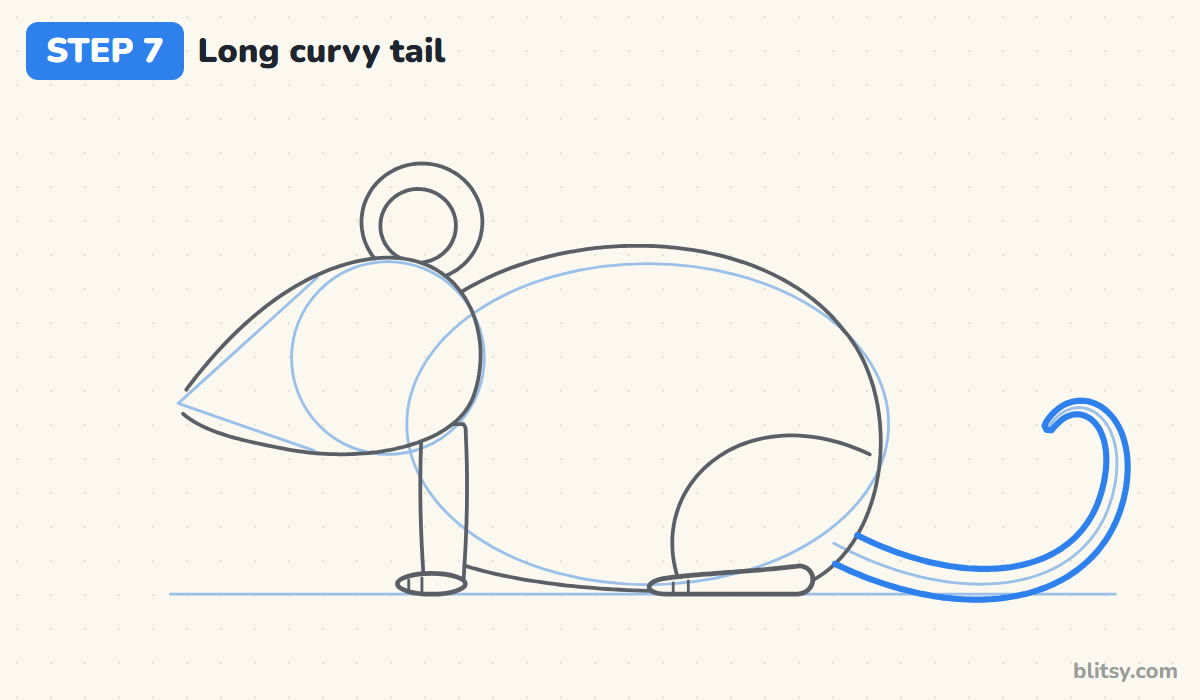
Follow your tail guide. Draw the bottom edge first, starting behind the body, then the top edge just above it. Keep the lines wide apart near the body and bring them closer as they travel, so the tail thins out. Close the curl with a small round tip. Don't draw the tail inside the body outline; it starts behind the rump.


💡 Tip: Slow down at the curl. That's where a tail usually goes lumpy.
Step 8: Add the eye, nose and whiskers
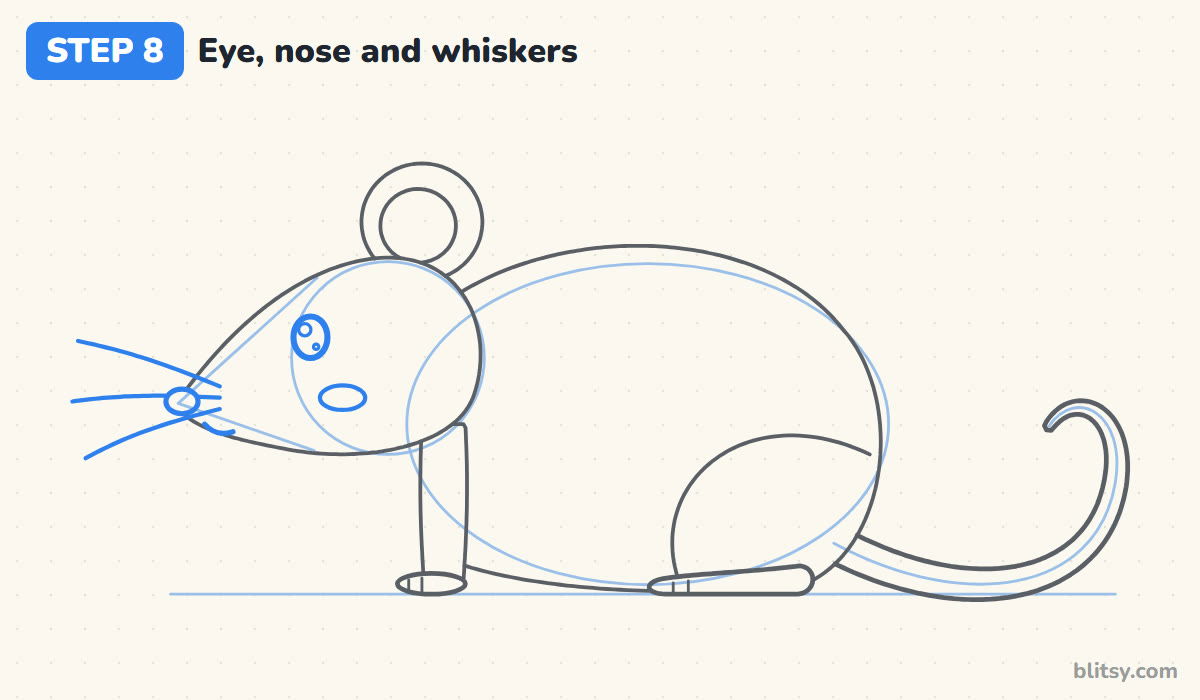
Put a tall oval eye in the upper part of the head, closer to the snout than to the ear, with two small shine circles inside. Cap the snout with a little oval nose and add a tiny curve under it for the mouth. Draw a flat oval cheek below the eye, then three long whiskers fanning out from behind the nose.
💡 Tip: Keep the eye a bit higher than the nose. A low eye makes the face look sad.
Step 9: Draw the belly line and tail rings
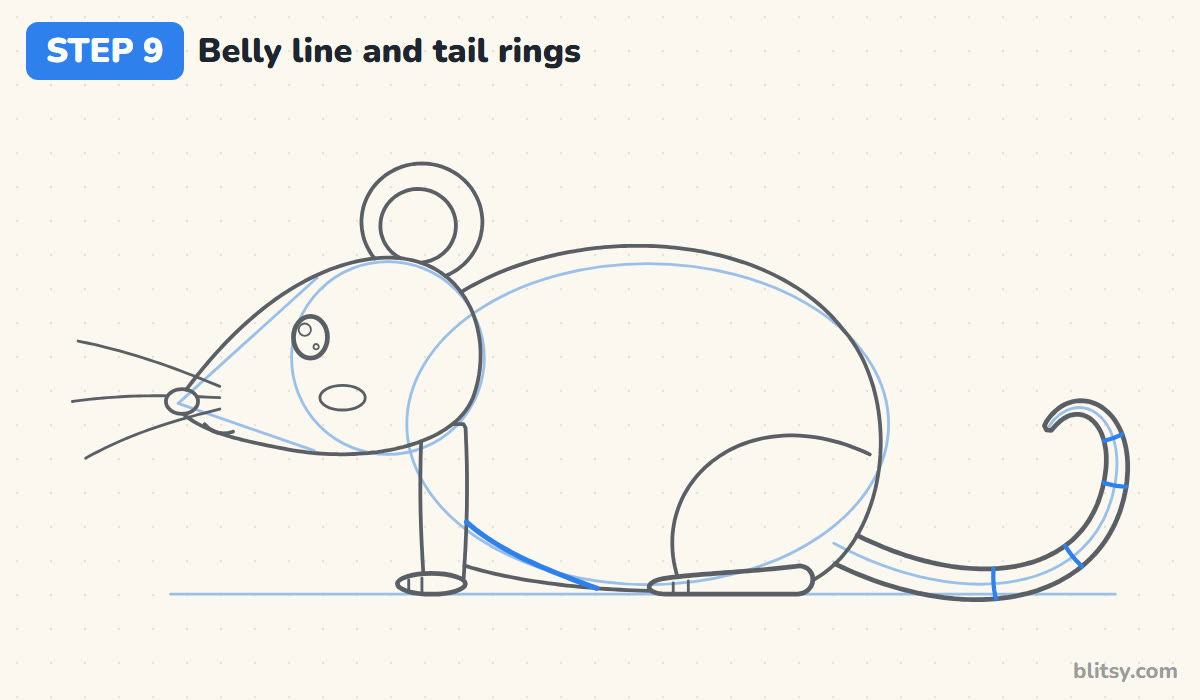
Behind the front leg, draw one gentle curve from the chest down toward the hind foot. Everything below it becomes the pale belly. Then add four short lines across the tail. Real rat tails are covered in fine scaly rings, and I find a few marks suggest them without cluttering the drawing.
💡 Tip: Curve each tail ring slightly, like it wraps around a tube. Straight dashes look flat.
Step 10: Ink the outline and erase the guides
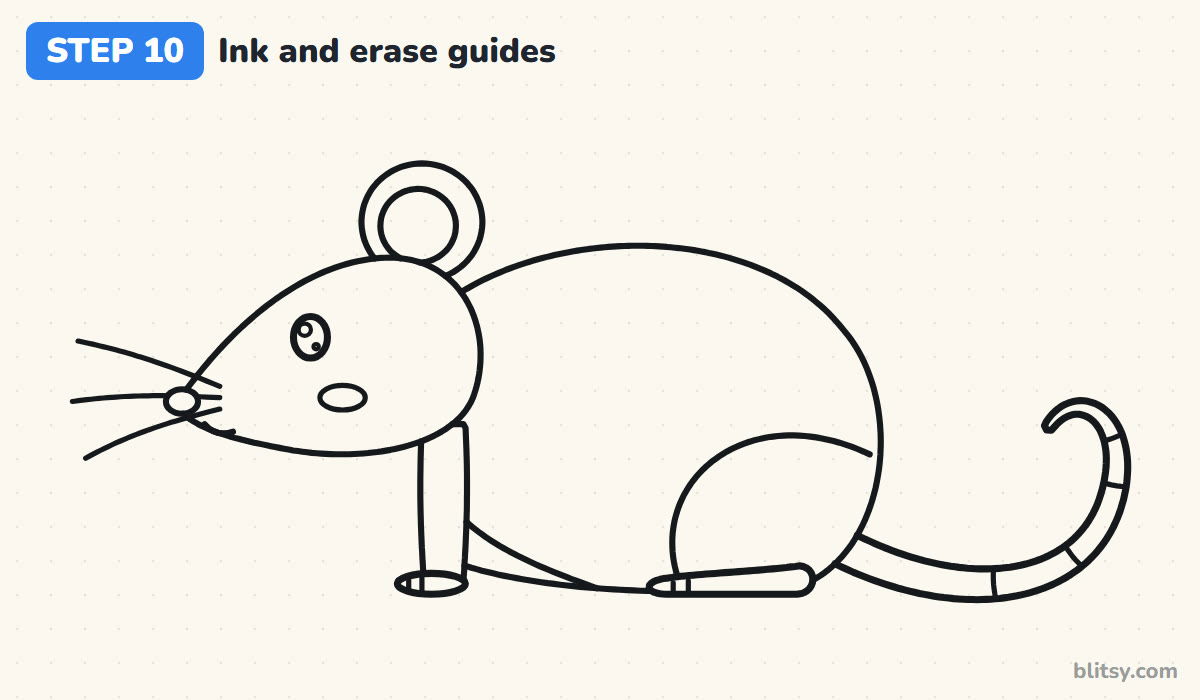
Trace every line you want to keep with the black pen. My order is face first, then the head and ear, then the body, legs and tail. Skip all the guide shapes and the ground line. Wait until the ink is completely dry, then erase the pencil underneath.
💡 Tip: Ink the whiskers in one quick flick each so they taper naturally.
Step 11: Color your rat
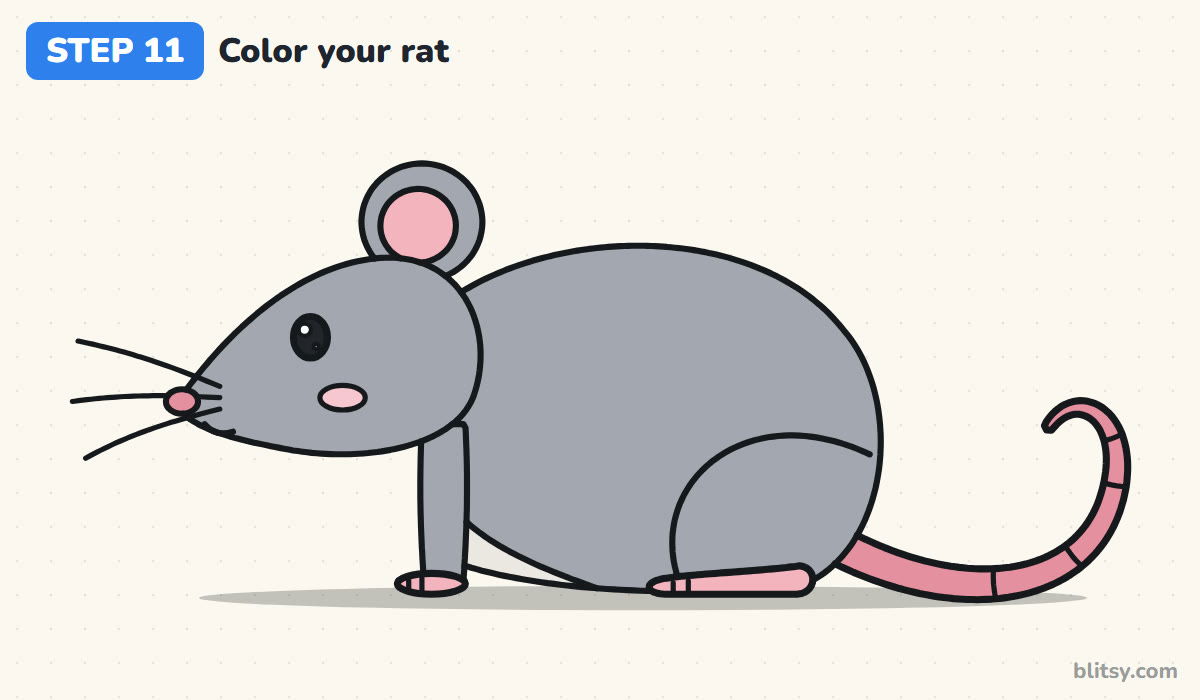
Use a medium gray for the head, ear, body and leg. The belly gets a pale cream, almost white. Color the inside of the ear and both feet pink, and use a darker pink for the tail and nose. The cheek takes your lightest pink. Fill the eye black, leaving the shine circles as white paper, and add a soft shadow under the feet.
💡 Tip: Layer the gray lightly two or three times rather than pressing hard once. It stays smooth that way.
When a Rat Starts Looking Like a Mouse
- A head that's too big. Large heads and huge ears belong to mice. Keep the rat's head clearly smaller than its body.
- A short tail. A stubby tail turns the rat into a hamster or a guinea pig. Make it at least as long as the body.
- A flat, straight back. Without the hump the animal looks like a weasel. Let the back rise higher than the head.
- The tail drawn through the body. It starts behind the rump, so erase any tail line that runs inside the body.
- Whiskers that start on the cheek. They come from the snout, near the nose. Start them there and let them reach past the face.
Rat Variations to Try Next
Once this one feels comfortable, I like to change the coat. Fancy rats come in white with red eyes, cream, black, or white with a dark hooded head and a stripe down the back. A wedge of cheese in front of its nose makes a fun scene. Younger kids can leave off the tail rings and toe lines. If you'd like another small furry friend, the bunny drawing tutorial uses many of the same round shapes, and the kitten drawing tutorial gives you a cat to pair with your rat.
Rat Coloring Page With a Printable Step Guide
If you want to color before you draw, print the free rat coloring page. A small finished rat at the top shows where each color goes, next to a key that names every color and part. The step-by-step PDF guide holds all 11 steps and tips, and both files print well on Letter or A4 paper.
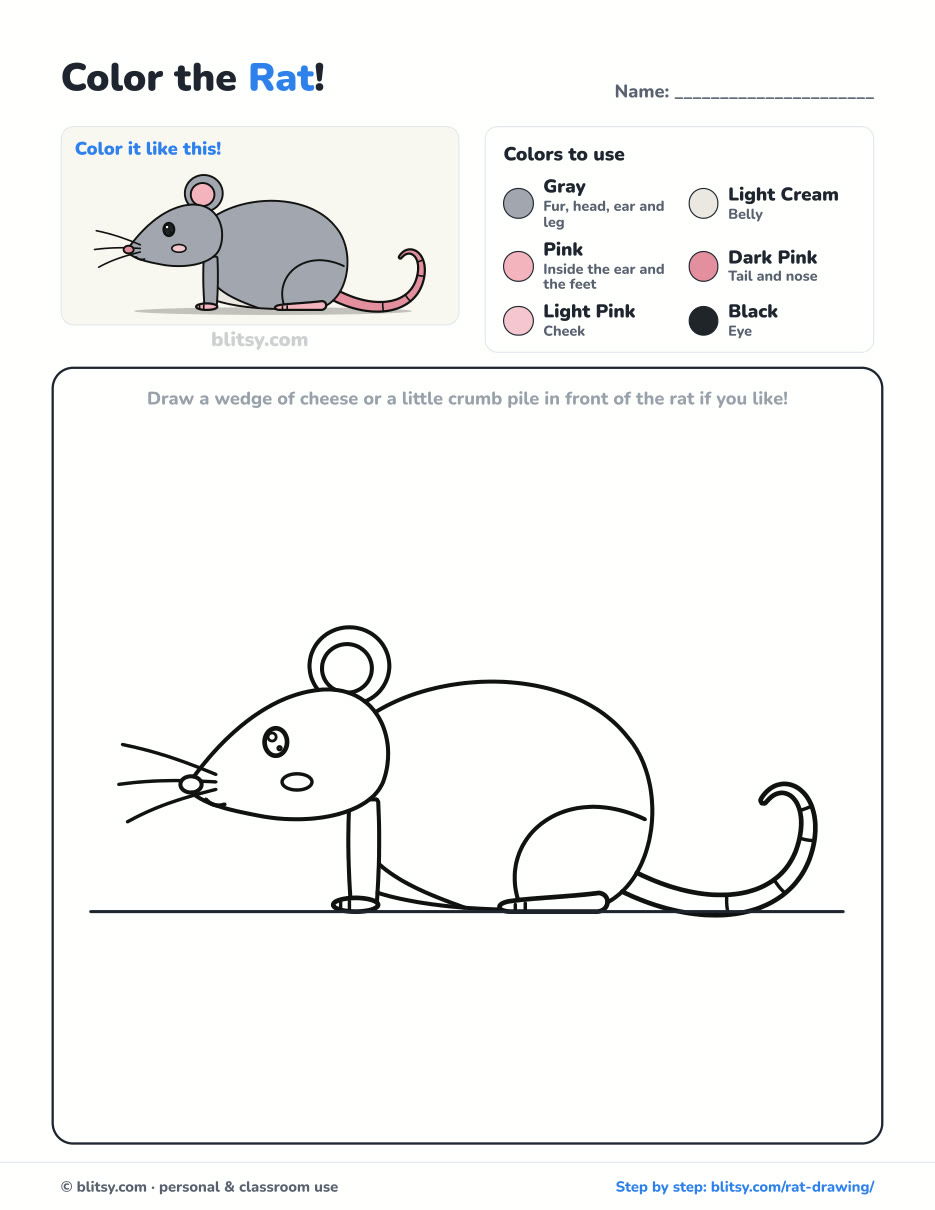
Black outlines with a colored example and the color names at the top. Ready to print and color.
⬇️ Download Coloring PageEvery step picture with its instructions and tips, to keep beside your paper while you draw.
⬇️ Download Drawing Guide📱 On a phone? Tap a download button, then open the file and choose Share → Save to Files or Print. On a computer, the PDF opens or saves straight to your Downloads folder.
Every Rat Step on a Single Pin
Rat Finished? More Animal Tutorials for Your Sketchbook
Every link below opens a full step-by-step tutorial, so you can pick one animal and draw it from the first guide shape to the last color.
- Penguin Drawing: Follow how to draw a penguin step by step to get a little bird with rosy cheeks, a tiny tuft and flippers held out for balance.
- Godzilla Drawing: Two ovals grow into a friendly kaiju over ten steps in this easy Godzilla drawing tutorial.
- Whale Drawing: A happy blue whale with its spout takes only ten steps when you use this whale drawing tutorial.
- Kitten Drawing: Draw a ginger kitten sitting politely with the lesson on how to draw a kitten, done in 11 steps.
- Ant Drawing: Three ovals become a red ant with its antennae up and all six feet on the ground in this ant drawing step by step guide.
- King Kong Drawing: The giant gorilla stands with fists down and mouth open, ready to roar, by step 11 of this King Kong drawing tutorial.
- Dragonfly Drawing: Spread the wings wide and give it big round eyes with the how to draw a dragonfly lesson.
- Realistic Drawing: Ready for shading? This realistic drawing tutorial walks you through one shiny apple under one lamp, with five kinds of light and a cast shadow.
- Paw Print Drawing: Draw a dog print, a cat print and a small heart between them in 10 steps with this paw print drawing tutorial.
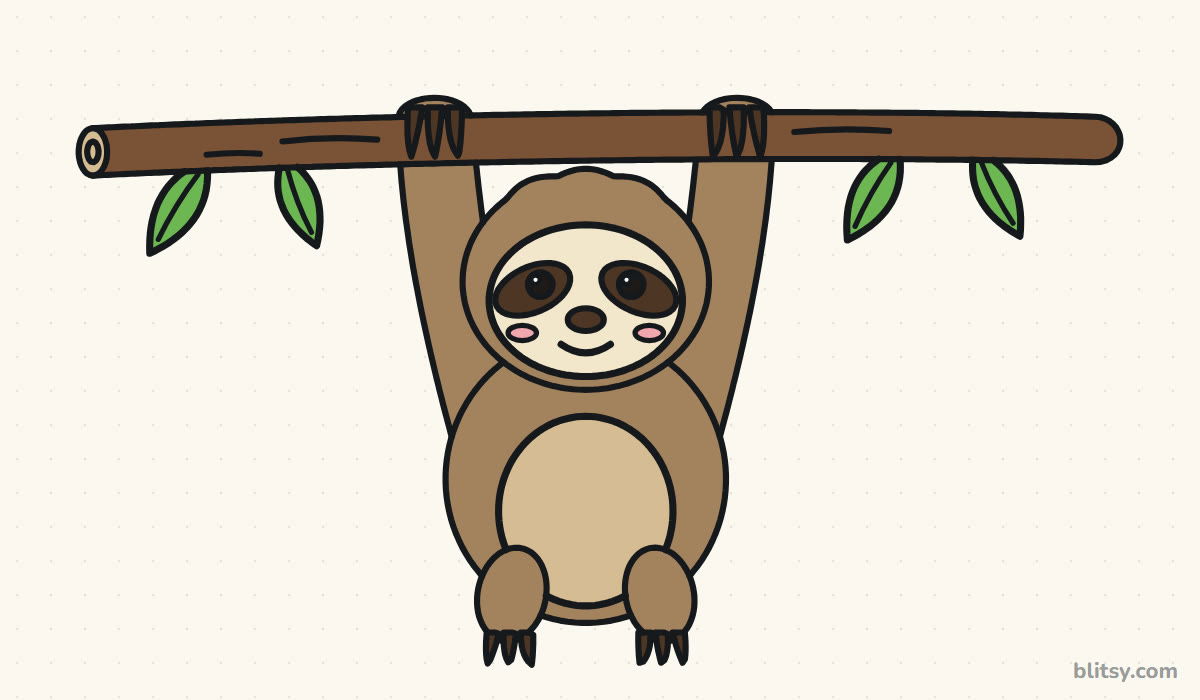
- Sloth Drawing: Learn how to draw a sloth step by step as it hangs from a branch with a happy face.
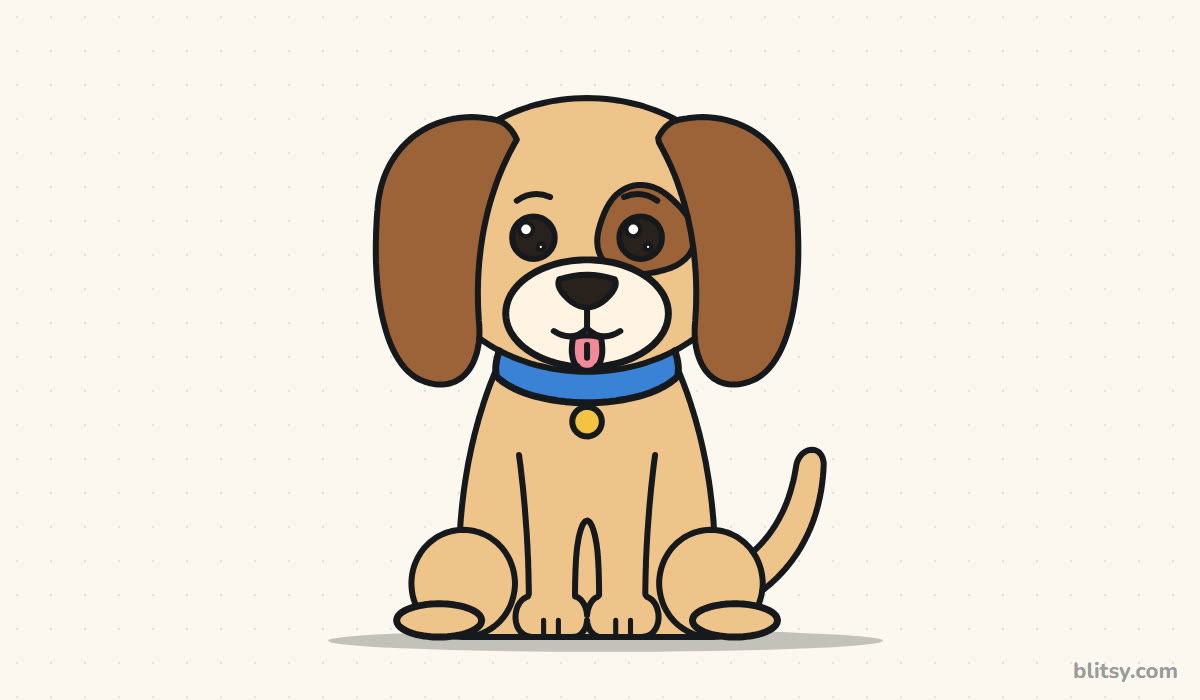
- Puppy Drawing: The pup in this easy puppy drawing tutorial has its tongue out and a collar on, ready for a walk.
- Narwhal Drawing: Point the tusk up and set it swimming with the narwhal drawing step by step lesson, 11 steps from blank paper.
- Miraculous Ladybug Drawing: Draw a chibi Ladybug with her mask on and yo-yo ready in this Miraculous Ladybug drawing tutorial.
- Arctic Fox Drawing: A sitting fox with cheek tufts and a tail curled to one side comes together in the how to draw an arctic fox guide.
Quick Answers About Drawing Rats
What is the easiest way to draw a rat?
Draw an oval for the body and a smaller circle for the head, then add a pointed snout, one round ear and a long tail. Starting from those simple shapes keeps the proportions in check before any detail goes in.
What's the difference between drawing a rat and a mouse?
A rat has a smaller head compared to its body, a longer snout, smaller ears and a thick, long tail. A mouse has a big head, very large ears and a thinner tail.
How do you draw a cute cartoon rat for kids?
Make the eye big and shiny, add a pink cheek and keep the snout short. Kids can skip the rings and toes and outline with a thick marker, which is easier to color inside.
How long does it take to draw a rat?
Most beginners need 20 to 30 minutes, including inking and coloring. The tail and the face take the most care.
Your rat only needs one circle and one oval to get started, so sketch them now and tell me what color coat you gave yours. 🐀✏️
Related posts:
 How to Draw a Car Step by Step (Easy Drawing for Beginners)
 How to Draw a Whale Step by Step (Easy for Beginners)
 How to Draw a Sloth Step by Step (Easy for Beginners)
 How to Draw a Puppy Step by Step (Easy for Beginners)
 How to Draw a Rose Step by Step (Spiral Method for Beginners)
 How to Draw Olaf Step by Step (Easy for Beginners)
 How to Draw a Ladybug Step by Step (Easy for Beginners)
 How to Draw a Dog Step by Step (Easy Side View for Beginners)
 How to Draw a Leopard Step by Step (Easy for Beginners)
 How to Draw a Light Bulb Step by Step (Easy for Beginners)
 How to Draw a Crow Step by Step (Easy for Beginners)
 How to Draw an Eagle Step by Step (Easy for Beginners)

