
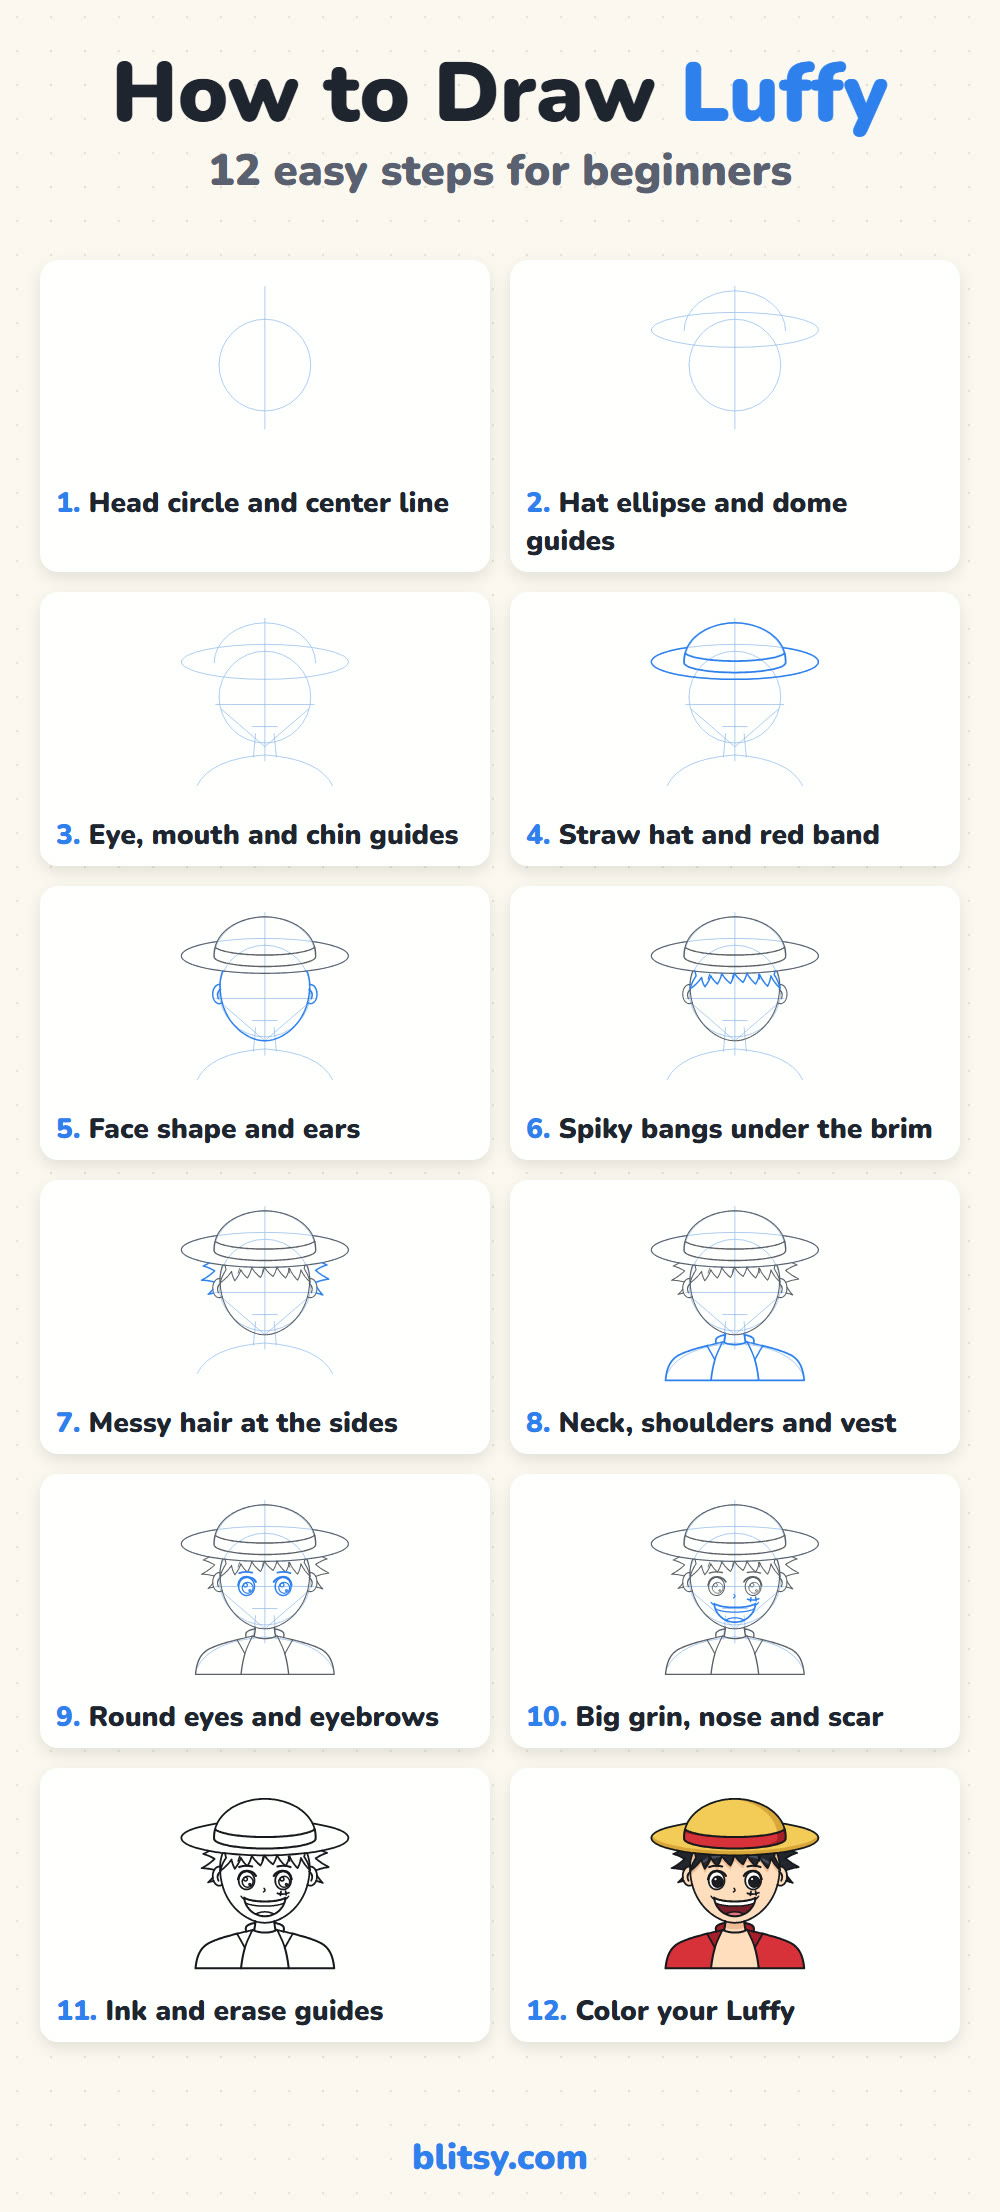
Give a cartoon boy a straw hat with a red band and a grin that nearly reaches his ears, and most One Piece fans will name him on sight. This lesson walks you through how to draw Luffy step by step, starting with a light circle and a flat oval for the hat brim and ending with a colored portrait. It's my own simple fan-art version for practice, not official artwork, so a few lines that wander from the show are completely fine.
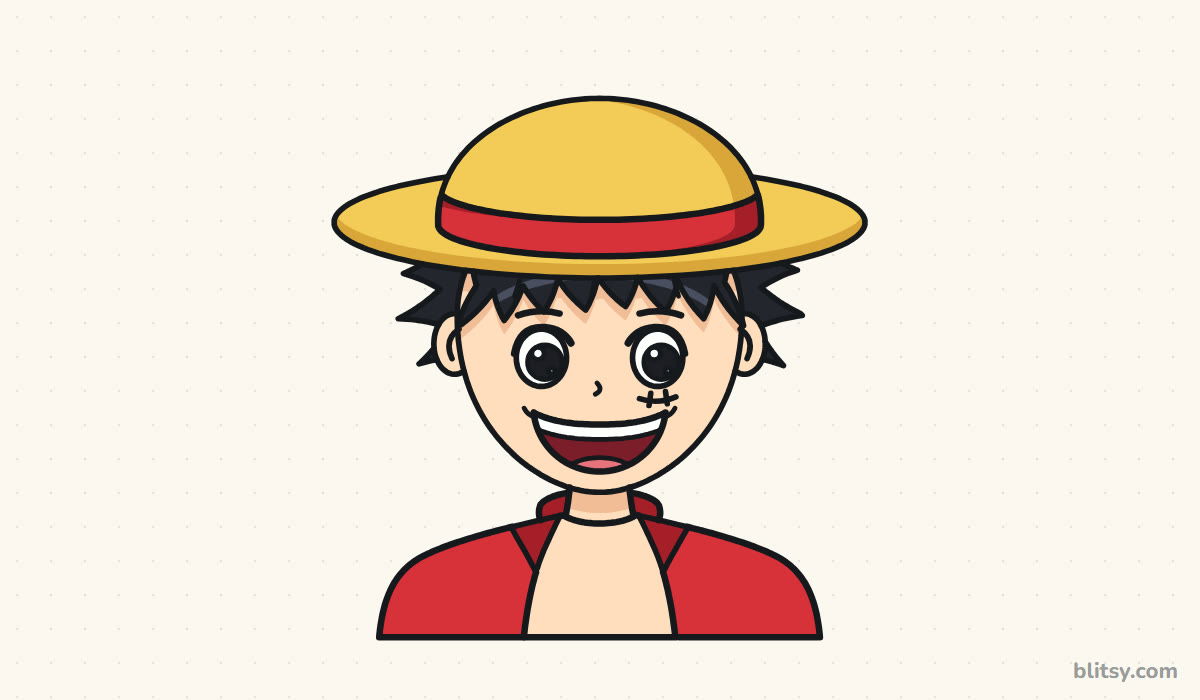
Every new line in these pictures is drawn in blue, while gray shows work from earlier steps. The pale blue helper shapes are rubbed out near the end.
Quick overview
⏱️ Time: roughly 30 minutes, a bit more if you color slowly
🎯 Level: easy to medium, fine for ages 8 and up
✏️ Steps: 12
👒 You'll draw: Luffy from the shoulders up, in his straw hat and open red vest
Straw Hat Supplies for a Pirate Captain Sketch
- A regular pencil (HB is plenty) for light guide lines
- An eraser that doesn't smear, ideally a soft white one
- A black fineliner or felt-tip pen for the final outline
- Colored pencils or markers in yellow, red, black and a peach skin tone
- A darker yellow or light brown if you want shading on the hat
- Plain paper, held upright
Markers give the red vest a bold, flat look, while colored pencils make the hat shading easier.
How to Draw Luffy Step by Step
Step 1: Draw a head circle and a center line
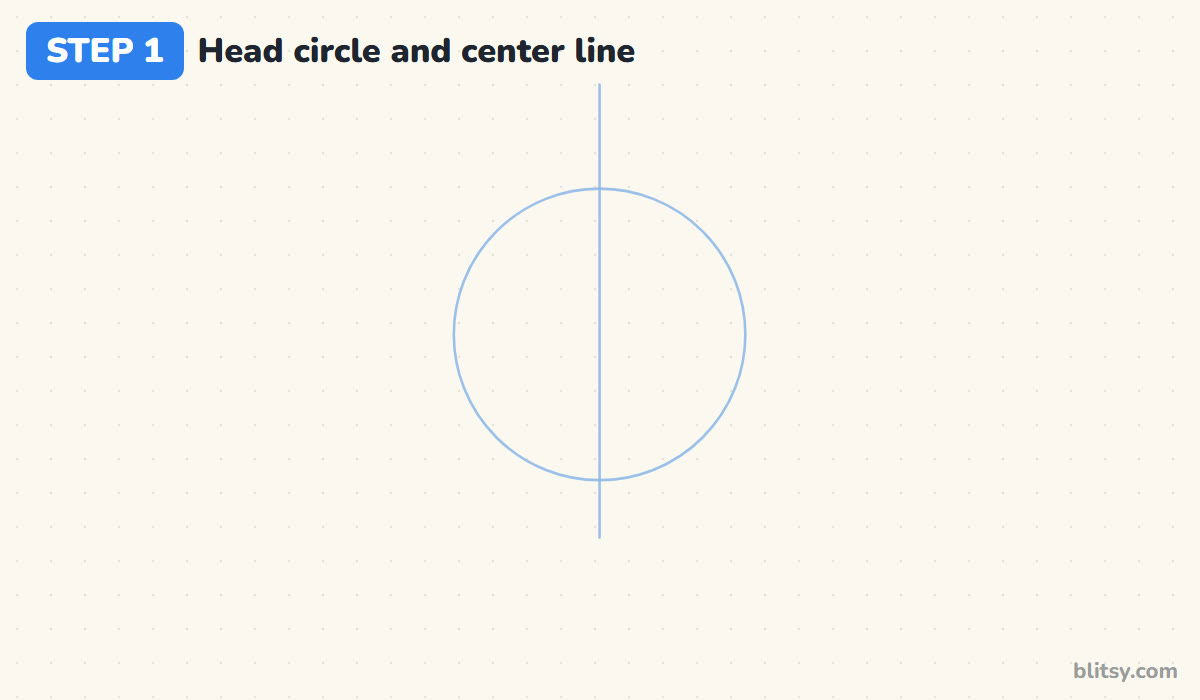
I place the circle a little below the middle of the page, because the hat sits on top and sticks out wide on both sides. Run a vertical line through the circle and let it continue below, where the neck goes. Both halves of the face will hang off this line.
💡 Tip: Leave at least two finger widths of paper above the circle for the hat dome.
Step 2: Sketch the hat as an ellipse and a dome
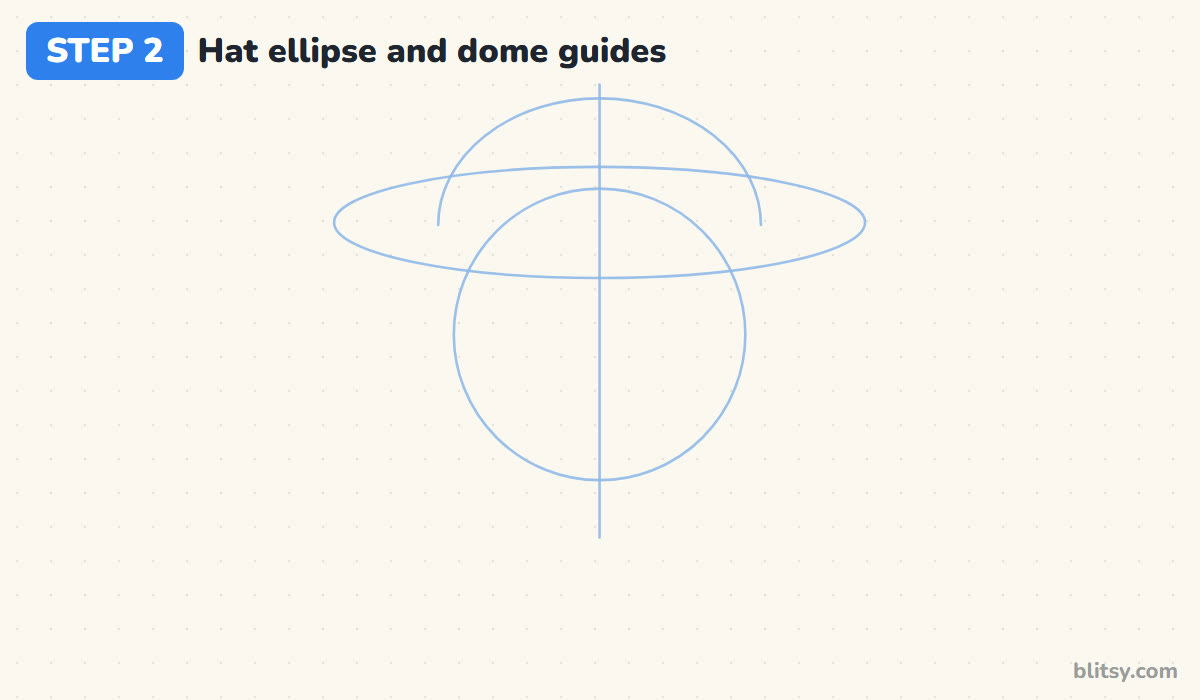
Here's the trick I use for the straw hat. Draw a long, flat ellipse across the upper part of the circle, almost twice as wide as the head. Then set a half circle on top of it, a bit narrower than the head. That's the whole hat: one flat oval for the brim and one dome for the crown.
💡 Tip: Draw the ellipse in two sweeps, top curve then bottom curve, and fix the ends where they meet.
Step 3: Mark the eye line and chin guides
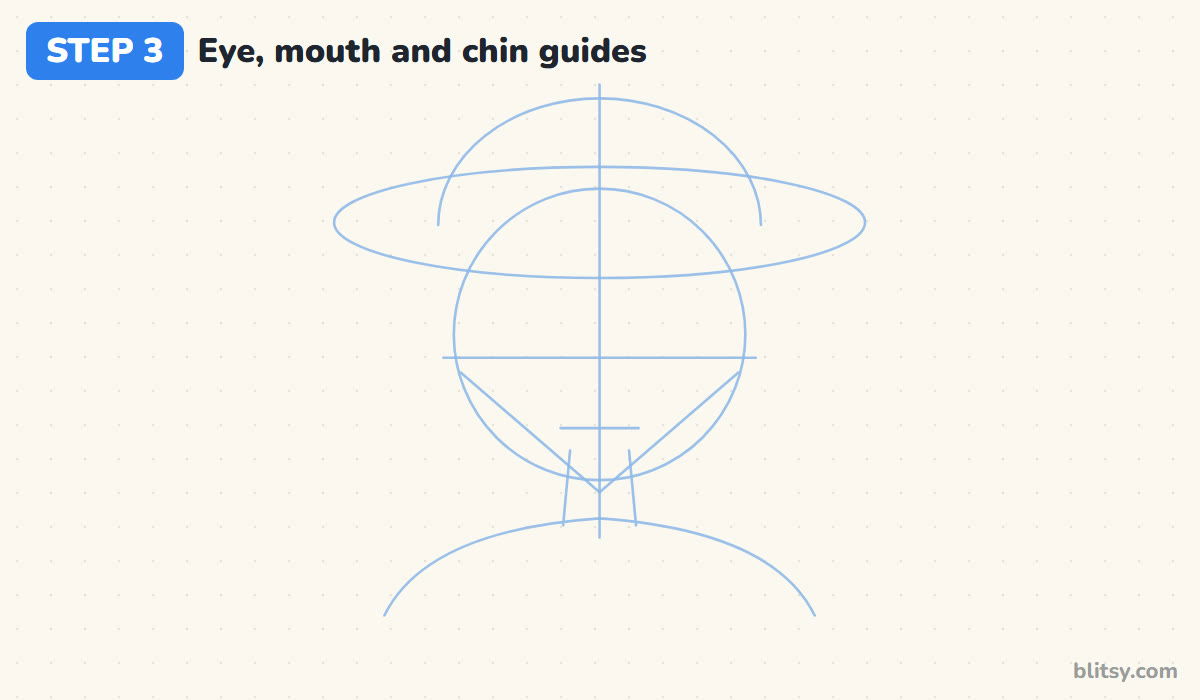
Draw a level line through the lower half of the circle for the eyes. A short mark lower down shows where the middle of the grin goes. From the sides of the circle, angle two lines down to a point on the center line to make a soft chin. Add neck lines and a shoulder curve.




💡 Tip: Keep the eye line low on the circle, since the hat brim will cover the forehead.
Step 4: Draw the straw hat and its red band
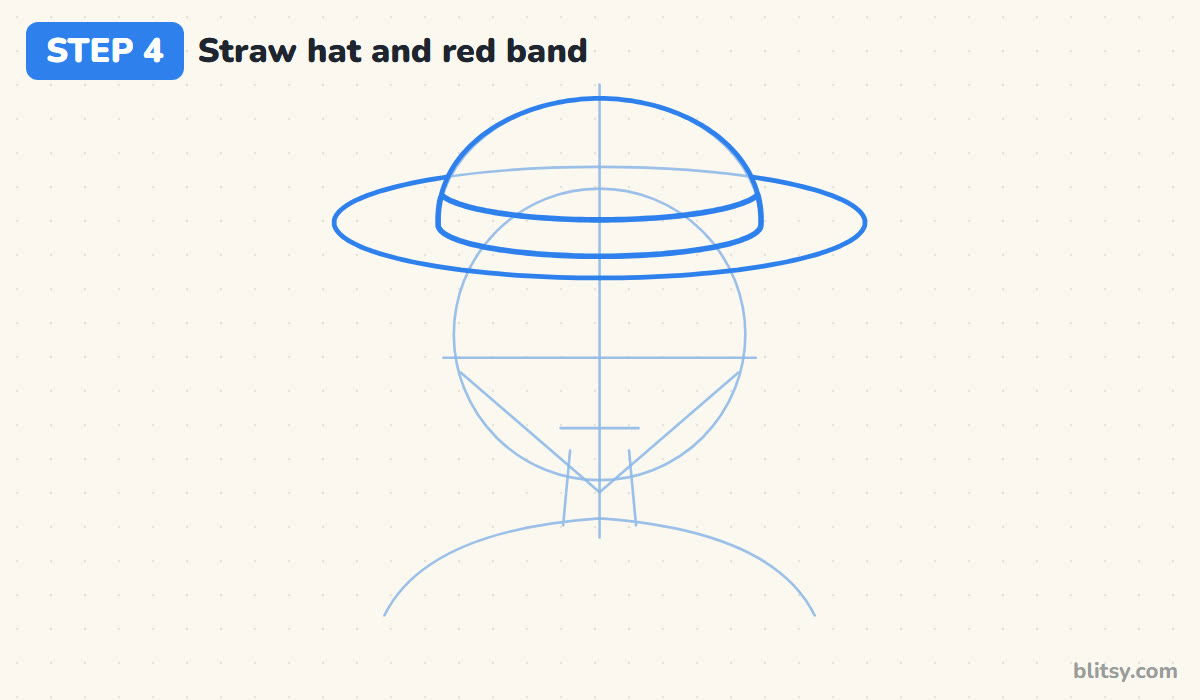
Now press a little harder. Trace the front part of the brim ellipse, but stop where it meets the dome; the back of the brim is hidden behind the crown. Round off the top of the dome, then draw a second curve a short way above its base. The strip between those two curves is the red band.
💡 Tip: Make the band curve follow the bottom of the dome so the stripe looks like it wraps around.
Step 5: Shape the face and add the ears
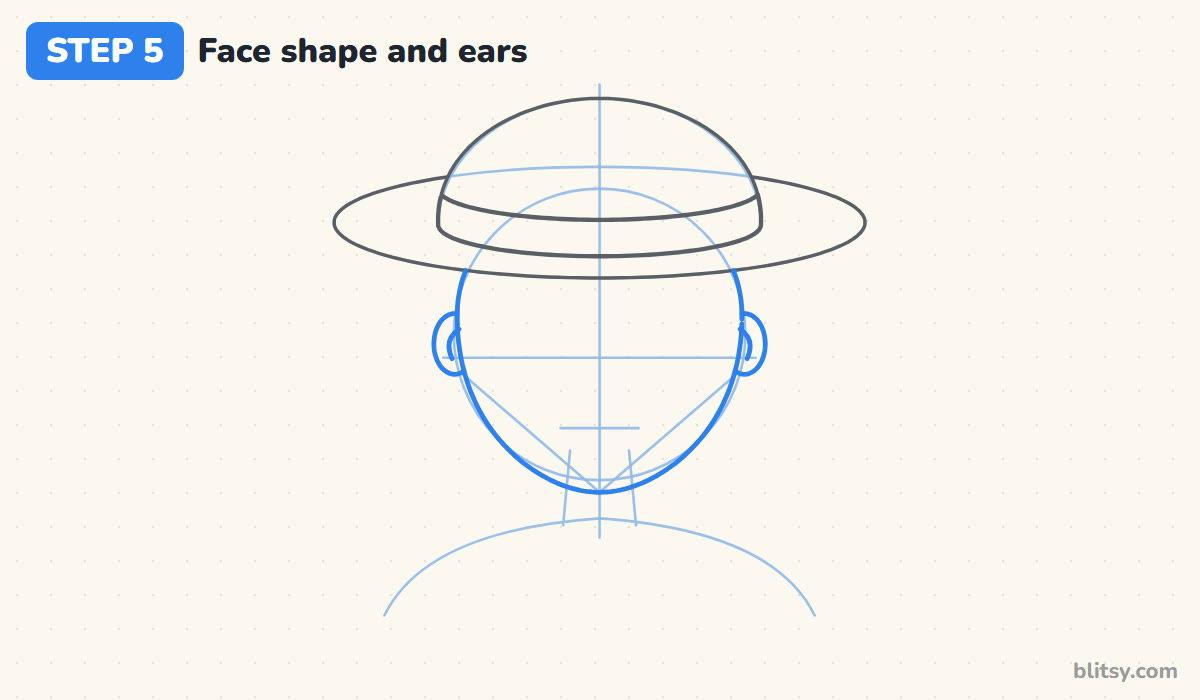
Start the face just under the brim and follow the circle down. Near the bottom, bring the cheeks in toward the chin point so the jaw is round rather than sharp. On each side, at eye level, add a small C-shaped ear.
💡 Tip: If the face looks too long, raise the chin a little and widen the lower cheeks.
Step 6: Draw spiky bangs under the brim
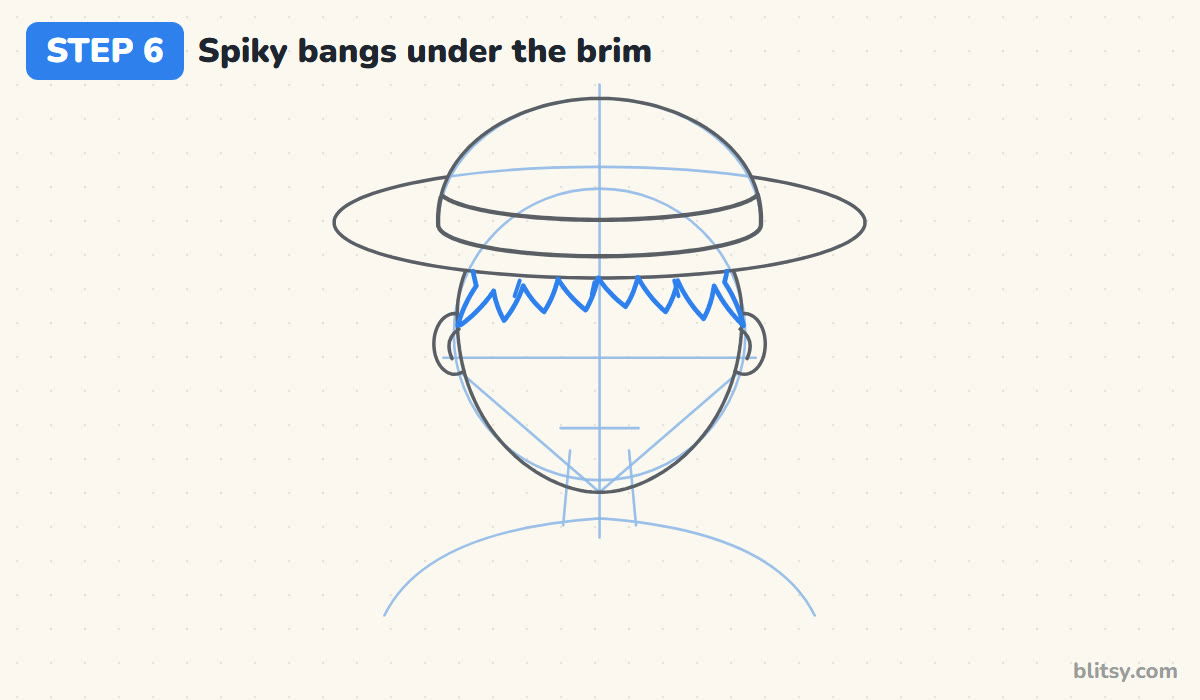
Luffy's hair pokes out below the hat in short, uneven points. Starting at one temple, draw a zigzag of spikes across the forehead, letting a few hang lower than the others. Add three tiny lines inside the hair near the brim to show strands.
💡 Tip: Let each spike lean a slightly different way; a perfect saw-tooth row looks stiff.
Step 7: Add messy hair at the sides
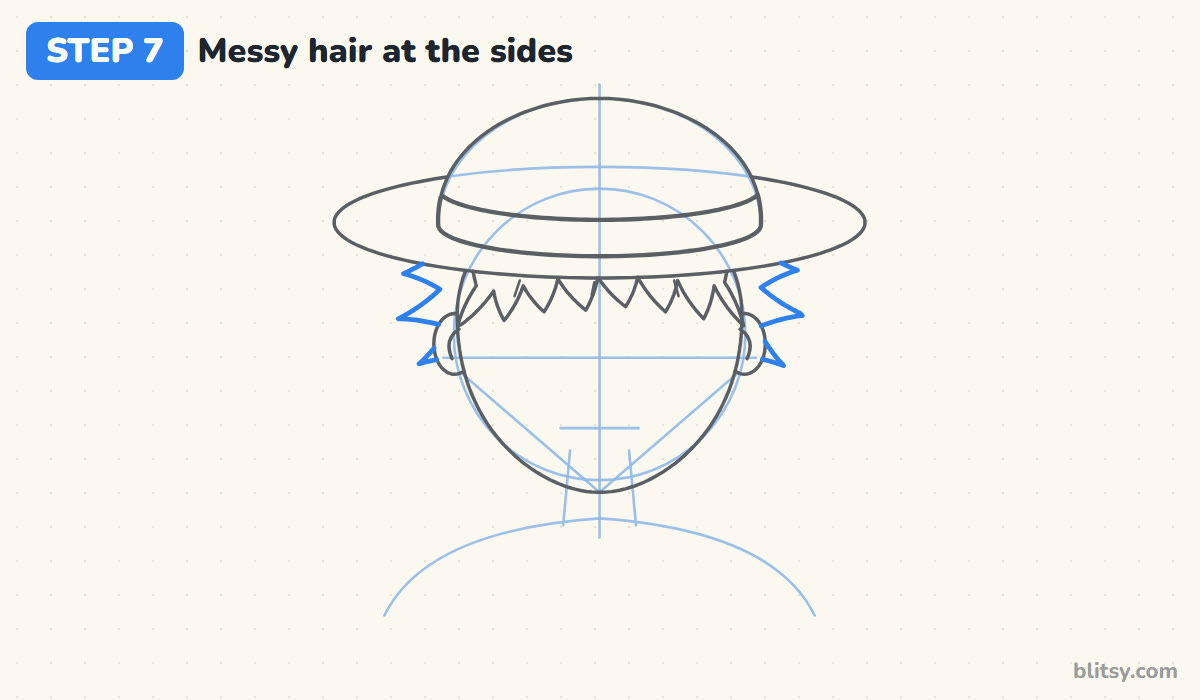
Behind each ear, draw three or four spikes that shoot sideways and down from under the brim. They should stick out past the face, which is what makes the head shape read as Luffy.


💡 Tip: Draw the side spikes with quick flicks of the wrist so their tips stay sharp.
Step 8: Draw the neck and shoulders, then the vest
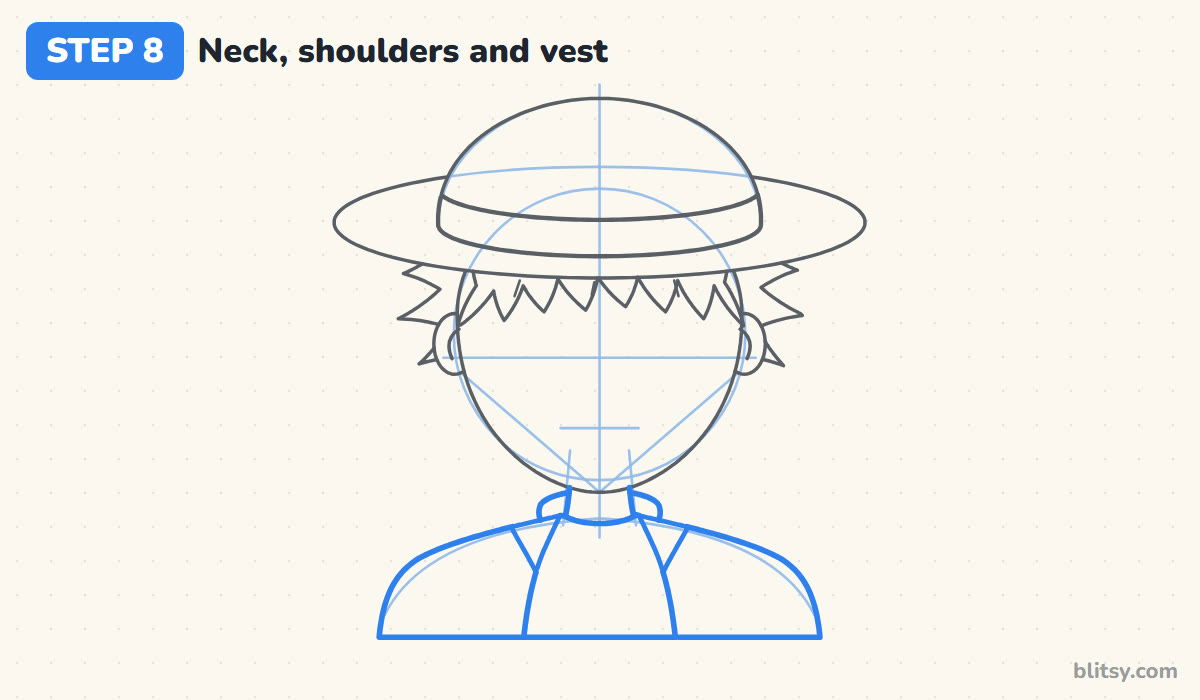
Draw the neck on its guides, follow the shoulder curve and close the bottom with a flat line. For the vest, draw two lines that hang down from the neck, leaving his chest open in the middle. Add a small folded lapel at the top of each side and a short collar standing up behind the neck.
💡 Tip: Keep the vest opening wider at the bottom than at the top so it looks loose and open.
Step 9: Draw round eyes and eyebrows
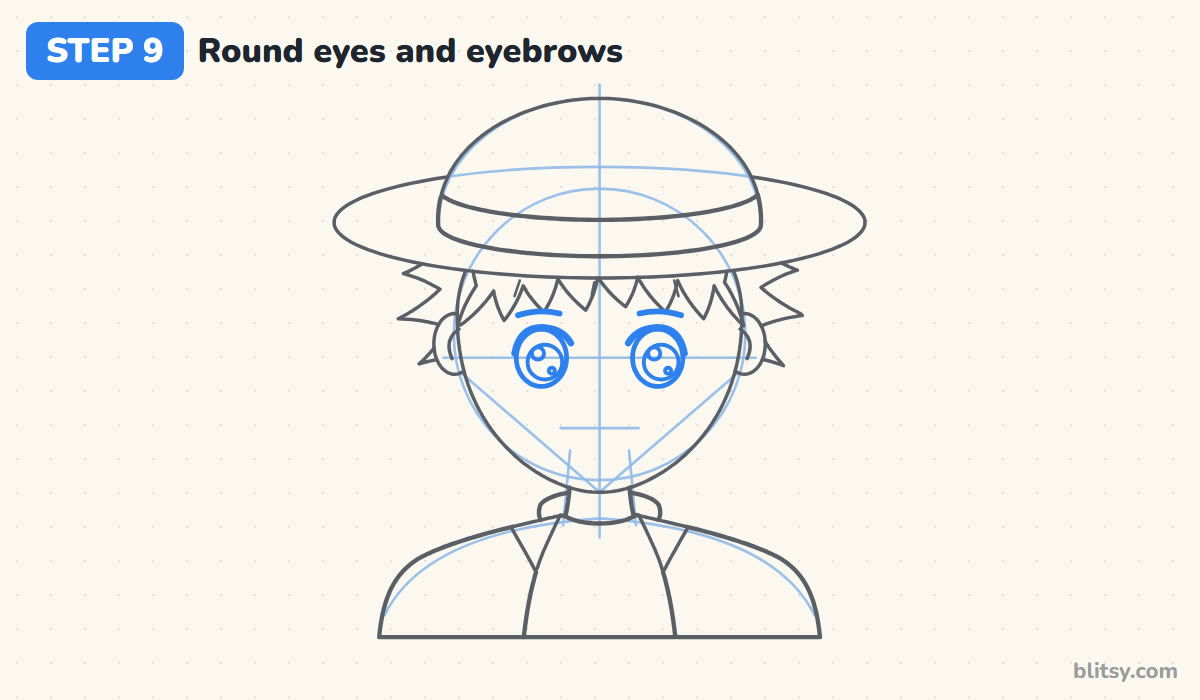
Sit two round eyes on the eye line, about one eye width apart. Inside each, draw a big round pupil and leave two small circles empty for shine, a bigger one high and a smaller one low. A thick curved line over each eye works as the upper lashes. Short, bold brows go just under the bangs.
💡 Tip: Put the shine circles on the same side in both eyes so his gaze stays straight.
Step 10: Add the big grin, the nose and the scar
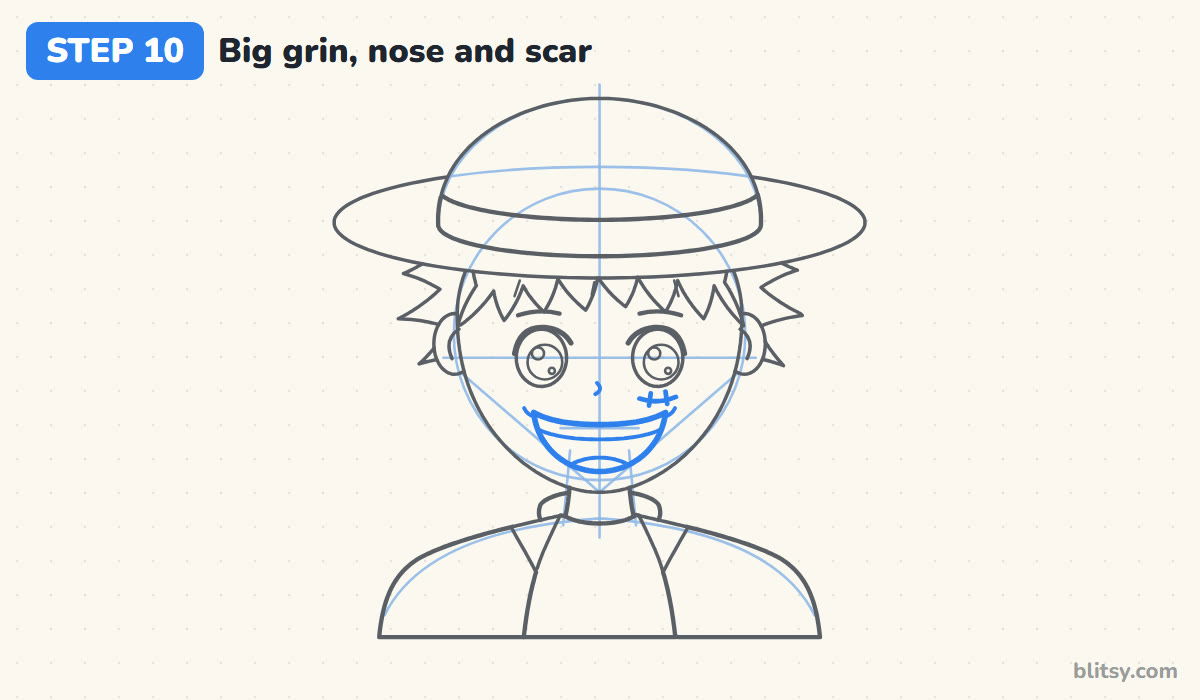
In my experience the grin decides whether it looks like him. Draw a wide upper curve between the cheeks, then a deep U underneath, so the mouth is open and happy. Inside, add a curve for the top row of teeth and a small tongue at the bottom. A tiny hook makes the nose. Under his left eye (on your right), draw a short curved scar with two stitch marks across it.
💡 Tip: Little curved lines at the mouth corners push the cheeks up and make the smile feel bigger.
Step 11: Ink the lines and erase the guides
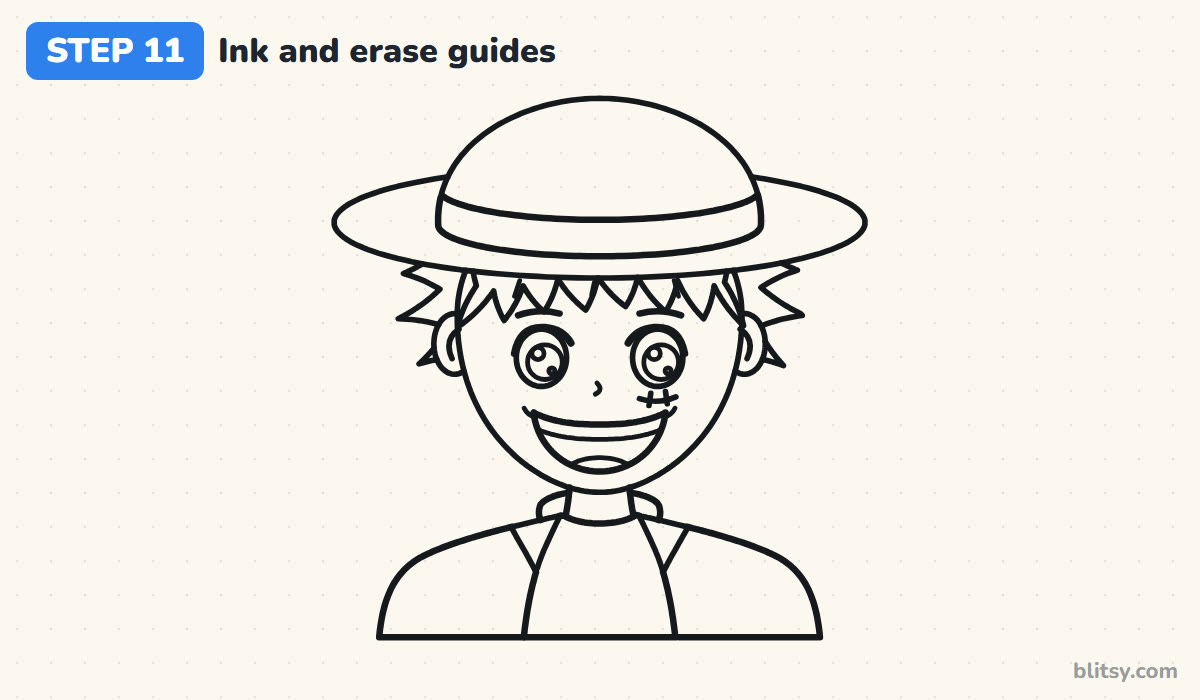
Trace every keeper line with your pen. I usually ink the face first, since a shaky hand shows most there, and save the hat for last. Don't ink the circle, the hat guides or the chin lines. Wait until the ink is fully dry, then erase all the pencil underneath.


💡 Tip: Press a bit harder on the outer outline than on inner details like the teeth and strands.
Step 12: Color your Luffy
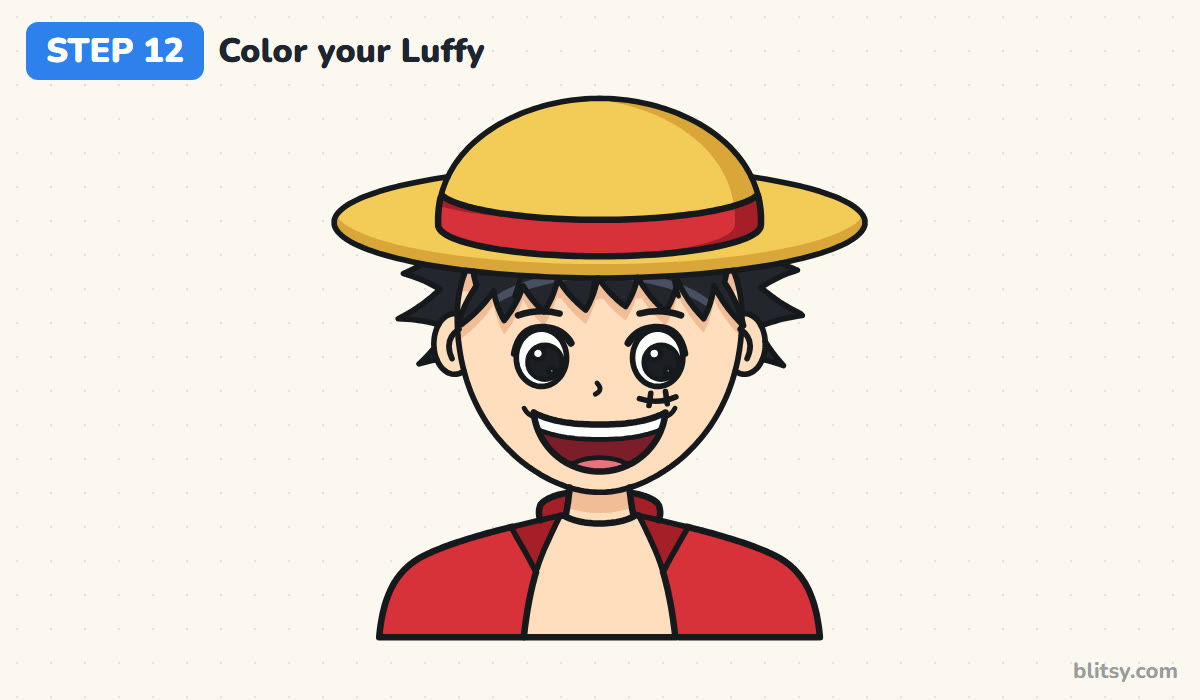
Color the hat straw yellow, darker along the right side and the front of the brim. The band and vest are red. Fill the hair black with a gray streak in the bangs as a shine. Use peach for the skin, a shade darker just below the hat and the bangs. Inside the mouth goes dark red with a pink tongue, and the teeth stay white.
💡 Tip: Shade the skin right under the brim first; that small shadow makes the hat look like it's really on his head.
Luffy Faces That Lose Their Grin
- A hat that's too small. A narrow brim makes it look like a party hat. Stretch the ellipse to almost twice the head width.
- The whole brim drawn as one ring. The back of the brim should hide behind the dome. Erase that part so the hat sits right.
- A small, polite smile. Luffy without a giant grin looks like someone else. Open the mouth wide and show the top teeth.
- Neat, even hair. Tidy spikes make him look combed. Mix long and short points and let the side spikes stick out.
- The scar on the wrong side. It belongs under his left eye, which is on your right when he faces you.
Swapping Moods and Outfits on Your Captain
Once this version feels easy, my favorite change is the face: squint the eyes into happy arcs or open the mouth wider for a shout. You can also hang the hat behind his neck on its string and show the full head of hair. Smaller kids can skip the stitches and lapels. For another character in a similar style, the anime drawing tutorial is a good next stop, and the Goku drawing tutorial makes a fun spiky-haired pair with this one.
Luffy Coloring Page Plus a Step Guide You Can Print
If you'd rather color first, the free Luffy coloring page has the inked outline, a small colored example and a color key next to it. The printable step-by-step guide puts all 12 steps and tips on a few pages for Letter or A4 paper.
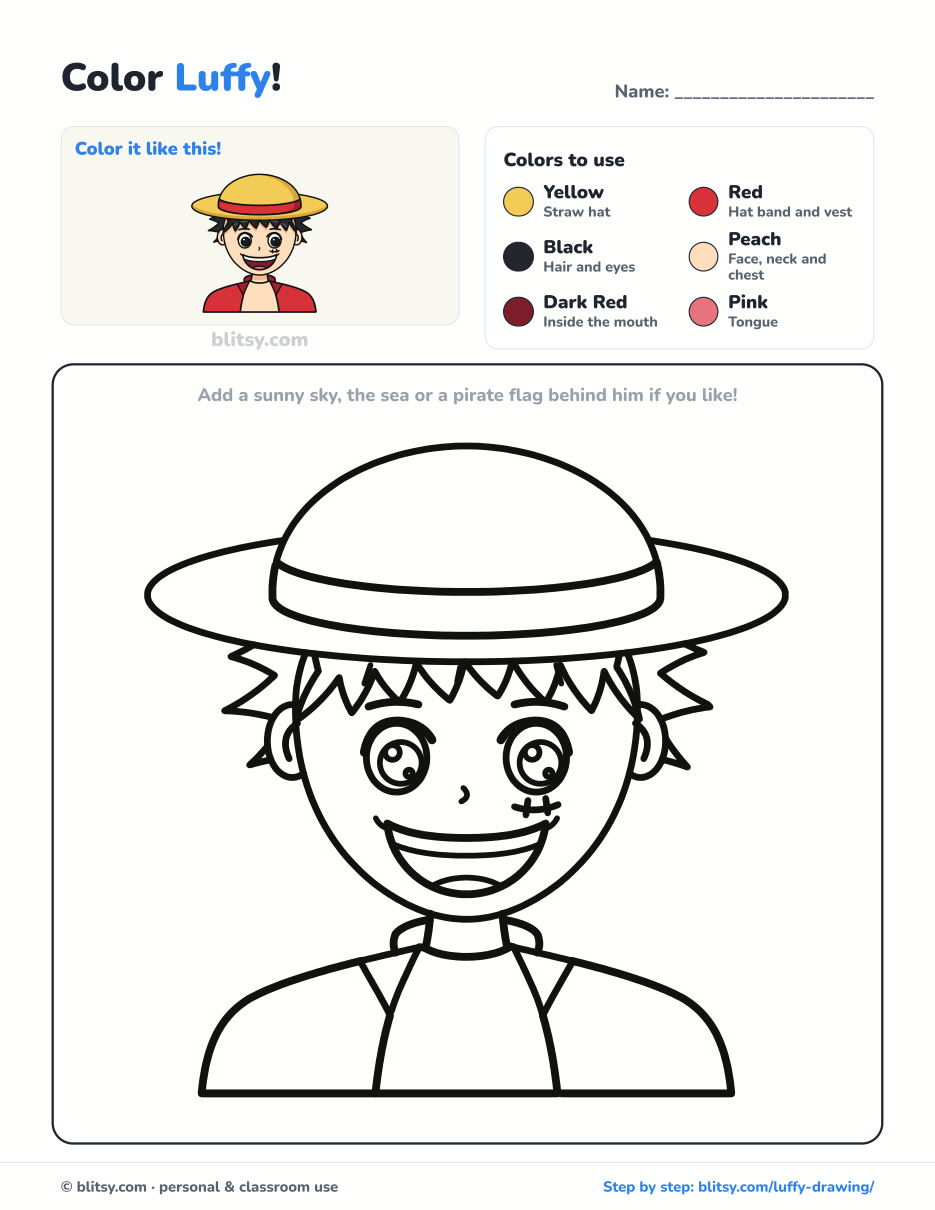
Black outlines with a colored example and the color names at the top. Ready to print and color.
⬇️ Download Coloring PageEvery step picture with its instructions and tips, to keep beside your paper while you draw.
⬇️ Download Drawing Guide📱 On a phone? Tap a download button, then open the file and choose Share → Save to Files or Print. On a computer, the PDF opens or saves straight to your Downloads folder.
Twelve Luffy Steps Saved to One Pin
Luffy Fans, Try These Character Tutorials Too
These links open step-by-step tutorials for more characters and a few practice subjects, each starting from simple shapes.
- Raccoon Drawing: Draw a masked raccoon with its tail up in this how to draw a raccoon step by step lesson.
- Heart Drawing: The heart drawing tutorial uses two circles and a V for an even shape, then adds three smaller hearts.
- Anime Girl Drawing: Pink bangs and purple eyes with two shines finish the anime girl drawing tutorial.
- Olaf Drawing: The snowman from Frozen stands with his arms up in the how to draw Olaf lesson.
- Side Profile Drawing: Learn to draw a head from the side with the side profile drawing tutorial.
- Hands Drawing: Luffy's fists get easier after the hands drawing step by step lesson, which starts with an open palm.
- Hulk Drawing: A chibi Hulk raises both fists in this Hulk drawing tutorial.
- Fortnite Drawing: The Fortnite llama drawing tutorial draws the piñata llama on its four stubby legs.
- Mario Drawing: Draw a chibi Mario with a bushy mustache and one waving glove in the how to draw Mario lesson.
- Phoenix Drawing: Wings up and tail blazing, the bird in this phoenix drawing step by step guide is a good color exercise.
- Nezuko Drawing: Another anime favorite, drawn chibi size, in the Nezuko drawing tutorial.
- Wonder Woman Drawing: The Wonder Woman drawing tutorial gives her a tiara, a lasso and hands on her hips.
- Todoroki Drawing: Split the hair into ice and fire colors with the how to draw Todoroki lesson.
- Rosa Parks Drawing: For a real person, try the Rosa Parks drawing tutorial, a calm portrait with glasses and a white collar.
One Piece Fans Ask Me These Drawing Questions
What is the easiest way to draw Luffy?
Start with the hat. A flat ellipse with a dome on top gives you his outline right away, and everything else fits underneath it.
How do you draw Luffy's straw hat?
Draw a wide, flat oval for the brim and a half circle on top for the crown. Add a curved stripe near the base of the dome for the red band and erase the brim line behind the crown.
Which eye is Luffy's scar under?
His left eye. When he faces you, that's the eye on your right. It's a short curved line with two small stitch marks.
How long does it take to draw Luffy?
About 30 minutes with coloring. The grin and the hair spikes take the most care, and your second try will be quicker.
Sharpen your pencil, draw that flat oval for the brim, and give your Luffy the biggest grin you can. 👒✏️
Related posts:
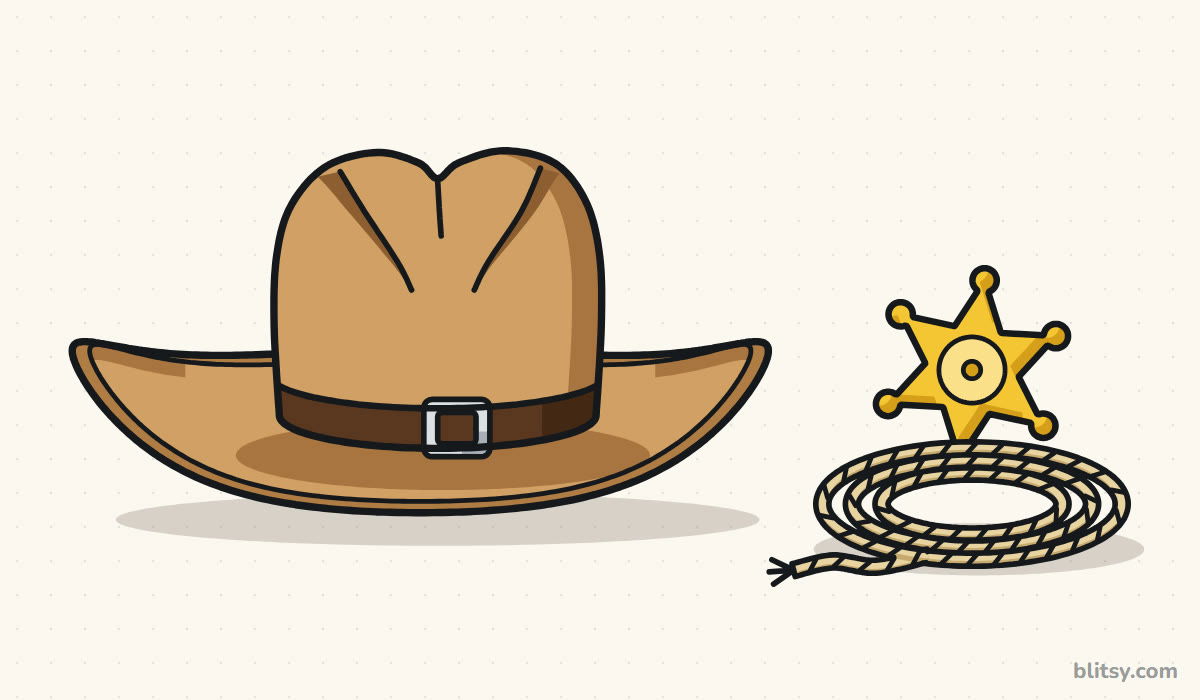 How to Draw a Cowboy Hat Step by Step (Easy Western Sketch)
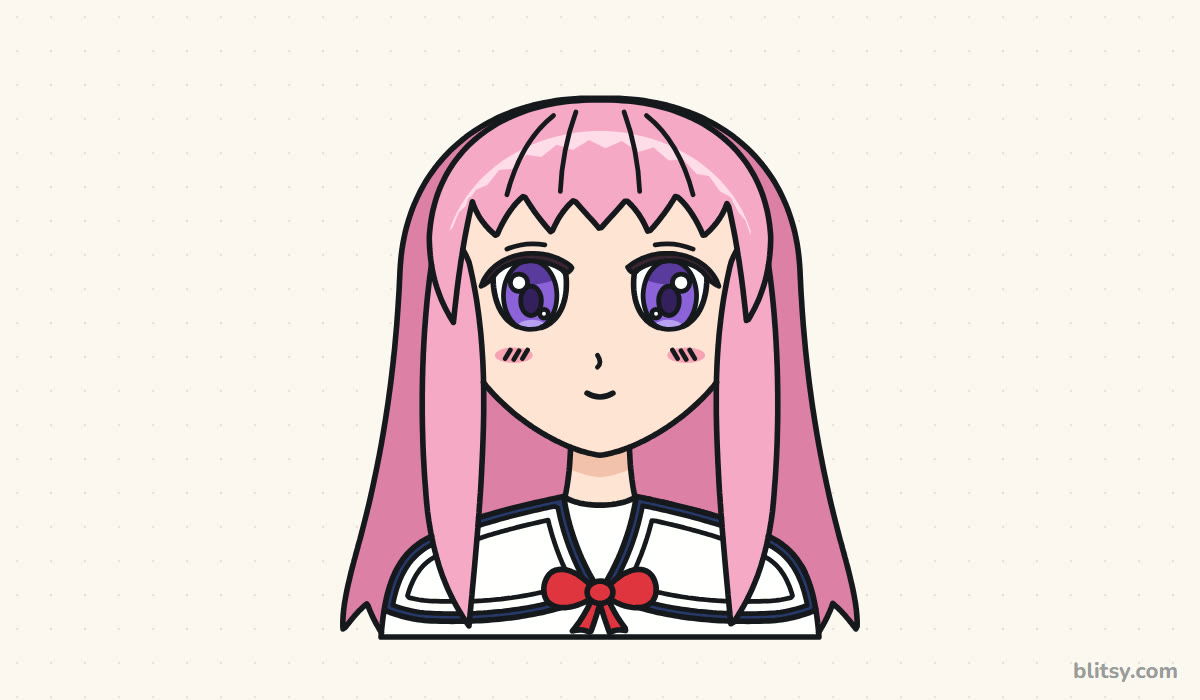 How to Draw an Anime Girl Step by Step (Easy Face Guide)
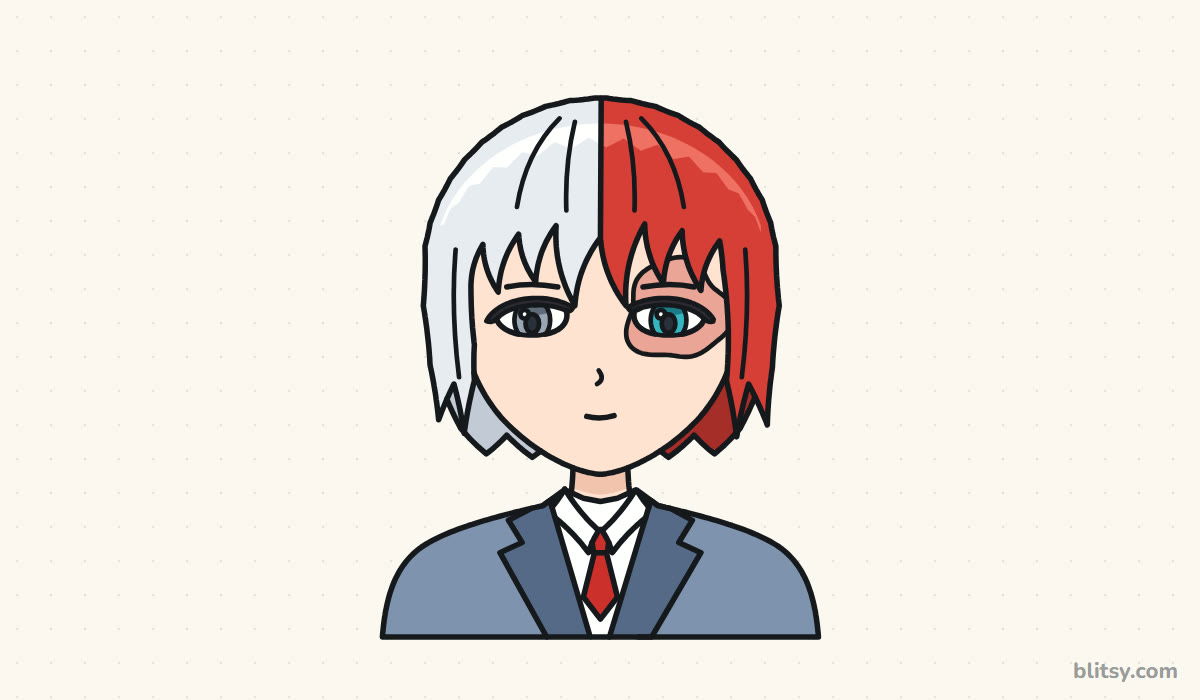 How to Draw Todoroki Step by Step (Easy Fire and Ice Guide)
 How to Draw a Snow Leopard Step by Step (Easy Guide)
 How to Draw a Cat Face Step by Step (Easy Tabby Guide)
 How to Draw a Face Step by Step (Easy Proportions Guide)
 How to Draw a Side Profile Step by Step (Easy Head Guide)
 How to Draw a Jellyfish Step by Step (Cute, Easy Guide)
 How to Draw a Magnolia Flower Step by Step (Easy Guide)
 How to Draw a Whale Step by Step (Easy for Beginners)
 How to Draw Lungs Step by Step (Easy Science Diagram)
 How to Draw a Pineapple Step by Step (Easy Crown and Slice)

