
Split a boy's hair straight down the middle, white on one side and red on the other, and any My Hero Academia fan knows who you mean. Here you'll learn how to draw Todoroki step by step, from a single light circle to a colored portrait in his school blazer. This is my own simple fan-art version for practice, not official art, so if your lines drift a little from the show, that's completely fine.
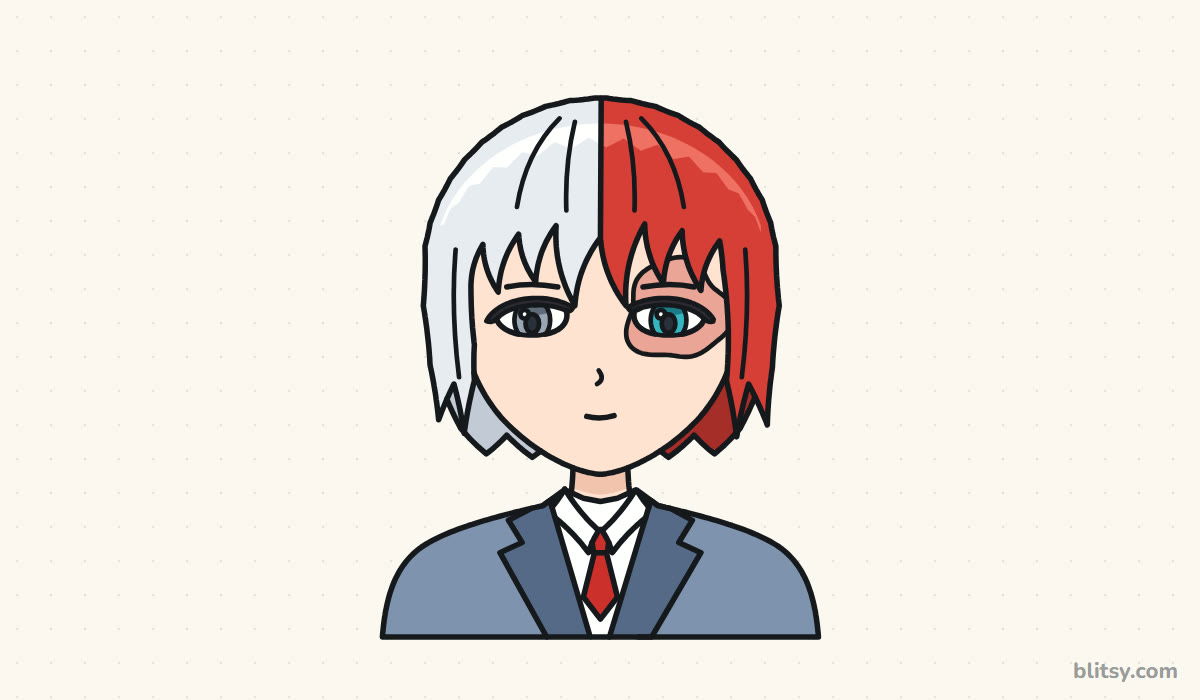
Lines you add in a step show up in blue. Gray lines are from earlier steps, and the faint blue helper shapes get erased once the drawing is inked.
Quick overview
⏱️ Time: about 35 minutes, plus coloring
🎯 Level: easy to medium, good for ages 9 and up
✏️ Steps: 12
❄️ You'll draw: Todoroki from the shoulders up, in his gray-blue blazer and red tie
Supplies That Handle White Hair and Red Hair
- A pencil with a light touch (HB or 2B) for the guide shapes
- A clean eraser, plus a kneaded one if you have it
- A black fineliner or thin marker for the final lines
- Colored pencils: red, turquoise, peach, gray-blue and a light gray
- A soft rose or pink pencil for the scar
- Smooth white paper, held upright
His white hair is mostly left as paper, so you only need a pale gray to shade it.
How to Draw Todoroki Step by Step
Step 1: Draw a head circle and a center line
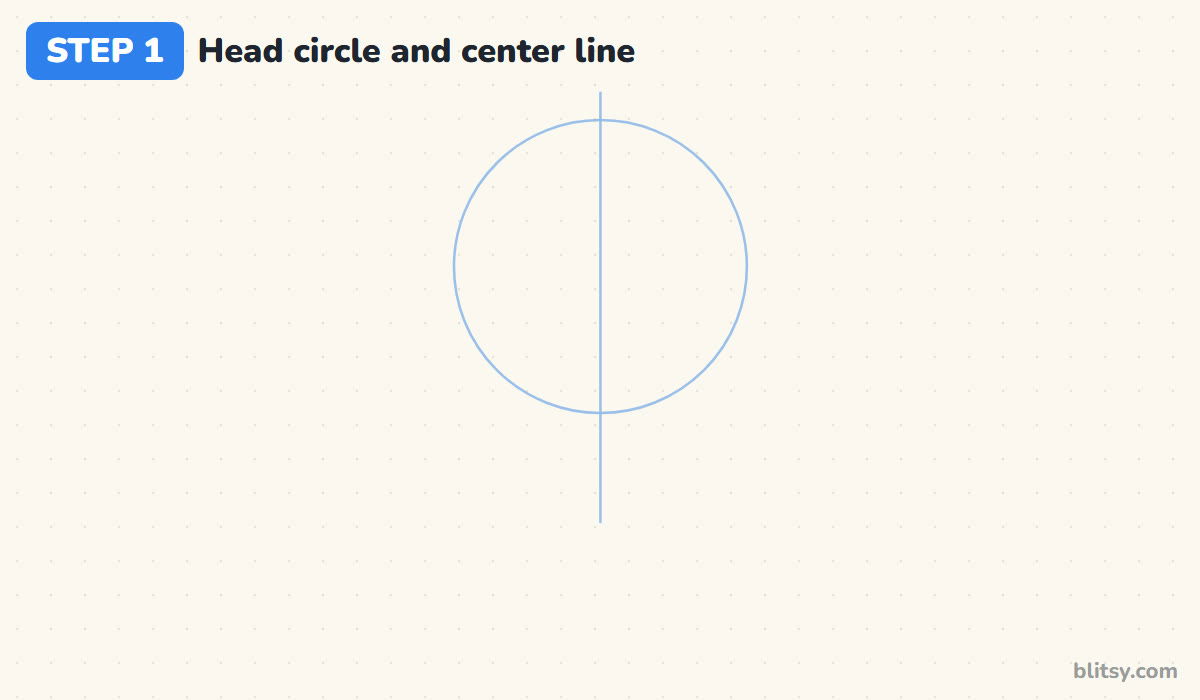
Start with a light circle a little above the middle of the page. I leave plenty of room below it, since the neck and blazer take up almost half the picture. Then run a straight vertical line through the circle and past it. That line matters more than usual here, because it becomes the part in his hair.
💡 Tip: Hold the pencil further back from the tip; it keeps guide lines faint without trying.
Step 2: Add the jaw and eye guides
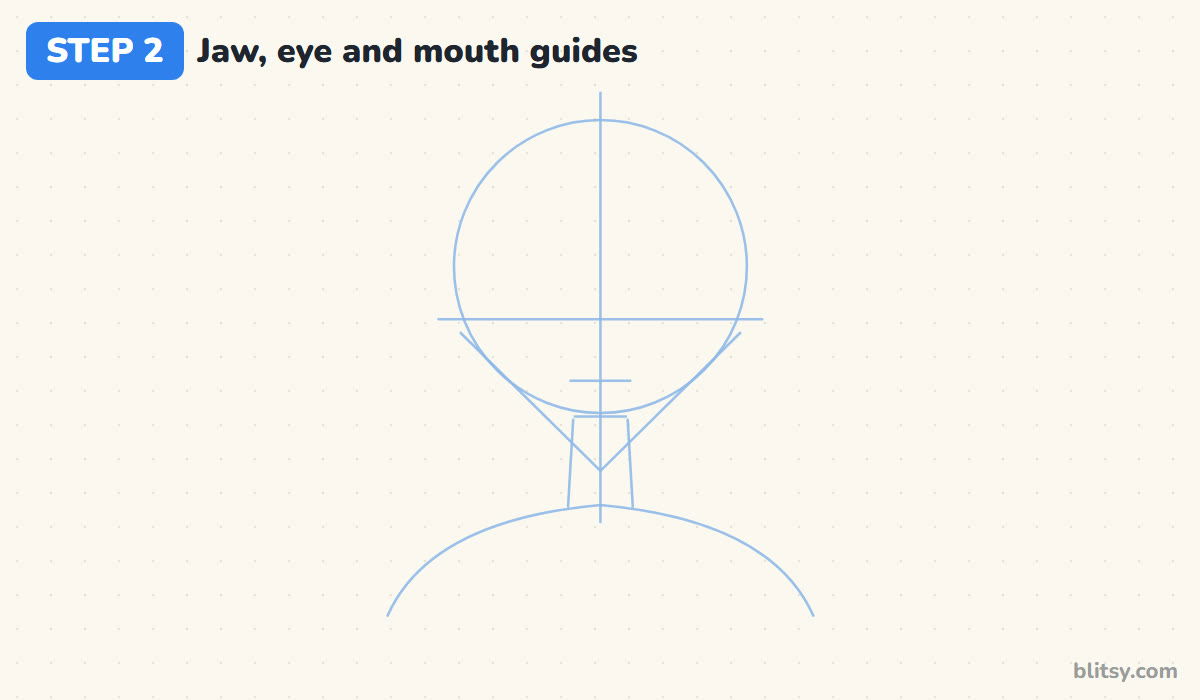
Draw a level line across the lower half of the circle for the eyes. Below the circle, add two short marks on the center line, one for the nose and one for the mouth. From both sides of the circle, angle two lines down to a point under it. Finish with two neck lines and a wide curve for the shoulders.
💡 Tip: If the chin point sits too low, the face turns long and older looking, so keep it close to the circle.
Step 3: Shape the face and the neck
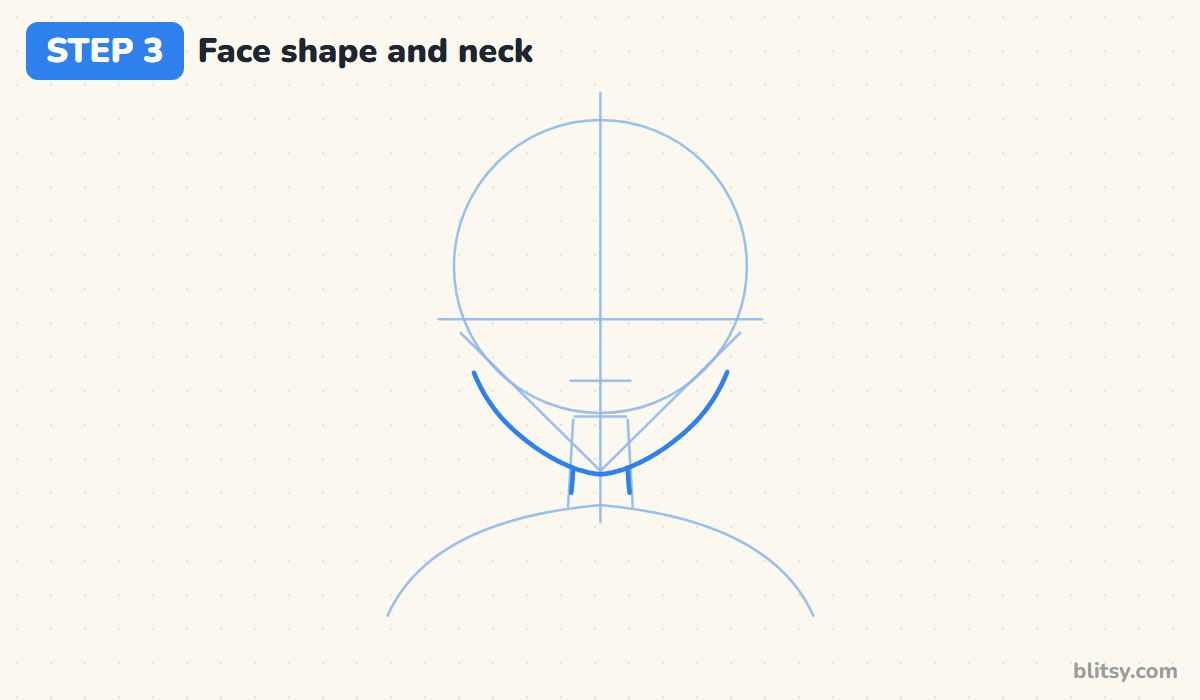
Follow the circle down each side, then curve the cheeks inward toward the chin point. His jaw is slim but not sharp, so round off the very bottom. You only need the lower half of the face, as the hair will cover the rest. Draw the neck straight down from the jaw guides.


💡 Tip: Make the neck a touch narrower than the space between the eyes.
Step 4: Draw the blazer and its lapels
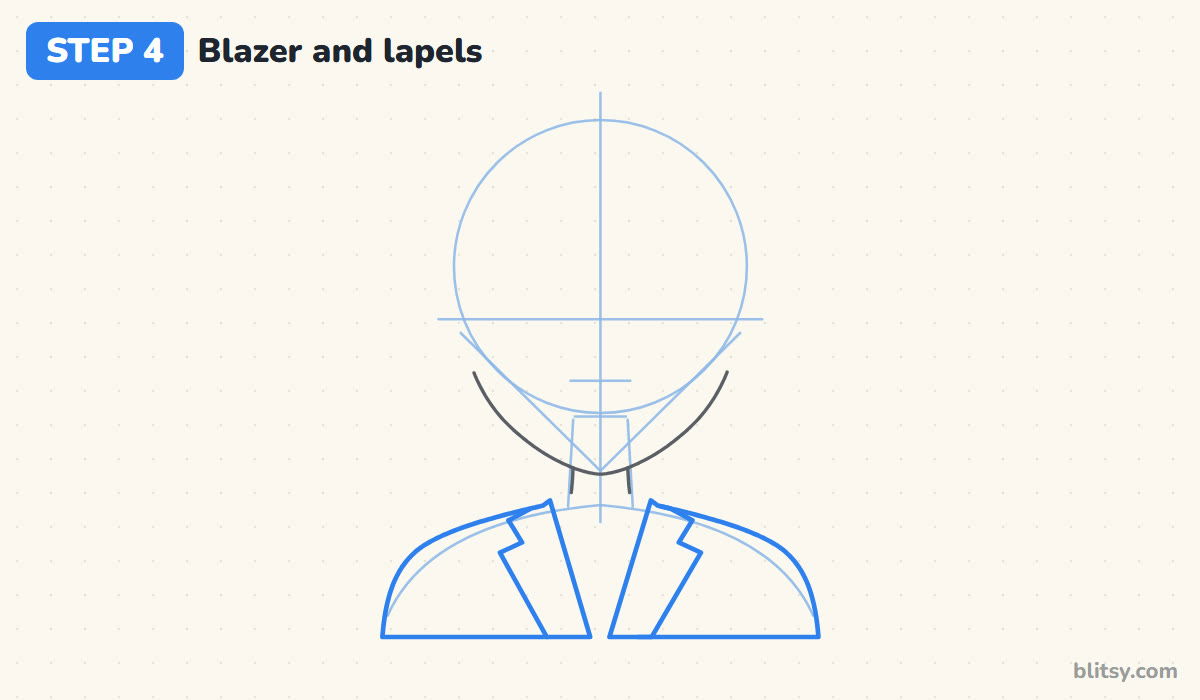
Slope the shoulders out from the neck and drop them straight down to a flat bottom edge. Inside, draw two lapels that meet in a V low on the chest. Each lapel gets a small notch near the top, which is what makes it read as a school blazer instead of a sweater.
💡 Tip: Keep both notches at the same height by checking them against the shoulder curve.
Step 5: Add the shirt collar and the tie
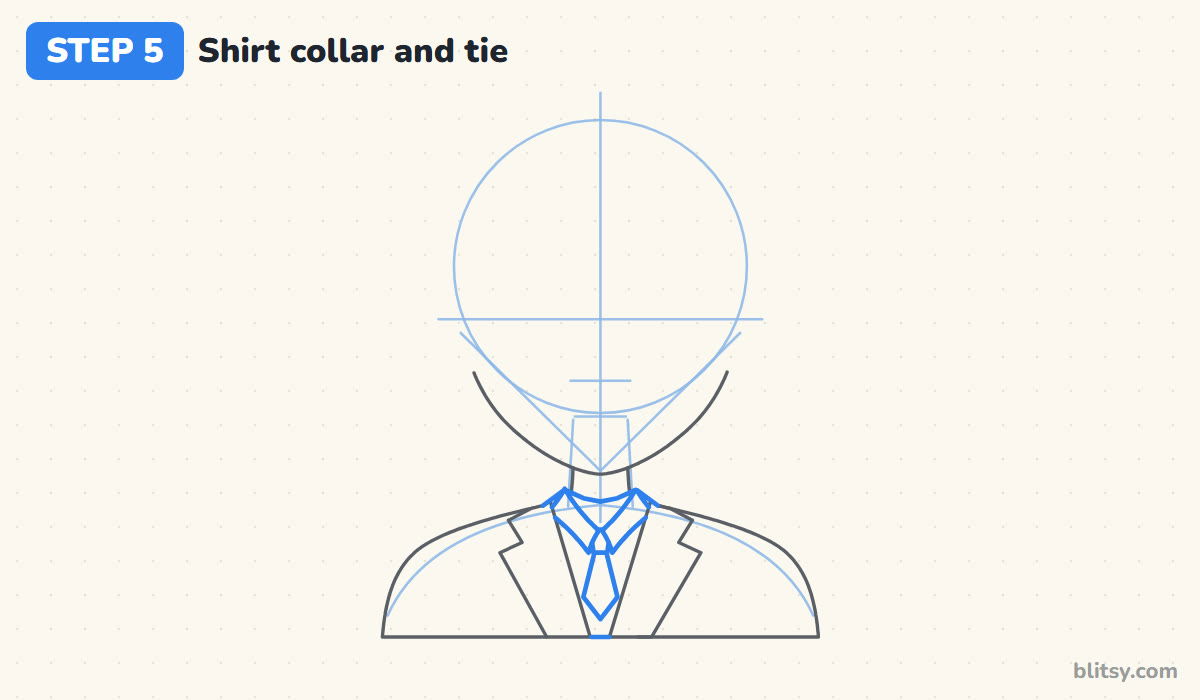
Between the lapels, draw a curved collar band around the base of the neck. Two small pointed collar flaps hang down from it. Right under the flaps, a little knot shape starts the tie, and a thin blade runs down from the knot to a point.
💡 Tip: Draw the knot first and then tuck the collar points over its top corners.
Step 6: Draw the parted hair and the bangs
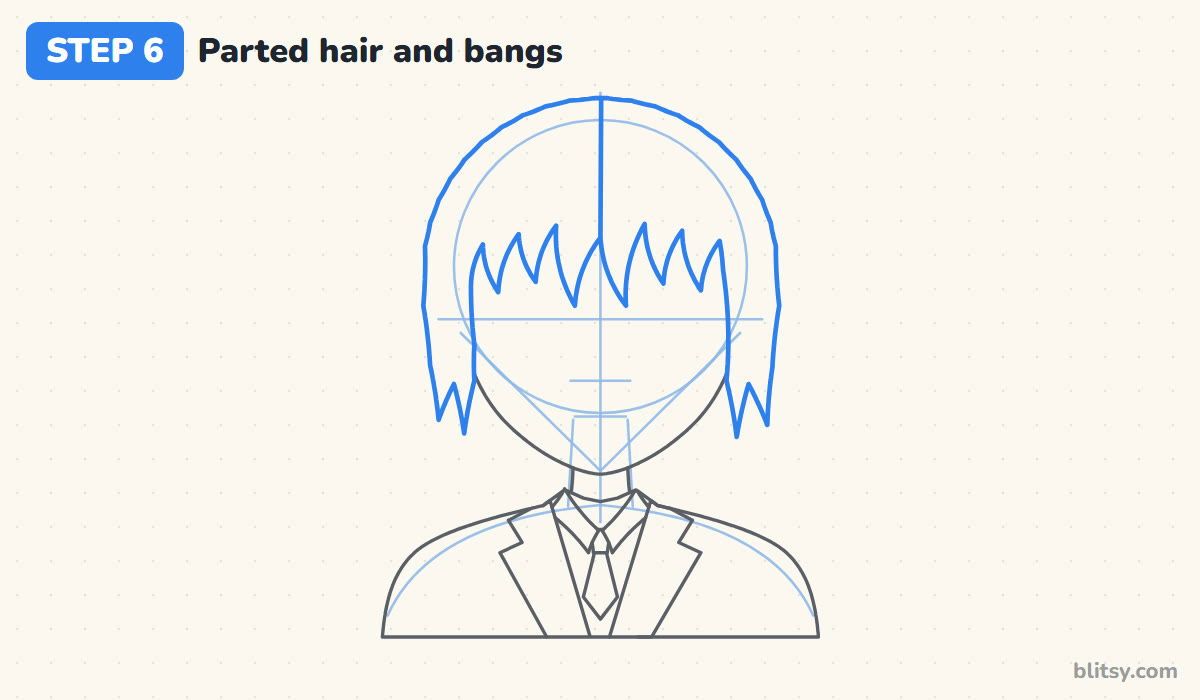
This step decides whether it looks like him. Trace a rounded hair shape slightly bigger than the circle, then let it fall down both sides of the face to about the cheeks, ending in a few uneven points. For the bangs, draw strands that start at the center line and sweep outward, so each tip leans away from the part. The center line itself becomes the part.
💡 Tip: Give the two strands next to the part the longest tips, and make the outer ones shorter.
Step 7: Add the back hair and a few strands
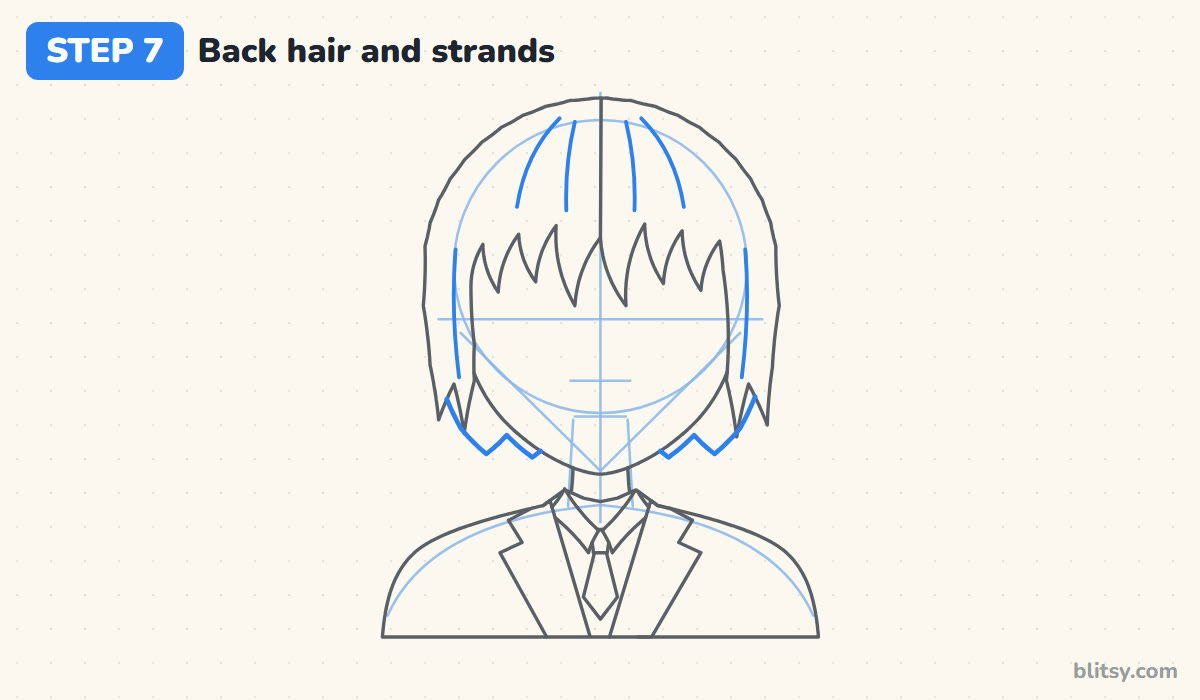
Below the side hair, a few short points peek out behind the neck. They make the hair look like it wraps around the head. Inside the top of the hair, add three or four long curved lines that flow from the part down toward the bangs.
💡 Tip: Strand lines should follow the direction the hair grows, never cross it.
Step 8: Draw calm, half-closed eyes
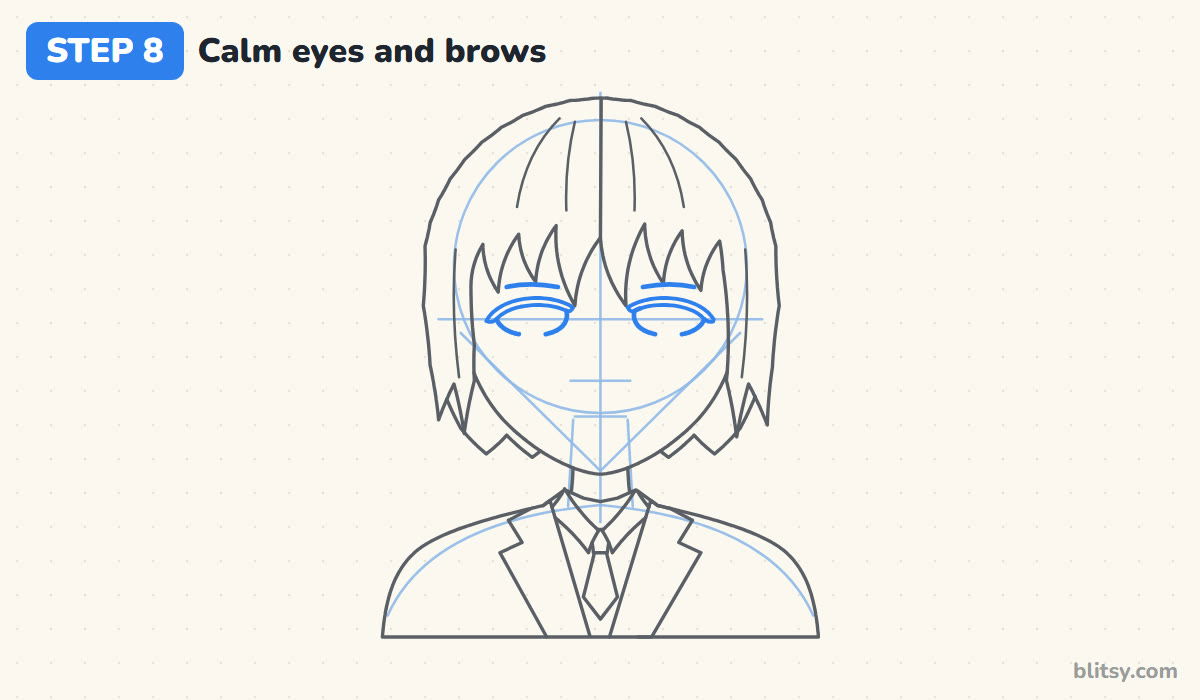
Todoroki rarely looks surprised, so I draw his eyes wider than they are tall, with a fairly flat top lid. Place one on each side of the center line, sitting on the eye guide and about one eye width apart. Thicken the upper lid into a dark lash line. Straight, slightly slanted brows go just above, half hidden by the bangs.
💡 Tip: A flatter upper lid looks calm, while a round arch makes him look startled.
Step 9: Add the irises, pupils and shines
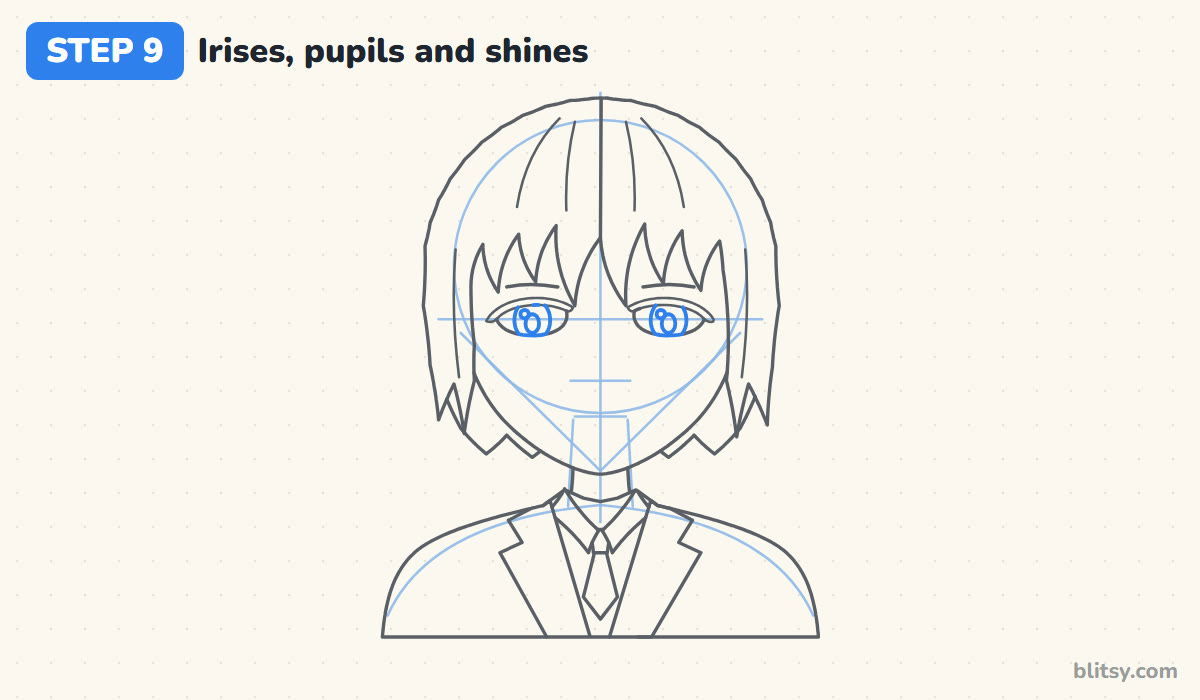
Draw a tall oval iris in each eye and let the upper lid cut off its top. That cropped top is a big part of his sleepy, steady look. Add a small dark pupil in the middle and one tiny circle for the shine.
💡 Tip: Put both shines on the same side of the eyes, or his gaze will look crossed.
Step 10: Draw the nose, mouth and scar
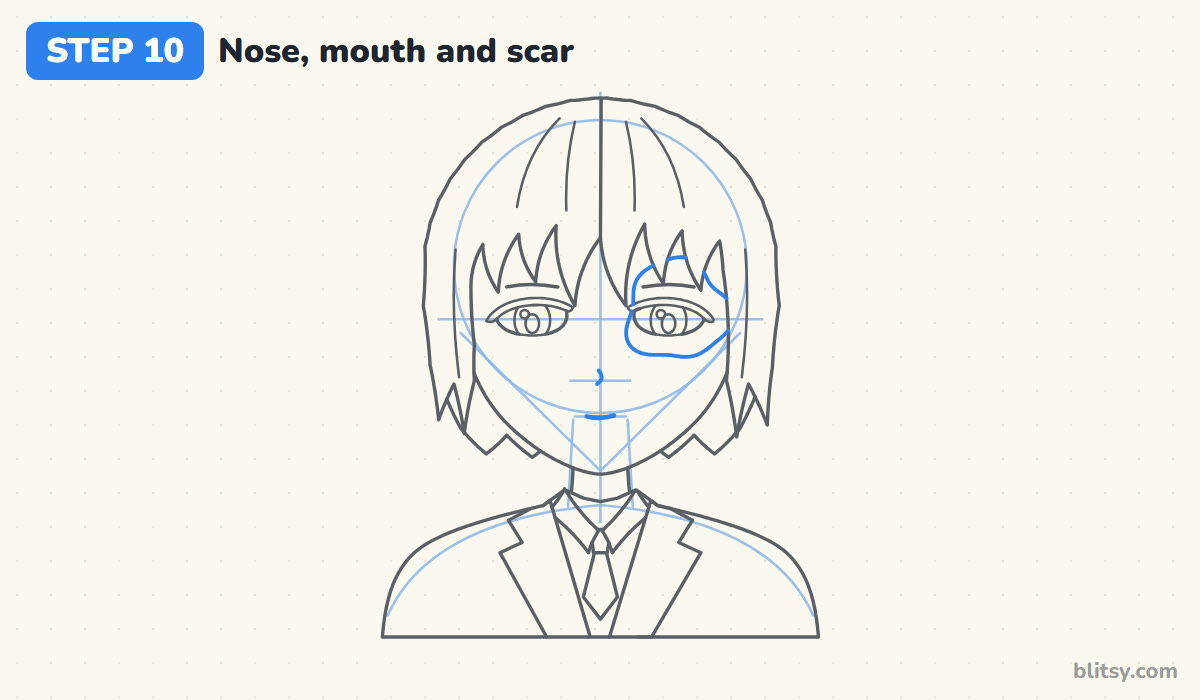
A tiny hook on the nose mark is enough. On the mouth mark, draw a short, almost flat line with the faintest upward curve. Then outline the scar: a soft, uneven patch around the eye on the red side, from just under the brow to the top of the cheek. Most beginners press too hard on the scar outline, so draw it lighter than the eyes.
💡 Tip: Keep the scar edge wobbly; a perfect oval reads as a pair of glasses.
Step 11: Ink the keeper lines and erase the guides
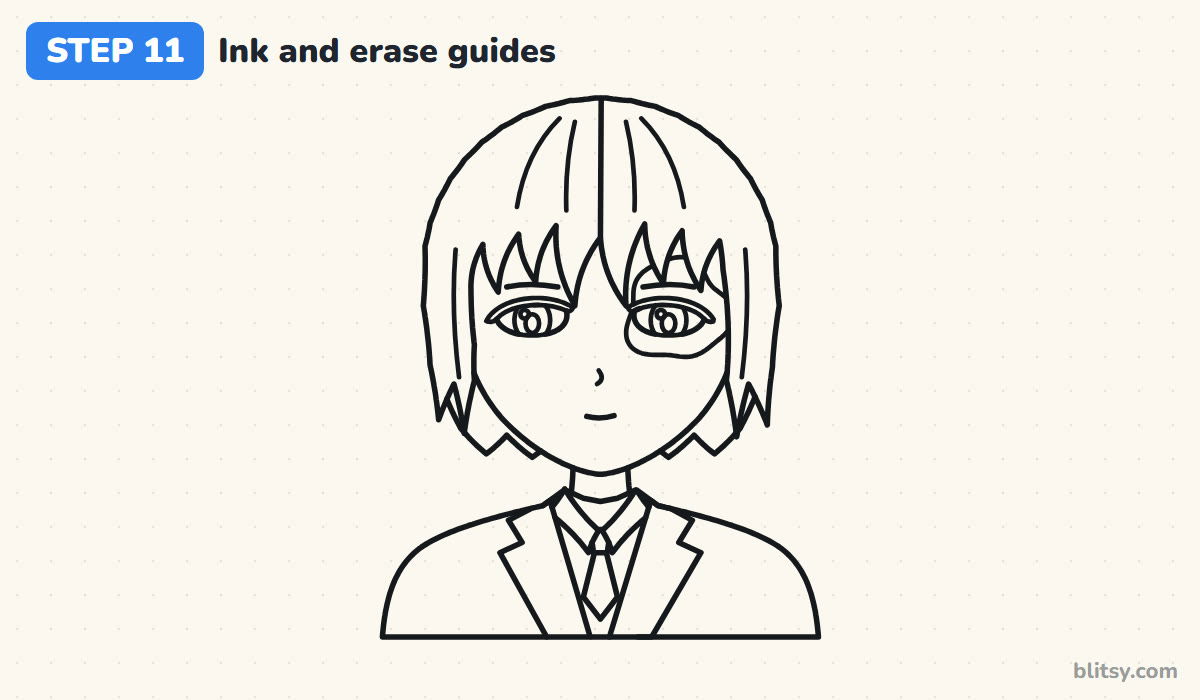
Go over every final line with your pen. I ink the eyes and mouth first while my hand is fresh, then the hair and the blazer. Skip the head circle, the jaw lines and the eye line. Once the ink is fully dry, erase all of the pencil underneath.


💡 Tip: Use a thinner pen for the scar and the hair strands, and a bolder one for the outer outline.
Step 12: Color your Todoroki
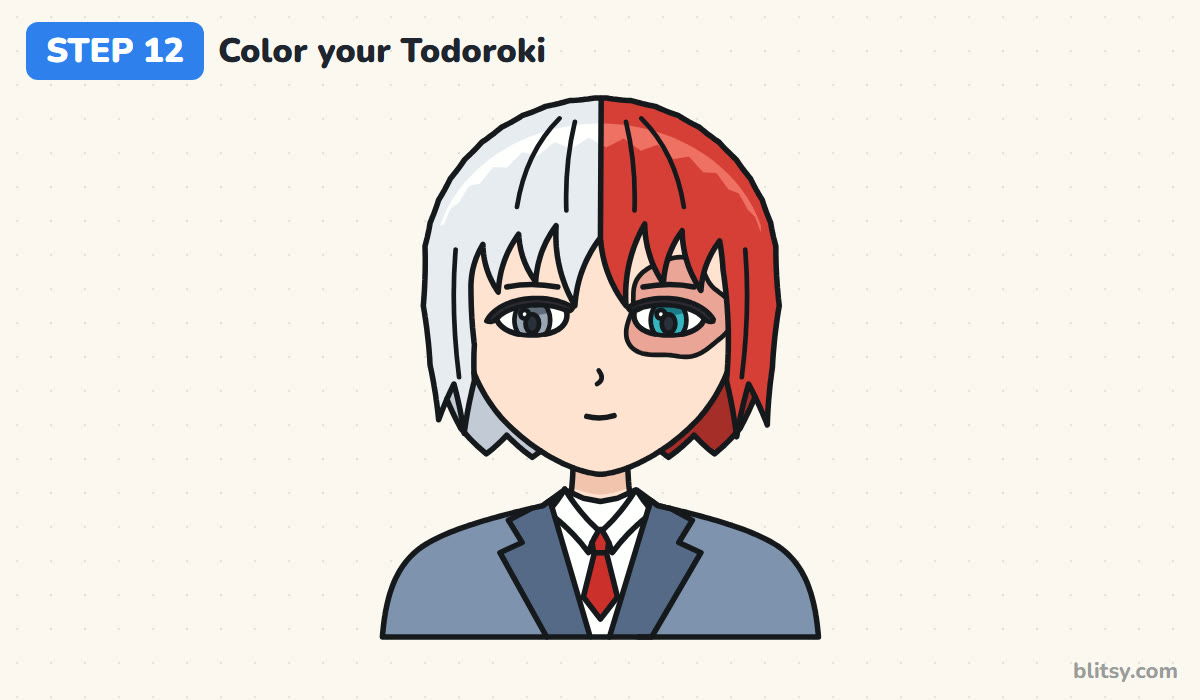
On your left, his hair is white, so leave the paper and add a pale gray just under the bangs. The other side is a bright red, darker near the bottom. The eye on the white side is gray and the other one is turquoise. Fill the scar with soft rose, the blazer gray-blue with darker lapels, and the tie red.
💡 Tip: Color the red hair with small strokes going the way the strands fall, and you'll get shine for free.
Why a Todoroki Sketch Can Look Like Someone Else
- The colors on the wrong sides. From where you sit, white goes on the left and red on the right. Mark the sides lightly before you color.
- A wavy or off-center part. The split has to run straight down the middle. Use the center line from step 1 as a ruler.
- Wide, sparkly eyes. Big round eyes make him look like a different character. Flatten the upper lid and crop the top of the iris.
- A dark, heavy scar. A thick black outline looks like a bruise. Keep the line thin and the color a soft rose.
- Bangs like a saw blade. Even, matching points look stiff. Vary the length and lean every tip away from the part.
Changing Todoroki's Outfit and Mood
When the school version feels easy, try his hero costume: swap the blazer for a dark blue jacket and add a small patch of ice on one shoulder. You can also draw a faint glow of flames on the red side and frost on the other. Younger artists can leave out the lapel notches and the back hair. For more characters in the same style, try the easy anime drawing tutorial, and the male face drawing step by step lesson is useful for practicing jaws and eyes.
Todoroki Coloring Page and a Printable Step Sheet
The free Todoroki coloring page has thick outlines, a colored example to copy and a key for every part. There's also a printable step-by-step guide with all 12 steps and tips, sized for Letter or A4 paper.
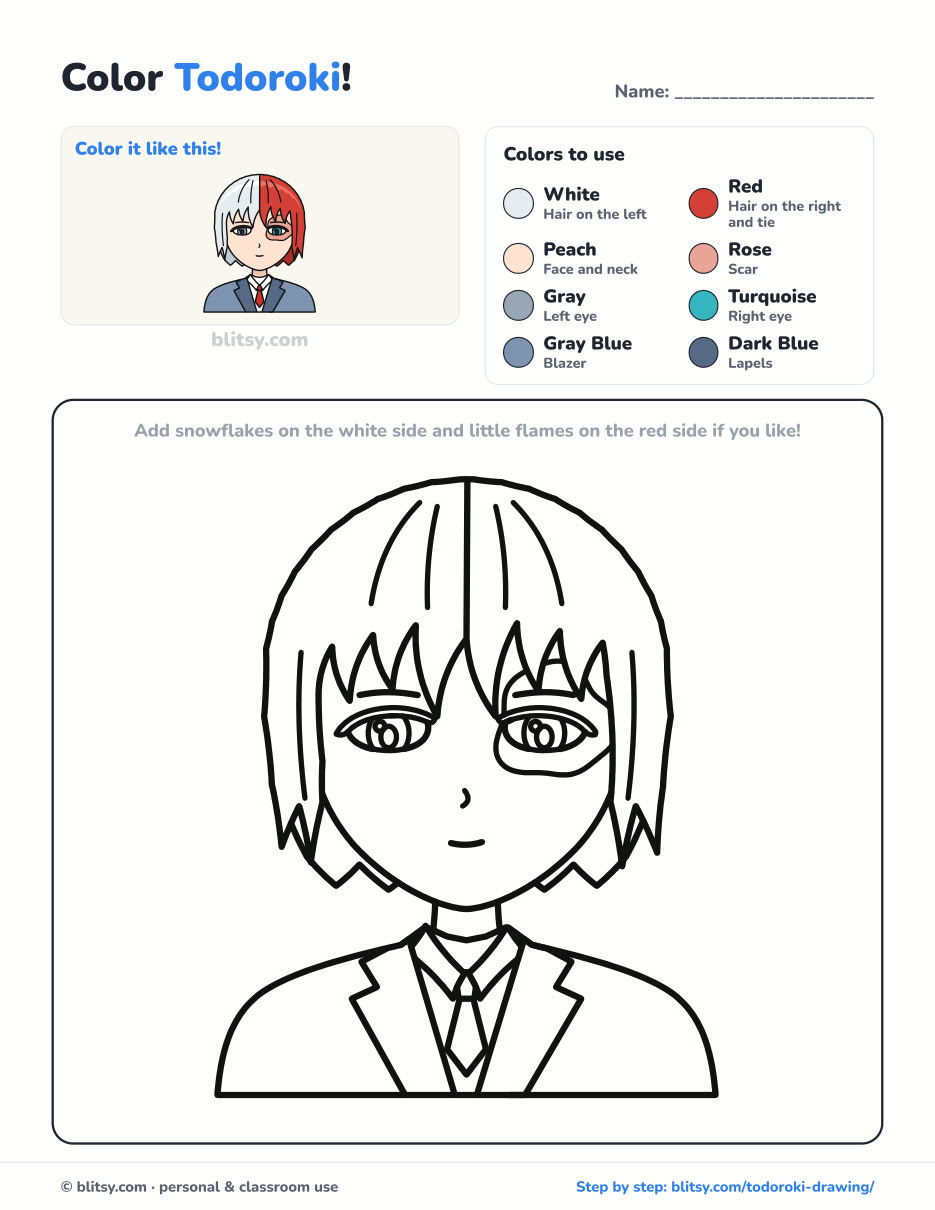
Black outlines with a colored example and the color names at the top. Ready to print and color.
⬇️ Download Coloring PageEvery step picture with its instructions and tips, to keep beside your paper while you draw.
⬇️ Download Drawing Guide📱 On a phone? Tap a download button, then open the file and choose Share → Save to Files or Print. On a computer, the PDF opens or saves straight to your Downloads folder.
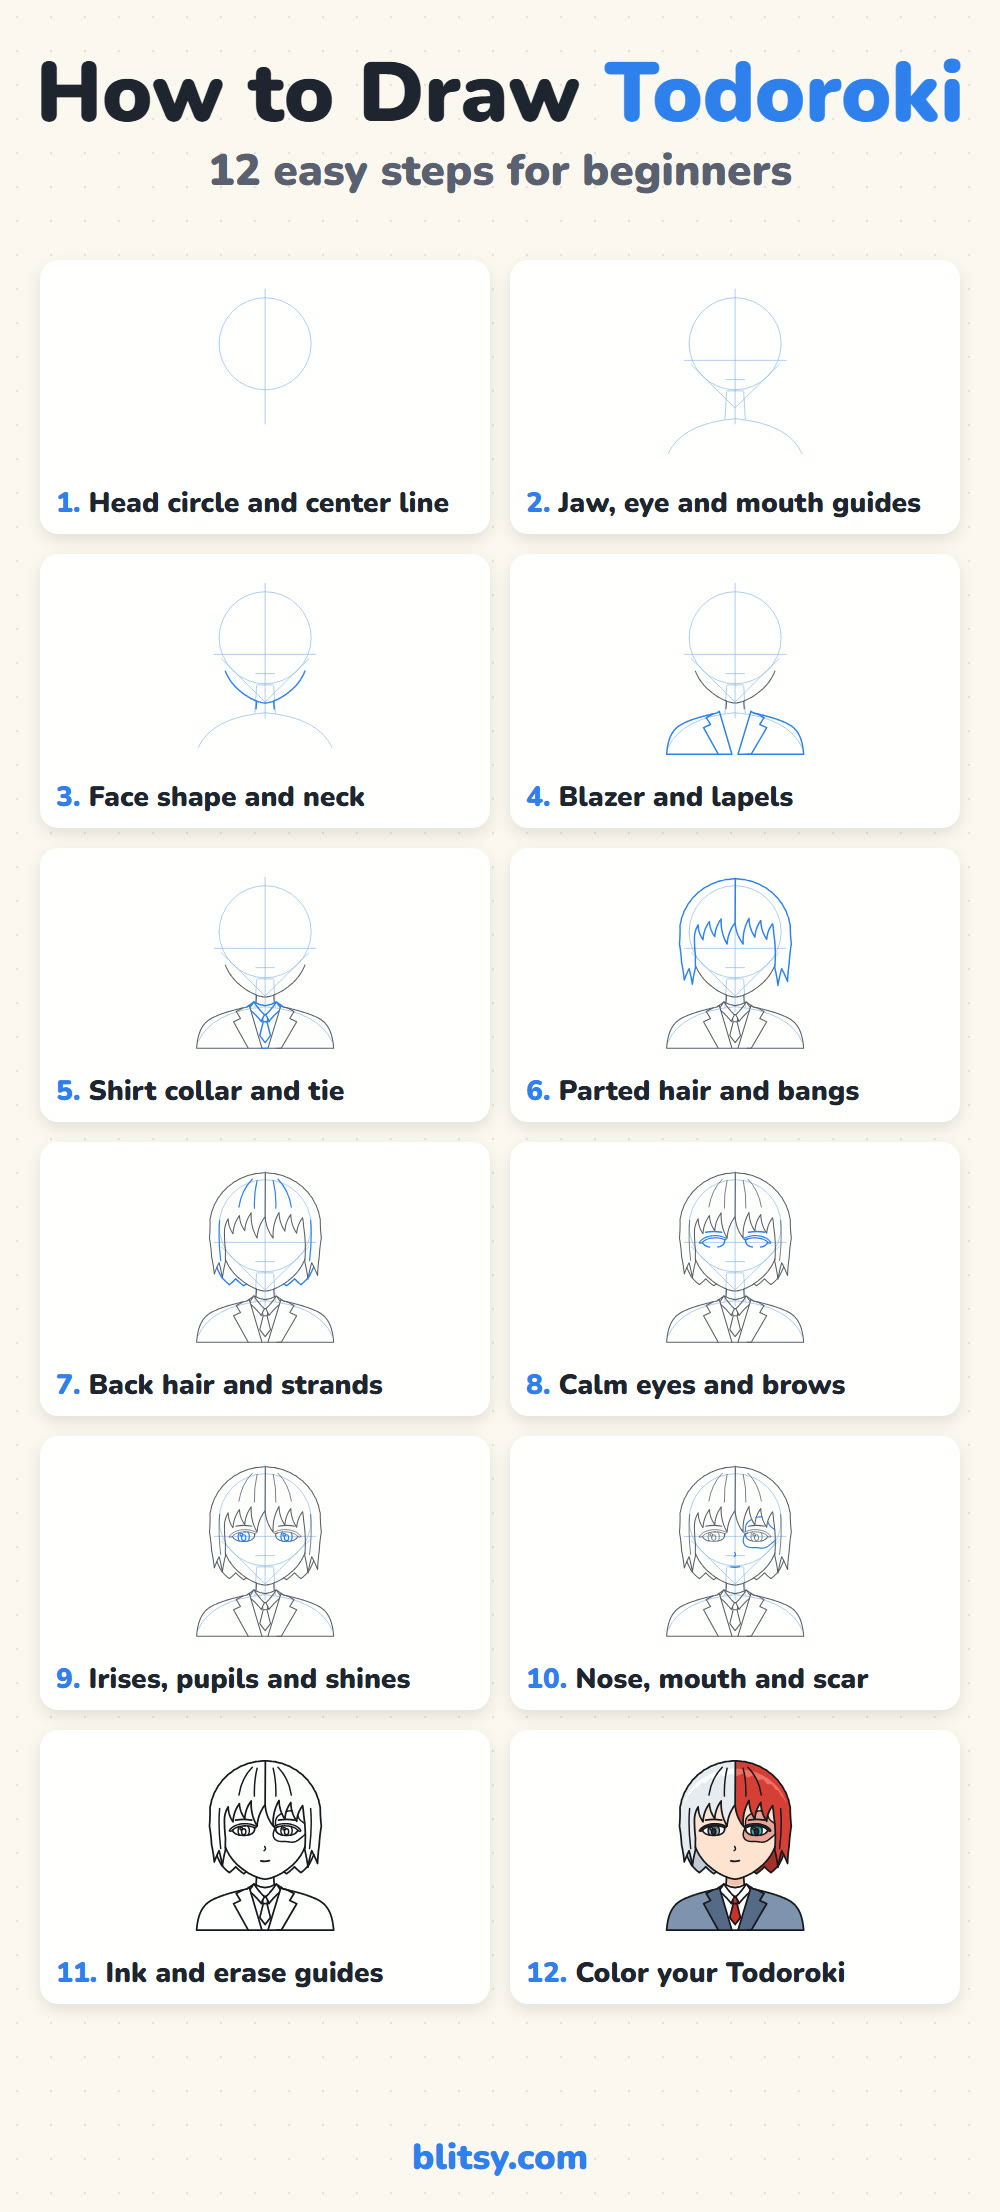
One Tall Pin With Every Todoroki Step
Todoroki Done? More Heroes and Portraits to Draw
Below are step-by-step tutorials, from chibi heroes to face and hand practice, each with a picture for every step.
- Wonder Woman Drawing: Draw a chibi Wonder Woman with her tiara and lasso in this Wonder Woman drawing tutorial.
- Rosa Parks Drawing: The Rosa Parks drawing step by step portrait takes you to soft glasses, a white collar and a calm expression.
- Fortnite Drawing: Learn how to draw the Fortnite llama, the piñata on four stubby legs, in 11 steps.
- Phoenix Drawing: If you liked the fire side, the phoenix drawing tutorial ends with a fire bird, wings up and tail blazing.
- Side Profile Drawing: Measuring lines do the hard work in this side profile drawing step by step guide.
- Skull Drawing: Draw a front-view skull with dark sockets and two marigolds using the easy skull drawing tutorial.
- Woman Drawing: The how to draw a woman lesson starts by marking six head heights for the body.
- Nezuko Drawing: Another anime favorite, chibi size, in the Nezuko drawing step by step tutorial.
- Anime Girl Drawing: Pink bangs, purple eyes and a sailor collar are built on one circle in this anime girl drawing tutorial.
- Mario Drawing: Draw a chibi Mario waving hello with the how to draw Mario step by step guide.
- Heart Drawing: The heart drawing tutorial shows how to keep a glossy red heart even, then adds three small variations.
- Hand Drawing: Practise an open palm with five fingers and three palm lines in this hand drawing step by step lesson.
- Ghost Drawing: A waving ghost, a baby ghost and a pumpkin all start from one circle in the cute ghost drawing tutorial.
- Raccoon Drawing: Mask on and tail up, the animal in this raccoon drawing tutorial is ready for a midnight snack.
Questions About Drawing Shoto Todoroki
What is the easiest way to draw Todoroki?
Get the center line right first. His look comes from hair split exactly down the middle, so once that part is straight, the rest of the face falls into place around it.
Which side of Todoroki's hair is red?
His left side is red and his right side is white. When he faces you, the white hair is on your left and the red hair is on your right.
What color are Todoroki's eyes?
One gray and one turquoise. The gray eye sits on the white-hair side, and the turquoise eye is on the red side, inside the scar.
How long does a Todoroki drawing take?
About 35 minutes with coloring. The bangs and the eyes need the most care, and the second try usually goes much faster.
Grab a red pencil and a light gray one, draw that straight part down the middle, and see how calm you can make his face. ❄️🔥
Related posts:
 How to Draw a Phoenix Step by Step (Easy Fire Bird)
 How to Draw a Fire Truck Step by Step (Easy for Kids)
 How to Draw an Anime Girl Step by Step (Easy Face Guide)
 How to Draw Luffy Step by Step (Easy Straw Hat Guide)
 How to Draw a Snow Leopard Step by Step (Easy Guide)
 How to Draw a Cat Face Step by Step (Easy Tabby Guide)
 How to Draw a Face Step by Step (Easy Proportions Guide)
 How to Draw a Side Profile Step by Step (Easy Head Guide)
 How to Draw a Jellyfish Step by Step (Cute, Easy Guide)
 How to Draw a Magnolia Flower Step by Step (Easy Guide)
 How to Draw a Whale Step by Step (Easy for Beginners)
 How to Draw Lungs Step by Step (Easy Science Diagram)

