
A shining bulb is the classic picture for a bright idea, and it's a great first object to draw because it is mostly one big circle. Here you'll learn how to draw a light bulb step by step, with a round glass globe, a tiny coiled filament on two wires, a screw base made of stacked bands and a ring of glow rays. Every part is a circle, a straight line or a rounded strip. If you can trace around a cup, you can draw this.

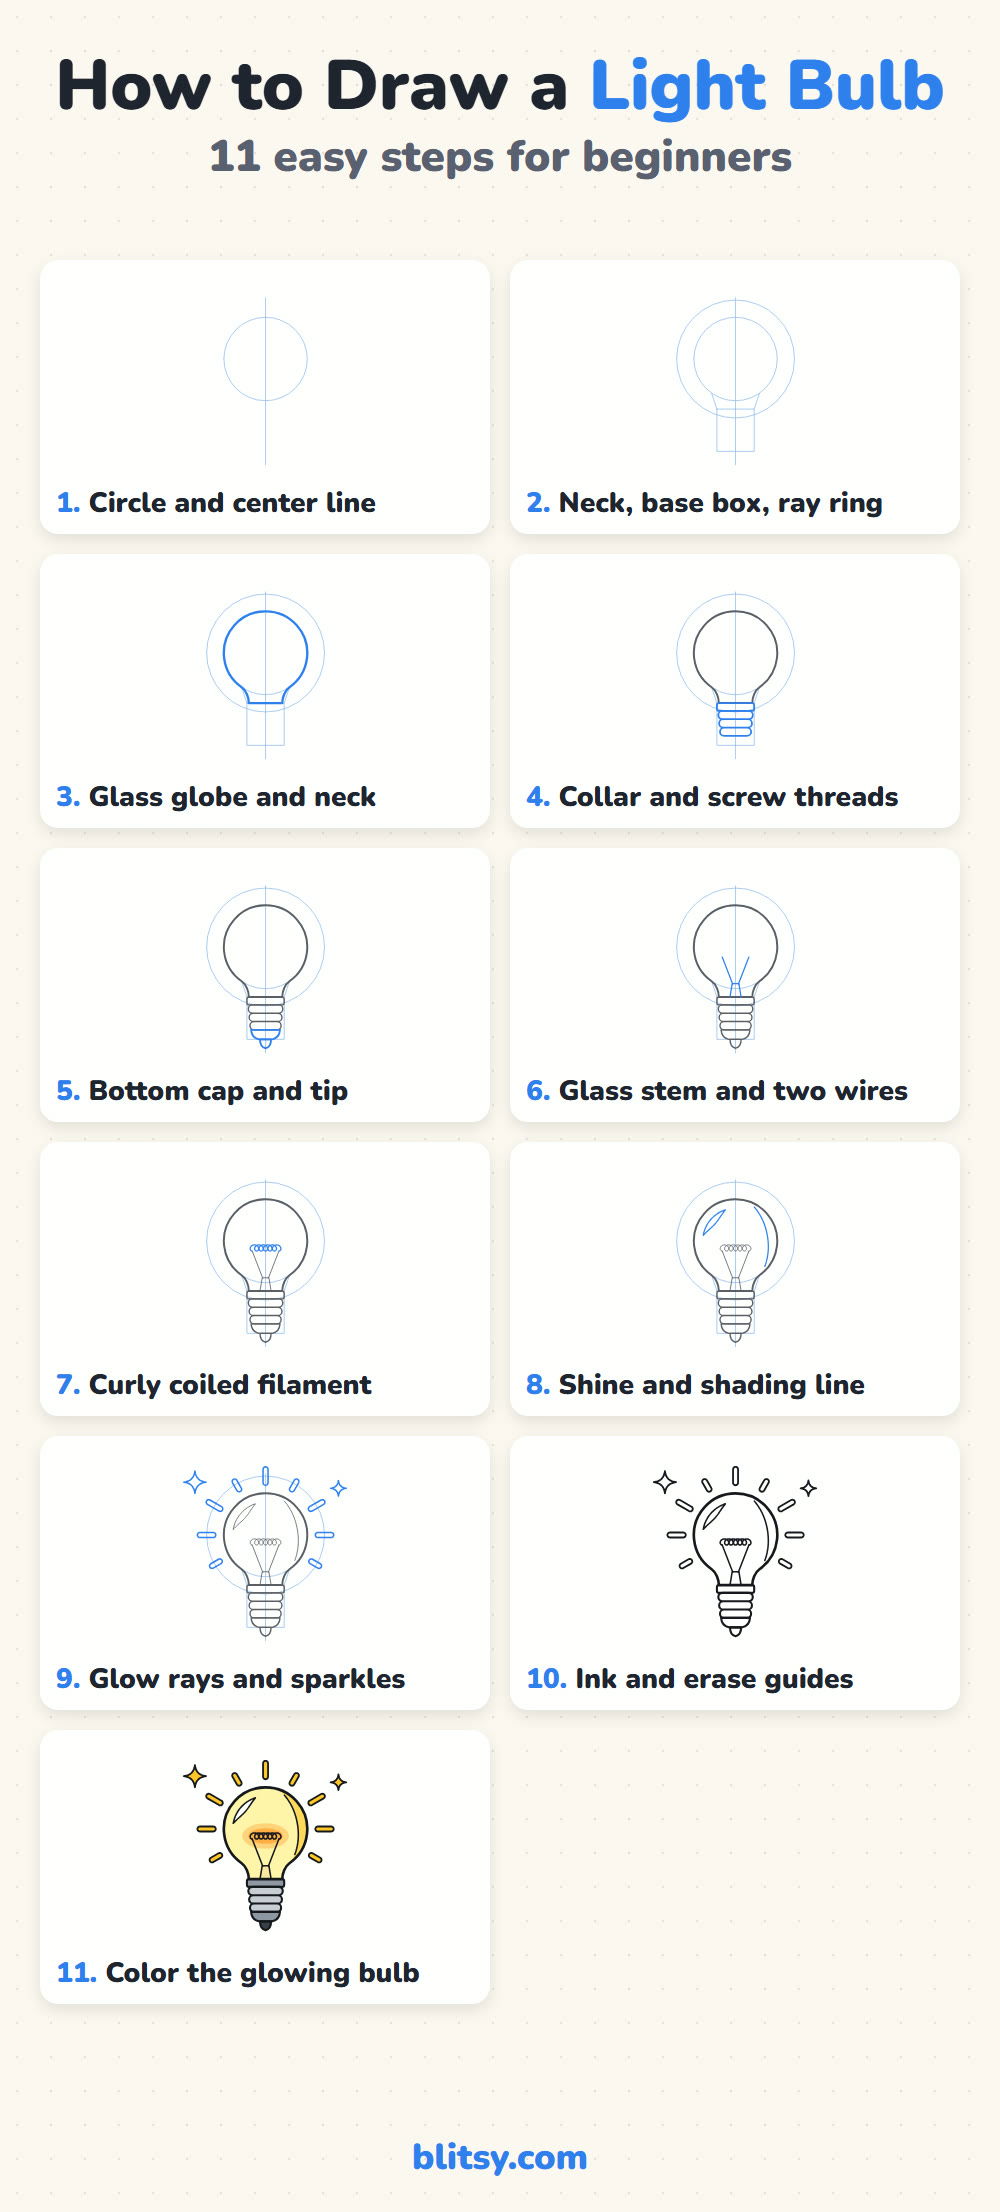
Every picture marks the newest lines in blue, while gray shows the work from earlier steps. The thin light blue shapes at the start are only helpers, so keep your pencil soft on them; they get erased in step 10.
Quick overview
⏱️ Time: about 20 to 25 minutes
🎯 Level: easy, good for kids around 6 and up
✏️ Steps: 11
💡 You'll draw: a glowing light bulb with rays and two sparkles
Supplies for a Bright Bulb Sketch
- A pencil you can hold loosely
- A clean eraser
- A black fineliner or felt tip pen
- Colored pencils or markers: pale yellow, yellow, orange, golden yellow, light gray, gray and black
- White paper, upright or sideways
- A coin or a round lid, if you'd like help with the circle
The bulb is mostly yellow, so even a small set of pencils covers nearly everything.
How to Draw a Light Bulb Step by Step
Step 1: Sketch a circle and a center line
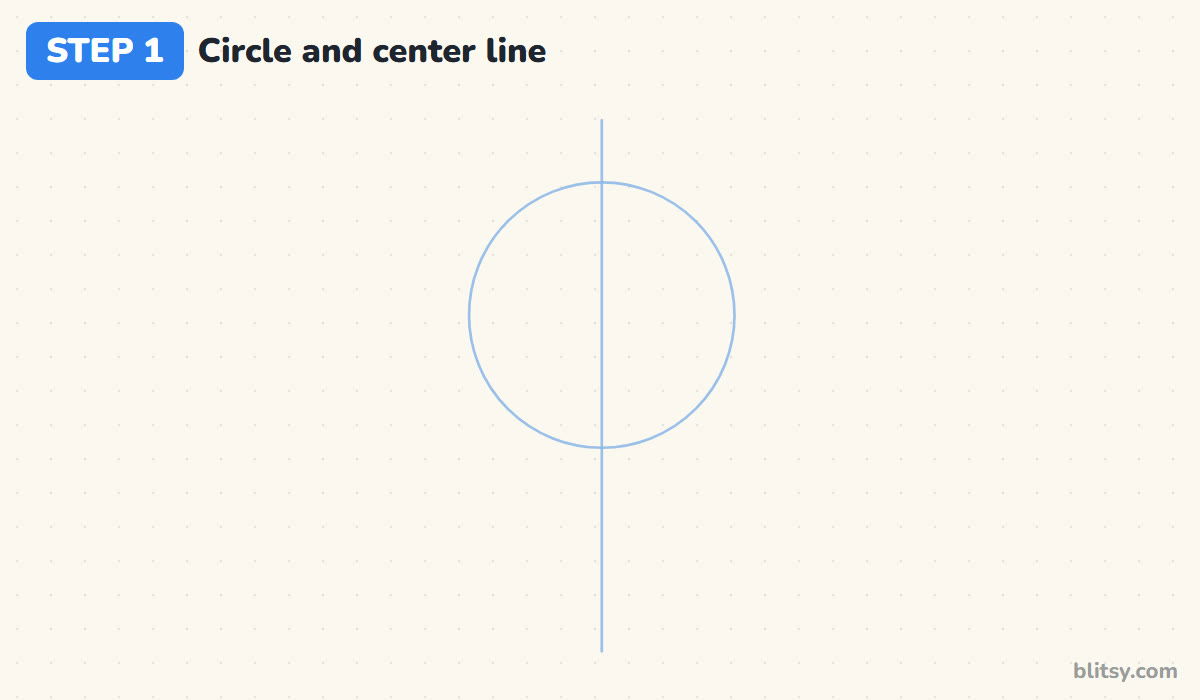
Draw a large circle in the upper half of your paper. This is the glass globe, so make it the biggest shape on the page. Then pull a straight line from above the circle down through its middle, ending well below it. That line keeps the bulb symmetrical.
💡 Tip: Trace a round lid if your freehand circle keeps turning into an egg.
Step 2: Add the neck lines, a base box and a ray ring
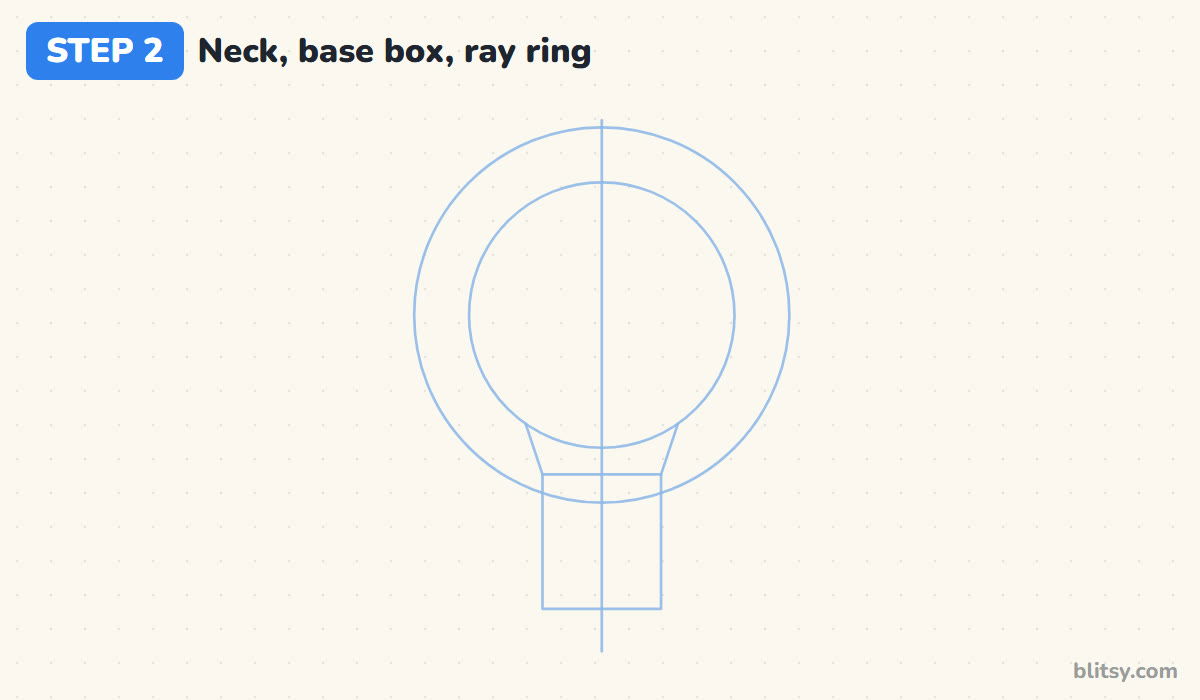
Below the circle, draw a tall narrow rectangle centered on your line. It should be a little less than half as wide as the circle. Connect the lower sides of the circle to the top corners of the box with two short slanted lines; that's the neck. Last, draw a bigger circle around the globe, leaving a gap about as wide as a finger. The rays will sit on it later.
💡 Tip: Keep the box narrow. A wide base makes the bulb look like a jar.
Step 3: Draw the glass globe and neck
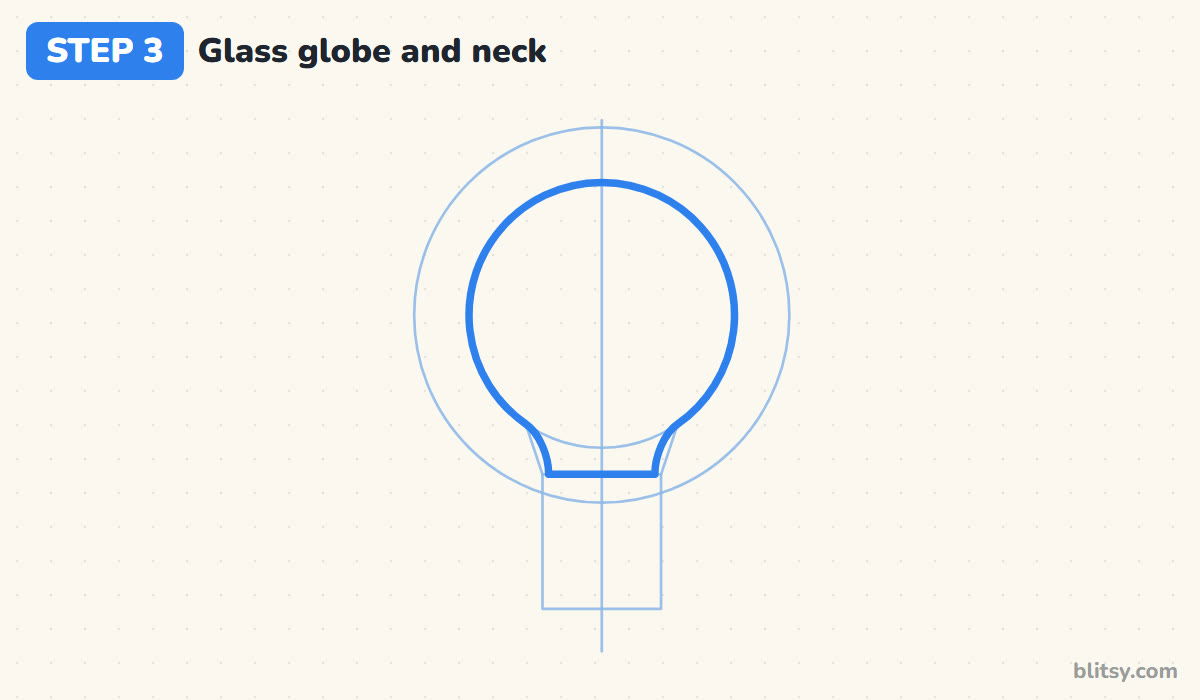
Now trace the real outline. Follow the circle all the way over the top, and when you reach the lower sides, curve inward so the glass pinches into the neck. Close the neck with a flat line on top of the box. I tell beginners to think of a balloon tied at the bottom, because the curve into the neck should feel soft, not like a sharp corner.
💡 Tip: Draw the left curve, then the right one, and compare them before you go on.




Step 4: Add the collar and the screw threads
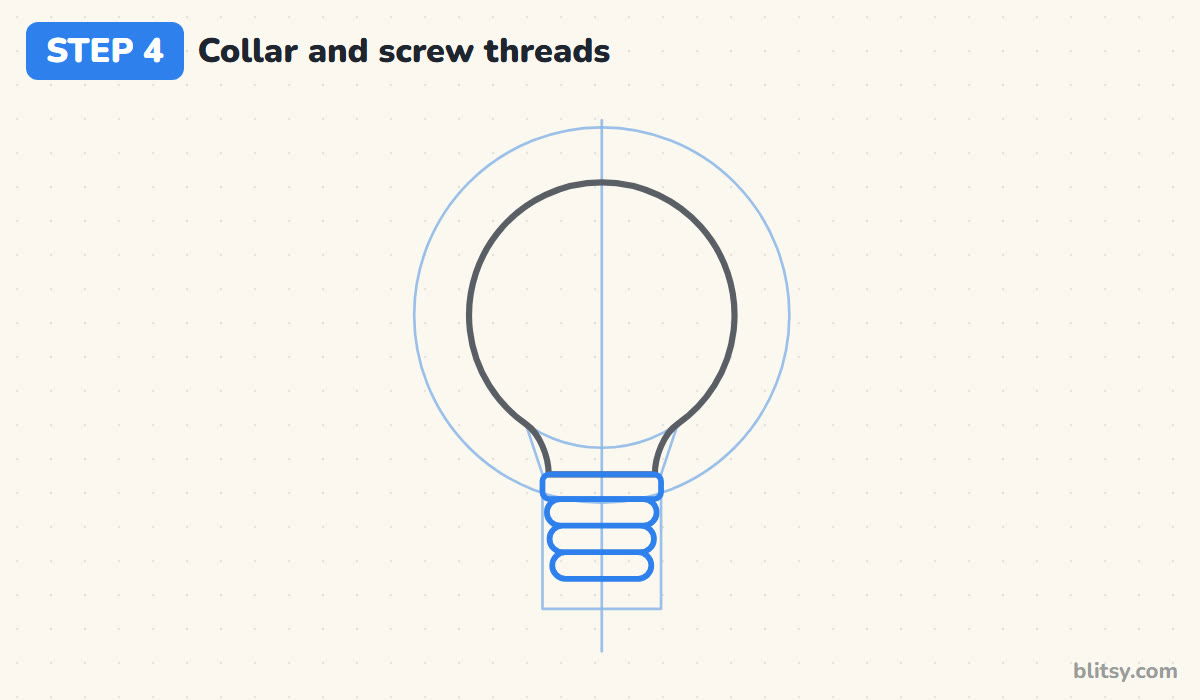
Start the base with a flat rounded strip right under the glass, slightly wider than the neck. That's the collar. Under it, stack three rounded bands, each one a little narrower than the band above. Their round ends make the bumpy edge of a screw thread without any tricky diagonal lines.
💡 Tip: Make every band the same height so the base looks machine-made.
Step 5: Finish the base with a cap and a tip
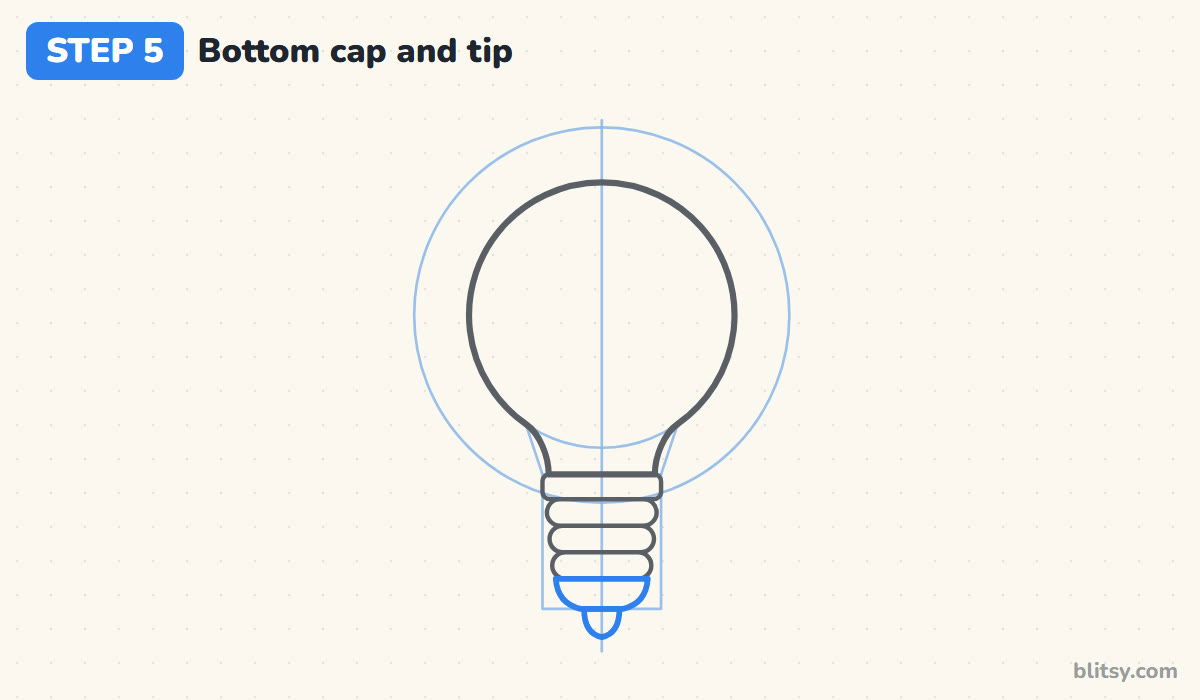
Under the last band, draw a short bowl shape that narrows toward the bottom. Then add a small rounded tip in the middle, like a tiny upside-down dome. On a real bulb this is the contact point that touches the socket, so it should be clearly smaller than the cap. If the tip gets too big, the bulb starts to look like a spinning top.
💡 Tip: Use the center line to keep the little tip right in the middle.
Step 6: Draw the glass stem and two wires
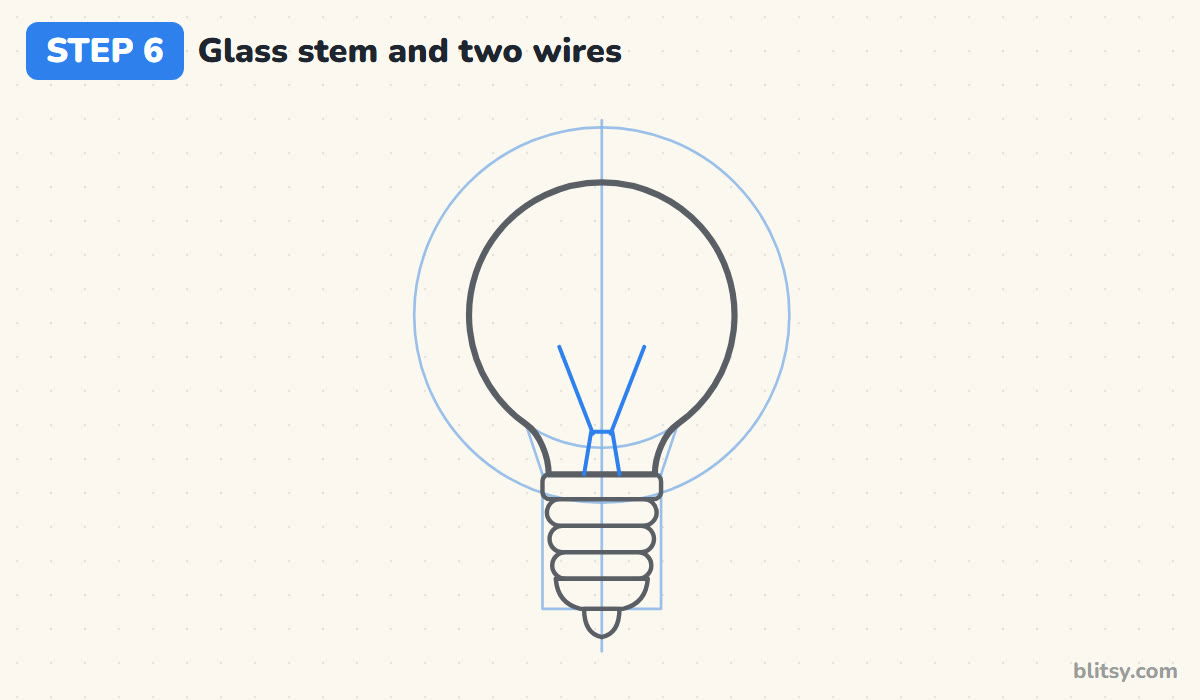
Inside the neck, draw a small trapezoid sitting on the collar, narrow at the top. This is the glass stem that holds everything up. From its top, draw two thin straight wires spreading out in a V toward the middle of the globe. Stop them a bit below the center of the circle. Keep these lines thin and light.
💡 Tip: Stop both wires at the same height so the filament sits level.
Step 7: Draw the curly coiled filament
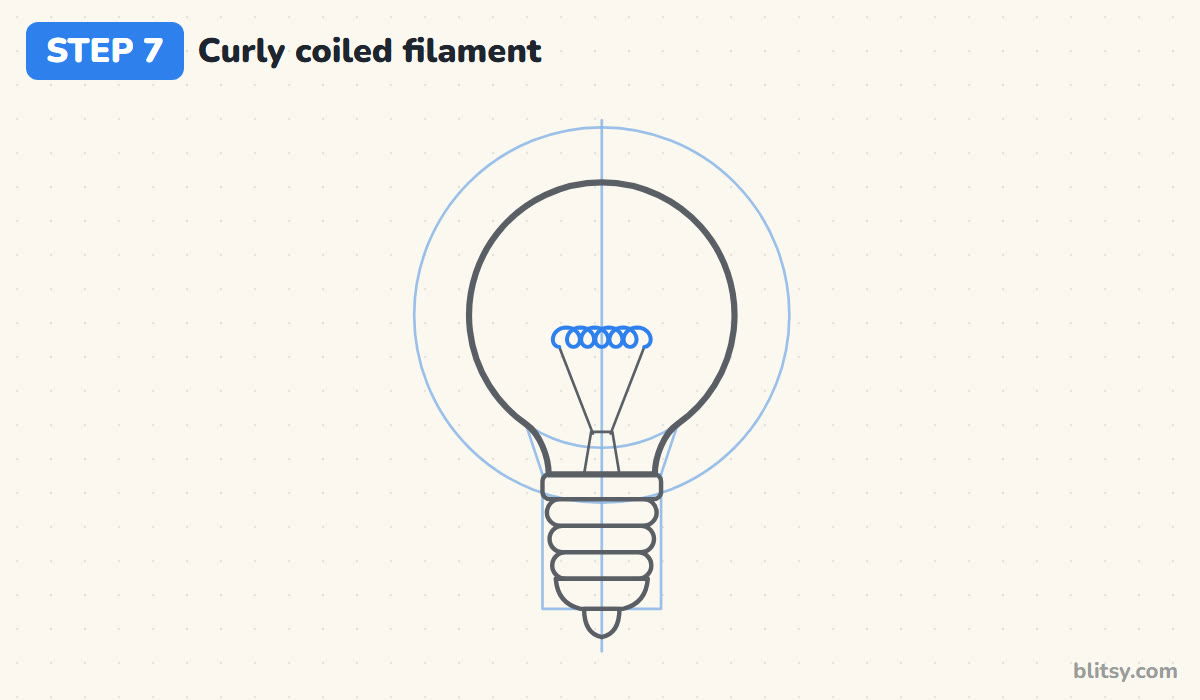
Connect the tops of the two wires with a row of small loops, like a stretched spring or a line of cursive e's. Six loops is plenty. Keep them small and overlapping, all the same size. Honestly, this is the fiddliest part of the whole bulb, so slow down. Younger kids can draw a simple zigzag instead and it still reads as a filament.
💡 Tip: Practice the loops on scrap paper first, moving your whole wrist.
Step 8: Add the shine and the shading line
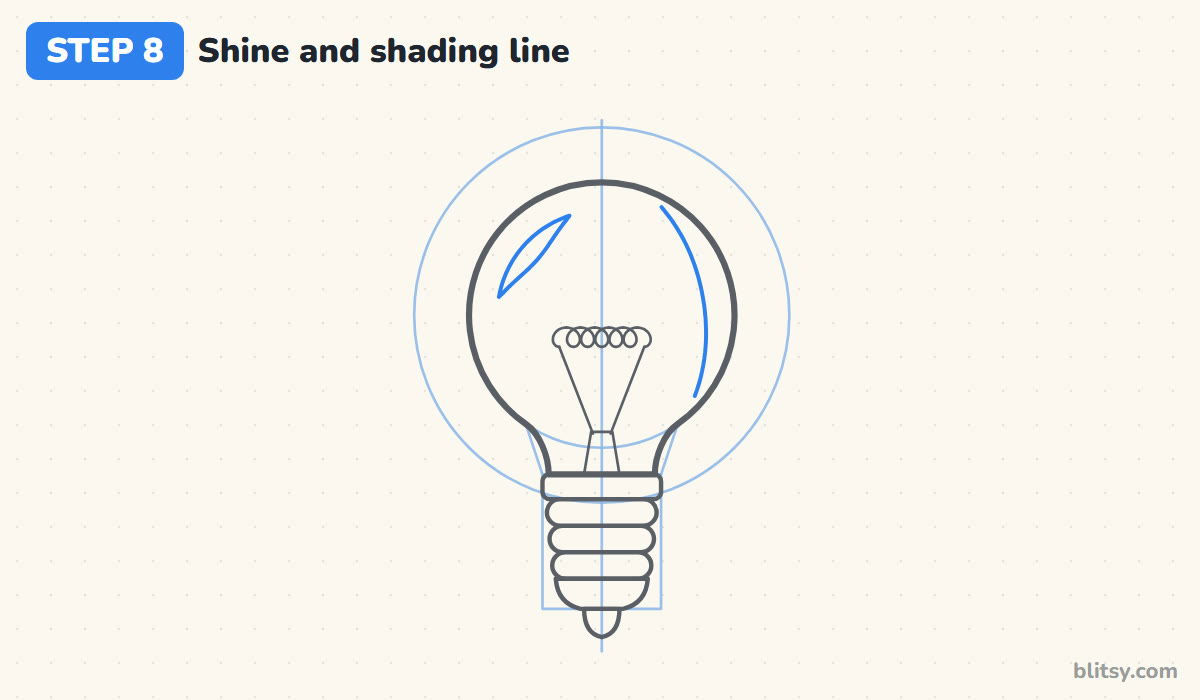
On the upper left of the glass, draw a thin curved crescent that follows the edge of the globe. This is where light reflects, and it instantly makes the glass look smooth. On the right side, draw a long curve just inside the outline, from near the top down to where the glass turns into the neck. The strip between that curve and the edge becomes the shaded side.
💡 Tip: Put the shine and the shading on opposite sides so the light makes sense.
Step 9: Draw the glow rays and two sparkles
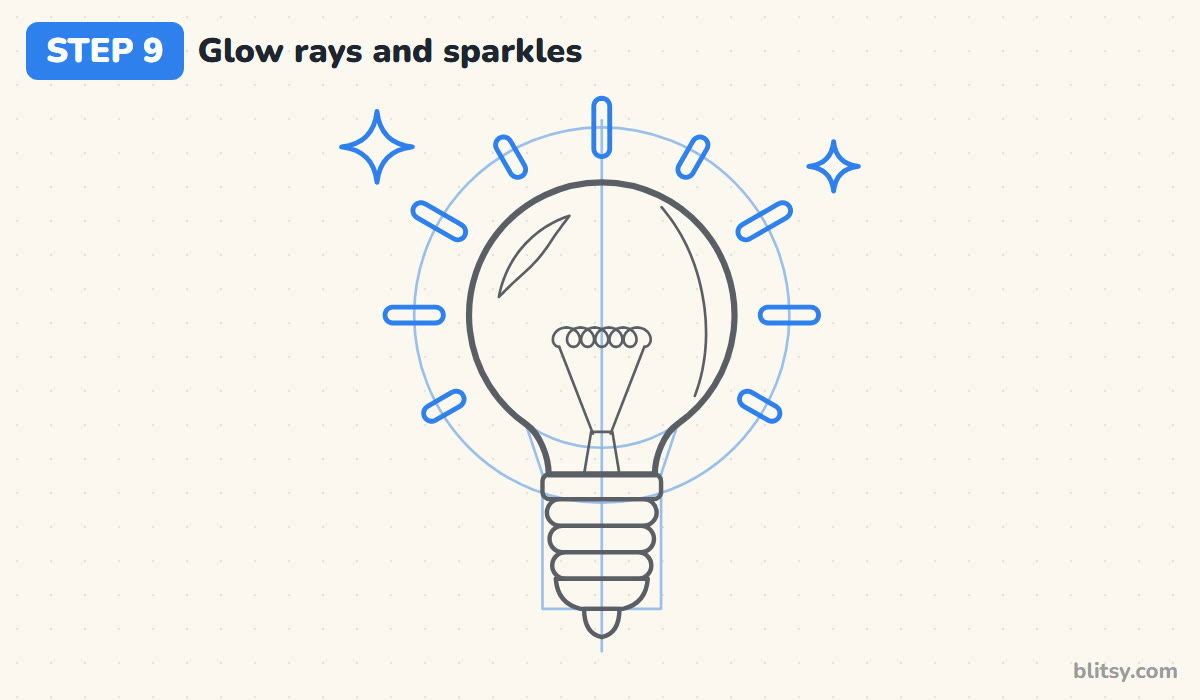
Using the outer ring as your guide, draw short rounded strips that point away from the bulb: one straight up, two at the sides, and a few in between. I make the top and side rays a bit longer than the diagonal ones, which gives the glow a gentle rhythm. Then add two four-pointed sparkles in the top corners, a bigger one on the left and a smaller one on the right.
💡 Tip: Point every ray at the center of the globe, never at the base.
Step 10: Ink the keeper lines and erase the guides
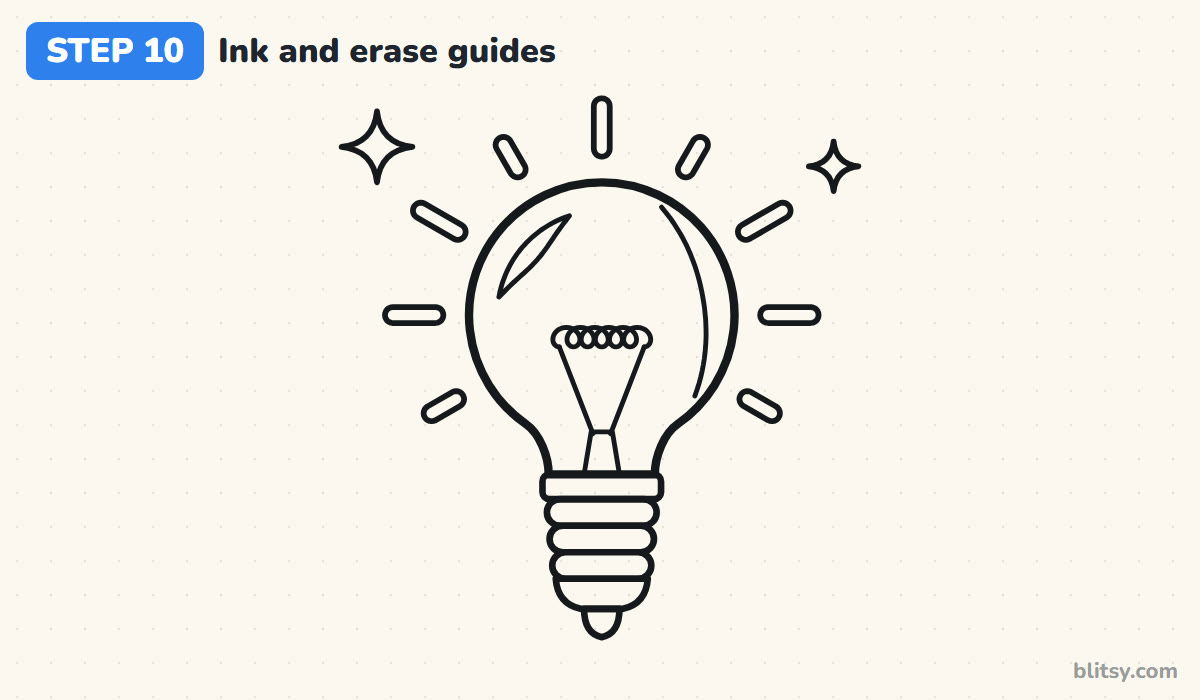
Go over the glass, the base, the stem, the wires, the filament, the shine, the shading line, the rays and the sparkles with your black pen. Leave the circles, the center line, the box and the neck lines in pencil. Wait for the ink to dry completely, then erase all the guides.
💡 Tip: Ink the thin wires with a lighter hand than the glass outline.
Step 11: Color the glowing bulb
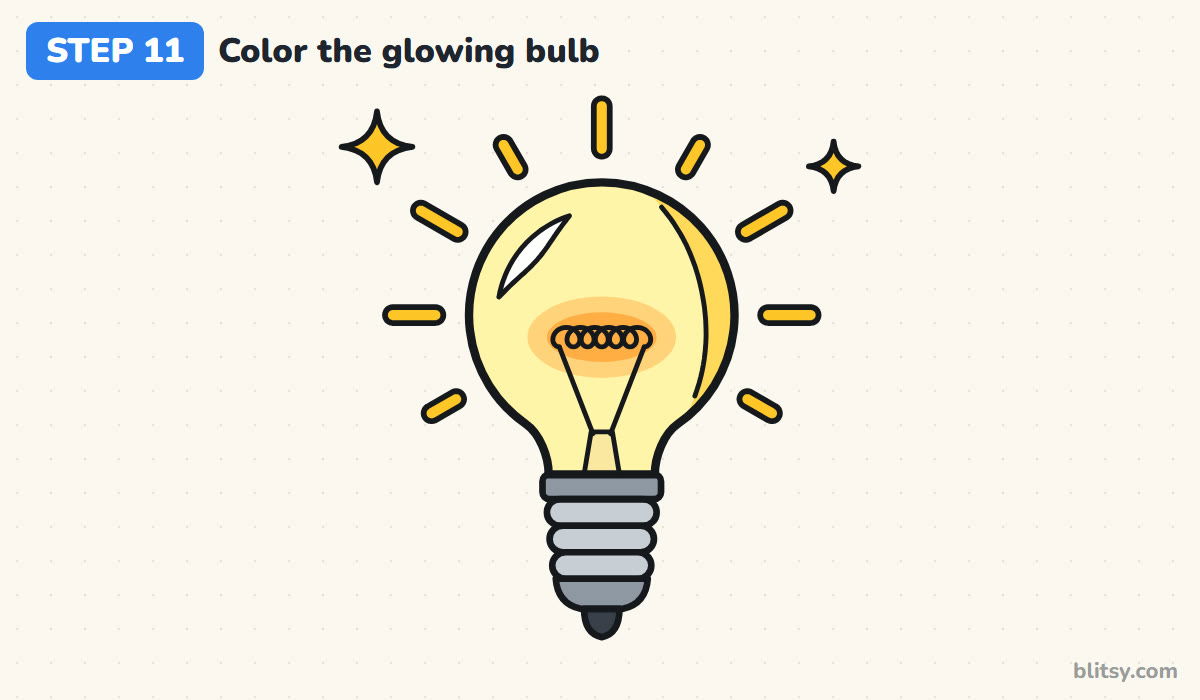
Fill the glass with pale yellow and the shaded strip on the right with a stronger yellow. Around the filament, color a soft oval of light orange, then a smaller, deeper orange oval inside it, so the glow looks hottest in the middle. Leave the shine white. Color the threads light gray, the collar and cap a darker gray, and the tip black. Finish the rays and sparkles in golden yellow.
💡 Tip: Color the orange glow before the yellow glass so the edges blend.
Where Light Bulb Sketches Tend to Slip
- A lopsided globe. One side bulges more than the other and the bulb looks dented. Draw the guide circle first and check both halves against the center line.
- A neck with sharp corners. Hard angles where the glass meets the neck look like a bottle. Curve gently inward, the way a balloon narrows at the knot.
- A base that's too big. If the metal part is as wide as the glass, it stops looking like a bulb. Keep the base a little less than half the width of the globe.
- Rays touching the glass. Rays that start on the outline make the bulb look spiky. Leave a clear gap, using the outer ring as your starting line.
- Pressing too hard on the filament. Dark, heavy loops turn into a black blob. Draw them lightly and small, and ink them with a fine pen.
Switch Up the Bulb With Fresh Twists
Once the classic bulb feels easy, give it a twist. Turn it off by coloring the glass pale gray and leaving out the rays, or draw two bulbs side by side, one dark and one bright, for a before-and-after picture. A smiling face on the glass turns it into a friendly cartoon. If you like drawing things that shine, try the star drawing tutorial, and for another "big thinking" subject, the brain drawing tutorial is a fun next step.
Light Bulb Coloring Page and Printable Step Guide
Prefer pencils and paper over a screen? The light bulb coloring page has a small colored example and a color key at the top, with a large bold outline below for crayons or markers. The step-by-step PDF guide holds all 11 steps with their tips. Both print fine on Letter or A4 paper.
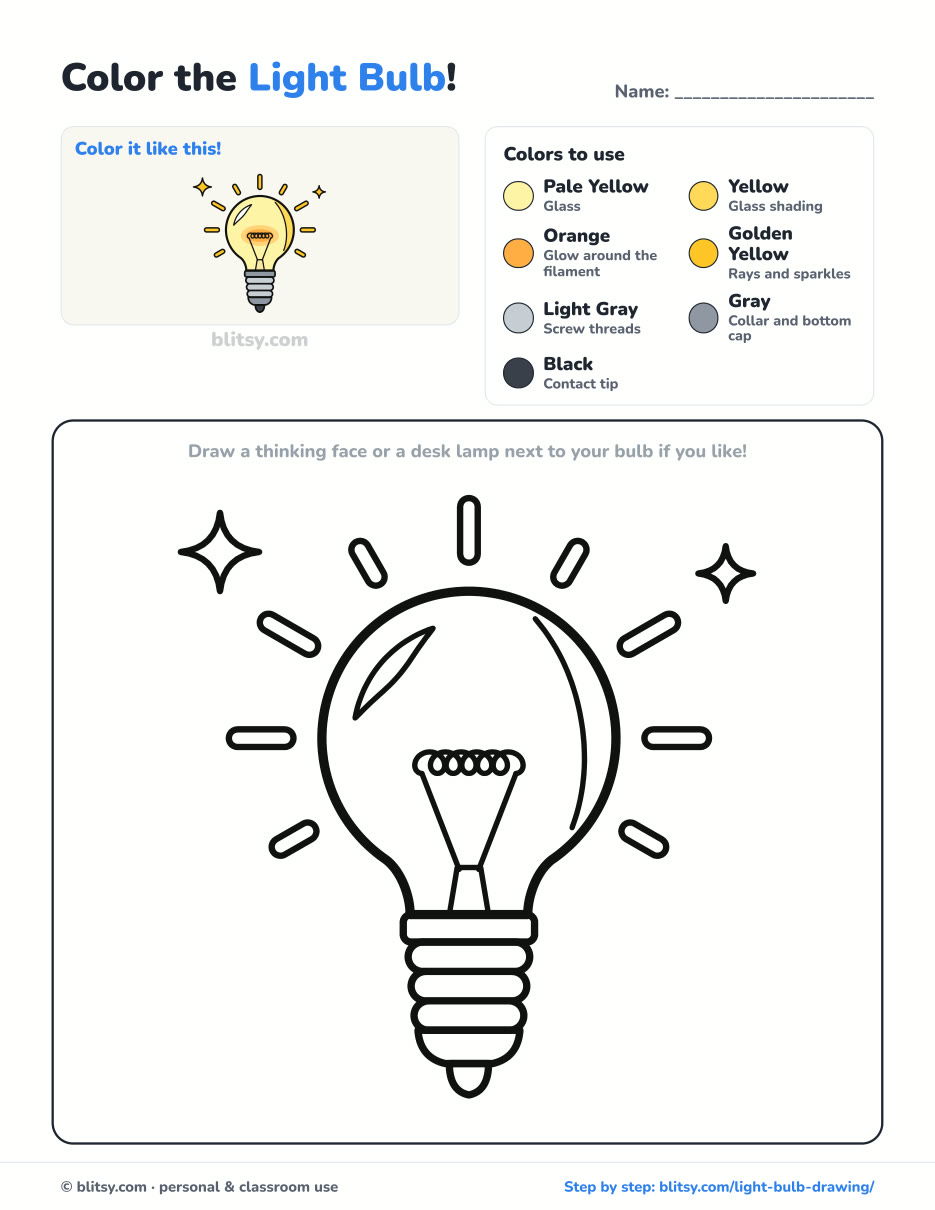
Black outlines with a colored example and the color names at the top. Ready to print and color.
⬇️ Download Coloring PageEvery step picture with its instructions and tips, to keep beside your paper while you draw.
⬇️ Download Drawing Guide📱 On a phone? Tap a download button, then open the file and choose Share → Save to Files or Print. On a computer, the PDF opens or saves straight to your Downloads folder.
Keep the Bulb Steps on Pinterest
Bright Next Steps: Scenes and Objects to Draw
Each link is a step-by-step tutorial, broken into numbered pictures, with subjects that range from campfires to a whole schoolhouse.
- Mountain Drawing: Three peaks, a lake and six pines make up the landscape in the how to draw a mountain tutorial.
- Flame Drawing: Another glowing subject: the flames drawing step by step lesson builds a campfire and a flame icon from one S-curve.
- Money Drawing: Play bills, a full sack and a coin tower stack up in this money drawing tutorial.
- Snowman Drawing: Hat on and scarf flying, the snowman takes twelve short steps in the easy snowman drawing tutorial.
- Mandala Drawing: Start from one dot and grow six rings of repeats in the how to draw a mandala tutorial.
- Realistic Drawing: Light and shadow are the whole lesson in this realistic drawing tutorial, which shades a shiny apple under one lamp.
- School Drawing: A brick schoolhouse with a bell tower and a picket fence is the goal of the school drawing step by step guide.
- Wave Drawing: Draw a deep blue curl with claw-shaped foam in the how to draw a wave tutorial.
- Halloween Drawing: Glowing windows and a grinning pumpkin finish the haunted house in our Halloween drawing tutorial.
- Basketball Drawing: An orange ball flies toward a hoop and net in the basketball drawing step by step lesson.
Bright Questions About Drawing Bulbs
What is the easiest way to draw a light bulb?
Draw a circle, add a narrow rectangle under it and join them with two short curves for the neck. Add a few stacked bands on the rectangle and it already reads as a bulb.
Why is the filament drawn as a coil?
In an old-style incandescent bulb, the thin wire is coiled so a long filament fits into a small space. Drawing it as a row of loops makes your bulb look like the real thing.
How do I make my light bulb look like it's glowing?
Add short rays around it, color the glass pale yellow and put a warm orange patch around the filament. Leaving a white shine on the glass helps the glow stand out.
Is this light bulb drawing good for kids?
Yes. The shapes are simple, and children around 6 can follow every step. Younger kids can swap the coiled filament for a zigzag and skip the shading line.
Hang your glowing bulb above your desk, and the next time an idea pops into your head, you'll have the perfect picture for it. 💡
Related posts:
 How to Draw a Car Step by Step (Easy Drawing for Beginners)
 How to Draw Godzilla Step by Step (Easy Kaiju for Beginners)
 How to Draw a Whale Step by Step (Easy for Beginners)
 How to Draw a Rat Step by Step (Easy for Beginners)
 How to Draw an Arctic Fox Step by Step (Easy for Beginners)
 How to Draw a Puppy Step by Step (Easy for Beginners)
 How to Draw a Shark Step by Step (Easy for Beginners)
 How to Draw a Dog Step by Step (Easy Side View for Beginners)
 How to Draw a Chicken Step by Step (Easy for Beginners)
 How to Draw a Fish Step by Step (Easy Goldfish for Beginners)
 How to Draw a Crow Step by Step (Easy for Beginners)
 How to Draw an Eagle Step by Step (Easy for Beginners)

