
Love is a feeling, so what do you actually put on the paper? I picked one small scene that says it without a single word: two teddy bears leaning into a hug, one holding a big heart balloon. This love drawing step by step is built from ovals and soft tubes, so you can follow along even if you've never drawn an animal. A hug between two bears fits any kind of love, from a best friend to a grandparent.
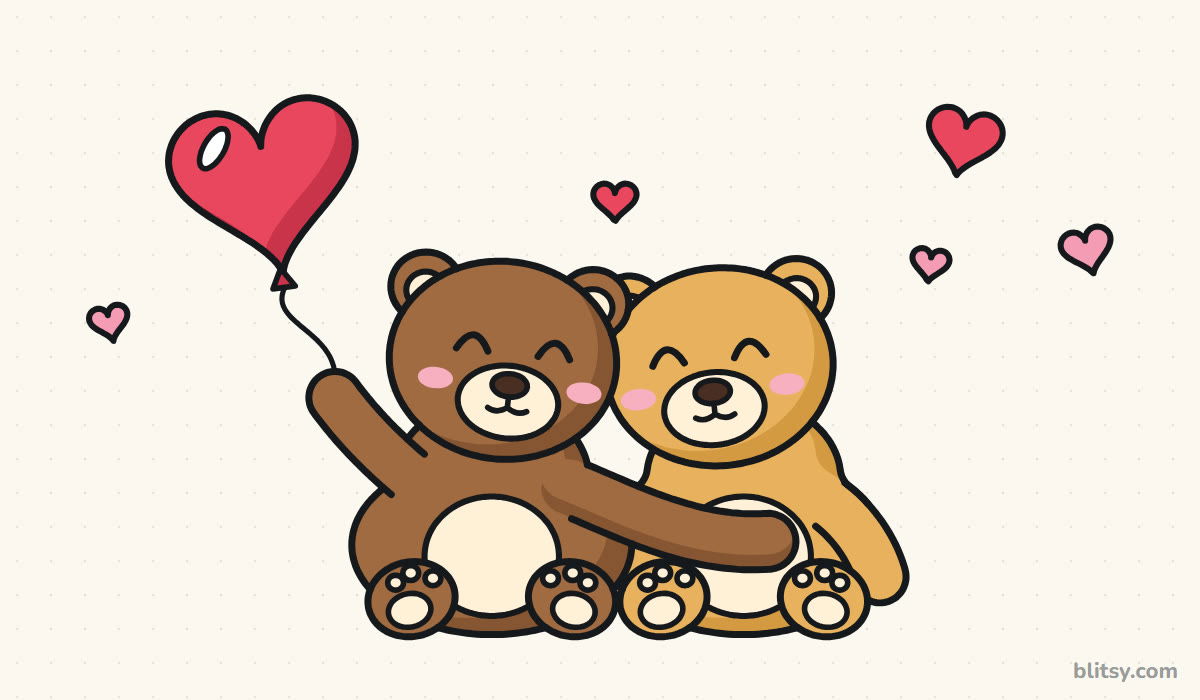
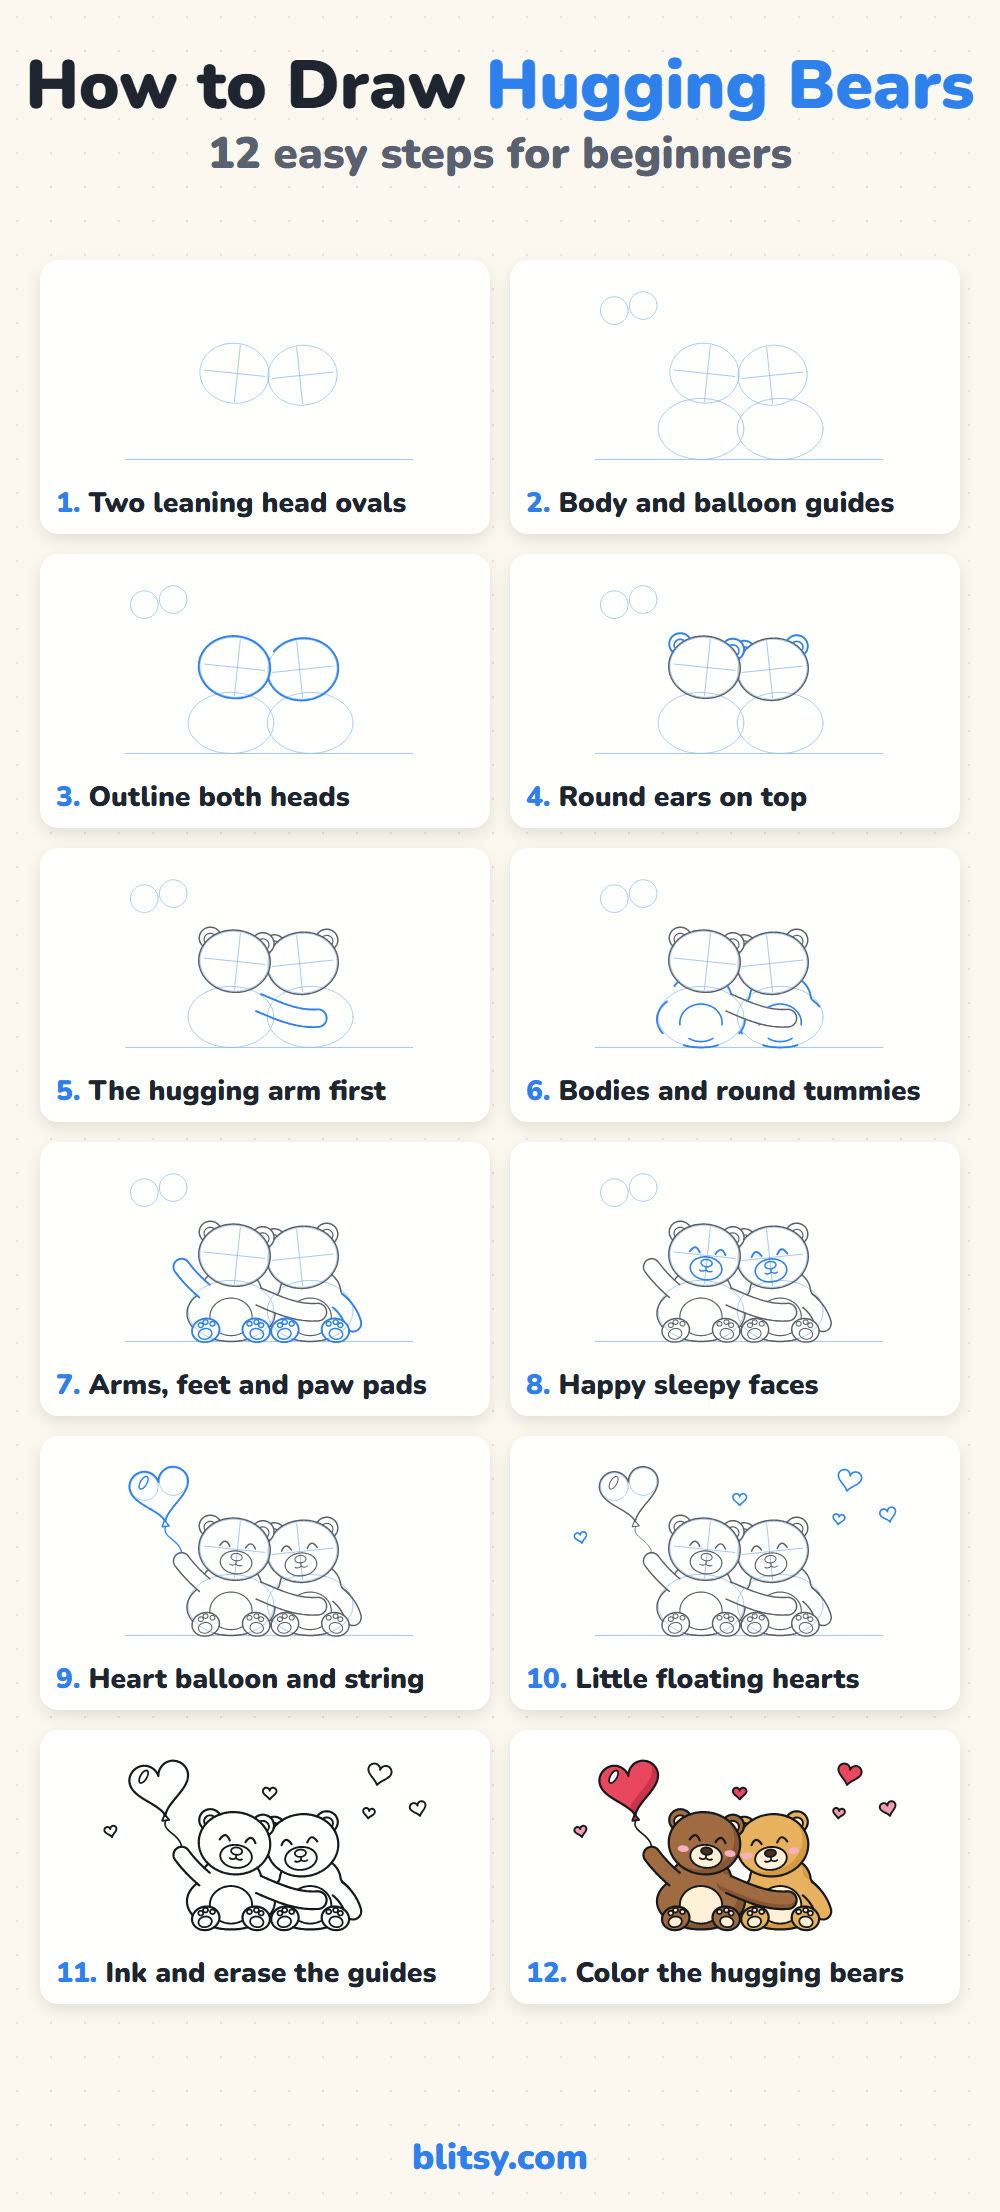
Every picture shows the lines for that step in blue, while everything you've already drawn turns gray. The pale ovals and cross lines are construction helpers, so keep them faint. They disappear in step 11.
Quick overview
⏱️ Time: about 45 minutes with coloring
🎯 Level: beginner, fine for kids from about 6 with a little help on the arms
✏️ Steps: 12
🧸 You'll draw: a brown bear and a golden bear hugging, a red heart balloon and five little hearts
Supplies for a Cozy Bear Hug
- A regular pencil, ideally HB, for the light sketch
- An eraser that lifts pencil without tearing the paper
- A black felt tip or fineliner to trace the keeper lines
- Colored pencils or markers in brown, golden yellow, cream, red and pink
- Plain paper turned sideways, since the scene is wider than it is tall
Crayons work too; they just need a little more care around the small paw pads.
Love Drawing Step by Step
Step 1: Sketch two leaning head ovals
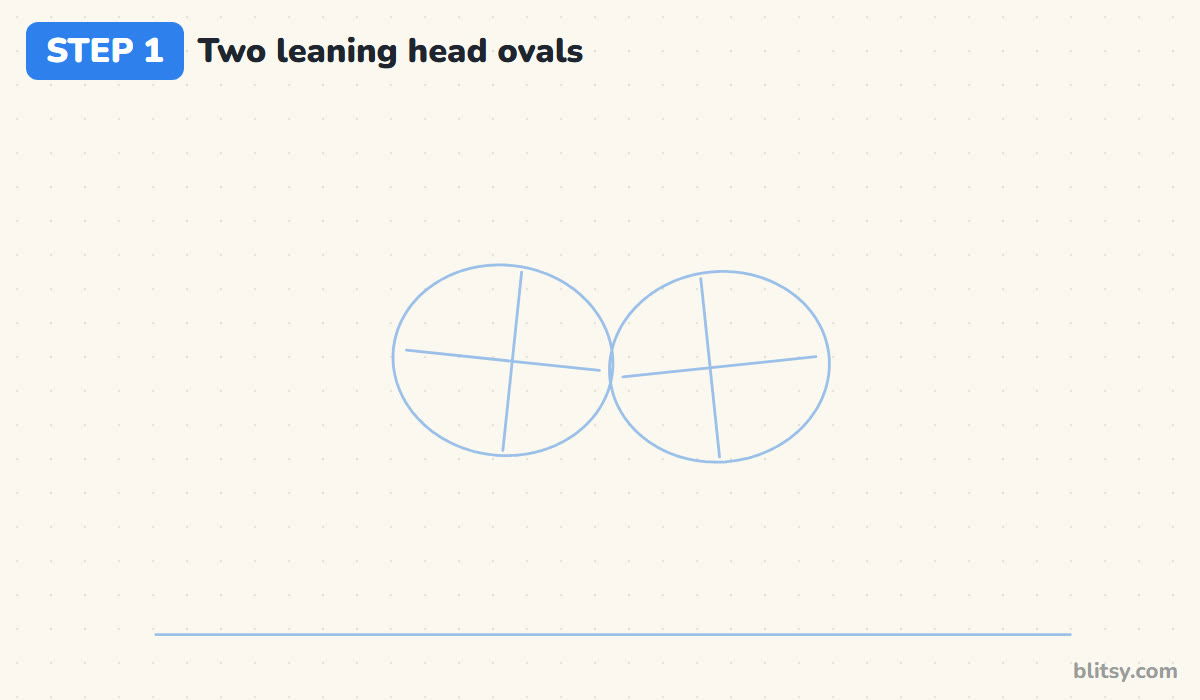
Start with a long, faint line near the bottom of the page for the bears to sit on. Then draw two ovals side by side, each tipped a little toward the other so their tops lean together and their cheeks just touch. Add a cross through each oval; the sideways line marks the eyes.
💡 Tip: That small tilt matters most. Upright heads look like two strangers standing in line, while leaning heads look like friends.
Step 2: Add body ovals and the balloon circles
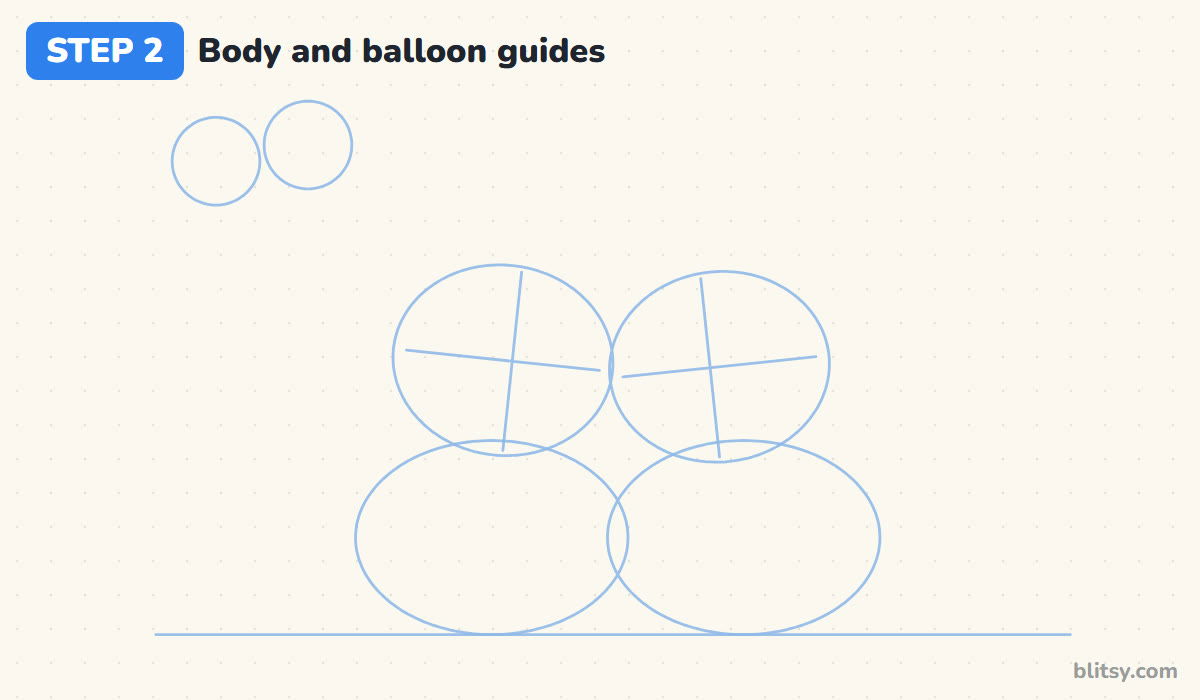
Under each head, draw a wider oval that sits on the ground line and tucks up behind the chin. The two bodies overlap in the middle. In the top left corner, draw two small touching circles. They're the top bumps of the heart balloon, and placing them now keeps the balloon off the page edge.
💡 Tip: Check the space before you go on. You need room above the left bear for the balloon and room on the right for small hearts.
Step 3: Outline both heads
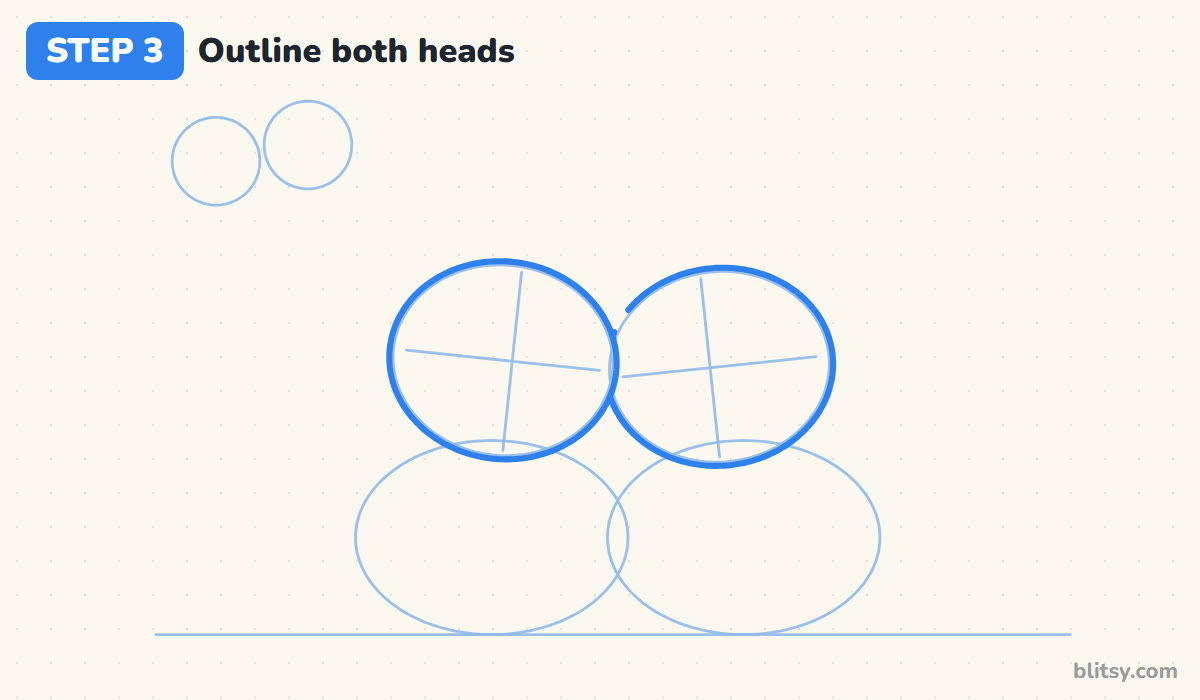
Trace the left head first with a steadier line, because that bear sits in front. Then trace the right head, stopping where it meets the left one so it tucks behind. You'll also leave a tiny gap at the top left of the back head, where the front bear's ear will overlap it in the next step.




💡 Tip: Draw round shapes in two or three short curves instead of one long sweep. Joined short curves stay rounder.
Step 4: Put round ears on top
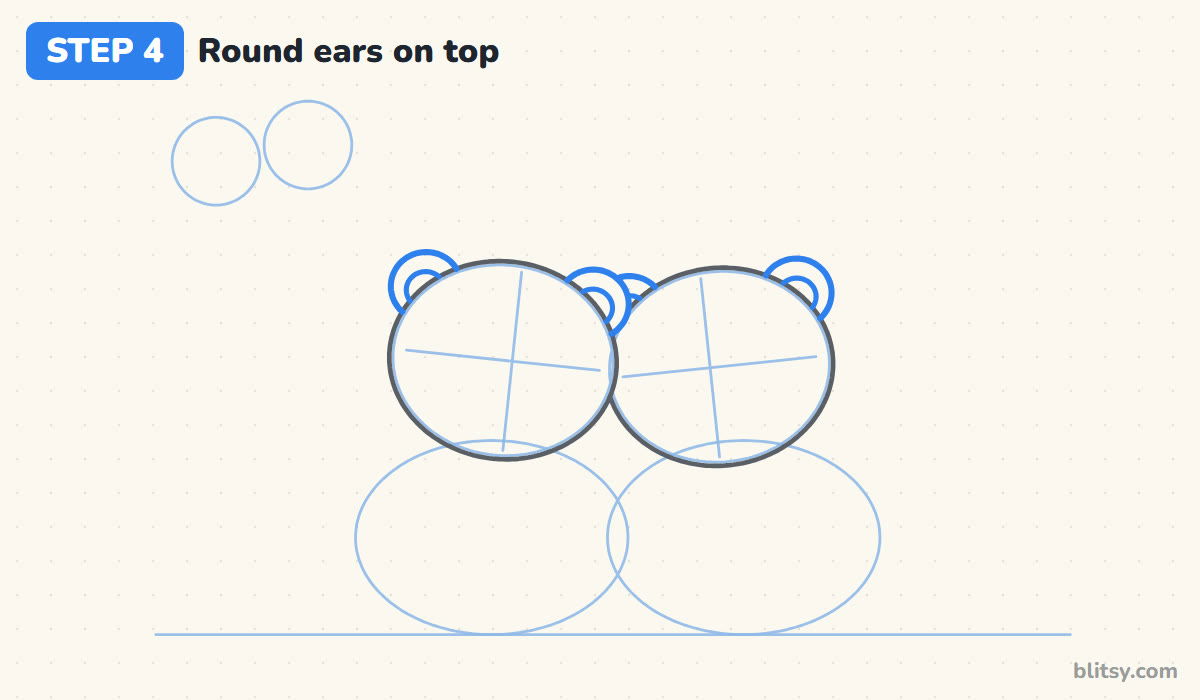
Each bear gets two round ears near the upper corners of its head, half hidden behind the oval, with a smaller circle inside. Between the heads the ears crowd together, so the back bear's ear only peeks out. I like that overlap, because it makes them feel close.
💡 Tip: Set the ears wide apart. Ears placed near the middle of the head turn a bear into a mouse.
Step 5: Draw the hugging arm before the bodies
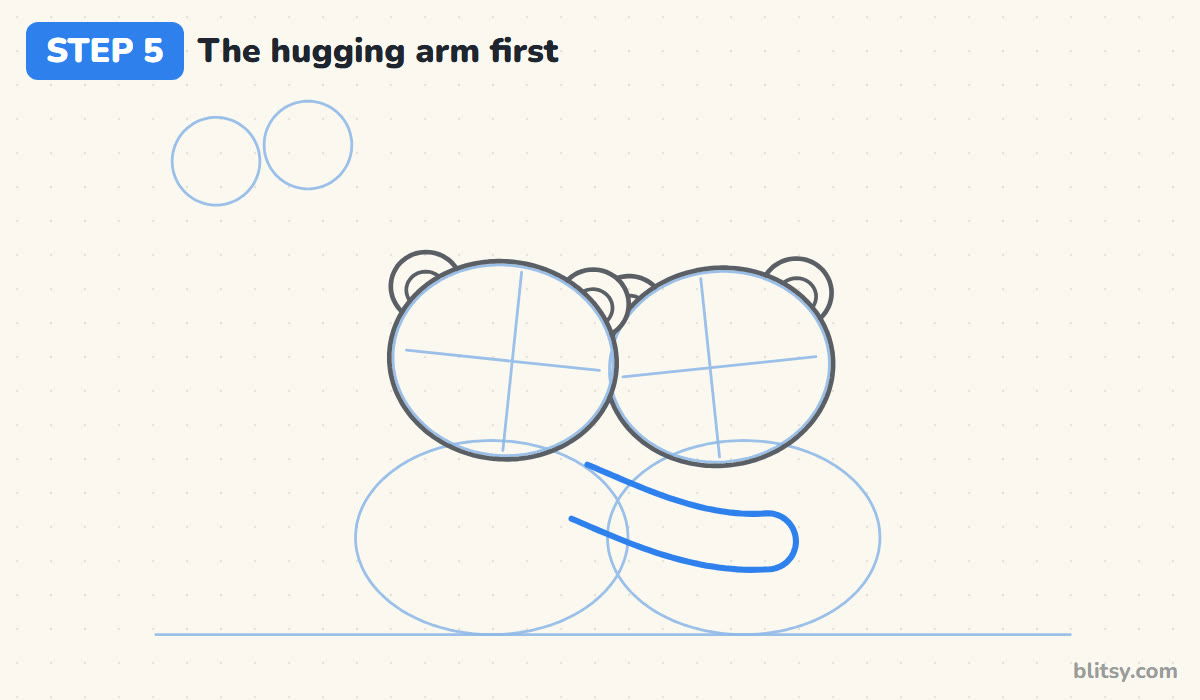
Here's the part that makes it a hug. From the front bear's right shoulder, draw a thick, gently curved arm that reaches across the golden bear's tummy and ends in a rounded paw on its far side. I always draw this arm before the bodies. It sits in front of everything, so the body lines can simply stop when they reach it.
💡 Tip: Keep the arm the same thickness from shoulder to paw. A thin middle makes it look like a noodle.
Step 6: Shape the bodies and round tummies
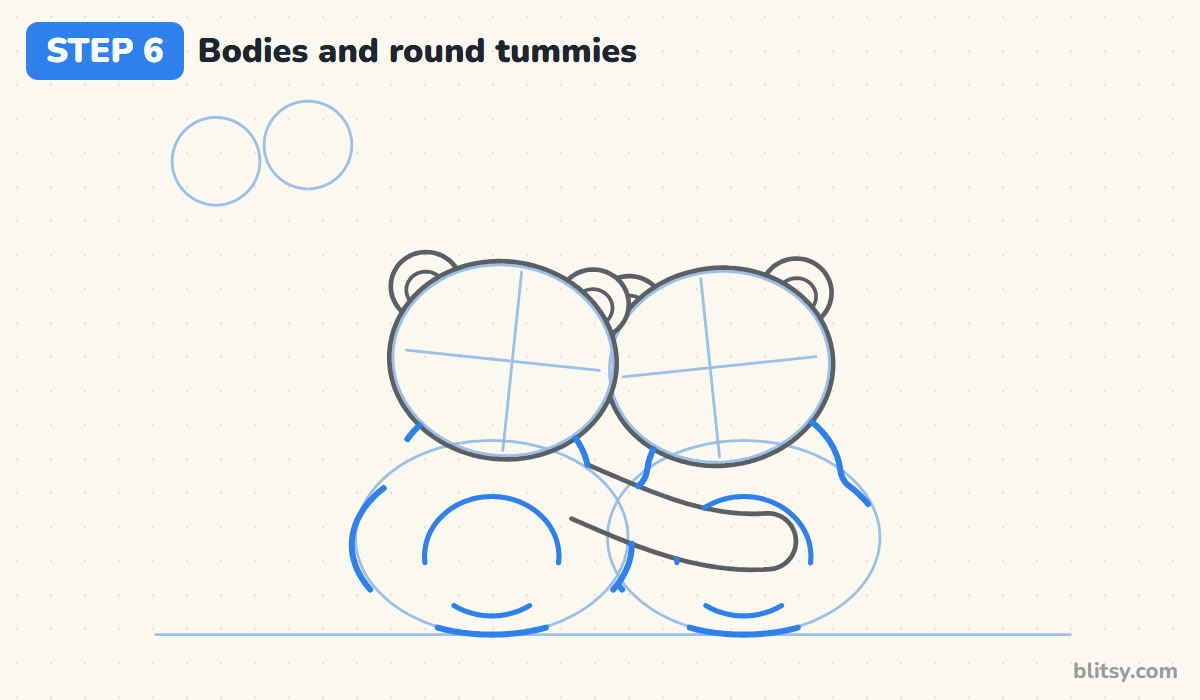
Go around each body guide with a soft pear shape: narrow under the head, wide near the ground. Your lines will come in pieces, since they break at the hugging arm and where the feet will go. Inside each body, add a large round tummy. The golden bear's tummy hides mostly behind its friend's arm.
💡 Tip: Make the bodies a little smaller than the heads look like they need. Big heads on small bodies read as cuddly.
Step 7: Add the arms, feet and paw pads
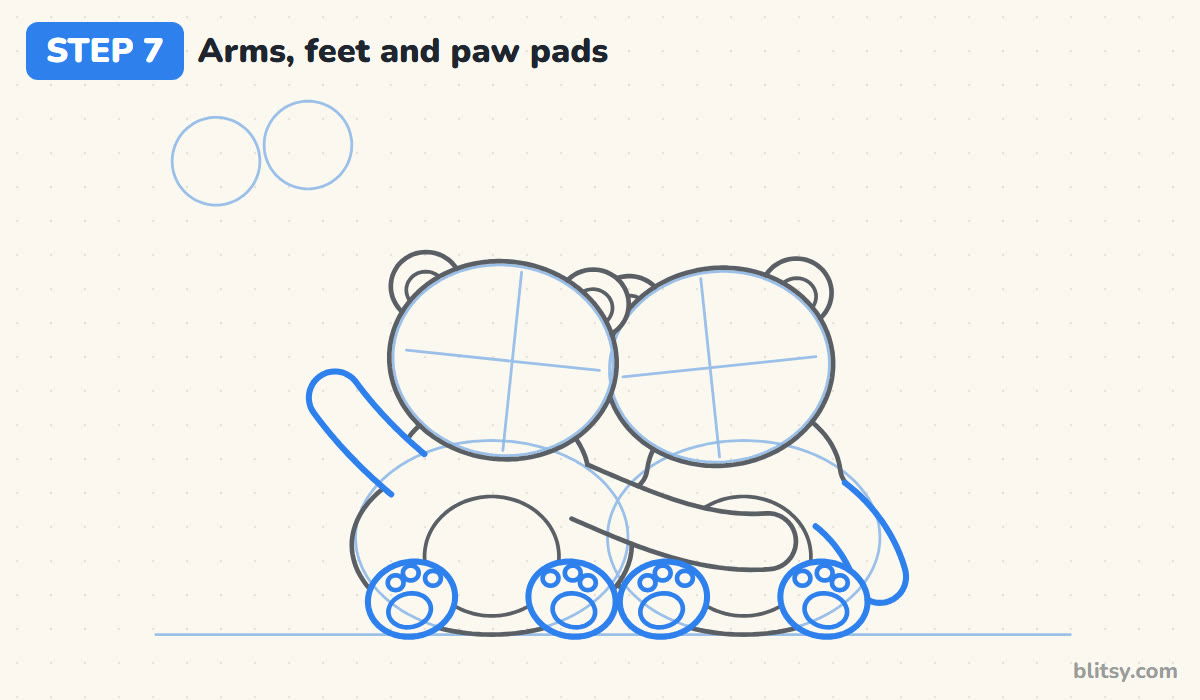
The front bear lifts its other arm up and out toward the balloon circles. The golden bear's outside arm hangs down along its side. At the bottom, draw four round feet, two per bear, with the soles facing you. Finish each foot with an oval pad and three little toe beans.


💡 Tip: Tilt each pair of feet slightly outward. Toes pointing straight up look stiff; a small outward turn looks relaxed.
Step 8: Give them happy sleepy faces
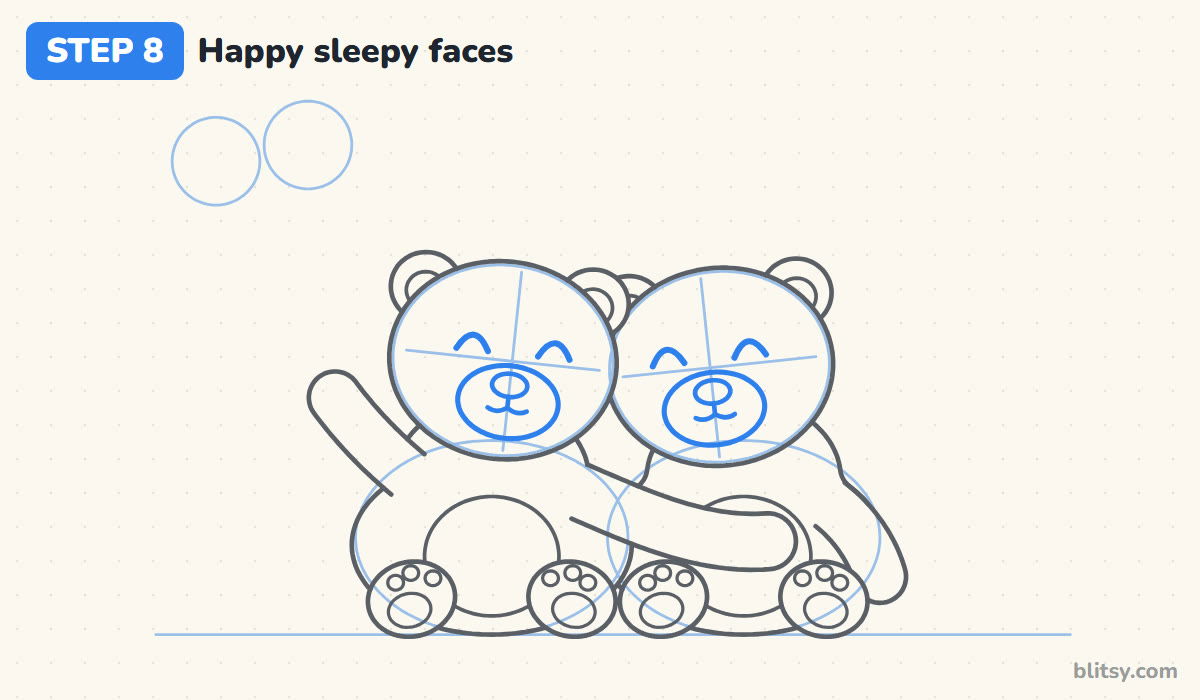
Draw an oval muzzle low on each face, shifted a little toward the other bear so they seem to turn toward each other. Put an oval nose on top and a small W-shaped smile under it. For the eyes I use two upside-down U shapes on the cross line, because closed, smiling eyes look content.
💡 Tip: Space the eyes at the same distance on both bears. Mismatched eyes are the first thing anyone notices.
Step 9: Draw the heart balloon and string
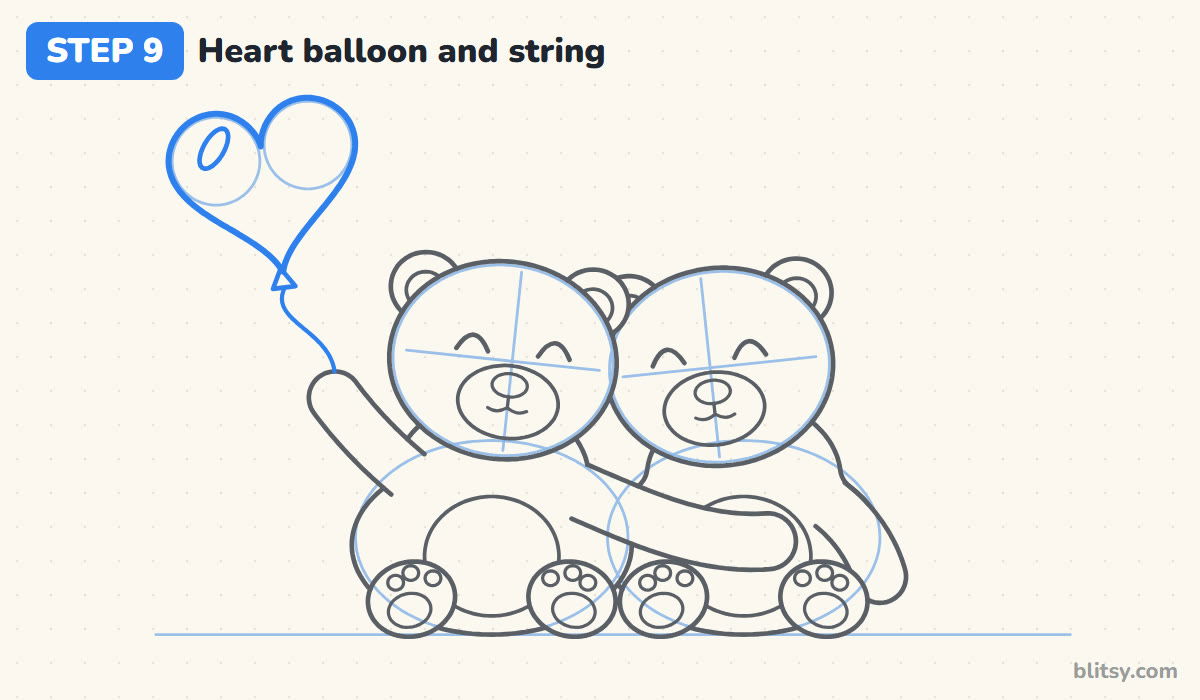
Use the two small circles as the top bumps of the heart, then bring both sides down to a point just above the bear's raised paw. Tilt the whole heart a little, the way a balloon sways. Add a small triangle knot under the point, a thin oval for a shine on the left bump, and a wavy string down into the paw.
💡 Tip: Let the string curve instead of drawing it ruler straight. A wavy string makes the balloon look light.
Step 10: Scatter a few floating hearts
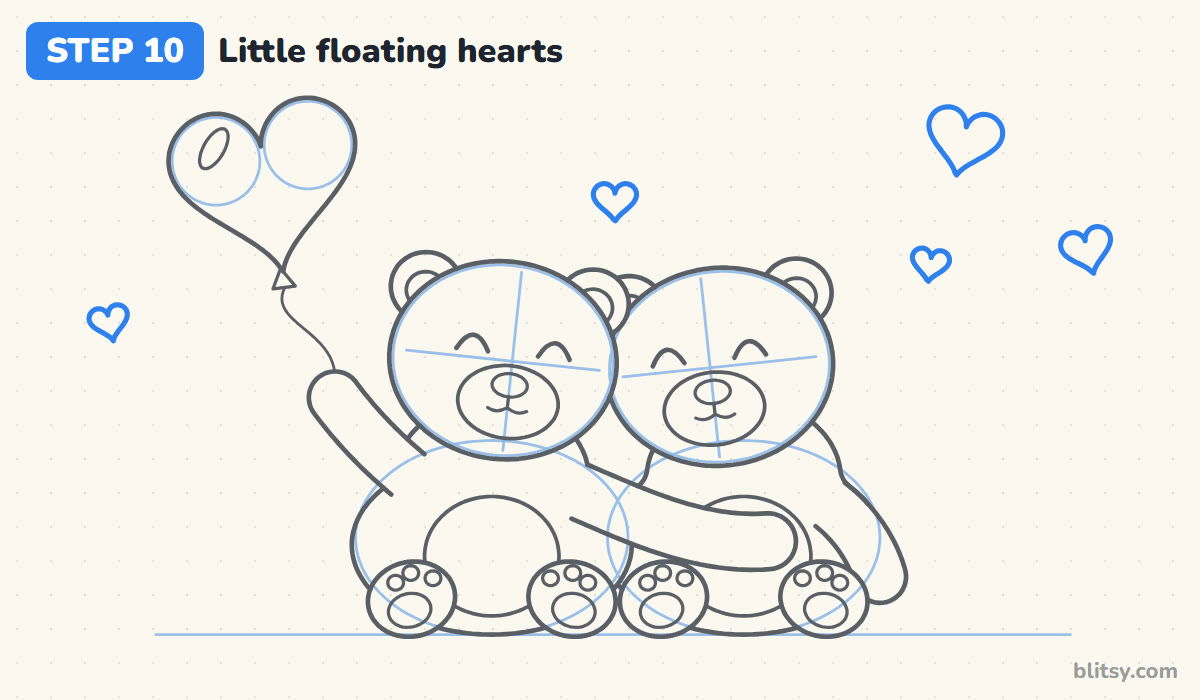
Draw five small hearts in the empty spaces: one above the heads, one on the far left and three on the right. Vary their sizes and tilt each one a different way. They balance the balloon and leave no doubt about what the picture means.
💡 Tip: Keep every small heart clear of the bears. Hearts that touch the ears or the balloon just look like clutter.
Step 11: Ink the keeper lines and erase the helpers
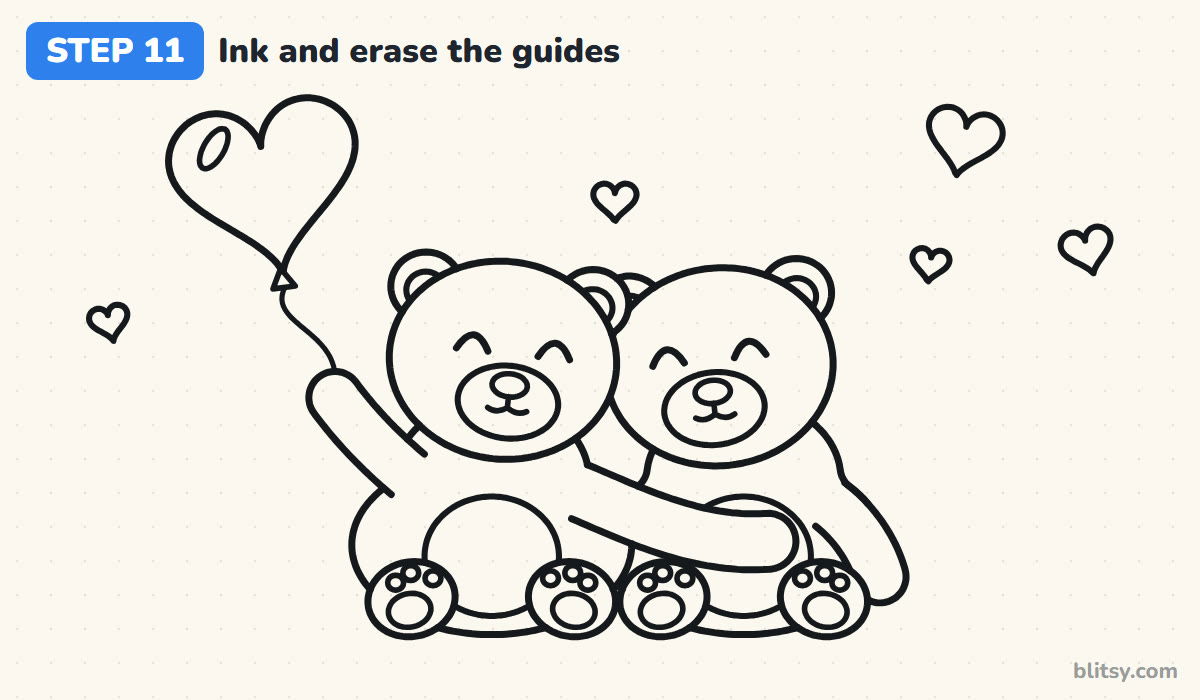
Trace all the lines you want to keep with the black pen. I start with the front bear, then the back bear, and leave the hearts and string for last. Let the ink dry for a minute or two, then erase the ground line, the ovals and the crosses. The broken body lines now read clearly as one bear behind another.



💡 Tip: Ink the string in one quick, light stroke. Going over it twice usually makes it wobble.
Step 12: Color the hugging bears
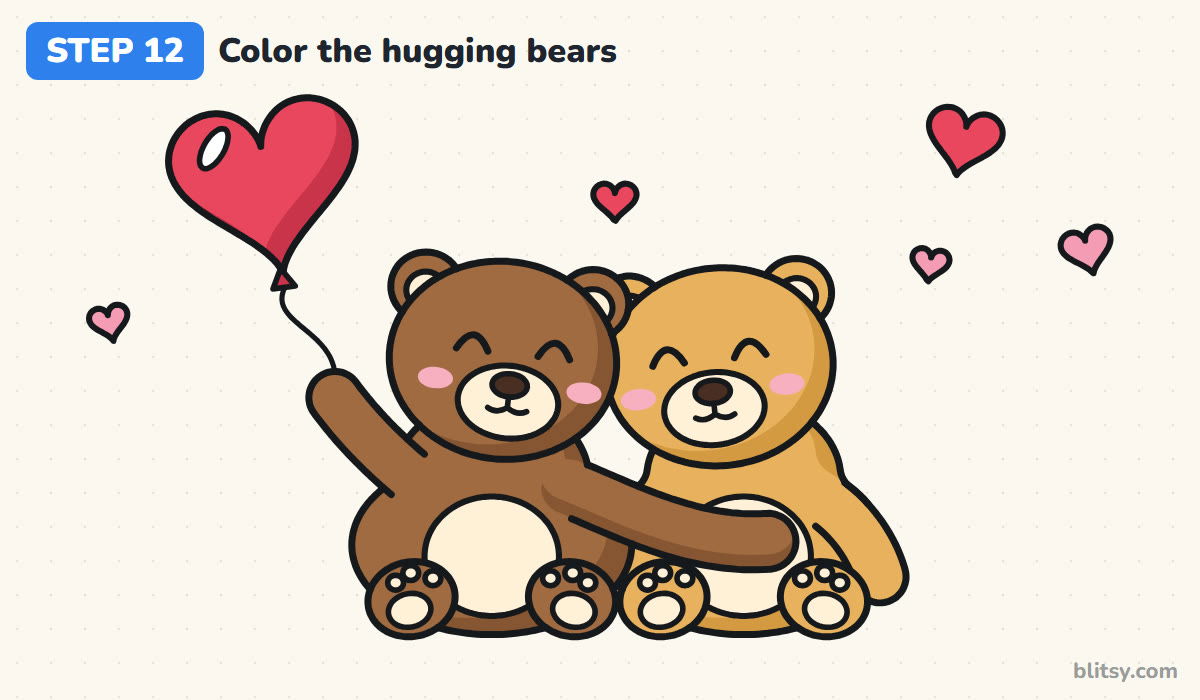
Color the front bear brown and the back bear golden yellow, with a darker shade of each along the right edges for roundness. Muzzles, tummies, inner ears and paw pads are cream. My balloon is red with a darker right side and a white shine. Finish with pink cheeks, dark brown noses and the small hearts.
💡 Tip: Color the cheeks with very light pressure. Soft pink blush looks sweet; heavy pink looks like a rash.
Where a Hugging Drawing Gets Awkward
- Two bears standing apart. A gap between the heads breaks the hug. Let the ovals touch, and tilt them toward each other.
- The arm drawn after the bodies. You end up erasing body lines from under it. Draw the hugging arm first so the other lines stop at its edge.
- A balloon that fills the corner. If it touches the page edge or the bear's ear, shrink the two top circles and try again.
- Open, staring eyes. They can look surprised in a hug. Closed, curved eyes look happy and calm.
- Dark helper lines. Heavy ovals leave ghost marks after erasing. Sketch them so lightly you can barely see them.
New Ways to Draw This Bear Hug
Once the hug feels comfortable, change the story. Swap the balloon for a heart pillow the bears hold together, or give the smaller bear a bow. A big bear hugging a tiny one becomes a parent and child, which makes a sweet card for Mother's or Father's Day. For more practice on round, furry shapes, try the easy bear drawing tutorial, and the heart drawing tutorial shows another way to draw the balloon.
Hugging Bears Coloring Page and Step Guide PDF
The free hugging bears coloring page has a small colored example at the top with the colors to use, and a big outline below with thick, easy lines. The step-by-step guide PDF holds all 12 steps with tips, two to a page, for Letter or A4.
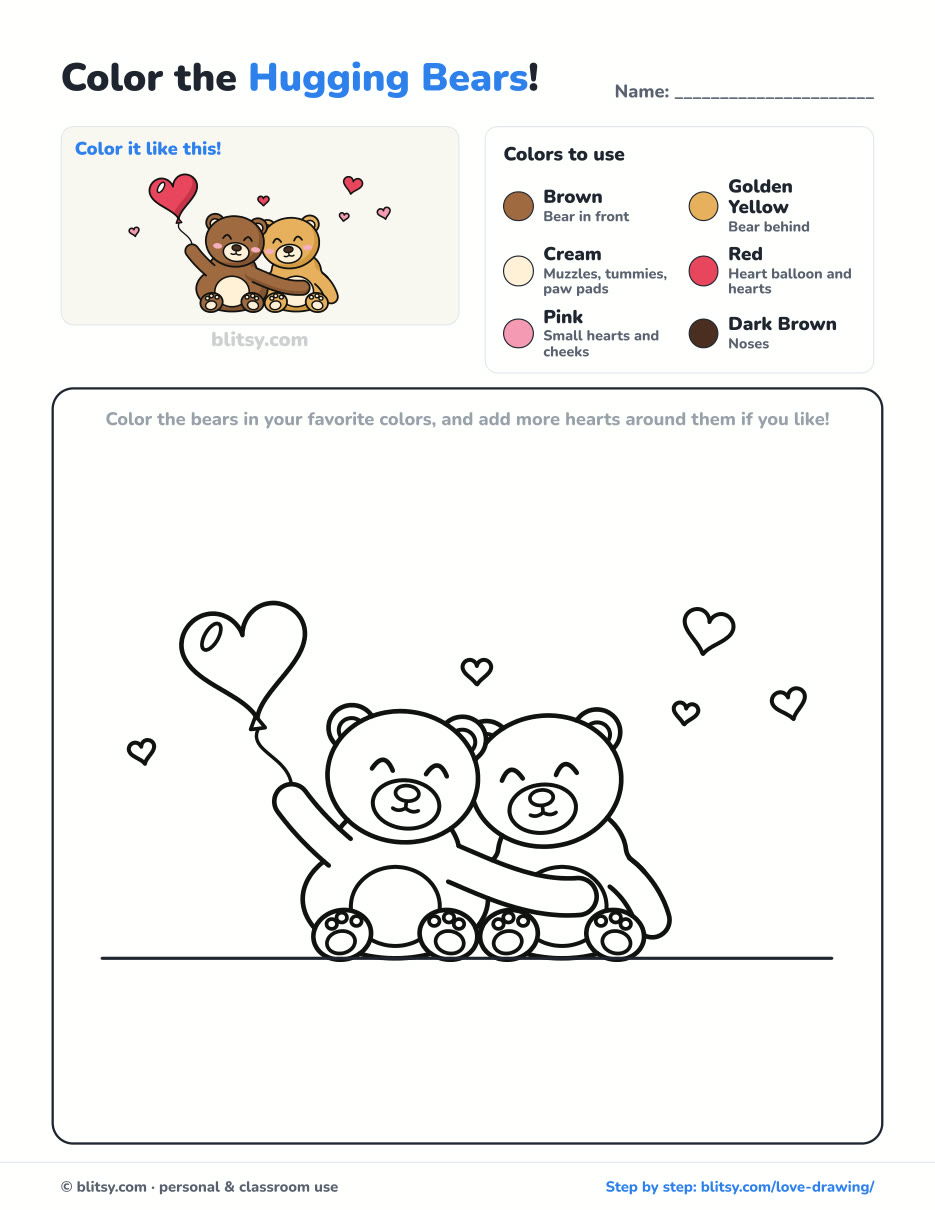
Black outlines with a colored example and the color names at the top. Ready to print and color.
⬇️ Download Coloring PageEvery step picture with its instructions and tips, to keep beside your paper while you draw.
⬇️ Download Drawing Guide📱 On a phone? Tap a download button, then open the file and choose Share → Save to Files or Print. On a computer, the PDF opens or saves straight to your Downloads folder.
Pin the Bear Hug Steps
Valentine Cards, Chibis and Other Sweet Tutorials
Every link here opens a step-by-step tutorial with pictures for each stage, a good mix for cards and gifts.
- Valentine's Day Drawing: A card, a box of chocolates and a rose, with a ladybug sneaking in, fill the Valentine's Day drawing tutorial.
- Chibi Drawing: Learn the two-head method for a chibi in a mint cat-ear hoodie with the how to draw a chibi step by step guide.
- Dragon Head Drawing: Green scales, purple frills and a puff of smoke grow from a circle in the dragon head drawing tutorial.
- Door Drawing: Draw a teal cottage door in a stone arch, lantern and plant included, with the door drawing tutorial.
- Hello Kitty Drawing: The easy Hello Kitty drawing tutorial ends with her in blue overalls and a red bow.
- Music Note Drawing: A purple treble clef and a ribbon of bright notes start from one wavy line in the how to draw music notes tutorial.
- Joker Drawing: One card held high and a knowing grin finish the Joker drawing step by step chibi.
- Demon Slayer Drawing: Draw Tanjiro in his checkered haori with this Demon Slayer drawing tutorial.
What People Ask About Drawing Love
What is an easy way to draw love?
Show it with a small scene instead of words. Two animals hugging, a shared heart balloon or a few floating hearts are easy for beginners and clear to anyone who looks.
Is this love drawing good for kids?
Yes. It's a friendship hug, not a romantic one, and the shapes are simple ovals and tubes. Younger kids may need help with the hugging arm, and they can skip the toe beans.
How do you draw two characters hugging?
Overlap them. Draw the front character's head and the arm that crosses the other one first, then let every line behind them stop at those edges.
How long does this drawing take?
Around 25 minutes for the pencil sketch and ink, plus about 20 minutes to color it.
Draw it once more for someone you care about and write their name on the balloon. 🧸💕
Related posts:
 How to Draw a Car Step by Step (Easy Drawing for Beginners)
 Oil Pastel Drawing Step by Step (Easy Sunset for Beginners)
 Summer Drawing Step by Step (Easy Beach Scene for Beginners)
 How to Draw a Rocket Step by Step (Easy Blast-Off Drawing)
 How to Draw Rocks Step by Step (Easy Boulder Drawing)
 How to Draw Flames Step by Step (Easy Campfire Drawing)
 Halloween Drawing Step by Step (Cute Haunted House for Kids)
 How to Draw a Scarecrow Step by Step (Easy Fall Drawing)
 Realistic Drawing Step by Step (Shade a Shiny Apple)
 How to Draw a Whale Step by Step (Easy for Beginners)
 How to Draw Lungs Step by Step (Easy Science Diagram)
 How to Draw a Pineapple Step by Step (Easy Crown and Slice)

