
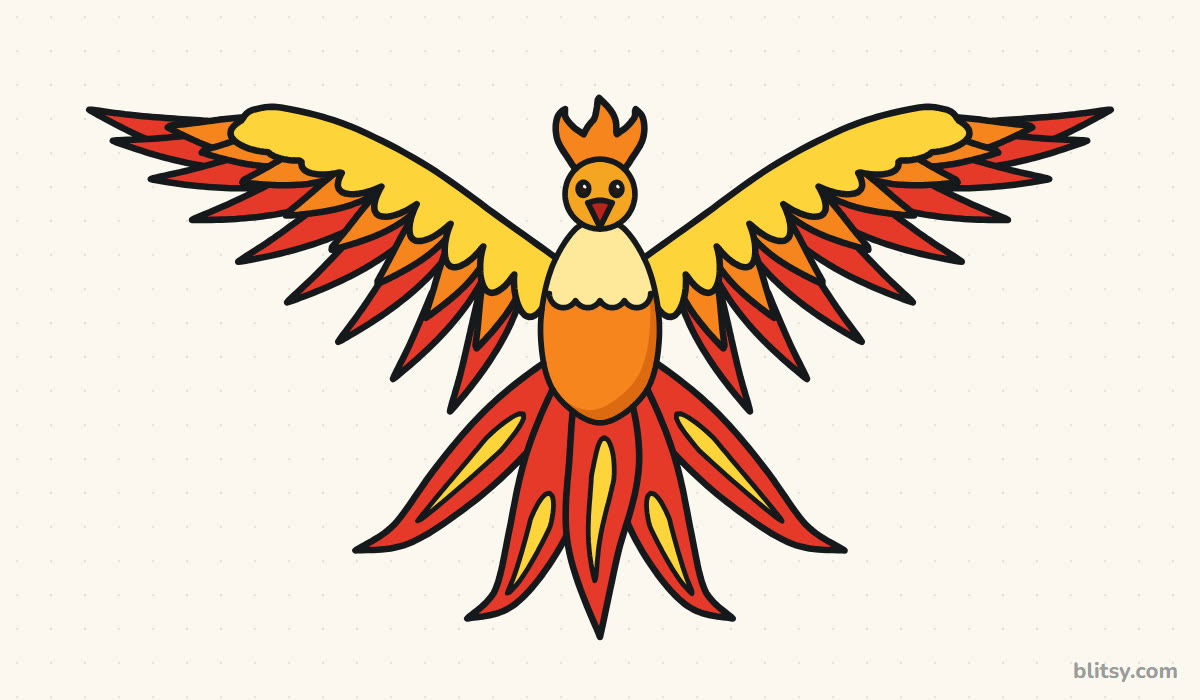
A phoenix looks like a showpiece, yet underneath all the fire it's a plain little bird with its arms up. In old Greek and Roman stories it lived for hundreds of years, then burned away and rose again, young, from its own ashes. Here I'll walk you through how to draw a phoenix step by step, starting with two circles and ending with a glowing bird in warm fire colors. The wings repeat the same feather shape over and over, so once you get one right, the rest follows.
Each picture shows the new lines for that step in blue. Anything gray was drawn in an earlier step and stays as it is. The pale blue lines are construction guides, so sketch them lightly and expect to rub them out in step 10.
Quick overview
⏱️ Time: around 30 to 40 minutes
🎯 Level: easy to medium, fine for kids aged 7 and up
✏️ Steps: 11
🔥 You'll draw: a phoenix facing you with both wings spread wide
Phoenix Art Supplies for a Fiery Sketch
- A pencil you can press lightly with, such as an HB
- A soft eraser
- A black fineliner or thin marker for inking
- Colored pencils or markers in warm shades, from yellow to deep red
- A sheet of paper turned sideways
Warm colors are the whole point here, so check that your yellow and orange are bright before you start.
How to Draw a Phoenix Step by Step
Step 1: Draw a center line and two circles
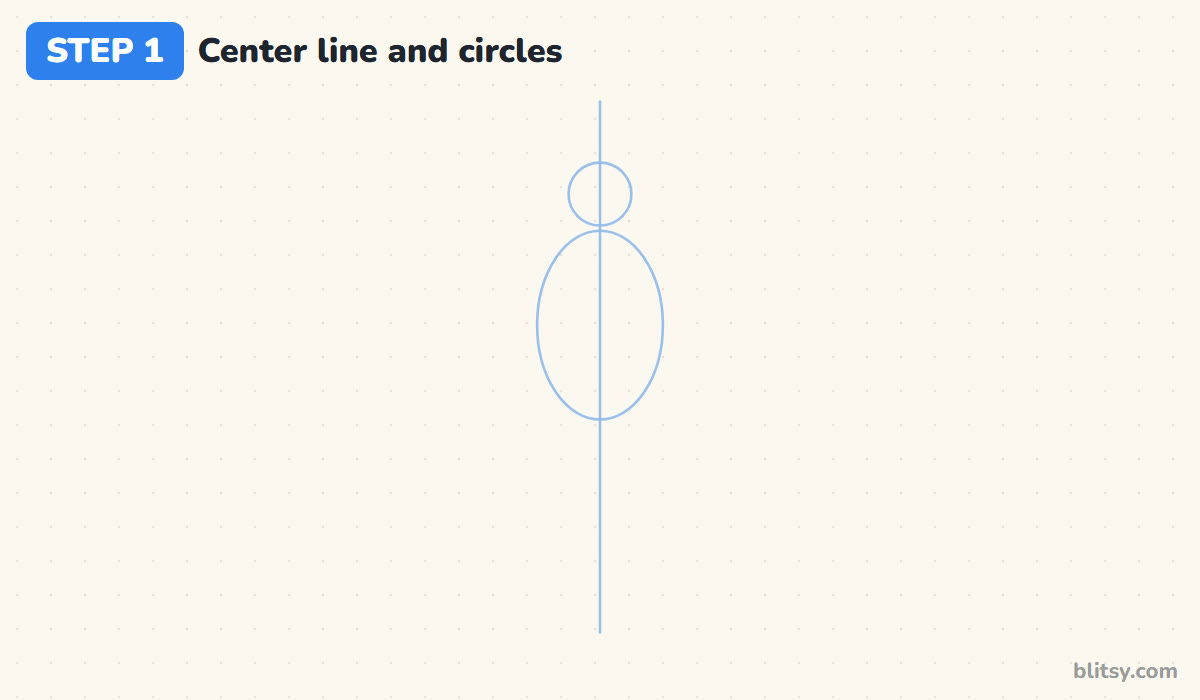
Draw a straight line down the middle of the page. Near the top, sketch a small circle for the head, and right under it a tall oval for the body. Keep the head small: on a phoenix the wings and tail do the showing off, so a big head would steal the attention.
💡 Tip: Hold the pencil far back from the tip. Your guide lines come out lighter that way.
Step 2: Add wing and tail guide lines
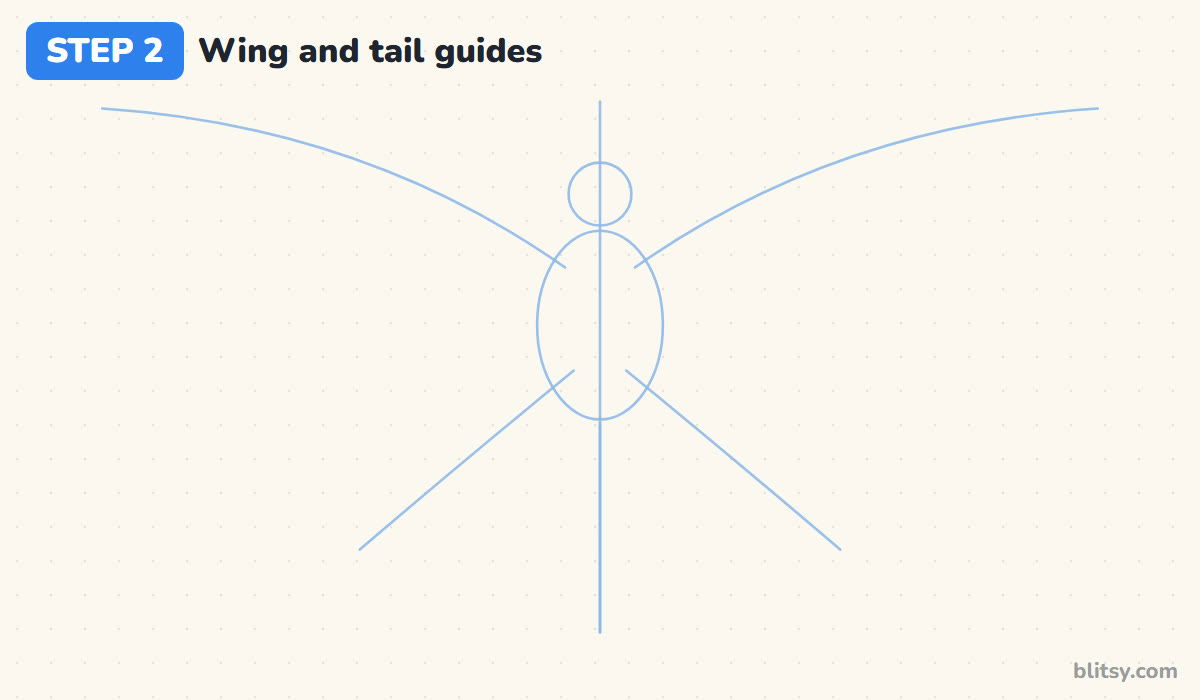
From each shoulder, near the top of the oval, draw a long curve sweeping up and out toward the top corners of the page. Those two curves set how high the wings rise. From the bottom of the body, draw two slanted lines going down and outward, one on each side. Together with the center line, they mark where the tail feathers will flow.
💡 Tip: Mark both wing tips with a dot first, at the same height, then connect to them.
Step 3: Draw the head and the flame crest
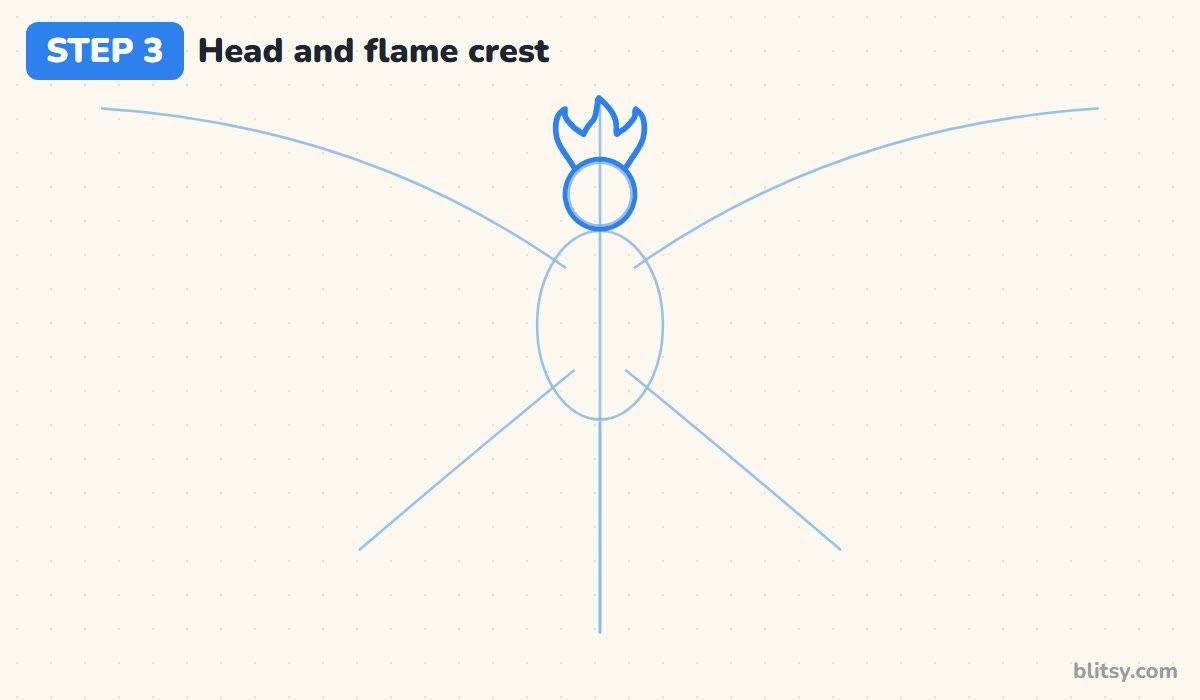
Go over the head circle with a firmer line. On top of it, draw three small flames: a tall one in the middle and a shorter one on each side, with their tips bending outward. Each flame is wide at the bottom and comes to a point, a bit like a candle flame. Let the bottoms tuck behind the head instead of sitting on top of it.



💡 Tip: Draw the middle flame first. The two side flames are easier to match when they have a center to lean away from.
Step 4: Outline the body and add a small beak
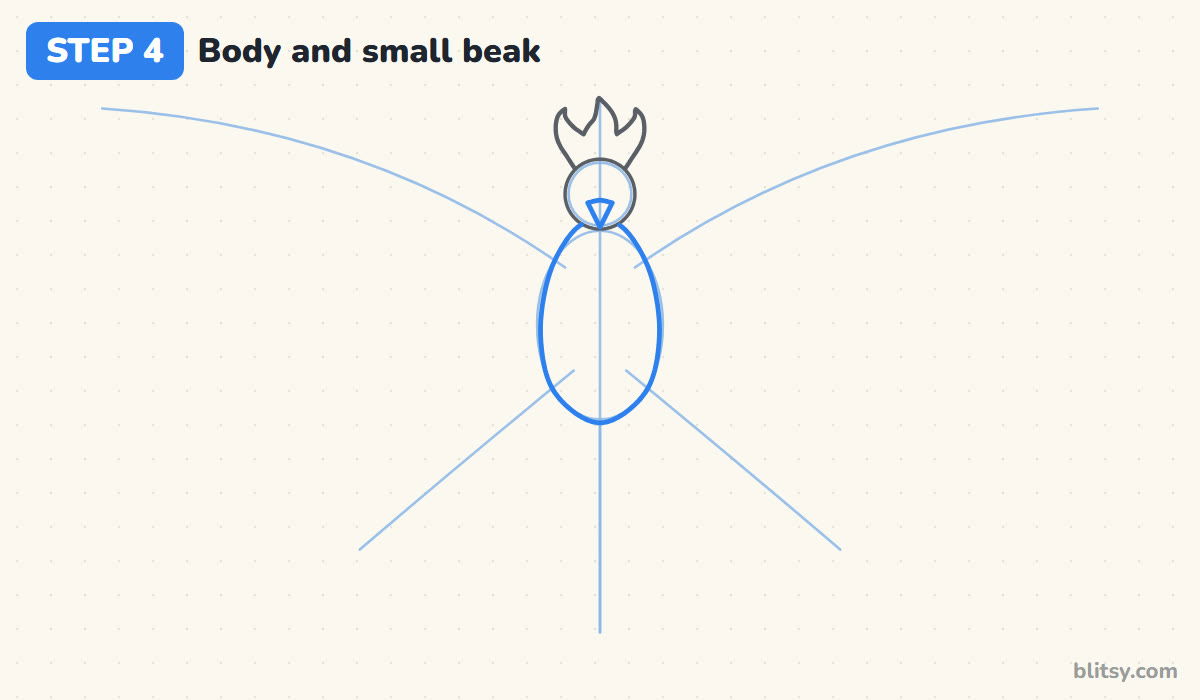
Turn the oval into the body, rounding it a little more at the bottom, like an egg standing on its wide end. The top of the body should disappear behind the head. Then add a short pointed beak at the bottom of the head, pointing straight down. I keep it small so the face still reads as a bird and not a parrot.
💡 Tip: If the beak looks too sharp, round its two top corners a little.
Step 5: Draw the top row of wing feathers
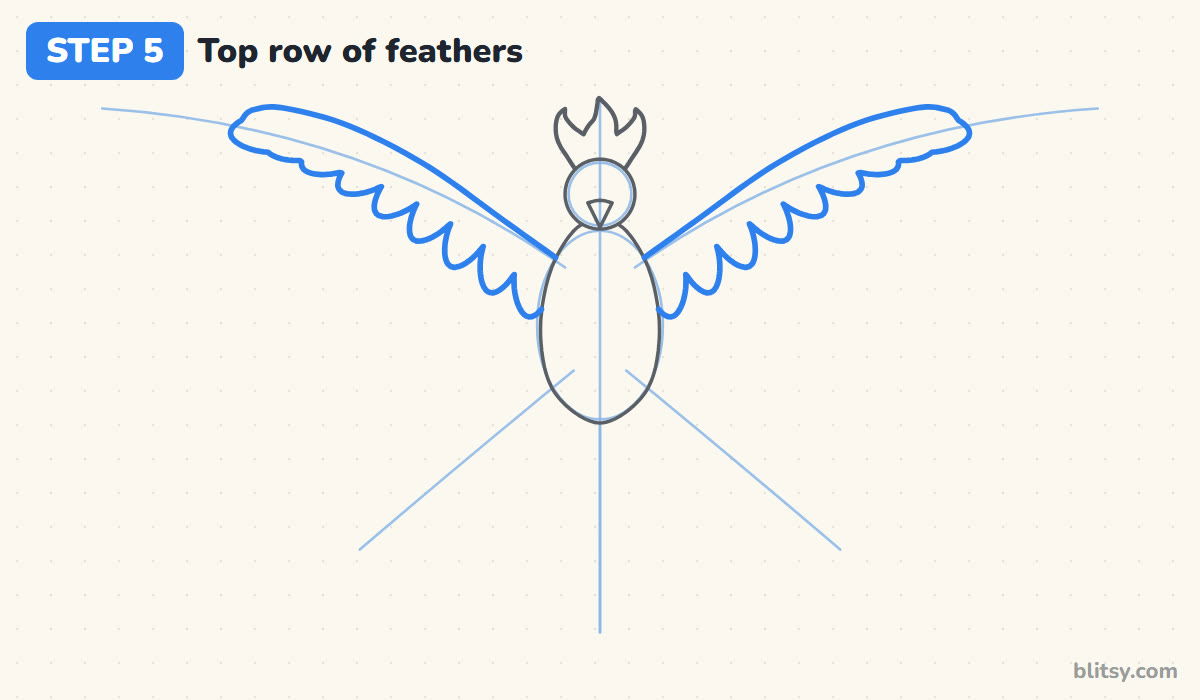
Start at the shoulder and follow the wing guide up to the tip with one smooth top edge. Under it, draw a row of small rounded bumps, like a scalloped edge, all the way back to the body. Then close the wing shape around the tip. This band is the top of the wing, and every other feather hangs from it.
💡 Tip: Make the bumps a little bigger near the body and smaller toward the tip.
Step 6: Add the middle row of pointed feathers
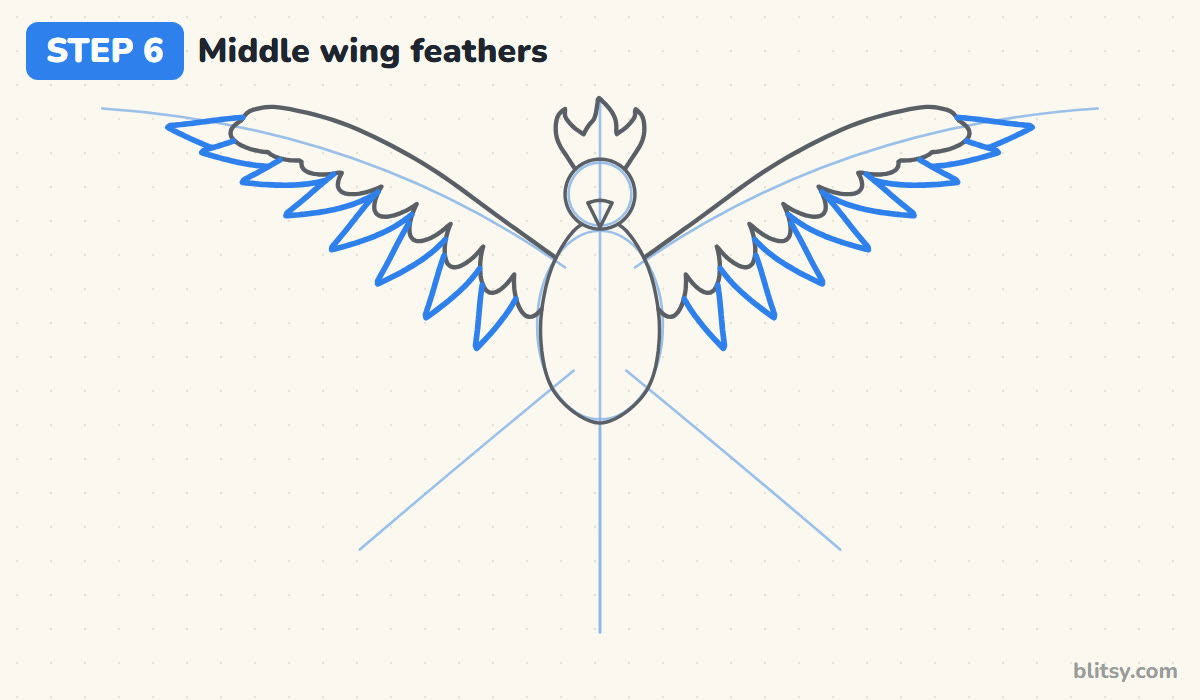
Below the scallops, draw a second row: medium feathers with pointed tips. Near the body they point down, and as you move toward the wing tip they slowly turn to point outward. That gentle turn is what makes the wing look like it's opening. Let each feather tuck slightly behind the one beside it.
💡 Tip: Count the feathers on the first wing and use the same number on the second.
Step 7: Draw the long flight feathers
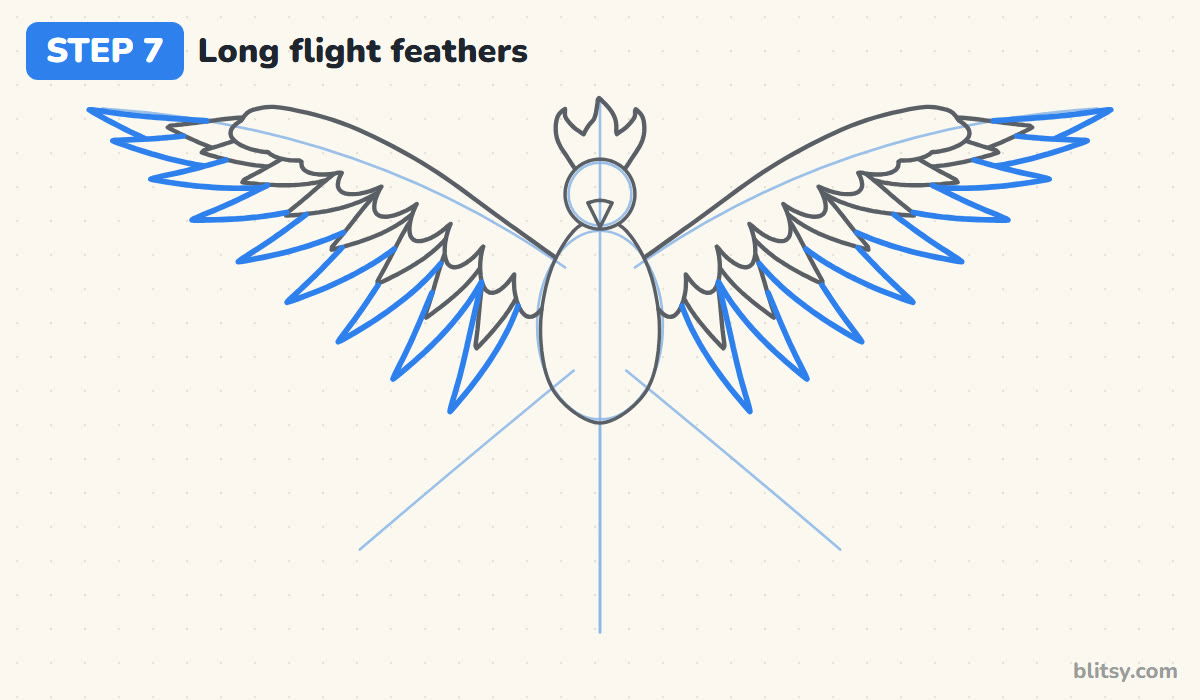
Now add the longest feathers under the middle row. They follow the same turn, pointing down near the body and outward at the tip, but reach much farther. The ones at the wing tip should be the longest of all, stretching past the top row. I find this step goes faster if you draw all the tips first as dots, then join each dot back to the wing.




💡 Tip: Curve each long feather slightly instead of drawing it ruler-straight. It looks softer and more alive.
Step 8: Draw the flowing flame tail
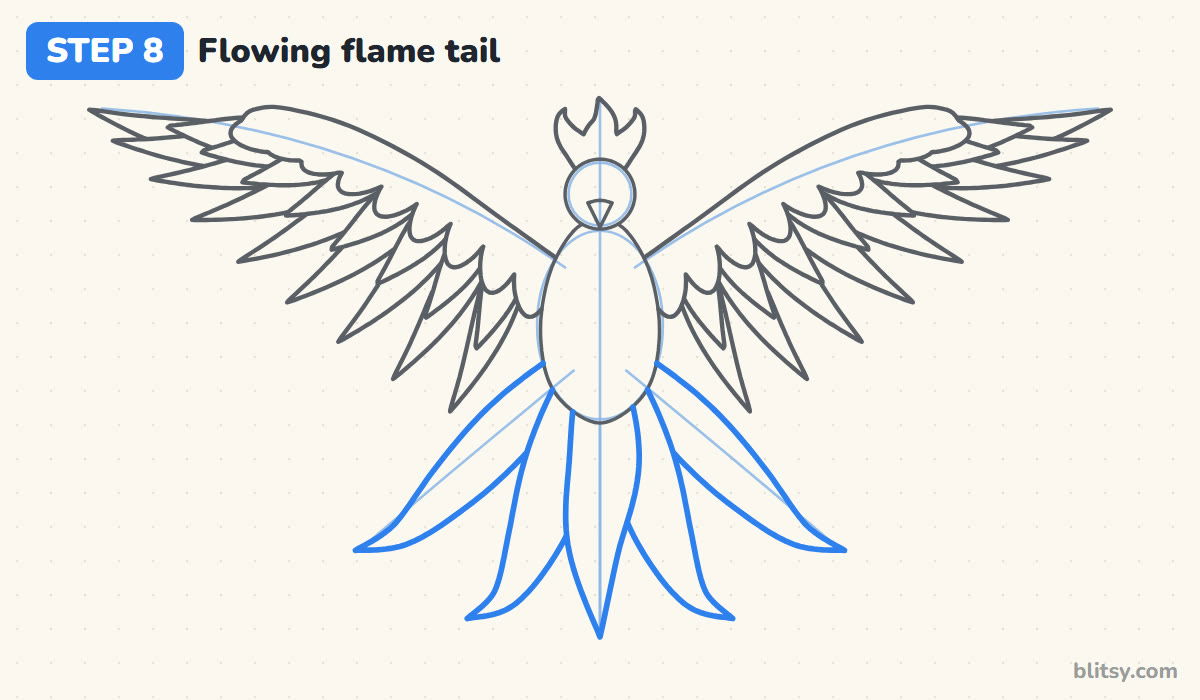
From the bottom of the body, draw five long tail feathers shaped like flames. The middle one drops straight down. The pair beside it bends out a little, and the outer pair follows the slanted guides, with their tips flicking outward at the end. Each feather is widest about a third of the way down, then thins to a point. Let them overlap near the body.
💡 Tip: Draw the center feather first, then build the others outward so they overlap neatly.
Step 9: Add the eyes, the chest and the flame centers
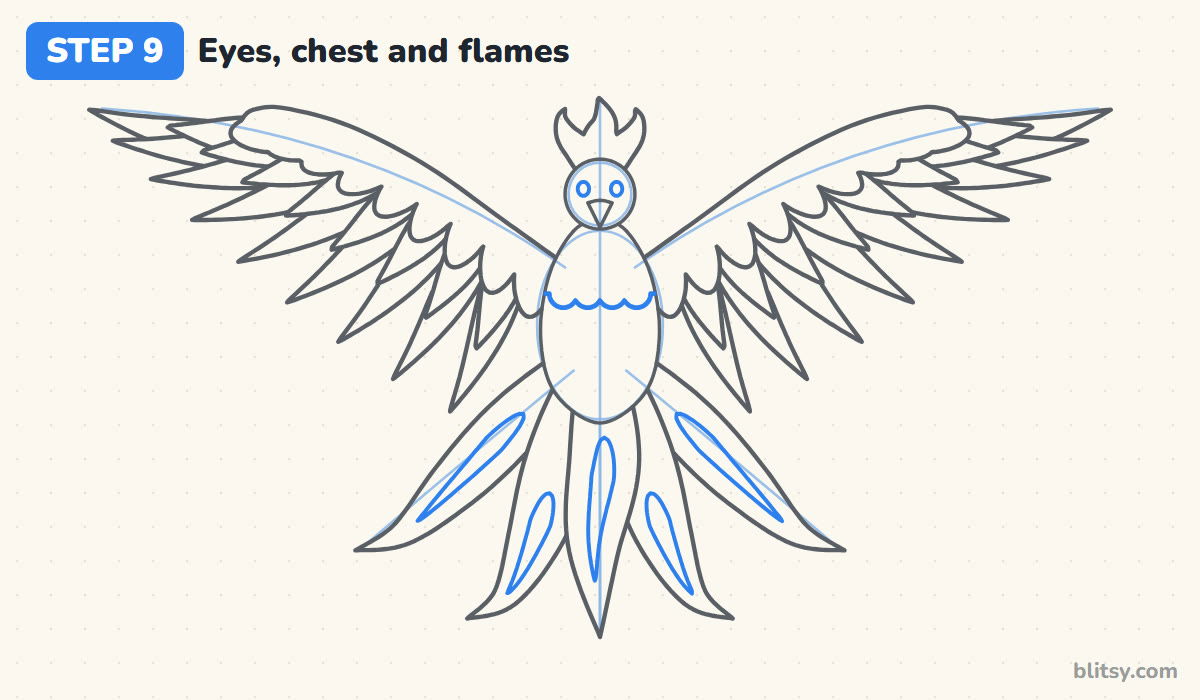
Give the head two small oval eyes just above the beak, close to the center line. Across the upper body, draw a wavy line of four little bumps to mark a pale chest bib. Inside each tail feather, draw a narrow teardrop with its round end near the body and its point toward the tip. These inner shapes are what turn plain feathers into flames once you color them.
💡 Tip: Keep the eyes close together and fairly low. Wide-set eyes make the bird look surprised.
Step 10: Ink the drawing and erase the guides
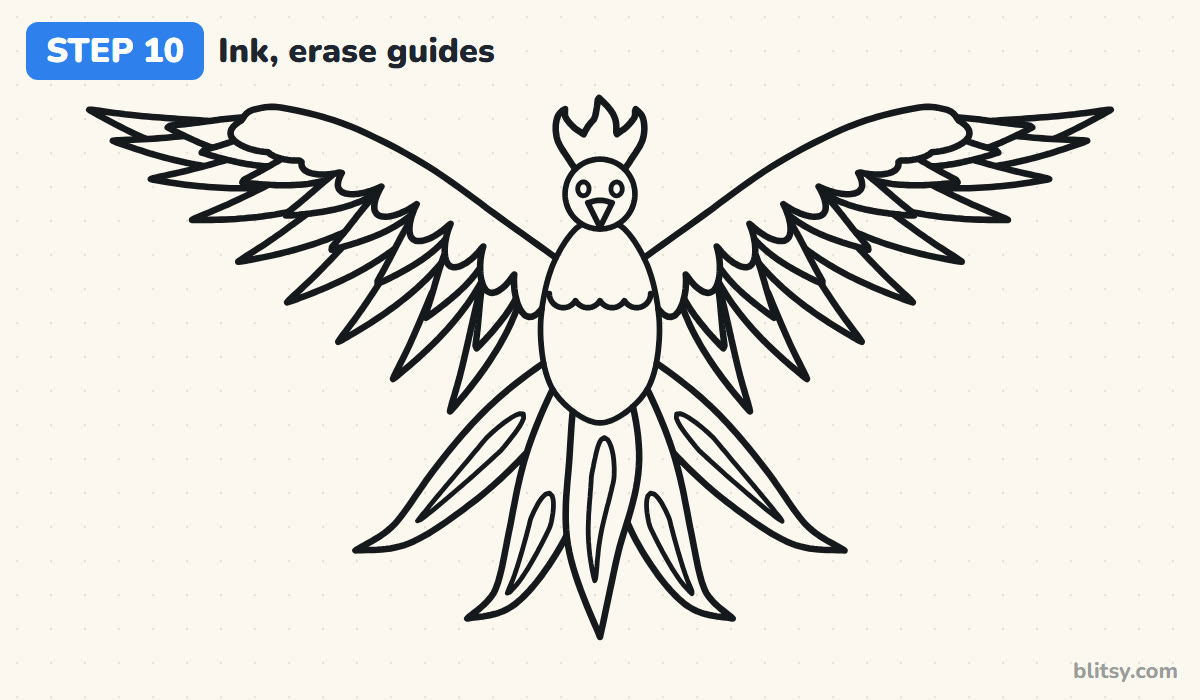
Trace all the lines you want to keep with a black pen. Wings take the longest here because of the many feather tips, so turn the paper to keep your hand comfortable. I skip the center line, the circles and the wing and tail guides. When the ink is completely dry, erase every bit of pencil.
💡 Tip: Ink the feather tips with a quick flick. Slow tips tend to end in a blob.
Step 11: Color your phoenix
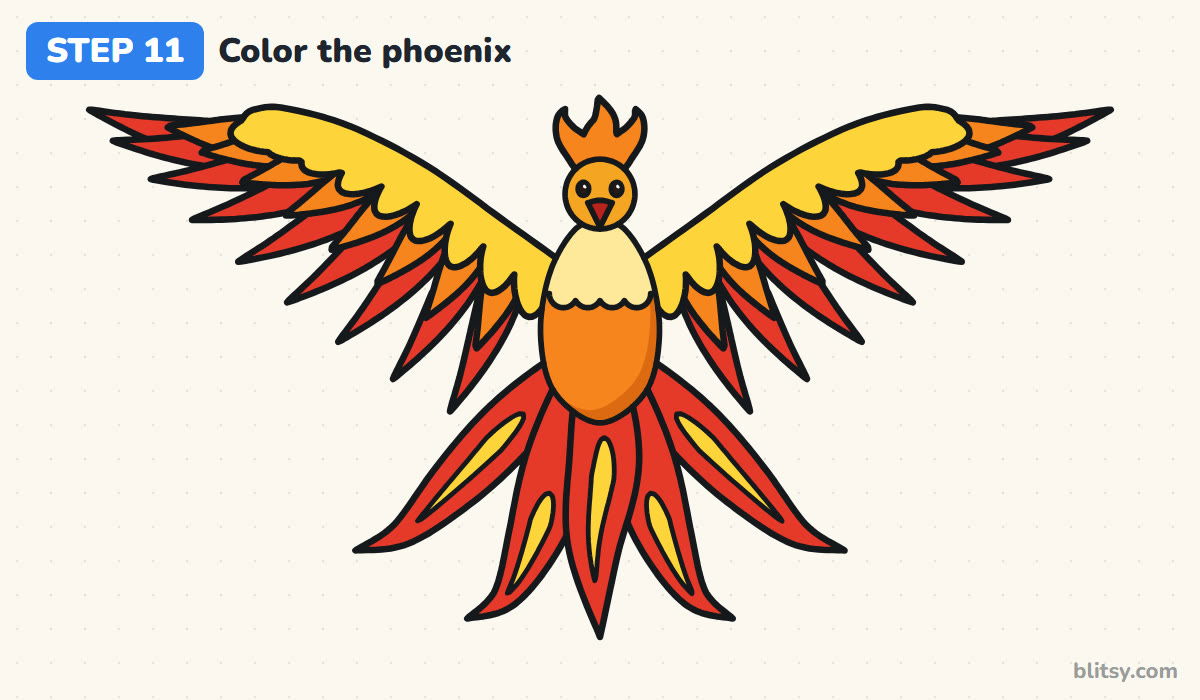
Color the top wing row bright yellow, the middle row orange and the long feathers red, so each wing glows from gold to fire. Make the body and crest orange, the head gold and the chest bib pale yellow. Fill the tail feathers with red and their teardrop centers with yellow. My last touch is a darker orange along the lower right edge of the body, which gives it a rounded look.



💡 Tip: Color the yellows first and the reds last, so the darker color never smears into the light one.
Phoenix Wings That Lose Their Fire
- Feathers that all point the same way. Straight-down feathers make a heavy curtain. Turn them gradually outward as you move toward each wing tip.
- A head that's too big. A large head makes the phoenix look like a chick. Keep it about a third of the body's height.
- Wings at different heights. One wing higher than the other makes the bird look tipped over. Mark both tips at the same height before drawing.
- Tail feathers like noodles. Even-width strips read as ribbons or tentacles. Give each tail feather a wide middle and a sharp point.
- Too much red. An all-red phoenix looks flat. Keep the yellow near the body and top of the wings so the fire seems to glow from inside.
Phoenix Twists for Your Second Drawing
Once the basic bird feels easy, try a blue ice phoenix by swapping the warm colors for pale blues and white, or draw the bird rising out of a small pile of ash and embers. When I draw this with small kids, we skip the middle feather row entirely. A real bird with a showy tail makes a fun next lesson, so look at our peacock drawing tutorial, or practice wings in motion with how to draw a flying bird.
Fire Bird Coloring Page and Printable Phoenix Steps
Prefer paper? Grab the free phoenix coloring page. A small colored example sits at the top beside a color key, showing which shade goes on each feather row, the tail and the head. The step-by-step PDF guide holds all 11 steps with their tips and prints on Letter or A4.
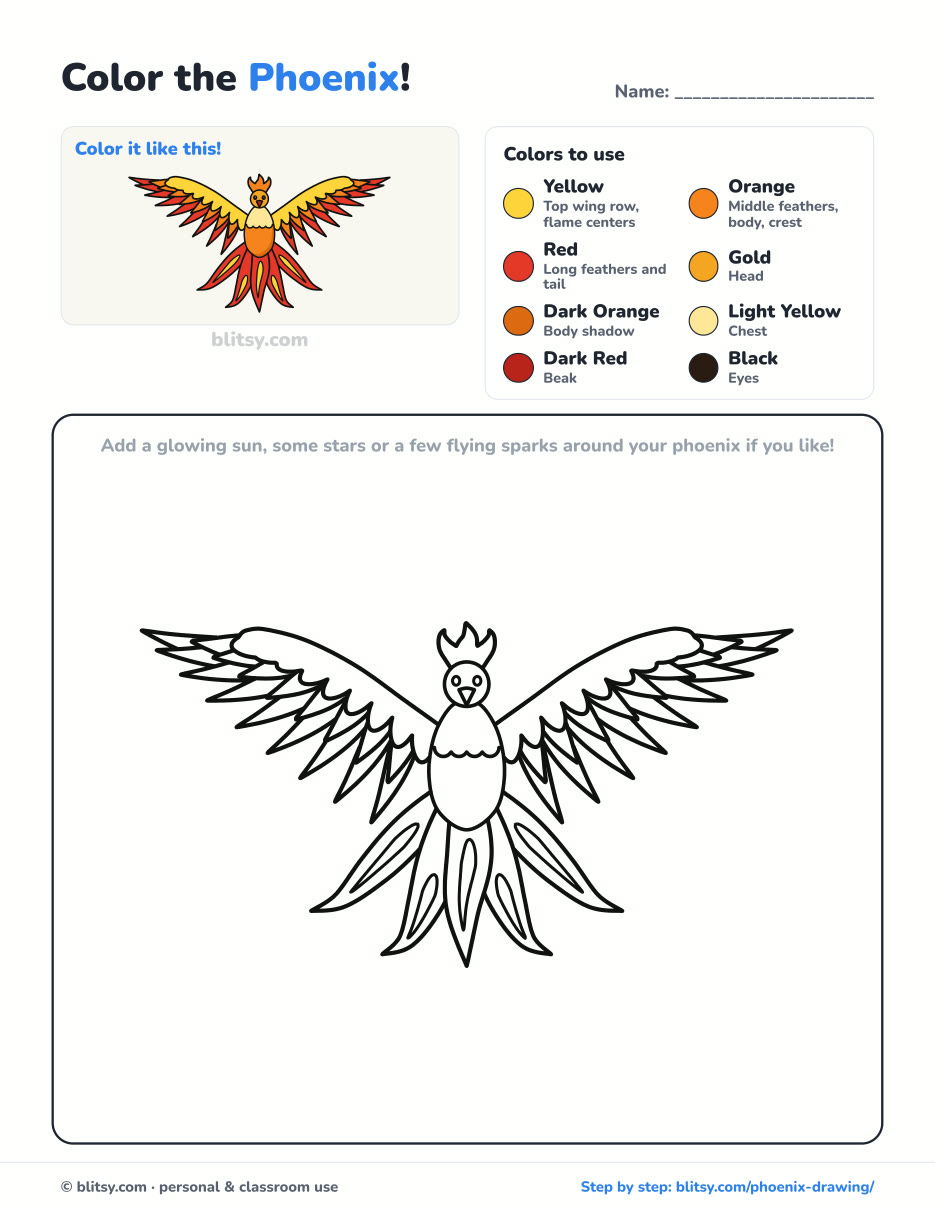
Black outlines with a colored example and the color names at the top. Ready to print and color.
⬇️ Download Coloring PageEvery step picture with its instructions and tips, to keep beside your paper while you draw.
⬇️ Download Drawing Guide📱 On a phone? Tap a download button, then open the file and choose Share → Save to Files or Print. On a computer, the PDF opens or saves straight to your Downloads folder.
Phoenix Lesson Pin for Your Art Board
Phoenix Complete? Try These Characters Next
Each link opens a step-by-step tutorial, so these heroes, cartoons and animals are all drawn in small, numbered steps.
- Olaf Drawing: Draw the Frozen snowman with his arms up and a huge grin in this how to draw Olaf step by step lesson.
- Wonder Woman Drawing: A chibi Wonder Woman stands hands on hips, tiara and lasso ready, in the Wonder Woman drawing tutorial.
- Luffy Drawing: Straw hat, scar and a giant grin: the Luffy drawing tutorial covers all three in twelve steps.
- Fortnite Drawing: Draw the piñata llama from Fortnite on its four stubby legs with this Fortnite llama drawing tutorial.
- Hulk Drawing: Learn how to draw the Hulk as a chibi with both fists up and a cheeky grin.
- Nezuko Drawing: One circle turns into a chibi Nezuko in this Nezuko drawing step by step guide.
- Anime Girl Drawing: Pink bangs, purple eyes and a navy sailor collar are the goal of this anime girl drawing tutorial.
- Todoroki Drawing: Fire and ice split Todoroki down the middle, and the how to draw Todoroki tutorial shows you how to handle both sides.
- Rosa Parks Drawing: Draw a calm portrait with soft glasses and a white collar in the Rosa Parks drawing tutorial.
- Mario Drawing: Cap on and one glove waving, Mario comes together in this easy Mario drawing tutorial.
- Raccoon Drawing: Finish with an animal: the raccoon drawing step by step ends with a masked raccoon, tail up.
Phoenix Drawing Questions Young Artists Ask
What is the easiest way to draw a phoenix?
Draw it facing you with the wings raised. Both sides match, so you plan each feather row once and mirror it. Start with a small head circle and a body oval, then build the wings from a top band down to the long feathers.
How do you draw a phoenix for kids?
Use fewer feathers. A scalloped top row plus one row of long pointed feathers is plenty, with three tail flames instead of five.
What colors is a phoenix?
Most pictures use fire colors, running from pale yellow through orange to deep red, often with a little gold. Since it's a creature from legend, there's no single correct answer, and blue or purple versions are fun too.
How long does it take to draw a phoenix?
Plan on 30 to 40 minutes with inking and coloring. The wing feathers take the most time, so a younger child may want to split it into two sessions.
Raise those wings high, light up the tail, and let your phoenix rise off the page. 🔥✏️
Related posts:
 How to Draw Todoroki Step by Step (Easy Fire and Ice Guide)
 How to Draw a Fire Truck Step by Step (Easy for Kids)
 How to Draw a Bird Step by Step (Easy Singing Bluebird)
 How to Draw a Flying Bird Step by Step (Easy Swallow)
 How to Draw a Whale Step by Step (Easy for Beginners)
 How to Draw Lungs Step by Step (Easy Science Diagram)
 How to Draw a Pineapple Step by Step (Easy Crown and Slice)
 How to Draw the Fortnite Llama Step by Step (Easy Fan Art)
 How to Draw a Hoodie Step by Step (Front and Back View)
 How to Draw a Parrot Step by Step (Easy Scarlet Macaw)
 How to Draw a Police Car Step by Step (Easy for Kids)
 How to Draw a Volcano Step by Step (Easy Erupting Volcano)

