
Anime has a handful of rules that show up in almost every series, and once you know them you can draw any character you dream up. This guide teaches how to draw anime step by step through one classic anime character: a grinning boy with spiky hair, big green eyes and a hoodie. I picked him because his face uses every core rule at once, from the halfway eye line to the spiky layers. He's my own design, not from any show, so change him freely.
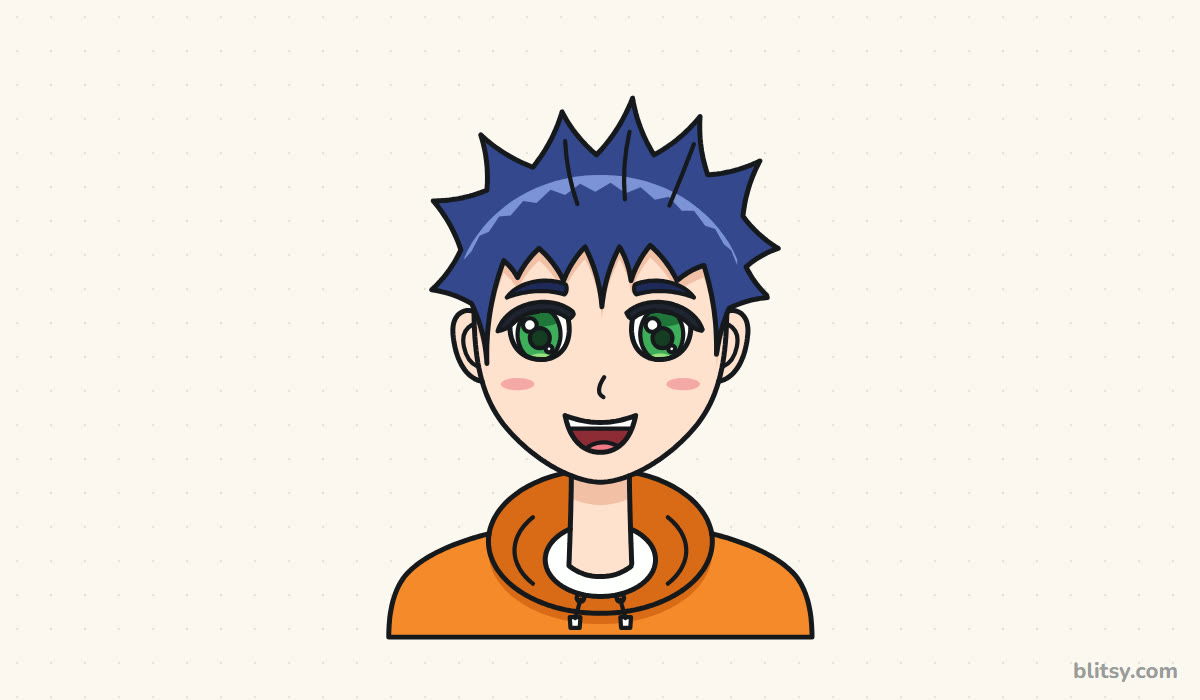
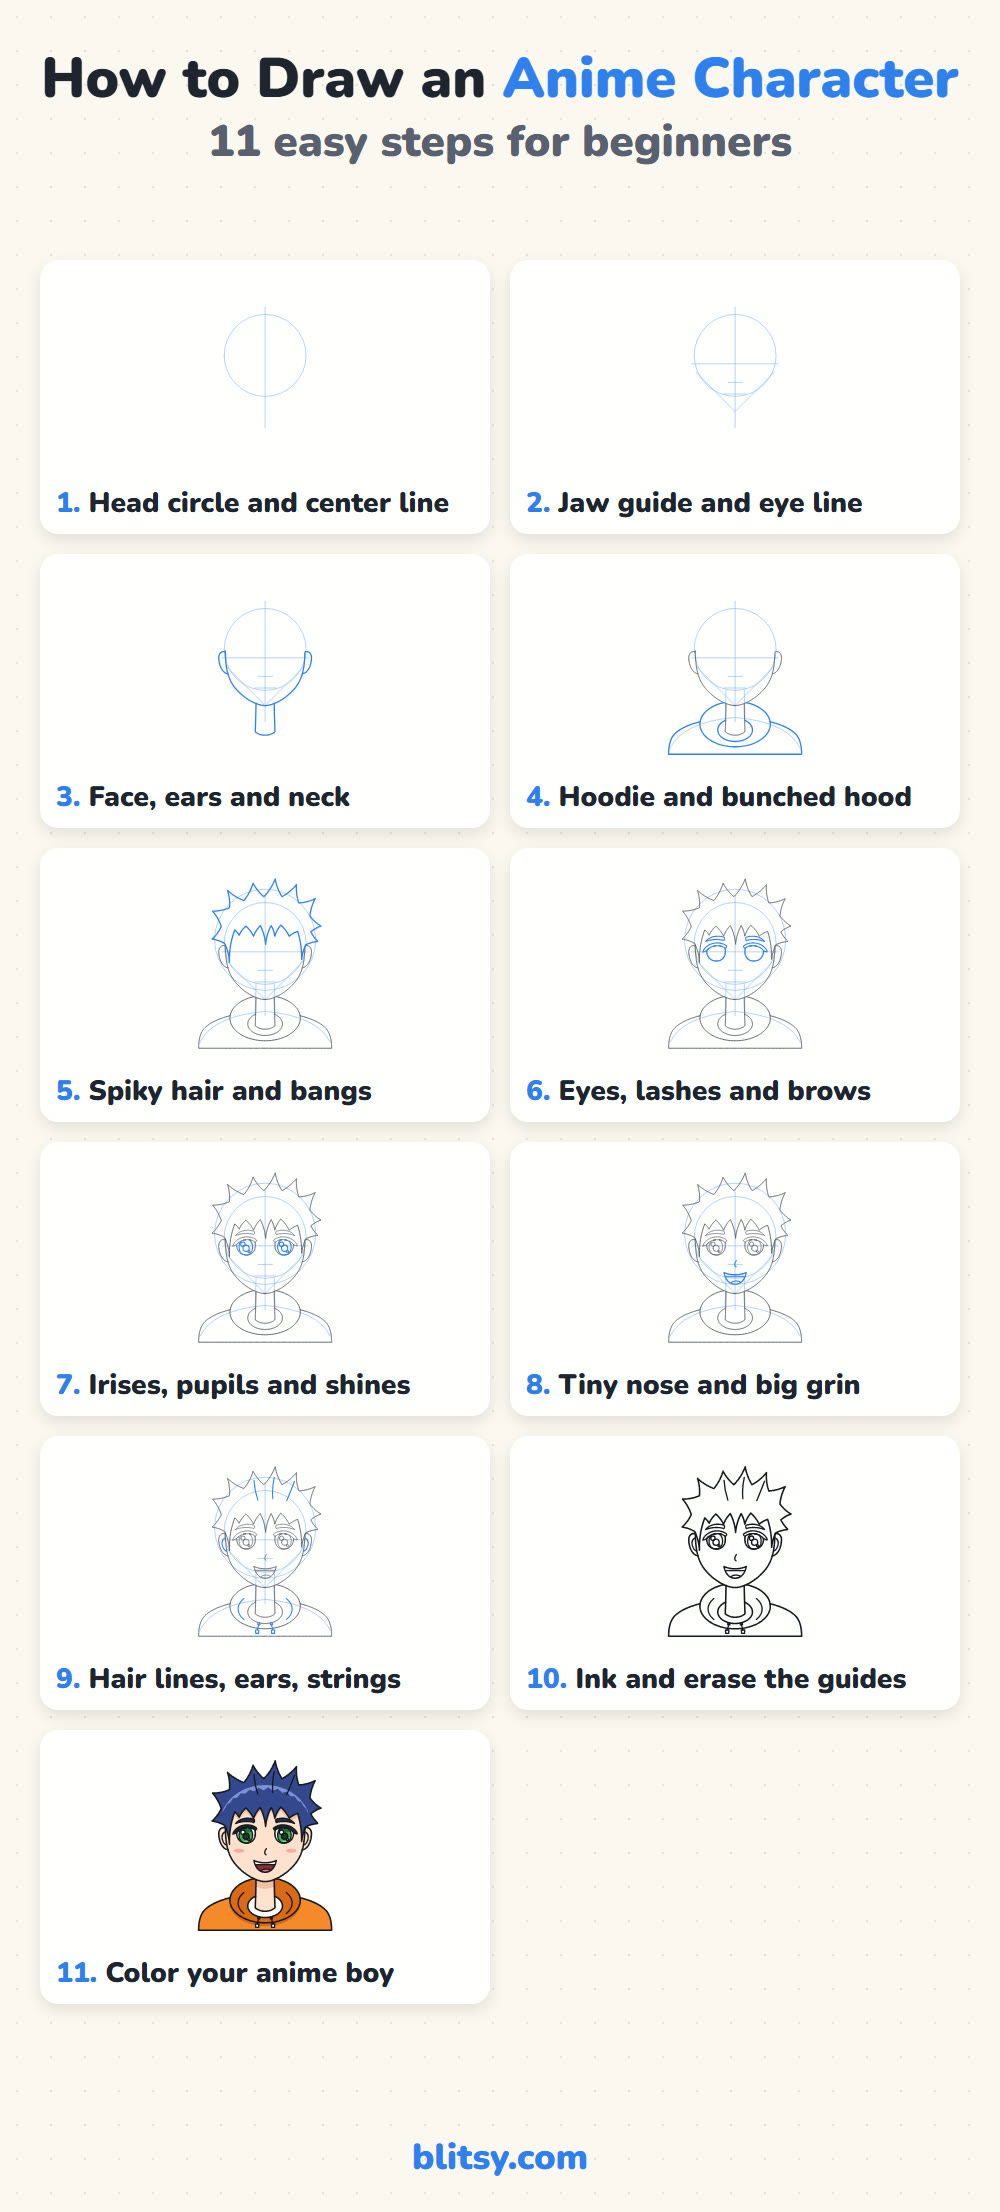
Every step image follows one color code: fresh lines show up blue, and anything gray was drawn earlier. The pale blue circles and lines are only helpers; sketch them lightly, because they disappear in step 10.
Quick overview
⏱️ Time: about 30 minutes, plus 10 for coloring
🎯 Level: easy to medium, good for ages 8 and up
✏️ Steps: 11
⚡ You'll draw: a smiling head-and-shoulders anime boy with spiky dark-blue hair and an orange hoodie
Gathering Supplies for an Anime Sketch
- A light pencil such as HB for the guide lines
- An eraser that won't smudge, ideally a kneaded one
- A black fineliner or felt-tip pen for the final lines
- Colored pencils or markers: blues, greens, oranges plus peach for skin
- Plain paper held upright, or a page in your sketchbook
Nothing fancy is needed here; a school pencil and a cheap black pen will give you a clean result.
How to Draw Anime Step by Step
Step 1: Draw the head circle and a center line
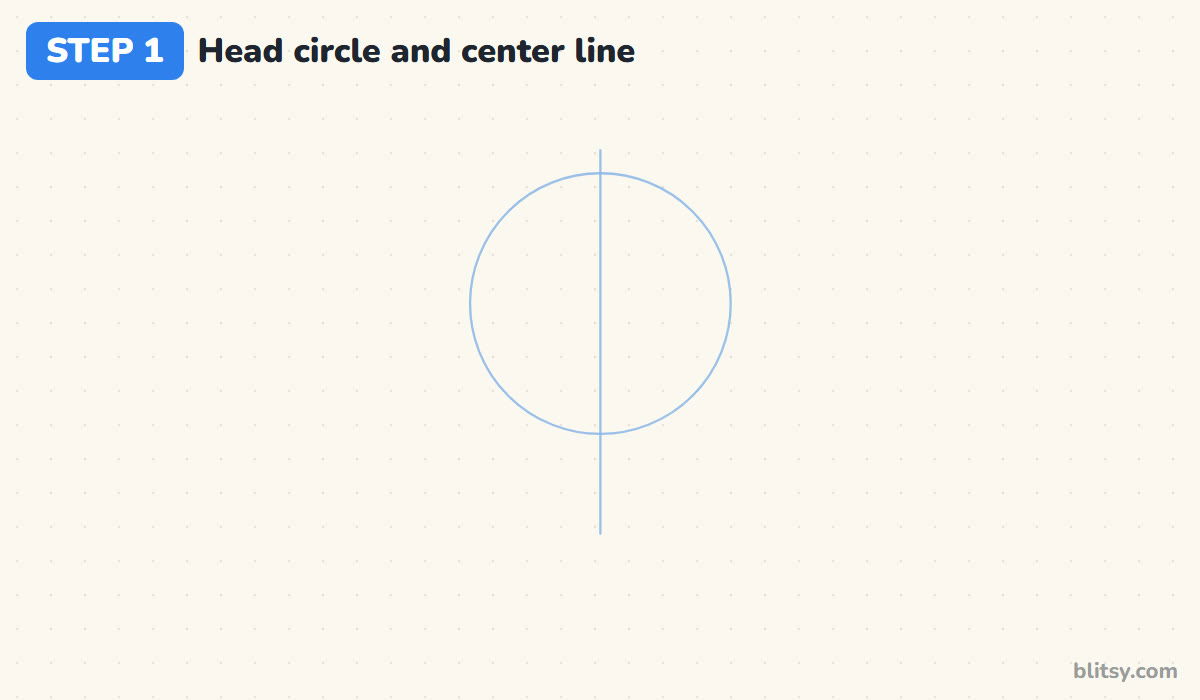
Begin with a circle about the size of a jar lid in the upper half of the paper. Drop a straight line through the middle of it and carry it well below the circle. The face is symmetrical in anime, and this line is how you'll keep the eyes level and the chin centered later.
💡 Tip: Draw the circle in two or three light passes instead of one heavy loop; it ends up rounder.
Step 2: Add the jaw guide, eye line and two small marks
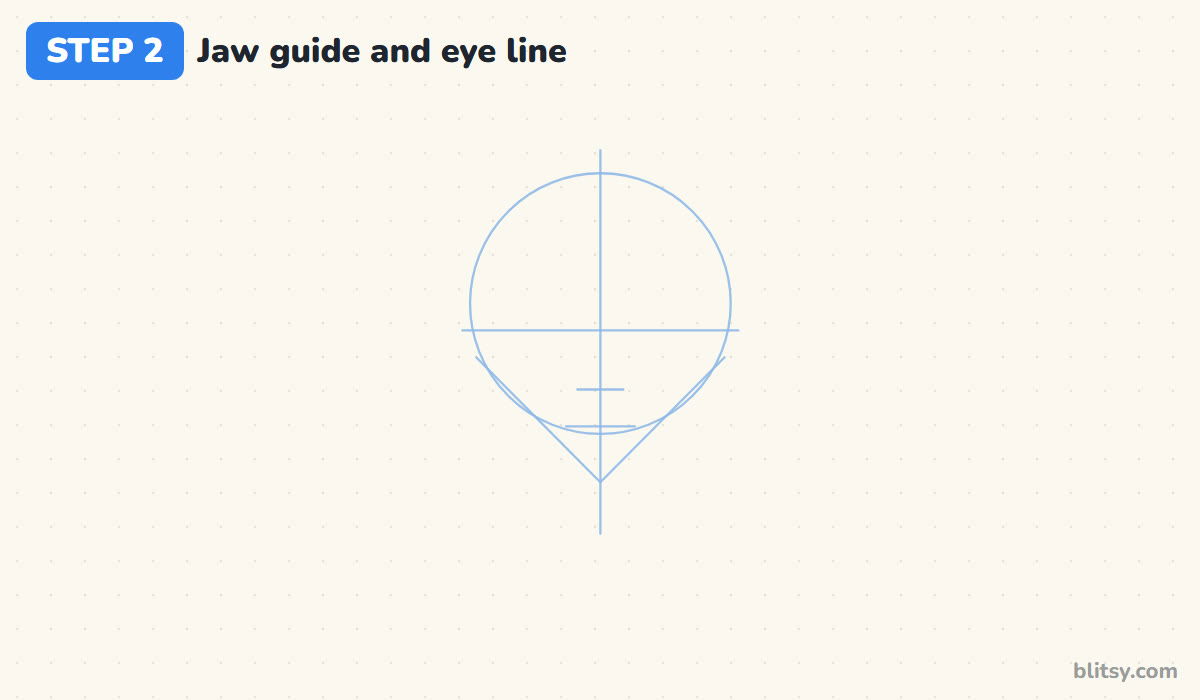
Pick a spot on the center line a short way below the circle. From each side of the circle, draw a straight line down to that spot to make a soft V. Now the most important anime rule: the eye line goes halfway between the top of the circle and the chin point. Add one short mark for the nose and a wider one just under it for the mouth.
💡 Tip: Measure the halfway point with your pencil held against the paper before you draw the eye line.
Step 3: Outline the face, the ears and the neck
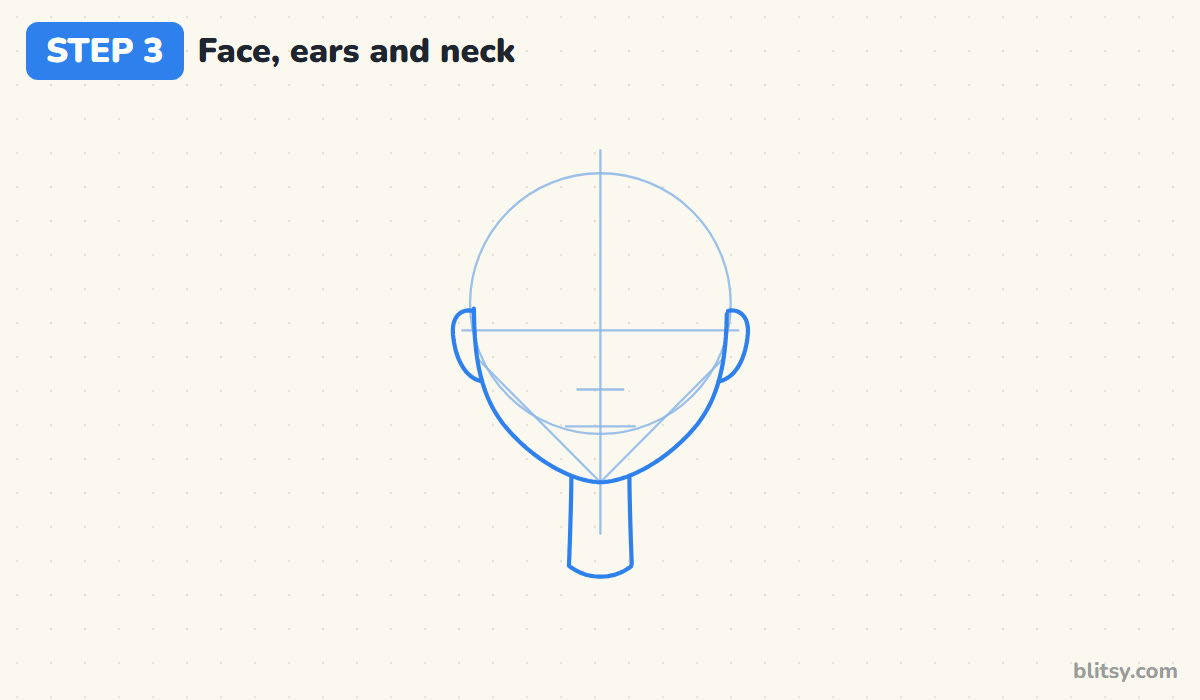
Round off the V into a face. Keep the cheeks full near the eye line, then let them slope into a soft chin. On a boy I make the chin a little wider and blunter than on a girl, which reads as older and sturdier. Add a small C-shaped ear on each side, level with the eyes, and a neck that drops straight down from under the jaw.

💡 Tip: If the ears look like handles, tuck them closer to the head and make them shorter.
Step 4: Sketch the hoodie and the bunched-up hood
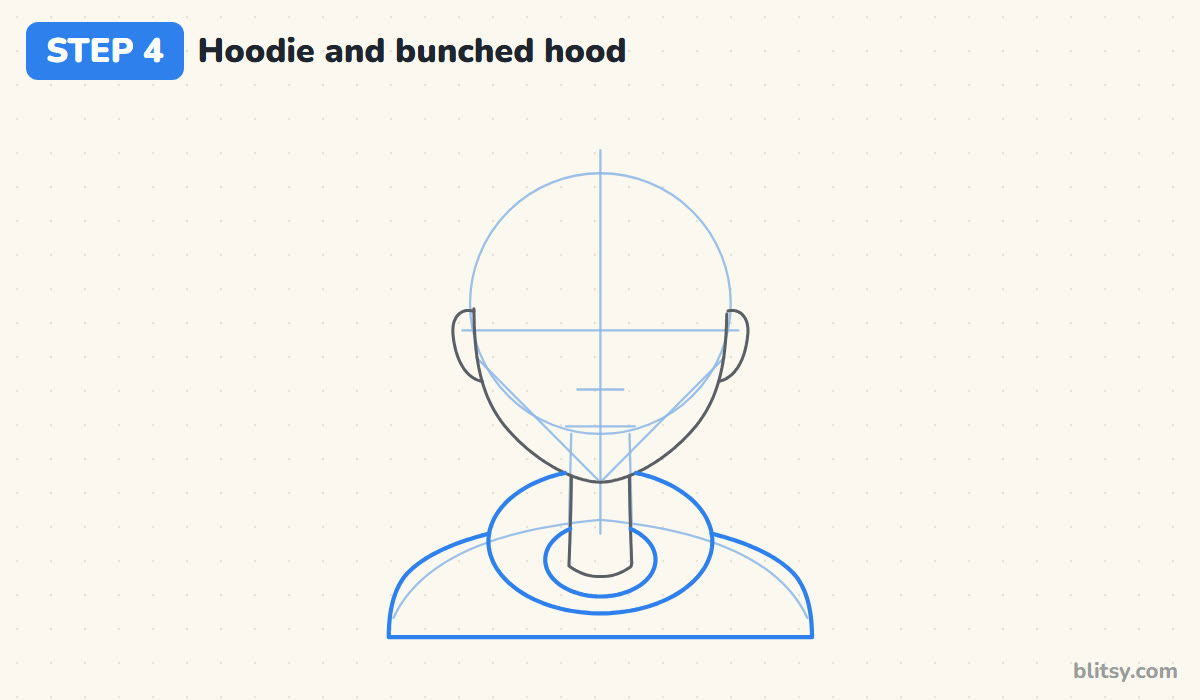
Lightly guide in the shoulder curve, then draw the hoodie over it with a flat line along the bottom. Behind the neck, draw a large oval for the hood lying down, and a smaller oval inside it for the neck opening. The hood is thick at the back and thin in front, so put the small oval low inside the big one.
💡 Tip: Make the shoulders much wider than the head; narrow shoulders make him look like a toddler.
Step 5: Draw the spiky hair and the bangs
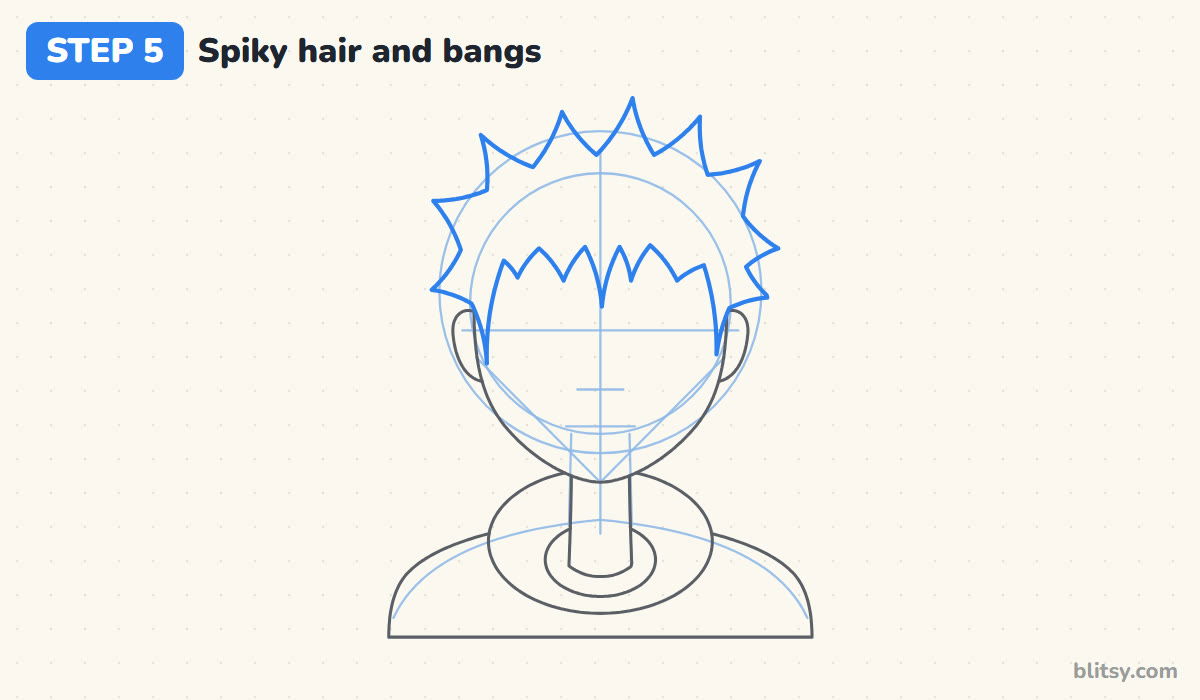
First, draw a bigger circle around the head, since hair sits well above the skull. Then work along that circle with spikes that point up and outward, uneven in size, with the tallest near the top. Across the forehead, draw bangs as smaller pointed locks, one dipping between the eyes and two longer ones down the sides of the face.
💡 Tip: Bend each spike slightly in the same direction, like flames, so the hair looks like it moves.
Step 6: Shape the eyes, lash lines and brows
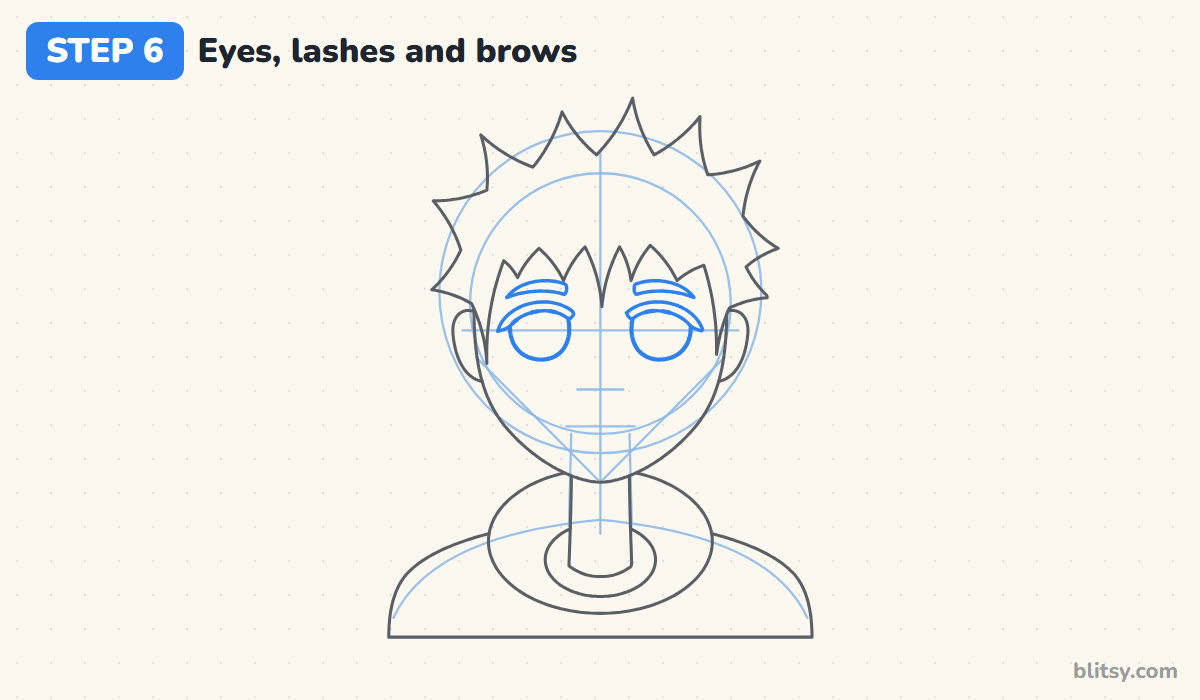
Sit both eyes on the eye line, with a gap between them about one eye wide. They're large but a little wider than tall here, which gives a boyish look. Over each one, draw a thick lash line that flicks out at the outer corner. Then add a short, bold brow just under the bangs, raised a little in the middle to match his happy mood.
💡 Tip: Compare the two lash lines side by side before moving on; one tilted eye throws off the whole face.
Step 7: Fill the eyes with irises, pupils and shines
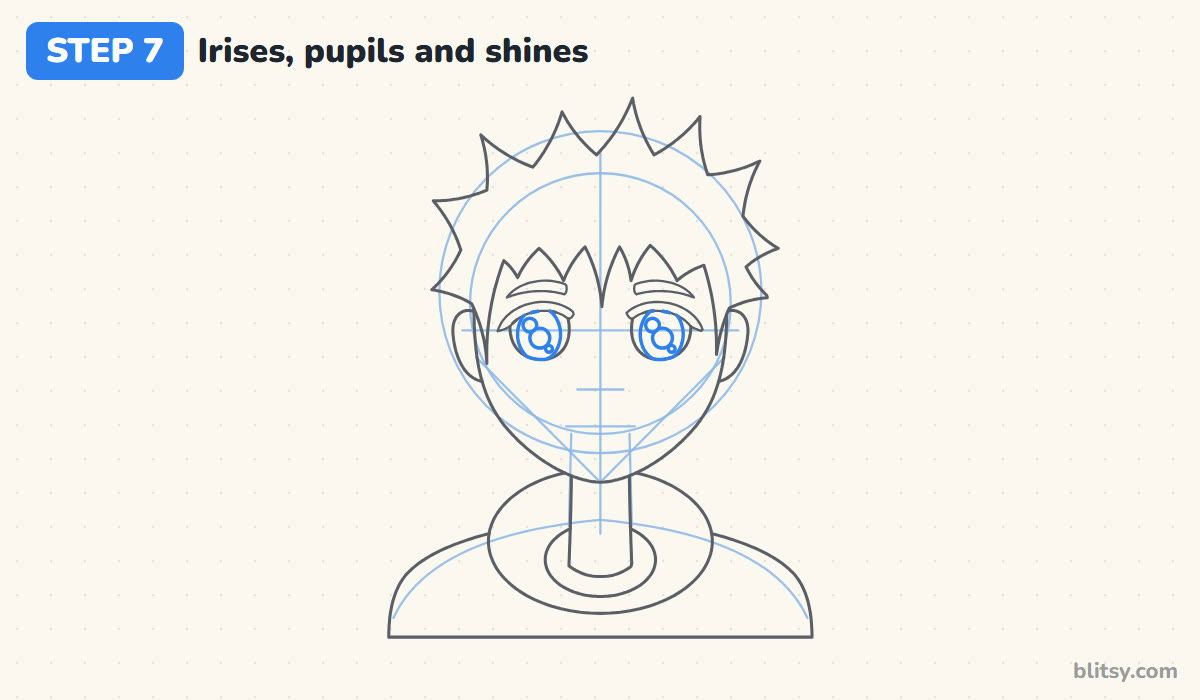
Draw a tall oval iris in each eye, big enough to touch the lash line at the top. Put a round pupil in the middle. Then add one large shine at the upper left of each iris and one tiny shine at the lower right. Both eyes get their shines on the same side, because the light comes from one place; mirrored shines look cross-eyed.


💡 Tip: Leave the shines as bare paper when you color; that white is what makes anime eyes sparkle.
Step 8: Add a tiny nose and a big grin
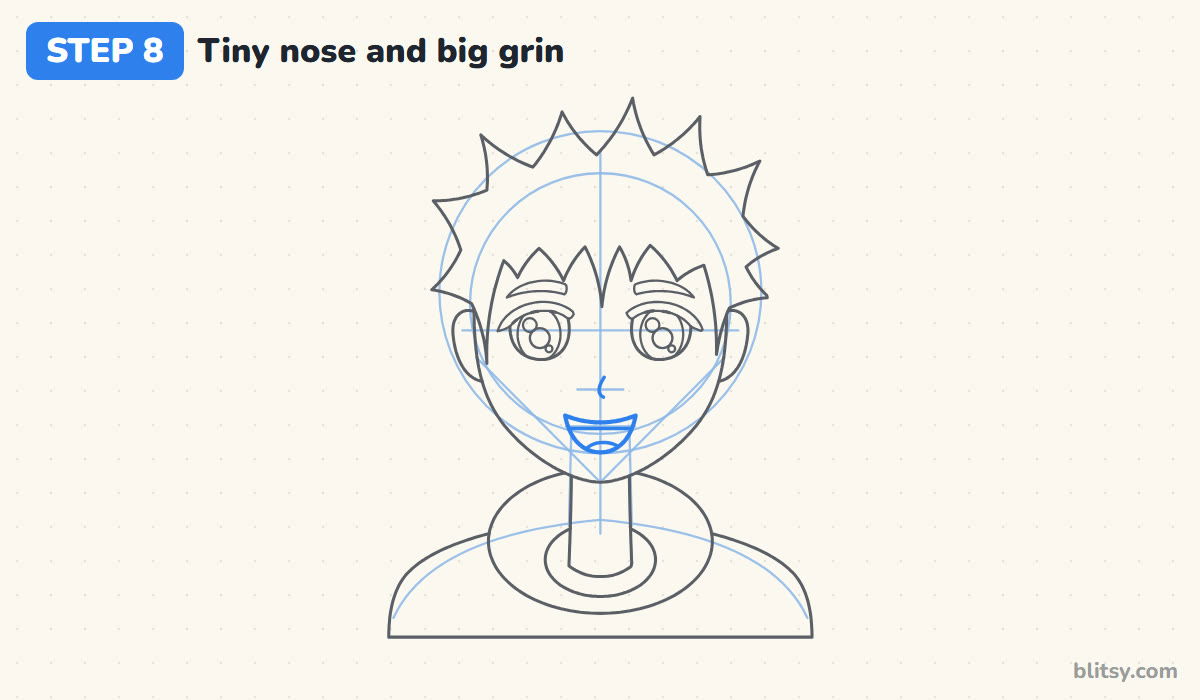
The anime nose is almost nothing: one little hooked line on the nose mark. For the mouth, draw a wide, slightly curved top line, then a deep curve underneath to make an open grin shaped like the letter D on its side. Inside, a straight line near the top marks the teeth and a small curve at the bottom makes the tongue. Keep it close under the nose.
💡 Tip: Stop the grin's corners at about the middle of each eye, or the smile starts to look forced.
Step 9: Add hair lines, ear details and drawstrings
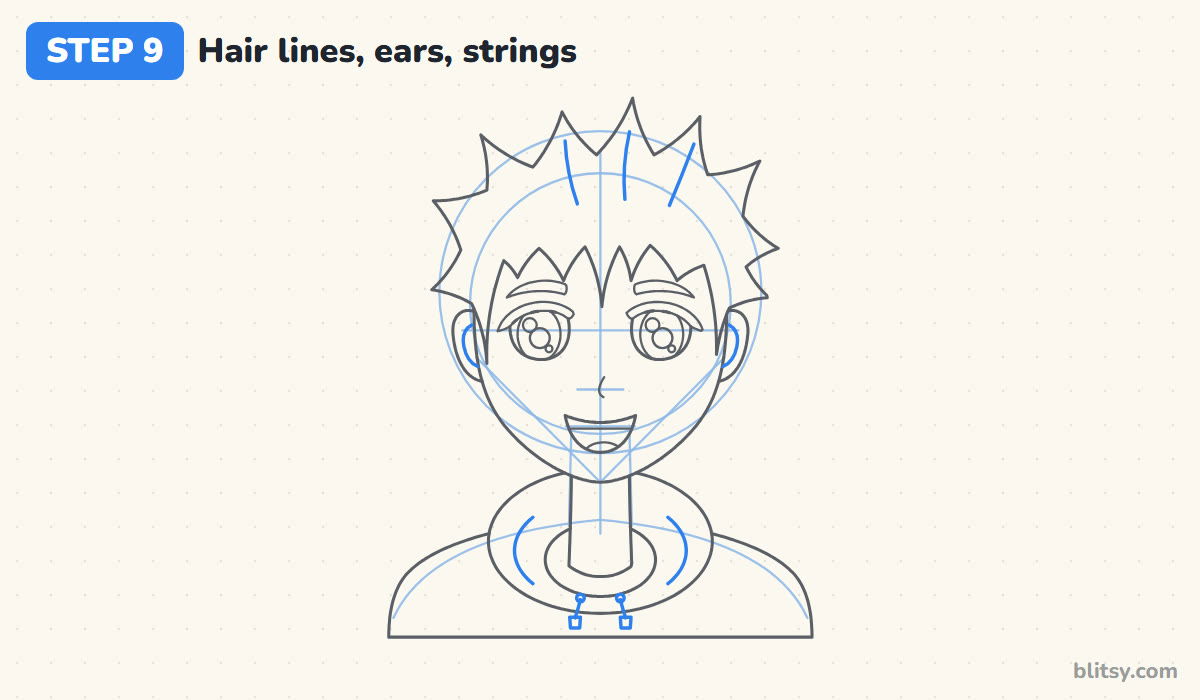
Draw three long strokes inside the hair, each one running from a spike toward the forehead. Inside each ear, a small curved line shows the inner fold. Two short arcs on the hood show its folds. Finish with two drawstrings hanging from the front of the hood, each with a tiny circle at the top and a small square tip.
💡 Tip: Fewer hair lines look cleaner, so stop at three even if the hair feels empty.
Step 10: Ink the drawing and erase the guides
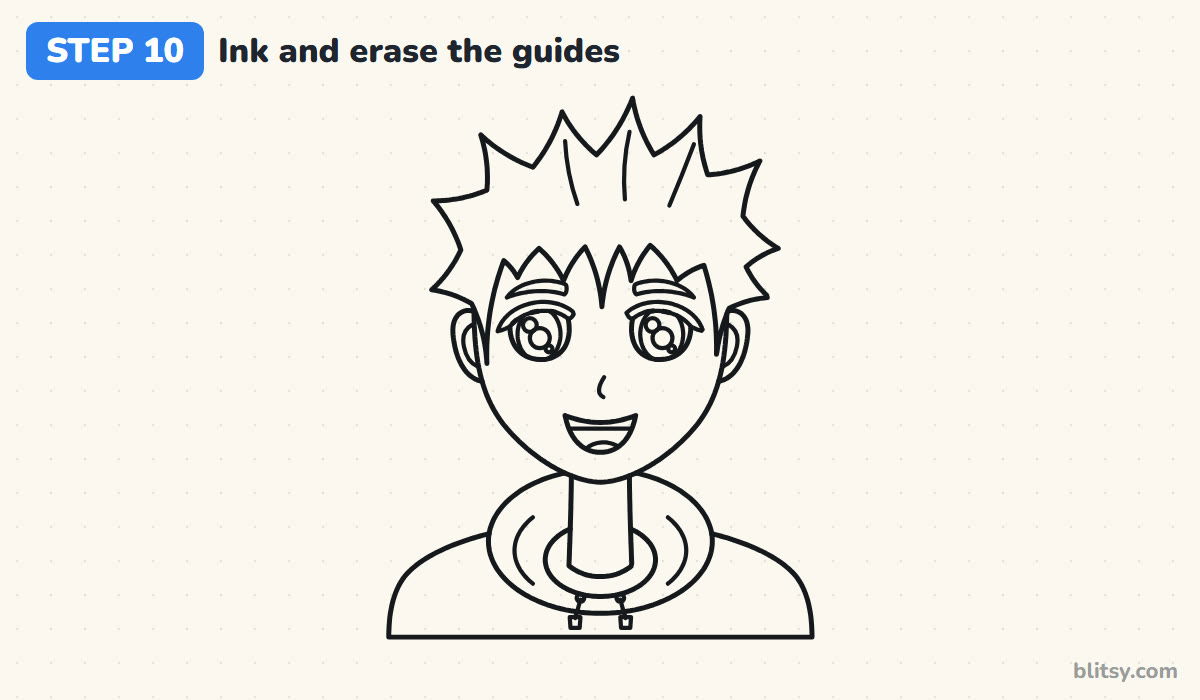
Go over the lines you want to keep with your black pen. I always ink the face and eyes first, while my hand is steady, and leave the hair and hoodie for last. Skip the circles, the V and the eye line. After the ink has dried for a minute, erase all of the pencil underneath.
💡 Tip: Turn the paper as you ink the spikes so you're always pulling the pen toward you.
Step 11: Color your anime boy
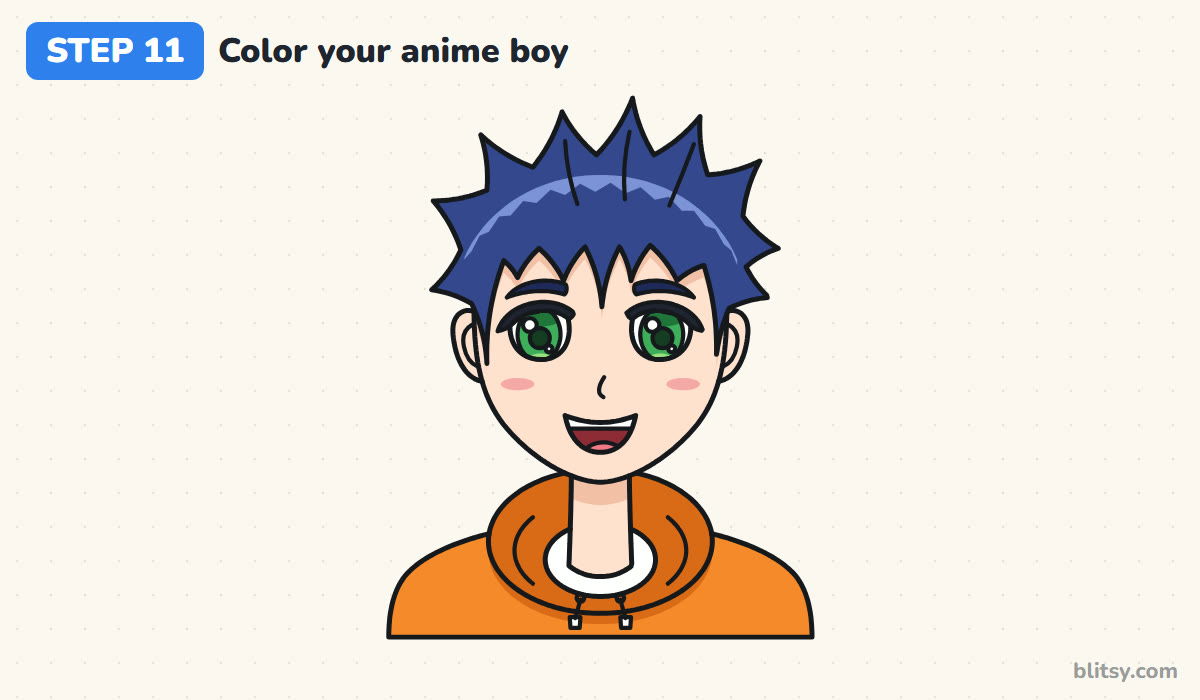
Use dark blue for the hair and leave a jagged lighter band across the top for shine. Peach covers the skin, with a slightly darker strip under the bangs and under the chin. Give the irises a darker green at the top and a lighter green at the bottom. The hoodie is orange, the hood a deeper orange, and the mouth dark red with a pink tongue.




💡 Tip: Color the darkest parts of each eye first, then blend lighter green downward into them.
Where Anime Proportions Slip
- The eyes float up near the hairline. That makes the face look long and strange. Use the halfway line from step 2 and sit the eyes right on it.
- A full nose with nostrils. It pulls the drawing toward realism and clashes with the big eyes. One tiny hooked stroke is enough.
- The mouth sits too low. In anime the mouth stays close under the nose. If yours touches the chin, erase it and move it up.
- Spikes all the same size. A row of equal triangles looks like a crown. Mix tall and short spikes and let them lean in one direction.
- Eye shines facing each other. Mirrored shines make the eyes look crossed. Put both big shines on the same side.
Turning This Boy Into Your Own Character
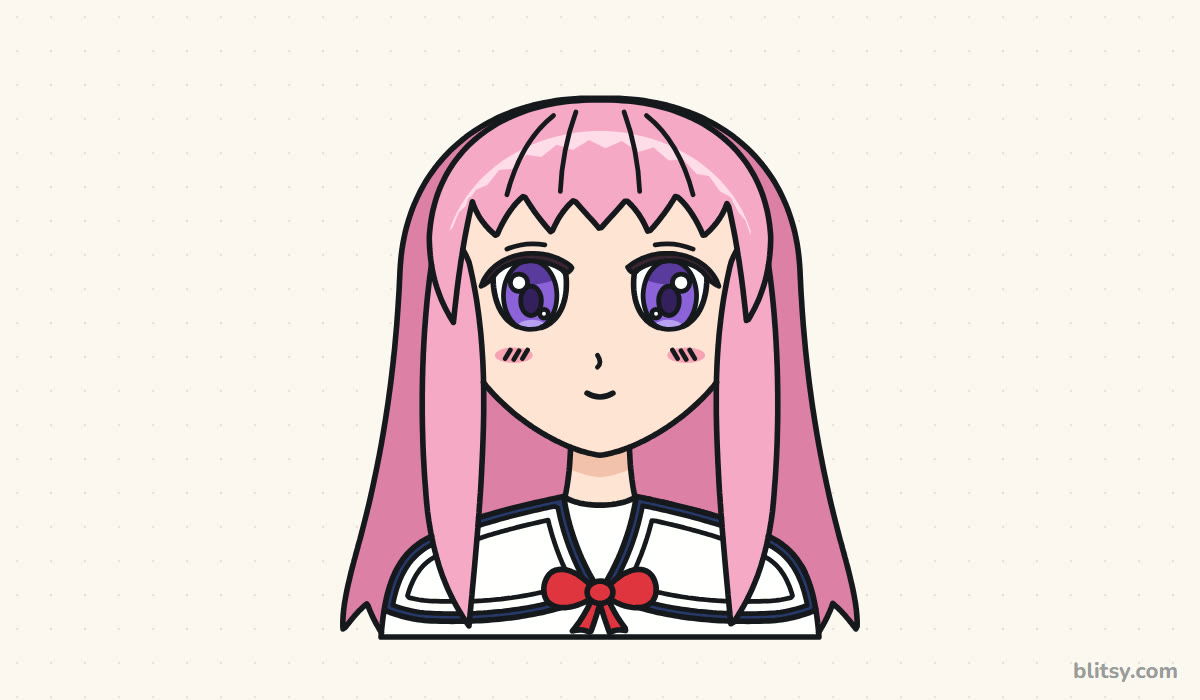
Once the face rules feel natural, swap the parts around. Smooth the spikes into a soft fringe, make the hair bright red or white, give him a jacket or a school uniform instead of the hoodie, or close one eye for a wink. If you'd like to practice longer hair and softer features, try the anime girl drawing tutorial next, or squash the same face into a tiny body with the easy chibi drawing tutorial.
Anime Boy Coloring Page and Printable Guide
Want to practice the colors on paper first? Print the coloring page below, which shows the finished boy in color next to a blank outline. The PDF guide has all 11 steps, so you can keep it beside you while you draw.
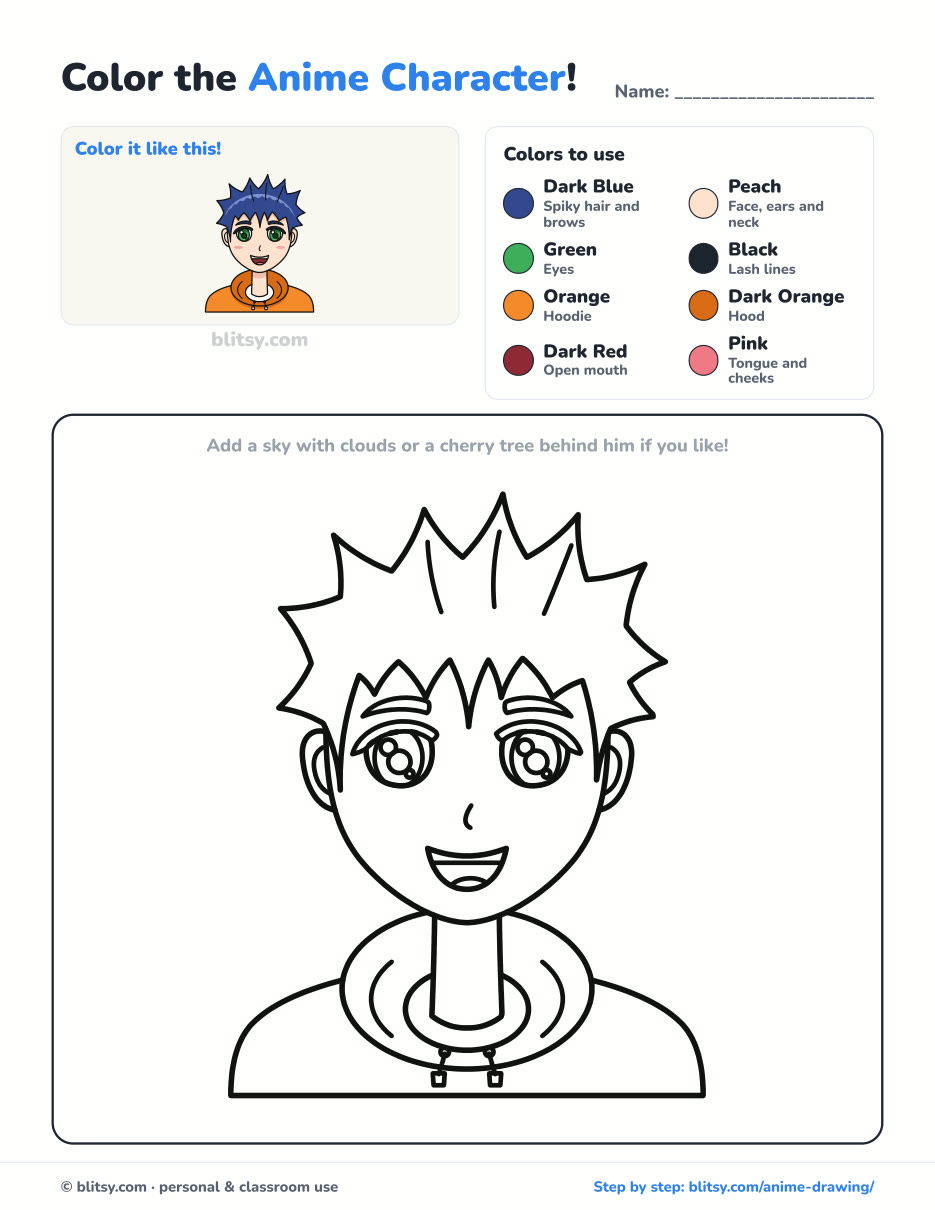
Black outlines with a colored example and the color names at the top. Ready to print and color.
⬇️ Download Coloring PageEvery step picture with its instructions and tips, to keep beside your paper while you draw.
⬇️ Download Drawing Guide📱 On a phone? Tap a download button, then open the file and choose Share → Save to Files or Print. On a computer, the PDF opens or saves straight to your Downloads folder.
Keep the Anime Steps Handy
Cartoon and Anime Lessons for Your Next Page
Every link opens one step-by-step tutorial, from famous cartoon characters to faces, hands and bodies.
- Pikachu Drawing: The Pikachu drawing step by step lesson ends with red cheeks and the tail flashing out.
- Springtrap Drawing: Draw a chibi Springtrap with one floppy ear in this Springtrap drawing tutorial.
- Bart Simpson Drawing: Spikes up and eyes wide, the Bart Simpson drawing tutorial takes 11 steps.
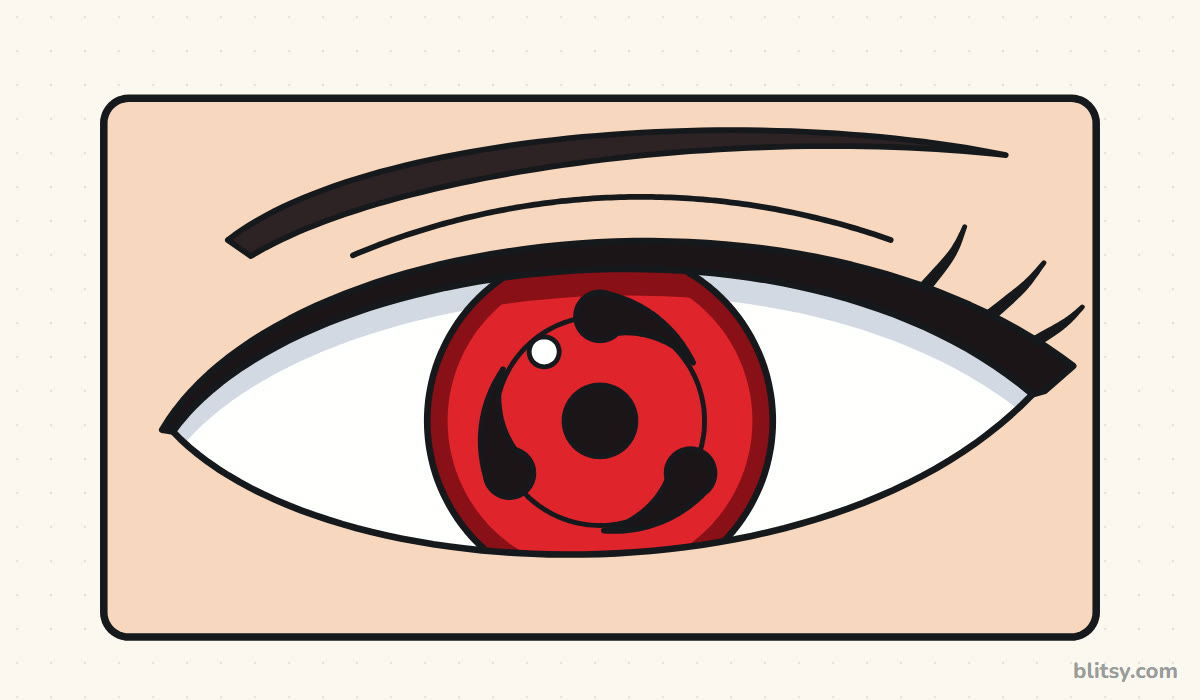
- Sharingan Drawing: Zoom in on one anime eye with the how to draw Sharingan guide: a red iris and three tomoe.
- Heart Drawing: The even heart drawing tutorial shows how to keep both halves matching.
- Iron Man Drawing: A chibi Iron Man with a glowing reactor is waiting in this Iron Man drawing tutorial.
- Disney Drawing: Draw Nemo the clownfish with the Disney character drawing tutorial.
- Stitch Drawing: The Stitch drawing tutorial gets his big ears and small grin right in twelve steps.
- Ghost Drawing: A waving ghost and a baby ghost float above a pumpkin in the cute ghost drawing tutorial.
- Woman Drawing: Learn how to draw a woman with body proportions, starting from six head lengths.
- Side Profile Drawing: Turn your anime face sideways with the help of the side profile drawing tutorial.
- Hand Drawing: The hand drawing step by step lesson shows an open palm with all five fingers.
- Kurama Drawing: Draw chibi Kurama in front of nine orange tails with this Kurama drawing tutorial.
- Skull Drawing: The skull drawing tutorial is a front view with dark sockets and two little marigolds.
Anime Drawing Questions From Beginners
What is the easiest way to start drawing anime?
Start with the face, because it carries the style. Learn the basic rules: eyes on the halfway line, a tiny nose and a small mouth close under it. Practice one character, like the boy here, until it feels easy.
Why are anime eyes drawn so big?
Big eyes show emotion clearly and make a character look friendly and young. They also leave room for shines.
How do you draw spiky anime hair?
Draw a guide circle larger than the head, then place spikes of mixed sizes along it, leaning the same way. Add a few pointed bangs across the forehead and keep the hair lines to two or three strokes.
Can kids learn to draw anime?
Yes. The shapes are simple and the rules are easy to remember. Younger kids can skip the hood folds and the drawstrings and still end up with a clear anime face.
Grab your pencil, give him a new hairstyle, and you've just invented your first anime character. ✏️
Related posts:
 How to Draw an Anime Girl Step by Step (Easy Face Guide)
 How to Draw a Boy Step by Step (Easy Full-Body Cartoon)
 How to Draw Sharingan Step by Step (Easy Anime Eye)
 How to Draw a Male Face Step by Step (Easy Proportions)
 How to Draw a Cat Face Step by Step (Easy Tabby Guide)
 How to Draw a Sad Cat Step by Step (Easy Sad Face Lesson)
 How to Draw a Face Step by Step (Easy Proportions Guide)
 How to Draw a Whale Step by Step (Easy for Beginners)
 How to Draw Lungs Step by Step (Easy Science Diagram)
 How to Draw a Pineapple Step by Step (Easy Crown and Slice)
 How to Draw Iron Man Step by Step (Easy Chibi for Kids)
 How to Draw a Hoodie Step by Step (Front and Back View)

