
Plenty of famous cartoon characters look tricky until you notice they're built from an oval or two. Nemo is the clearest example I know: an orange egg shape, a fan tail, three white stripes and one big eye. Here you'll learn how to draw a Disney character step by step using him as the example, starting from light guides and finishing with color. I picked Nemo for this Disney lesson because a clownfish has almost no hard parts, no hands, no hair and no clothes, so first-timers get a win quickly. This is my own simple fan-art version for practice, not official artwork.
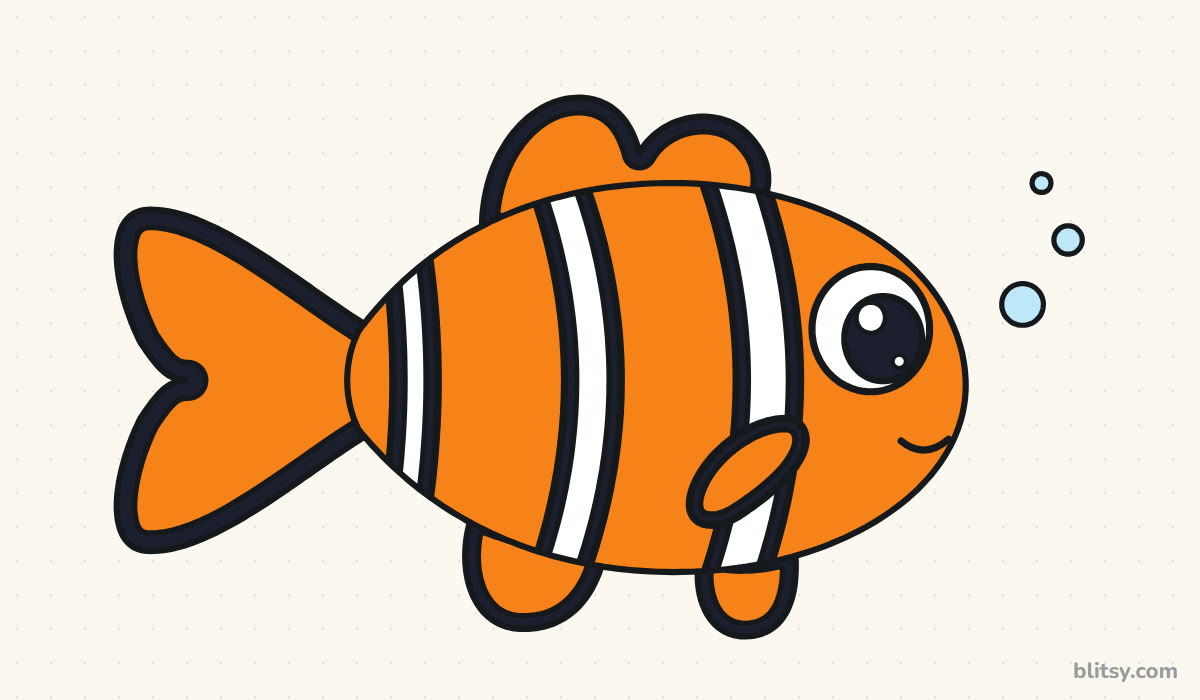
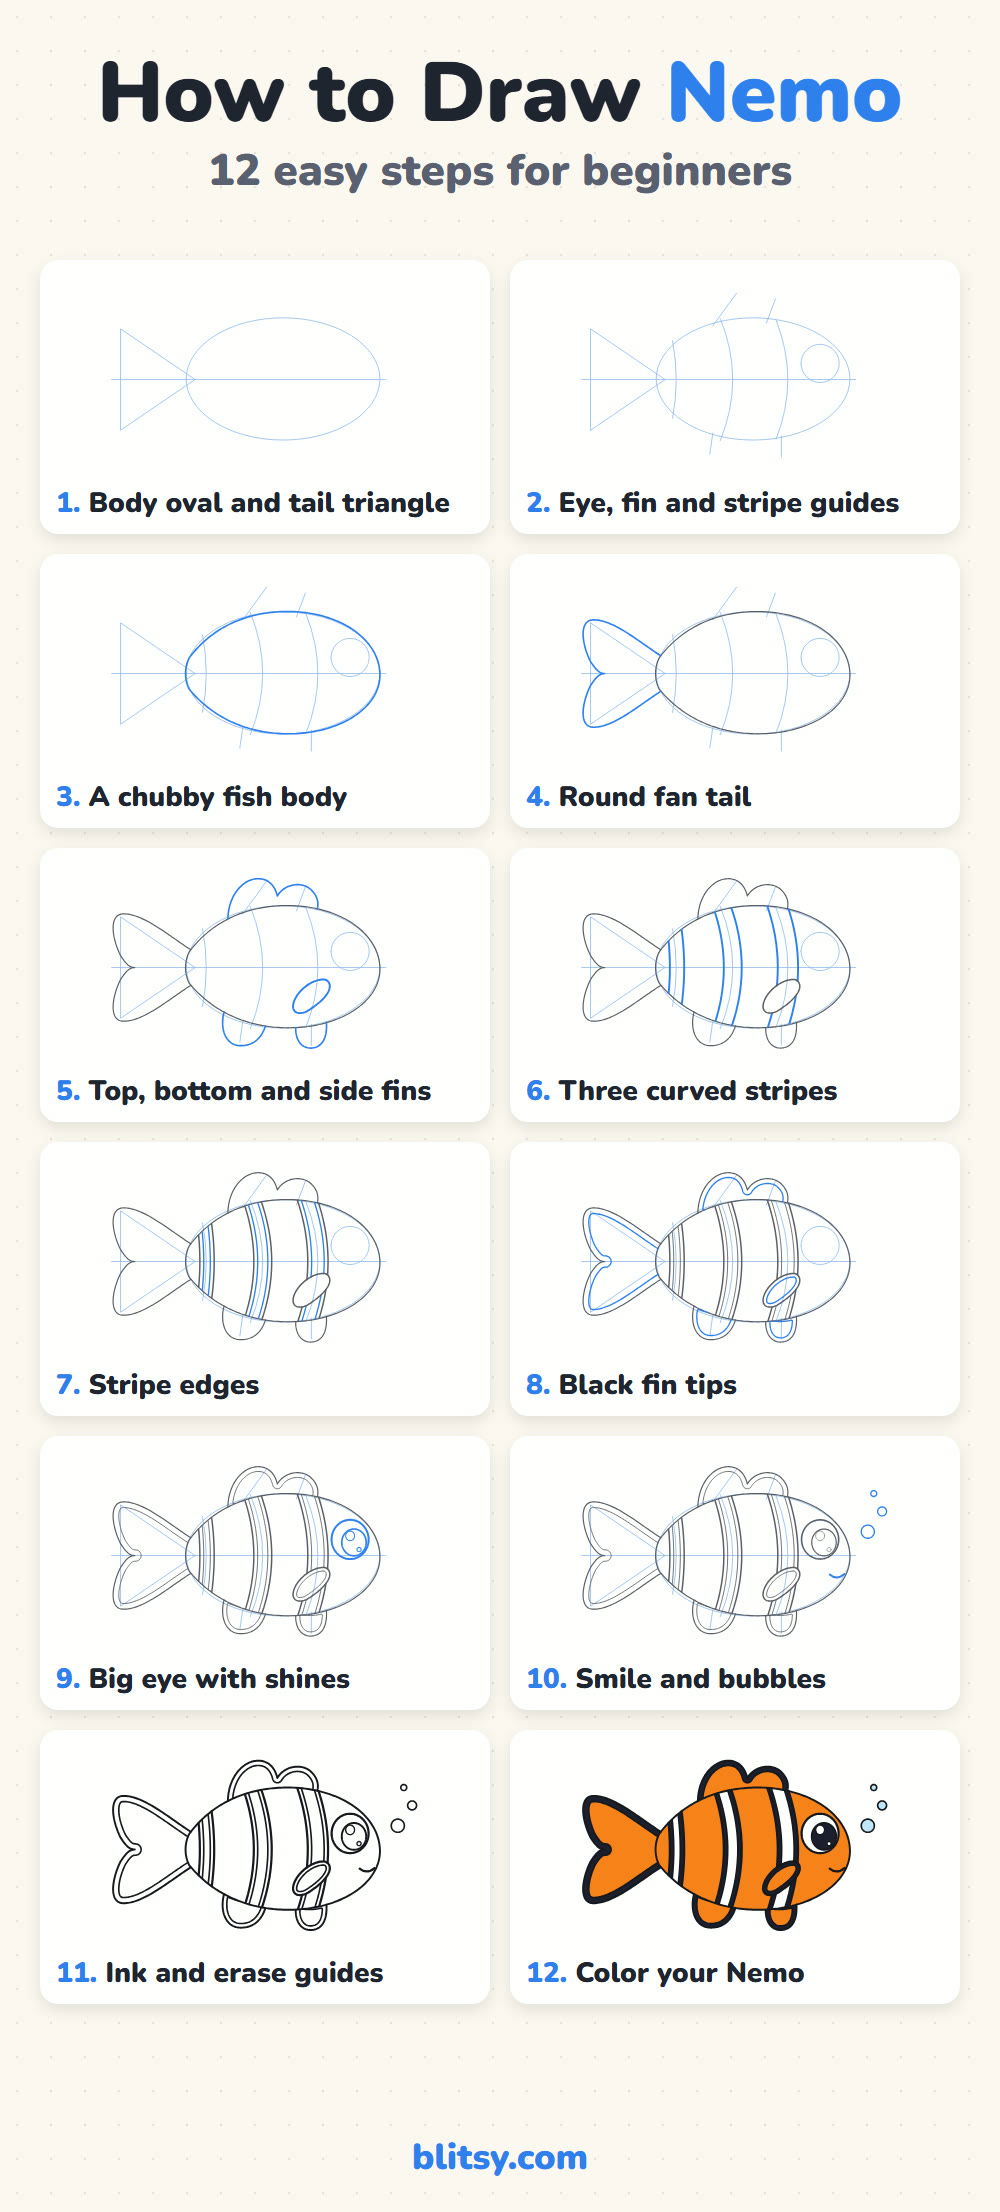
In each picture, blue marks the lines you add in that step. The gray ones were drawn earlier, which makes it easy to compare your page with mine as you go.
Quick overview
⏱️ Time: around 30 minutes, coloring included
🎯 Level: easy, fine for kids from about 5
✏️ Steps: 12
🐠 You'll draw: a cartoon clownfish swimming to the right
Supplies for an Orange Clownfish
- A soft pencil for light guide lines
- A clean eraser
- A black marker or fineliner for inking
- An orange pencil or marker
- Black for the stripe edges and fin tips
- Light blue for the bubbles, if you add them
Plain printer paper is fine, and turning it sideways gives the tail and bubbles enough room.
How to Draw a Disney Character Step by Step
Step 1: Sketch a body oval and a tail triangle
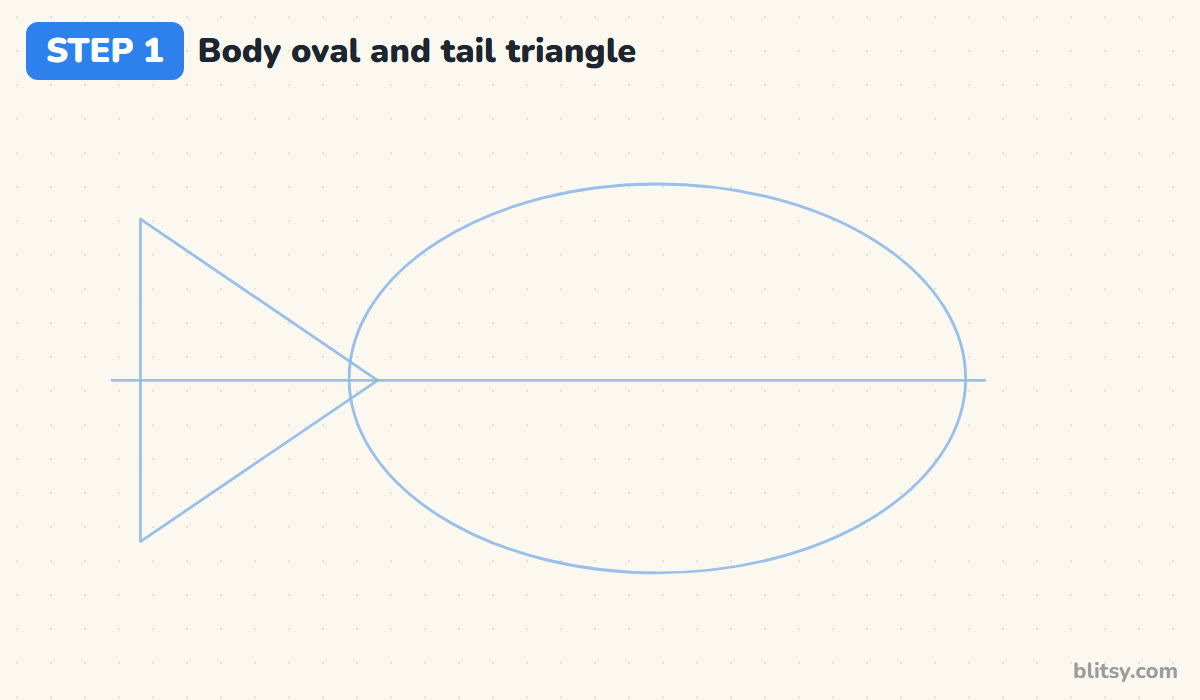
Draw a long horizontal line across the middle of the page. On the right half, sketch a wide oval for the body, a bit wider than it is tall. Then add a sideways triangle on the left with its point touching the oval. That triangle marks where the tail fans out.
💡 Tip: Keep the oval big. A tiny body leaves you no room for the stripes later.
Step 2: Add eye, fin and stripe guides
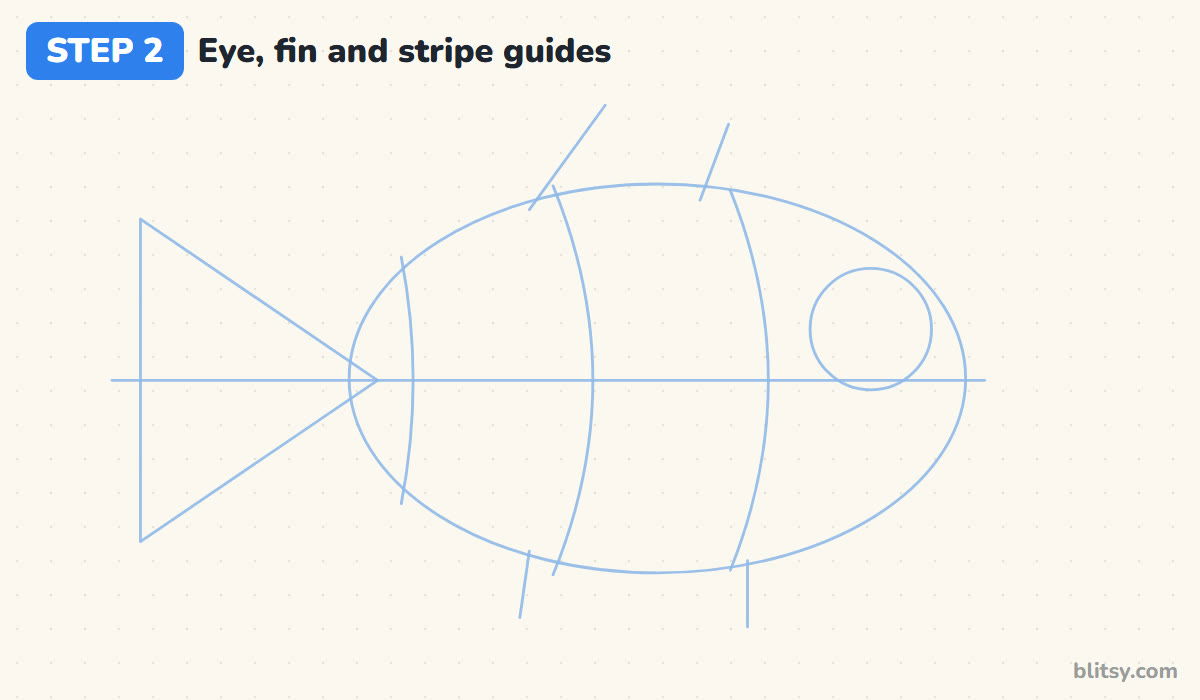
Near the right end of the oval, just above the middle line, draw a circle for the eye. Next, three curved lines run from top to bottom across the body. Space them out: one close to the tail, one in the middle and one just behind the eye. Finish with four short ticks, two above and two below, to show where the fins will go.
💡 Tip: Bend all three stripe guides the same way, like a row of brackets facing the head.
Step 3: Draw a chubby fish body
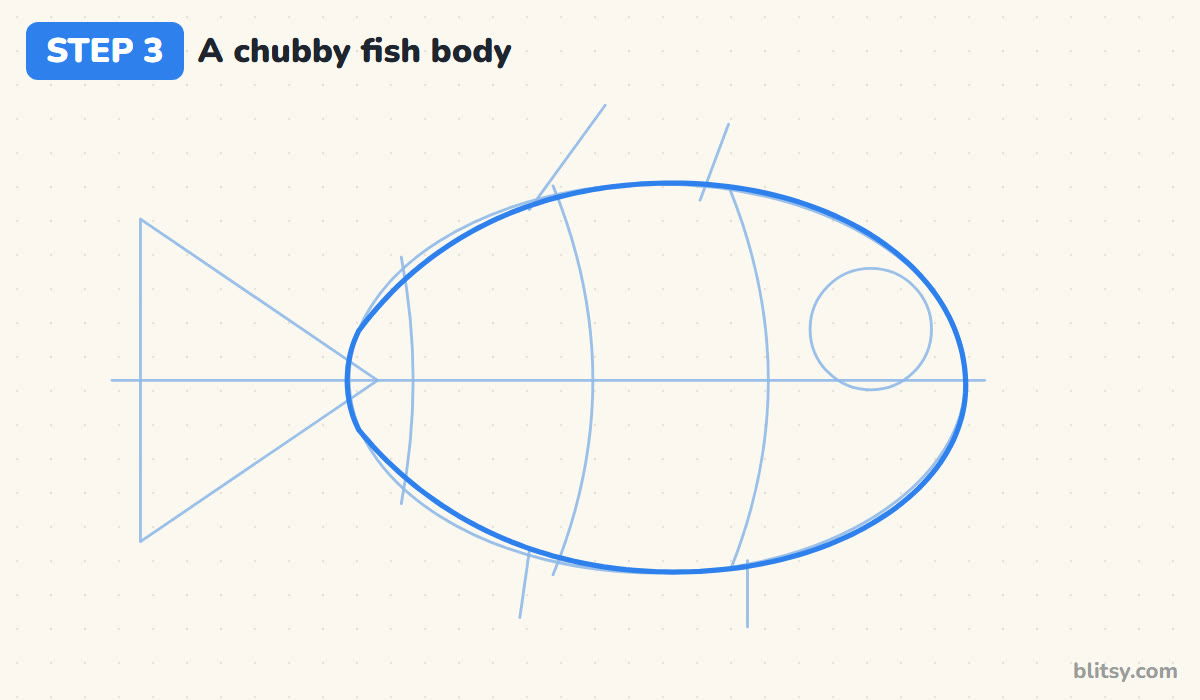
Now press a bit harder and draw the real body over the oval. Make the head end round and full, and let the back narrow toward the tail where it meets the triangle. Close it with a small rounded end at the tail base. I keep the front almost circular, because a pointy nose makes him look like a shark.


💡 Tip: Draw the top curve and the bottom curve as two separate strokes. Each one stays smoother that way.
Step 4: Draw a round fan tail
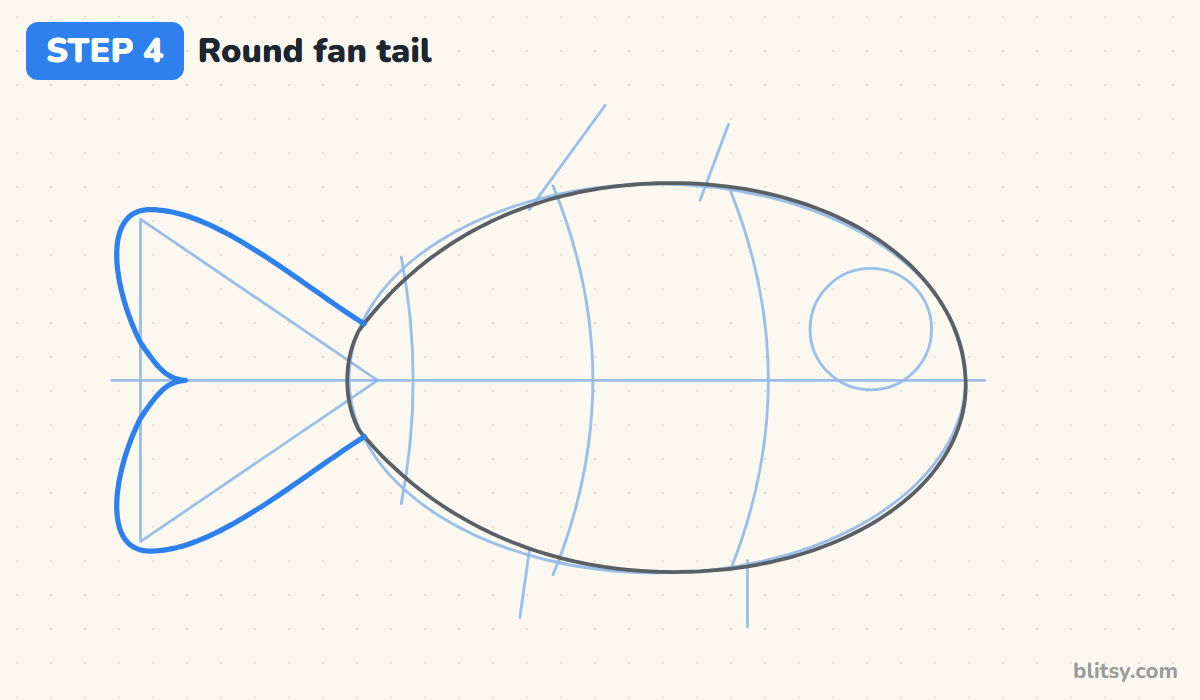
Use the triangle as your frame. From the top of the tail base, sweep a curve out to a rounded upper lobe, dip in to a small notch at the center line, and swing back out to a matching lower lobe. Then curve back to the bottom of the tail base. Stop the lines where they reach the body.
💡 Tip: Make the notch shallow. A deep cut splits the tail in two and looks like a whale fluke.
Step 5: Add the top, bottom and side fins
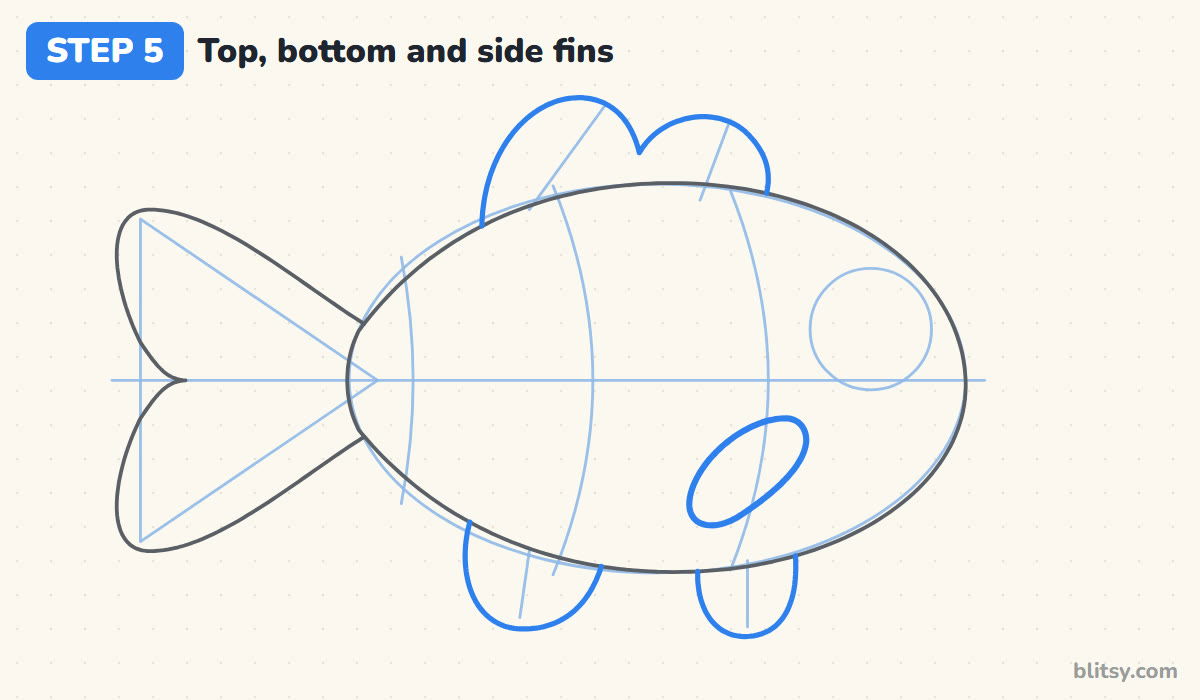
On top, draw a fin with two bumps and a little dip between them, using the two upper ticks as its edges. Underneath, add two small rounded fins, one under the middle and one under the head. Then draw a short oval side fin low on the body, tilted down toward the tail. It overlaps the front stripe guide, and that's fine.
💡 Tip: Keep the bottom fins smaller than the top one so the fish doesn't look like it's standing on legs.
Step 6: Draw three curved stripes
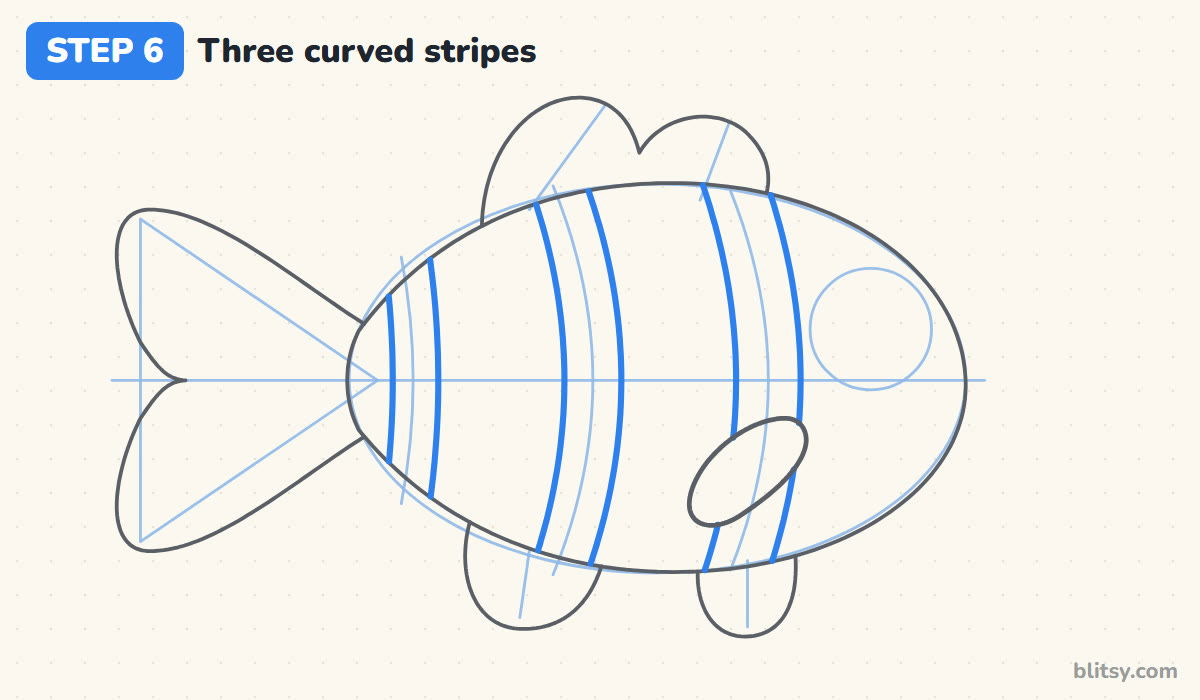
Each stripe is a band with two edges. Draw one line on each side of every stripe guide, running from the top of the body to the bottom. The stripe near the tail is the thinnest, the middle one is wider and the head stripe is the widest. Skip the lines where the side fin covers the body.
💡 Tip: Leave a bit more orange between the stripes than the stripes are wide. Too much white turns him into a zebra fish.
Step 7: Add the stripe edges
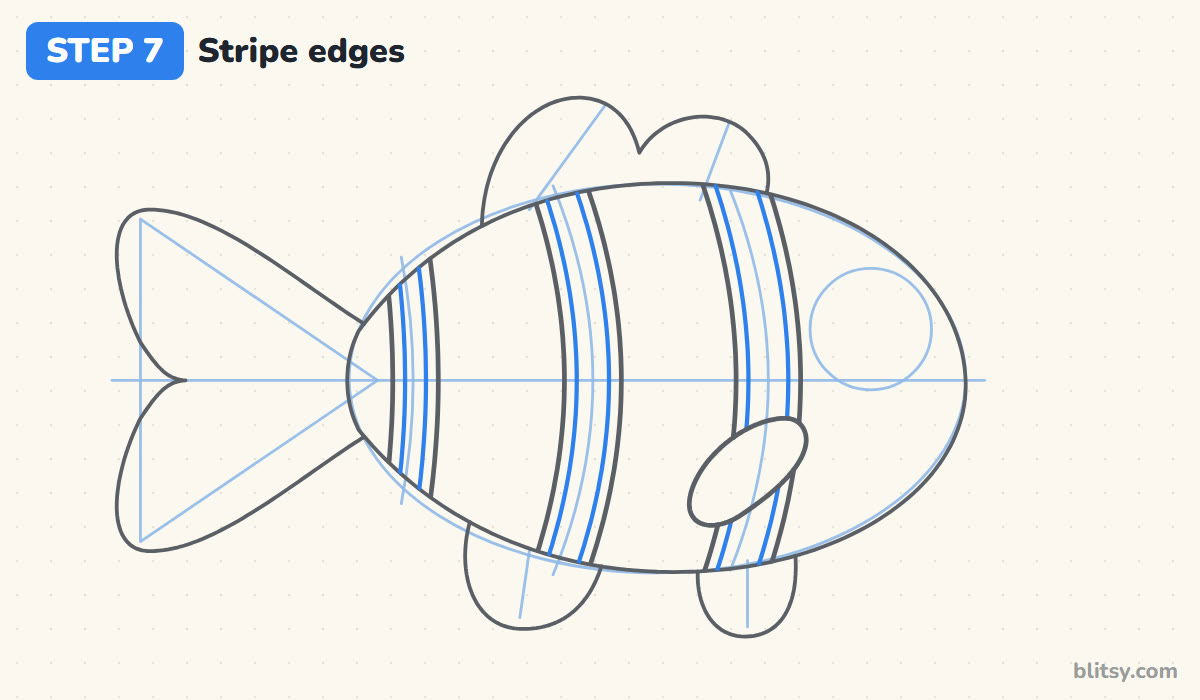
Clownfish stripes have thin black borders. To show them, draw a second line just inside each edge you drew in the last step, so every white band gets a narrow strip on both sides. This takes patience, and younger kids can skip it and simply use a thick marker on the stripe outlines instead.

💡 Tip: Rest your little finger on the paper while you draw these close lines. It steadies your hand.
Step 8: Draw the black fin tips
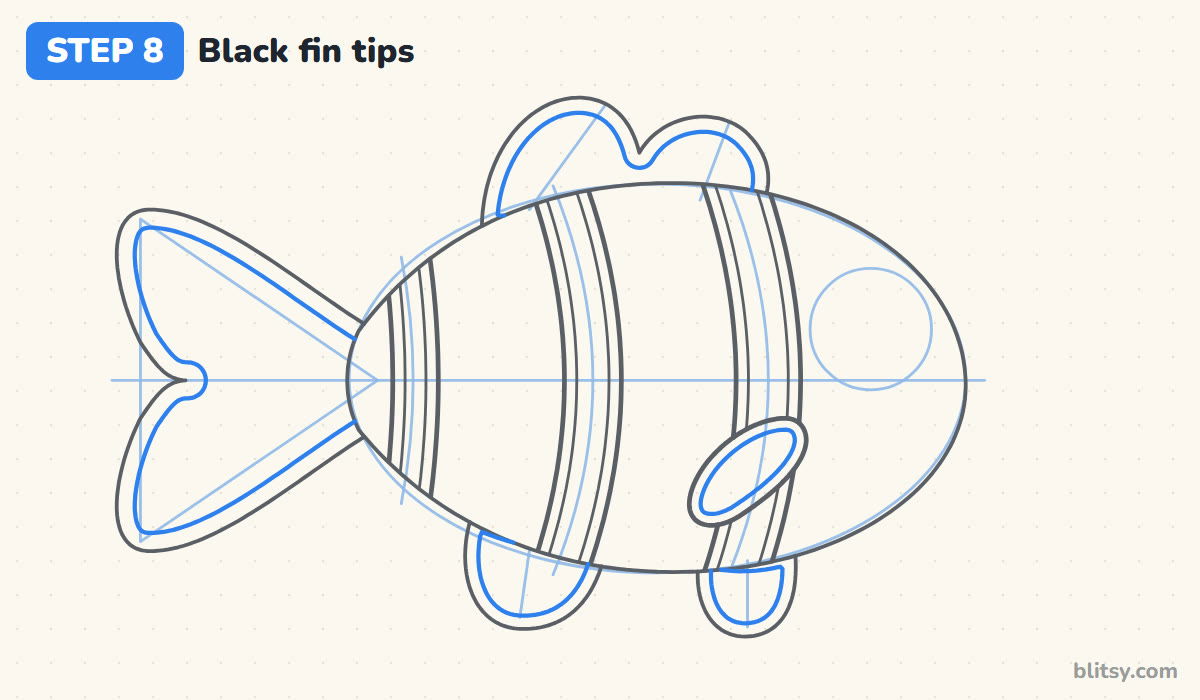
Clownfish fins have dark edges, and they're what makes the fish look finished. Inside each fin, draw a line that follows the outer edge about a finger width in. Do it on the tail, the top fin, both bottom fins and the side fin. Let the line stop where the fin disappears behind the body.
💡 Tip: Keep the band the same width all the way around. Uneven tips look like smudges.
Step 9: Draw a big eye with shines
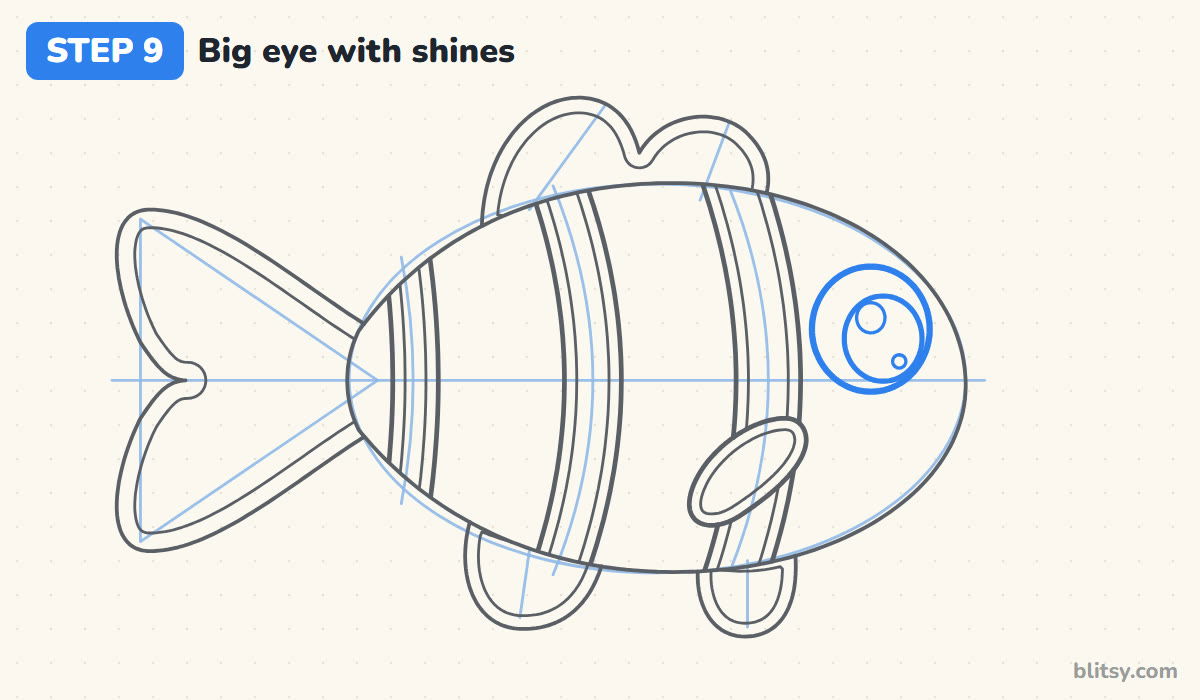
Go over the eye circle with a clean line, then draw a large round pupil inside it, nudged slightly toward the front and bottom. Add one big shine circle at the top of the pupil and a tiny dot lower down. The eye should be large, since Nemo's charm comes almost entirely from it.
💡 Tip: Leave the shines empty from the start. Coloring around a small white circle is easier than erasing one later.
Step 10: Add a smile and some bubbles
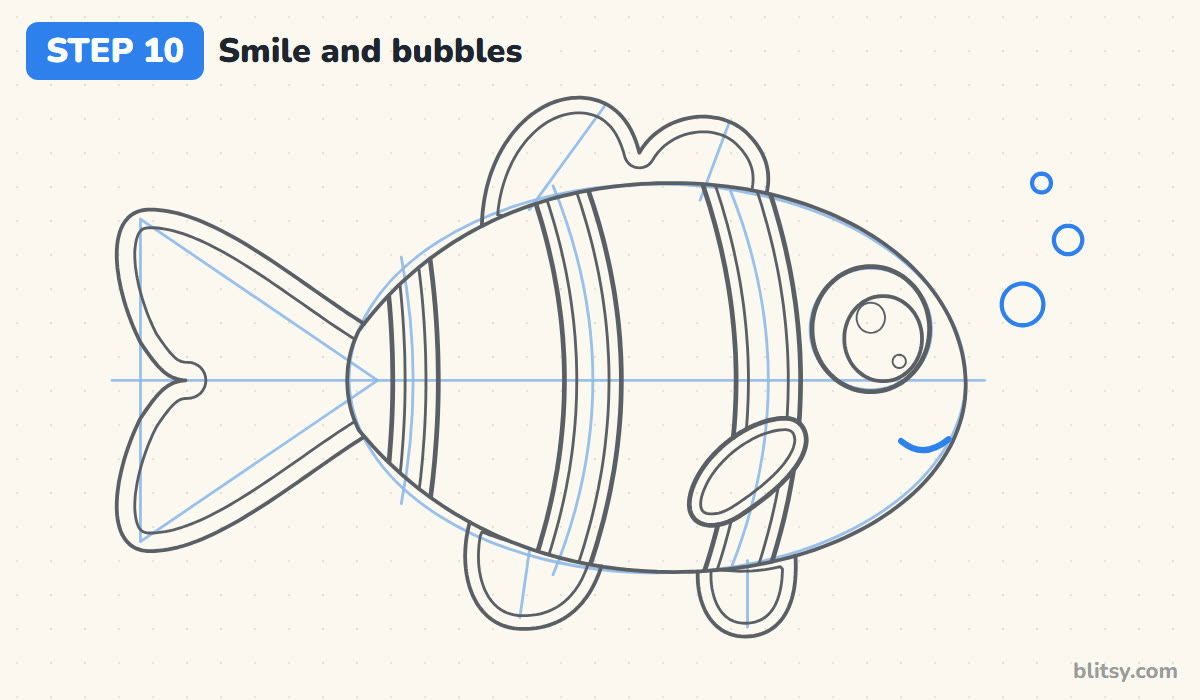
Below the eye and close to the front of the head, draw a short curved smile. Keep it small and slightly tilted up at the front. Then add three bubbles rising in front of his face, getting smaller as they go up. Most beginners draw the mouth too far back. It belongs near the nose.
💡 Tip: Space the bubbles unevenly. A perfectly straight line of circles looks like buttons.
Step 11: Ink the lines and erase the guides
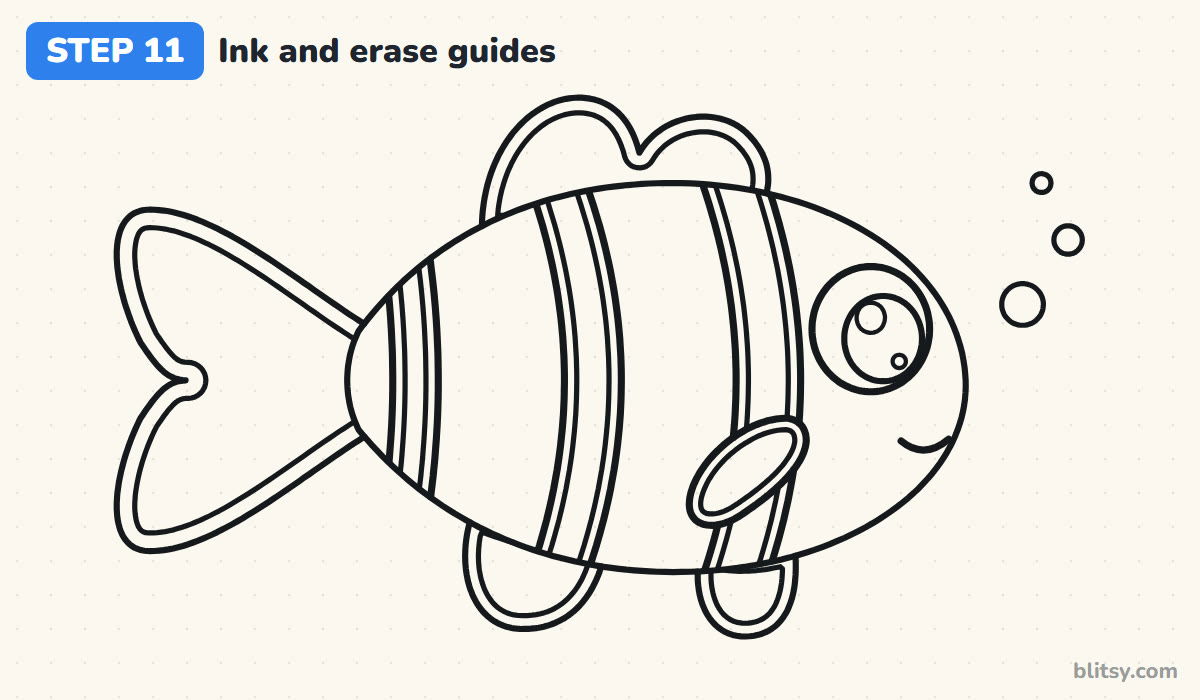
Trace over every keeper line with your black marker. I begin with the eye, because it's the part where a wobble shows most, then move to the body and fins. Leave the guide oval, the triangle and the straight lines alone. Wait a minute for the ink to dry before you erase all the pencil underneath.

💡 Tip: Turn the paper so you always pull the marker toward you. Pushed lines tend to shake.
Step 12: Color your Nemo
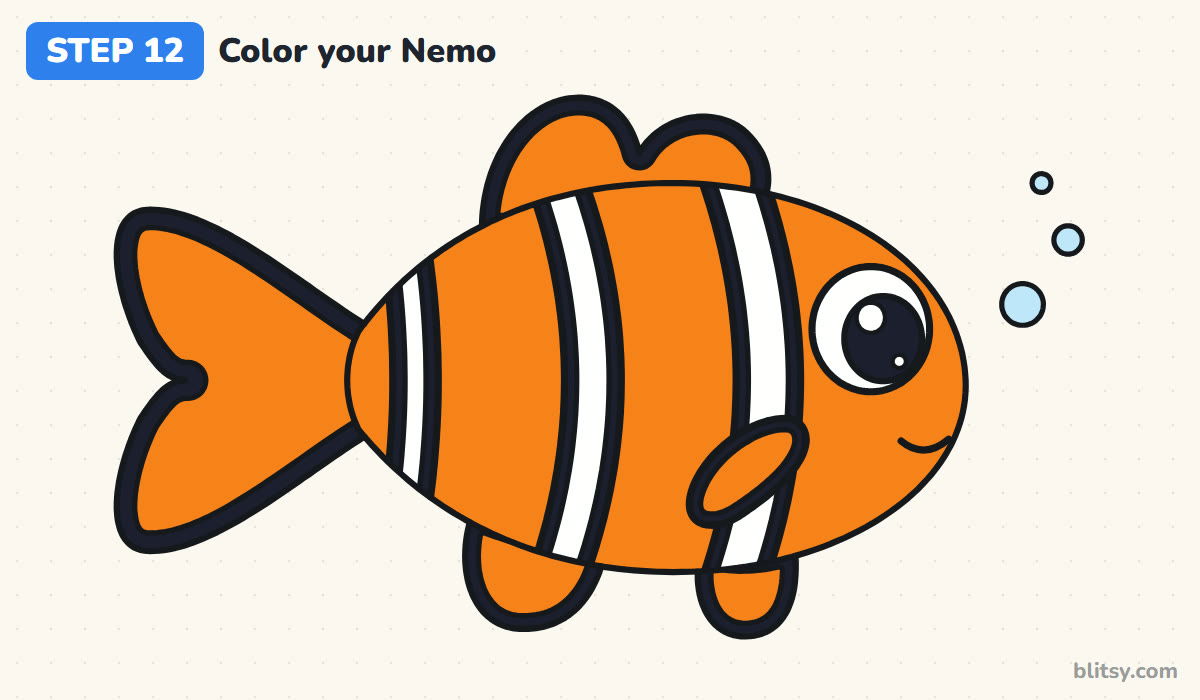
Fill the body and the middle of every fin with a bright orange. Color the thin borders of the stripes and the fin tips black, and leave the stripes themselves white. The pupil goes black too, with the shines left white. A light blue for the bubbles finishes the picture.
💡 Tip: Do the black parts last. Orange dragged over black looks muddy, but black covers small mistakes.
Where a Clownfish Drawing Can Slip
- Straight stripes. Ruler-straight bands make the body look flat. Curve every stripe so it wraps around the round body.
- An eye that is too small. A little dot eye looks like a plain goldfish. Make it about a quarter of the body height.
- Too many stripes. Four or five bands lose the character. Three is the number people recognise.
- Fins as big as the body. Huge fins make him look like a butterfly. Keep them short and rounded.
- Skipping the black edges. Without them the white stripes melt into the orange. Even a thick outline helps.
Fresh Ideas for Your Little Clownfish
Once the first fish is done, try him facing the other way, or draw a second, bigger clownfish beside him as a parent swimming along. You can tuck him into a sea anemone made of wavy tubes, or give him a surprised face with a round open mouth. If you liked the underwater theme, this easy fish drawing tutorial is a natural follow-up, and a blue alien friend waits in the how to draw Stitch lesson.
Nemo Coloring Page and Printable Step Guide
The Nemo coloring page shows a colored clownfish at the top with a key for each color, then a big outline below for coloring in. The step-by-step PDF guide holds all 12 steps with their pictures and tips. Both fit Letter and A4 paper.
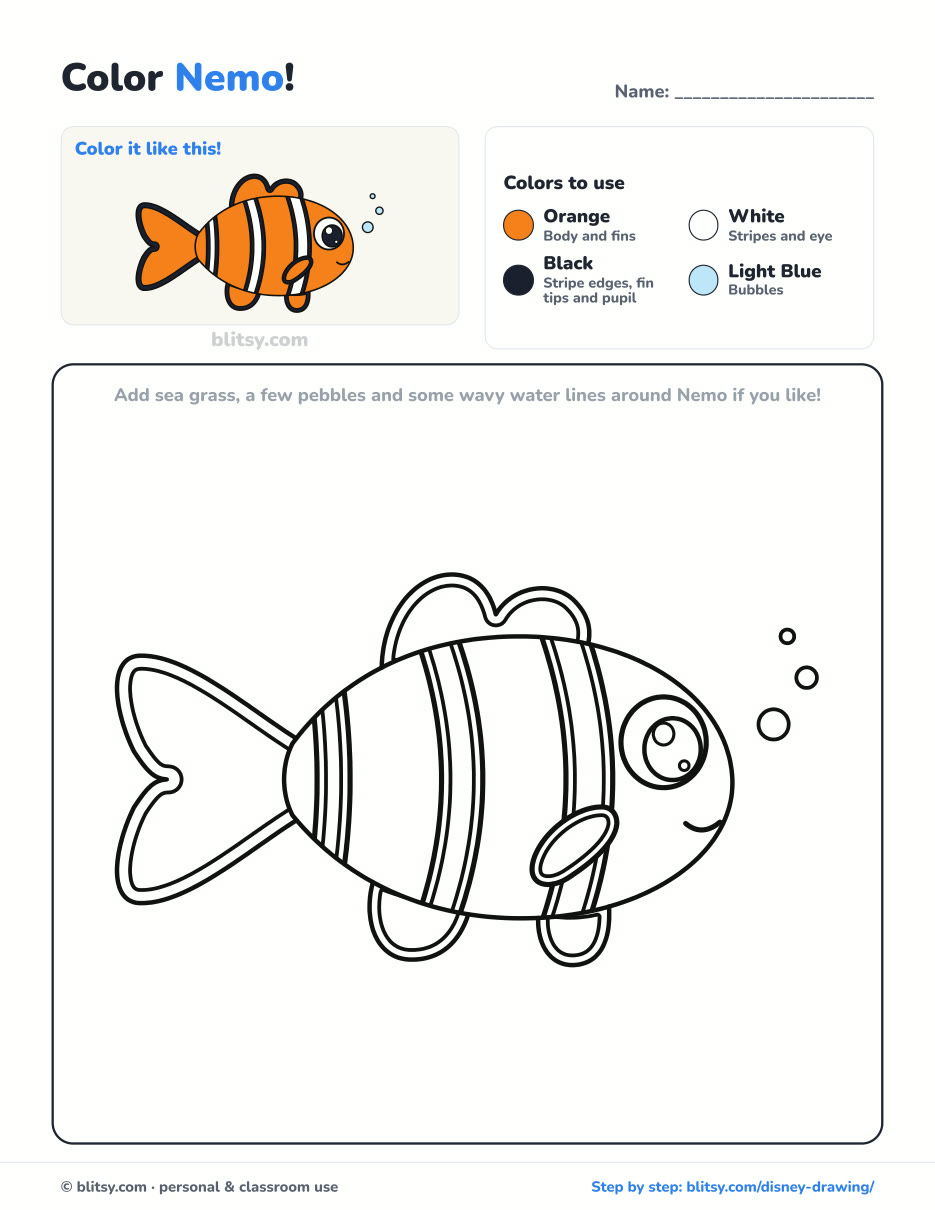
Black outlines with a colored example and the color names at the top. Ready to print and color.
⬇️ Download Coloring PageEvery step picture with its instructions and tips, to keep beside your paper while you draw.
⬇️ Download Drawing Guide📱 On a phone? Tap a download button, then open the file and choose Share → Save to Files or Print. On a computer, the PDF opens or saves straight to your Downloads folder.
The Whole Clownfish Lesson in One Pin
Nemo Done? More Characters to Draw Step by Step
These are full step-by-step tutorials as well, each one taking a favorite character from a first circle to color.
- Stitch Drawing: Big ears and a small grin make up the Stitch drawing tutorial, twelve short steps from blank paper.
- Bart Simpson Drawing: Spiky hair and a trouble-ready smirk come together in the how to draw Bart Simpson lesson.
- Pikachu Drawing: Draw Pikachu with red cheeks and a lightning tail in this Pikachu drawing step by step guide.
- Springtrap Drawing: A cute chibi Springtrap with one floppy ear is the result of this Springtrap drawing tutorial.
- Iron Man Drawing: Learn how to draw Iron Man as a small chibi hero, helmet on and reactor glowing.
- Kurama Drawing: A grinning chibi Kurama sits in front of nine orange tails in the Kurama drawing tutorial.
- Master Chief Drawing: Draw a little Spartan with fists on hips in this Master Chief drawing step by step lesson.
- Anime Drawing: Start with one circle and end with a spiky-haired anime boy in the how to draw anime tutorial.
- Mickey Mouse Drawing: Stay with Disney and draw Mickey waving one glove in this easy Mickey Mouse drawing tutorial.
- Sharingan Drawing: A red iris with three tomoe fills a manga panel in the Sharingan drawing tutorial.
- Juice WRLD Drawing: Draw a quiet tribute portrait in soft colors with the Juice WRLD drawing step by step lesson.
- Hands Drawing: Practice an open palm with five fingers and three palm lines in this how to draw hands tutorial.
- Ghost Drawing: A waving ghost, a baby ghost and a pumpkin all start from one circle in the cute ghost drawing tutorial.
- Woman Drawing: Mark six head lengths first, then build a standing figure in the woman drawing tutorial.
- Cerberus Drawing: Give each of three puppy heads its own mood with the how to draw Cerberus step by step guide.
Questions About Drawing Nemo and Friends
What is the easiest Disney character to draw?
Characters built from one simple shape are easiest. Nemo is mostly an oval with a tail, which is why I chose him here. Mickey Mouse, made of circles, is another good starter.
How do you draw Nemo for kids?
Start with an oval and a triangle, then add three curved stripes and one big eye. Small kids can leave out the black stripe edges and just trace the outlines with a thick marker.
How long does it take to draw Nemo?
About 20 minutes for the drawing and another 10 for coloring. The stripe edges take the longest, so give them a little extra time.
What colors do you need for Nemo?
Orange and black plus the white of the paper are enough. A light blue for bubbles or water around him is a nice extra.
Grab that orange pencil, give your clownfish a big shiny eye and let him swim across the page. 🐠✏️
Related posts:
 How to Draw a Whale Step by Step (Easy for Beginners)
 How to Draw Lungs Step by Step (Easy Science Diagram)
 How to Draw a Pineapple Step by Step (Easy Crown and Slice)
 How to Draw the Fortnite Llama Step by Step (Easy Fan Art)
 How to Draw a Hoodie Step by Step (Front and Back View)
 How to Draw a Parrot Step by Step (Easy Scarlet Macaw)
 How to Draw a Police Car Step by Step (Easy for Kids)
 How to Draw a Volcano Step by Step (Easy Erupting Volcano)
 How to Draw a Crow Step by Step (Easy for Beginners)
 How to Draw a Tiger Step by Step (Easy Walking Pose)
 How to Draw a Heart Step by Step (Even, Symmetric Shape)
 How to Draw a Jellyfish Step by Step (Cute, Easy Guide)

