
A lot of portrait requests land on my desk in February, when classes start Black History Month projects, and Rosa Parks comes up again and again. This lesson shows you how to draw Rosa Parks step by step as a simple, kind cartoon portrait: her hair parted and pulled back, small round glasses, a quiet smile and a coat with a white collar. You won't need any portrait experience, because every feature lands on a guide line you draw first.
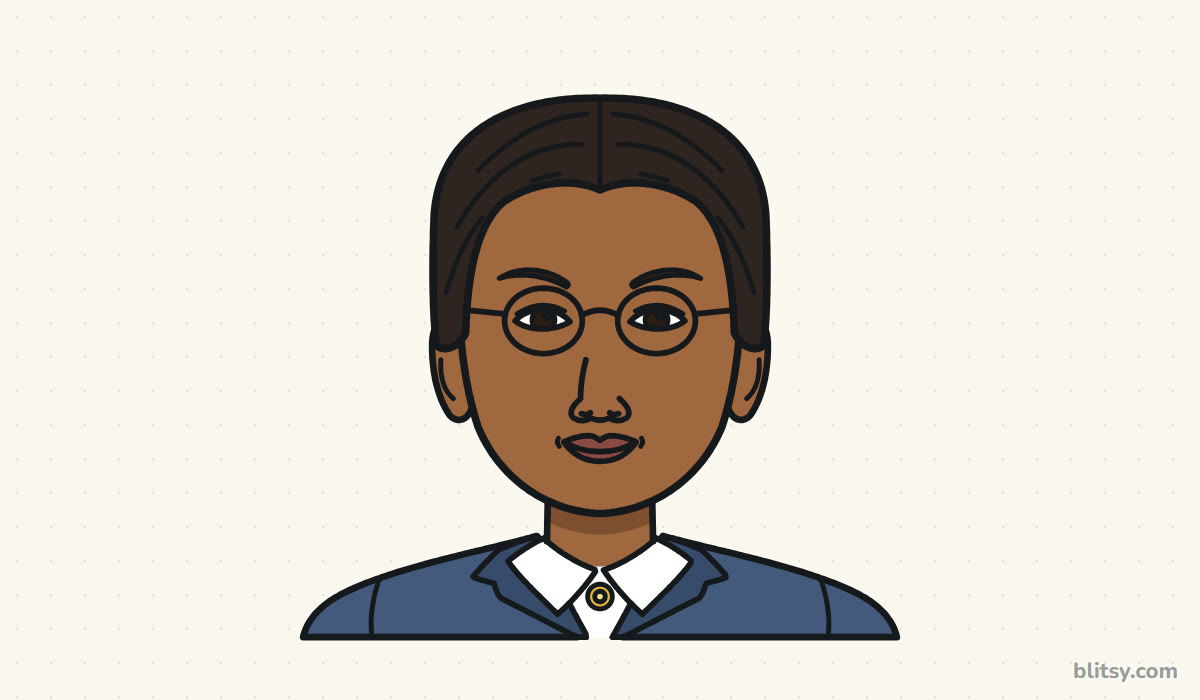
New lines for every step are printed in blue. Gray shows what you drew before, and the pale blue guides get erased near the end.
Quick overview
⏱️ Time: about 40 minutes, plus 15 for color
🎯 Level: easy to medium, good for ages 9 and up
✏️ Steps: 12
👓 You'll draw: a head-and-shoulders portrait of Rosa Parks in glasses and a collared coat
Supplies for Drawing Her Portrait
- An HB pencil for light guide lines
- A soft eraser, ideally a kneaded one
- A black fineliner or thin marker
- Colored pencils: a medium brown, a darker brown, black, two blues, gold and a rose brown
- Plain white paper or a sheet of card for a school poster
A regular school pencil case will cover this; the gold pencil is the only thing kids sometimes have to borrow.
How to Draw Rosa Parks Step by Step
Step 1: Sketch the head oval and a center line
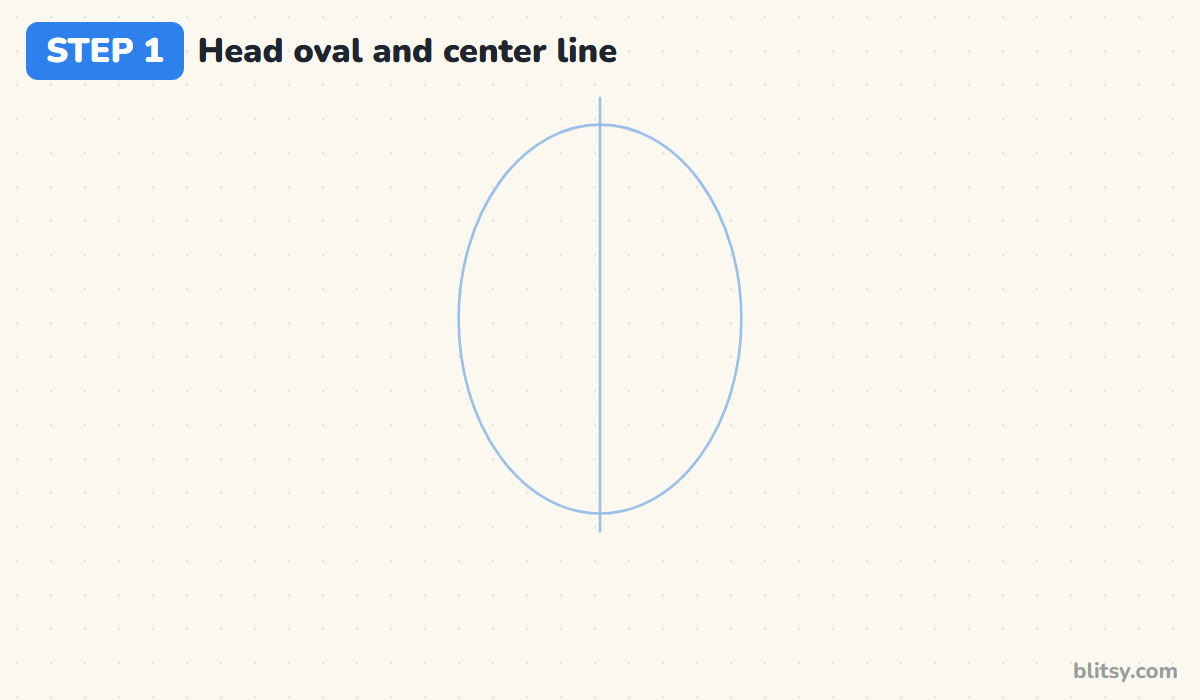
Start with an egg shape a bit taller than it is wide, roughly three units across for every four down. Keep your pencil light. Then draw a straight line down the middle, from just above the oval to just below it. That line keeps the glasses and mouth centered later.
💡 Tip: Draw the oval with your whole arm, not just your fingers. The curve comes out smoother.
Step 2: Add the face lines and a shoulder curve
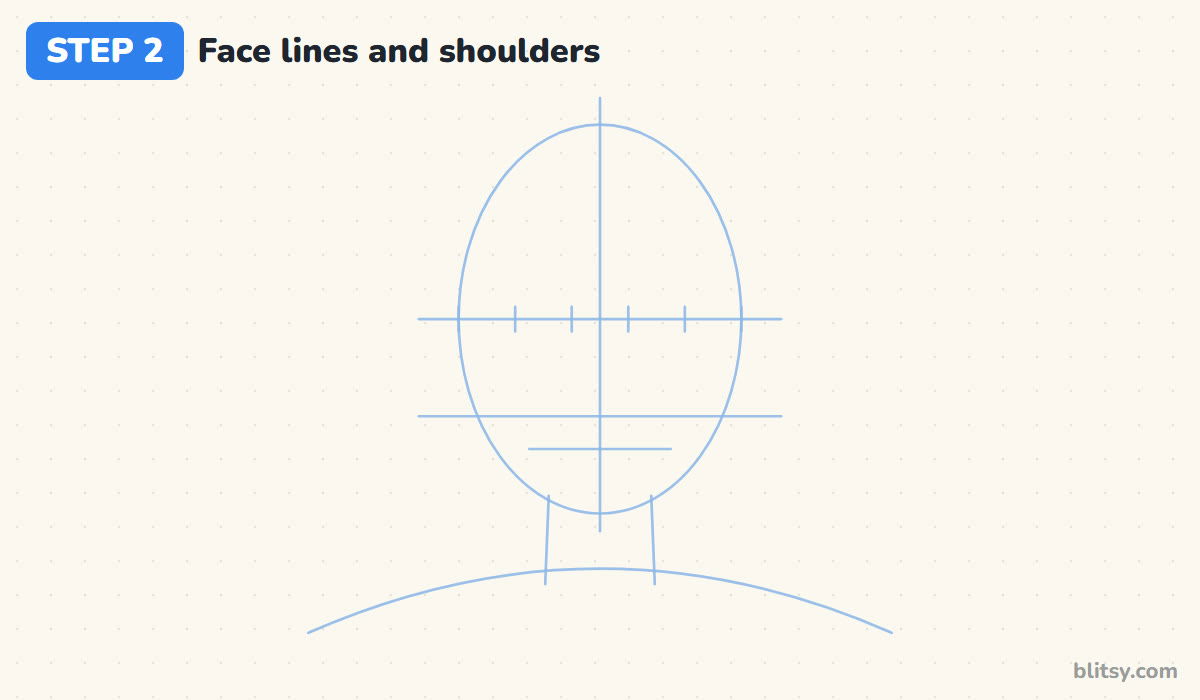
The eye line goes exactly halfway down the oval, which feels too low at first. Put the nose line halfway between the eye line and the chin, and a short mouth line a third of the way below that. Mark five equal spaces along the eye line. Last, add two short neck lines and a wide, low arc for the shoulders.
💡 Tip: Measure the halfway point with your pencil held against the paper instead of guessing.
Step 3: Draw a soft face outline
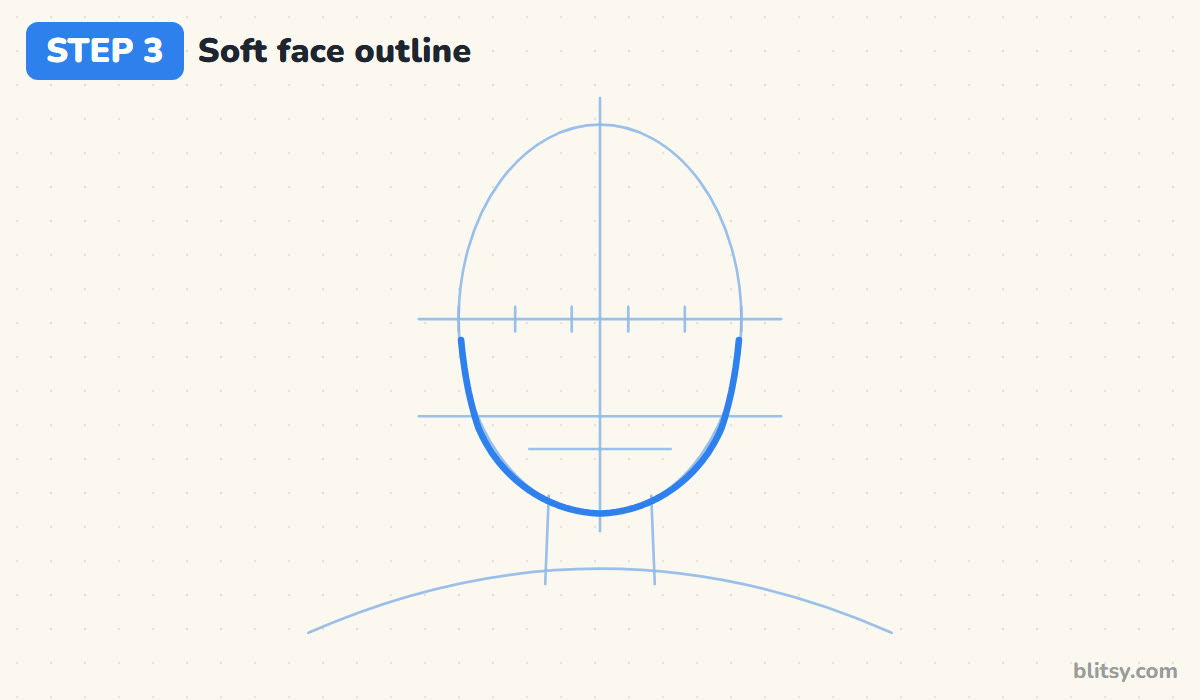
Trace the lower half of the oval, from about the eye line on one side down around the chin and up to the eye line on the other side. I keep this jaw round and gentle, with no sharp corner, because a soft curve suits her calm look. Skip the top; hair will cover it.

💡 Tip: If one cheek bulges more, flip the paper over and hold it to a window to spot it.
Step 4: Add the ears and the neck
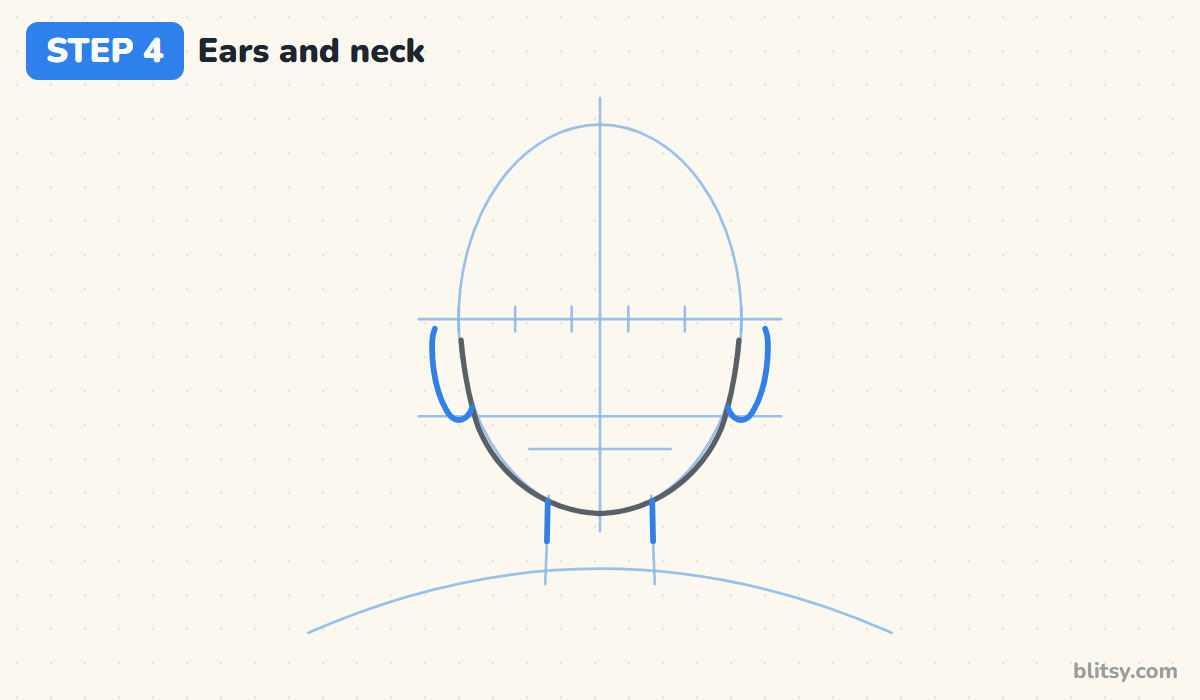
Ears sit between the eye line and the nose line. Draw each one as a narrow C shape on the side of the head; the top part will tuck under her hair in the next step, so it can stay short. Then go over the neck guides with two steady lines, a little narrower than the jaw.
💡 Tip: Compare the bottoms of both ears with the nose line. They should match it.
Step 5: Draw hair parted in the middle
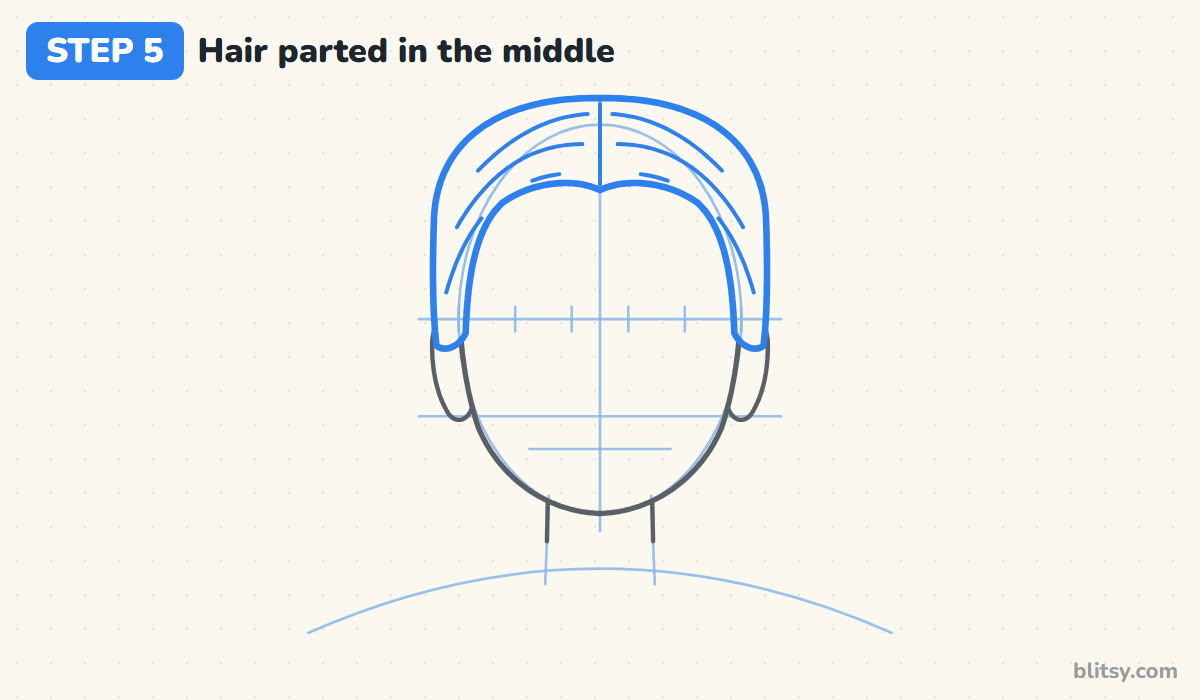
In many photos, Rosa Parks wears her hair parted in the center and smoothed back, so draw a rounded cap a finger's width above the oval. Bring the sides down close to the head until they cover the tops of the ears. The hairline dips into a small point at the part. Add the part itself and three combed strokes on each side.
💡 Tip: Curve the hair strokes away from the part, like water flowing off a roof.
Step 6: Shape the coat and the lapels
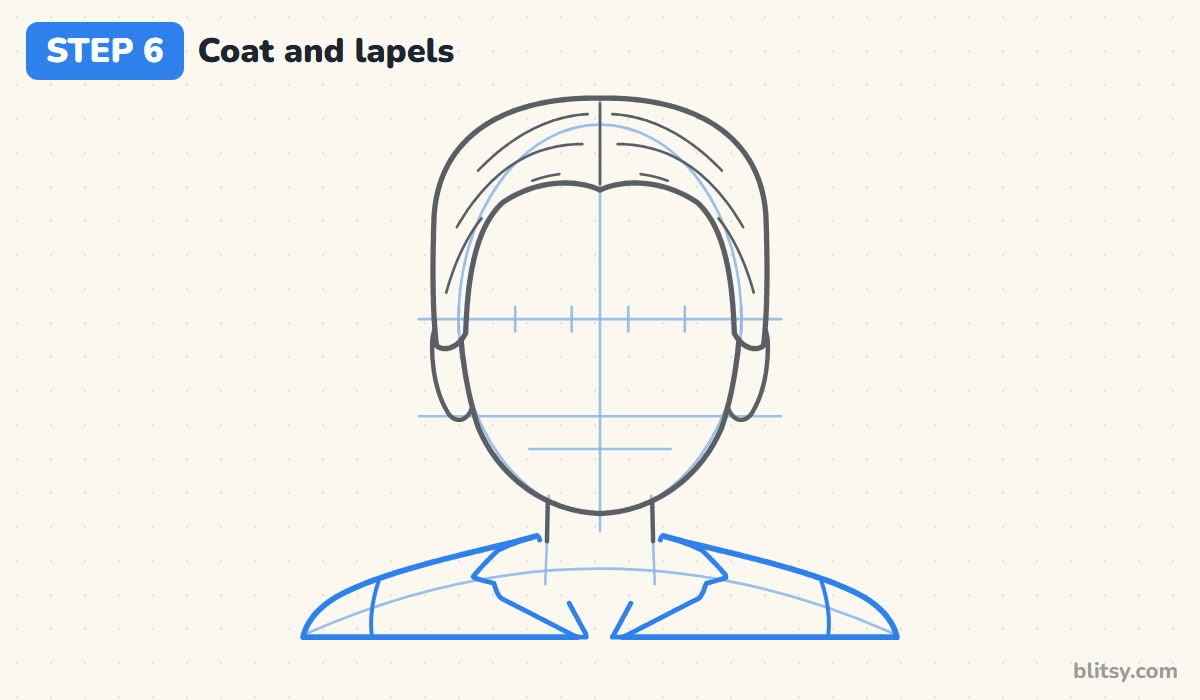
Starting at the neck, draw a shoulder line that slopes gently down and out on each side, then cut the bottom off flat. The two coat fronts meet low in the middle and make a V. Along that V, add a folded lapel with a small notch near each shoulder, plus a short seam line on each arm.
💡 Tip: Keep the shoulders wide, about twice the width of the head. Narrow ones make the portrait look childish.
Step 7: Add the blouse collar and the brooch
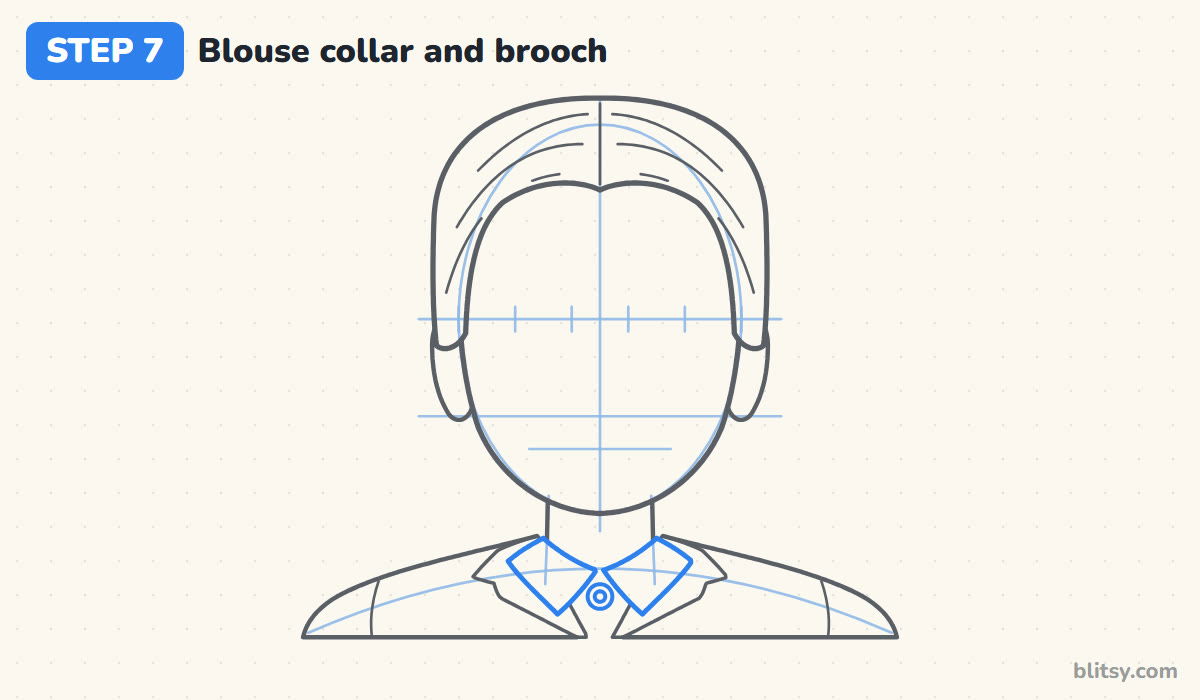
Her white collar lies on top of the coat. Draw two pointed flaps that start at the sides of the neck, meet in the center, and point down and outward. Below the spot where they meet, draw a small circle with a dot inside for the brooch. I keep it modest in size; a large pin pulls attention away from the face.




💡 Tip: Draw one collar flap, then copy its angle on the other side before you add the brooch.
Step 8: Draw calm eyes and soft brows
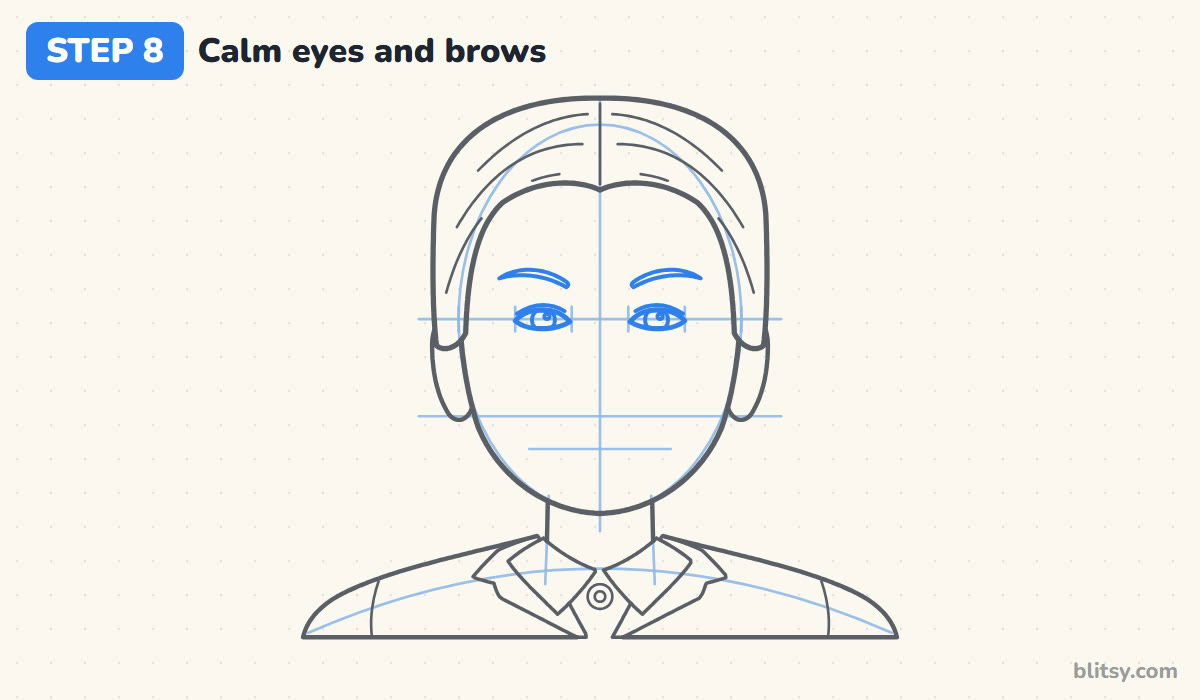
Use the second and fourth spaces on the eye line for two almond shapes. Each iris should be tucked slightly under the upper lid, which gives a relaxed, steady gaze instead of a startled one. Add a pupil, a tiny highlight and a light lid curve above. The brows are thin, gentle arches a little above each eye.
💡 Tip: Leave the white highlight on the same side in both eyes so she looks in one direction.
Step 9: Add the small round glasses
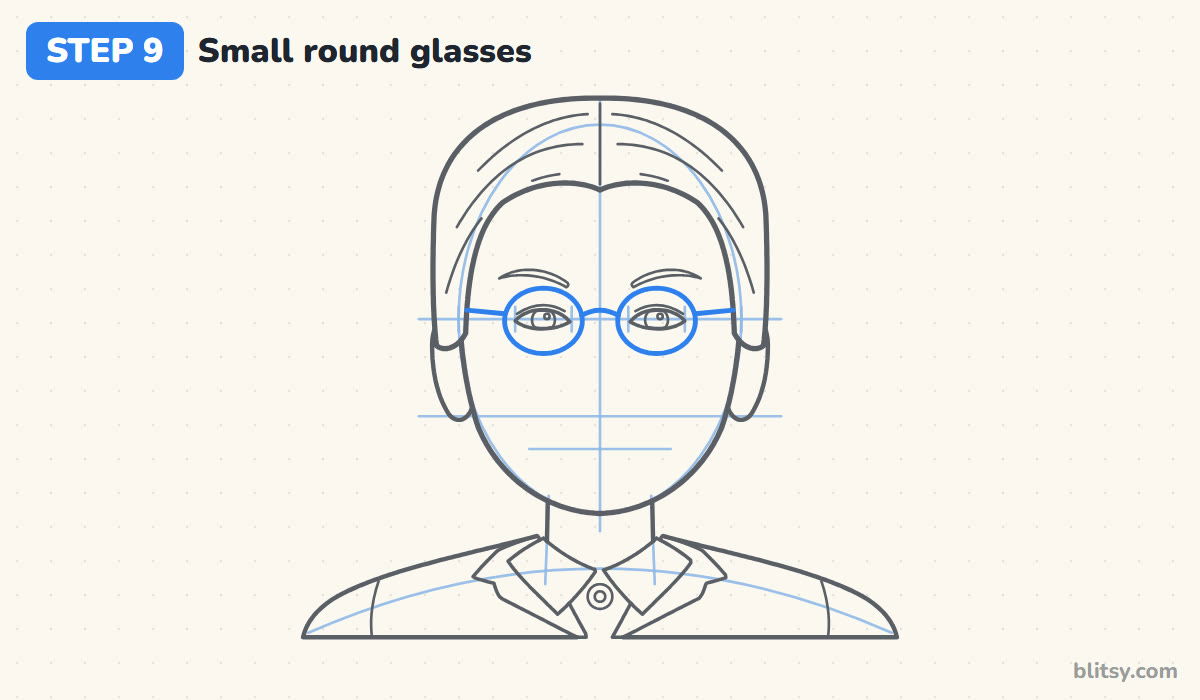
Center a slightly wide circle on each eye. Most beginners draw the lenses too big here; the top edge should stay below the brows and the bottom should stop well above the nose line. Join the lenses with a small curved bridge, then draw one straight arm from each lens back to the hair.
💡 Tip: Trace around a coin lightly if your circles keep going lopsided.
Step 10: Draw the nose and a gentle smile
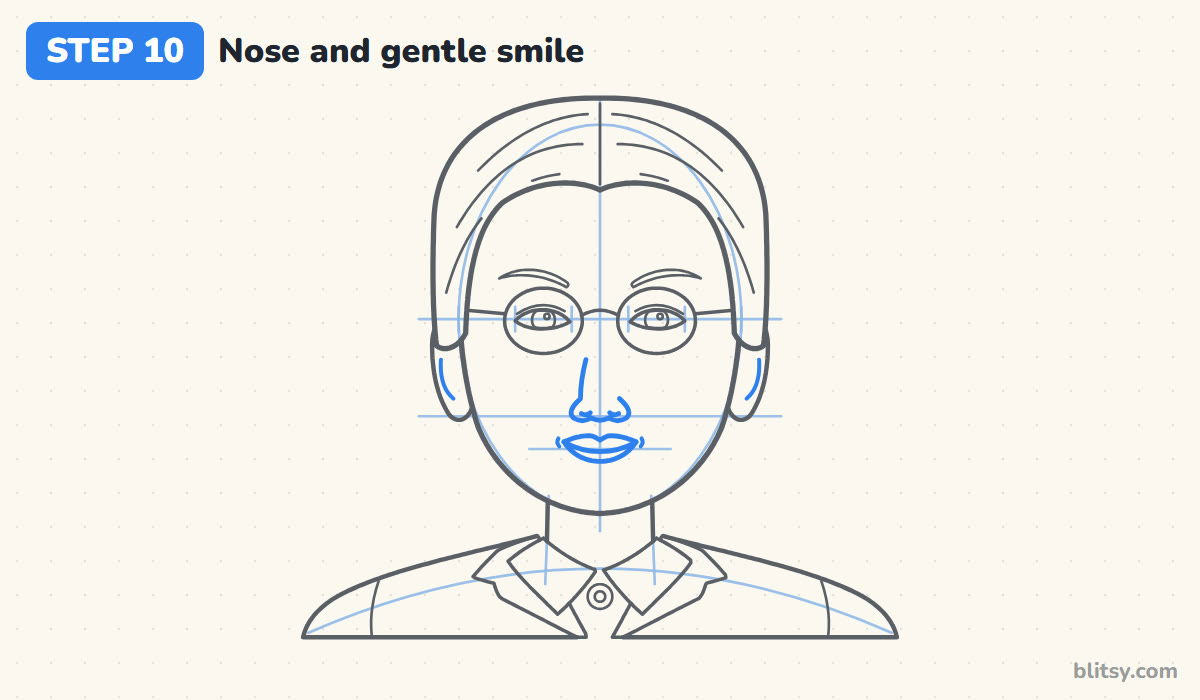
Put a short, soft line down from between the lenses, then draw the base of the nose on the nose line with two rounded sides and two small nostrils. For the mouth, the line between the lips curves up slightly at the ends. Add a thin upper lip, a slightly fuller lower lip, and a tiny curve at each corner of the smile.
💡 Tip: Stop the mouth corners under the centers of the eyes. Going wider changes her expression.
Step 11: Ink the portrait and erase the guides
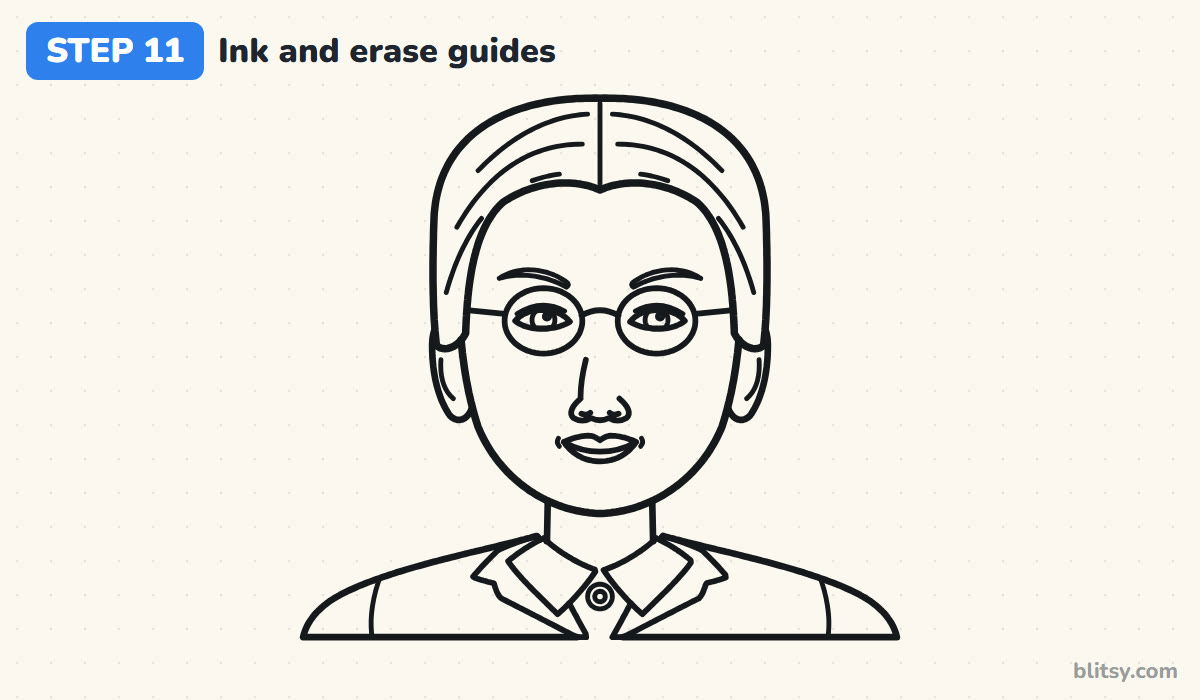
Go over every line you want to keep with a black fineliner. Take your time on the glasses, because wobbly circles stand out on a face. Give the ink a minute to dry, then erase the oval, the center line, the shoulder arc and the face lines.



💡 Tip: Ink from the top of the page downward so your hand never rests on wet lines.
Step 12: Color the portrait
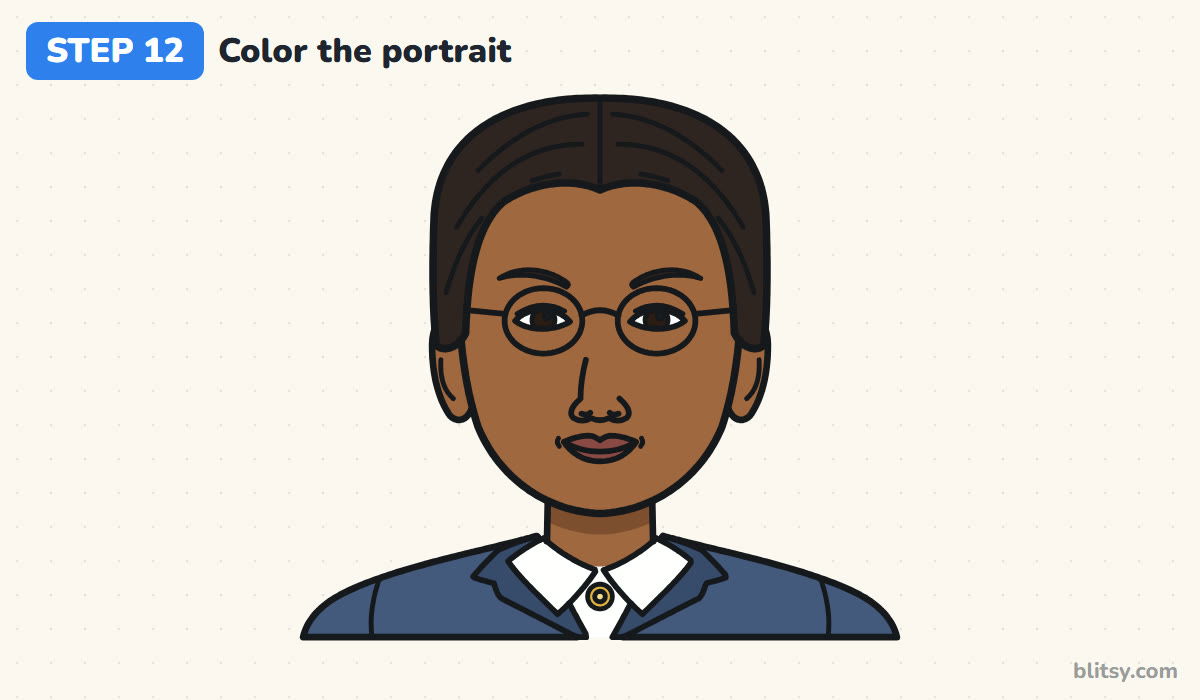
Fill the face, ears and neck with a warm medium brown, then add a darker brown band on the neck right under the chin. Color the hair and brows black. The coat is blue with darker blue lapels; keep the collar white and the brooch gold. Finish the lips with a soft rose brown.
💡 Tip: Build the skin color in two light layers. One heavy layer usually looks streaky.
Where This Portrait Usually Slips
- Glasses too large. Keep each lens around the eye only, below the brow and above the nose line.
- Exaggerated features. This is a respectful portrait, so keep the nose, lips and eyes at normal size on the guide lines.
- Hair drawn on top of the oval. Draw it a little above and around the head, or the forehead disappears.
- A tiny, narrow coat. Let the shoulders spread wide; a portrait needs that solid base.
- Skin colored in one dark pass. Start light and layer, so the shadow under the chin still shows.
Turning the Drawing Into a School Project
Rosa Parks was a civil rights activist from Alabama. On December 1, 1955, in Montgomery, she refused to give up her seat on a city bus and was arrested, and her arrest sparked the Montgomery bus boycott, which lasted more than a year. My drawing is a simple cartoon portrait for practice and school projects, not an exact likeness, so I kept her look general and kind. For a poster, I like to add her name in large letters with the year 1955 underneath. Older students can write a short paragraph about the boycott next to the portrait. Classes that want more pages to color can use the Black History Month coloring page set, and the Abraham Lincoln drawing tutorial works well for a set of historical portraits.
Rosa Parks Coloring Page and a Printable Step Guide
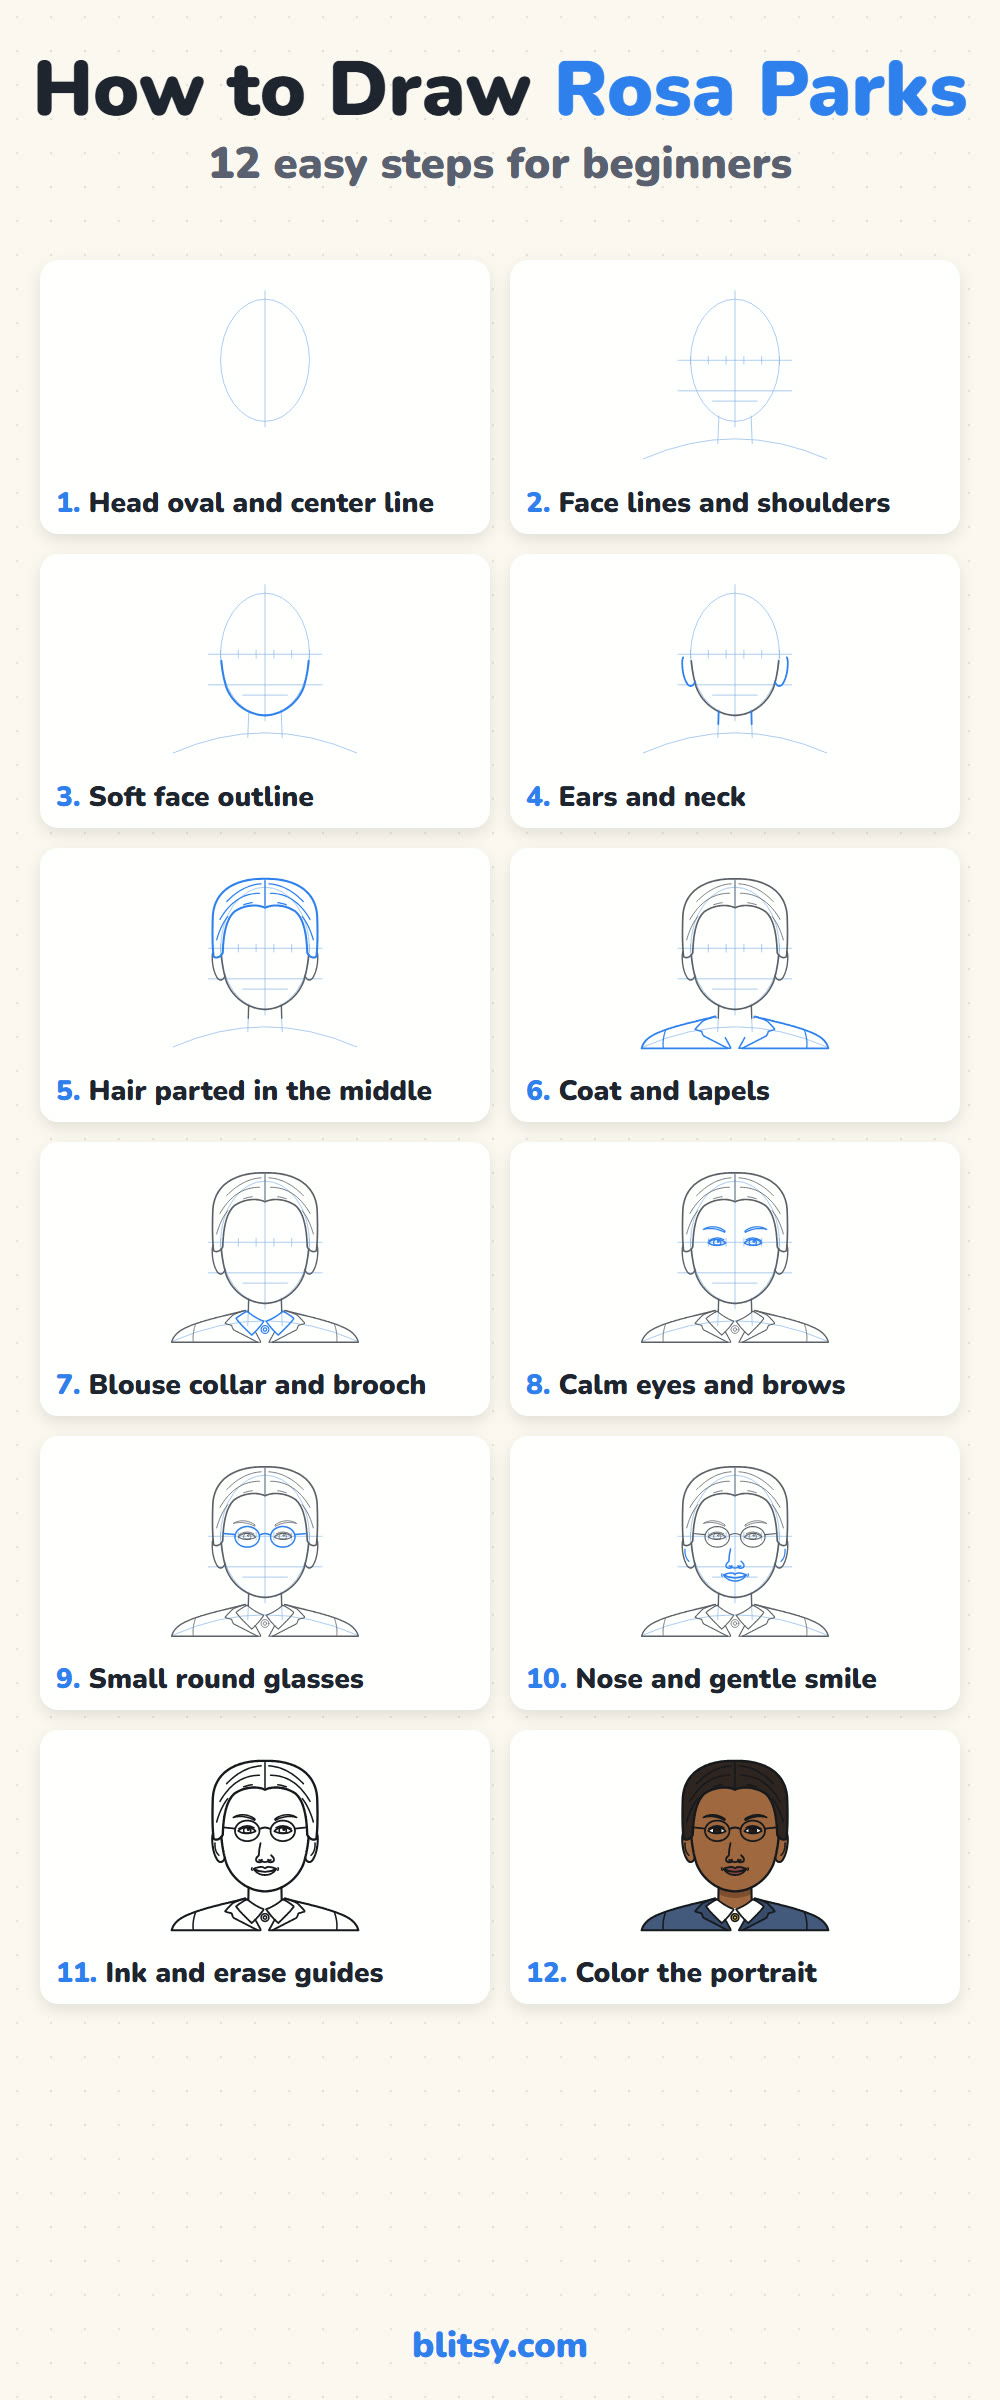
For a classroom or a quiet afternoon, print the coloring page. It has the inked portrait, a small colored example and a key that names each color. The step guide PDF puts all twelve steps on a few sheets, so you can draw at a desk away from a screen.
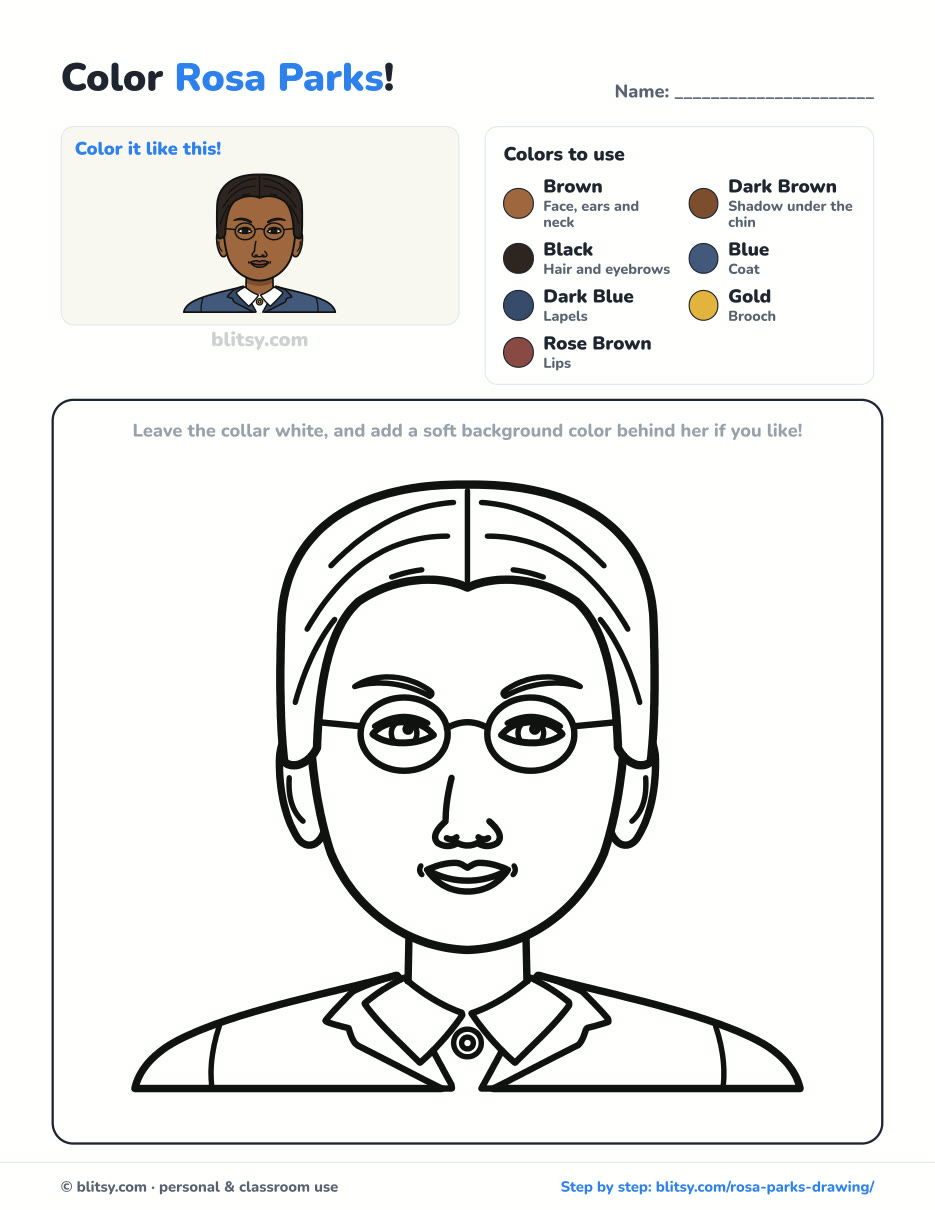
Black outlines with a colored example and the color names at the top. Ready to print and color.
⬇️ Download Coloring PageEvery step picture with its instructions and tips, to keep beside your paper while you draw.
⬇️ Download Drawing Guide📱 On a phone? Tap a download button, then open the file and choose Share → Save to Files or Print. On a computer, the PDF opens or saves straight to your Downloads folder.
Keep the Rosa Parks Steps on Pinterest
Characters and Heroes to Draw After Rosa Parks
Here are more step-by-step tutorials, mostly characters and portraits, each one broken into small numbered stages.
- Mario Drawing: Cap on and one glove waving, the plumber comes together in this how to draw Mario step by step chibi lesson.
- Hulk Drawing: Both arms up and a cheeky grin: the Hulk drawing tutorial takes eleven steps.
- Nezuko Drawing: One circle starts the chibi Nezuko in this Nezuko drawing step by step guide.
- Anime Girl Drawing: Pink bangs, purple eyes and a navy sailor collar are built from a plain circle in the anime girl drawing tutorial.
- Wonder Woman Drawing: Another strong woman to draw: the how to draw Wonder Woman tutorial ends with her tiara on and lasso ready.
- Todoroki Drawing: Ice on one side and fire on the other frame a quiet face in this Todoroki drawing tutorial.
- Raccoon Drawing: Learn how to draw a raccoon with its mask on and tail up, in twelve steps.
- Phoenix Drawing: Wings up and tail blazing, the fire bird takes eleven calm steps in the phoenix drawing step by step lesson.
- Olaf Drawing: The Olaf drawing tutorial finishes on the snowman with his arms up and a huge grin.
- Luffy Drawing: Straw hat, scar and a wide grin all appear in our how to draw Luffy tutorial.
- Fortnite Drawing: Draw the pinata llama on four stubby legs with this Fortnite llama drawing tutorial.
Questions Students Ask About Drawing Rosa Parks
What is the easiest way to draw Rosa Parks?
Start with a head oval and the eye line, then add the parted hair and round glasses. Those two features make the portrait recognizable even when the rest stays simple.
Is this Rosa Parks drawing good for a Black History Month project?
Yes. It's sized for a poster or a report cover, and the coloring page works for younger classes. Add her name and a short note about the 1955 bus boycott.
How long does it take to draw Rosa Parks?
Plan on about 40 minutes for the drawing and 15 more for color. Younger kids can split it into two sessions, stopping after the ink step.
Can younger kids draw this portrait?
Kids around 7 or 8 can follow it if they skip the hair strokes, the lapel notches and the eye lids. Dots for eyes inside the glasses still look friendly.
Pick up your pencil, start with that quiet oval, and take your time on her face, because a calm portrait needs calm lines. 📚
Related posts:
 How to Draw Juice WRLD Step by Step (Easy Tribute Portrait)
 How to Draw Abraham Lincoln Step by Step (Easy Portrait)
 How to Draw a Family Step by Step (Easy Cartoon Portrait)
 How to Draw a Whale Step by Step (Easy for Beginners)
 How to Draw Lungs Step by Step (Easy Science Diagram)
 How to Draw a Pineapple Step by Step (Easy Crown and Slice)
 How to Draw the Fortnite Llama Step by Step (Easy Fan Art)
 How to Draw a Hoodie Step by Step (Front and Back View)
 How to Draw a Parrot Step by Step (Easy Scarlet Macaw)
 How to Draw a Police Car Step by Step (Easy for Kids)
 How to Draw a Volcano Step by Step (Easy Erupting Volcano)
 How to Draw a Crow Step by Step (Easy for Beginners)

