
Master Chief is the main hero of the Halo video games, which started back in 2001, and fans know him at a glance by his green armor and that wide gold visor. The good news for beginners is that his whole look comes down to rounded blocks and one big curved window. Below I'll walk you through how to draw Master Chief step by step, standing proud with his fists on his hips. This is my simple fan-art version for drawing practice, so it isn't copied from any official Halo artwork.
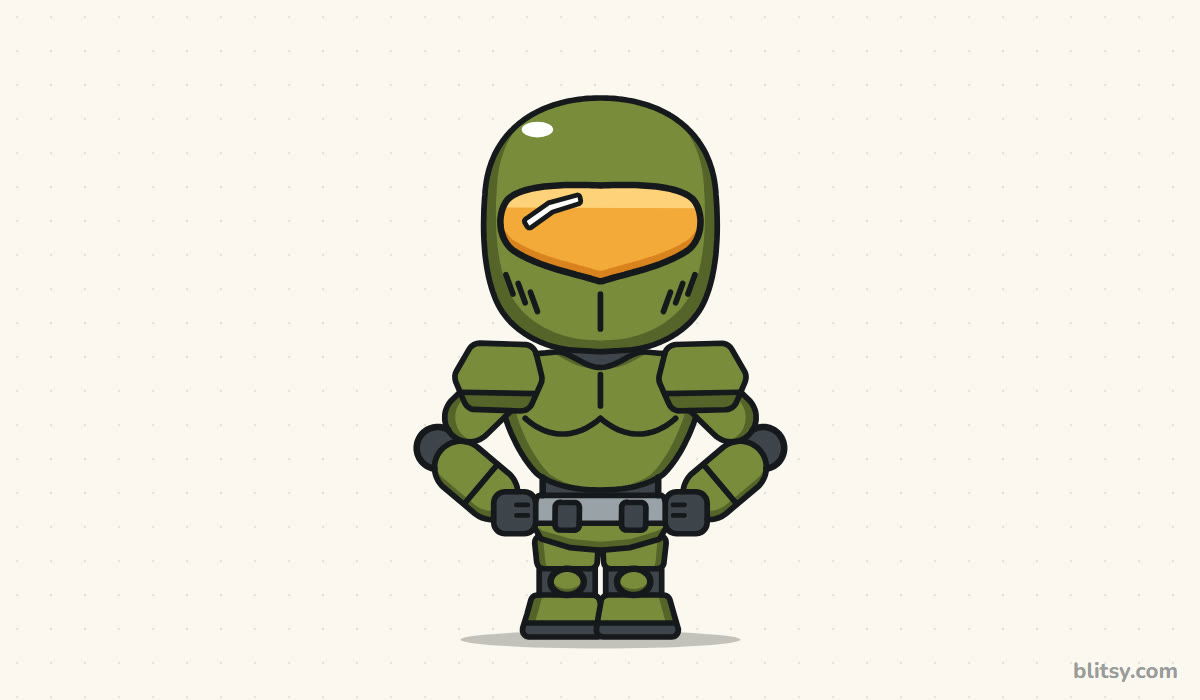
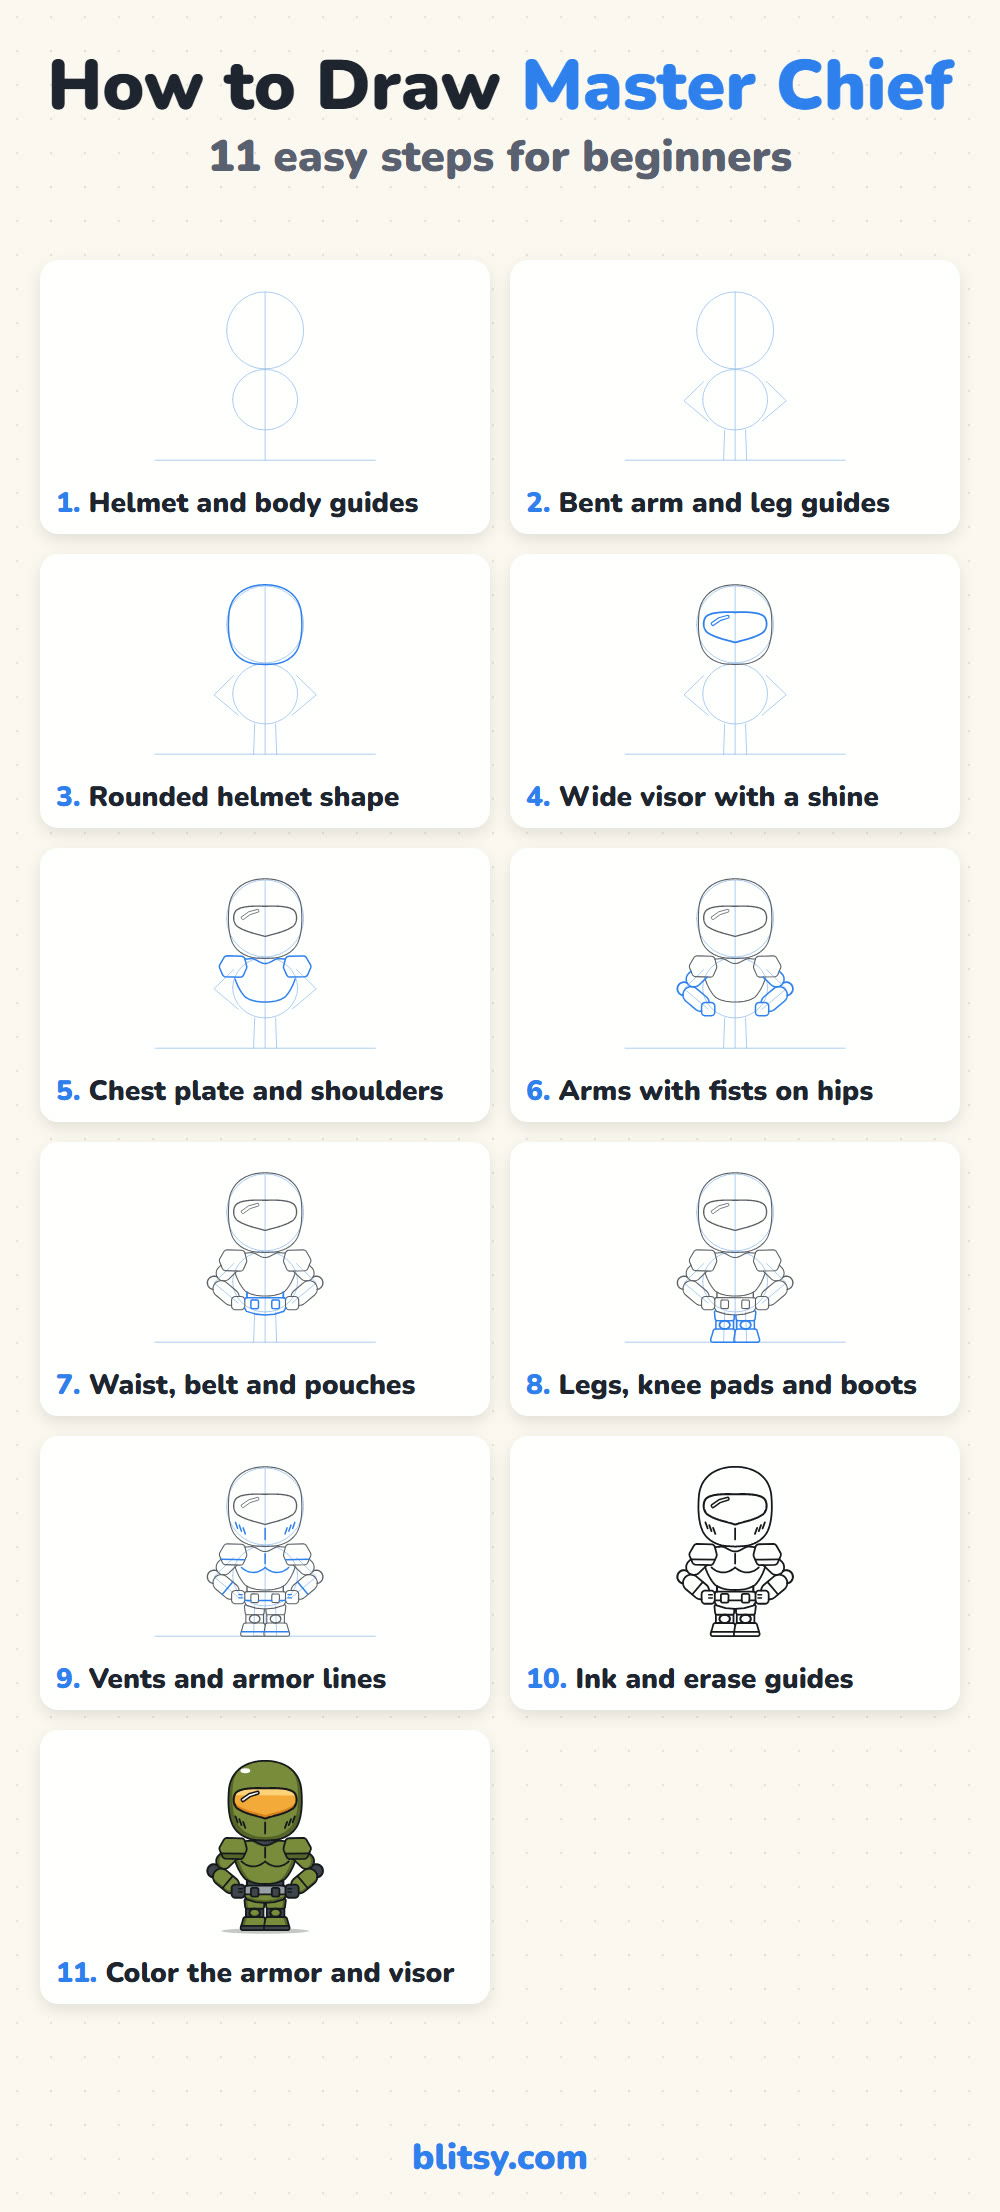
Bright blue marks what to add in that step. Gray lines are already done, and the pale blue circles and lines from steps 1 and 2 are helpers that vanish when you ink.
Quick overview
⏱️ Time: about 40 minutes with coloring
🎯 Level: easy, good for kids around 7 and up
✏️ Steps: 11
🪖 You'll draw: a chibi Master Chief in olive armor with a gold visor
Halo Hero Sketch Supplies
- A pencil you can press lightly, such as HB
- A clean eraser
- A black marker or fineliner for the final lines
- Two greens, one a little darker than the other
- Orange and light yellow for the visor
- A dark gray and a mid gray pencil
- Plain white paper, held tall
Only one green? Color the whole suit with it, then press harder along the edges to get the darker tone.
How to Draw Master Chief Step by Step
Step 1: Sketch the helmet circle and body oval
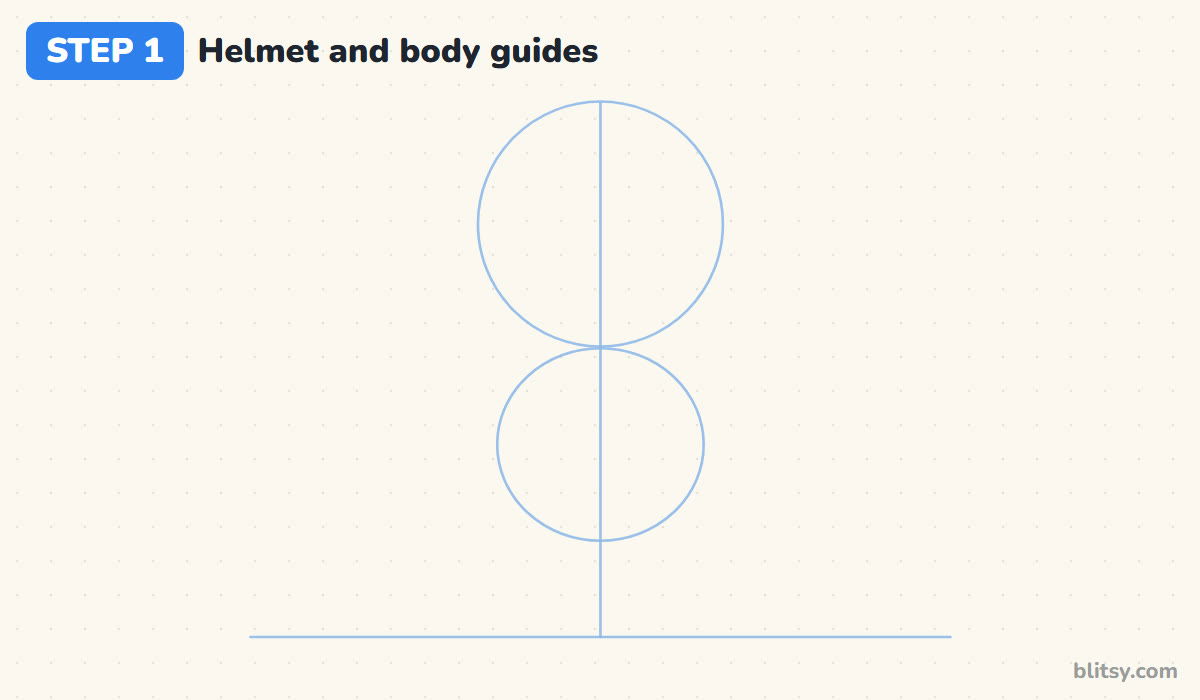
Start with a soft ground line near the bottom of the page and a straight line down the middle. High on that line, draw a big circle for the helmet, then a slightly smaller oval under it for the body. I make the helmet almost half of the whole height, because that oversized head turns a tall soldier into a chibi.
💡 Tip: Keep your pencil loose and light. These shapes are scaffolding, not part of the final picture.
Step 2: Add bent arm guides and leg lines
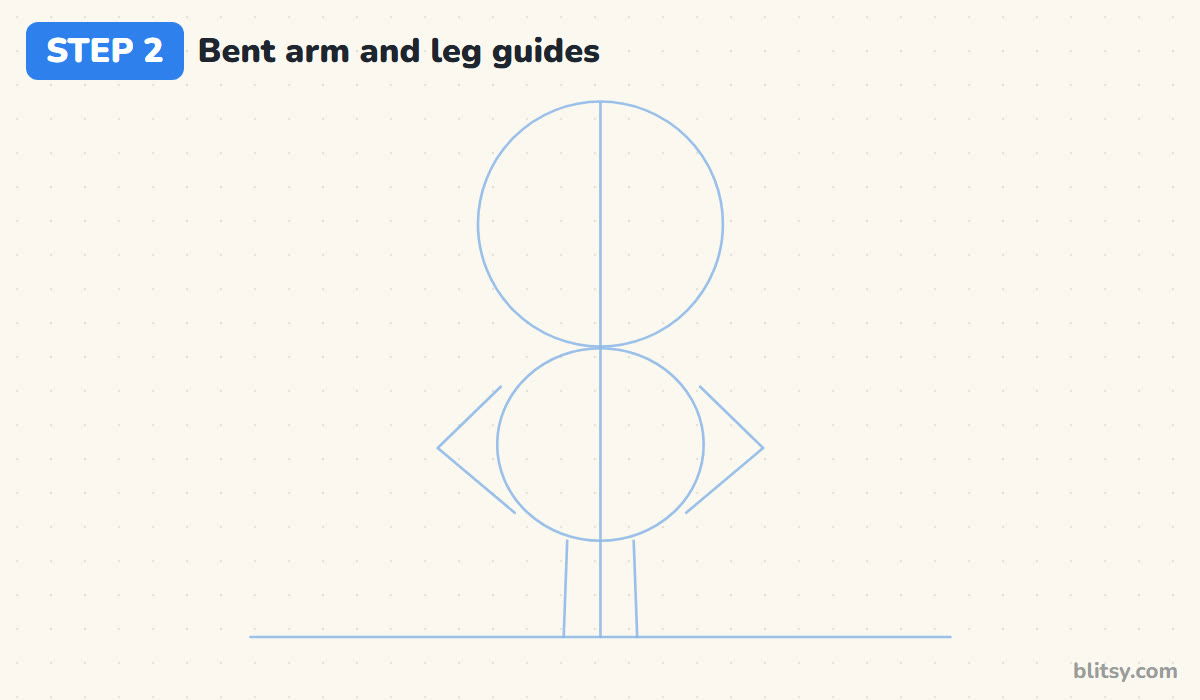
From each upper side of the body oval, draw a line going down and out to an elbow point, then back in toward the bottom of the oval. Each arm now looks like a sideways V, which is the fists-on-hips pose. Below the oval, draw two short leg lines to the ground, close together. Check that both V shapes poke out the same distance.
💡 Tip: Put both elbow points at the same height, or one shoulder will look dropped.
Step 3: Draw the rounded helmet
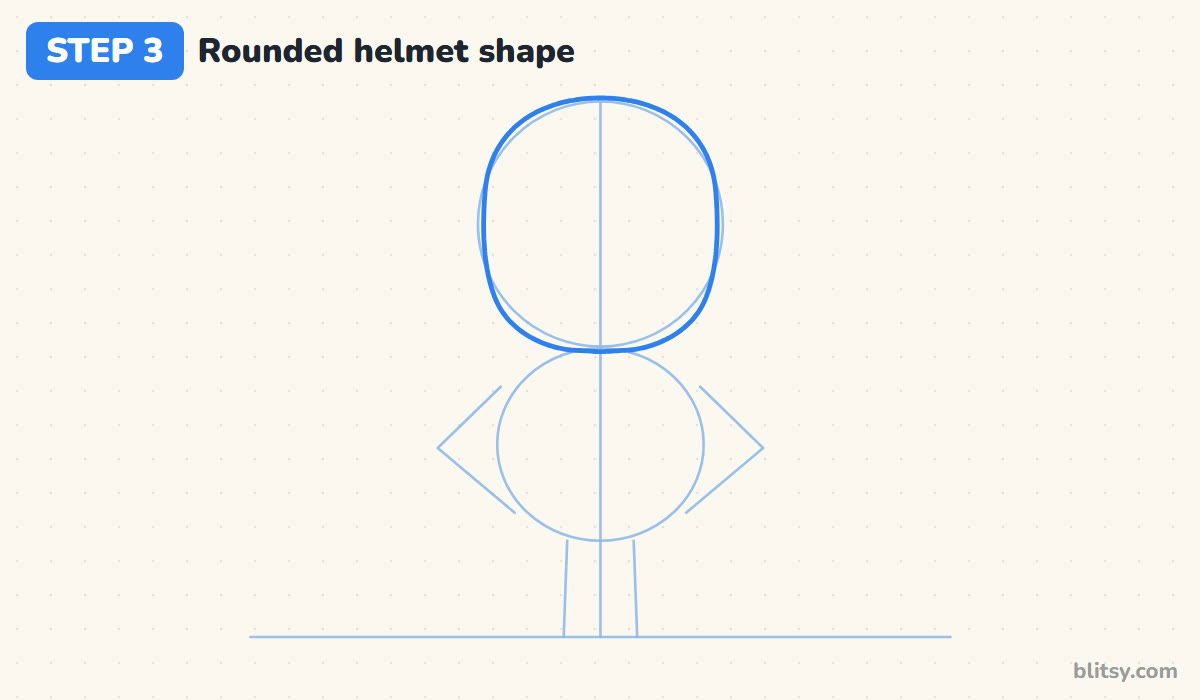
Trace around the big circle with a firmer line. Keep the top round, let the sides run fairly straight, and tuck the bottom in so the chin is a bit narrower than the forehead. A little squareness at the jaw makes it feel like hard armor instead of a ball.


💡 Tip: Turn your paper as you draw the curve, so your wrist always pulls the pencil in a comfortable direction.
Step 4: Draw the wide visor and its shine
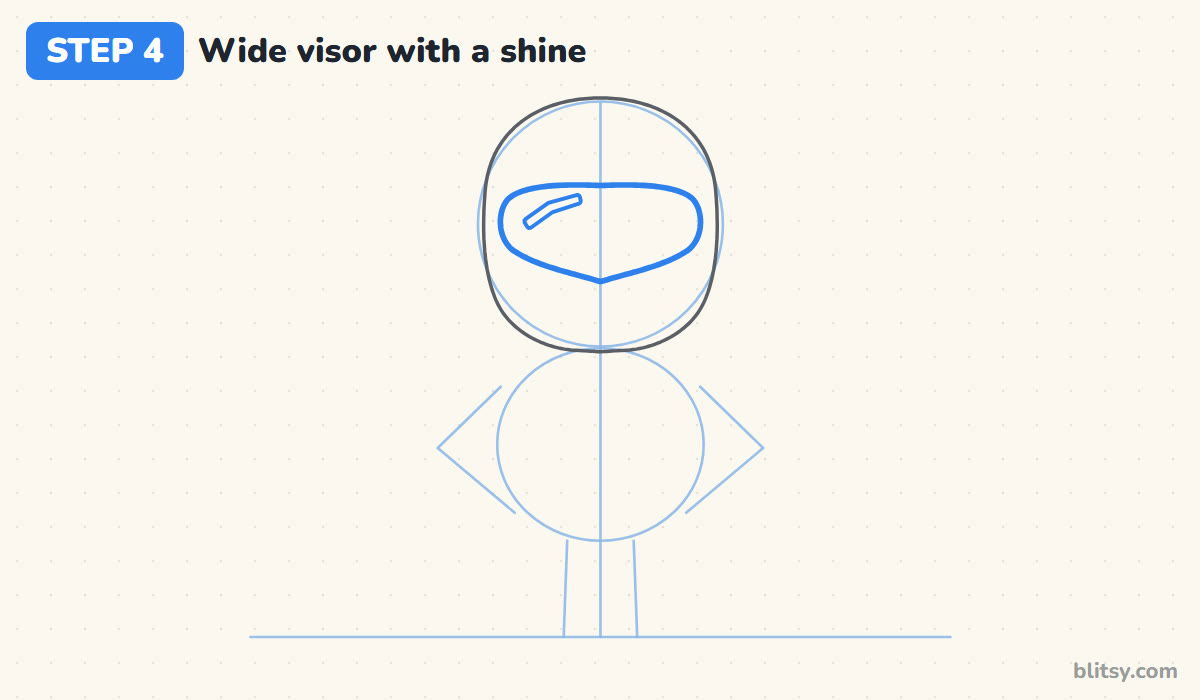
Across the middle of the helmet, draw the visor. Its top edge is almost flat, its sides curve around, and its bottom edge dips down to a soft point in the center. Leave a band of helmet showing on both sides. Then sketch a thin slanted streak in the upper left of the visor, which will stay white later as a shine.
💡 Tip: Make the visor wide but not tall. It should fill about two thirds of the helmet's width.
Step 5: Shape the chest plate and shoulder pads
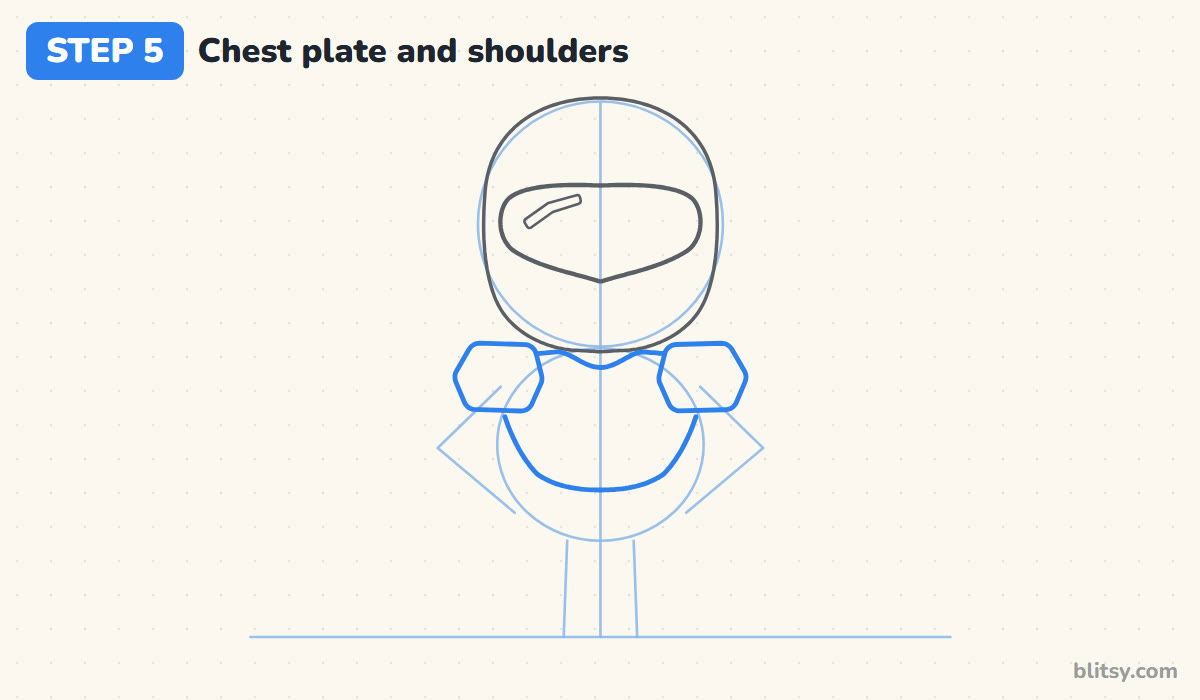
Just under the chin, draw the chest plate. It's broad at the top, with a small dip in the middle of the collar, and it narrows as it reaches the waist. Over each top corner, draw a chunky shoulder pad with flat-ish sides and rounded corners. I want these pads to stick out past the chest, since that wide shoulder line is a big part of the Spartan look.
💡 Tip: Draw the left pad, then copy its size on the right by counting how far it reaches past the chest.
Step 6: Draw the arms with the fists on the hips
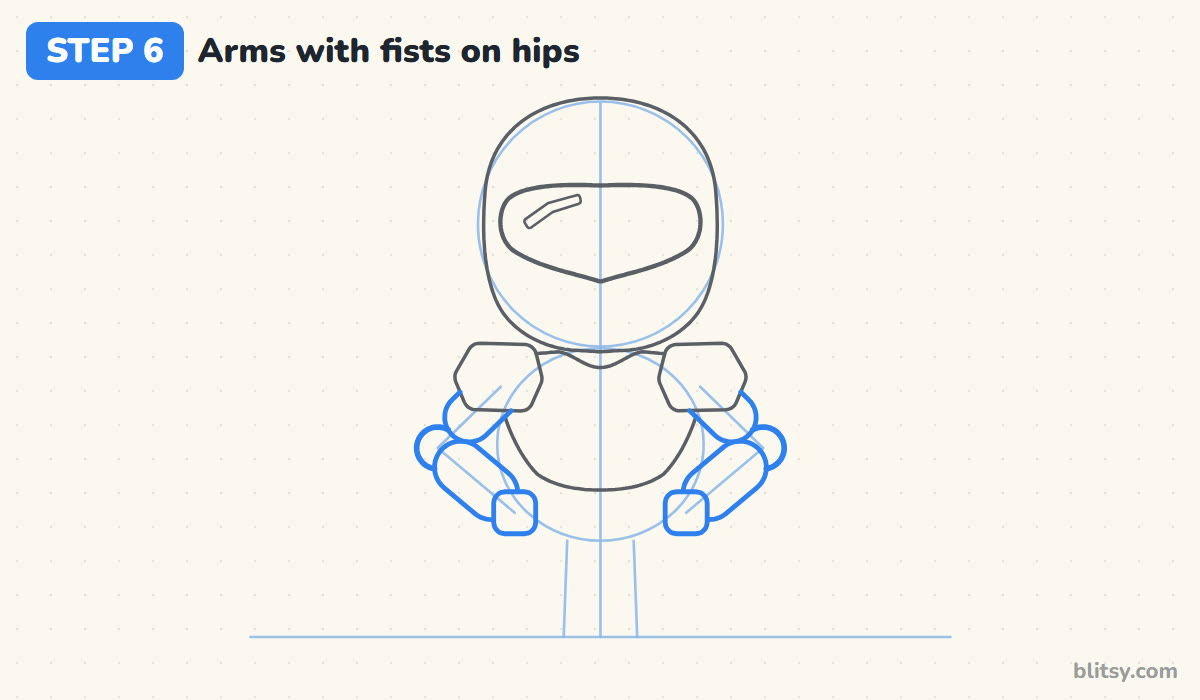
Following your V guides, draw a short, thick upper arm coming out from under each pad. At the elbow point, add a small circle for the joint. From there, a chunky forearm angles back in toward the hip and ends in a rounded square fist. The fists should land right where the waist will be, on the outer edge of the body.
💡 Tip: Draw the forearm thicker than the upper arm. Bulky gauntlets make him look strong.
Step 7: Add the waist, belt and pouches
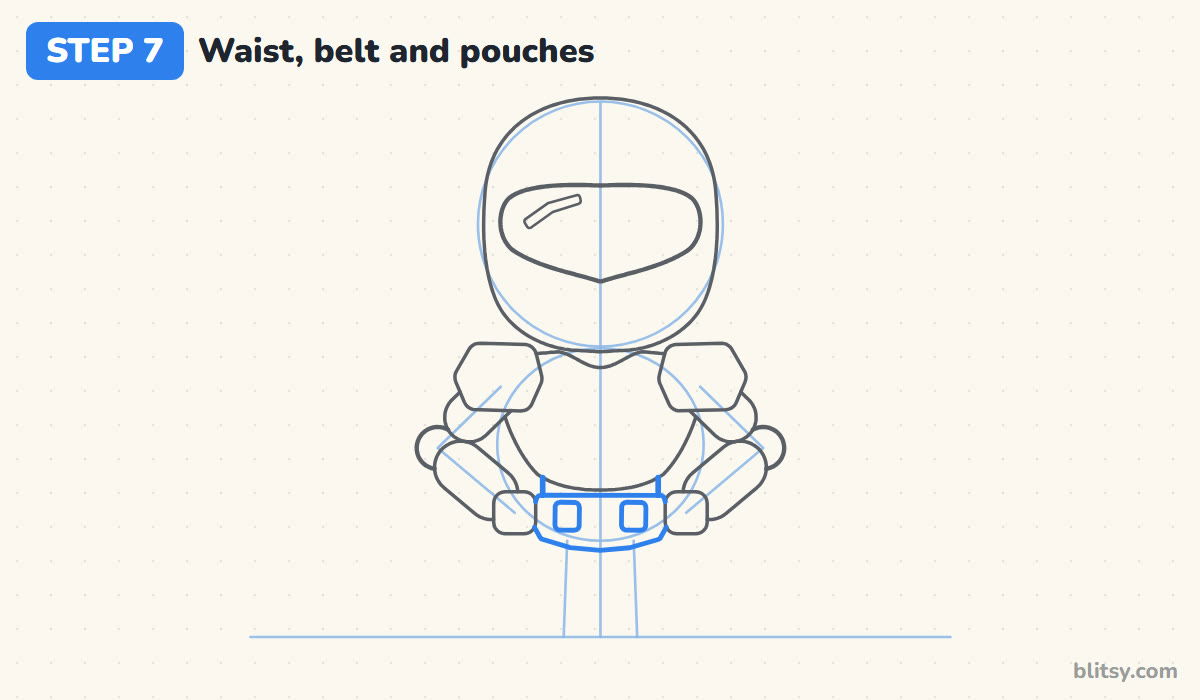
Under the chest plate, draw a narrow strip for the waist, then a wider hip shape below it that rounds off at the bottom. Draw a line across the top of the hips to mark the belt. Add two small rounded squares on the belt for pouches, one on each side of the middle, leaving space between them and the fists.


💡 Tip: Don't crowd the belt. If the pouches touch the fists, slide them closer to the center.
Step 8: Draw the legs, knee pads and boots
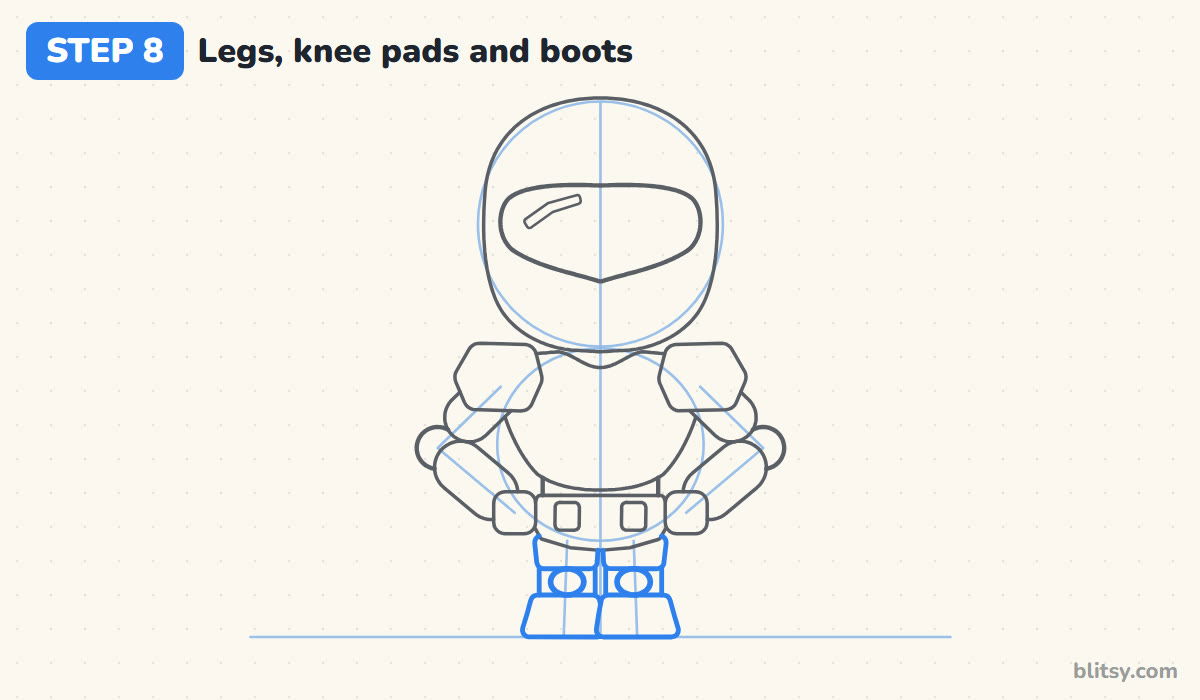
Two short legs come down from the hips. Draw a thigh plate under the hips, a small oval knee pad, and a big boot that widens at the sole and sits flat on the ground line. A little gap beside each knee pad shows the under-suit. Tiny legs keep the big helmet looking playful.
💡 Tip: Stand the boots flat and level on the ground line, so he looks planted and steady.
Step 9: Add the vents and armor lines
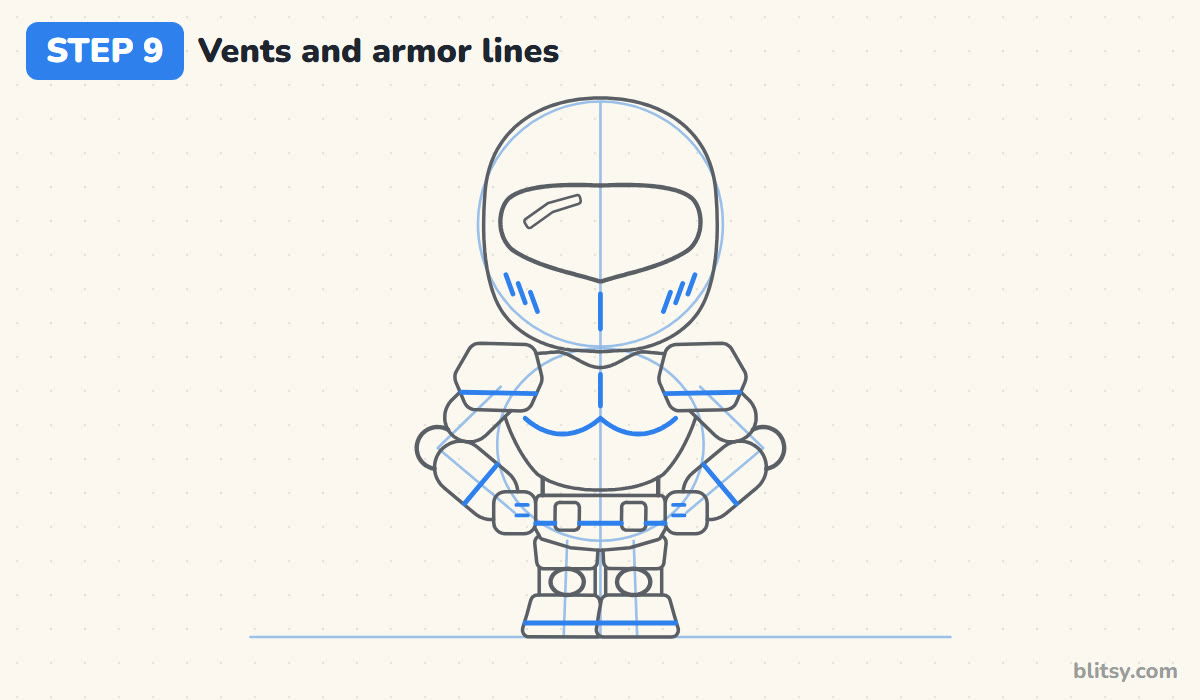
Now for the details that say Halo. Draw three short slanted vents on each cheek of the helmet and one short ridge under the visor point. On the chest, add a curved line under each side and a short center line. Put one line across each shoulder pad and forearm, one under the belt, one across each boot for the sole, and two tiny finger lines on each fist.
💡 Tip: One or two lines per part is plenty. Extra lines make chibi armor look busy instead of tough.
Step 10: Ink the drawing and erase the guides
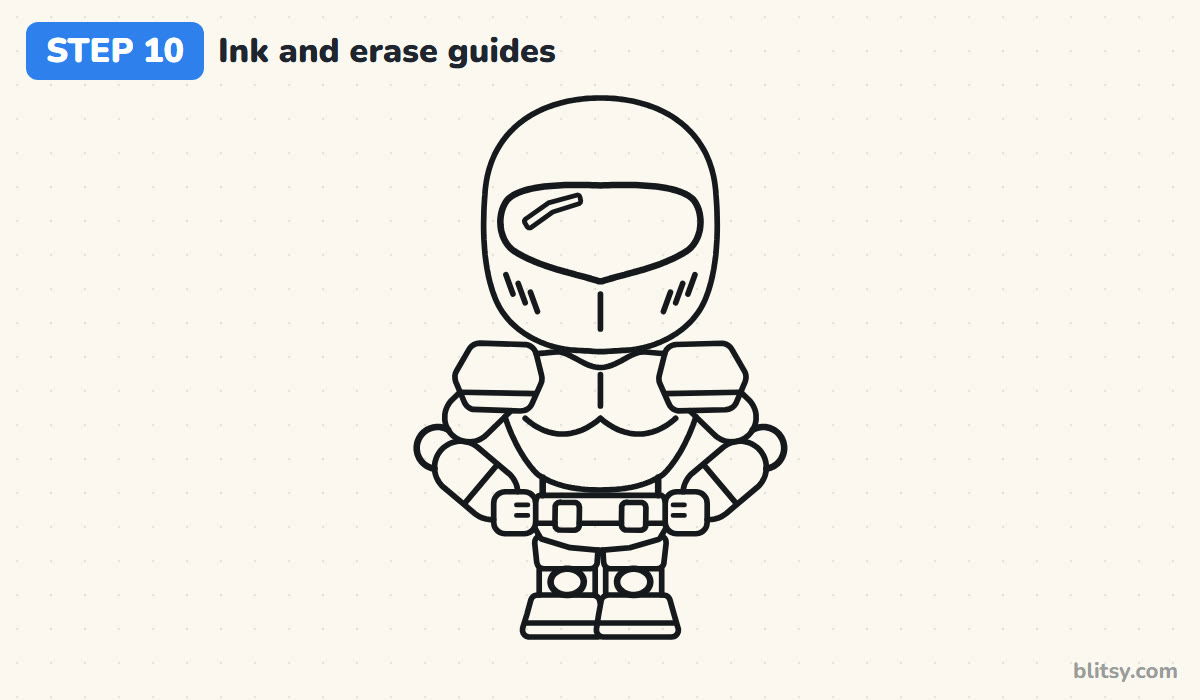
Trace every line you're keeping with your black marker. I do the outer silhouette first and the vents and panel lines last, when my hand is warmed up. Skip the circles, the V shapes and the leg lines from the start. Wait a minute for the ink to dry, then erase all the pencil.
💡 Tip: Ink the long helmet curve in two or three smooth strokes instead of many short, scratchy ones.
Step 11: Color the armor and the gold visor
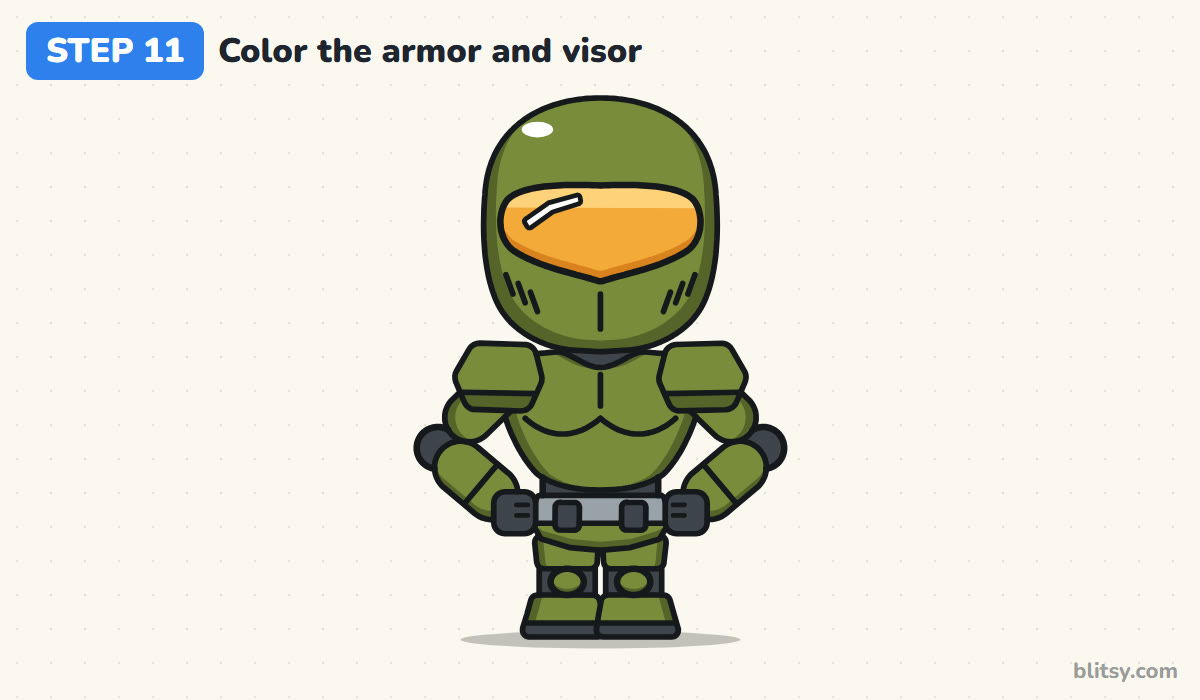
Fill the helmet, chest, shoulder pads, arms, thighs, knee pads and boots with olive green. Use dark gray for the neck, waist, elbows, the gaps at the knees, the fists, pouches and boot soles, and mid gray for the belt. Color the visor orange with light yellow along its top, and keep the shine streak white. Last, add dark green along the outer edges of the armor.
💡 Tip: Leave a small white oval on the top left of the helmet. It makes the armor look polished.
Visor Troubles and Other Armor Slip-Ups
- A visor that's too small. A narrow window makes the helmet look like a motorbike helmet. Stretch it across most of the face.
- Drawing a face. Master Chief's face stays hidden, so skip eyes and a mouth. The shine streak gives the visor all the life it needs.
- Thin shoulder pads. Small pads shrink his frame. Let them reach out past the chest on both sides.
- Arms that hang straight down. The elbows pointing out are what make the pose look confident. Follow the V guides closely.
- Everything in one flat green. The darker green edges and gray joints are what make the armor read as separate plates.
Spartan Armor Swaps to Try Next
Once this version feels easy, try a thumbs-up pose: keep one fist on the hip and lift the other arm with the thumb pointing up. You could also invent your own Spartan with red or blue armor and a different visor tint. Younger kids can skip the vents and panel lines; the green suit and gold visor still make it clear who he is. If you enjoy drawing armored heroes, my Iron Man drawing tutorial is a fun next stop, and the astronaut drawing tutorial uses the same big helmet trick.
Print a Master Chief Coloring Page and the 11-Step Guide
Want something to hand out on a rainy day? Print the free Master Chief coloring page. A small colored example at the top shows which shade goes where, so kids can work on their own. The step-by-step PDF guide holds all 11 steps with tips, two per page, and prints on Letter or A4 paper.
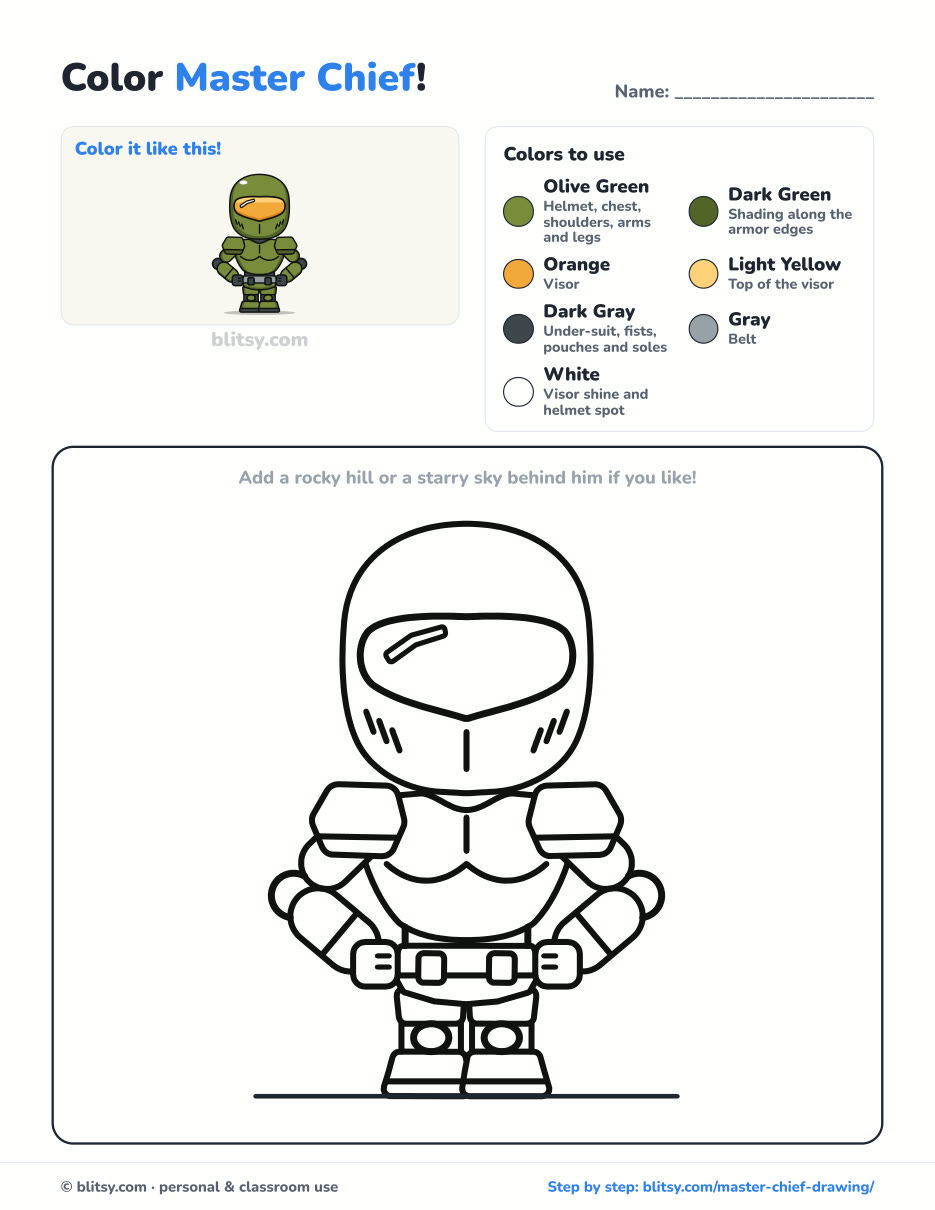
Black outlines with a colored example and the color names at the top. Ready to print and color.
⬇️ Download Coloring PageEvery step picture with its instructions and tips, to keep beside your paper while you draw.
⬇️ Download Drawing Guide📱 On a phone? Tap a download button, then open the file and choose Share → Save to Files or Print. On a computer, the PDF opens or saves straight to your Downloads folder.
Keep Master Chief Handy on Pinterest
Halo Drawing Questions From Young Artists
What is the easiest way to draw Master Chief?
Draw him as a chibi from the front. A big circle sets the helmet and a smaller oval sets the body, and the wide gold visor makes him recognizable even with very few details.
How do you draw the Master Chief visor?
Draw a wide shape across the middle of the helmet with a nearly flat top and a bottom edge that dips to a soft point. Add a thin white streak in the upper corner for shine.
What colors do you need for Master Chief?
Two olive greens for the armor, orange and light yellow for the visor, dark gray for the under-suit and fists, and a mid gray for the belt.
Is this drawing good for kids?
Yes. It's built from simple rounded shapes, and children around 7 and older can usually finish it in about 40 minutes. Smaller kids can leave out the panel lines.
Sharpen that pencil, sketch your two circles, and give your own little Spartan his first heroic stance on paper. 🪖💚
Related posts:
 How to Draw Wonder Woman Step by Step (Chibi for Kids)
 How to Draw the Hulk Step by Step (Easy Chibi for Kids)
 How to Draw Nezuko Step by Step (Cute Chibi for Beginners)
 How to Draw Iron Man Step by Step (Easy Chibi for Kids)
 How to Draw Kurama Step by Step (Easy Chibi Nine-Tails)
 How to Draw Cat Noir Step by Step (Easy Chibi Hero)
 How to Draw Goku Step by Step (Easy Chibi Version)
 How to Draw Freddy Krueger Step by Step (Cute Chibi Version)
 How to Draw Ariana Grande Step by Step (Cute Chibi Fan Art)
 How to Draw Tinkerbell Step by Step (Easy Flying Chibi)
 How to Draw a Chibi Step by Step (Easy 2-Head Method)
 How to Draw Darth Vader Step by Step (Easy Chibi Version)

