
Raccoons look like tiny burglars, and that black mask is the reason kids love drawing them. Get the mask and the ringed tail right and almost nothing else can go wrong. Here you'll learn how to draw a raccoon step by step, walking along on four short legs with its face turned to look straight at you. A circle, an oval and a few light lines hold the whole pose together before any detail goes in.
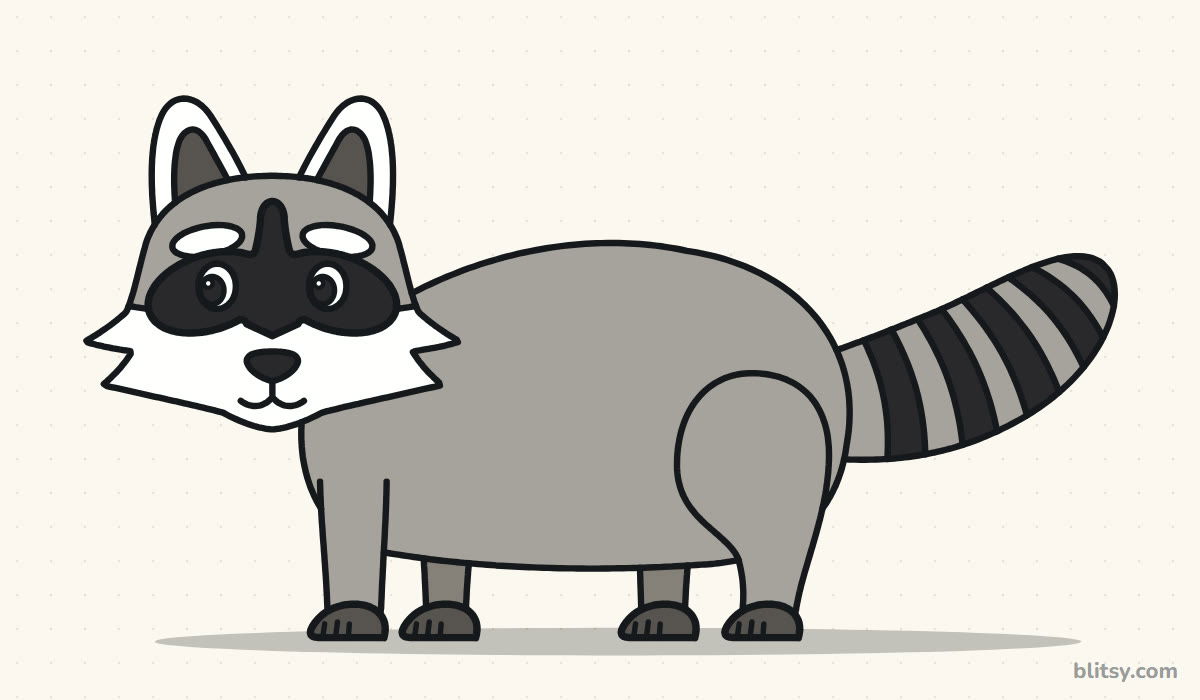
Blue lines are new in each picture. Dark gray ones came from earlier steps, and the pale blue guide shapes get erased in step 11.
Quick overview
⏱️ Time: roughly 30 to 40 minutes
🎯 Level: easy, good for kids from about 7
✏️ Steps: 12
🦝 You'll draw: a walking raccoon with a bandit mask, white eyebrows and a bushy tail with black rings
Raccoon Sketch Kit for the Kitchen Table
- An HB pencil for the light guide work
- A soft eraser (a kneaded eraser lifts guides cleanly)
- A black fineliner or felt-tip pen
- Colored pencils in gray, dark gray and black
- A sheet of white paper turned sideways
- A white gel pen for the eye shine, if you have one
This raccoon is long, so start the head close to the left edge of the page and save the right side for the tail.
How to Draw a Raccoon Step by Step
Step 1: Sketch a head circle and a ground line
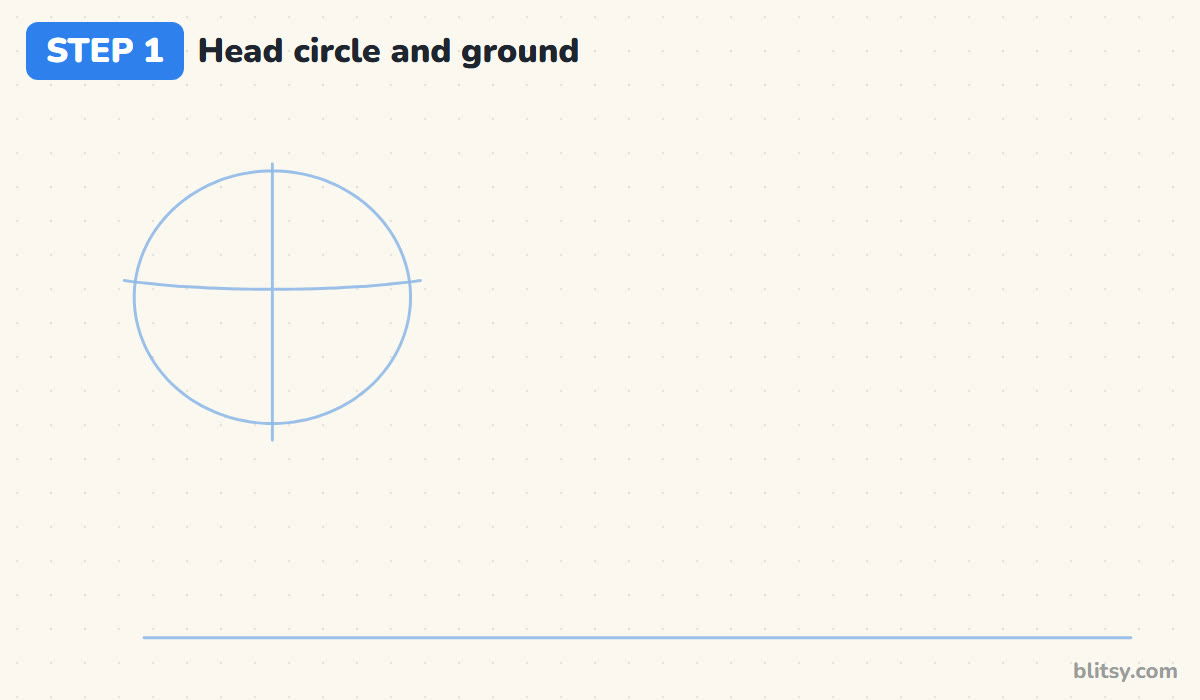
Draw a long, flat line across the bottom of your page first. Everything stands on it. Near the left end, well above the line, sketch a circle for the head. Split it with a vertical line down the middle and a gentle curve across, a little below center. The eyes will sit on that curve later.
💡 Tip: Keep your pencil light and loose. These shapes are scaffolding, not part of the final raccoon.
Step 2: Add a body oval, leg lines and a tail curve
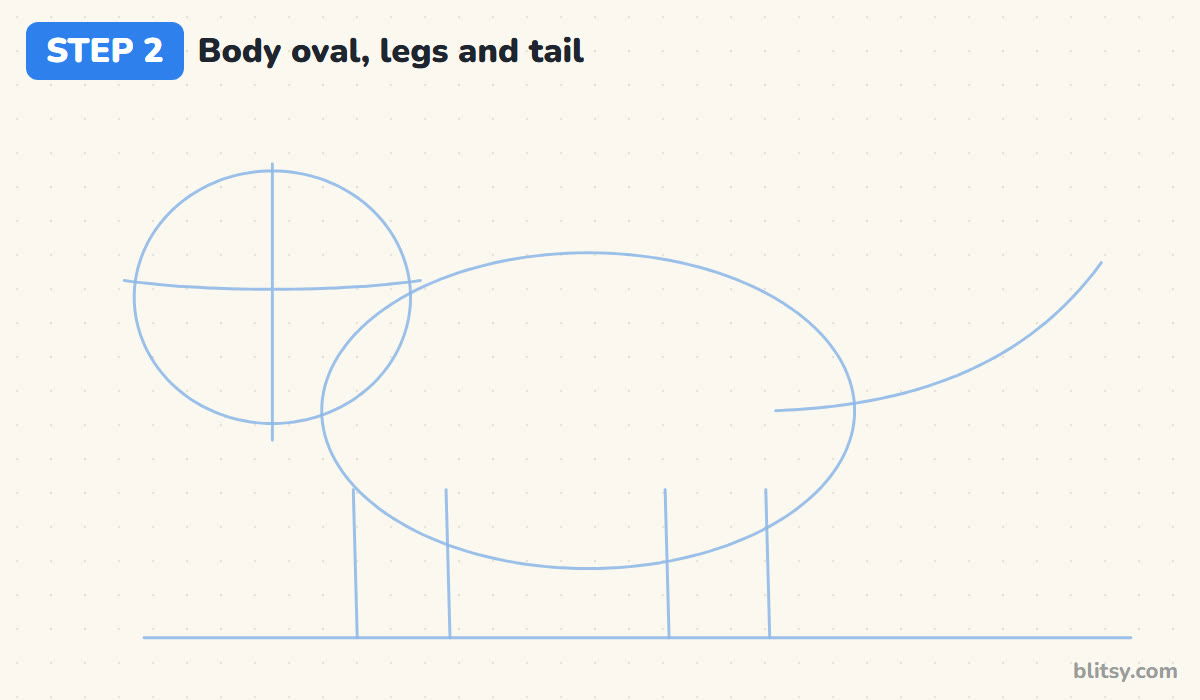
Now draw a wide oval for the body, overlapping the lower right side of the head circle. Make it about twice as wide as the head. Drop four short lines from the oval to the ground, two near the front and two near the back. Then sweep one curve from the back of the oval up to the right for the tail.
💡 Tip: Look at the gap between your four leg lines. Two close together at each end reads as a walking animal.
Step 3: Draw the head with fluffy cheek tufts
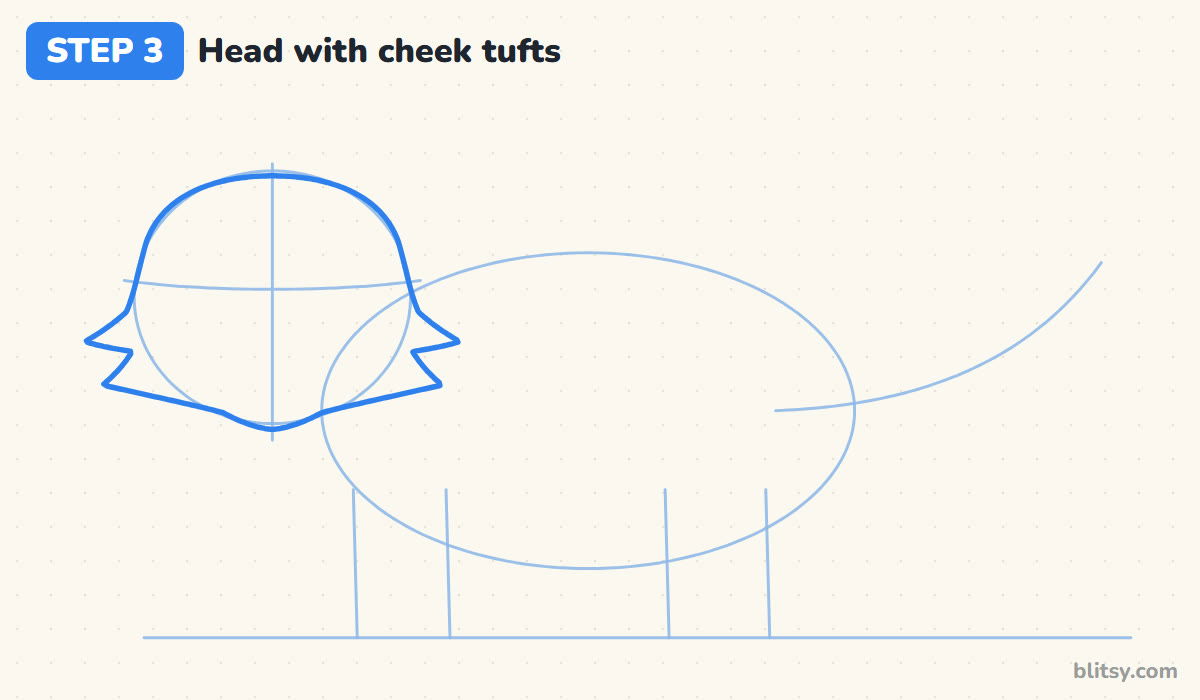
Trace the top of the circle for the forehead, then let the sides drop almost straight down. Around the cross line, pull each side out into two pointed tufts of fur. I make the lower tuft a little shorter. Finish with a soft V that ends in a narrow chin just below the circle, since a raccoon's face is pointier than a bear's.



💡 Tip: Draw one side, then copy it on the other side while the first is still fresh in your eye.
Step 4: Add two pointed ears
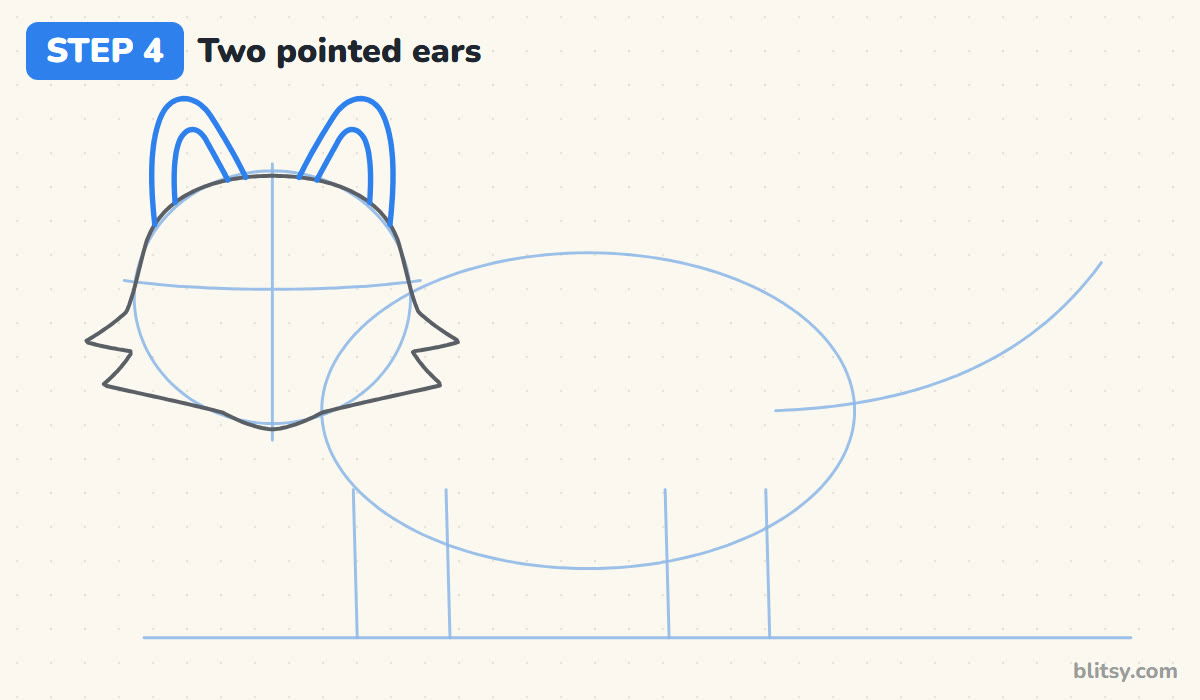
Set the ears wide apart on top of the head, near the outer edges. Each one is a tall triangle with a rounded tip. Stop the outline where it meets the head. Inside, draw a smaller copy of the same shape so there's a band between the two lines. That band becomes the white rim raccoons have around their ears.
💡 Tip: Leave a clear gap between the two ear lines. Without it, the white rim disappears when you color.
Step 5: Draw the hunched back and belly
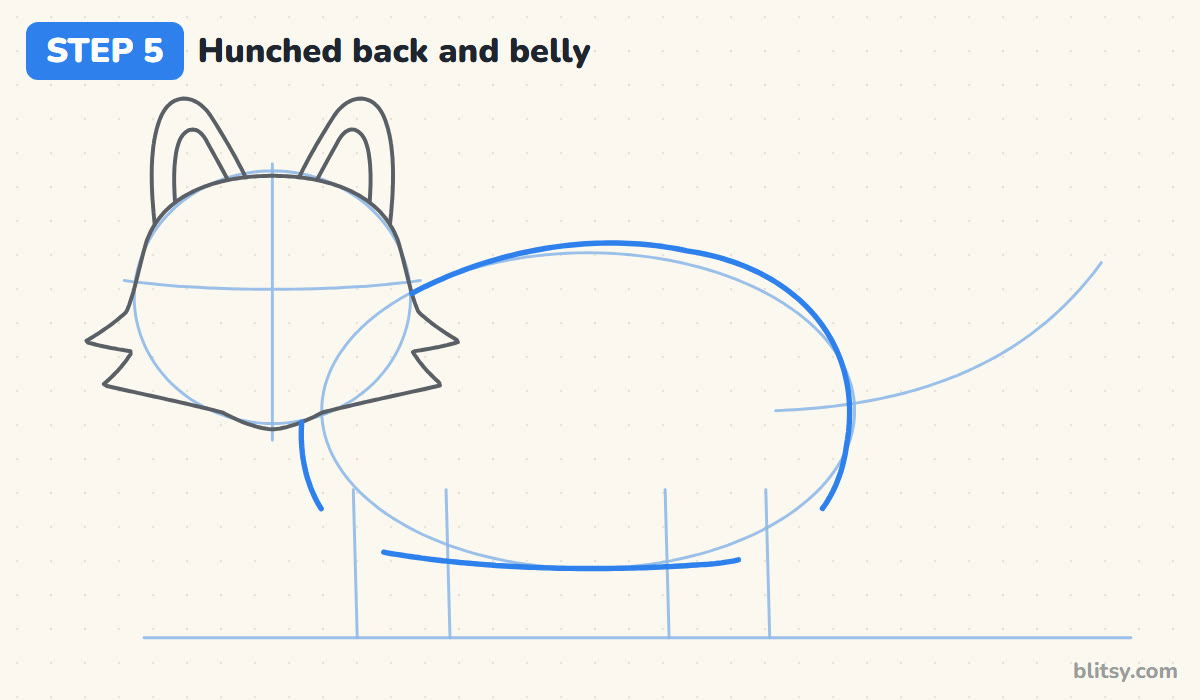
Start just behind the head and run a line up over the back. A raccoon's back is highest over the hips, not the shoulders, so let it climb as it goes right. Round it down over the rump. Then draw the belly as a long, slightly sagging curve along the bottom of the oval. Leave small gaps where the legs will cover the body.
💡 Tip: A hump near the back end is what makes this look like a raccoon and not a dog.
Step 6: Add four legs and little paws
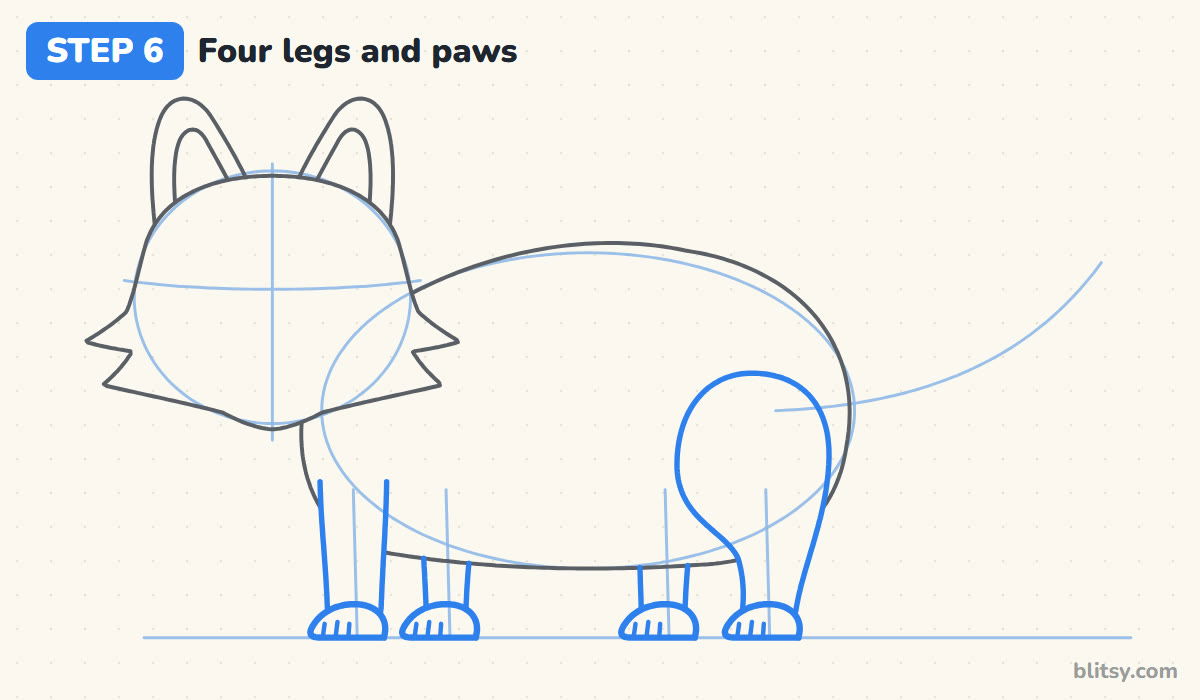
Build each leg around its guide line. The two near legs sit in front of the body, and the far legs only show below the belly. For the near back leg, I draw a big round thigh that narrows into the lower leg. Add a paw at the bottom of every leg, pointing left, with three short toe lines. Raccoon paws look a lot like small hands.
💡 Tip: Keep all four paws resting on the ground line, or your raccoon will seem to float.
Step 7: Shape the big bushy tail
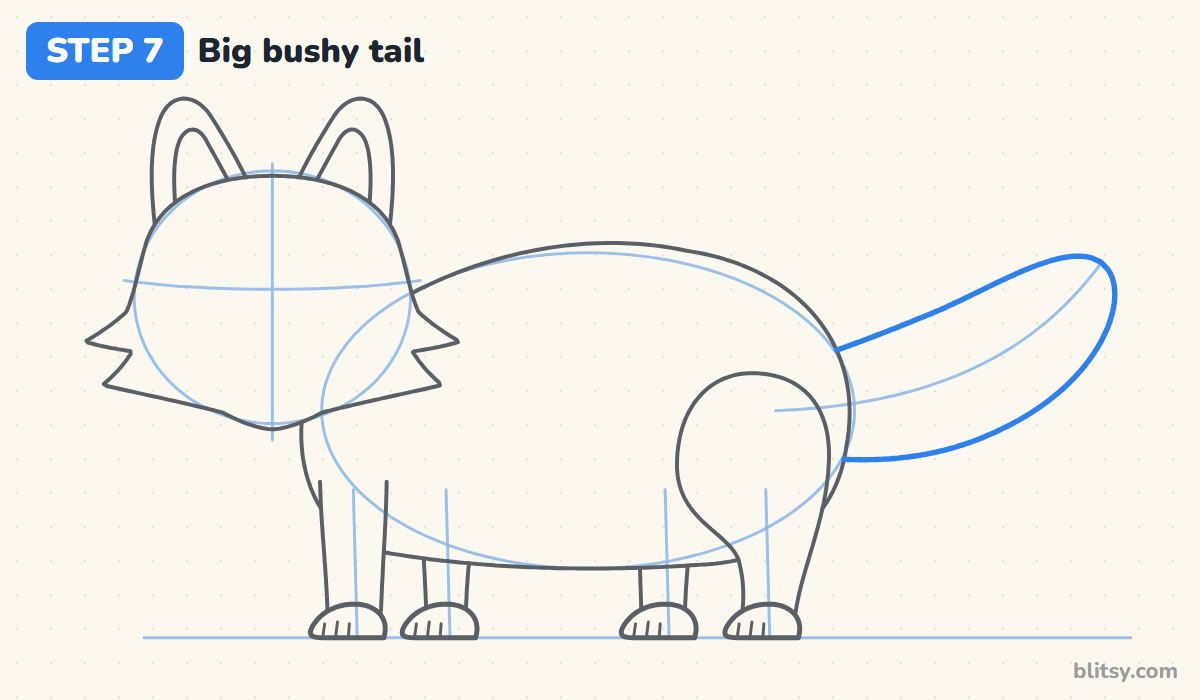
Follow the tail curve from behind the rump. Start fairly thick, get a bit fatter in the middle, then round it off at the tip like the end of a sausage. If yours looks thin and pointed, it'll read as a rat tail, so add width before you move on.

💡 Tip: Hide the base of the tail behind the body. Only draw the part you can actually see.
Step 8: Mark the rings on the tail
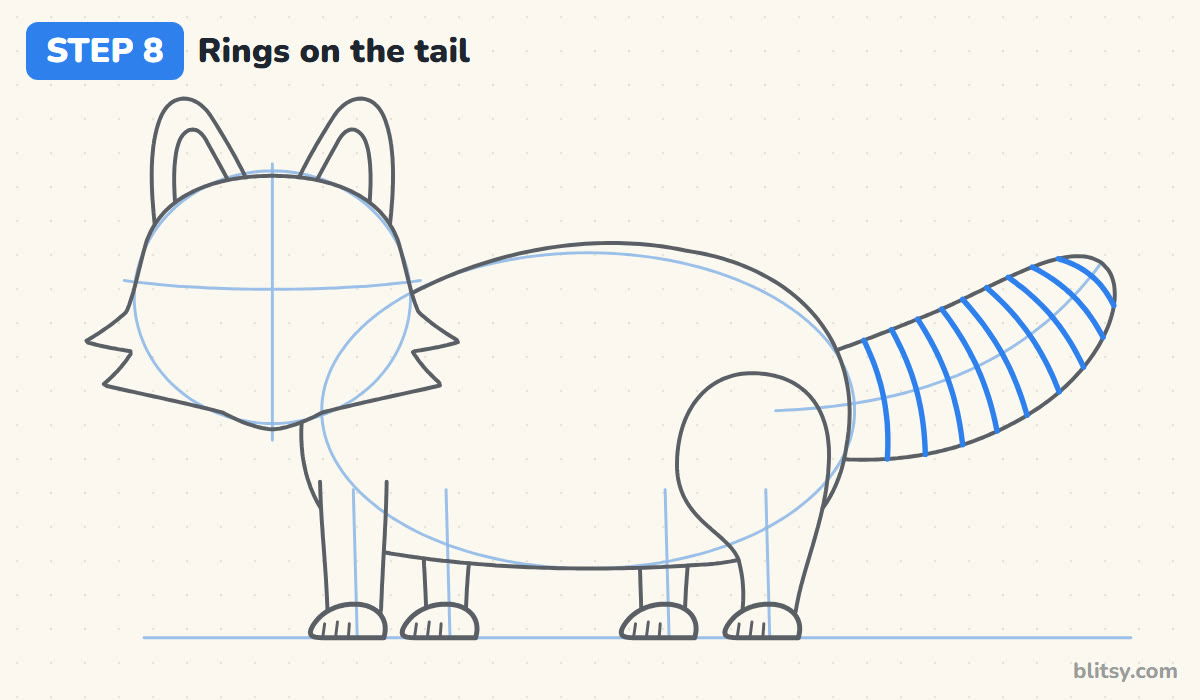
Draw curved lines across the tail to mark four black rings and a black tip. Each pair of lines makes one ring. Bend every line slightly toward the tip so the tail looks round, not flat. I keep the gray bands about as wide as the black ones.
💡 Tip: Count your bands before you ink. Four rings plus a dark tip looks balanced on this tail.
Step 9: Draw the bandit mask
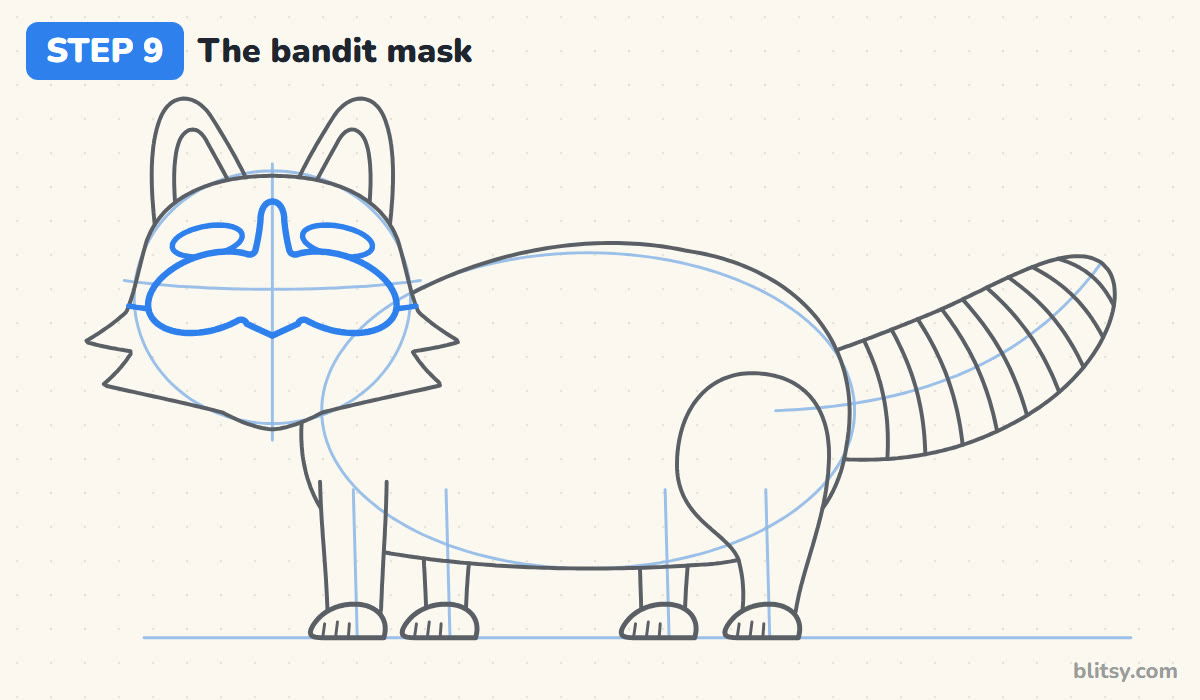
This is my favorite part. Across the cross line, draw a wide mask with a rounded patch around each eye area, the outer ends sloping down toward the cheeks. Join the patches in the middle and run a narrow stripe up the forehead. Above each patch, draw a flat oval for the white eyebrow. Then add a curve under the mask on each side where the white lower face begins.
💡 Tip: Make the mask wider than you think. A small mask looks like sunglasses.
Step 10: Add the eyes, nose and mouth
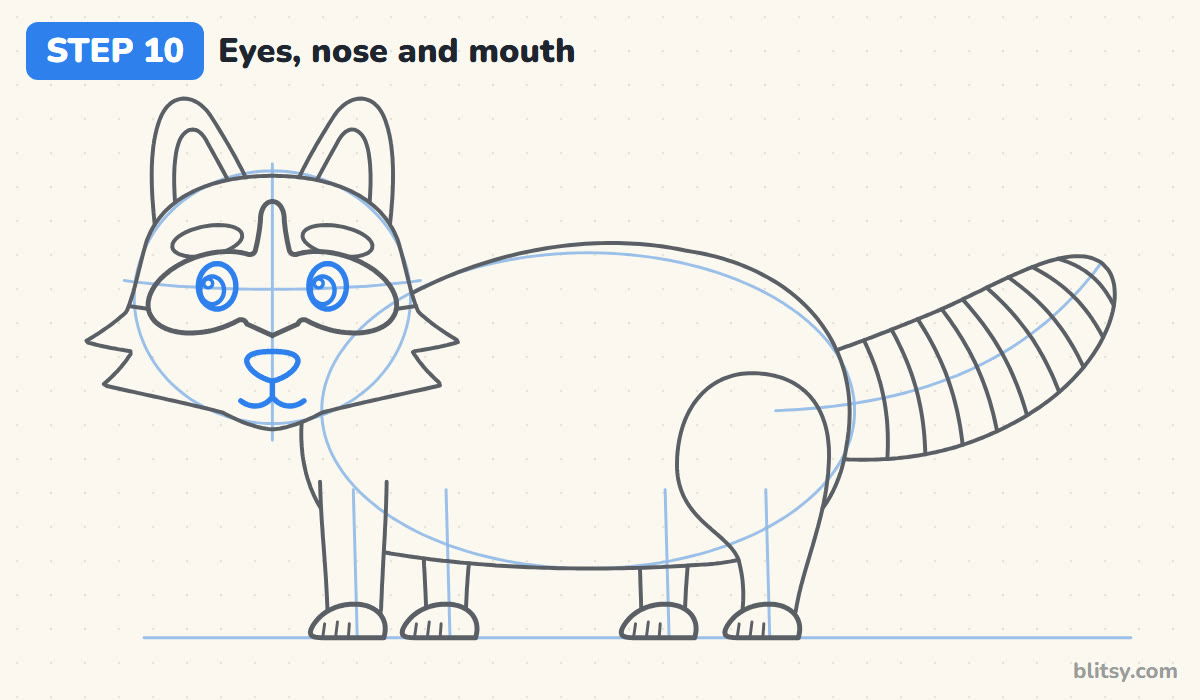
Inside each mask patch, draw an upright oval eye. Put a smaller dark oval in each, nudged to the left, plus a tiny circle for the shine. Below the mask, draw a rounded triangle nose with a short line dropping into a soft W for the mouth.
💡 Tip: Nudge both pupils the same way. It makes the raccoon look curious instead of cross-eyed.
Step 11: Ink the lines and erase the guides
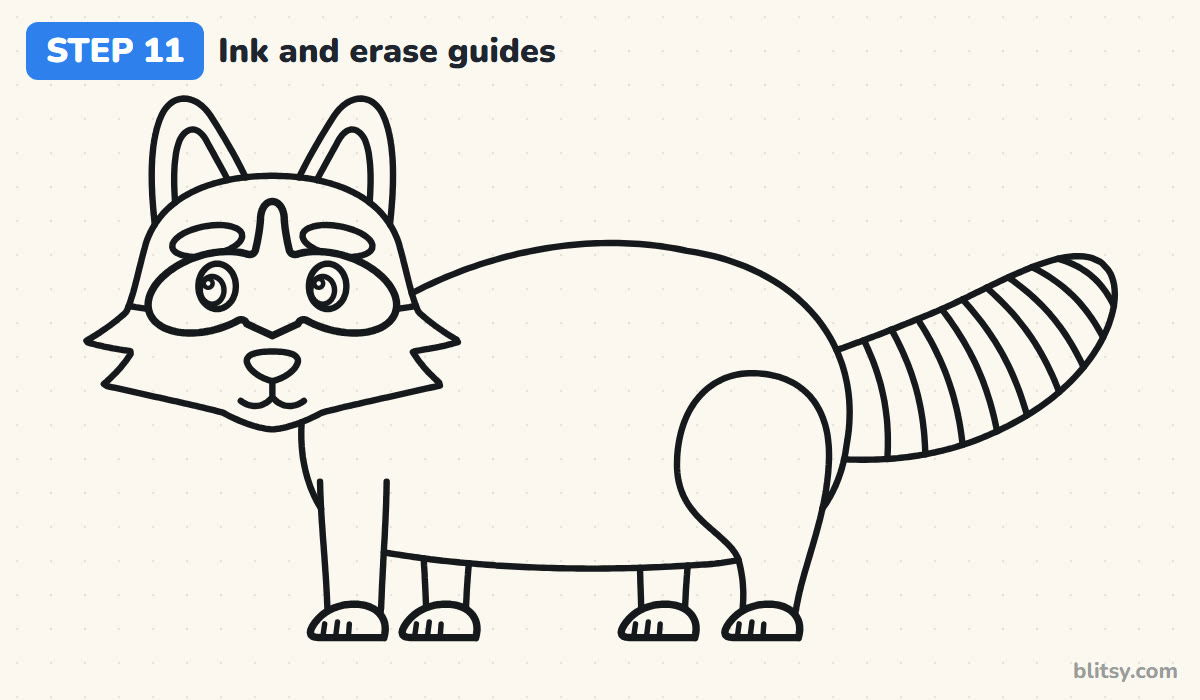
Go over every line you want to keep with the black pen. Skip the circle, the oval, the leg lines, the tail curve and the ground. Let the ink dry for a minute. Then erase all the guides. Most beginners erase too soon and drag a gray smear across the face.
💡 Tip: Use a lighter hand on the toe lines and tail rings than on the outer outline.
Step 12: Color your raccoon
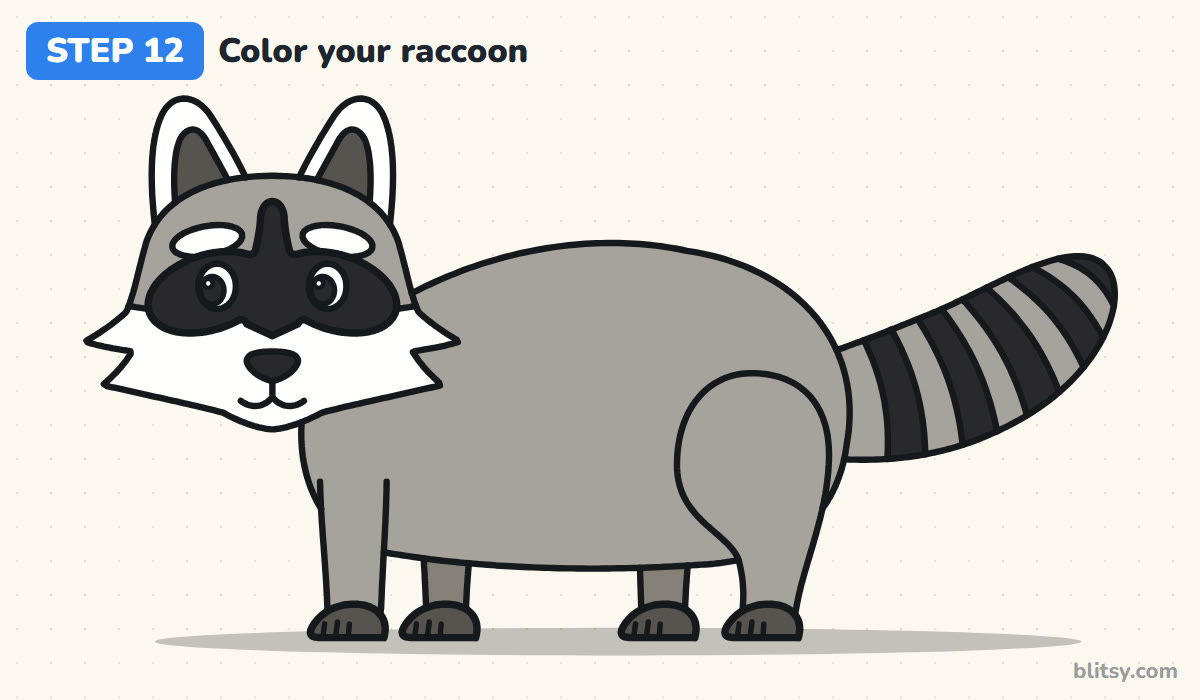
Shade the head, body, near legs and the gray tail bands in a soft gray. A slightly darker gray on the two far legs pushes them back. Fill the mask, tail rings, nose and pupils with black, and give the paws and inner ears dark gray. I leave the ear rims, eyebrows and lower face as clean white paper.
💡 Tip: Color the black parts last so your hand doesn't drag them into the white face.
Raccoon Sketches That Turn Into Cats or Rats
- A mask that's too thin. A narrow strip across the eyes looks like a blindfold. Give each eye a big rounded patch and slope the ends down toward the cheeks.
- Skipping the white around the mask. Black on gray gets lost. The white eyebrows and the white lower face are what make the mask jump out.
- A skinny tail. A thin tail turns your raccoon into a rat. Keep it thick almost all the way to a rounded tip.
- A flat, straight back. Raccoons are hunched, with the back highest over the hips. A level back reads as a cat or a dog.
- Pupils pointing different ways. Shift both the same way, or the face looks confused.
Ideas for Giving Your Raccoon a Story
Once you can draw this raccoon from memory, put it somewhere. Stand it next to a tipped-over trash can, add a full moon behind it, or tuck a small apple between its front paws. If you want another small, clever animal to practice next, try the rat drawing tutorial, or go bigger with the bear drawing tutorial, which uses the same circle and oval start.
Free Raccoon Coloring Page and a Printable Drawing Guide
Prefer pencil and paper over a screen? The raccoon coloring page has a small colored example and a color key at the top, so kids know which parts go black, gray or white, plus a large clean outline below. The step-by-step PDF guide puts all 12 steps and tips on a few printable pages. Both print well on Letter or A4.
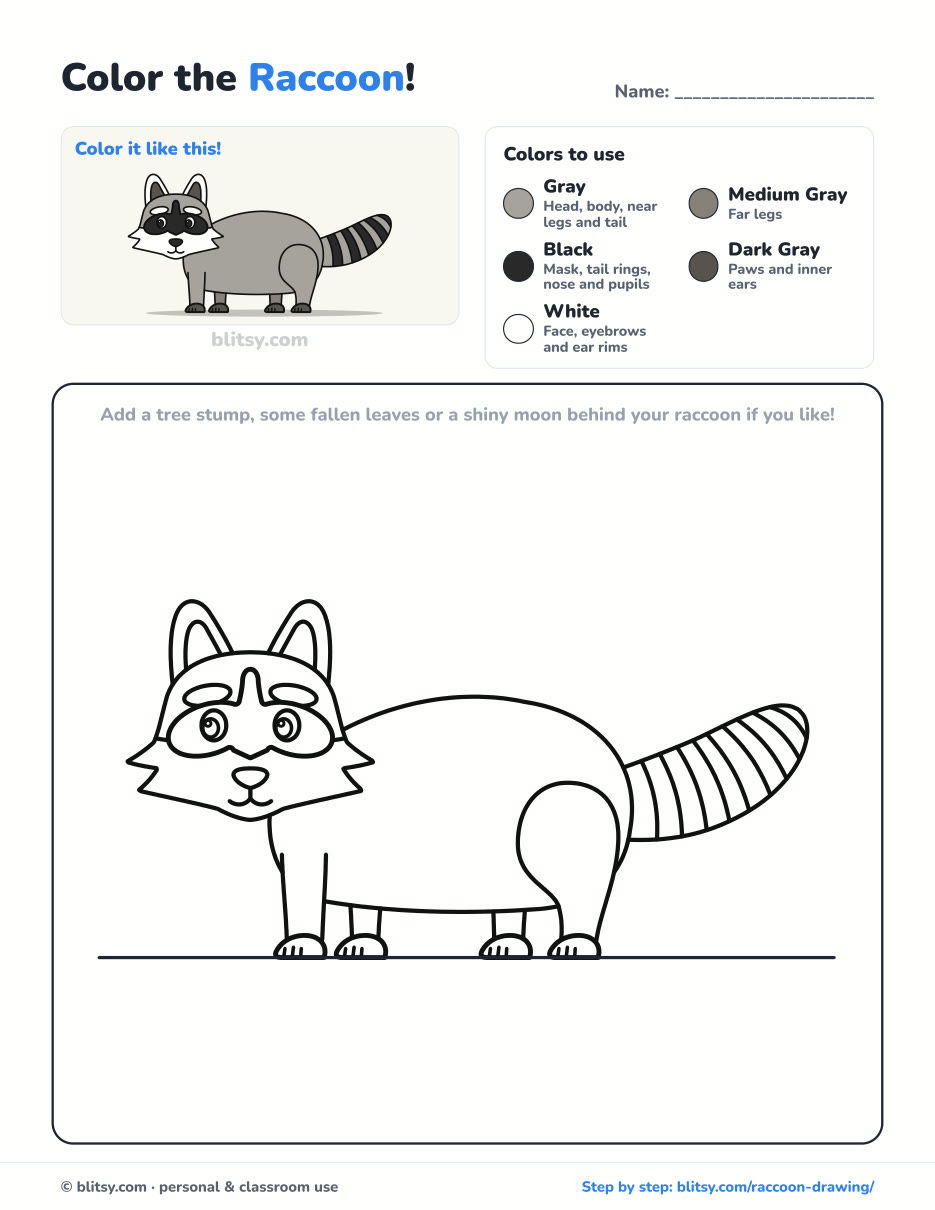
Black outlines with a colored example and the color names at the top. Ready to print and color.
⬇️ Download Coloring PageEvery step picture with its instructions and tips, to keep beside your paper while you draw.
⬇️ Download Drawing Guide📱 On a phone? Tap a download button, then open the file and choose Share → Save to Files or Print. On a computer, the PDF opens or saves straight to your Downloads folder.
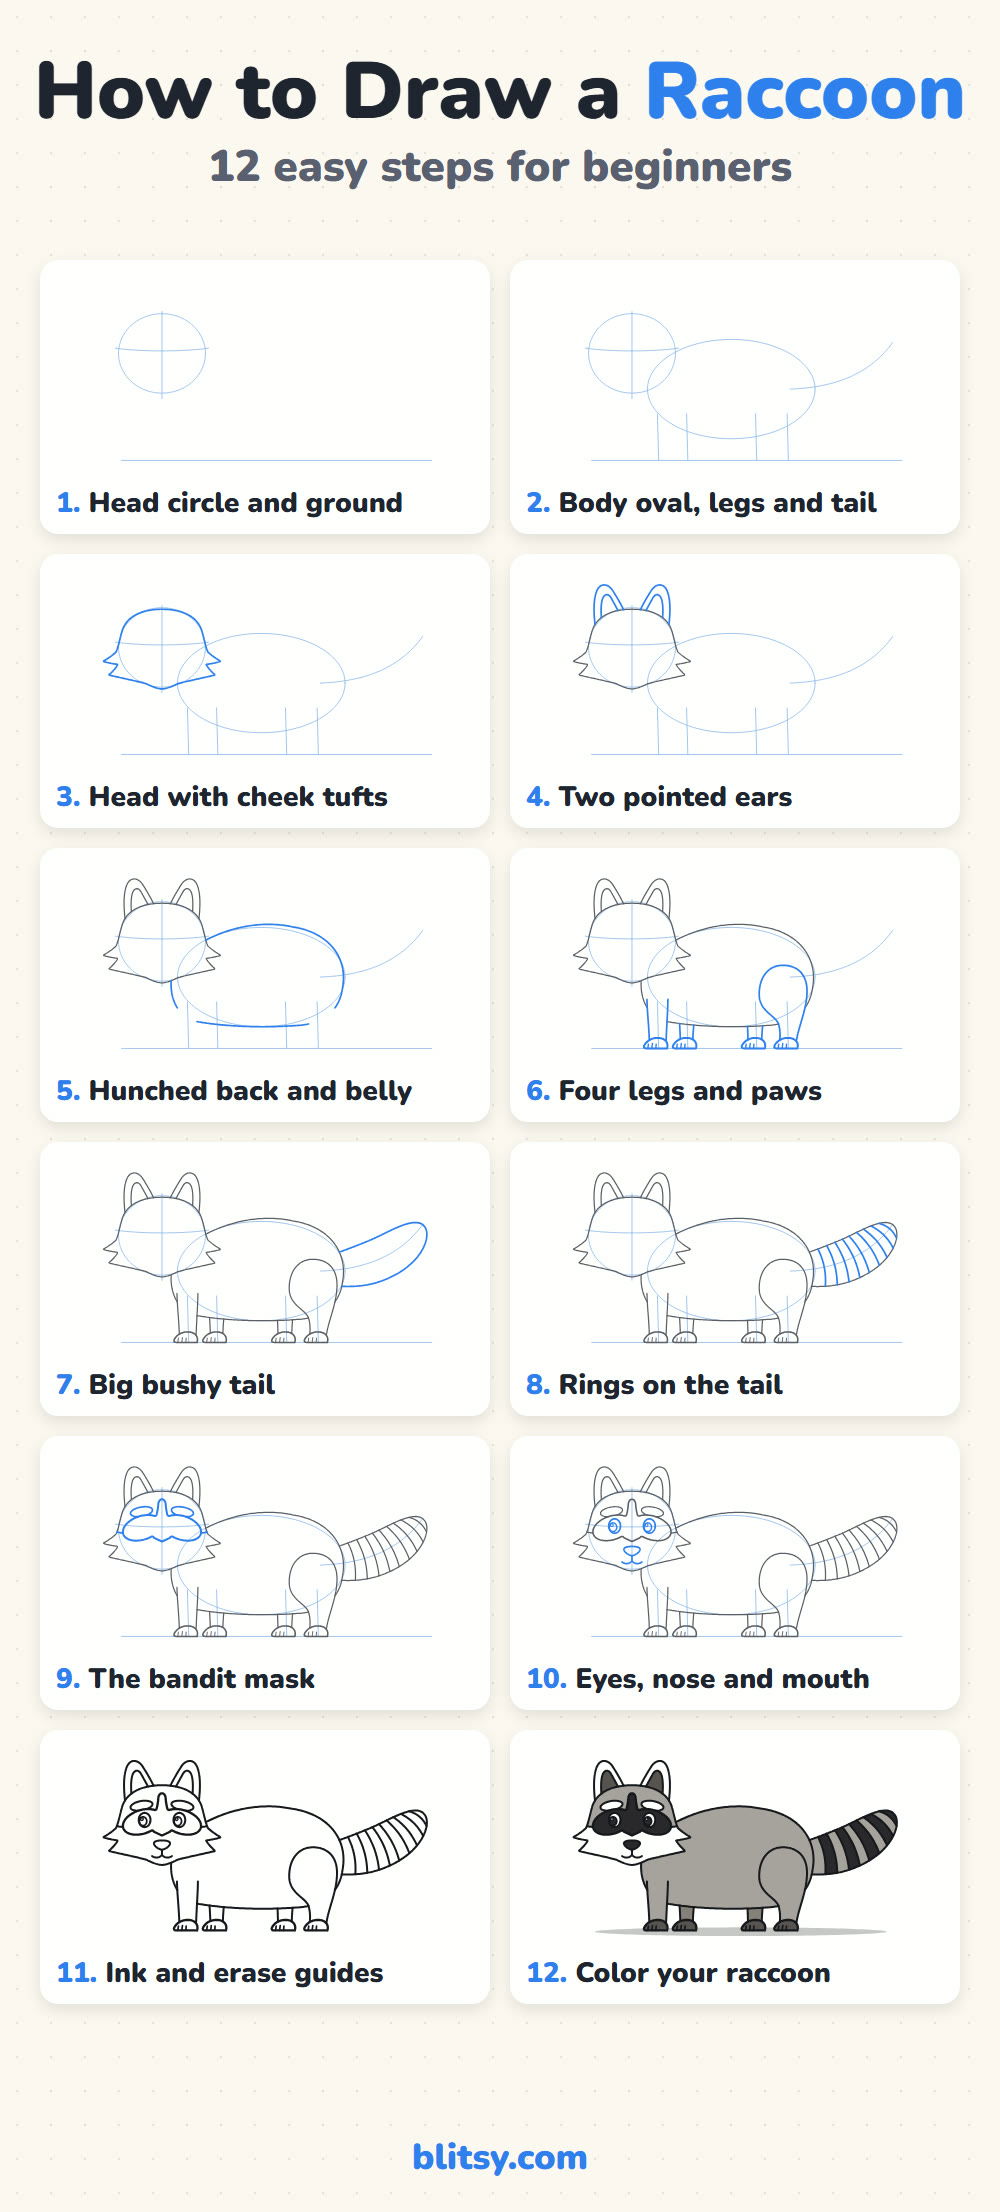
All 12 Raccoon Steps on One Pin
Raccoon Done? Draw a Hero or a Cartoon Friend Next
All of these are step-by-step tutorials. Most of them draw a well-known character in a simple chibi or cartoon style.
- Olaf Drawing: Draw the grinning snowman from Frozen with this how to draw Olaf step by step lesson.
- Luffy Drawing: The Luffy drawing tutorial finishes with his straw hat, the scar under his eye and a huge grin.
- Hulk Drawing: A cheeky chibi Hulk clenches both fists in the Hulk drawing step by step guide.
- Nezuko Drawing: One circle starts the small Nezuko in this chibi Nezuko drawing tutorial.
- Wonder Woman Drawing: Give the heroine her tiara and lasso with the how to draw Wonder Woman lesson.
- Todoroki Drawing: Ice on one side, fire on the other: the Todoroki drawing tutorial keeps the face quiet in between.
- Rosa Parks Drawing: The Rosa Parks drawing tutorial is a gentle portrait with soft glasses and a gold brooch.
- Anime Girl Drawing: Practice big anime eyes in this anime girl drawing step by step lesson.
- Phoenix Drawing: A fire bird with raised wings is the goal of the phoenix drawing tutorial.
- Fortnite Drawing: Draw the piñata llama from the game with this Fortnite drawing tutorial.
- Mario Drawing: The how to draw Mario lesson gives you a chibi plumber in his cap, waving hello.
Raccoon Drawing Questions From Young Artists
What is the easiest way to draw a raccoon?
Start with a circle for the head and a long oval for the body, then add a curved line for the tail. Draw the outline over those guides, and save the mask and the tail rings for the end.
How do you draw a raccoon face?
Draw a wide head with pointed cheek tufts, then a black mask across the eyes with white eyebrows above it. Keep the lower face white and add a small black nose.
How many rings does a raccoon tail have?
Real raccoons usually show around four to seven dark rings. For a simple drawing, four rings plus a dark tip looks clear and balanced.
How long does it take to draw a raccoon?
Plan on 30 to 40 minutes with ink and color. The mask and the tail rings take the most care, so don't rush those two steps.
Pick up your pencil, give that little bandit its mask, and decide what it's sneaking off with tonight. 🦝🌙
Related posts:
 How to Draw a Car Step by Step (Easy Drawing for Beginners)
 How to Draw a Whale Step by Step (Easy for Beginners)
 How to Draw a Rat Step by Step (Easy for Beginners)
 How to Draw an Arctic Fox Step by Step (Easy for Beginners)
 How to Draw Olaf Step by Step (Easy for Beginners)
 How to Draw a Lion Step by Step (Easy for Beginners)
 How to Draw a Ladybug Step by Step (Easy for Beginners)
 How to Draw a Dog Step by Step (Easy Side View for Beginners)
 How to Draw a Leopard Step by Step (Easy for Beginners)
 How to Draw a Light Bulb Step by Step (Easy for Beginners)
 How to Draw a Crow Step by Step (Easy for Beginners)
 How to Draw an Eagle Step by Step (Easy for Beginners)

