
Three heads sounds like three times the work, but it really comes down to spacing. In Greek myths Cerberus is the giant dog guarding the gates of the underworld, yet nothing stops us from turning him into a friendly little pup. Below I'll walk you through how to draw Cerberus step by step, beginning with a fan of light lines that tells each head exactly where to sit. One head naps, one pants with its tongue out, and one has just heard something interesting.
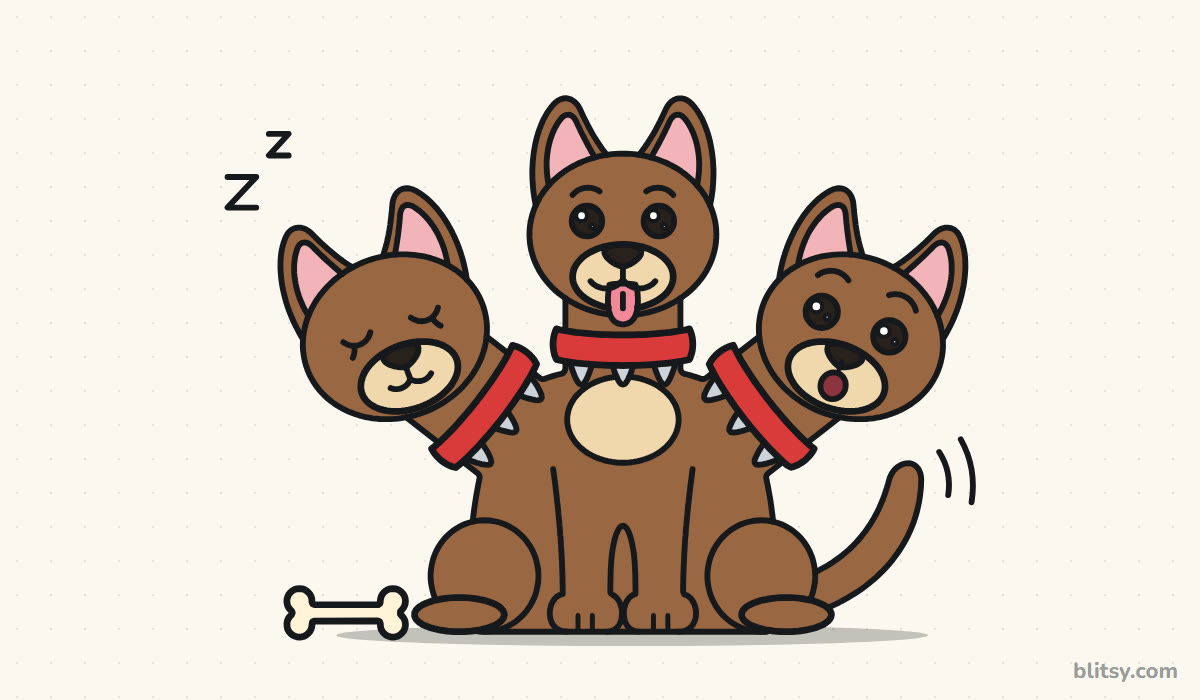
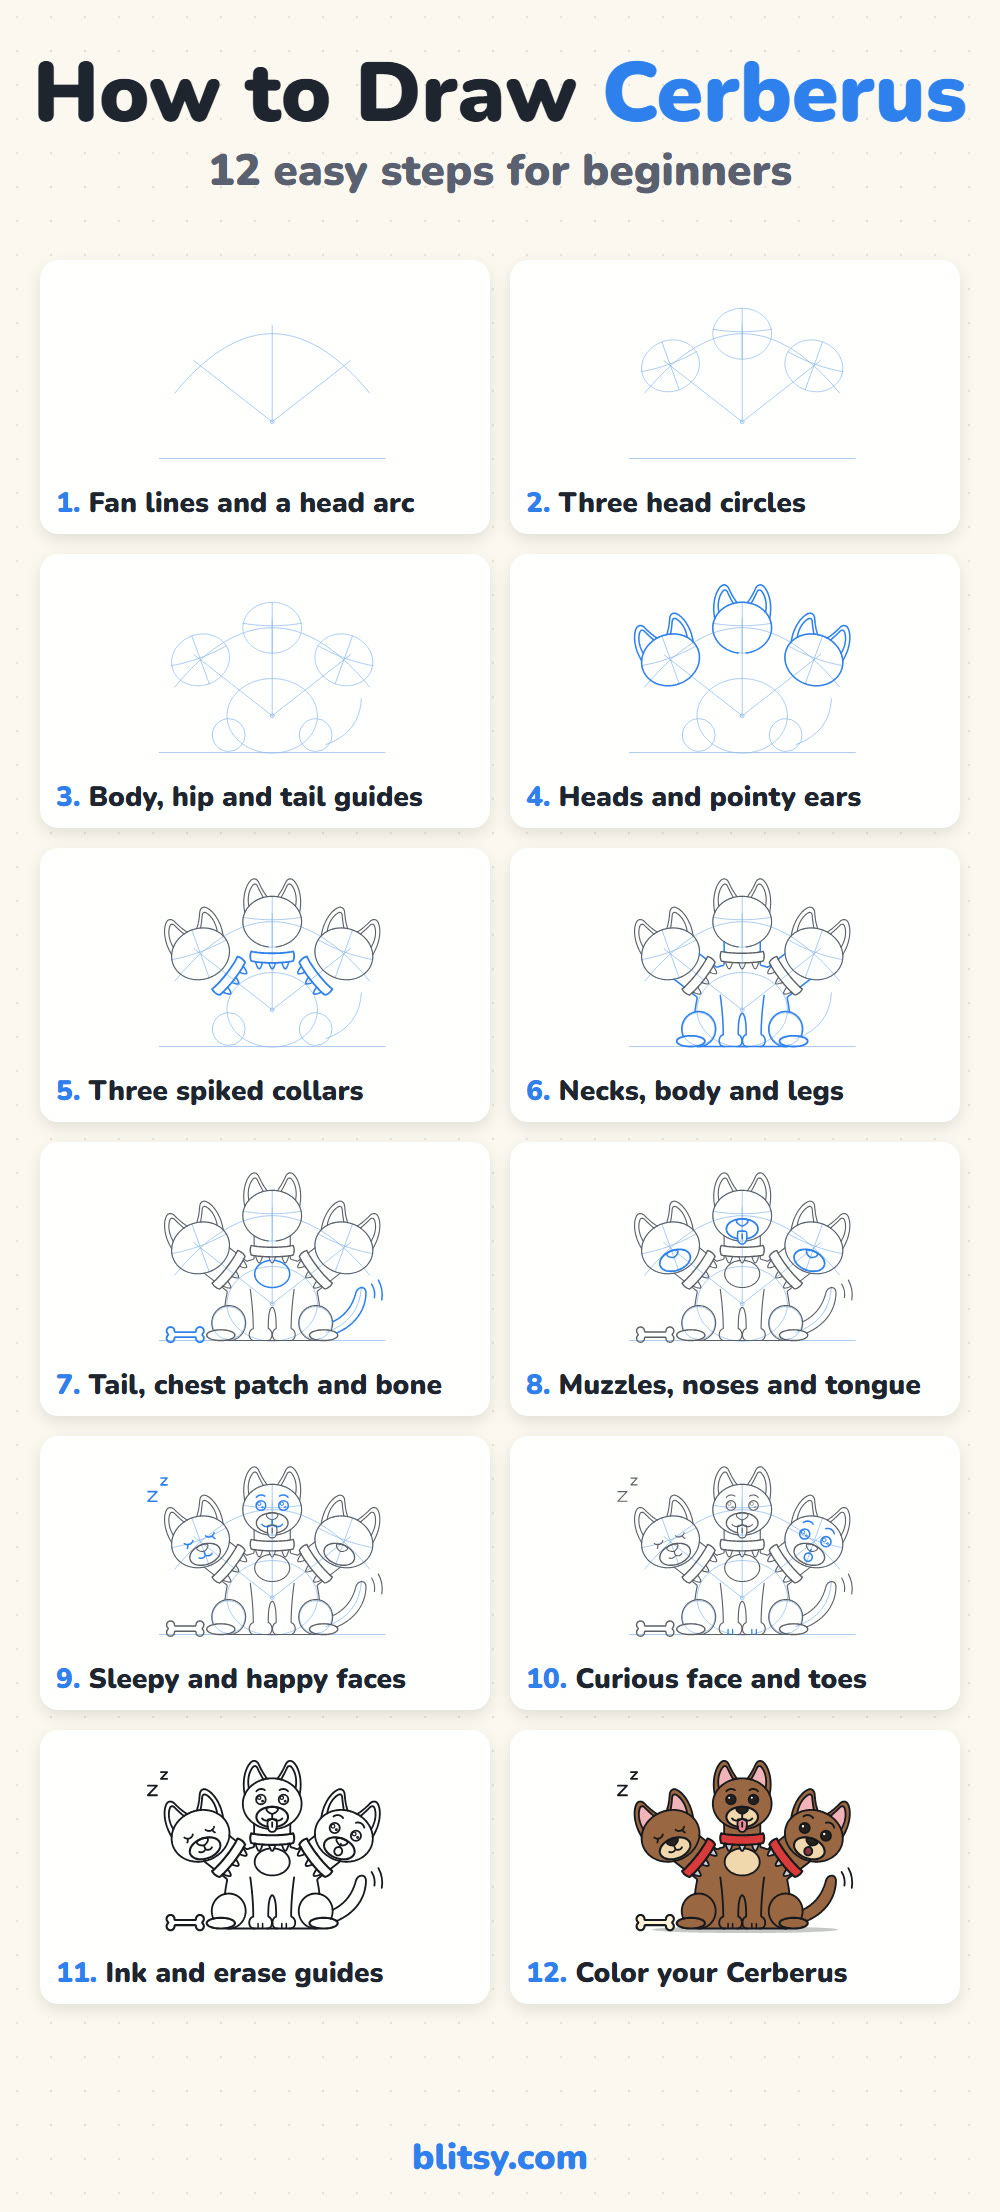
Three heads mean lots of lines, so each picture paints only that step's new lines blue and turns the older ones gray. Copy the blue part, compare, then move on.
Quick overview
⏱️ Time: about 40 minutes with coloring
🎯 Level: easy to medium, good for kids around 7 and up
✏️ Steps: 12
🐶 You'll draw: a sitting puppy Cerberus with three heads, three collars and a bone
Three-Headed Pup Drawing Kit
- A regular pencil for the guide lines
- A soft eraser that doesn't smear
- A black marker or fineliner
- Colored pencils or crayons in brown, light tan, pink plus red
- Gray for the collar spikes and cream for the bone
- Printer paper turned sideways
Turn the paper sideways, because three heads in a row need more width than height.
How to Draw Cerberus Step by Step
Step 1: Draw fan lines and a head arc
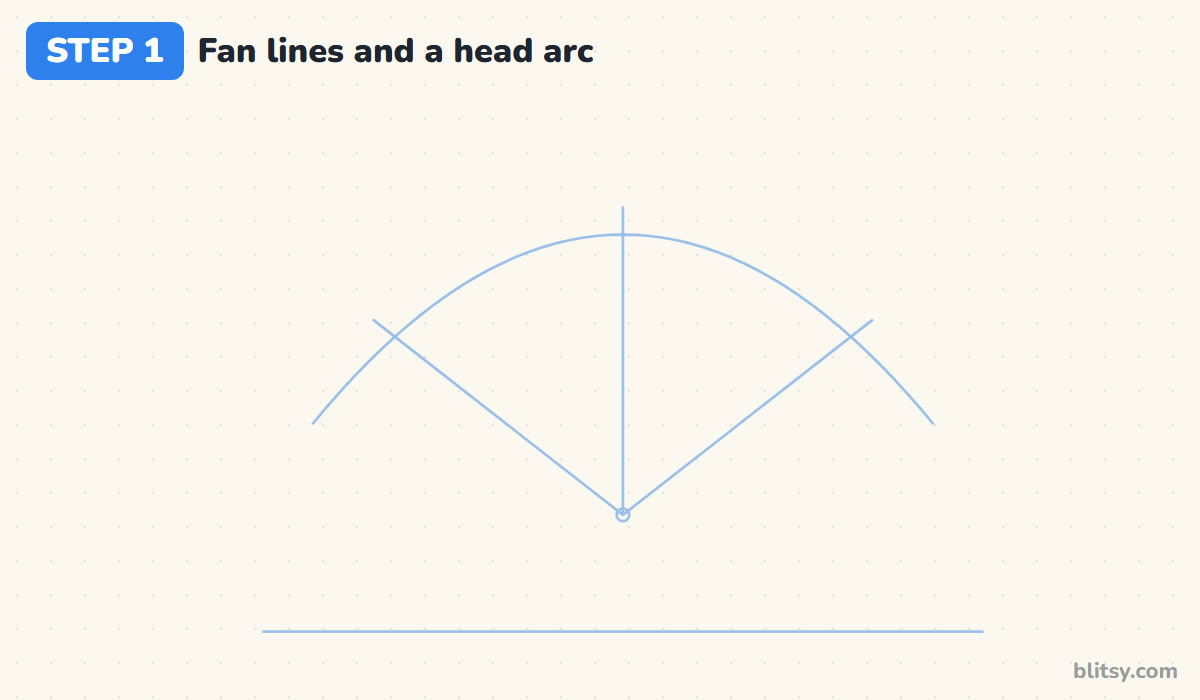
Start with a light ground line near the bottom of the page. A little above the middle, put a small dot: that's the chest. From the dot, draw three straight lines like the ribs of an open fan, one straight up and one leaning out to each side. Then sketch a wide arch, like a rainbow, that crosses all three lines.
💡 Tip: Keep the two side lines at the same slant. If one leans more, that head will look like it's falling off.
Step 2: Place three head circles on the arc
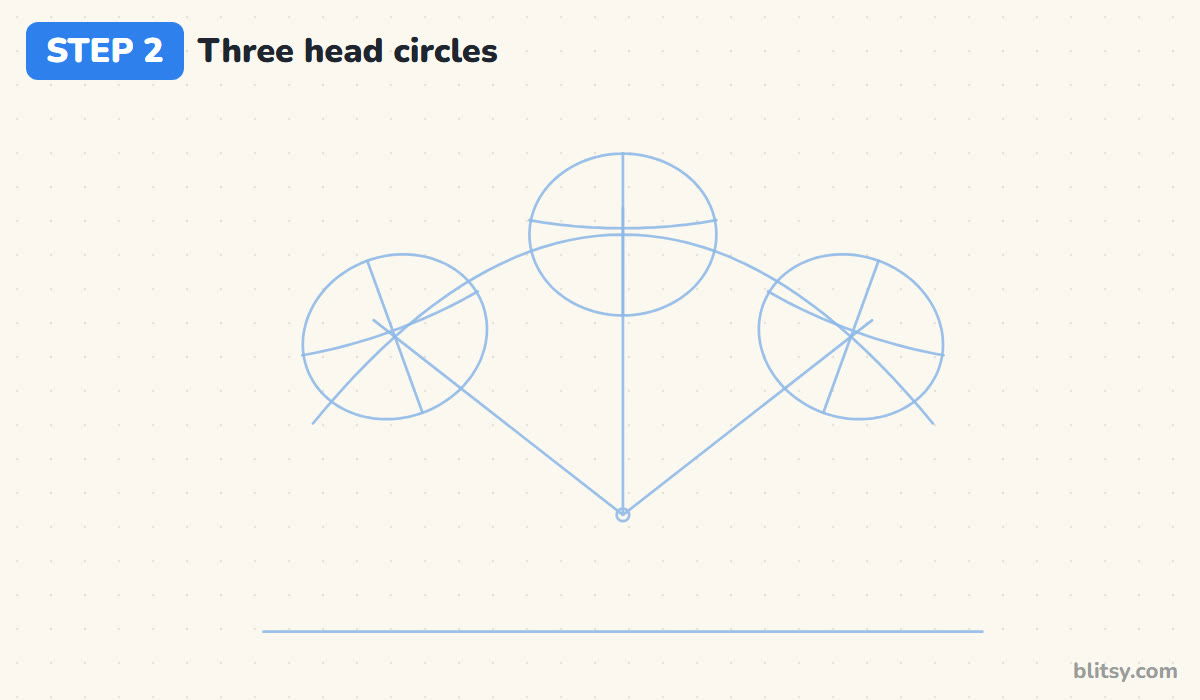
Where each fan line meets the arch, draw an oval for a head. All three are the same size, and the gaps between them should be about a third of a head wide. Add cross lines in each oval. On the side heads, tilt the cross lines outward a little, because those heads lean away from the middle one.
💡 Tip: Heads touching each other? Slide the side ovals farther down the arch instead of making them smaller.
Step 3: Add guides for the body, hips and tail
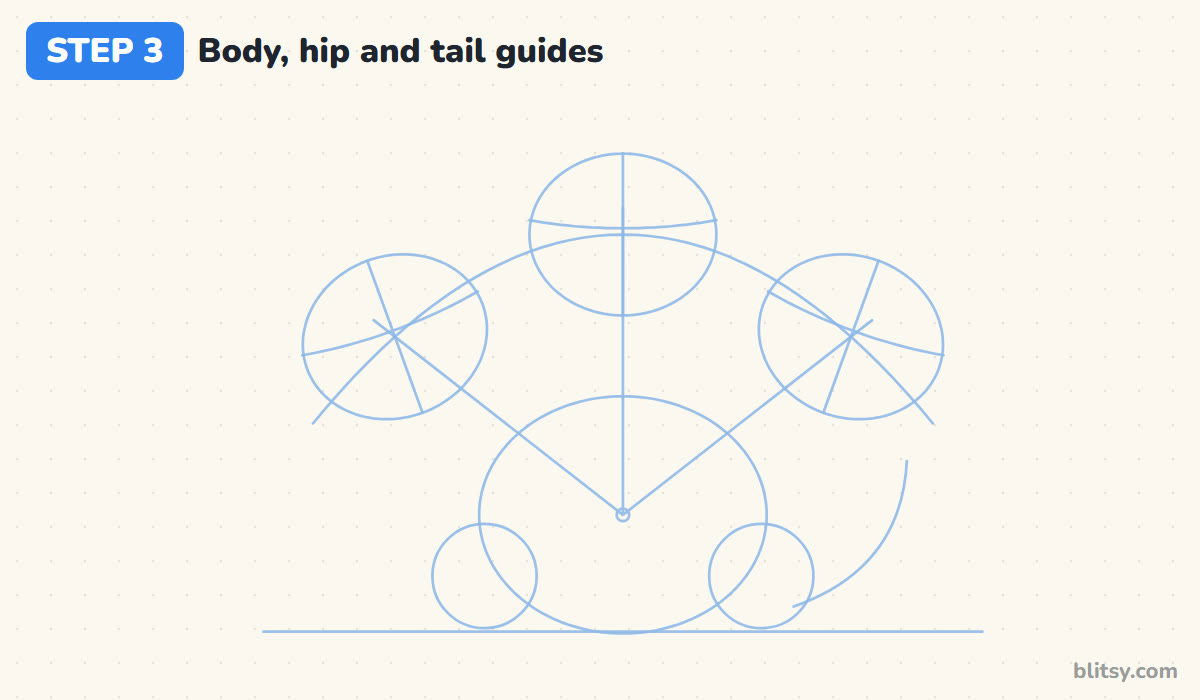
Under the heads, draw a big round oval for the body that sits on the ground line. Its top should cover the fan dot. At the bottom corners, add two circles for the back hips, and sketch one curved line rising on the right for the tail. I keep it wide on purpose, since a thin body under three heads looks top heavy.




💡 Tip: Let the hip circles poke out past the body oval a little. That bulge is what makes the pup look like it's sitting.
Step 4: Outline the heads and pointy ears
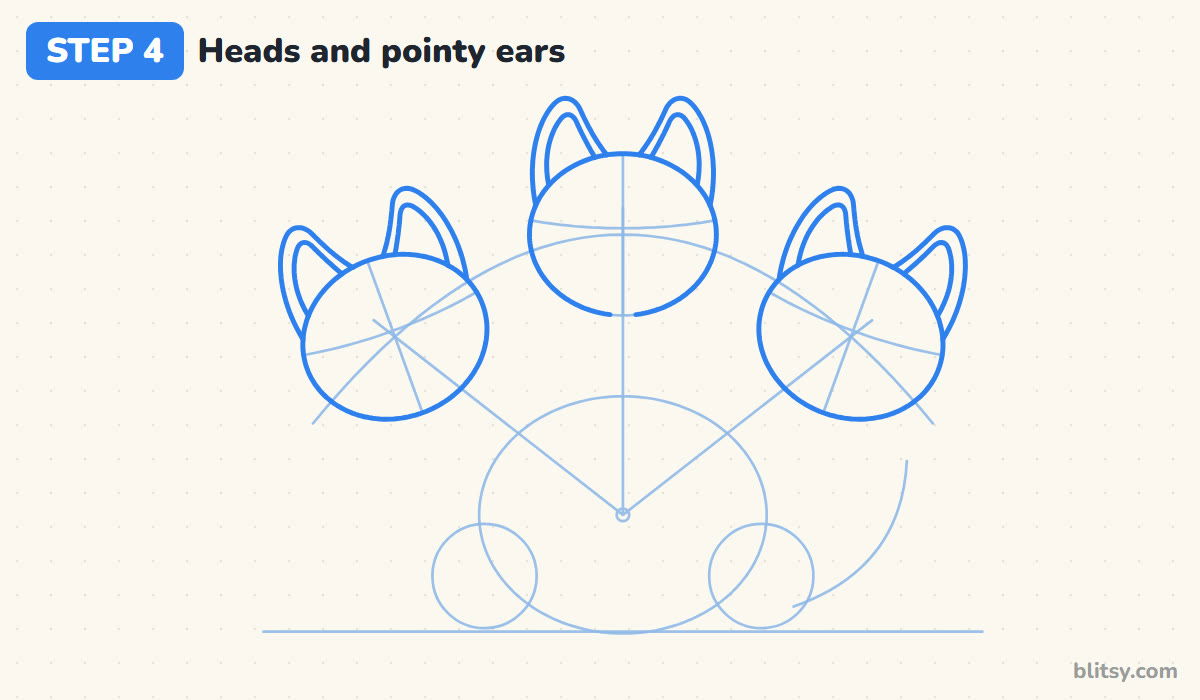
Trace each head oval with a firmer line. On top of every head, draw two pointy ears with rounded tips and a smaller ear shape inside each one. The ears on the side heads tilt along with the head. Leave a tiny gap at the bottom of the middle head. A tongue will hang over that spot later.
💡 Tip: Round off the ear tips. Sharp points make the dog look fierce, and we want friendly.
Step 5: Draw three spiked collars
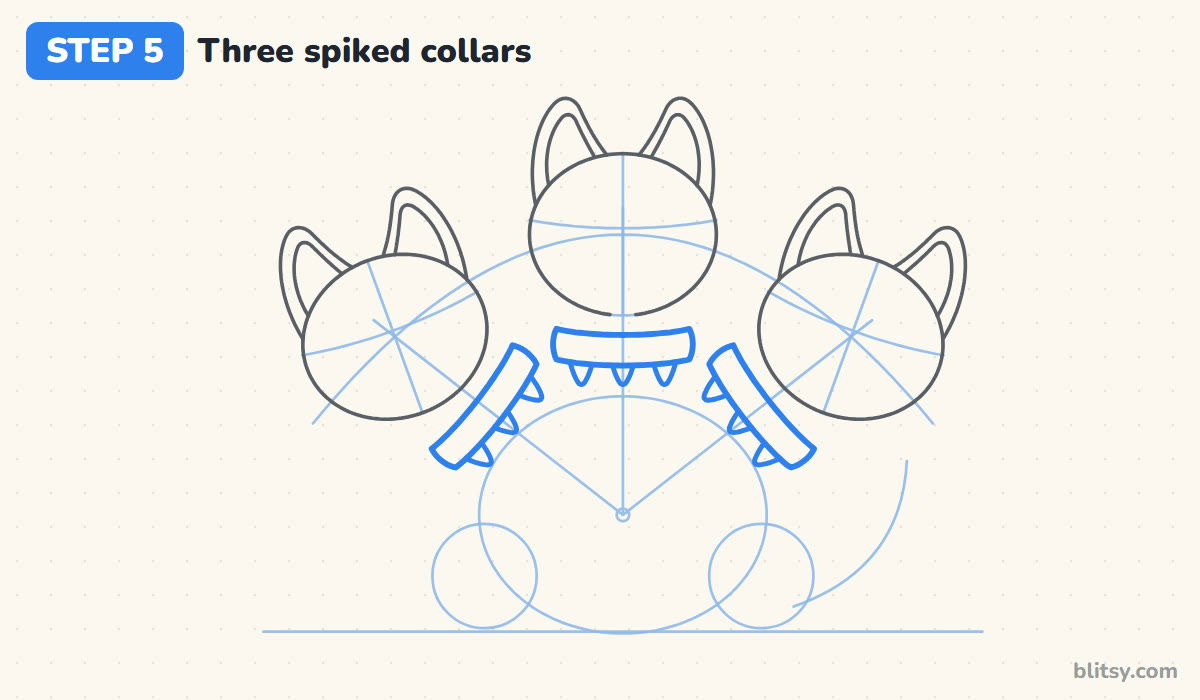
Just under each head, draw a short curved band across the fan line. That's a collar. The side collars follow the slant of their fan lines, so they look tilted. Hang three small rounded spikes from the bottom edge of each band. Collars come before necks so the neck lines can just stop at them.
💡 Tip: Space the three spikes evenly by drawing the middle one first.
Step 6: Connect the necks, body and legs
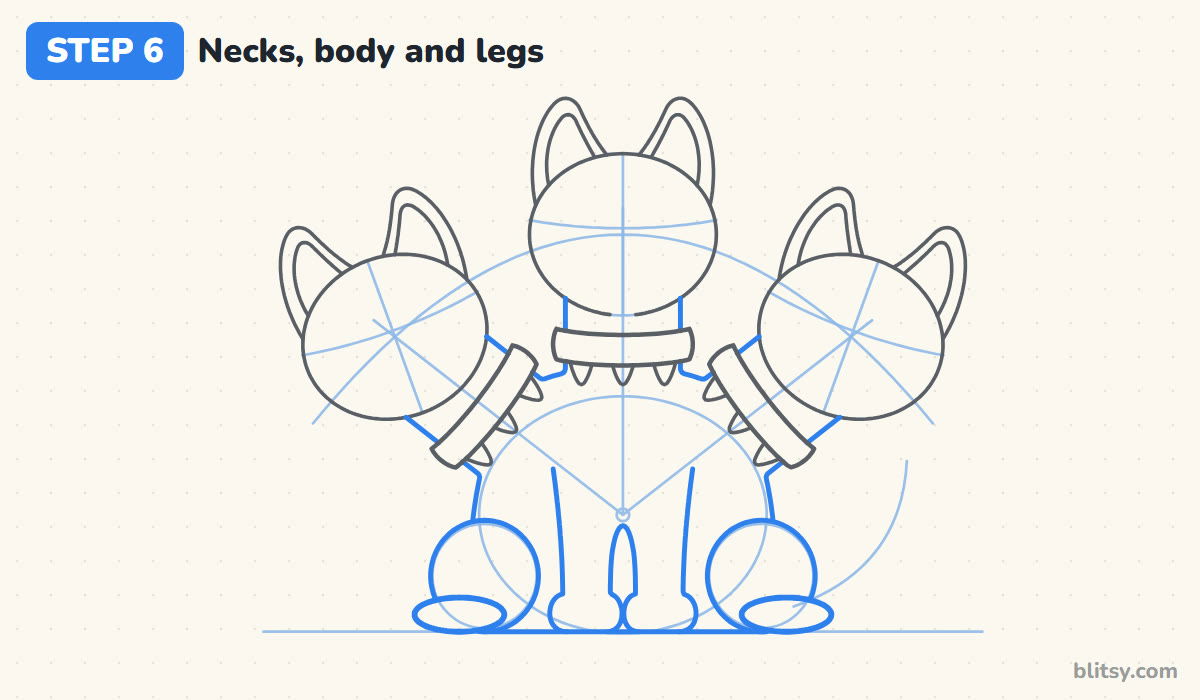
Now join everything. Run two short lines from each head down to its collar, then from the collars into the shoulders. Curve the outline of the body down around the hips to the ground. Draw the round hips, a flat oval foot in front of each one, and two front legs with chunky paws in the middle. Keep the necks short and thick.
💡 Tip: Most beginners leave a dip between the necks that's too deep. A shallow little curve reads better.
Step 7: Add the tail, chest patch and a bone
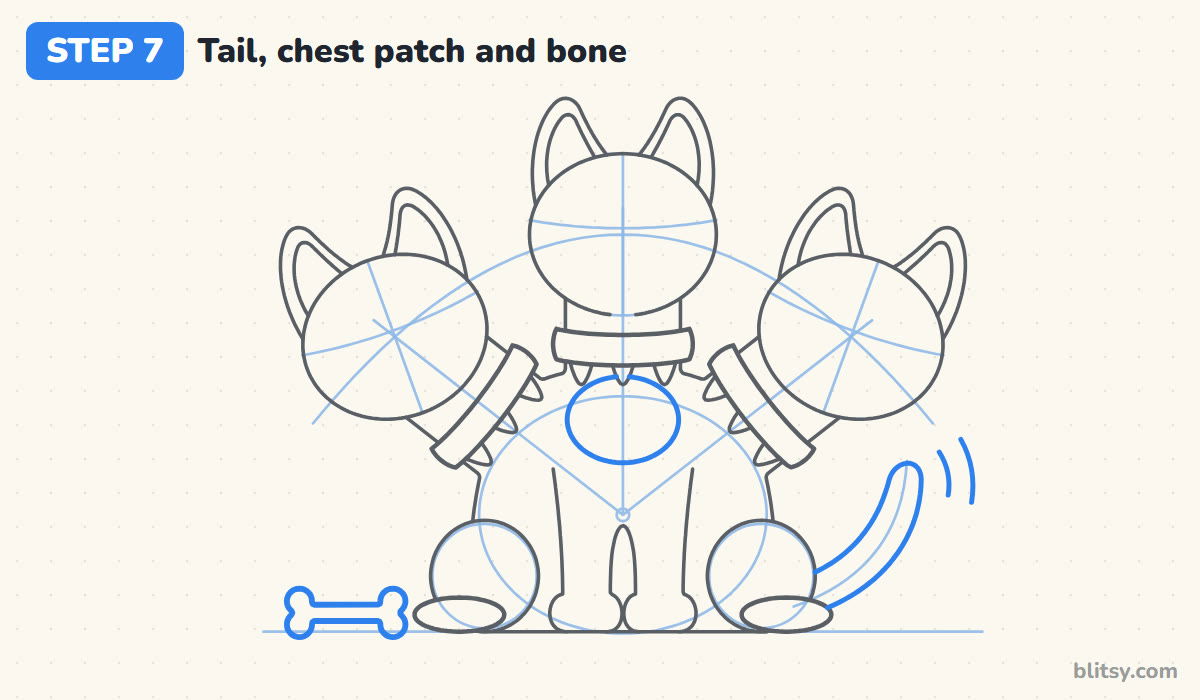
Follow the tail guide from behind the right hip and make a thick tail curving up, closed with a round tip. Two short curved lines beside the tip show that it's wagging. On the chest, between the collars and the legs, draw an oval patch for lighter fur. Down by the left foot, a bone: one short bar with two bumps at each end.


💡 Tip: Draw the bone flat on the ground line so it looks dropped, not floating.
Step 8: Draw the muzzles, the noses and a tongue
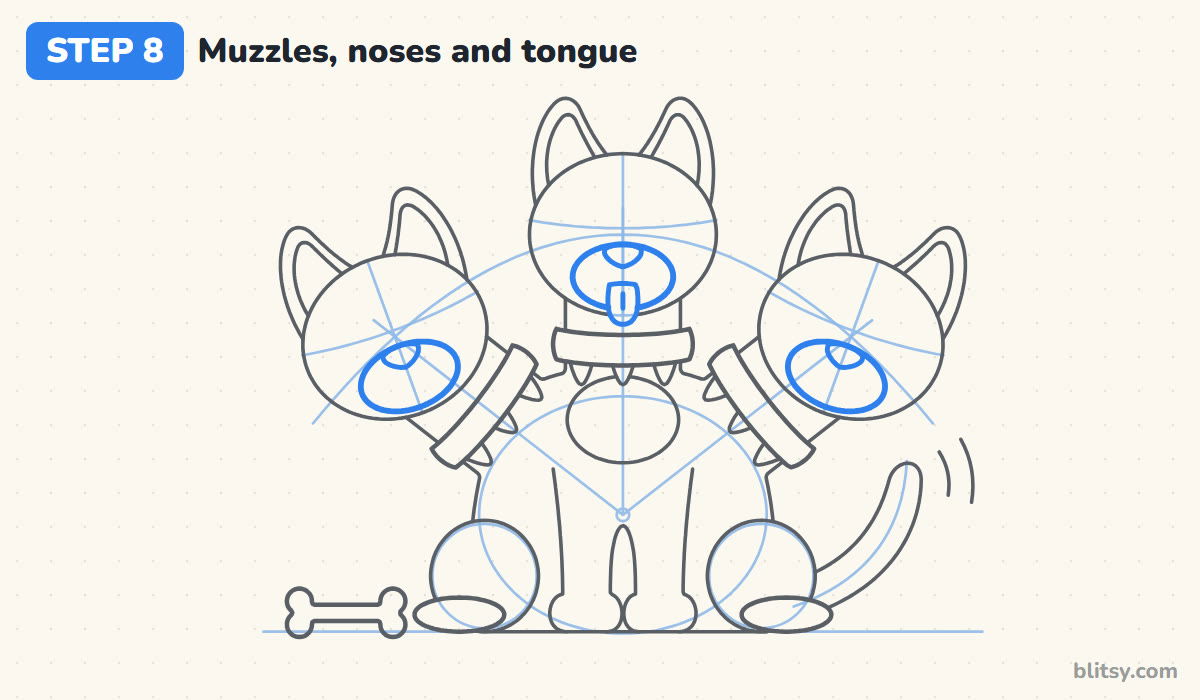
Each face gets a wide oval muzzle on the lower half of its head, tilted with that head. Near the top of every muzzle, put a rounded triangle for the nose. For the middle head, add a U-shaped tongue that hangs down from the mouth, past the chin, through the gap you left in step 4.
💡 Tip: Make all three noses the same size. It's one dog, even with three faces.
Step 9: Give the left and middle heads a face
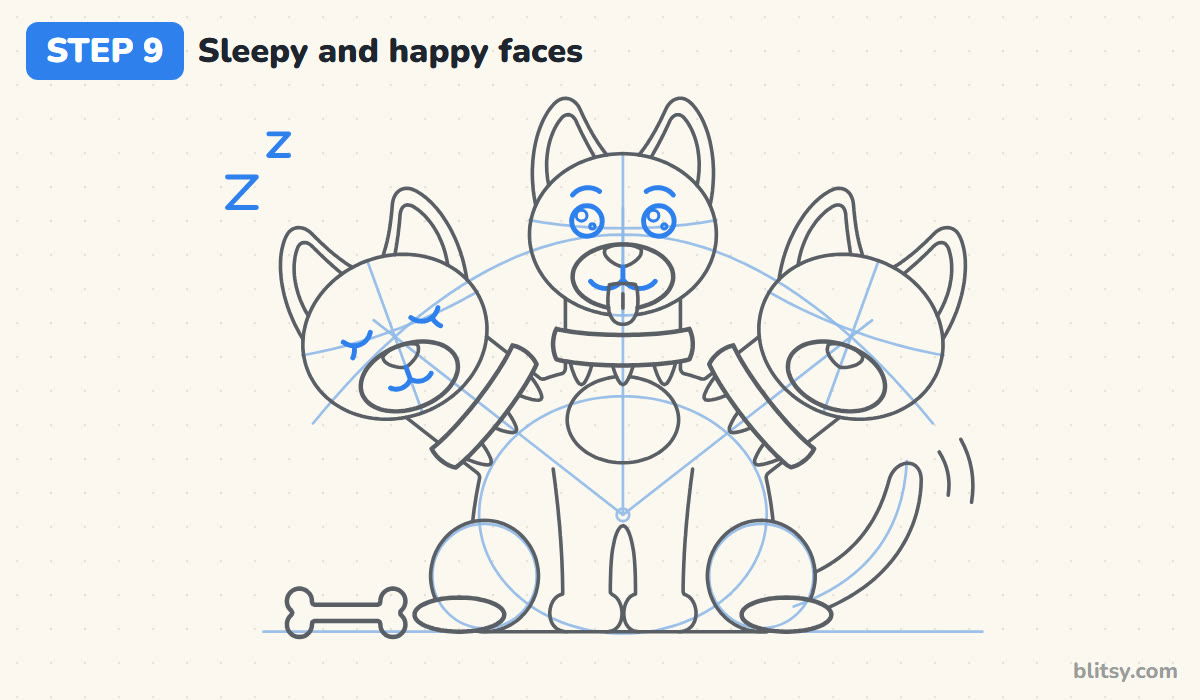
The left head is the sleepy one. Its eyes are two curves bending down, each with one little lash, and its mouth is a soft, small smile. A few zigzag Z letters float above it. The middle head is happy: two round eyes with shine dots, raised brows and a wide smile on each side of the tongue.
💡 Tip: Put the shine dots in the same corner of every eye, as if one lamp lights the whole dog.
Step 10: Finish the curious head and the toes
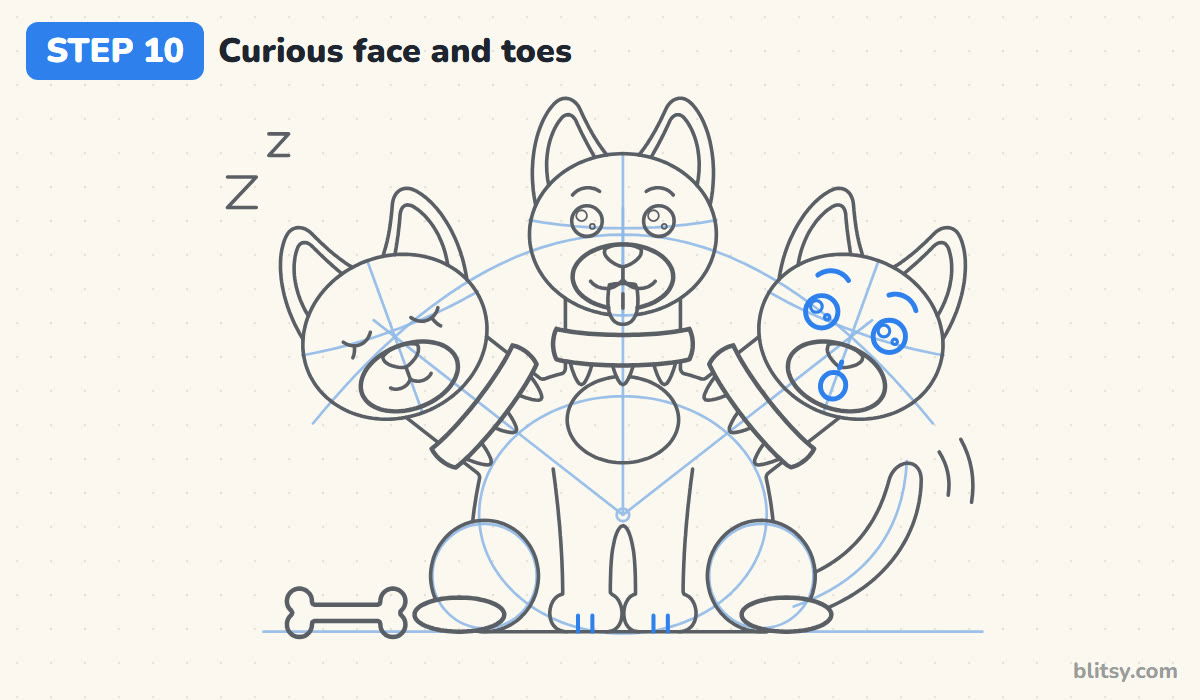
The right head has just heard a noise. Give it slightly bigger round eyes with shines, brows lifted high, and a small round open mouth with a tiny tongue at the bottom, like a short woof. Then draw two little lines on each front paw for toes.
💡 Tip: Keep that open mouth small. A big dark mouth turns a curious pup into a scary one.
Step 11: Ink the lines and erase the guides
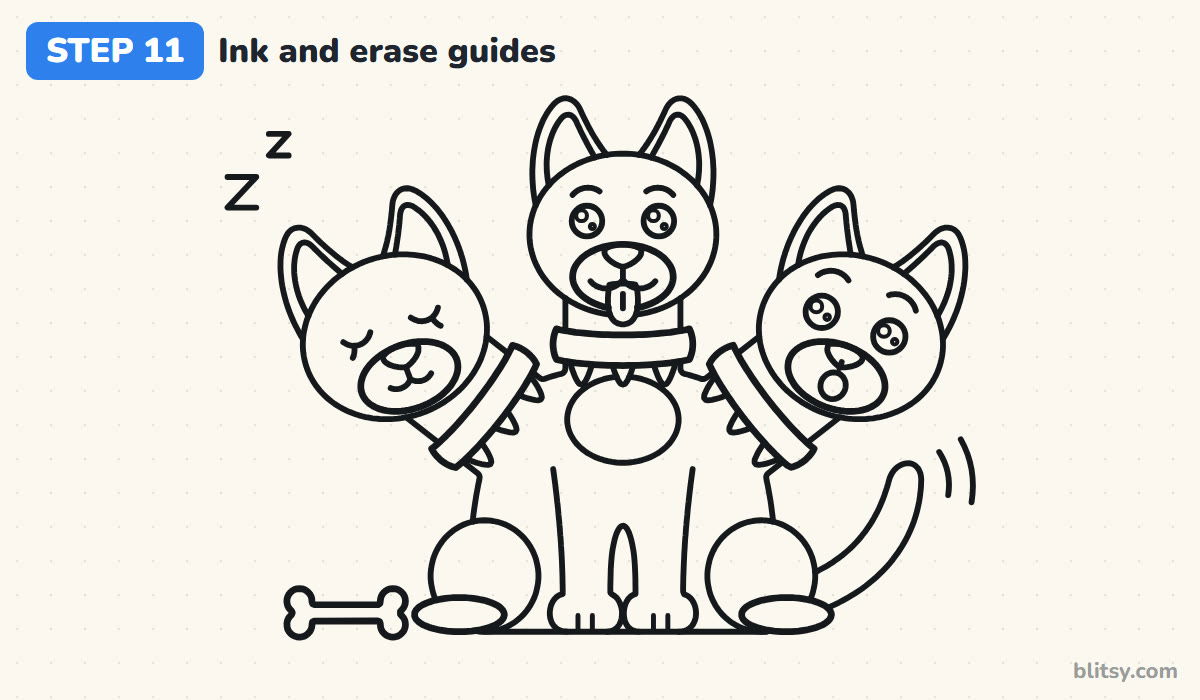
Go over every keeper line with the black marker. I usually start with the faces while my hand is still fresh, then do the collars and the body. Skip the fan lines, the arch and the guide ovals. Once the ink is fully dry, erase all the pencil, including the bit of chin line under the tongue.

💡 Tip: Turn the page as you ink the tilted heads, so your hand always pulls the line toward you.
Step 12: Color your Cerberus
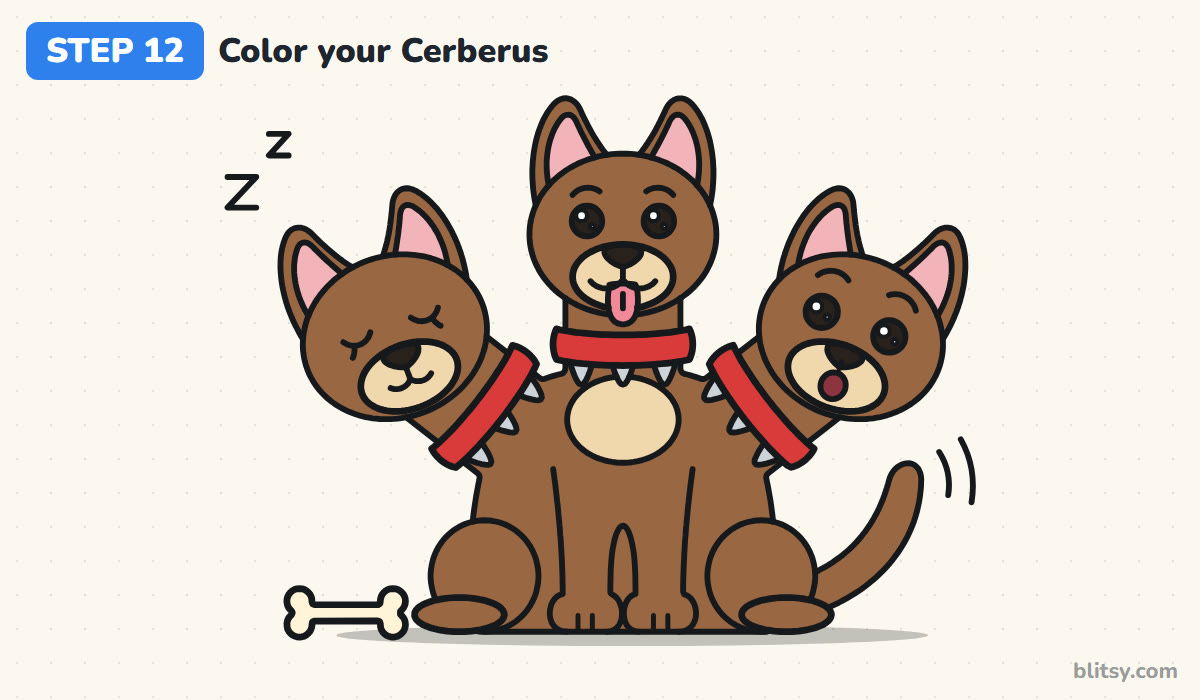
Brown covers all the fur, from the ear tips to the tail. Use light tan for the three muzzles and the chest patch. Then pink inside the ears and on the tongues, red on the collars and gray on the spikes. The bone is cream. Leave the eye shines white, and add a soft gray shadow under the pup.
💡 Tip: Color the light tan patches before the brown fur, so the darker pencil never drags into them.
Where Three-Headed Dogs Get Crowded
- Heads squeezed together. Without the fan and the arch, the heads tend to bunch up. Draw those guides first and keep a gap between every head.
- Side heads that float. If a head isn't connected by a neck and a collar, it looks stuck on. Run each neck line all the way into the shoulders.
- Three identical faces. Copying the same face three times looks stiff. Change the eyes and mouths so each head has a mood.
- A tiny body. Three heads on a thin body tip over visually. Make the body wide and round, with big hips.
- Sharp spikes and fangs. They push the drawing toward scary. Rounded spikes and small mouths keep it kid friendly.
Three Heads, Endless Personalities
Every head can act differently, so swap the moods around: one head chewing the bone, another wearing a party hat. Floppy ears work too, and so does a black and gray coat or a spotted one. Younger kids can skip the lashes and toes. For a one-headed version of this same chubby style, try the puppy drawing tutorial, and if mythical creatures are your thing, the dragon drawing tutorial is a good next challenge.
Cerberus Coloring Page and Printable Steps
The free Cerberus coloring page shows a colored pup at the top to copy from, with a key that names each color and the part it goes on, and a large outline underneath for coloring. The step-by-step PDF guide has all 12 steps with pictures and tips. Both fit on Letter or A4 paper.
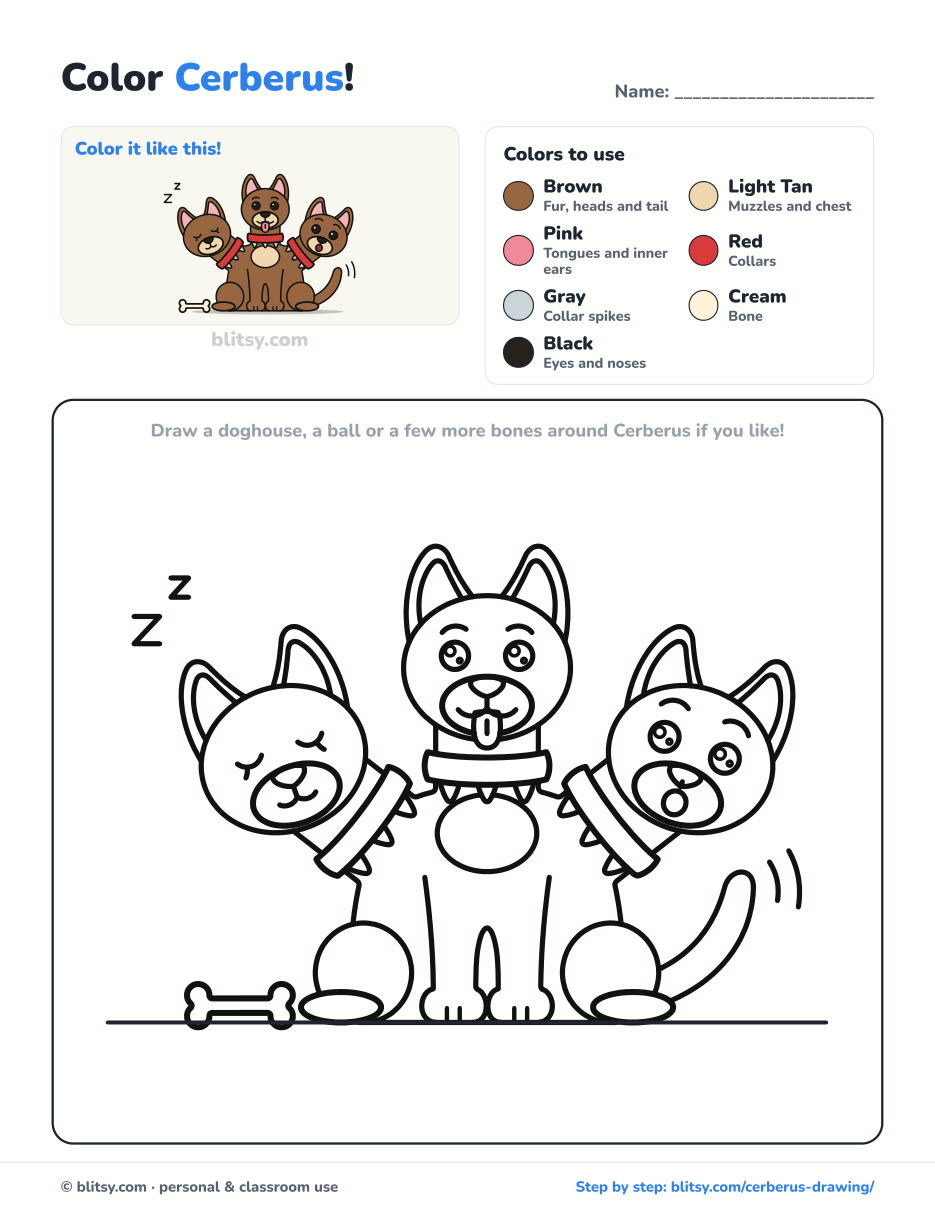
Black outlines with a colored example and the color names at the top. Ready to print and color.
⬇️ Download Coloring PageEvery step picture with its instructions and tips, to keep beside your paper while you draw.
⬇️ Download Drawing Guide📱 On a phone? Tap a download button, then open the file and choose Share → Save to Files or Print. On a computer, the PDF opens or saves straight to your Downloads folder.
Cerberus Steps on a Single Pin
Cerberus Drawing Questions, Answered
What is the easiest way to draw Cerberus?
Draw a fan of three lines from one point on the chest and an arch across them. Put a head circle where each line meets the arch, then build one round body underneath.
Who is Cerberus in Greek mythology?
He is the three-headed dog who guards the gates of the underworld. In the myths, capturing him was the twelfth and last labor of Hercules.
How do you make Cerberus look cute instead of scary?
Use big round eyes, rounded ear tips and small mouths, and give the heads friendly moods like sleepy or happy. Rounded collar spikes help too.
How long does it take to draw Cerberus?
About 40 minutes with coloring. The three faces take the most care; the guides and body go quickly.
Pick a mood for each head, sharpen your pencil, and give your pup a name that works three times over. 🐶🐶🐶
Related posts:
 How to Draw a Tooth Step by Step (Cute and Easy for Kids)
 How to Draw a UFO Step by Step (Cute Alien Saucer)
 How to Draw an Astronaut Step by Step (Cute and Easy)
 How to Draw an Owl Step by Step (Cute Night Owl)
 How to Draw an Axolotl Step by Step (Cute and Easy)
 How to Draw an Octopus Step by Step (Cute and Easy)
 How to Draw Freddy Krueger Step by Step (Cute Chibi Version)
 How to Draw a Frog Step by Step (Cute Frog on a Log)
 How to Draw a Jellyfish Step by Step (Cute, Easy Guide)
 How to Draw Ariana Grande Step by Step (Cute Chibi Fan Art)
 How to Draw a Care Bear Step by Step (Cute Fan Art for Kids)
 How to Draw a Monster Step by Step (Cute and Easy)

