
A lion is mostly mane. Draw a big wavy ring around a round face and the job is half done before you even reach the nose. Below I'll walk you through how to draw a lion step by step, from two light circles to a proud, friendly male lion sitting with his tail curled out to the side. No experience needed, just some patience with the bumpy edges.
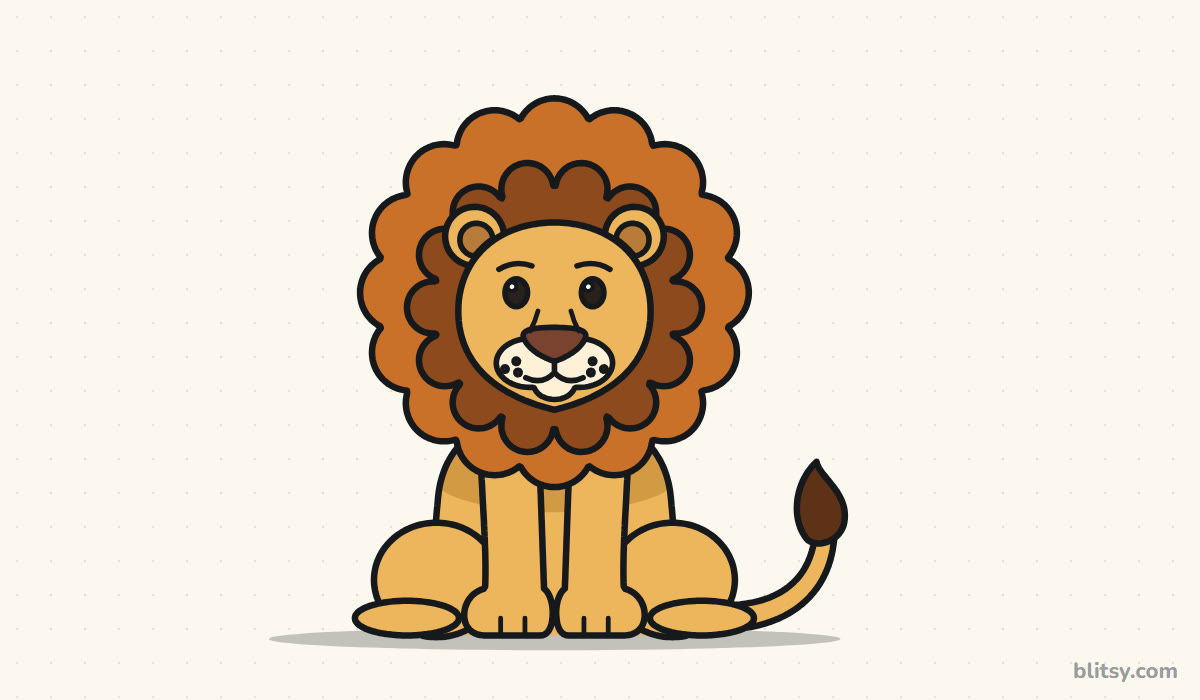
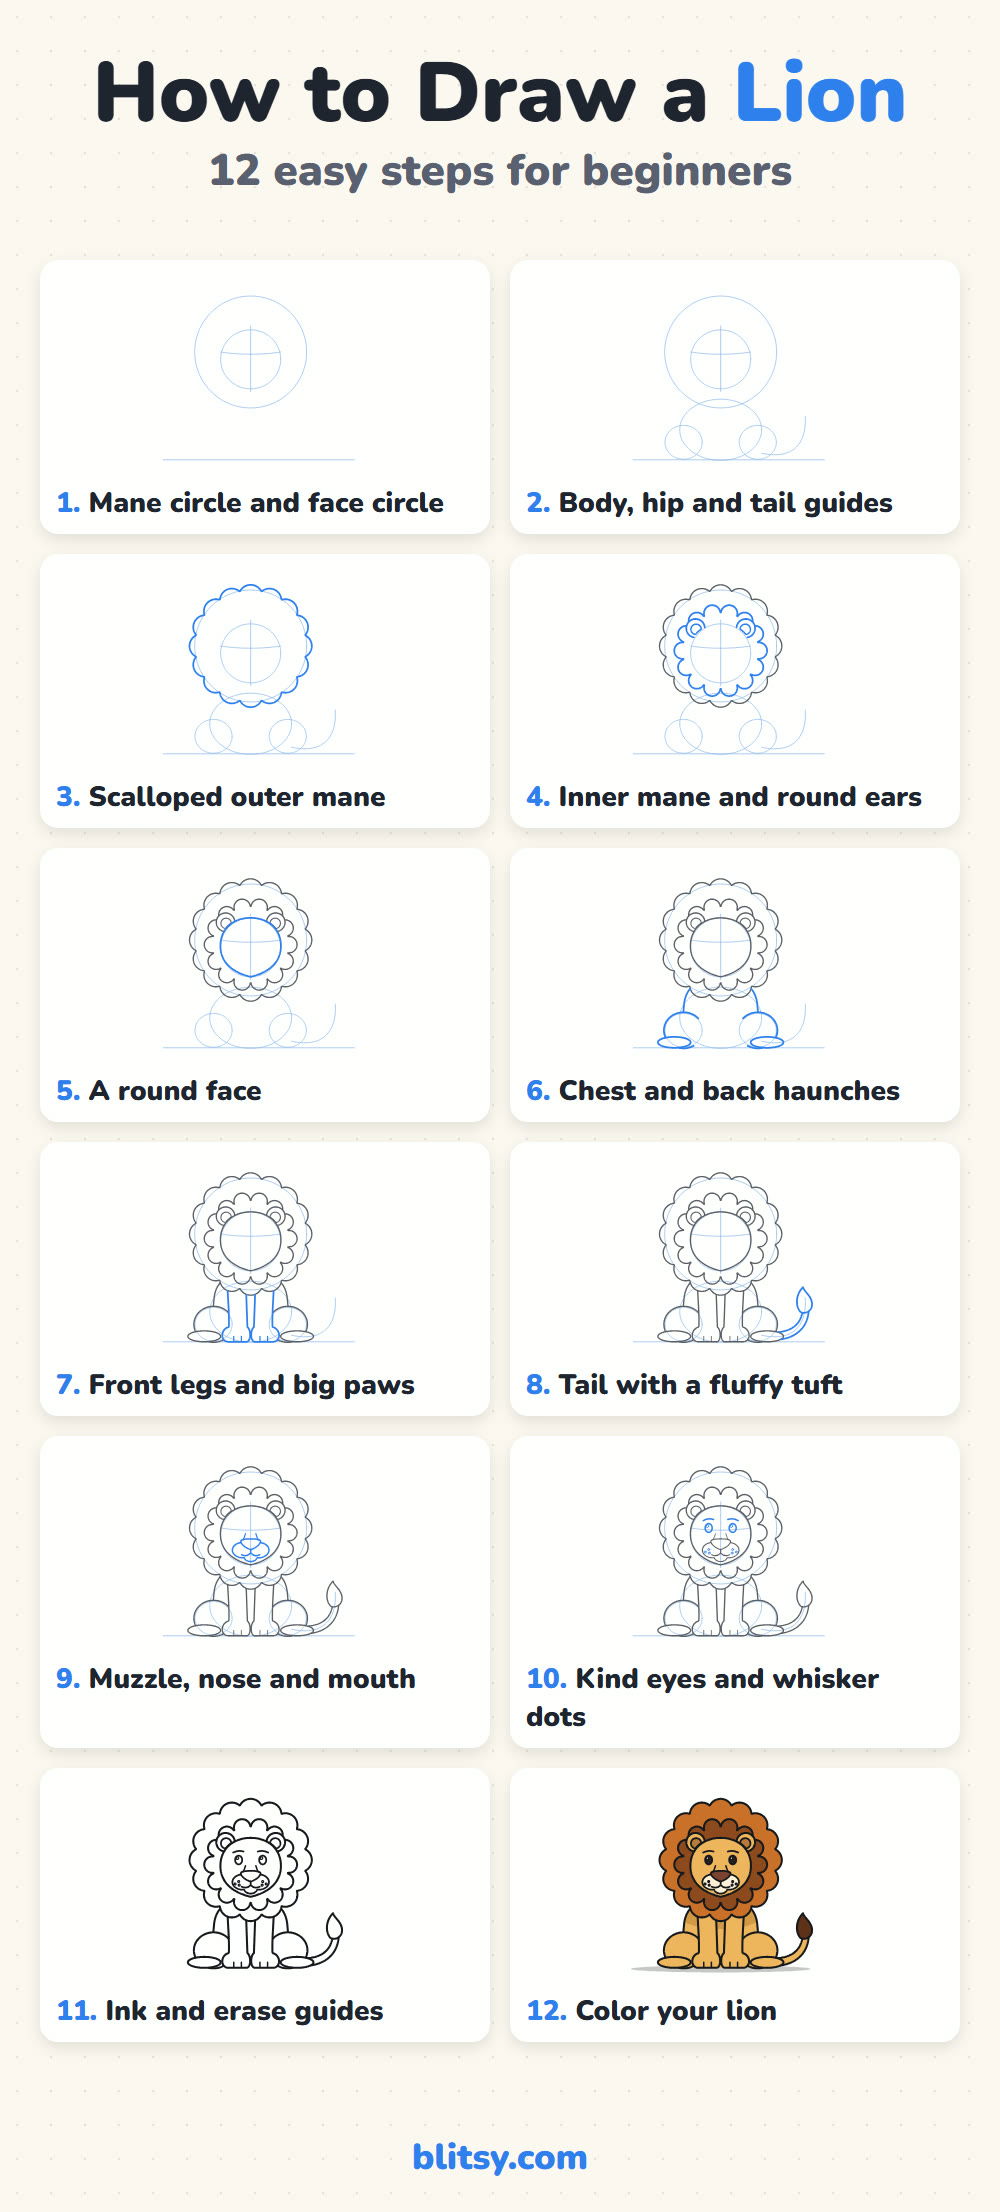
Blue shows the lines you add in each picture. Gray shows what you finished before. Copy just the blue, compare, then carry on.
Quick overview
⏱️ Time: about 35 to 40 minutes with coloring
🎯 Level: easy, good for kids from about 7 up
✏️ Steps: 12
🦁 You'll draw: a sitting adult lion with a two-layer mane
Supplies for a Sitting Lion
- A pencil you can press lightly with (HB is fine)
- A clean eraser
- A black marker or fineliner for the final lines
- Colored pencils or crayons: golden yellow, orange, two browns and cream
- A sheet of plain white paper
Turn the paper sideways if you can, since the tail needs some room on the right.
How to Draw a Lion Step by Step
Step 1: Draw the mane circle and the face circle
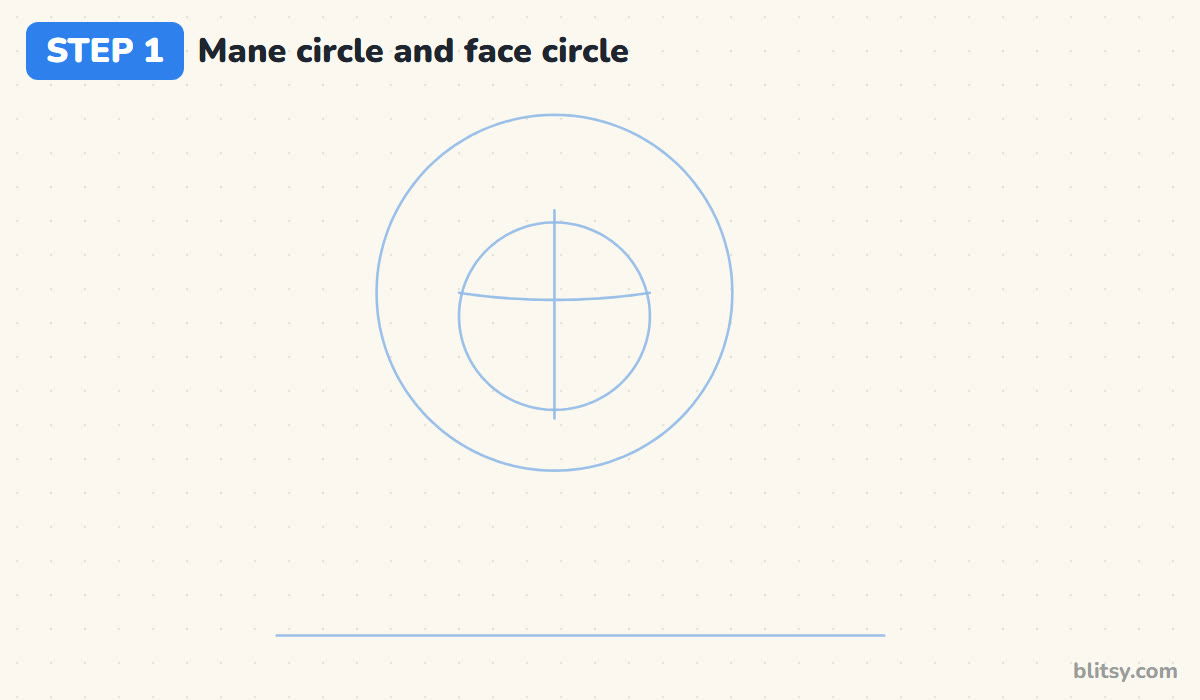
Start with a light ground line low on the page. Above it draw a big circle for the whole mane. Inside it, slightly below the middle, draw a smaller circle for the face, about half as wide. Add a line down the face and a gentle curve across, just above halfway, where the eyes will sit.
💡 Tip: Press so lightly that you can barely see the line. You'll erase all of it.
Step 2: Add body and hip guides plus a tail line
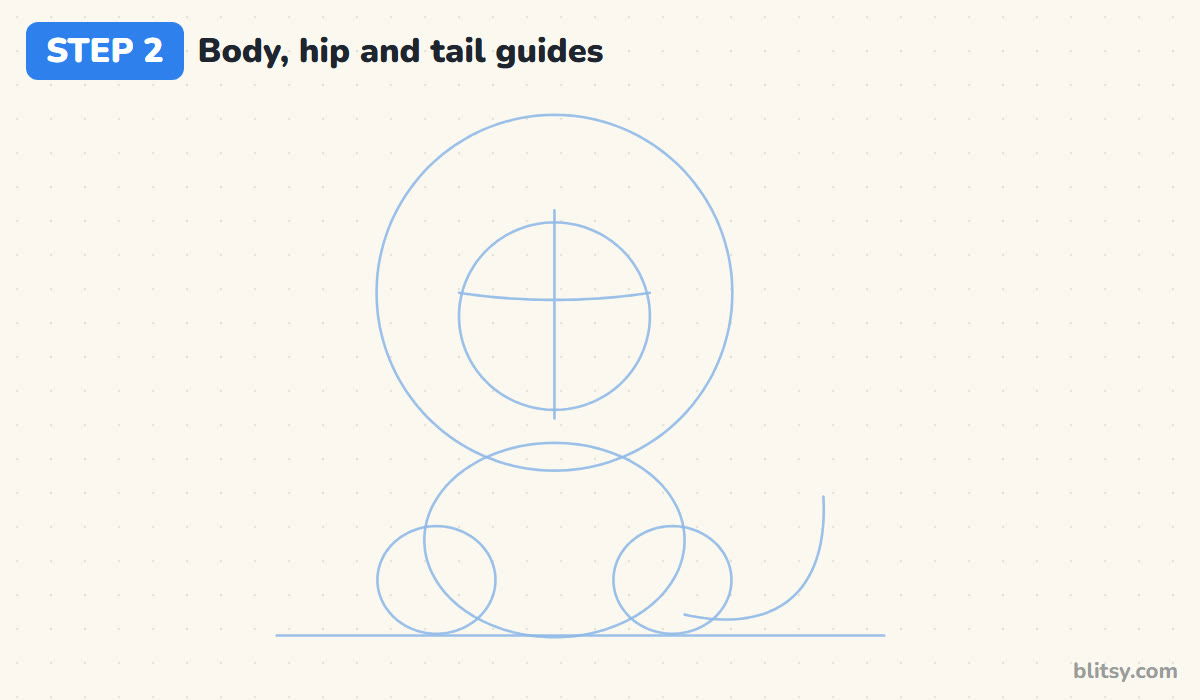
Under the mane, sketch a wide oval for the chest and body that rests on the ground line. Its top should tuck up into the bottom of the mane circle. Put a smaller circle on each side at the bottom for the back legs, then one long curved line from the right hip that sweeps out along the ground and up. That curve is the tail.
💡 Tip: If the body oval looks wider than the mane, shrink it. The mane should stay the biggest shape.
Step 3: Draw a scalloped outer mane
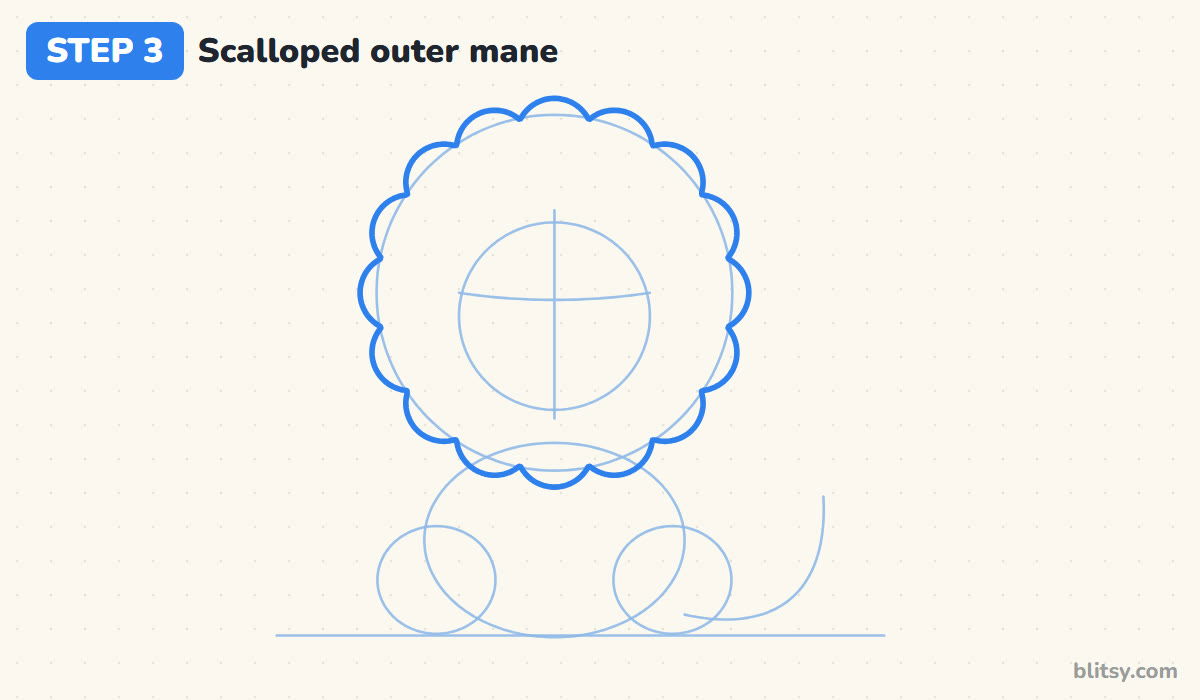
Go around the big circle with a row of rounded bumps, like the edge of a cloud. I aim for about sixteen, all roughly the same size, each sitting half outside the guide so the mane gets a little fuller. Put one bump right at the top and one at the bottom, and the rest falls into place.


💡 Tip: Turn the paper as you go round. Bumps are easier to draw when your hand moves the same way every time.
Step 4: Add the inner mane and two round ears
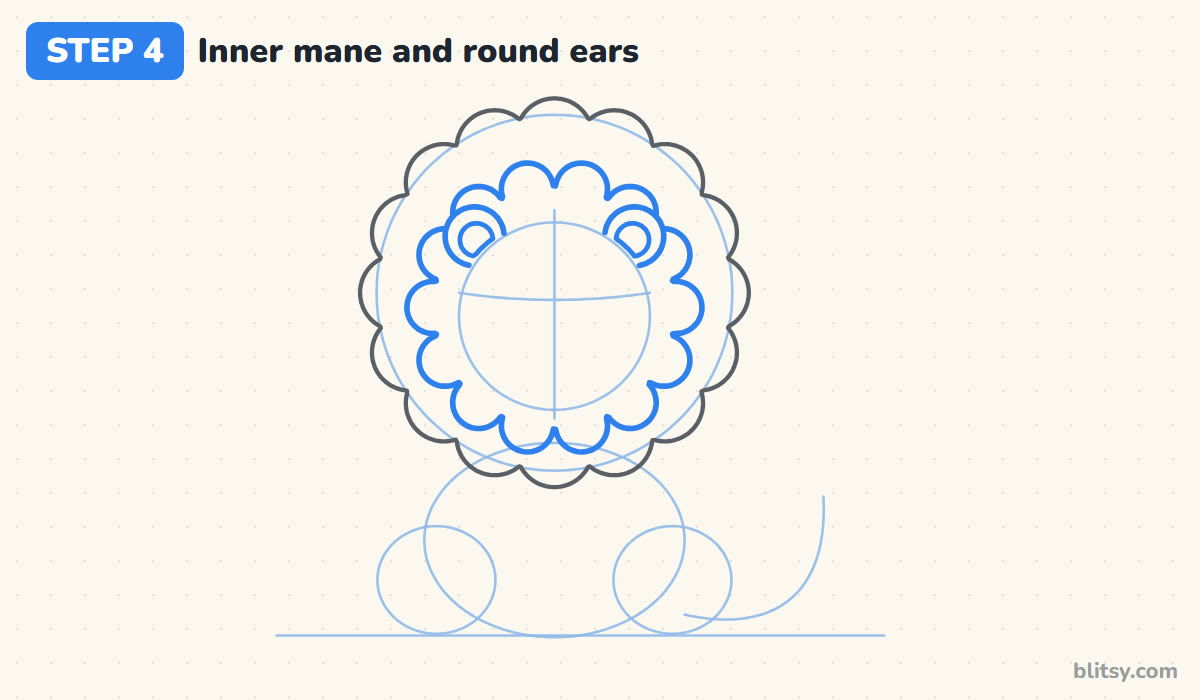
Draw a second, smaller ring of bumps inside the first, leaving a gap between them. This inner layer gives the mane depth, since it gets a darker color later. Near the top of the face circle, add two small round ears with a smaller circle inside each. Their bottoms tuck behind the face, so stop where the face will be.
💡 Tip: Keep the ears small. Big ears make a lion look like a bear or a mouse.
Step 5: Outline the round face
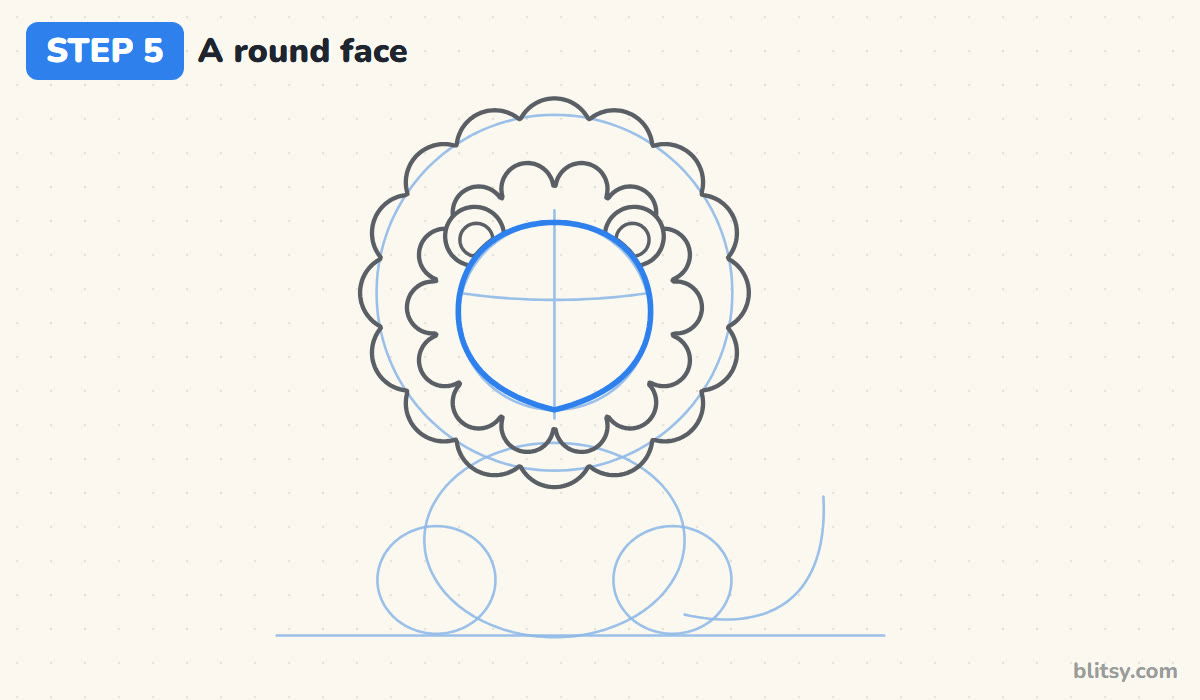
Trace over the face circle with a firm line, letting the bottom come to a very soft point where the chin is. Any mane or ear lines inside the face can go later. I usually wait, because those leftovers help me check that the face sits in the center of the mane.
💡 Tip: Keep the face wide at the cheeks. A narrow face loses the big cat look.
Step 6: Draw the chest and back haunches
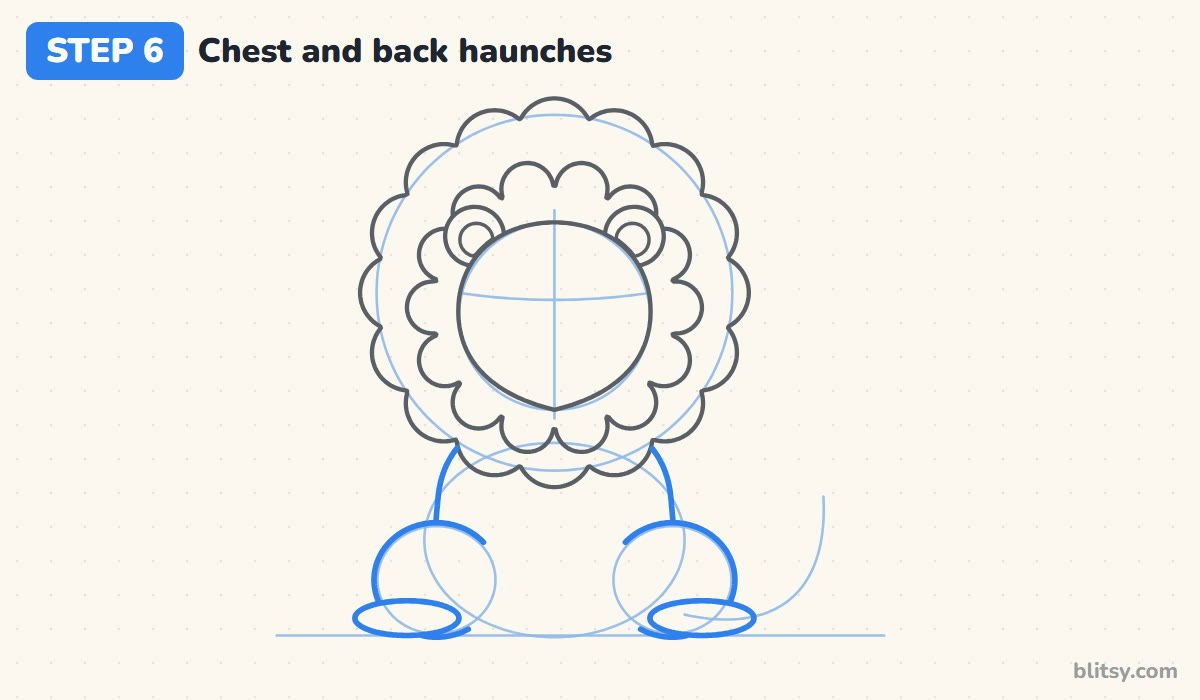
From under the mane on each side, bring a short line down for the shoulders. Over the hip circles, draw rounder, firmer outlines, and in front of each one add a flat oval lying on the ground for a back foot. Leave a gap in the middle of the chest. The front legs fill it in the next step, so there's no need to draw anything there yet.
💡 Tip: Rest the back feet flat on the ground line so the lion looks heavy and settled.
Step 7: Add the front legs and big paws
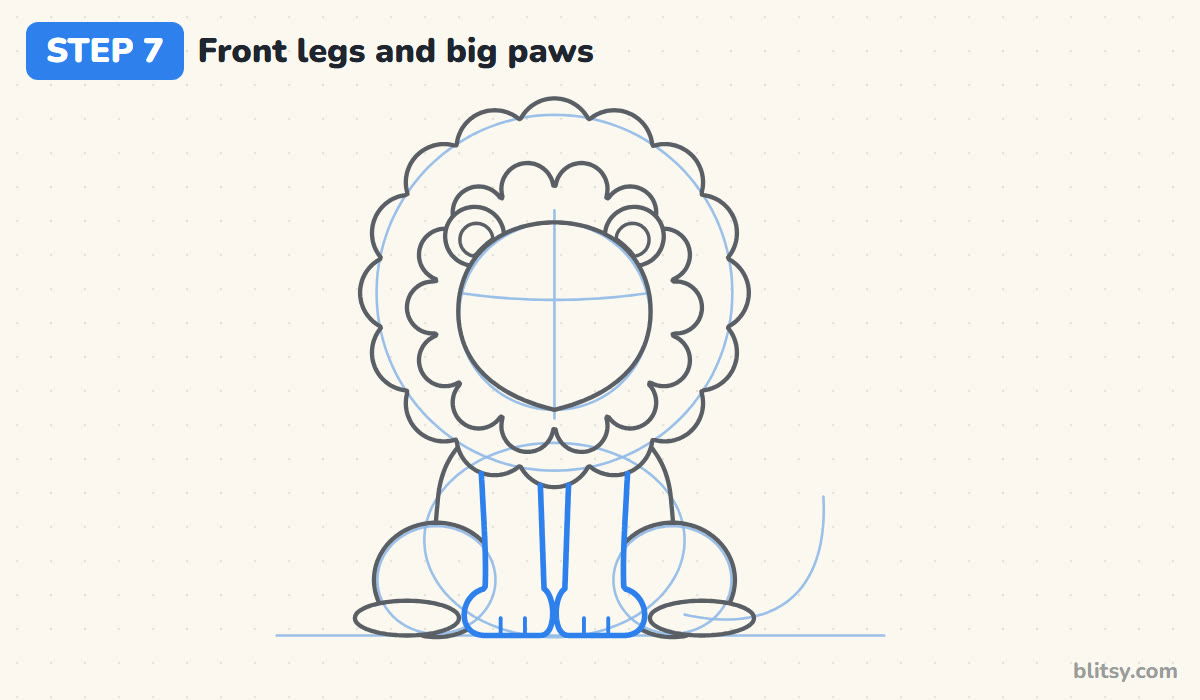
Each front leg is a tall column coming straight down from the mane to the ground, close to its neighbour. Near the bottom, swell the outside of each leg into a wide, rounded paw, clearly wider than the leg. Two short lines on each paw split the toes.


💡 Tip: Draw both outer edges first, then the inner ones. It keeps the two legs the same width.
Step 8: Draw a tail with a fluffy tuft
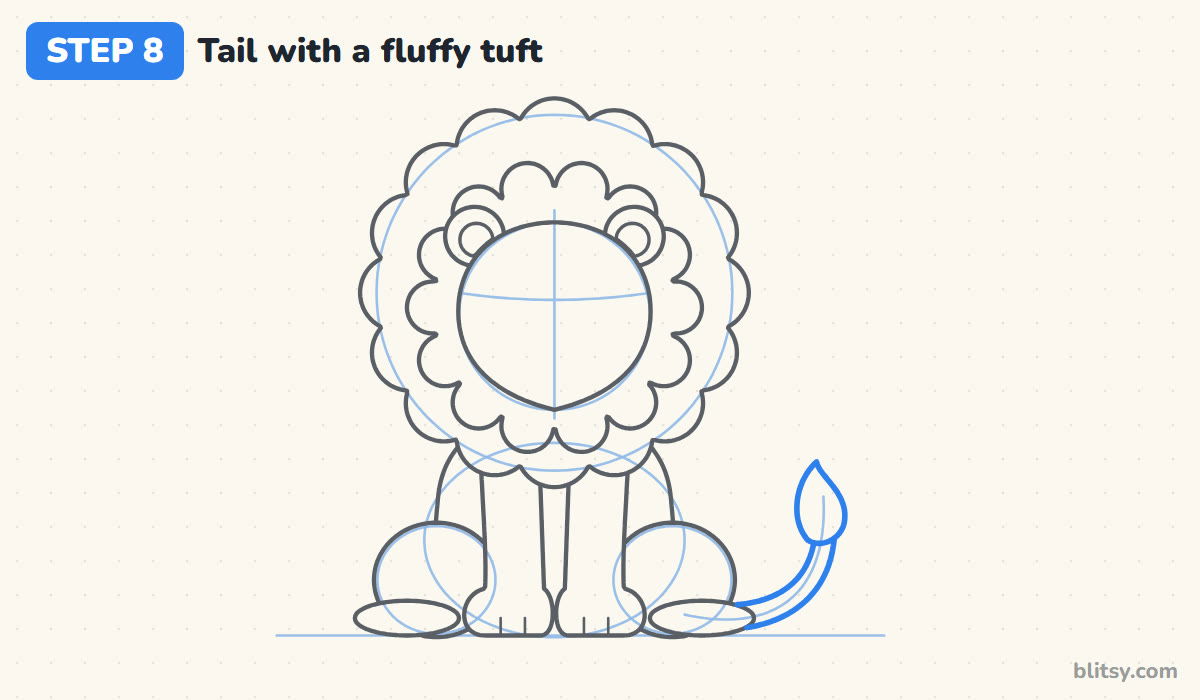
Follow the tail guide with two lines a finger width apart, starting from behind the right hip. They curve out along the ground and then lift upward. At the end, draw a teardrop shape with a pointed tip for the tuft. Don't draw the part of the tail that the hip and foot would hide.
💡 Tip: Let the tail get just a touch thinner toward the tuft, which makes it look softer.
Step 9: Draw the muzzle and a broad nose
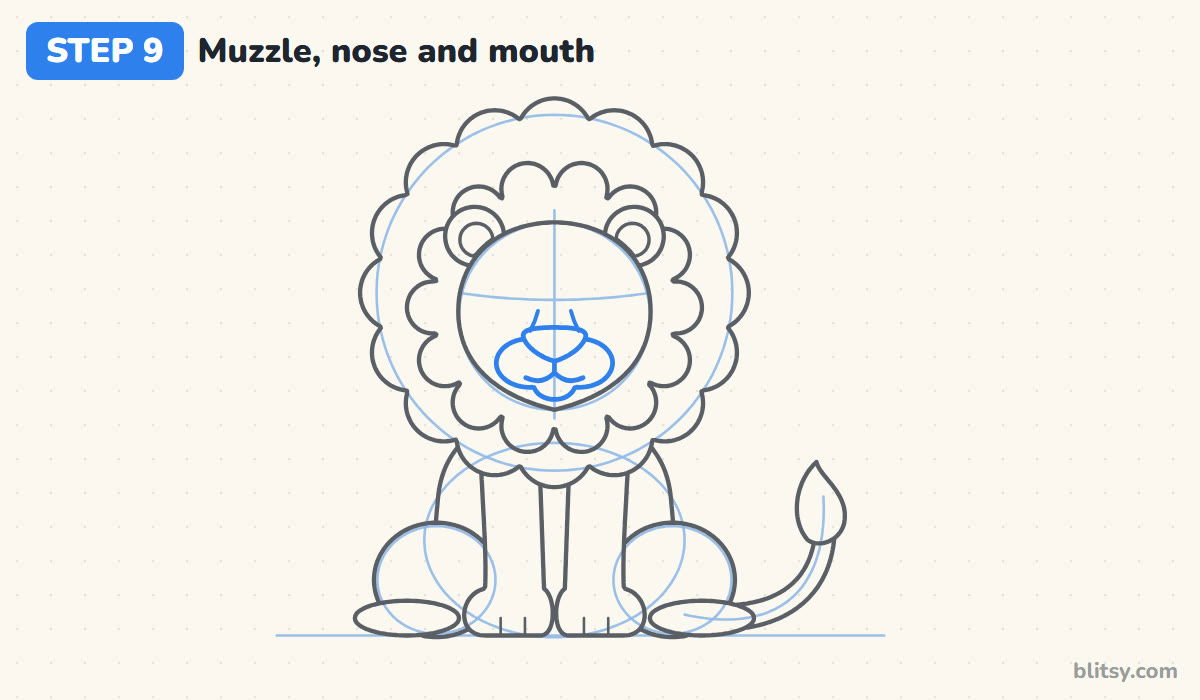
The muzzle is two puffy cheek bumps side by side with a small chin bump under them, low in the face. On top of them, where they meet, draw a broad nose shaped like a rounded upside-down triangle. Two short lines rise from the nose toward the eyes for the bridge. Under the nose, a small line drops down and splits into two curves, one into each cheek.
💡 Tip: Make the nose wider than you think. A broad nose is one of the things that says lion.
Step 10: Add kind eyes with brows and whisker dots
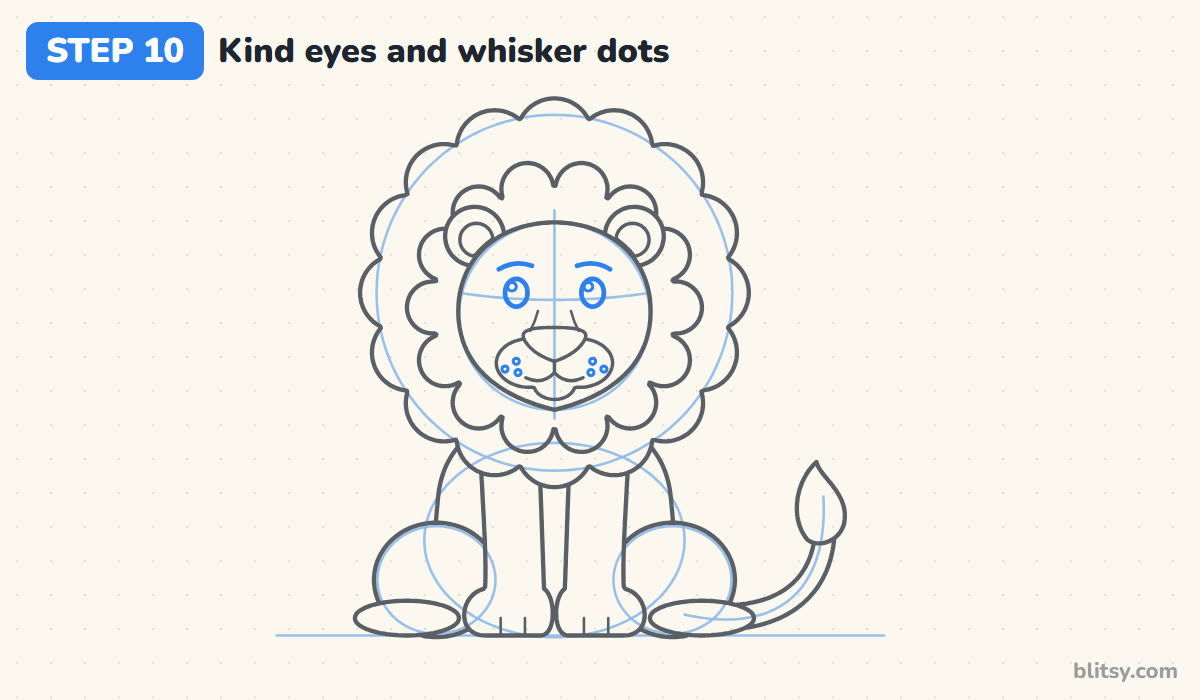
Place two oval eyes on the curved cross line, one on each side of the center, a nose width or more apart. Add a small shine circle in the top left of each. Above them, draw short brows that curve up softly, which keeps the face calm and friendly rather than fierce. Then add three little dots on each cheek where the whiskers grow.
💡 Tip: Check that both shine circles are in the same corner before you ink them.
Step 11: Ink the lion and erase the guides
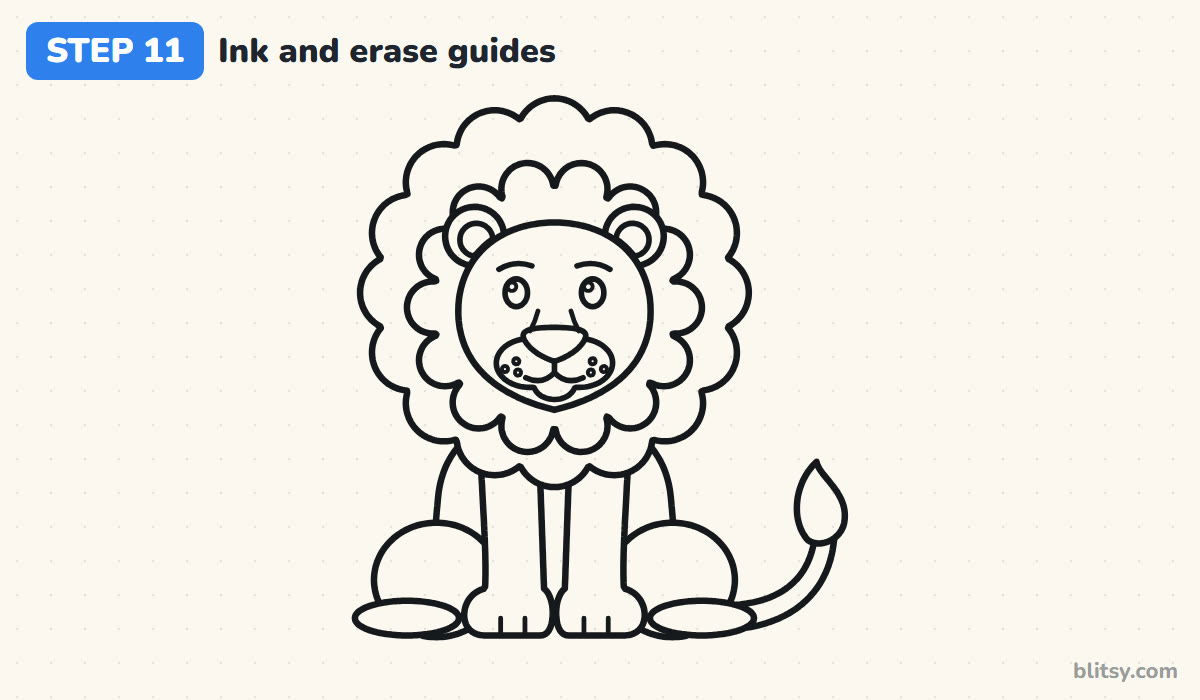
Go over every keeper line with the black marker. I start with the face while my hand is fresh, then the mane rings, and the body last. Skip the light circles and cross lines. Once the ink is dry, erase the pencil until only the clean outline is left.
💡 Tip: Lift the marker between mane bumps instead of dragging it. The scallops stay crisper.
Step 12: Color your lion
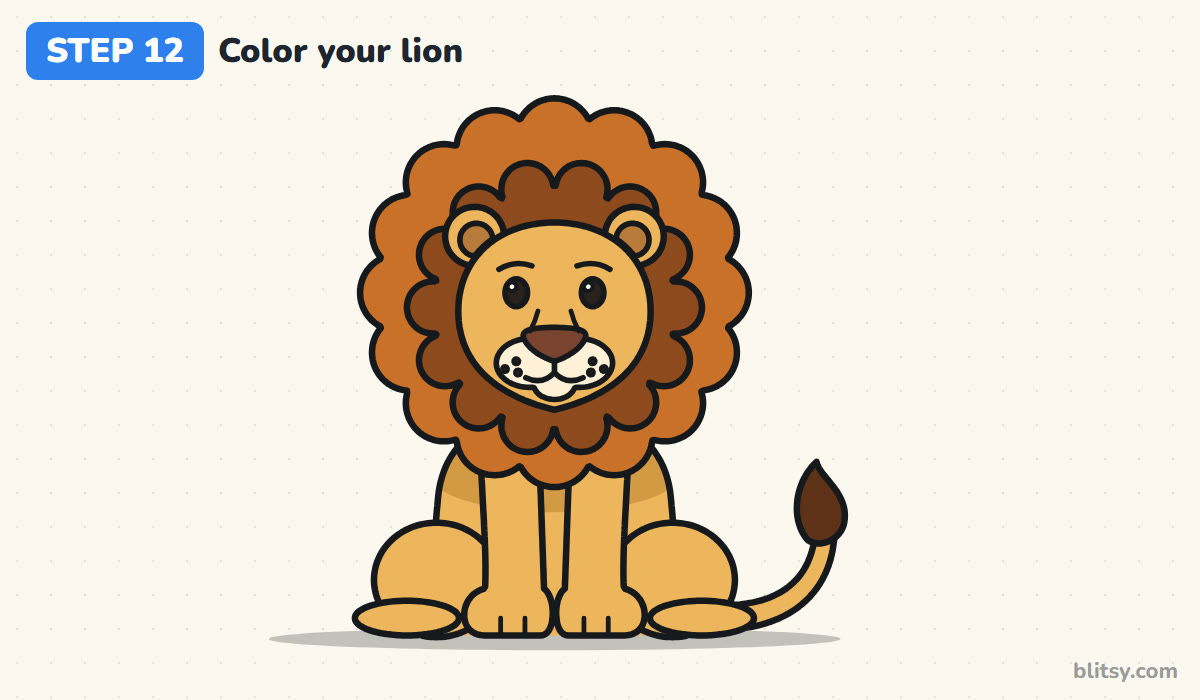
Golden yellow covers the face, ears, body and legs, plus the tail. Color the outer mane orange brown and the inner mane a deeper brown. The muzzle is cream, the nose reddish brown, the tuft dark brown. Fill the eyes and whisker dots black but leave the shine white. A darker yellow under the mane on the chest and a gray ground shadow finish it.
💡 Tip: Color the mane with short strokes that point outward, the way the fur grows.
Where Lion Drawings Lose Their Roar
- A mane that's too small. A thin frame around the face looks like a cub. Make the mane at least twice as wide as the face.
- Bumps of every size. One giant scallop next to tiny ones looks messy. Keep the bumps in each ring close in size.
- A narrow, pointed nose. Dogs and foxes get pointy noses. A lion's nose is broad and flat on top.
- Skinny front legs. Lions are heavy animals. Give the legs real width and finish them with big round paws.
- A tail with no tuft. Without the dark tip the tail could belong to any cat, so don't skip it.
Turning One Lion into a Whole Pride
Drop the mane, keep the round ears and make the body smaller for a lioness. Add a crown for a king, or color the mane red and gold for a fantasy lion. Smaller kids can leave out the whisker dots and the inner mane ring and it still reads as a lion. For another big cat with bold stripes, try the easy tiger drawing tutorial, and if a lion cub is more your style, this Simba drawing step by step lesson is a fun next step.
Free Lion Coloring Page and Step Guide PDF
The free lion coloring page shows a colored lion at the top as a model, with a key that says which color belongs to which part, and a big outline underneath for coloring. The step-by-step PDF guide holds all 12 steps with pictures and tips, so you can draw away from the screen. Both print fine on Letter or A4 paper.
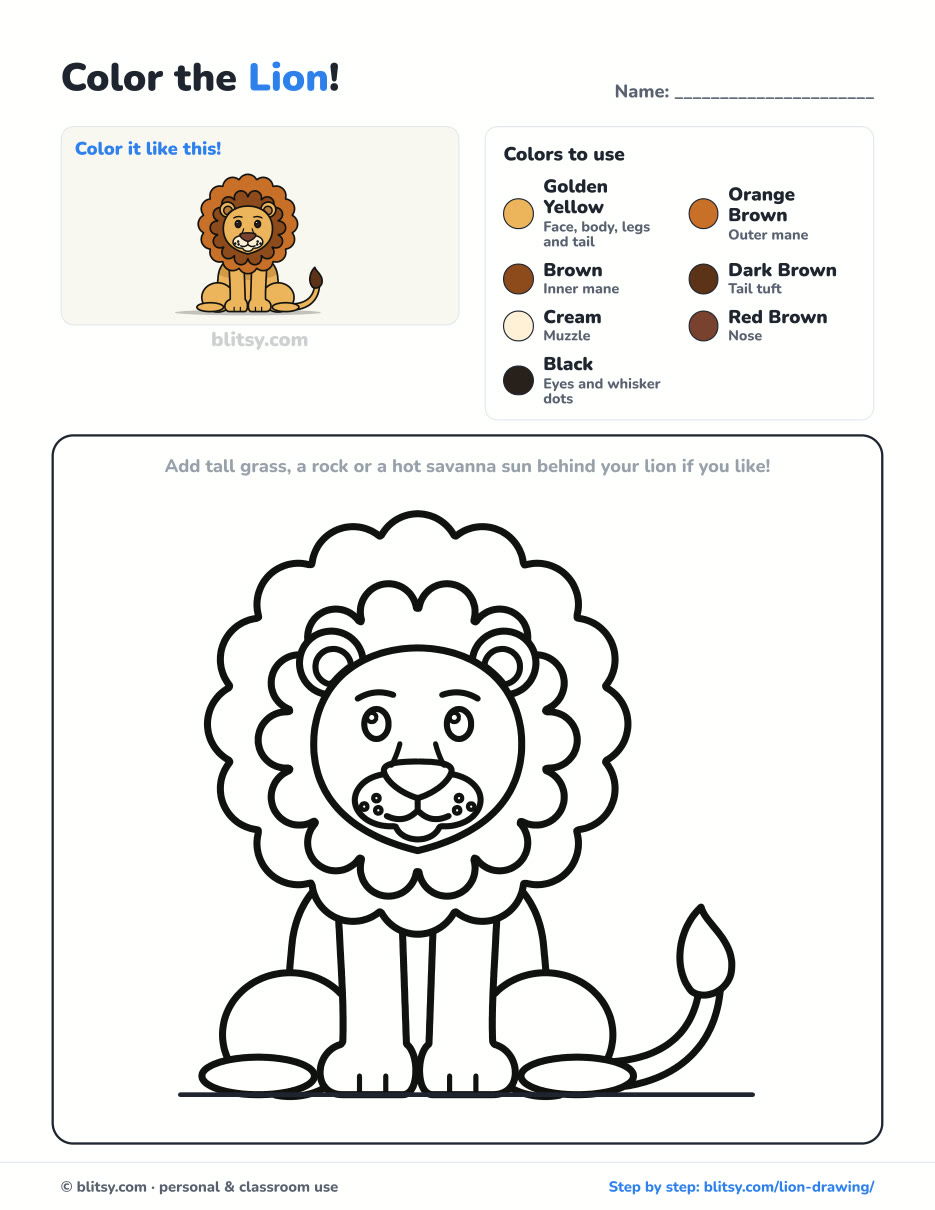
Black outlines with a colored example and the color names at the top. Ready to print and color.
⬇️ Download Coloring PageEvery step picture with its instructions and tips, to keep beside your paper while you draw.
⬇️ Download Drawing Guide📱 On a phone? Tap a download button, then open the file and choose Share → Save to Files or Print. On a computer, the PDF opens or saves straight to your Downloads folder.
Pin the Lion Steps for Next Time
Beyond the Lion: Birds, Animals and Everyday Objects
Each link below is a complete step-by-step tutorial with a picture per stage, so you can switch subjects without losing the method.
- Mask Drawing: A purple masquerade mask with gold trim, a teal gem and three feathers grows from one center line in this mask drawing tutorial.
- Chicken Drawing: Draw a brown hen and her yellow chick on a strip of grass with this how to draw a chicken step by step lesson.
- Cardinal Drawing: A bright red cardinal with its black mask perches on a winter branch in this cardinal drawing tutorial.
- Spider Drawing: A friendly purple spider dangles from its silk next to a round web in this spider drawing step by step guide.
- Hoodie Drawing: Start from a plain T-shape and draw one hoodie from the front and the back in this hoodie drawing tutorial.
- Dove Drawing: A white peace dove flies with an olive branch in its beak in this how to draw a dove lesson.
- Suit Drawing: Draw a navy two-button suit flat, like a tailor's sketch, with this suit drawing step by step tutorial.
- Shoes Drawing: Build a red high-top and a low-top sneaker from the sole upward with this how to draw shoes tutorial.
- Feather Drawing: One curved line and a leaf shape make a teal feather and a small orange one in this feather drawing tutorial.
- Shark Drawing: A smiling great white with a tall dorsal fin and a crescent tail starts as one long oval in this shark drawing step by step lesson.
- Elephant Drawing: Draw a gray-blue elephant with a huge ear and its trunk spraying water in this elephant drawing tutorial.
- Bear Drawing: A brown bear walking through the grass, head low and hump high, fills this how to draw a bear step by step guide.
Lion Drawing Questions I Hear a Lot
What is the easiest way to draw a lion?
Start with two circles, a big one for the mane and a smaller one for the face. Turn the big circle into bumps, add a muzzle and eyes, then a simple sitting body below.
How do you draw a lion's mane for kids?
Draw it like a cloud: a ring of rounded bumps around the face. Kids can do just one ring and color it orange. The second, darker ring is a nice extra for older kids.
How long does it take to draw a lion?
Plan on about 35 to 40 minutes with coloring. The two mane rings take the longest.
What colors do I need for a lion?
Golden yellow for the body, orange plus a brown for the mane, cream for the muzzle, dark brown for the tuft and black for the eyes.
Your lion is waiting on a blank page somewhere, so grab a pencil and give him that big bumpy mane. 🦁✏️
Related posts:
 How to Draw Simba Step by Step (Easy Lion Cub for Beginners)
 How to Draw a Car Step by Step (Easy Drawing for Beginners)
 How to Draw a Whale Step by Step (Easy for Beginners)
 How to Draw a Rat Step by Step (Easy for Beginners)
 How to Draw an Arctic Fox Step by Step (Easy for Beginners)
 How to Draw a Ladybug Step by Step (Easy for Beginners)
 How to Draw a Dog Step by Step (Easy Side View for Beginners)
 How to Draw a Butterfly Step by Step (Easy for Beginners)
 How to Draw a Leopard Step by Step (Easy for Beginners)
 How to Draw a Light Bulb Step by Step (Easy for Beginners)
 How to Draw a Crow Step by Step (Easy for Beginners)
 How to Draw an Eagle Step by Step (Easy for Beginners)

