
Few characters are built from so little: an oval, two ears, two dots, a nose and a bow. That simplicity is exactly why this is a great first character to learn, and below I'll show you how to draw Hello Kitty step by step, from a light guide oval to a colored kitty in blue overalls. This is my own simple fan-art version for practice, not official artwork, so feel free to change her outfit once you know the shapes.
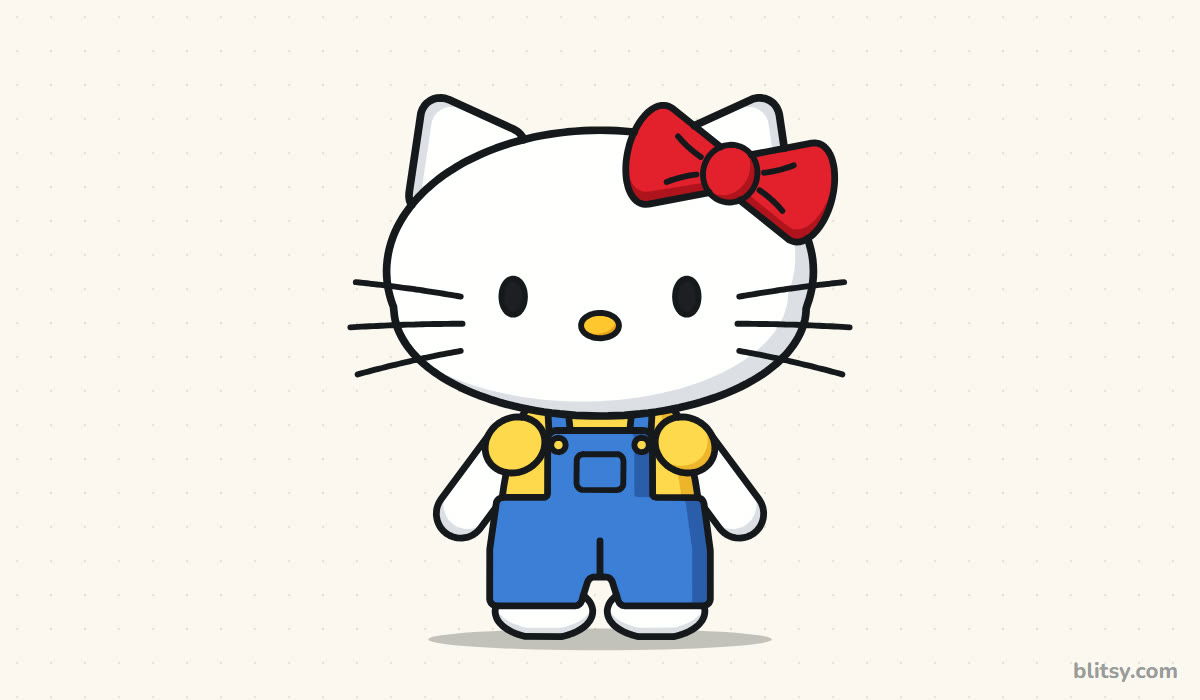
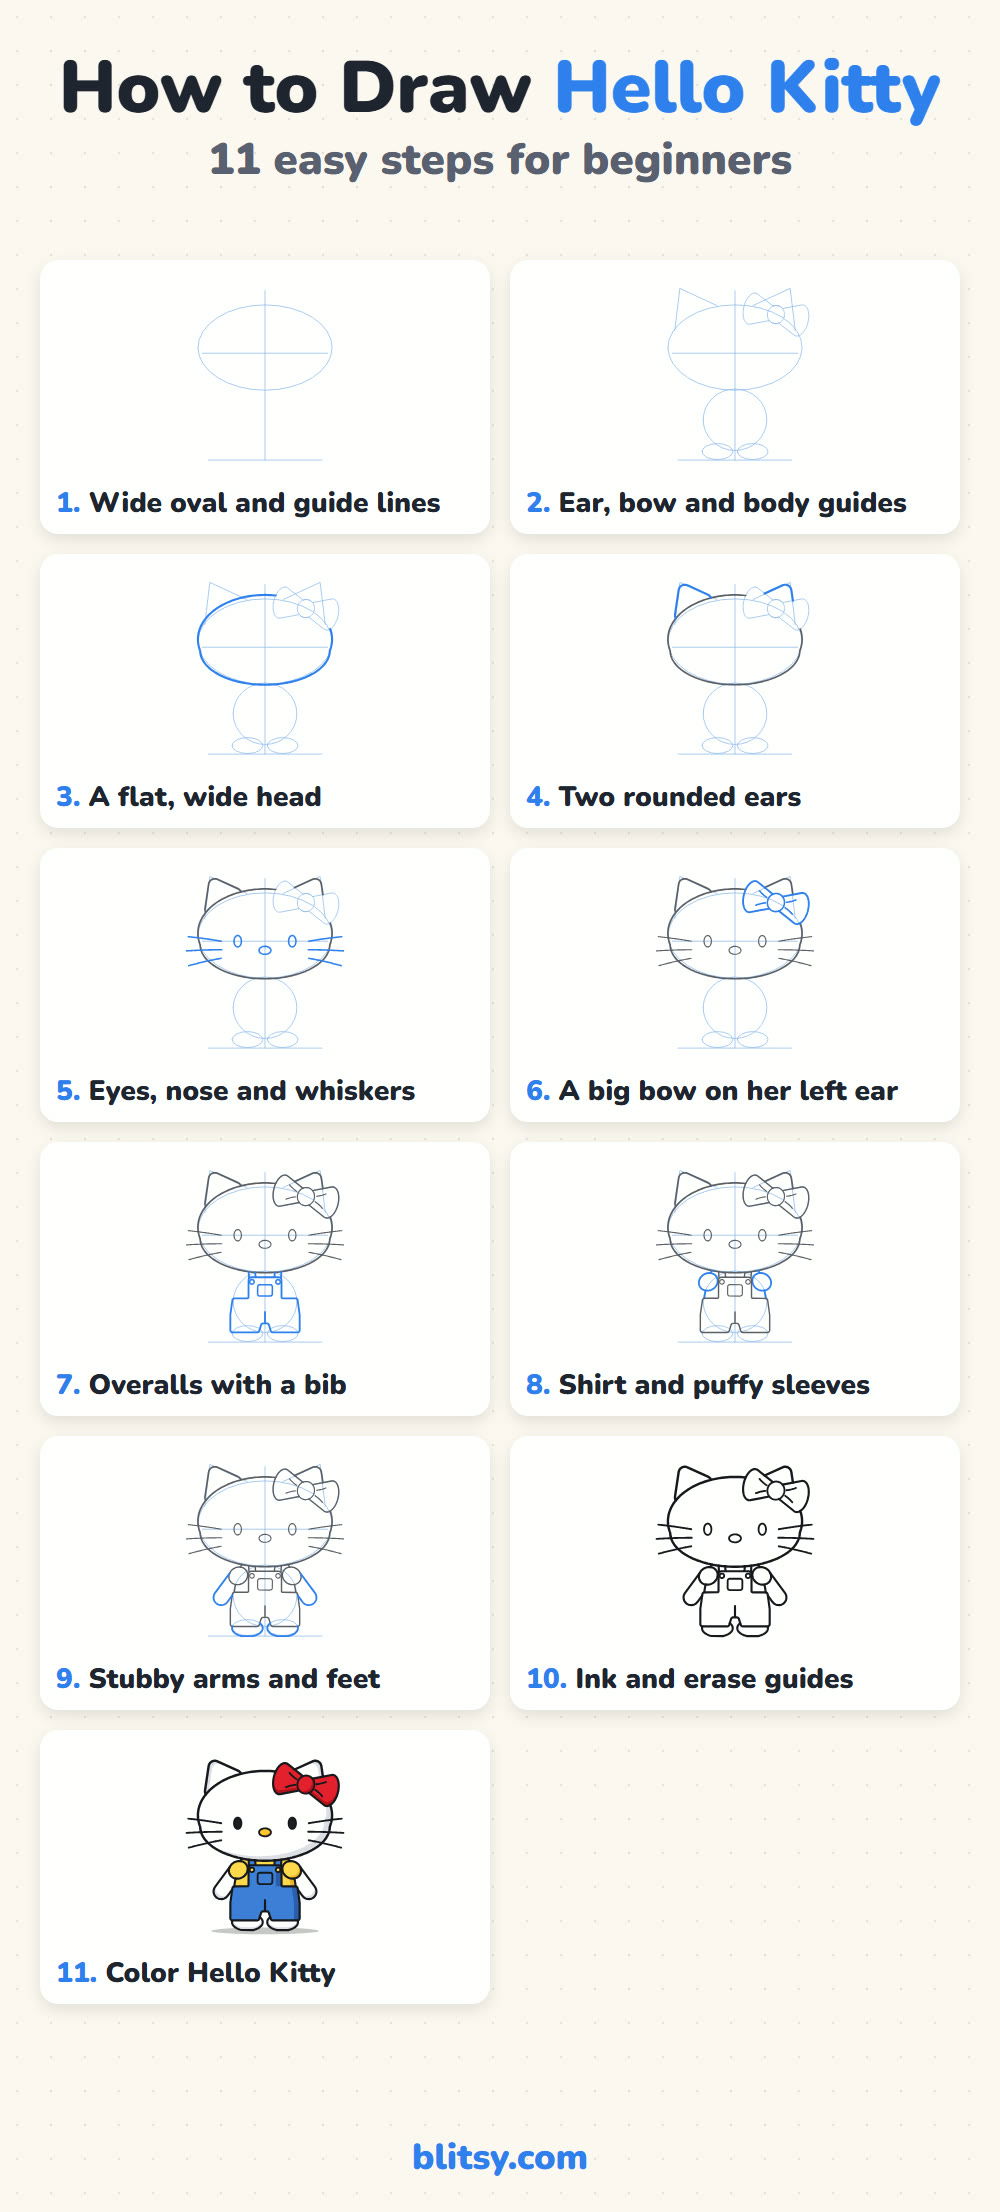
Kitty's newest lines are blue in every picture, so you always know what to add. Everything gray was drawn earlier, and the pale blue shapes are light guides you'll erase near the end.
Quick overview
⏱️ Time: around 25 minutes, plus 10 for coloring
🎯 Level: easy, good for kids from about 5 and for adult beginners
✏️ Steps: 11
🎀 You'll draw: Hello Kitty standing, with a big red bow and blue overalls
Kitty Drawing Kit: Five Simple Things
- A pencil you can press lightly with, such as an HB
- A soft eraser that won't smudge the white face
- A black fineliner or thin marker for the final lines
- Colored pencils or markers: red for the bow, yellow, blue, plus black and light gray
- A sheet of plain paper, upright
If you only own a red and a blue, that's still enough; the bow and overalls carry the whole look.
How to Draw Hello Kitty Step by Step
Step 1: Draw a wide oval and guide lines
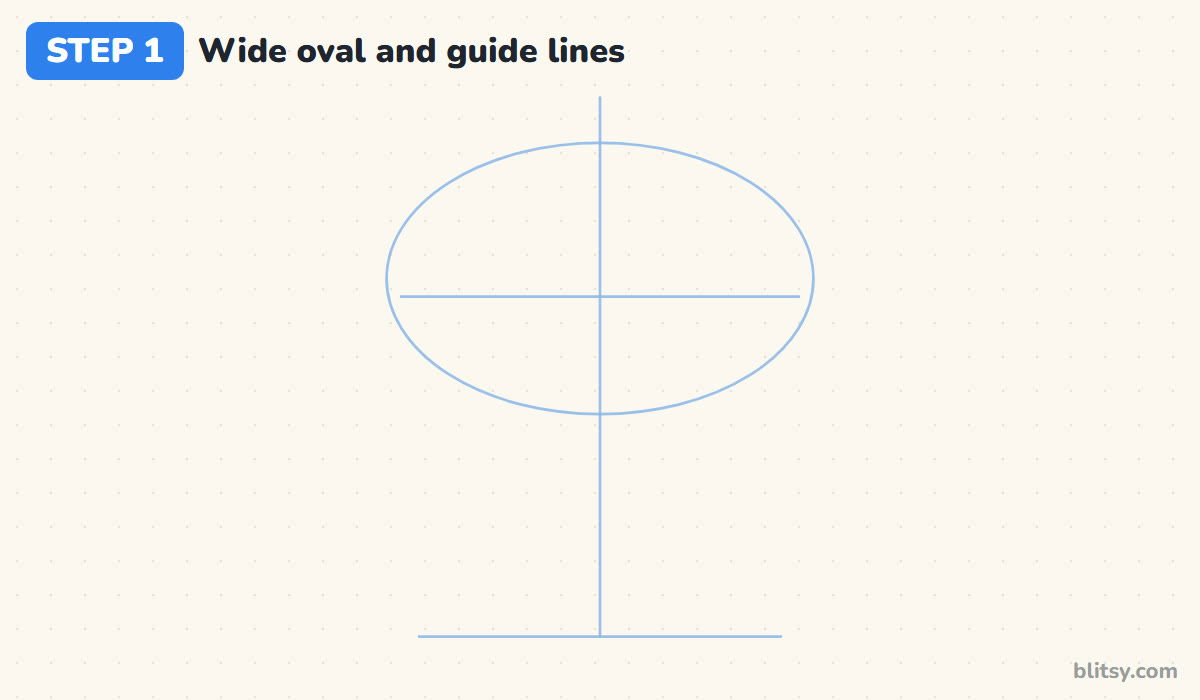
Sketch a big oval in the top half of the page, clearly wider than it is tall. Run a straight line down the middle, all the way to where her feet will stand, and draw a short ground line there. Then add a line across the oval a little below its middle. Her eyes and nose will sit on and just under that line.
💡 Tip: Turn your paper sideways for a moment if the oval keeps coming out round; a fresh angle shows the shape better.
Step 2: Sketch guides for the ears and body
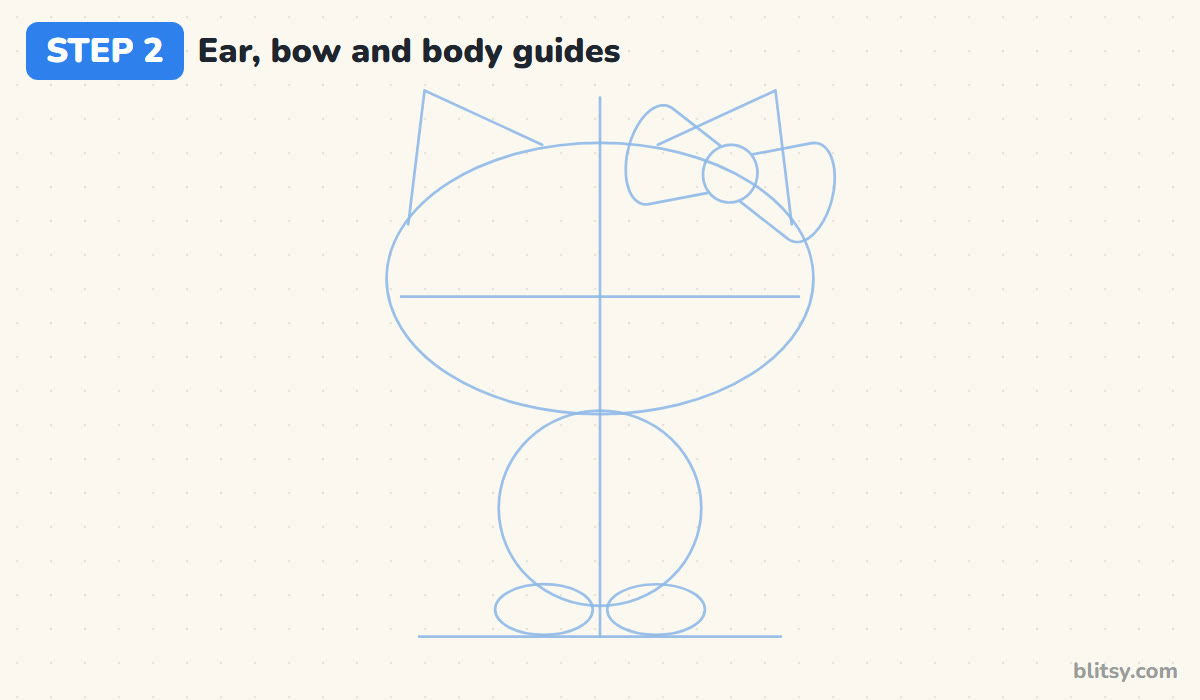
Add two pointed triangles on the top corners of the oval for the ears. On the right ear, as you look at it, sketch a rough bow: a circle for the knot and an oval loop on each side. Below the head, draw a small circle for the body and two flat ovals for the feet. The body circle is only about half as wide as the head, and that tiny body is a big part of her charm.
💡 Tip: Compare the body circle to the head by holding your pencil across both. If they look close in size, shrink the body.
Step 3: Outline the flat, wide head
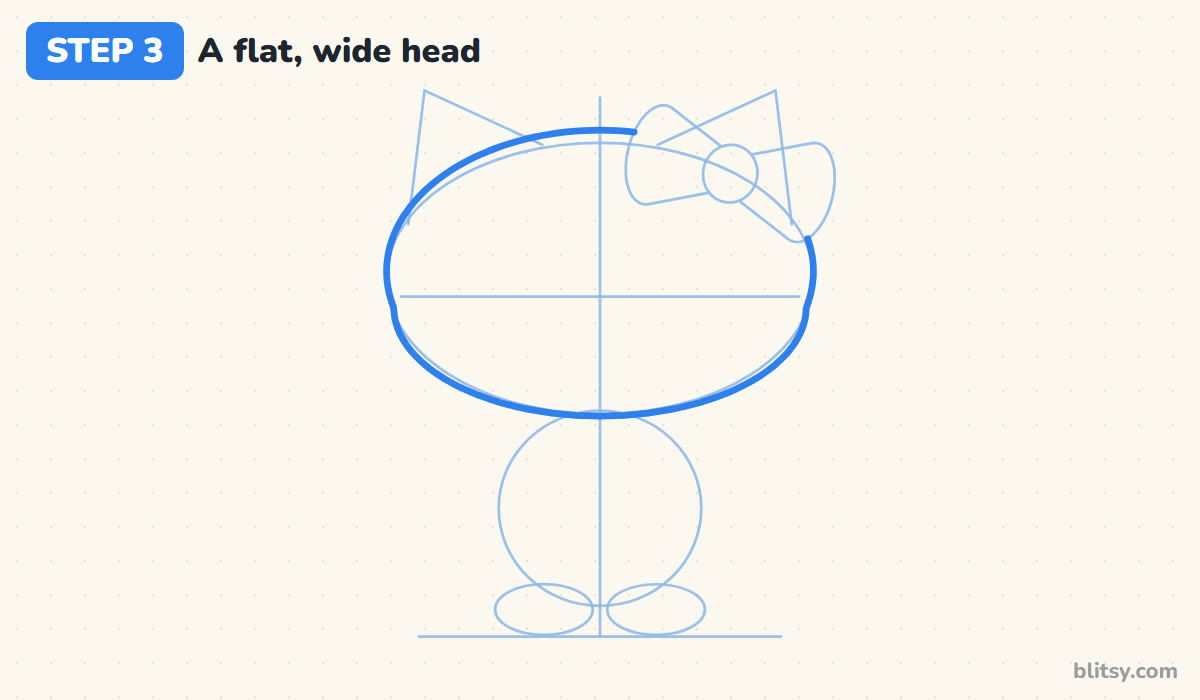
Go over the oval with a firmer line, keeping the top a little flatter and letting the cheeks bulge slightly at the bottom. Stop the line where it meets the bow guide, because the bow will cover that part of the head. I find this flattened shape matters more than any other detail; a round ball head makes her look like a generic cat.




💡 Tip: Draw the outline in two halves, left then right, starting each at the top. Matching halves are easier than one long loop.
Step 4: Add two rounded ears
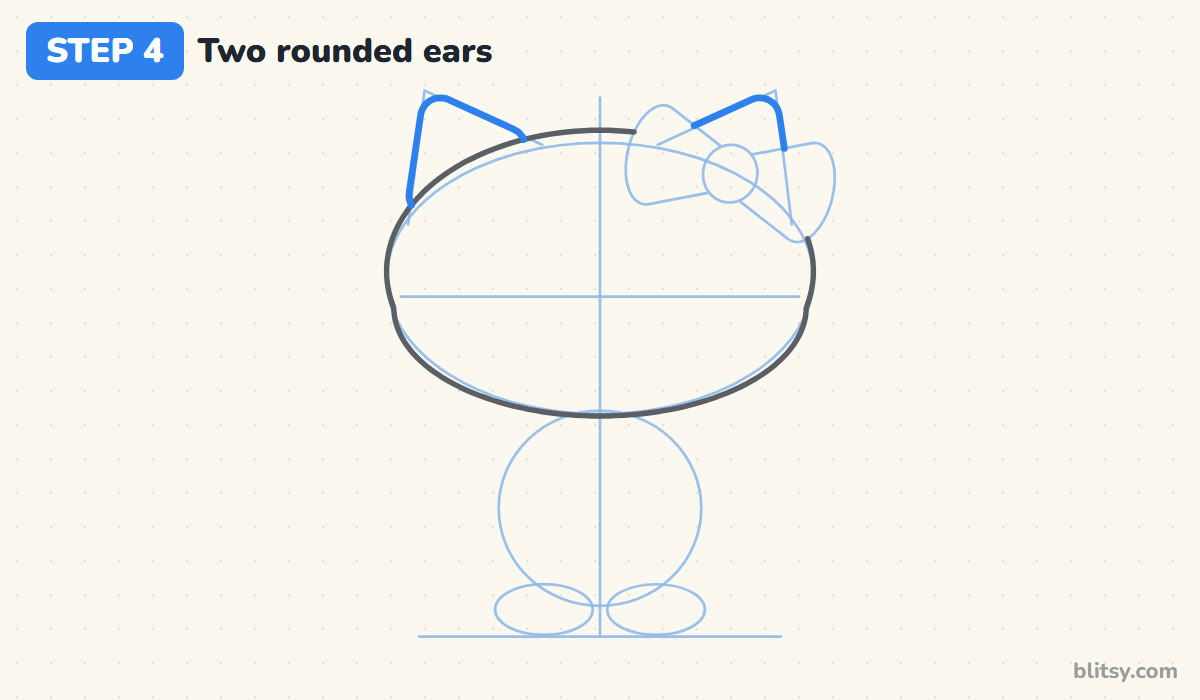
Trace the ear guides with soft, rounded tips. Each ear leans slightly outward, and its lines end where they touch the head. On the right side, only the tip of the ear peeks out, since the bow sits in front of the rest.
💡 Tip: Round the tips with a tiny curve instead of a sharp point. Pointy ears make her look more like a fox.
Step 5: Place the face details and whiskers
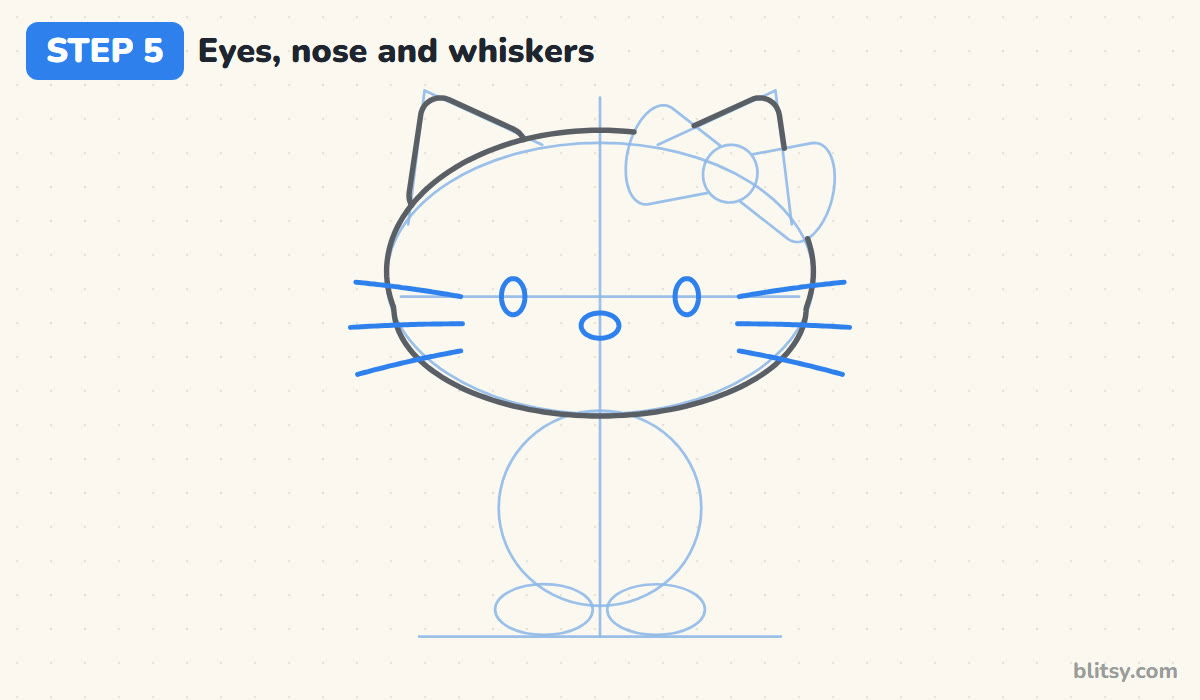
Draw two small upright ovals on the cross line, set far apart, with roughly three eye widths between them. Halfway between them and a bit lower, add a small sideways oval for the nose. Then give her three whiskers on each side, starting inside the face and crossing the outline. There's no mouth to draw. Hello Kitty is always shown without one, and adding a smile changes who she is.
💡 Tip: Keep the eyes tiny. Beginners almost always draw them too big, and her calm look disappears.
Step 6: Draw the big bow on her left ear
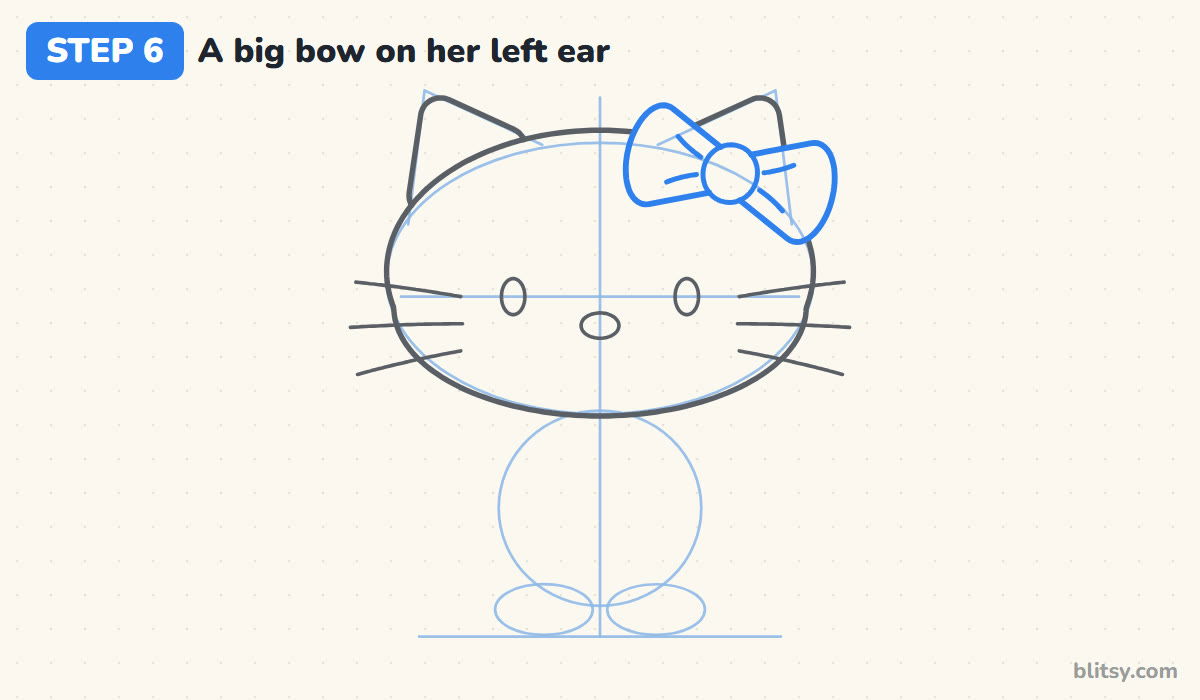
Her bow sits on her left ear, which is on your right when she faces you. Go over the knot circle, then shape each loop like a fat, rounded fan that widens away from the knot. Add two short crease lines in each loop, starting just outside the knot. The bow tilts down a little toward the outside, following the slope of the head.
💡 Tip: Draw the knot first and the loops second, so both loops grow from the same center.
Step 7: Draw the overalls with a bib
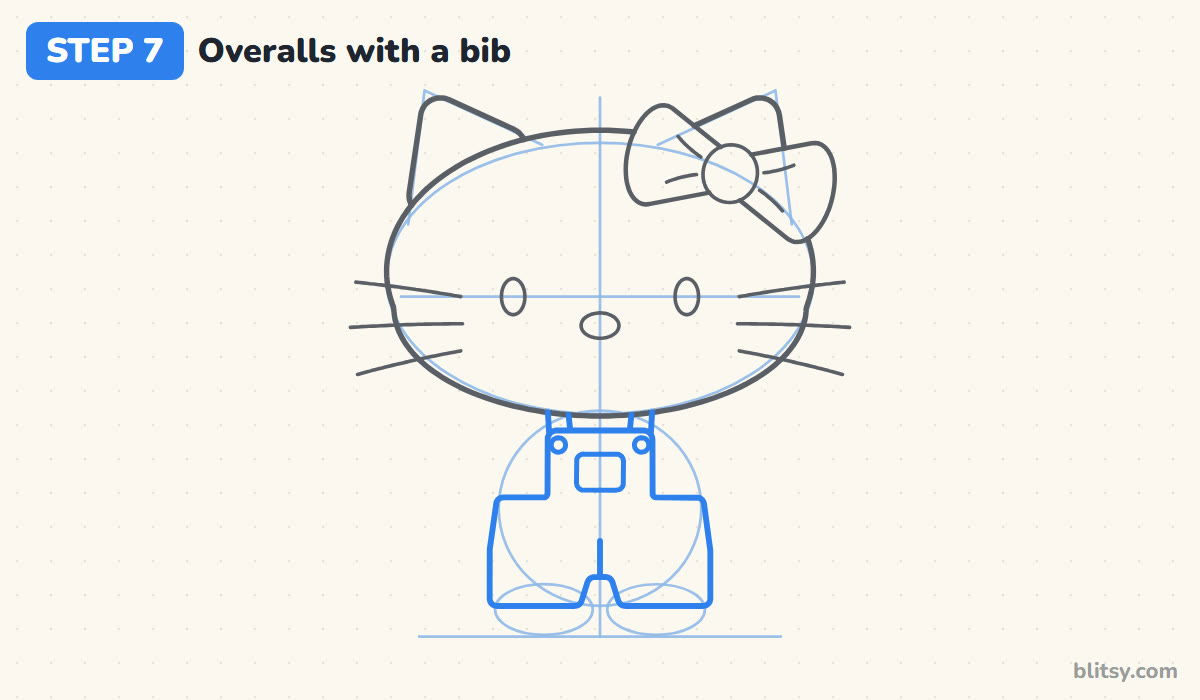
Below the head, draw a small square bib with two short straps going up under the chin. Under the bib, draw the wider pants part with straight sides and a flat bottom, and cut a small notch in the middle so you get two short legs. Finish with a little pocket on the bib, a button at each strap and a short center seam.

💡 Tip: Use the body circle as a size limit. The pants can stick out a bit at the sides, but not much.
Step 8: Add the shirt and puffy sleeves
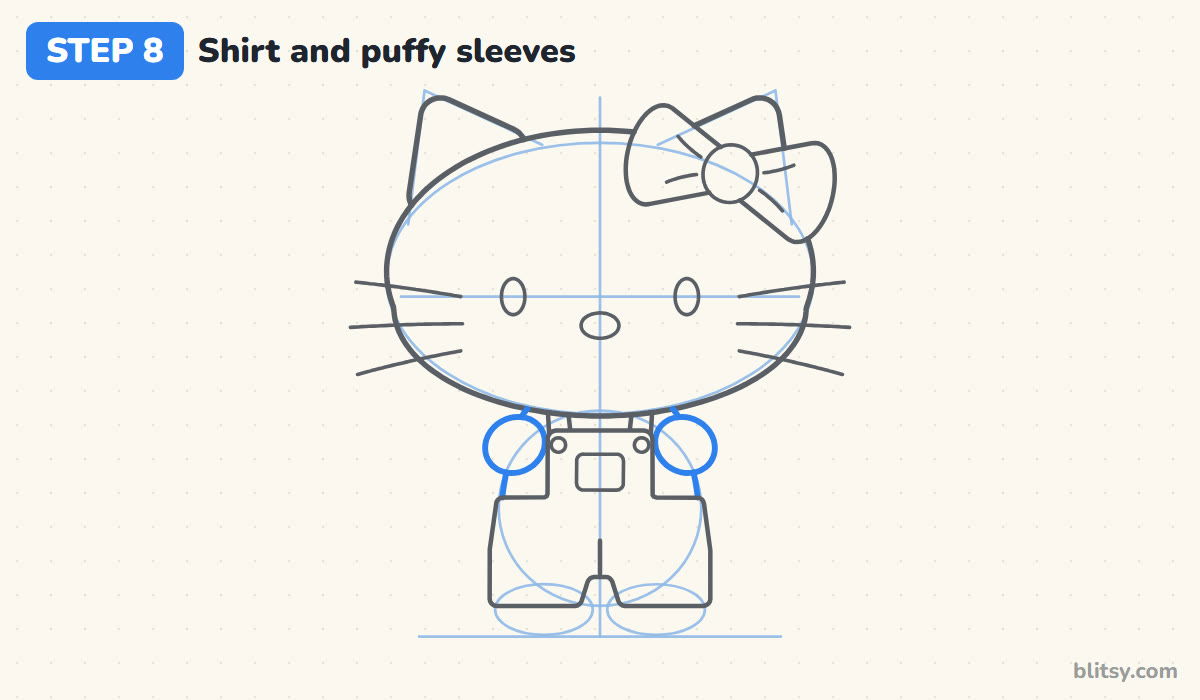
Now fill in the shirt that shows around the overalls. Draw a short line on each side from under the head down to the pants. Over each shoulder, add a round puffy sleeve that overlaps the bib edge slightly. The sleeves are what make her look dressed instead of just colored in.
💡 Tip: Make both sleeves the same size by drawing them one right after the other, without stopping between.
Step 9: Draw stubby arms and round feet
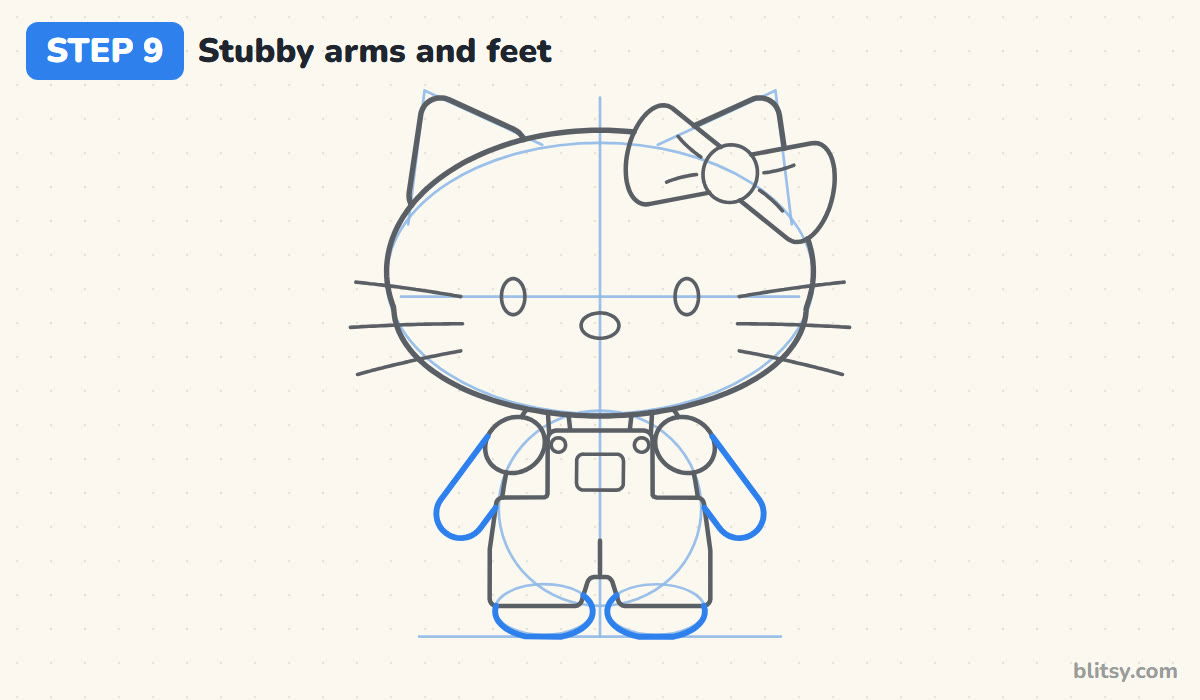
From under each sleeve, draw a short, thick arm that angles down and out, ending in a round mitten hand with no fingers. Keep them chunky, roughly twice as long as a sleeve is wide. At the bottom, add a round white foot under each leg, with a flat sole resting on the ground line.
💡 Tip: Short arms look right here. If you're unsure, stop them before they reach the bottom of the pants.
Step 10: Ink the lines and erase the guides
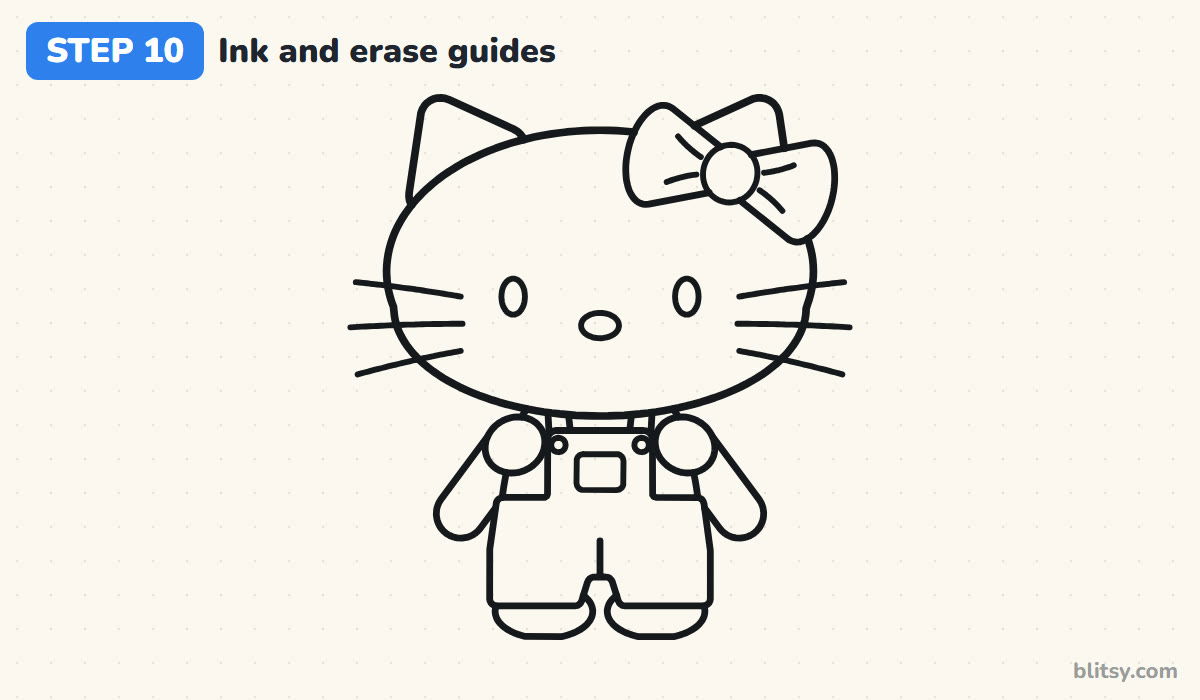
Trace every keeper line with your fineliner. Go slowly, pulling the pen toward you where you can. I take the most care on the face, because a wobbly eye or nose is the first thing people notice. When the ink is completely dry, erase the oval, the cross lines, the bow guide and the body circles.
💡 Tip: Test your pen on scrap paper first. A pen that skips will leave gaps in the whiskers.
Step 11: Color Hello Kitty
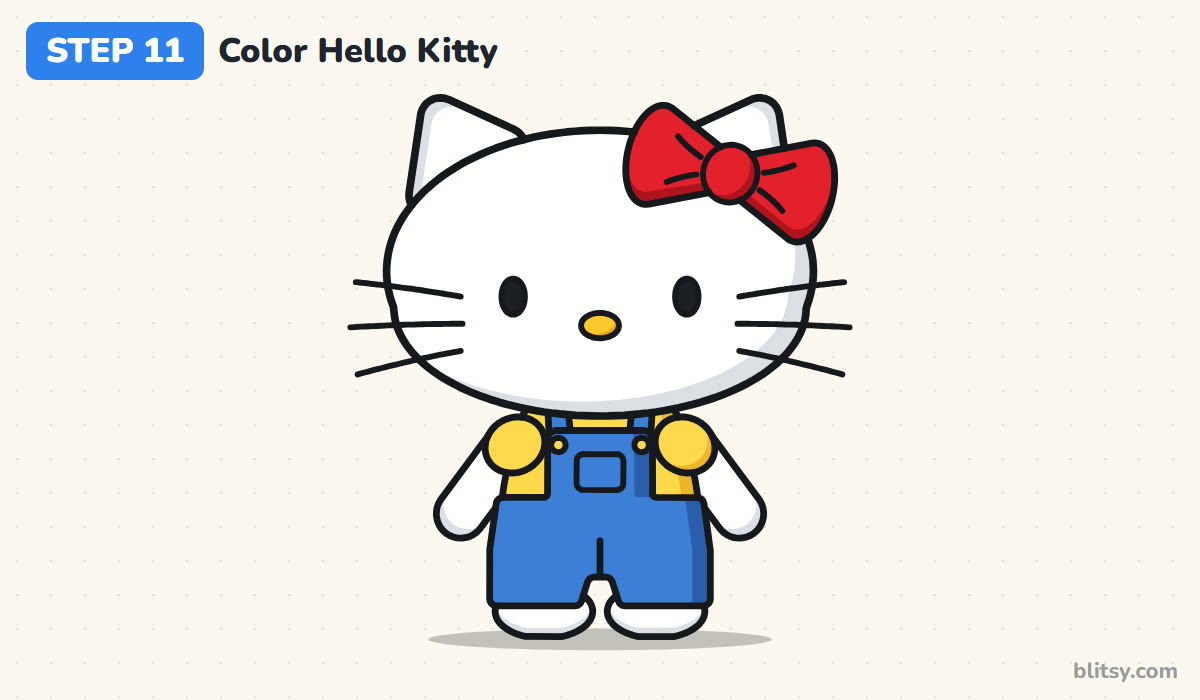
Leave her head, ears, arms and feet white, and shade their right and lower edges with light gray so she doesn't disappear into the paper. Color the bow red with a darker red under each loop. The nose, shirt and buttons are yellow, the overalls blue, and the eyes solid black.


💡 Tip: Press very gently with the gray. Heavy gray shading makes white fur look dirty instead of soft.
Where a Hello Kitty Sketch Goes Off Model
- Drawing a mouth. It's the most common change people make, and it turns her into a different cat. Leave the space under the nose empty.
- A round head. Her head is wider than it is tall. Squash your guide oval before you outline it.
- Eyes too close together. Close-set eyes look worried. Keep a wide gap, with the nose sitting in the middle.
- The bow on the wrong ear. The bow belongs on her left ear, which is your right. Check before you ink.
- A body as big as the head. A large body makes her look like a regular cat figure. Keep it about half the head's width.
New Outfits and Bows for Your Kitty
Once the head and bow feel easy, the outfit is yours to play with. Swap the overalls for a pink dress, give her a striped shirt, or trade the red bow for a pink or yellow one with a small flower in the middle. Hello Kitty was created by Sanrio in Japan in 1974 and designed by Yuko Shimizu, and she has worn countless outfits since, so there's no wrong costume. If you'd like to try a real cat next, the cat face drawing tutorial is a good follow-up, and fans of cute characters will enjoy how to draw a Care Bear too.
Printable Hello Kitty Coloring Page and Step Guide
Want to color her without drawing first? Print the free Hello Kitty coloring page. The small colored version at the top shows which color goes where, and the big outline has thick lines that young kids can stay inside. The step-by-step guide PDF holds all 11 steps with their tips, two to a page, and prints on Letter or A4 paper.
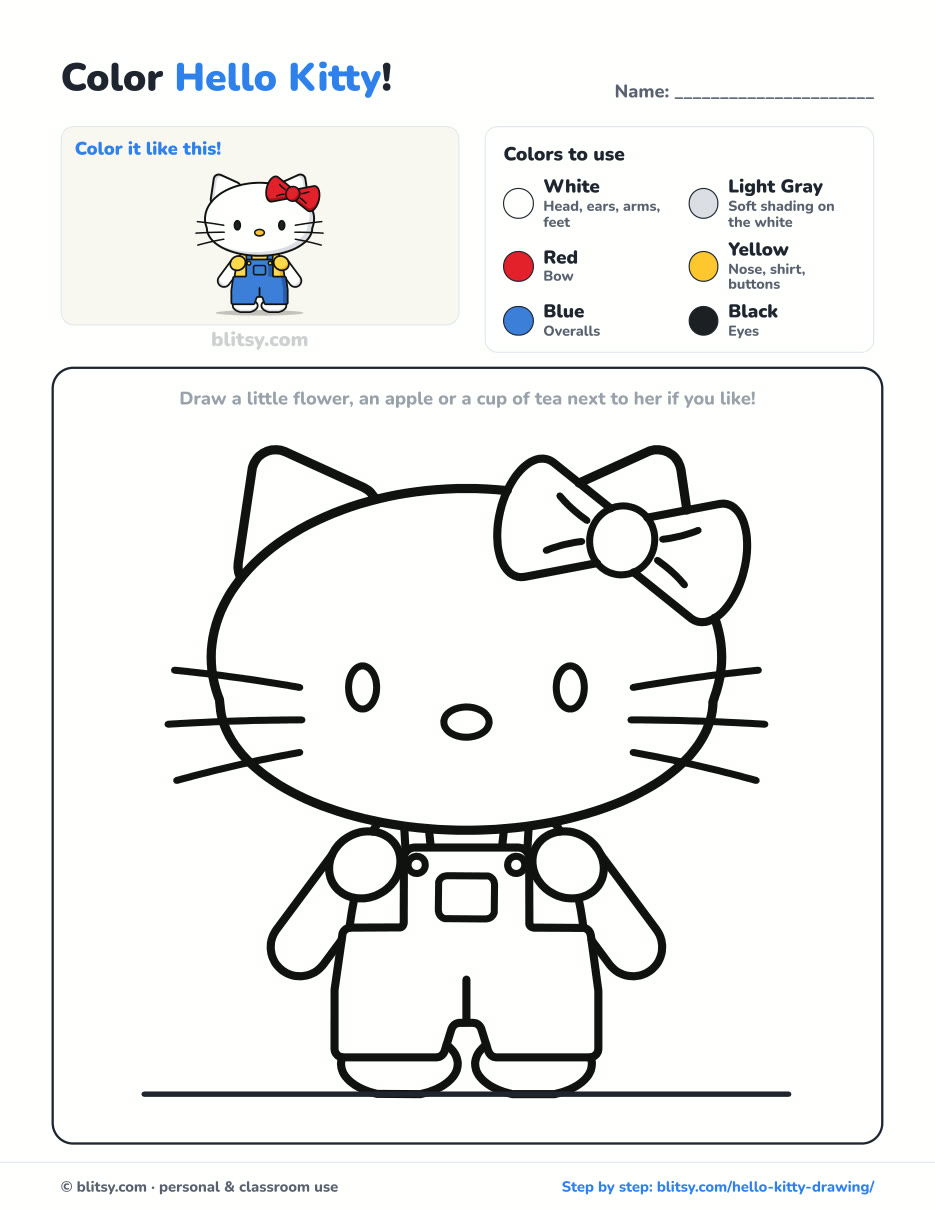
Black outlines with a colored example and the color names at the top. Ready to print and color.
⬇️ Download Coloring PageEvery step picture with its instructions and tips, to keep beside your paper while you draw.
⬇️ Download Drawing Guide📱 On a phone? Tap a download button, then open the file and choose Share → Save to Files or Print. On a computer, the PDF opens or saves straight to your Downloads folder.
Pin the Bow and Overalls Lesson
Hello Kitty Done? More Cute Tutorials to Try
Each one below is a full step-by-step tutorial with a picture for every step, all in the same friendly style.
- Music Note Drawing: A purple treble clef and a ribbon of bright notes grow from one soft wave in the how to draw music notes lesson.
- Chibi Drawing: Use the two-head method to draw a chibi in a cat-ear hoodie, boba cup in hand, with this chibi drawing tutorial.
- Dragon Head Drawing: Turn a plain circle into a proud green dragon with purple frills in the dragon head drawing step by step guide.
- Love Drawing: Two bears hug under a floating balloon in this love drawing tutorial.
- Joker Drawing: Draw a chibi Joker holding up a playing card with how to draw the Joker step by step.
- Valentine's Day Drawing: A card, a box of chocolates and a rose line up in the Valentine drawing tutorial, with a ladybug sneaking in.
Hello Kitty Drawing Questions, Answered
Why doesn't Hello Kitty have a mouth?
She has always been drawn without one. Without a mouth, her face doesn't show one fixed mood, so she can look happy, calm or thoughtful depending on how you feel when you look at her.
Which ear does Hello Kitty wear her bow on?
On her left ear. When she faces you, that's the ear on your right side.
Is Hello Kitty easy for kids to draw?
Yes. Most of her is ovals and circles. Kids around 5 or 6 can manage it with a little help on the bow, and younger ones can stop once the head and bow are done.
How long does it take to draw Hello Kitty?
Plan on about 25 minutes for the sketch and ink, and another 10 minutes or so to color her in.
Pick a bow color, sharpen that pencil, and see what outfit your kitty ends up wearing. 🎀
Related posts:
 How to Draw a Tooth Step by Step (Cute and Easy for Kids)
 How to Draw a Mother and Daughter Step by Step (Easy for Kids)
 How to Draw Wonder Woman Step by Step (Chibi for Kids)
 How to Draw the Hulk Step by Step (Easy Chibi for Kids)
 How to Draw Iron Man Step by Step (Easy Chibi for Kids)
 How to Draw Springtrap Step by Step (Cute Chibi for Kids)
 How to Draw a Police Car Step by Step (Easy for Kids)
 How to Draw a Monster Truck Step by Step (Easy for Kids)
 How to Draw a Fire Truck Step by Step (Easy for Kids)
 How to Draw a Mermaid Step by Step (Easy Cartoon for Kids)
 How to Draw a Boat Step by Step (Easy Sailboat for Kids)
 How to Draw a Care Bear Step by Step (Cute Fan Art for Kids)

