
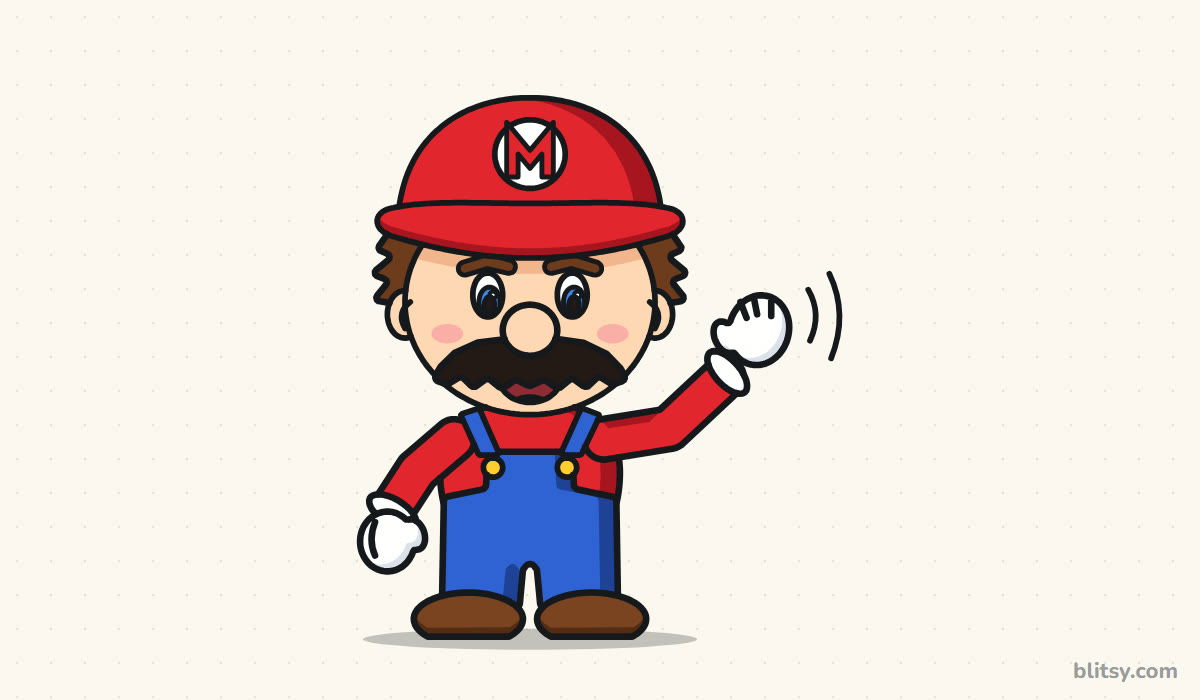
A red cap, a round nose and a mustache shaped like a pair of clouds: three shapes, and nearly everyone knows who you've drawn. Below I show you how to draw Mario step by step as a small chibi figure with a big head, short legs and one gloved hand up in a wave. This is my simple fan-art version for practice, not official Nintendo artwork, so treat it as a friendly exercise rather than a copy job.
Every picture paints that step's fresh lines blue, while finished work turns gray. Pale blue helper shapes get erased after inking.
Quick overview
⏱️ Time: about 30 to 40 minutes including color
🎯 Level: easy, good for kids around 7 and older
✏️ Steps: 12
🍄 You'll draw: a full-body chibi Mario waving hello
Mustache-Ready Art Supplies
- A soft pencil (HB or 2B) for light helper shapes
- A clean eraser; a kneaded one won't scuff the paper
- A black fineliner or marker for the final lines
- Colored pencils or markers: red and blue for the clothes; peach and brown for skin and hair; yellow for buttons
- Plain white paper, turned upright
Markers give the cap and overalls a flat cartoon look, but pencils are easier around the small buttons.
How to Draw Mario Step by Step
Step 1: Draw a big head circle and a center line
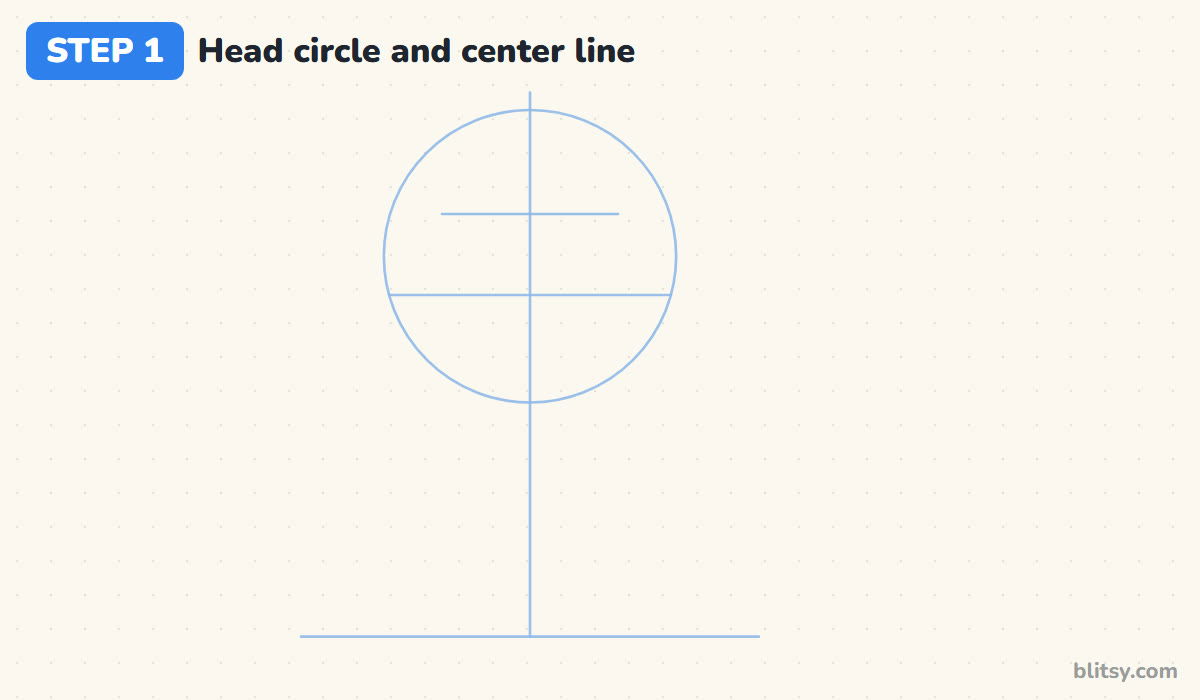
Chibi characters are mostly head, so this circle should fill a bit more than the top half of your page. Press lightly. Run a vertical line from the top of the circle down to a flat ground line, then add a level line across the lower circle for the eyes and a shorter one higher up where the cap ends.
💡 Tip: If your circle comes out lumpy, go around it again lightly instead of erasing; the outline will cover the extra lines later.
Step 2: Sketch guides for the body and limbs
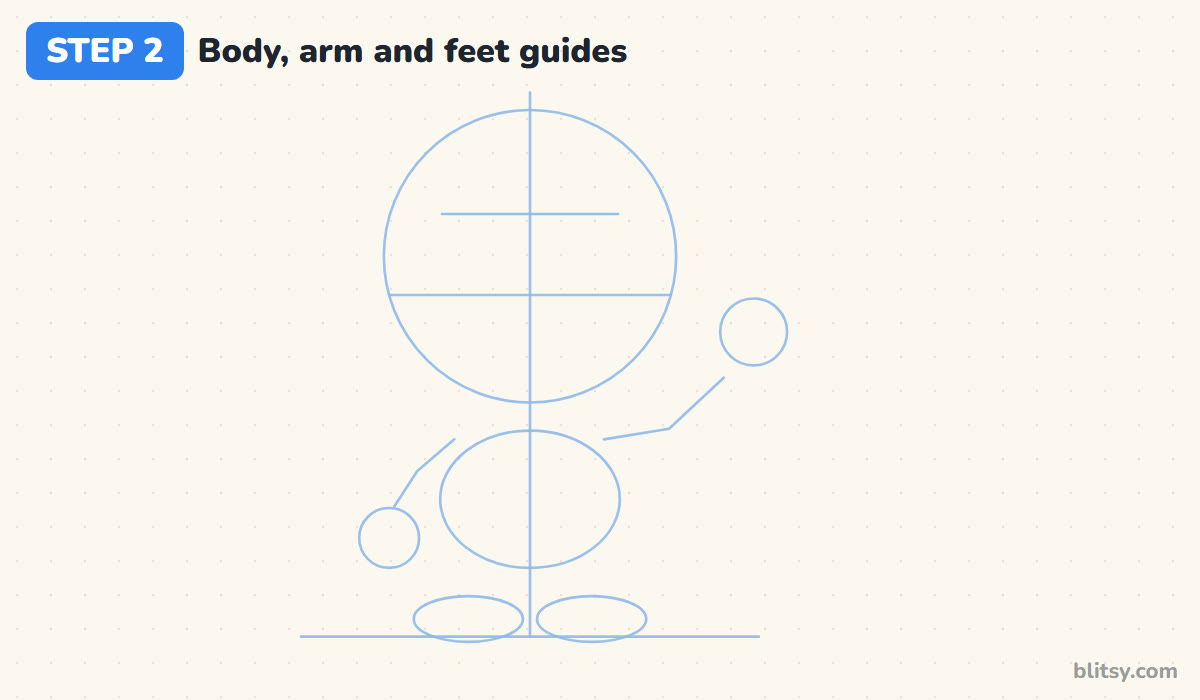
Under the head, draw a small oval for the body, about two thirds as wide as the head. Add stick lines for the arms: one hangs down at an angle, the other bends at the elbow and points up beside his face. Put a circle at each arm's end for the hands and two flat ovals on the ground line for shoes.
💡 Tip: Keep the raised hand well away from the head circle, or the glove and the hair will crowd each other.
Step 3: Draw the cap dome and its curved brim
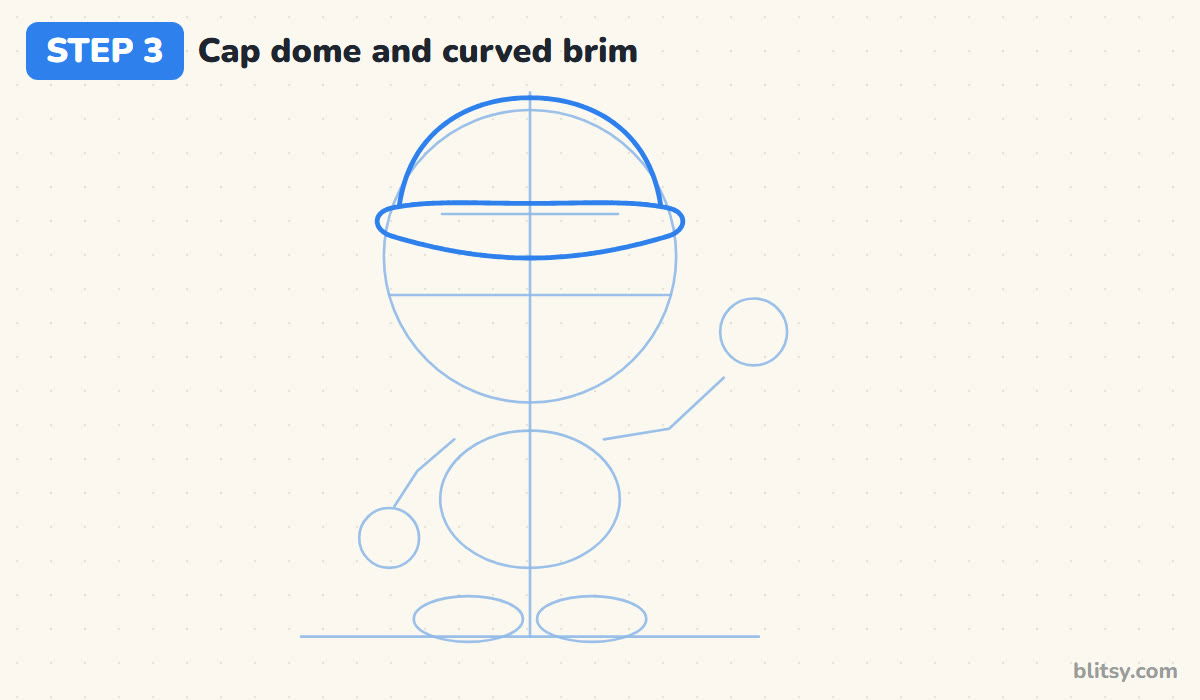
The cap is the first real outline, so press a little harder now. Draw a rounded dome over the top of the head circle, slightly wider than the circle at its base. Below it, add the brim as a long band that is thin at the ends and bulges down in the middle, the way a cap bill looks when someone faces you.
💡 Tip: Let the brim stick out past the dome on both sides by about a finger width; that overhang is what makes it read as a cap and not a helmet.
Step 4: Shape the round face, then add ears and hair
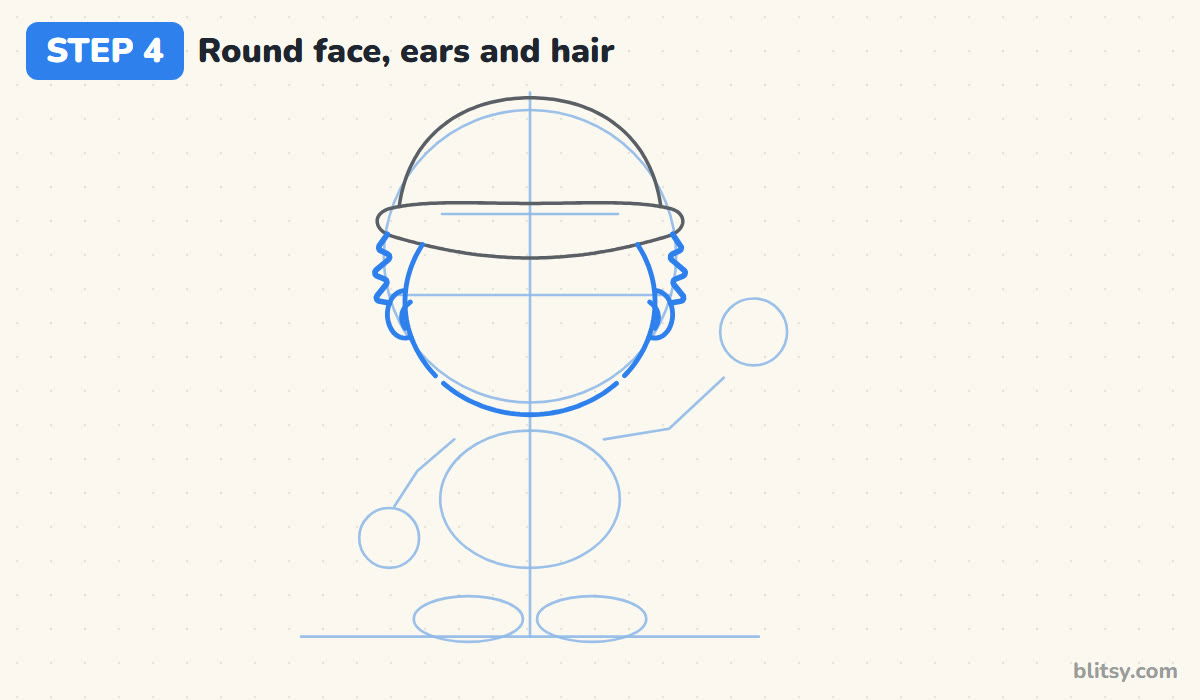
His face is a wide oval that starts under the brim and follows the head circle down. Add a small ear on each side at eye level. Behind the ears, draw his brown hair as a bumpy tuft poking out under the cap. I keep it a bit messy on purpose, because neat hair makes him look like someone else.
💡 Tip: Draw the hair tufts with short up-and-down wiggles, about four bumps per side.
Step 5: Add the big nose and the mustache
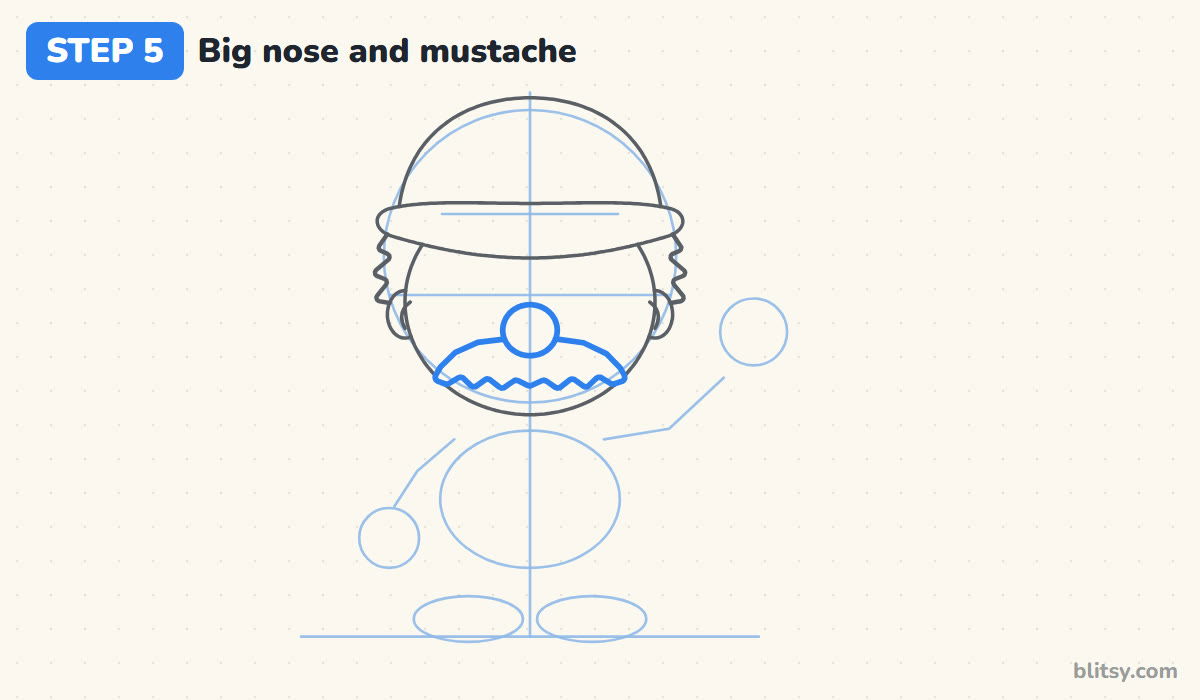
Put a large circle right in the middle of the face, just below the eye line. Yes, really that big. Under it, draw the mustache as one wide shape reaching almost to the cheeks, with rounded bumps along the bottom edge. Most beginners make it too thin, and the face loses its charm.
💡 Tip: Draw the nose after the mustache outline is planned, so the nose can overlap the top of the mustache.
Step 6: Draw the eyes and a small smile
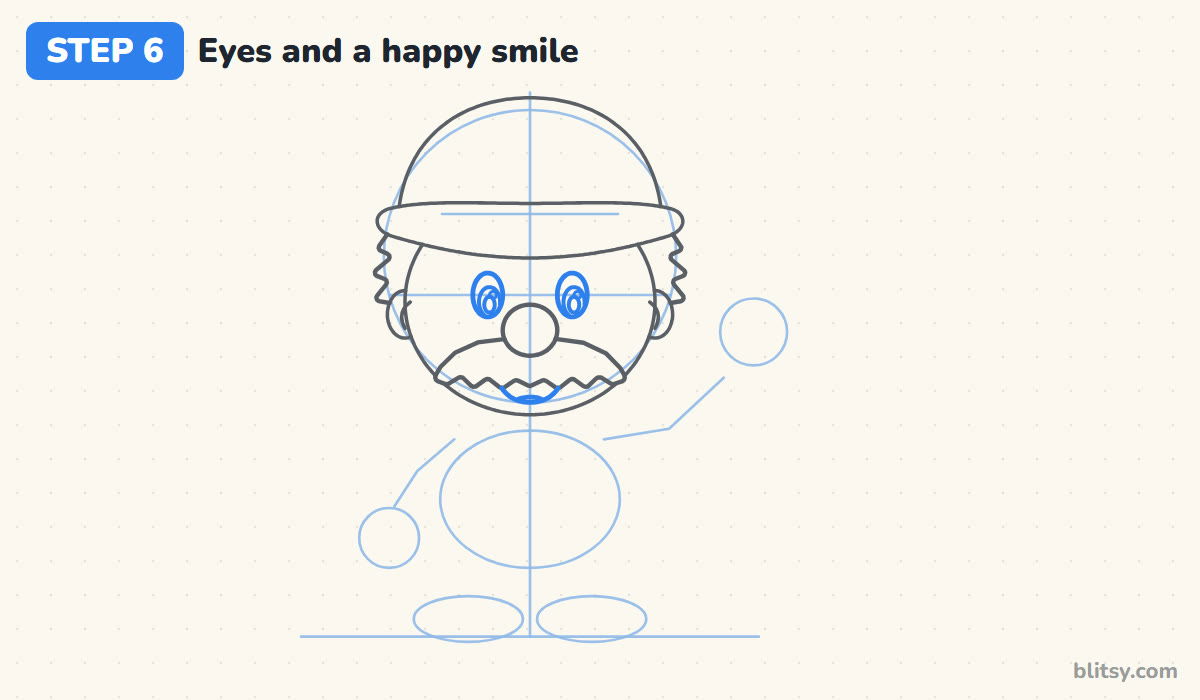
On the eye line, draw two tall ovals, one on each side of the nose. Inside each, add a smaller oval for the blue iris in the lower half, a dark pupil in it and a tiny circle of shine near the top. Under the mustache, a short open smile with a little tongue is enough, since most of the mouth hides behind the hair.
💡 Tip: Put both shine circles on the same side of the eyes so he looks straight at you.
Step 7: Draw the overalls and two buttons
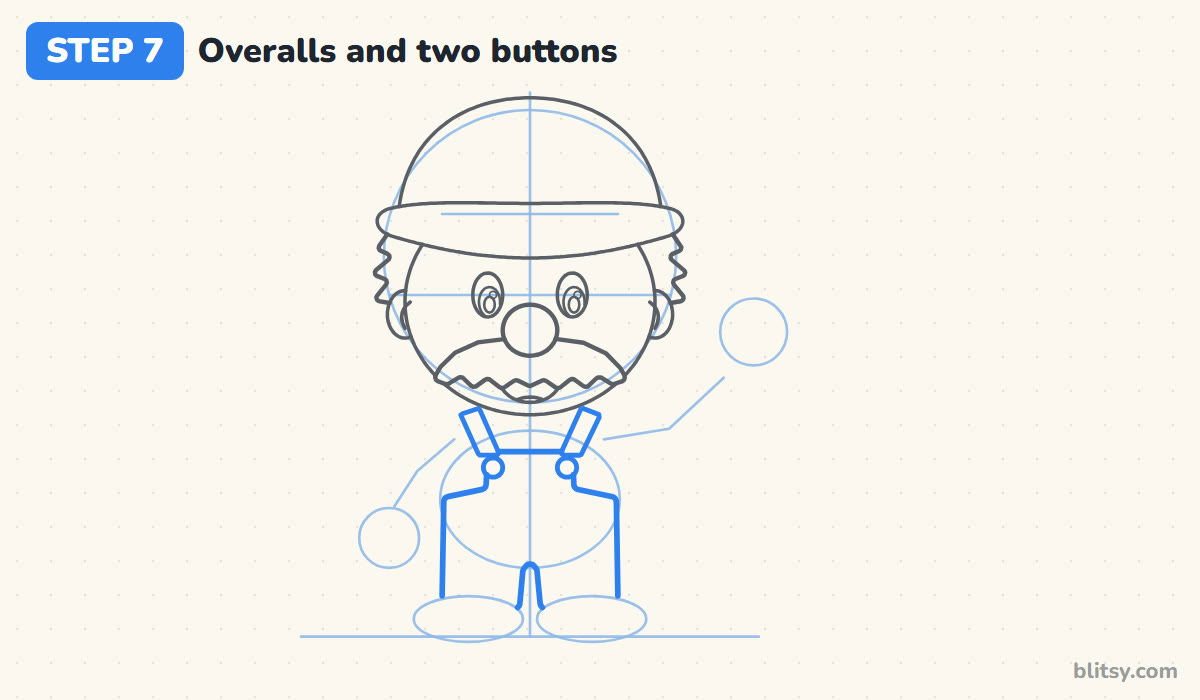
The overalls come before the shirt because they sit on top of it. Draw a square bib on the chest, widen out at the waist and run two short, wide pant legs down to the shoe ovals with a small gap between them. Two straps go from the bib corners up over the shoulders, with a round button where each one meets the bib.

💡 Tip: Keep the pant legs short and chunky; long legs break the chibi look straight away.
Step 8: Add the shirt and the waving arms
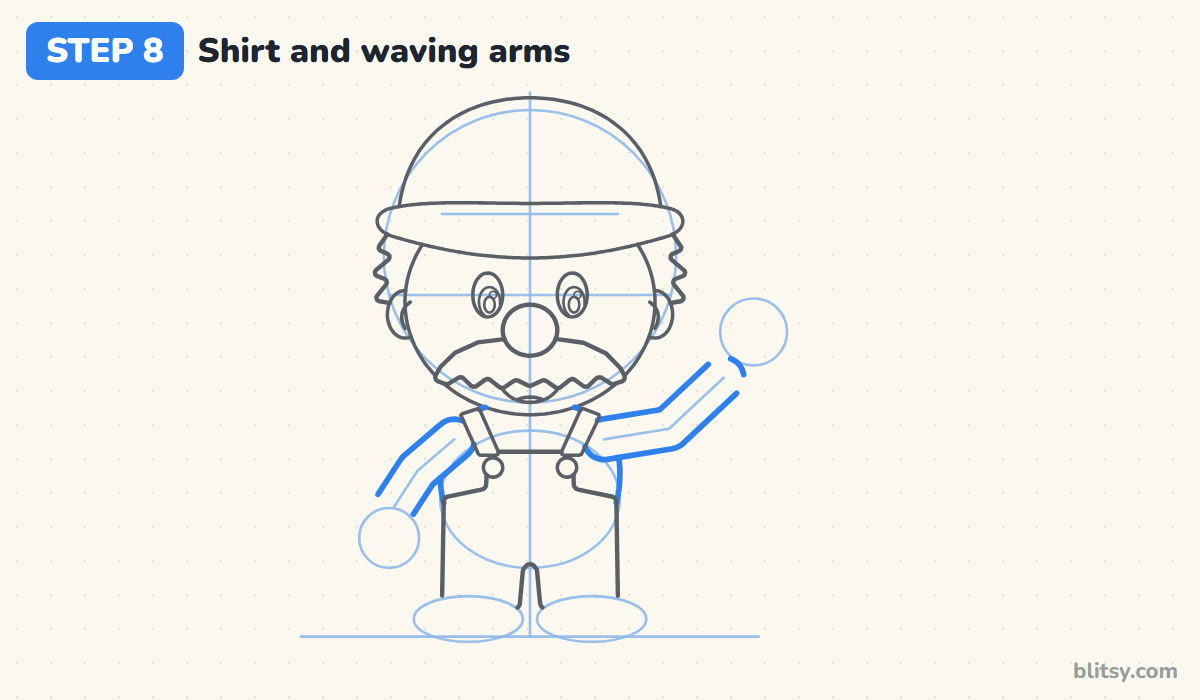
The red shirt only shows where the overalls don't cover it, at the shoulders and beside the bib. Draw the sleeves around your arm guides as two tubes with rounded elbows. The raised arm has a clear bend, which turns the pose into a wave.
💡 Tip: Make both sleeves the same thickness from shoulder to wrist; a sleeve that narrows to a point looks like a noodle.
Step 9: Draw the gloves and chunky shoes
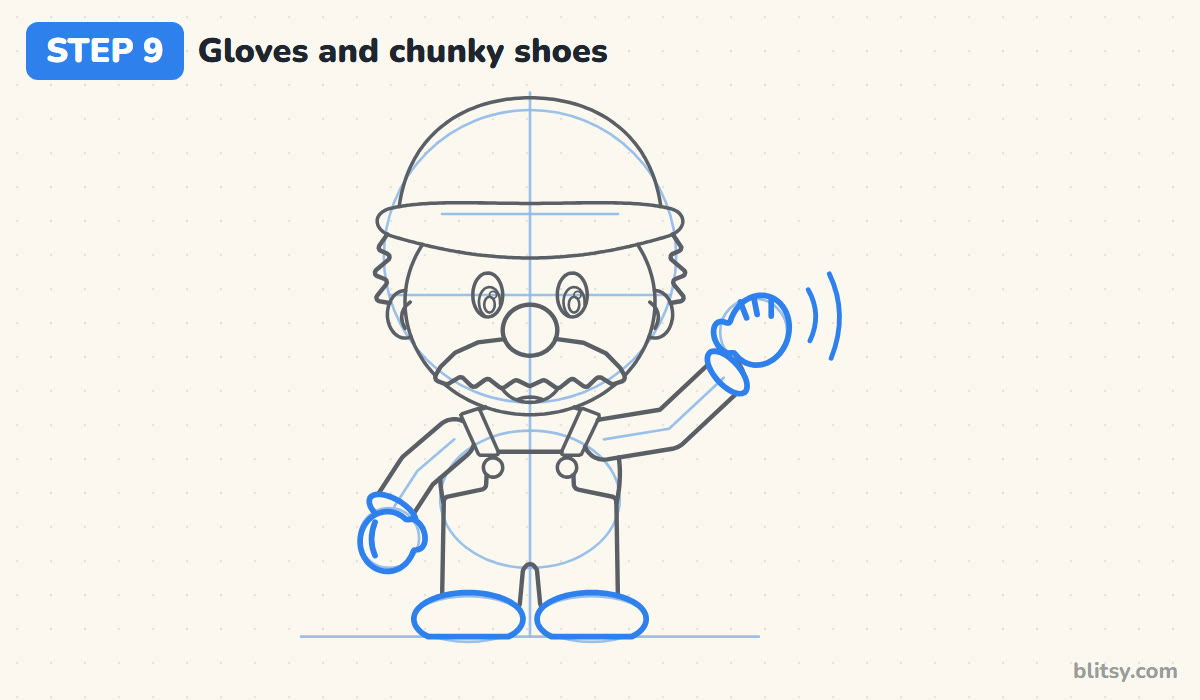
Each glove starts with a ring-shaped cuff at the end of the sleeve. The lowered hand is a round mitten with a thumb bump. For the waving hand, draw an open mitten with three short finger lines on top and two curved motion lines beside it. The shoes are big rounded shapes with flat bottoms on the ground line.
💡 Tip: Make the shoes slightly wider than the pant legs, which keeps him steady on his feet.
Step 10: Add the cap badge and eyebrows
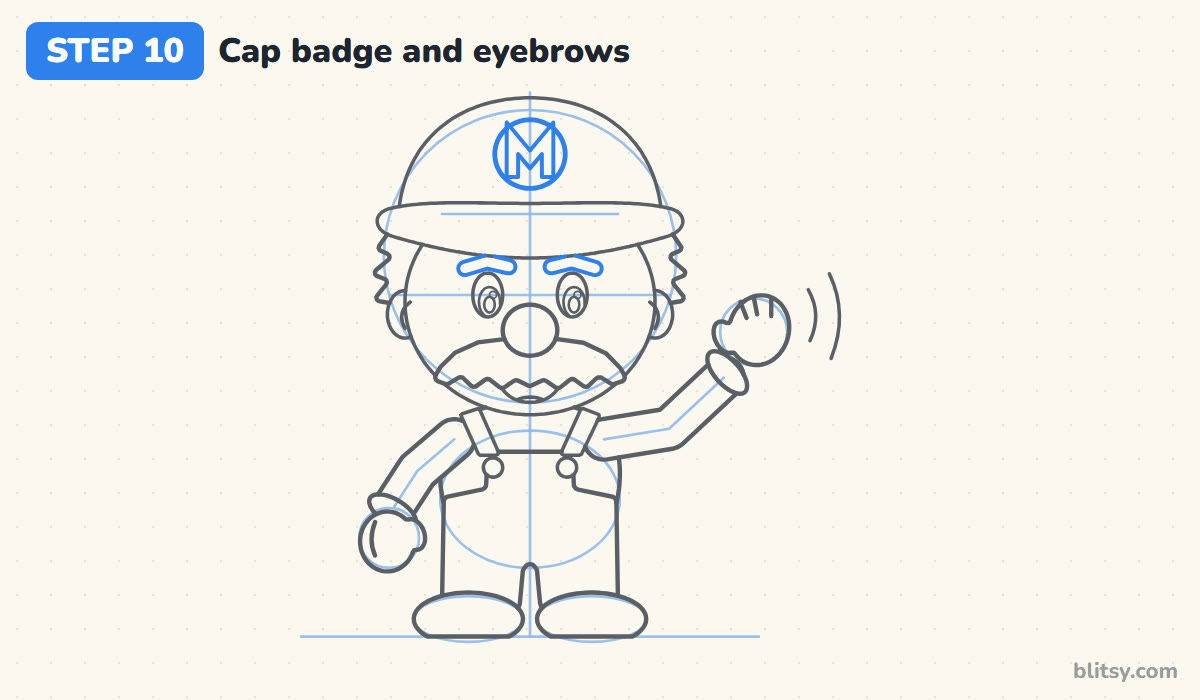
Draw a white circle on the front of the cap, centered on your guide line. Inside it, sketch a simple block letter M. Then add two thick, arched eyebrows peeking out under the brim for a friendly, slightly surprised look.
💡 Tip: Draw the M as two tall posts first, then join their tops with a V; it stays centered more easily that way.
Step 11: Ink the lines and erase the guides
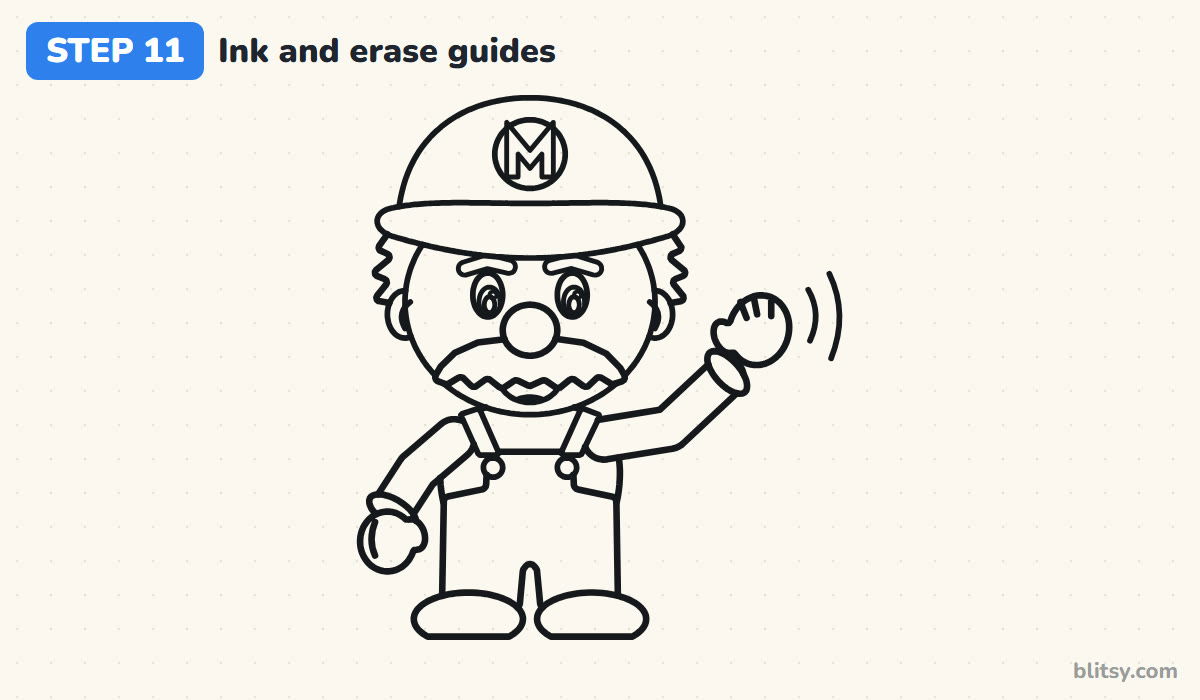
Go over every keeper line with your black pen. I start with the face and mustache, because a wobble there shows the most, and do the shoes last. Skip the circles and stick arms. Let the ink dry for a minute before you erase, or it will smudge.

💡 Tip: Use a slightly thicker line for the outside outline and a thinner one for inside details like the eyes and fingers.
Step 12: Color your Mario
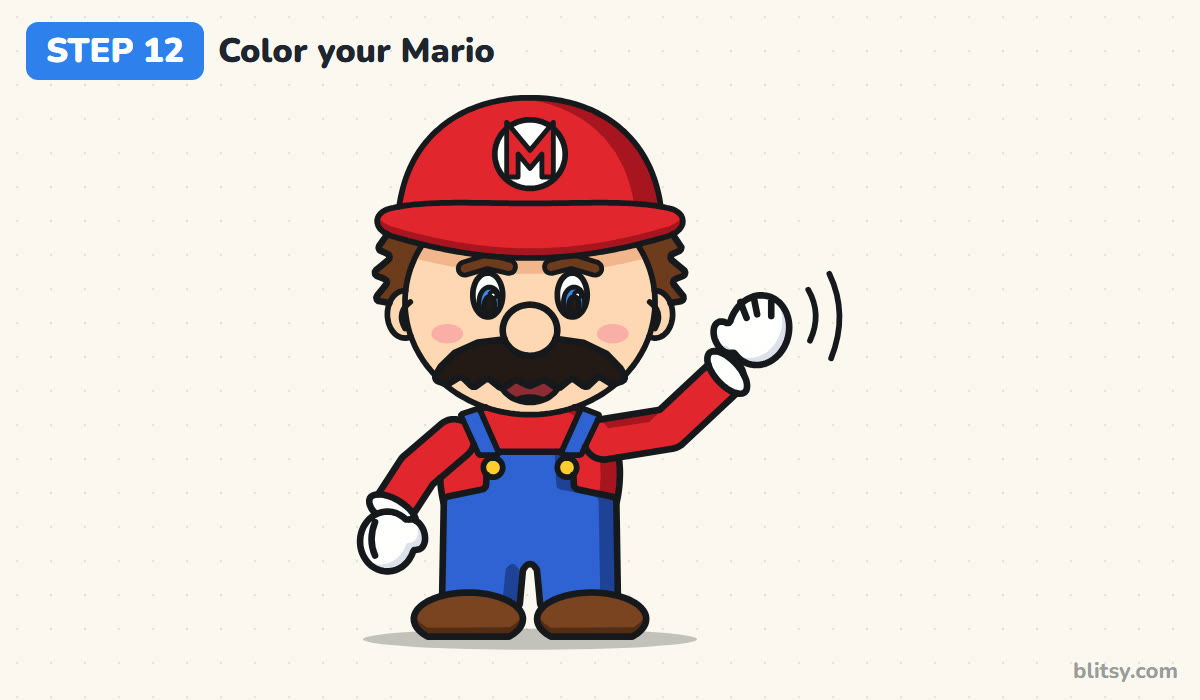
The cap and shirt are red, and so is the M; leave the circle behind it white. The overalls are blue with yellow buttons. Skin parts get peach. Hair, brows and shoes are brown, the mustache is black and the gloves stay white. A darker red on one side of the cap and a darker blue on the overalls make him look rounder.
💡 Tip: Add a light pink spot on each cheek last; it makes the face feel warm and happy.
Where Mario Sketches Tend to Slip
- A tiny nose. A small nose turns him into a generic cartoon man. Make it about as wide as one eye and a half.
- A skinny mustache. Draw it thick and wide, with rounded bumps along the bottom, so it almost touches the cheeks.
- A cap with no brim overhang. Without the brim sticking out, the cap looks like a swim cap. Push the ends of the brim past the dome.
- Long legs. Chibi Mario has very short legs and a big head. If he looks tall, shorten the pant legs and enlarge the head.
- The shirt drawn over the overalls. Draw the overalls first, then let the red shirt show only around them.
Fresh Poses and Power-Ups for Your Mario
Once this pose feels comfortable, change one thing at a time. Swap the wave for a raised fist mid-jump, or give him a closed-eye grin. Younger artists can skip the finger lines. A power-up looks great beside him, and the easy mushroom drawing tutorial fits right in. The Pikachu drawing tutorial makes a good next game character to practice.
Mario Coloring Page and a Printable Step Sheet
Want to color before you draw? The free Mario coloring page shows the inked outline with a small colored example and a list of colors beside it. The printable drawing guide gathers all 12 steps and tips on a few pages that fit Letter or A4 paper.
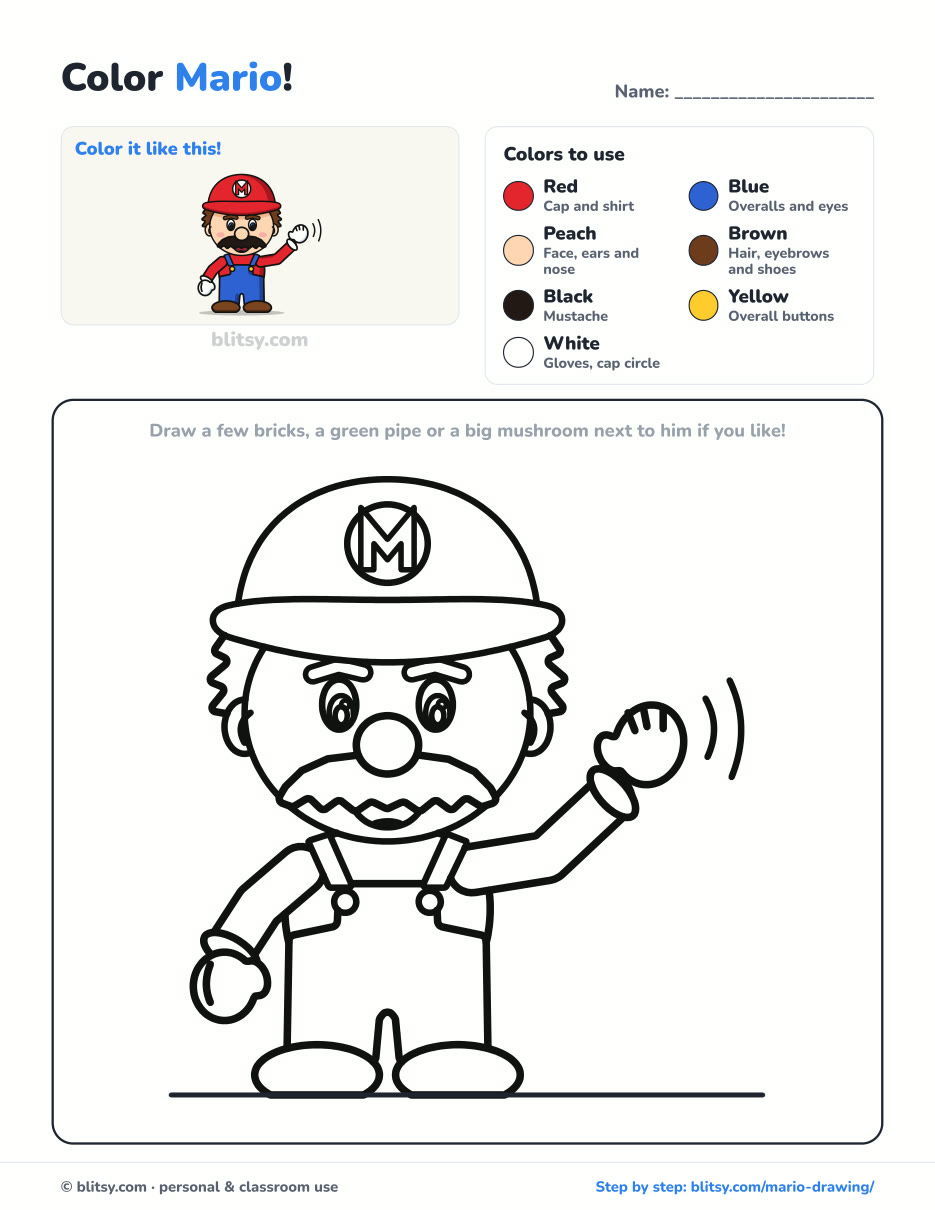
Black outlines with a colored example and the color names at the top. Ready to print and color.
⬇️ Download Coloring PageEvery step picture with its instructions and tips, to keep beside your paper while you draw.
⬇️ Download Drawing Guide📱 On a phone? Tap a download button, then open the file and choose Share → Save to Files or Print. On a computer, the PDF opens or saves straight to your Downloads folder.
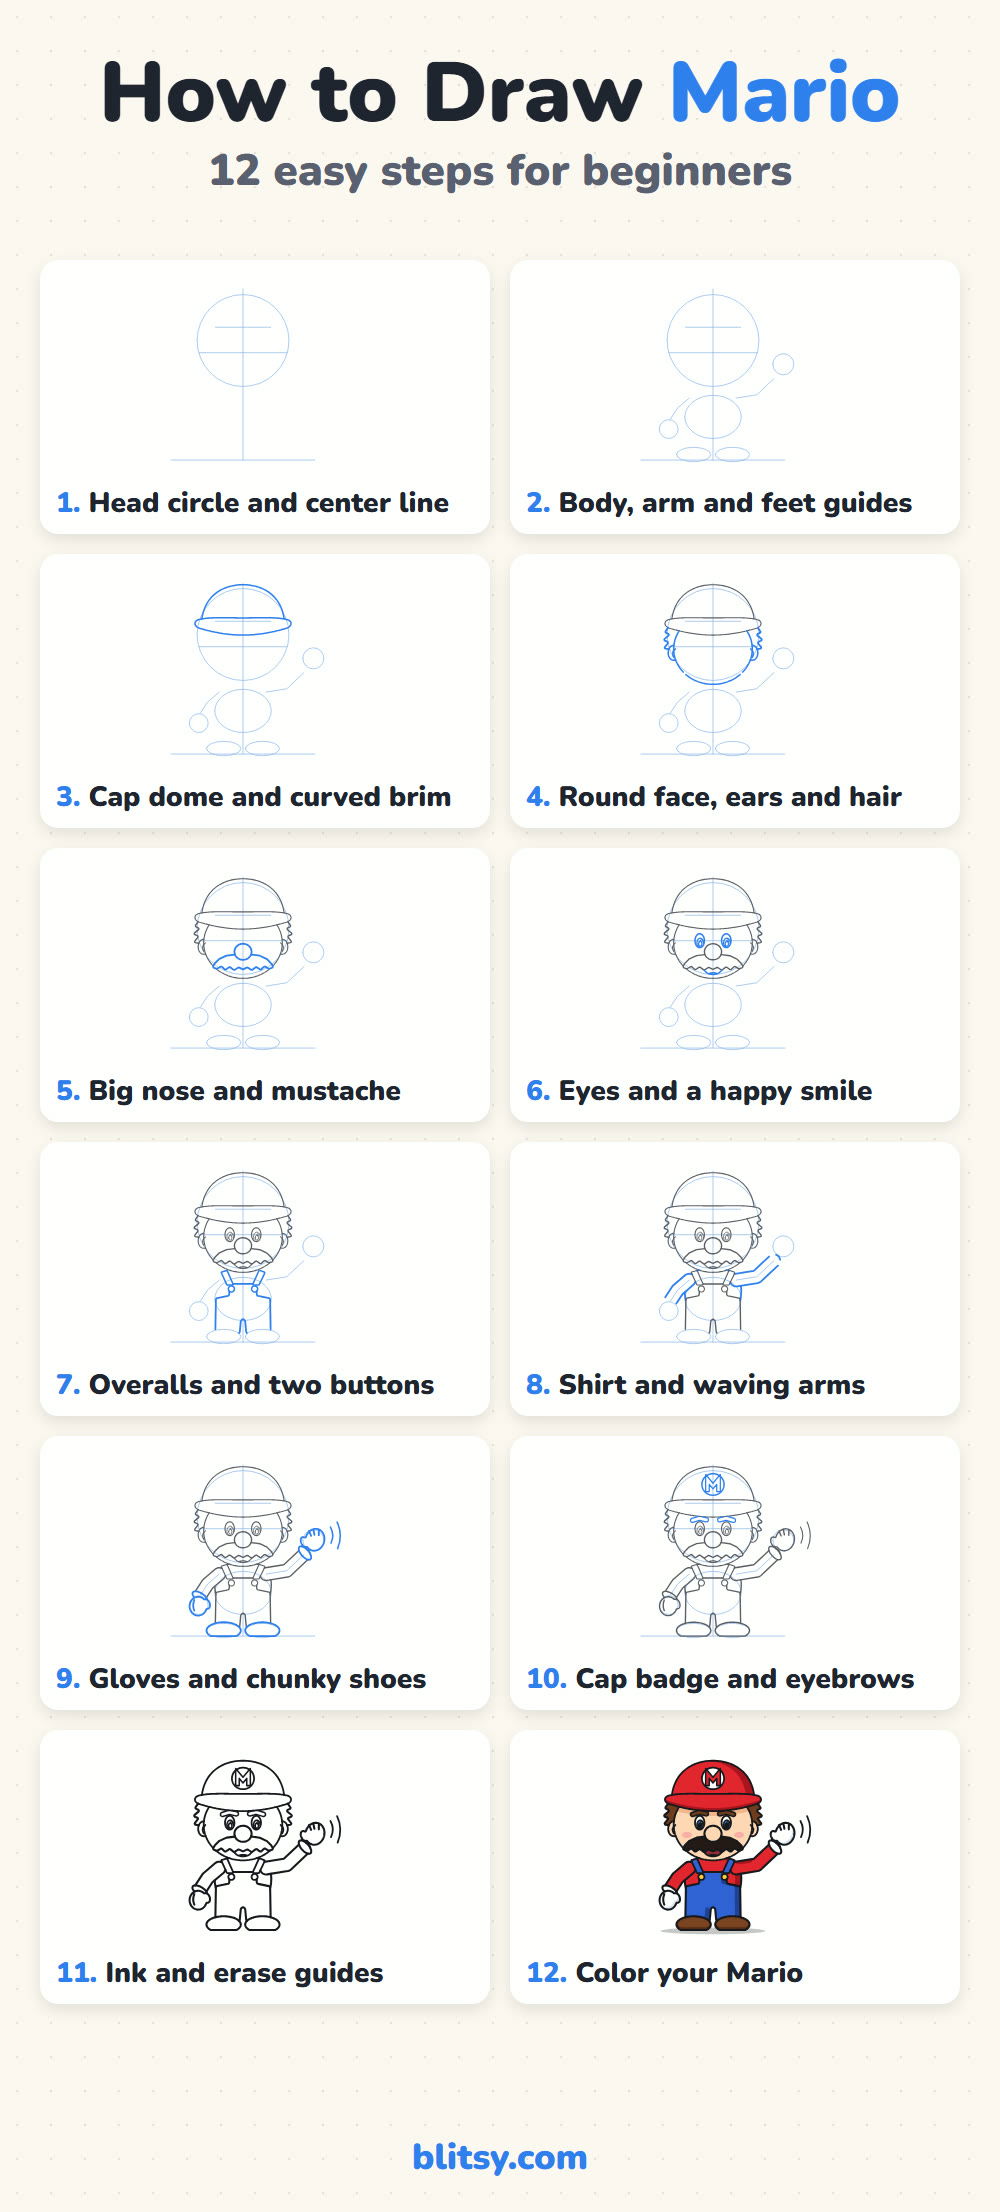
Every Mario Step on a Single Pin
Next Level Up: Characters to Draw After Mario
Each of these is a full step-by-step tutorial, with a picture for every stage and plenty of chibi characters to choose from.
- Hulk Drawing: A chibi Hulk with both fists up and a cheeky grin is the result of the how to draw the Hulk tutorial.
- Wonder Woman Drawing: Draw her with tiara, lasso and hands on hips in this Wonder Woman drawing step by step guide.
- Todoroki Drawing: The Todoroki drawing tutorial splits the page between ice and fire around one quiet face.
- Rosa Parks Drawing: For a history project, the how to draw Rosa Parks tutorial is a simple portrait with glasses and a gold brooch.
- Luffy Drawing: Straw hat on and scar under his eye, Luffy takes twelve steps in this Luffy drawing step by step lesson.
- Nezuko Drawing: Start from one circle and finish with a chibi Nezuko in the Nezuko drawing tutorial.
- Fortnite Drawing: Another game favorite: the Fortnite llama drawing tutorial builds the pinata llama on four stubby legs.
- Raccoon Drawing: Mask on and tail up, the raccoon in this how to draw a raccoon step by step guide looks ready for a midnight snack.
- Anime Girl Drawing: Learn a simple face guide with the anime girl drawing tutorial, ending on pink bangs and a sailor collar.
- Phoenix Drawing: Draw a fire bird with its wings up in this phoenix drawing tutorial.
- Olaf Drawing: The how to draw Olaf tutorial ends with Frozen's snowman grinning, arms up.
Questions Kids Ask Me About Drawing Mario
What is the easiest way to draw Mario?
Start with a large head circle and build the cap, nose and mustache on it first. Those three parts carry the whole character, so the body can stay very simple.
How do you draw Mario's mustache?
Draw one wide shape under the nose that reaches toward the cheeks, then give the bottom edge a row of rounded bumps. Color it solid black or very dark brown.
How do you draw the M on Mario's cap?
Put a white circle on the front of the cap and draw a simple block M inside it: two straight posts joined by a V in the middle.
How long does it take to draw Mario?
Most beginners finish in 30 to 40 minutes with coloring. The face takes the longest, and the second drawing usually goes much faster.
Grab your red pencil, start with that big head circle, and let your Mario wave back at you. 🍄✏️
Related posts:
 How to Draw Goku Step by Step (Easy Chibi Version)
 How to Draw Freddy Krueger Step by Step (Cute Chibi Version)
 How to Draw Darth Vader Step by Step (Easy Chibi Version)
 How to Draw Mickey Mouse Step by Step (Easy Cute Version)
 How to Draw Wonder Woman Step by Step (Chibi for Kids)
 How to Draw the Hulk Step by Step (Easy Chibi for Kids)
 How to Draw Iron Man Step by Step (Easy Chibi for Kids)
 How to Draw Kurama Step by Step (Easy Chibi Nine-Tails)
 How to Draw Cat Noir Step by Step (Easy Chibi Hero)
 How to Draw Master Chief Step by Step (Easy Chibi Armor)
 How to Draw Tinkerbell Step by Step (Easy Flying Chibi)
 How to Draw a Chibi Step by Step (Easy 2-Head Method)

