
Valentine's Day on February 14 is mostly about paper hearts, cards for classmates and a few sweets shared with friends, so that's what I wanted on the page. Instead of one lonely heart, this lesson shows you how to draw a valentine step by step as a little table set: a card sliding out of its envelope, a heart box of chocolates, a rose in a vase and a smiling ladybug. Every object starts as a box, an oval or a circle, which keeps a busy picture easy to follow.
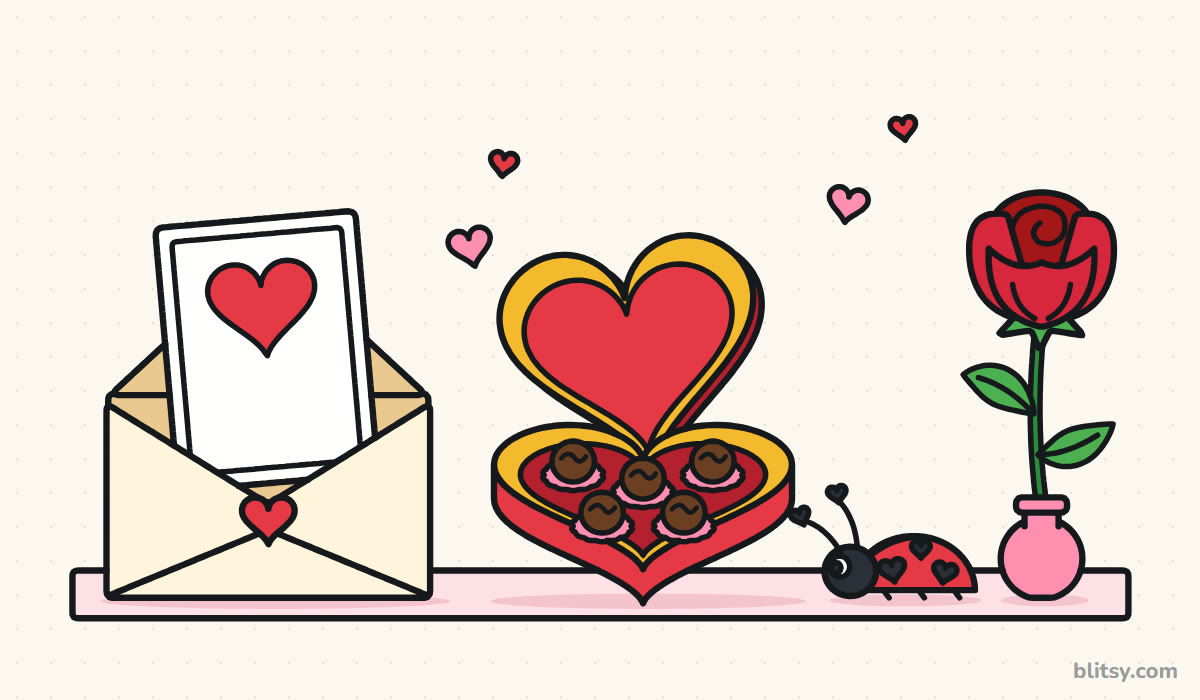
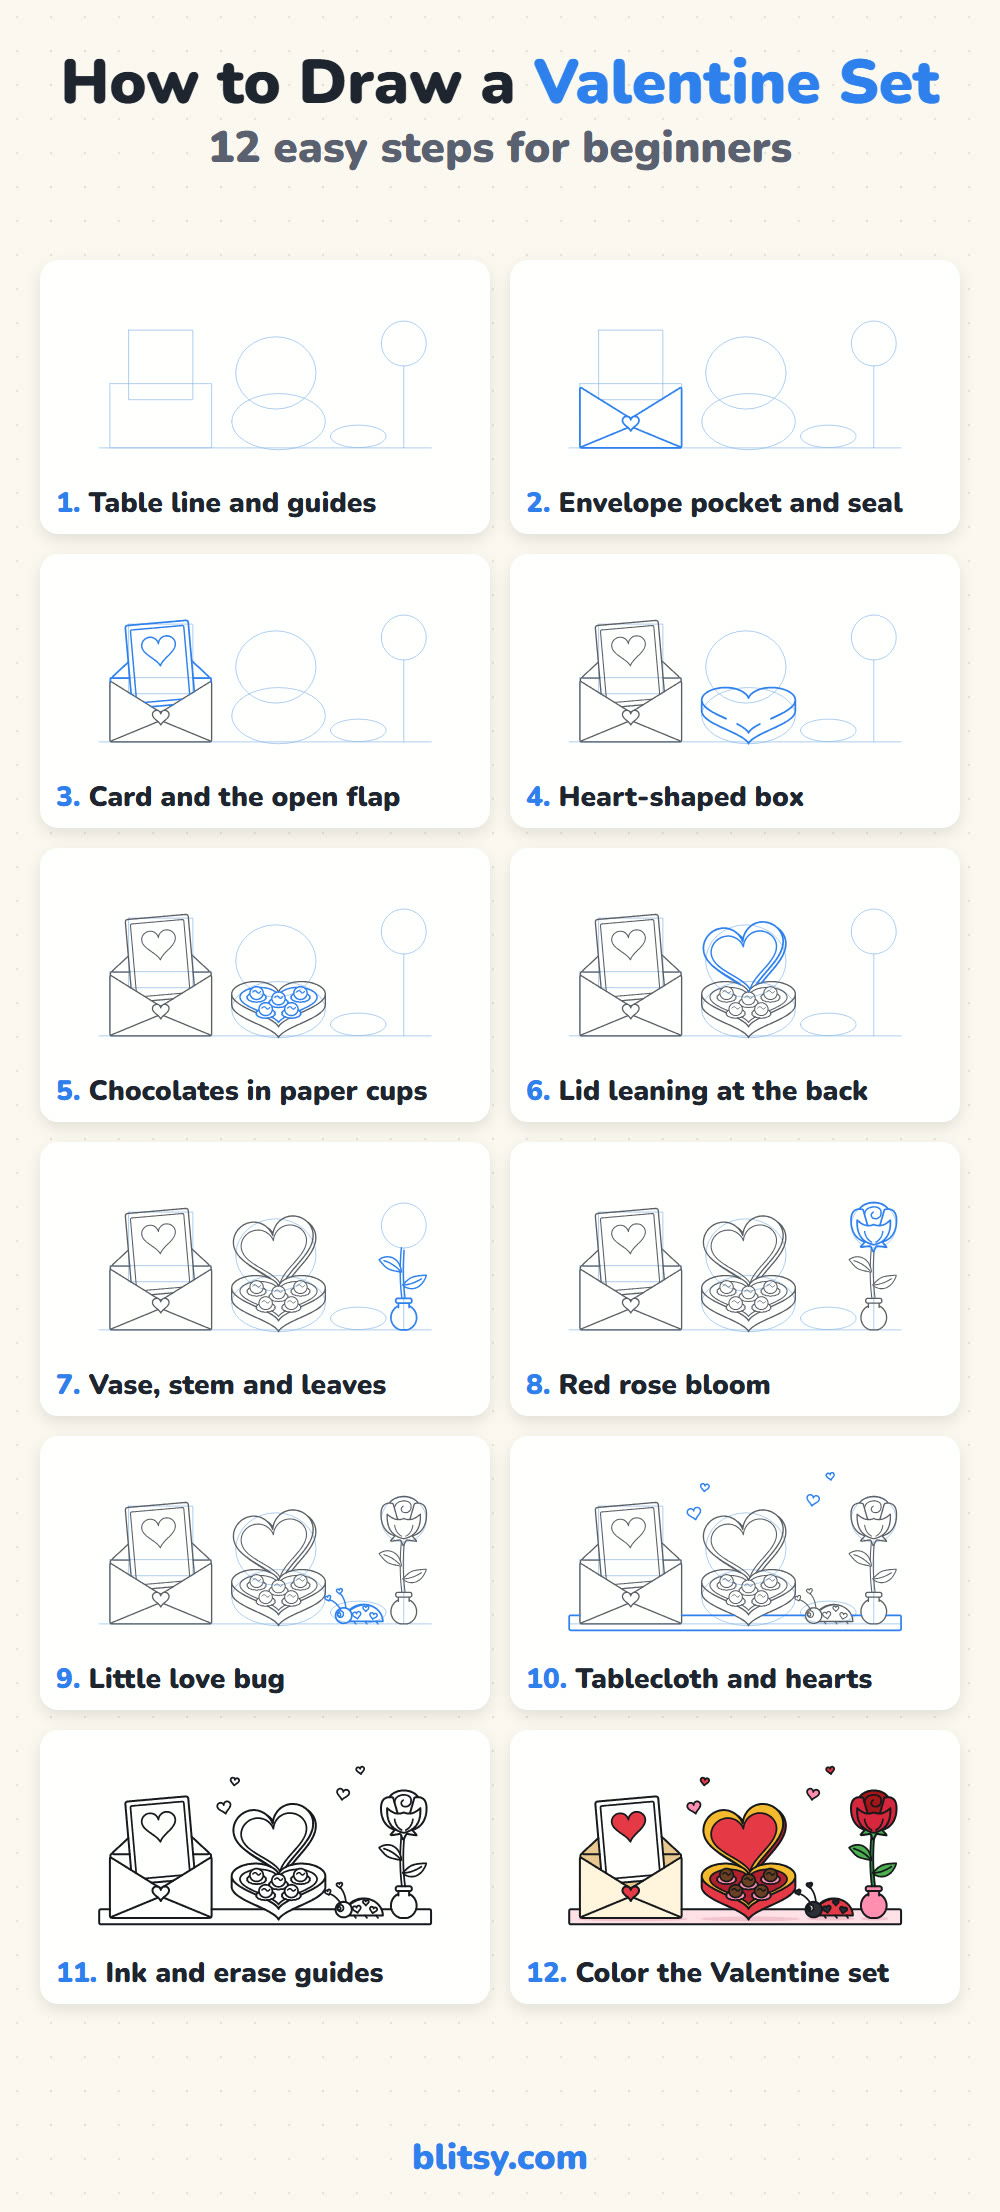
Every Valentine picture below adds one layer: the newest lines are blue and older work turns gray. The very pale shapes are light helpers that disappear in step 11.
Quick overview
⏱️ Time: around 40 minutes, plus 20 for coloring
🎯 Level: easy, good for kids from about 7 and adult beginners
✏️ Steps: 12
💌 You'll draw: an open envelope with a heart card, a heart box of chocolates, a rose in a vase, a love bug and floating hearts
Supplies on the Valentine Craft Table
- A pencil you can keep light, like an HB
- A soft eraser that won't smudge
- A black marker or fineliner for the final lines
- Coloring pencils or crayons: red, pink, cream, tan, gold, brown, green and black
- Plain paper turned sideways, because the set is wide
No gold pencil? A yellow one with a little orange on top reads as gold from across the room.
How to Draw a Valentine Step by Step
Step 1: Draw a table line and light guide shapes
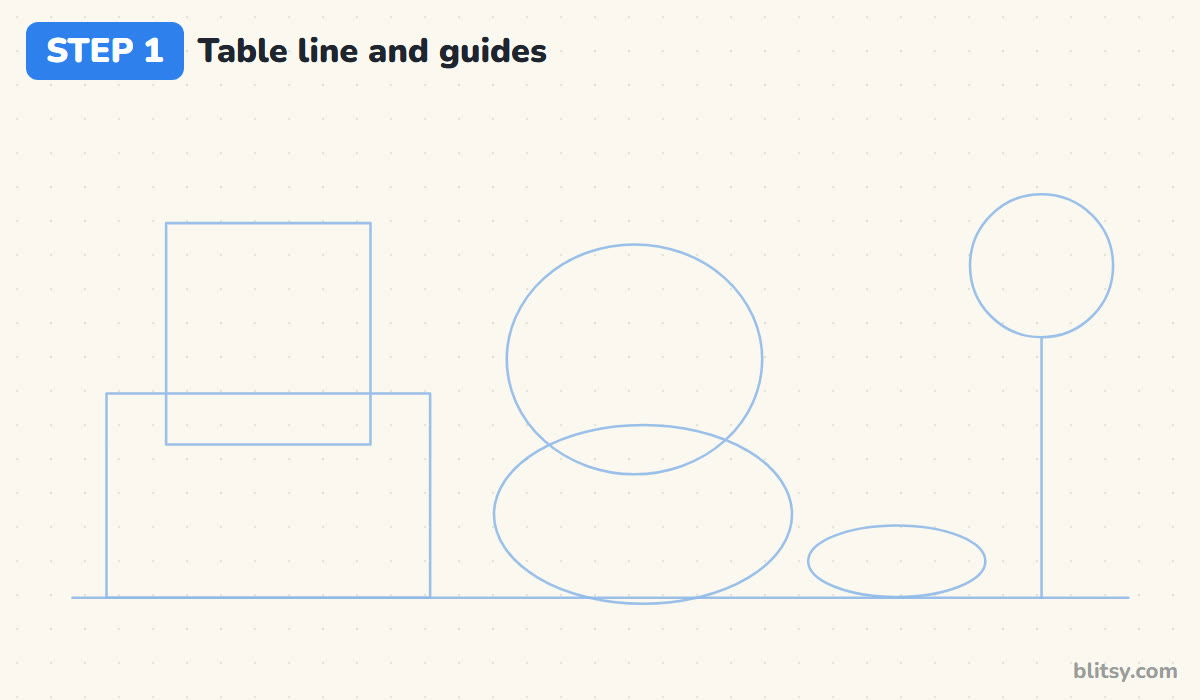
Start with one long, level line near the bottom of the page; everything stands on it. Then sketch the helpers very lightly: a wide box for the envelope with a tall box poking out of it for the card, a big oval with a rounder one above it, a small flat oval for the ladybug and a circle on a stick for the rose.
💡 Tip: Leave a finger's width of space between the guide shapes, so every object has its own room.
Step 2: Draw the envelope pocket and the heart seal
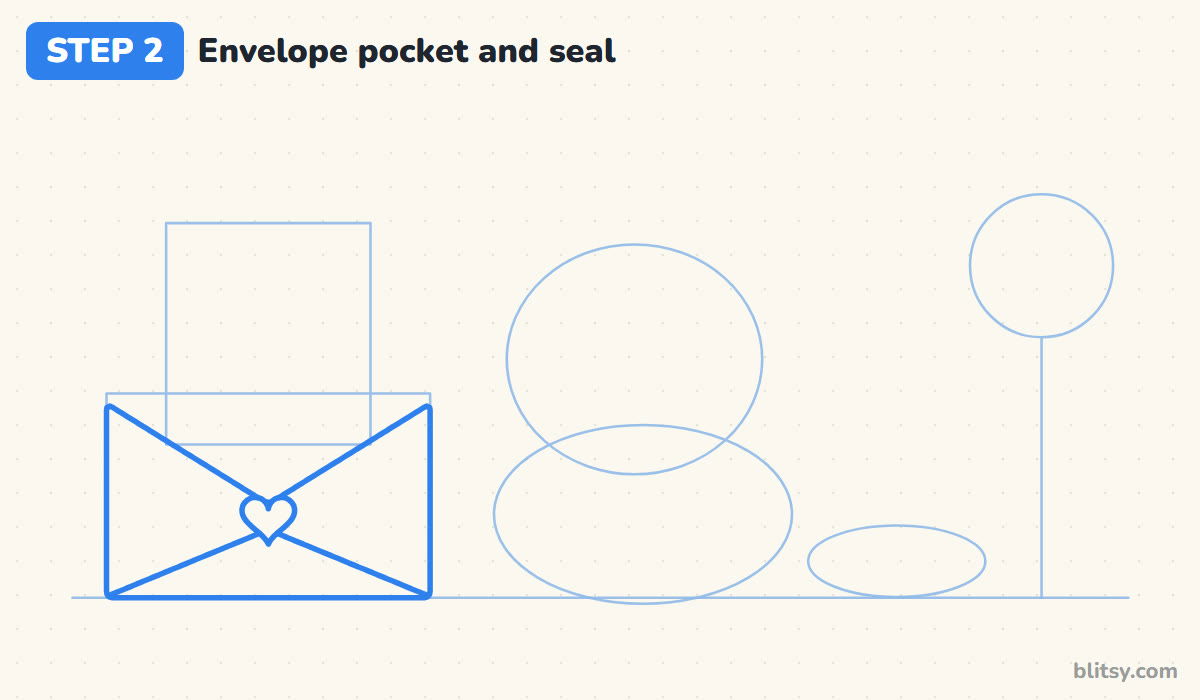
I draw the front of the envelope first, because it sits in front of the card. Trace the sides and bottom of the wide box, then make the top edge a wide V that dips to the middle. From each bottom corner, draw a line up toward that point and put a small heart sticker where the lines meet.
💡 Tip: Make the V dip about halfway down the envelope. Too shallow and the card looks like it's floating.
Step 3: Add the card and the open flap
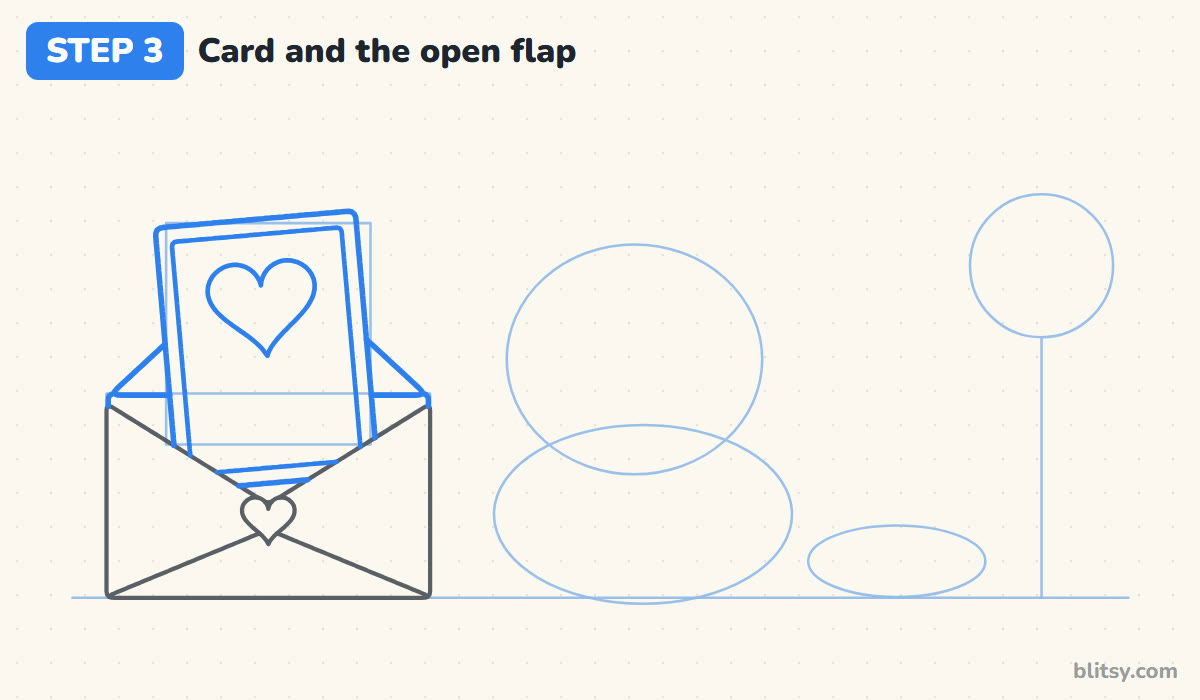
Draw the card as a tall rounded rectangle, tilted a little to the left, with its bottom hidden in the pocket. A second rectangle just inside the edge makes a border, and a big heart goes in the upper half. Behind the card, two slanted lines rise from the envelope's top corners for the open flap.




💡 Tip: A small tilt on the card makes it look like it's being pulled out right now.
Step 4: Draw the heart-shaped box
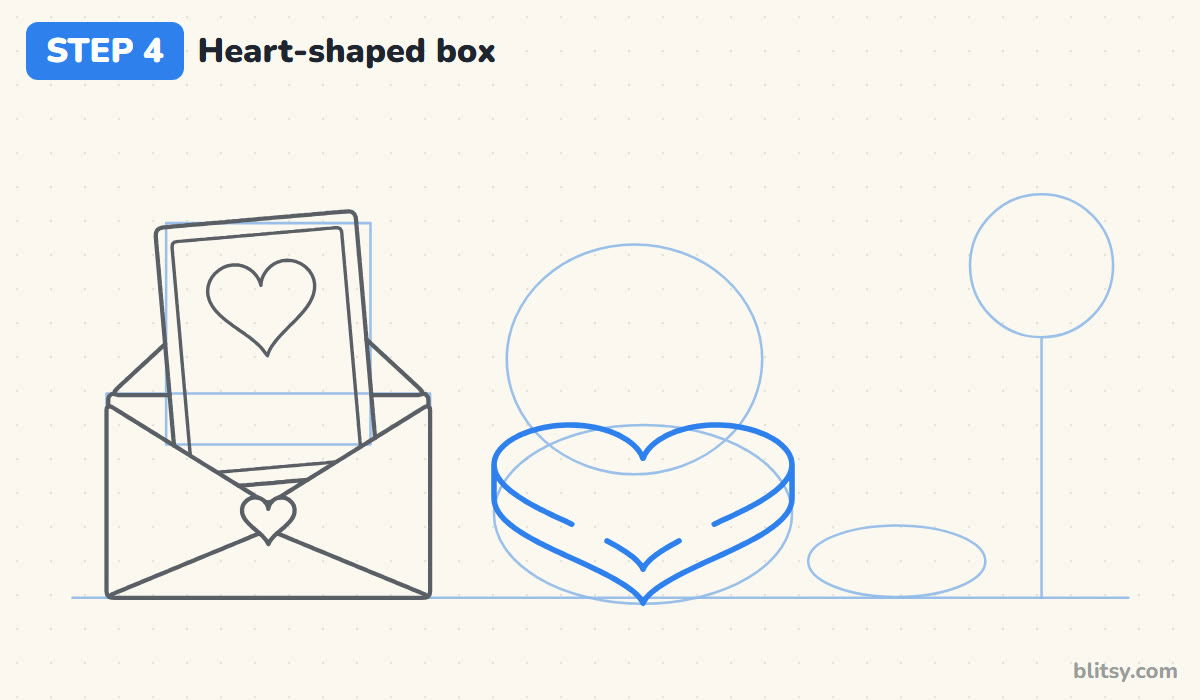
Inside the big middle oval, draw a wide, squashed heart; it's the top edge of the box seen from slightly above. Drop short lines down from its far left and right points and copy the bottom curve a little lower. I always point out that this band, the side wall, is what makes the box look deep.
💡 Tip: Keep the two bumps of the heart the same size by drawing the left half first and mirroring it.
Step 5: Fill the box with chocolates in paper cups
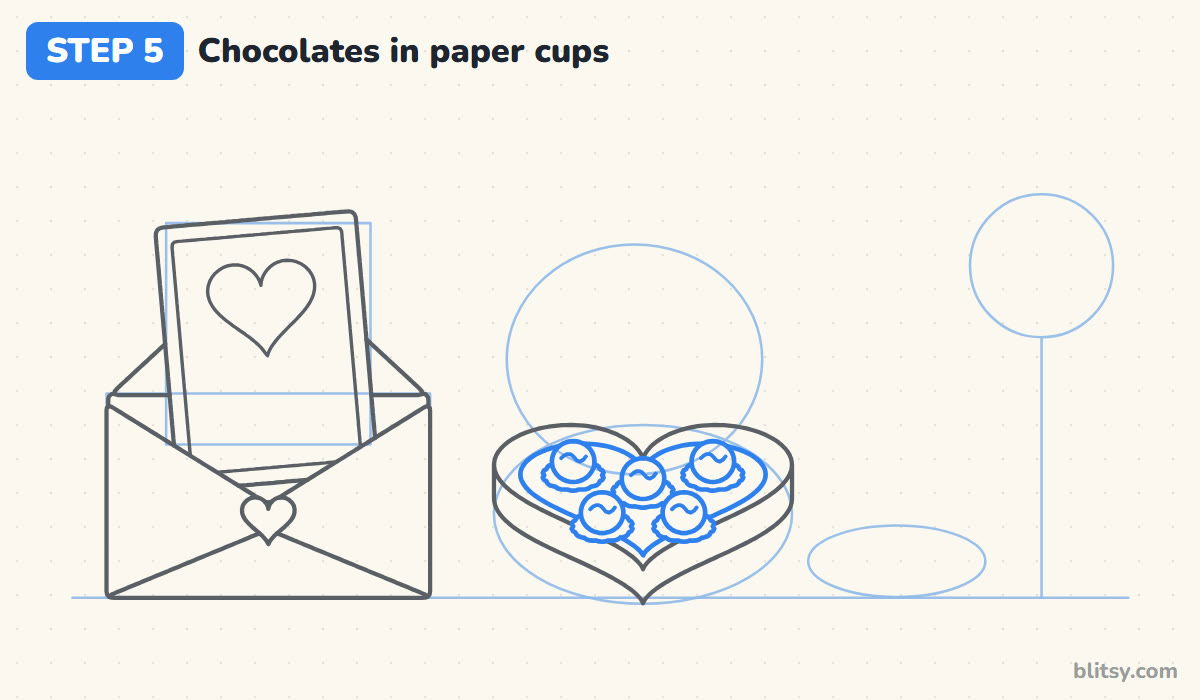
Draw five round chocolates: three across the back and two lower at the front. Under each ball, add a frilly oval that peeks out at the sides like a paper cup, and a tiny wiggle on top for drizzle. Last, draw a slightly smaller heart inside the rim, stopping wherever a chocolate is in the way.
💡 Tip: Draw the front two chocolates before the back three, so you never have to erase an overlap.
Step 6: Draw the lid leaning at the back
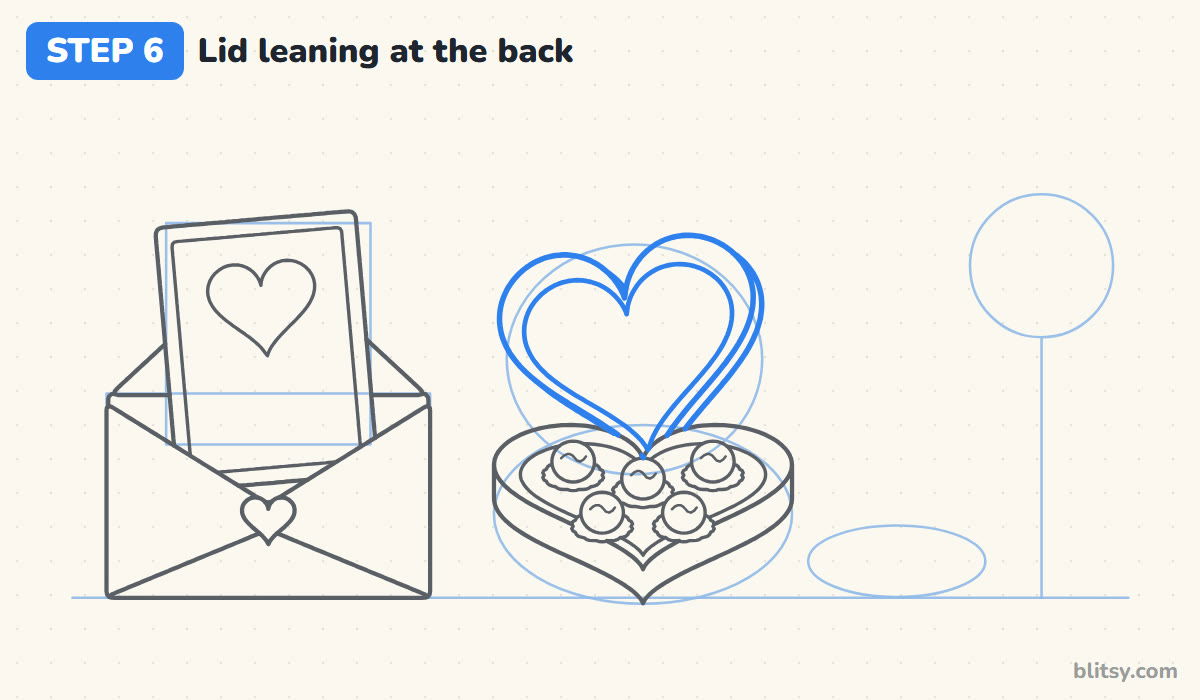
Above the box, draw a bigger heart tipped gently to the left, with its point hidden behind the box. Add a second heart just inside it for the gold trim, then repeat the outside line a little down and to the right for a thin edge. Most beginners shrink the lid, but a big one reads much better.
💡 Tip: Stop every lid line the moment it touches the box rim; the box is in front.
Step 7: Add the vase, the stem and two leaves
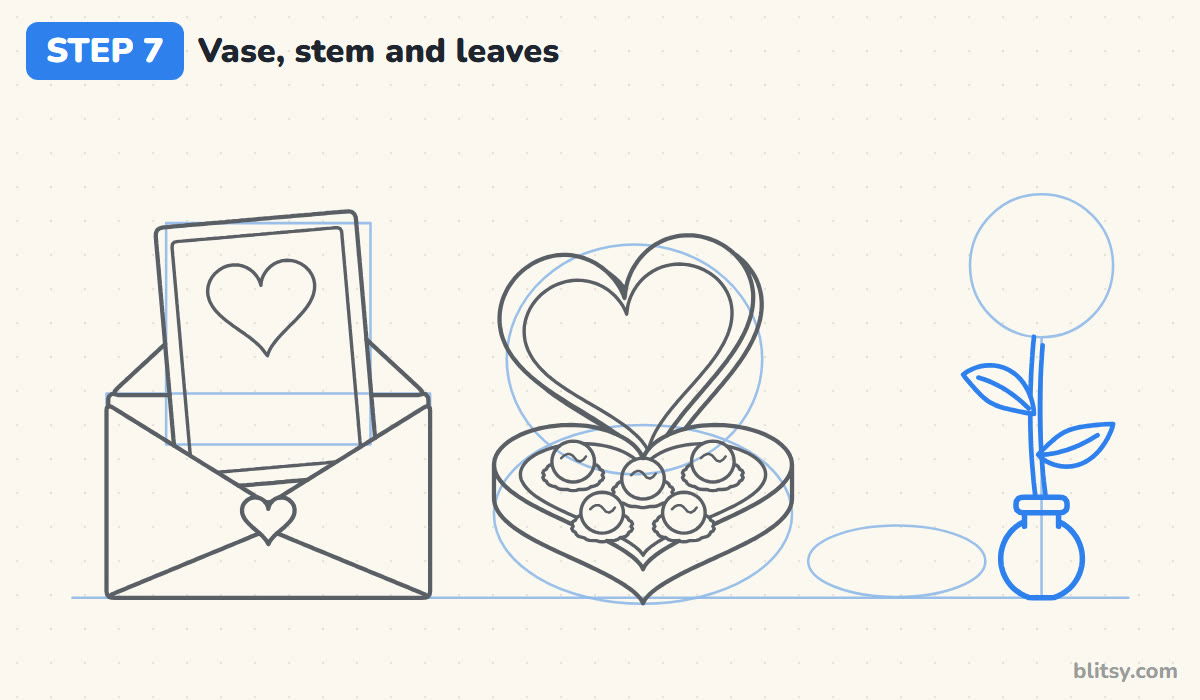
At the bottom of the stick guide, draw a round vase with a short neck and a flat lip. From the neck, pull up a stem made of two close, gently curved lines that reach the circle. Then add two pointed leaves with a center vein, one higher on the left and one lower on the right.



💡 Tip: Put the leaves at different heights. Two leaves at the same spot look like a bow tie.
Step 8: Draw the rose bloom
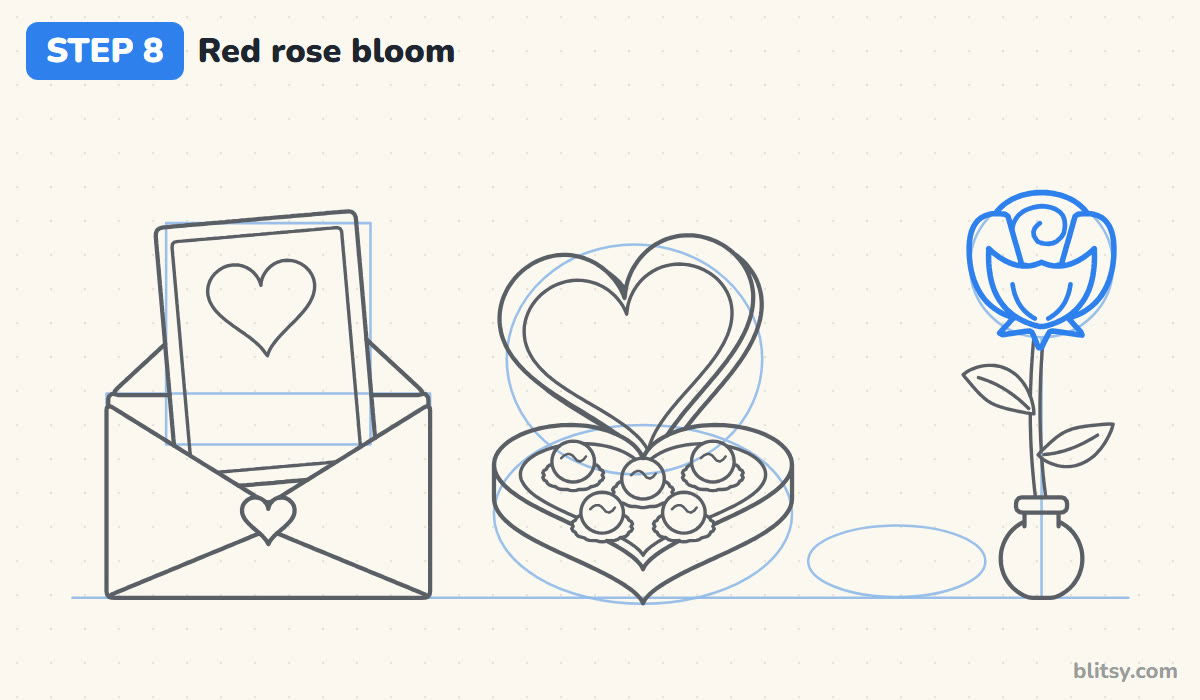
Inside the circle, draw a round bud near the top with a loose spiral in it. Below it, add a cup-shaped front petal with a wavy top, then a curling petal on each side tucked behind it. I finish with a spiky green collar under the bloom and two short fold lines on the front petal.
💡 Tip: Draw the spiral loosely and leave it open in the middle; a tight coil turns into a snail shell.
Step 9: Draw the little love bug
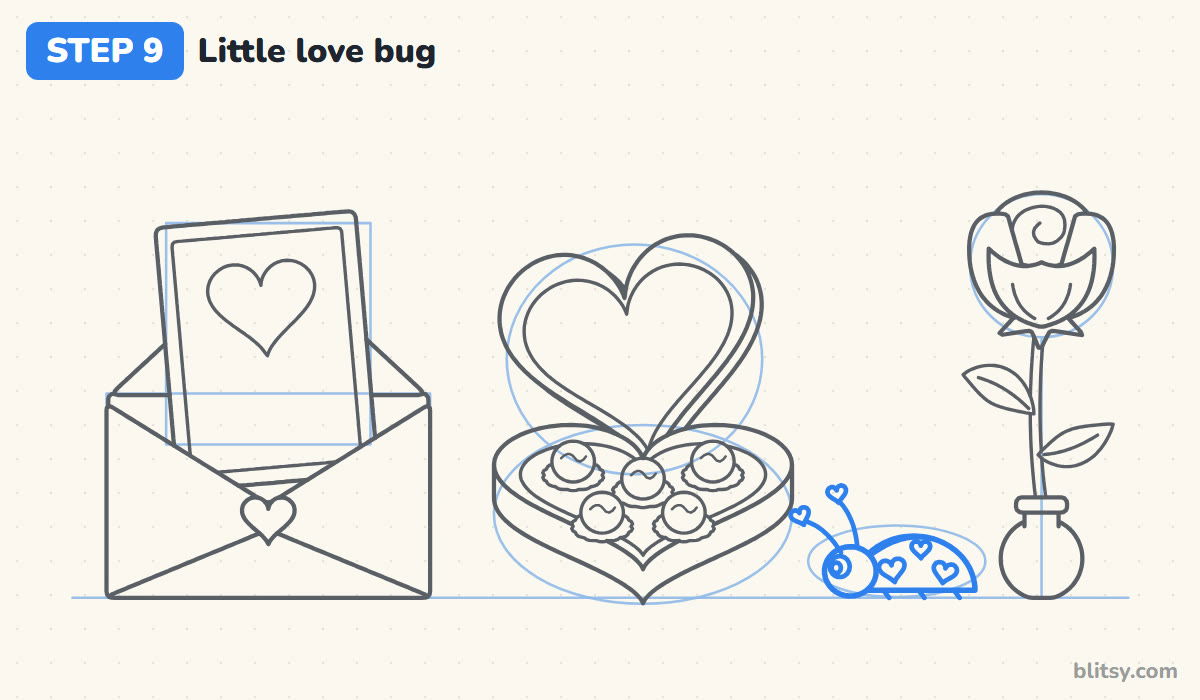
Between the box and the vase, draw a dome with a flat bottom for the shell and a round head on its left. Add a curved line for the wing split, three heart-shaped spots and a big eye. Two antennae curl up with tiny hearts on the ends, and three short legs peek out below.
💡 Tip: Give the ladybug one eye facing us and it instantly looks friendly from the side.
Step 10: Add the tablecloth and floating hearts
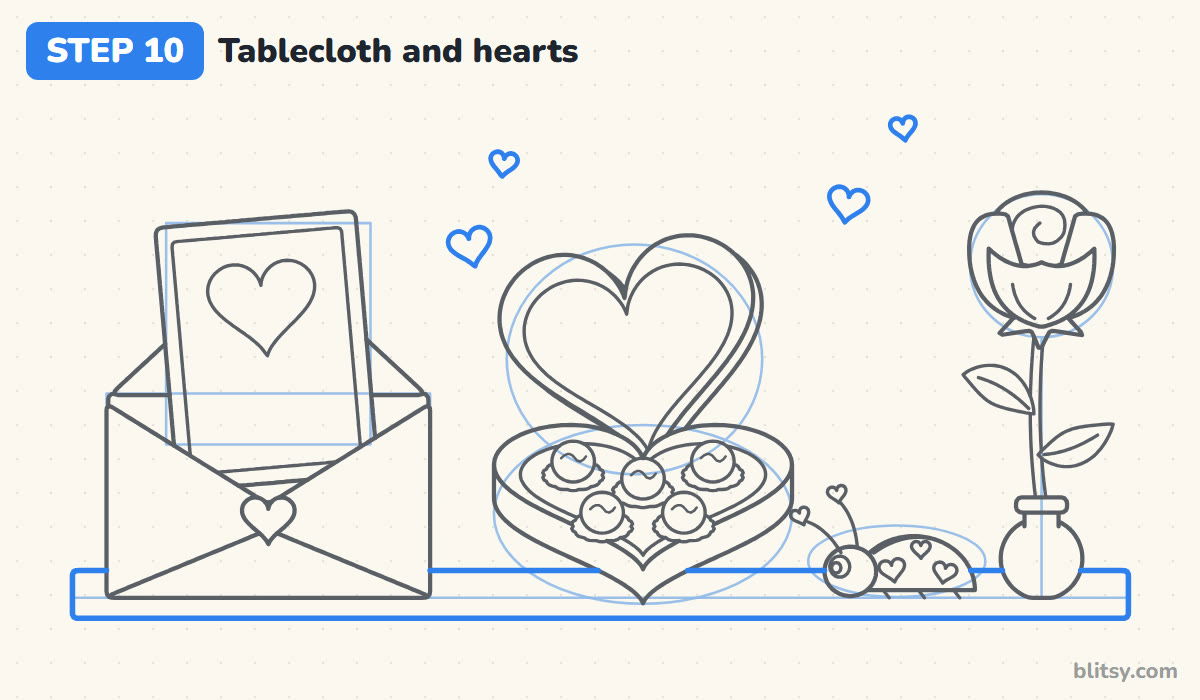
Go over the table line, draw a second line a short way below it and join the ends with rounded corners for the tablecloth. Stop the top line wherever an object stands in front of it. Then scatter four small hearts in the empty space above, each at a different angle.
💡 Tip: Tilt each floating heart a different way so they look like they're drifting, not stamped on.
Step 11: Ink the lines and erase the guides
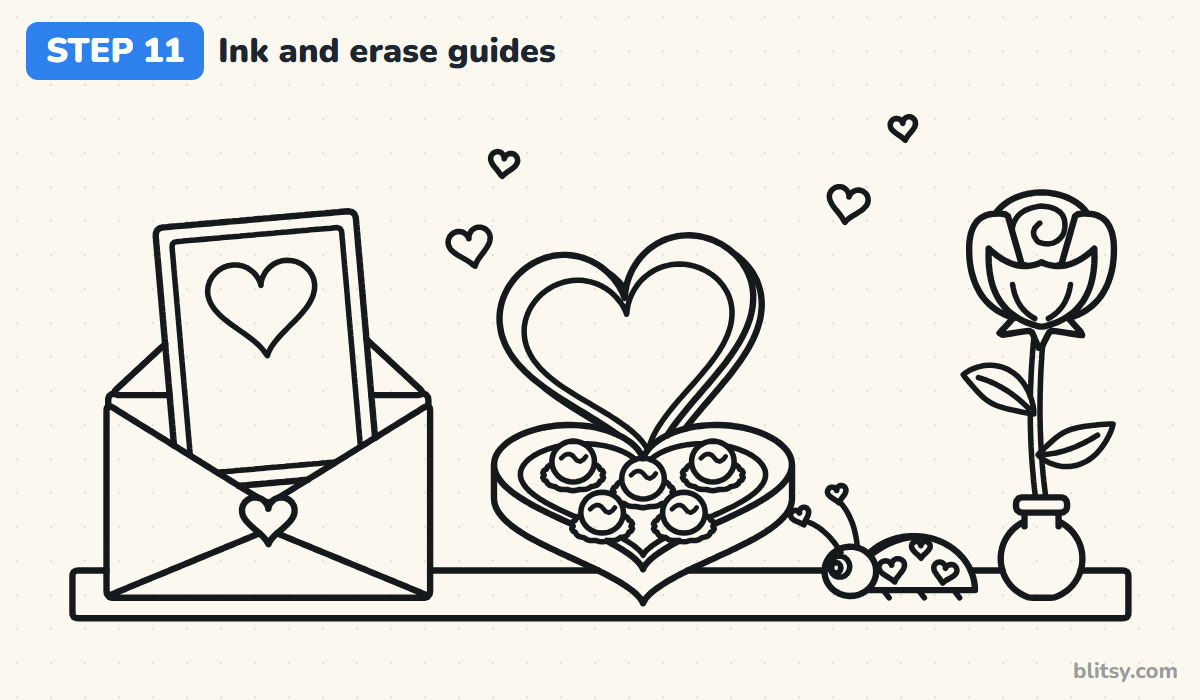
Trace every line you want to keep with the black marker. Take it slow on the frilly paper cups and the rose spiral, where a shaky hand shows most. Let the ink dry for a minute, then erase all the pale helper shapes.

💡 Tip: Turn the paper as you ink the curves, so your hand always pulls the line toward you.
Step 12: Color your Valentine set
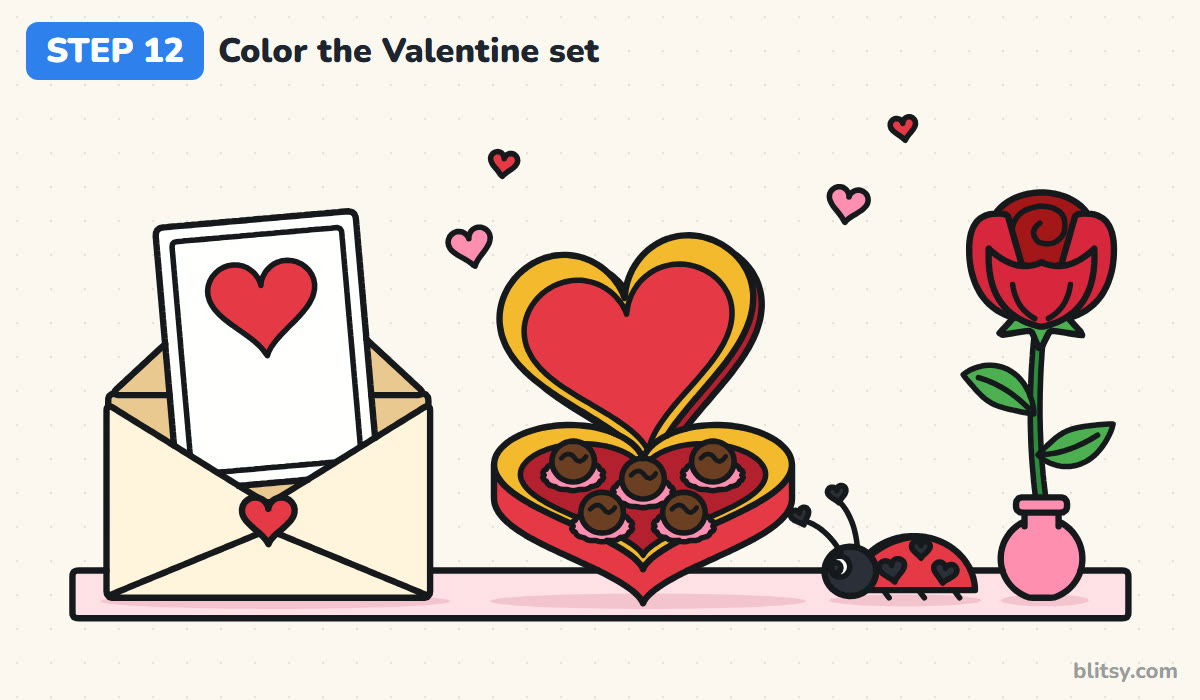
Color the envelope cream with a tan inside, keep the card white and make its heart red. The box gets red walls, a gold rim and a dark red floor, with brown chocolates in pink cups; the lid is gold around a red middle. Make the rose red with green leaves in a pink vase, and give the ladybug a red shell with black hearts.
💡 Tip: Press harder for the box floor and the rose bud; the darker red makes them look deeper.
Valentine Sketches That Go a Bit Wonky
- Drawing the card before the envelope. Then the pocket lines cut across the card. Draw the pocket first and let the card disappear into it.
- A box with no side wall. It looks like a flat heart sticker. The short band under the front curve is what turns it into a box.
- Hearts with uneven bumps. One big lobe and one small one makes the heart lean. Draw one half, then copy it on the other side.
- Chocolates crowding the rim. When they touch the edge, the box looks overfilled. Keep a little gold showing all the way around.
- Coloring everything the same red. The objects melt together. Put pink, gold or cream between the reds so each one stands apart.
Ways to Turn This Into Your Own Valentine
Once the set works, change the pieces. Write a friend's name on the card, swap the rose for a tulip or turn the lid into a big candy heart with a message. Bears and bees with little hearts make good Valentine subjects too. If one part gave you trouble, practice it on its own with the heart drawing tutorial or the rose drawing tutorial.
Valentine Coloring Page and Printable Step Guide
For a classroom party or a quiet afternoon, print the free Valentine's Day coloring page. The small colored picture at the top shows which color goes where, and the outline below has thick, easy lines. The step-by-step guide PDF holds all 12 steps with tips, and both files fit Letter or A4 paper.
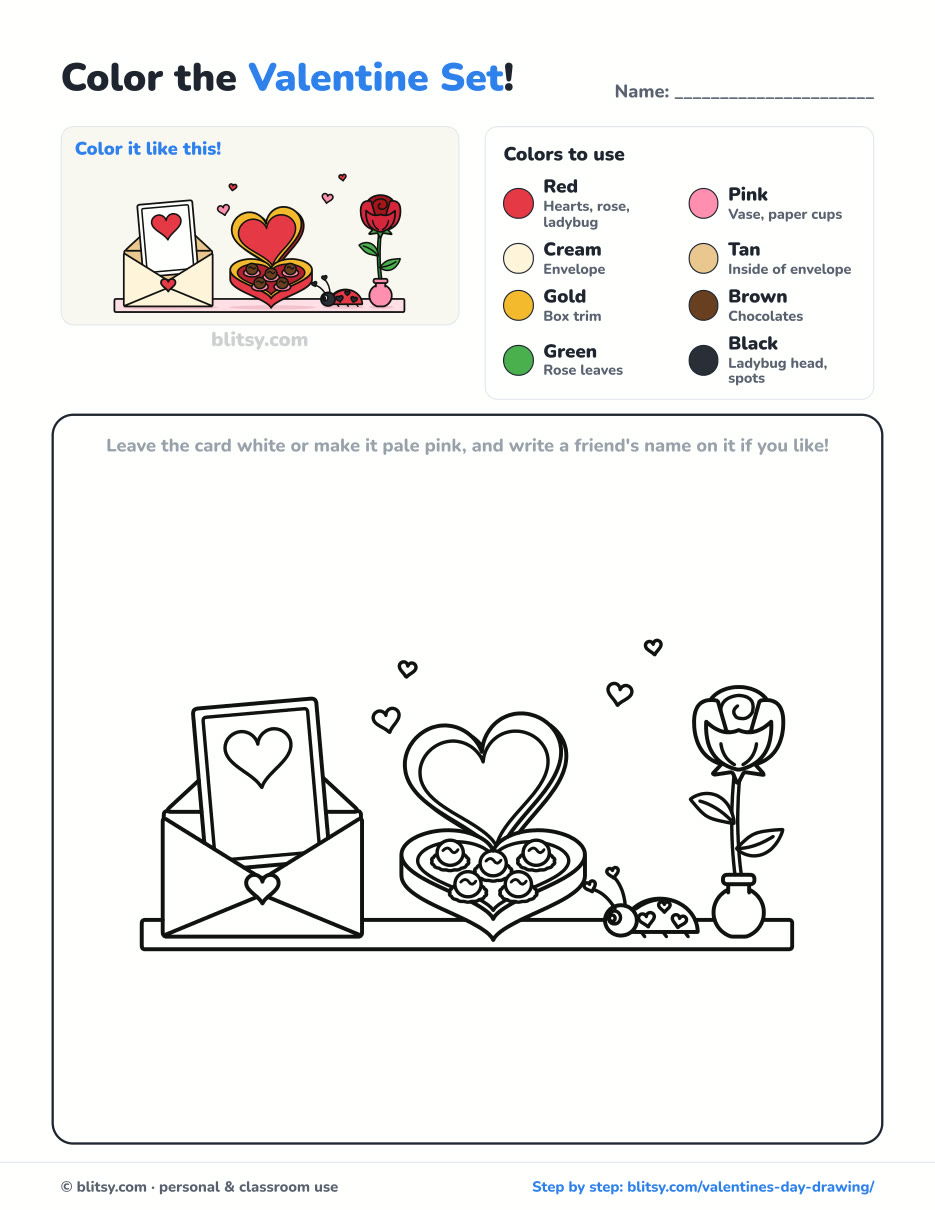
Black outlines with a colored example and the color names at the top. Ready to print and color.
⬇️ Download Coloring PageEvery step picture with its instructions and tips, to keep beside your paper while you draw.
⬇️ Download Drawing Guide📱 On a phone? Tap a download button, then open the file and choose Share → Save to Files or Print. On a computer, the PDF opens or saves straight to your Downloads folder.
Pin the Valentine Steps for February
Sweet Follow-Ups to Your Valentine Set
These are step-by-step tutorials, each one a single subject, from cute characters to a dragon and a cottage door.
- Dragon Head Drawing: The how to draw a dragon head guide adds purple frills and a little puff of smoke.
- Music Note Drawing: Draw a treble clef and a ribbon of bright notes with the music note drawing tutorial.
- Love Drawing: Two teddy bears share a hug and a heart balloon in the love drawing step by step lesson.
- Demon Slayer Drawing: This Tanjiro drawing tutorial draws the Demon Slayer hero in chibi size.
- Hello Kitty Drawing: The easy Hello Kitty drawing tutorial finishes with her red bow and blue overalls.
- Door Drawing: A teal cottage door with a lantern and a mat is the goal of the door drawing tutorial.
- Joker Drawing: Draw a cheerful chibi Joker holding up a playing card with the Joker drawing tutorial.
- Chibi Drawing: The chibi drawing step by step lesson draws a kid in a cat-ear hoodie with a cup of boba.
Valentine Drawing Questions From Kids and Parents
What is an easy Valentine's Day drawing for kids?
A heart card in an envelope is one of the easiest: it's a rectangle, a V and a heart. Add a box of chocolates or a ladybug once that feels comfortable.
What should I draw for Valentine's Day?
Things people give and share on February 14 work best, like cards, hearts, roses, chocolates or cute animals holding hearts. Pick two or three and group them on one table.
How do you draw a heart-shaped box of chocolates?
Draw a wide, squashed heart for the top, copy its bottom curve a little lower for the side wall, then add round chocolates with frilly cups inside.
How long does this Valentine drawing take?
About 40 minutes for the pencil and ink, and around 20 more to color. Younger kids can draw just the envelope and card in one sitting.
Draw one for yourself, then make a second copy to slip into a real envelope for someone you like. 💌
Related posts:
 How to Draw a Tooth Step by Step (Cute and Easy for Kids)
 How to Draw a Mother and Daughter Step by Step (Easy for Kids)
 How to Draw Wonder Woman Step by Step (Chibi for Kids)
 How to Draw the Hulk Step by Step (Easy Chibi for Kids)
 How to Draw Iron Man Step by Step (Easy Chibi for Kids)
 How to Draw a Police Car Step by Step (Easy for Kids)
 How to Draw a Monster Truck Step by Step (Easy for Kids)
 How to Draw a Fire Truck Step by Step (Easy for Kids)
 How to Draw a Mermaid Step by Step (Easy Cartoon for Kids)
 How to Draw a Boat Step by Step (Easy Sailboat for Kids)
 How to Draw a Care Bear Step by Step (Cute Fan Art for Kids)
 How to Draw Hello Kitty Step by Step (Easy for Kids)

