
A scarecrow is really a stack of easy shapes: a T-shaped post, a round sack for a head, a shirt, a pair of overalls and lots of little straw spikes. In this lesson I'll show you how to draw a scarecrow step by step, starting with three light guide shapes and finishing with a colored farm scene. Farmers put up scarecrows to keep birds off their crops, so giving ours a crow on his arm always makes me smile.
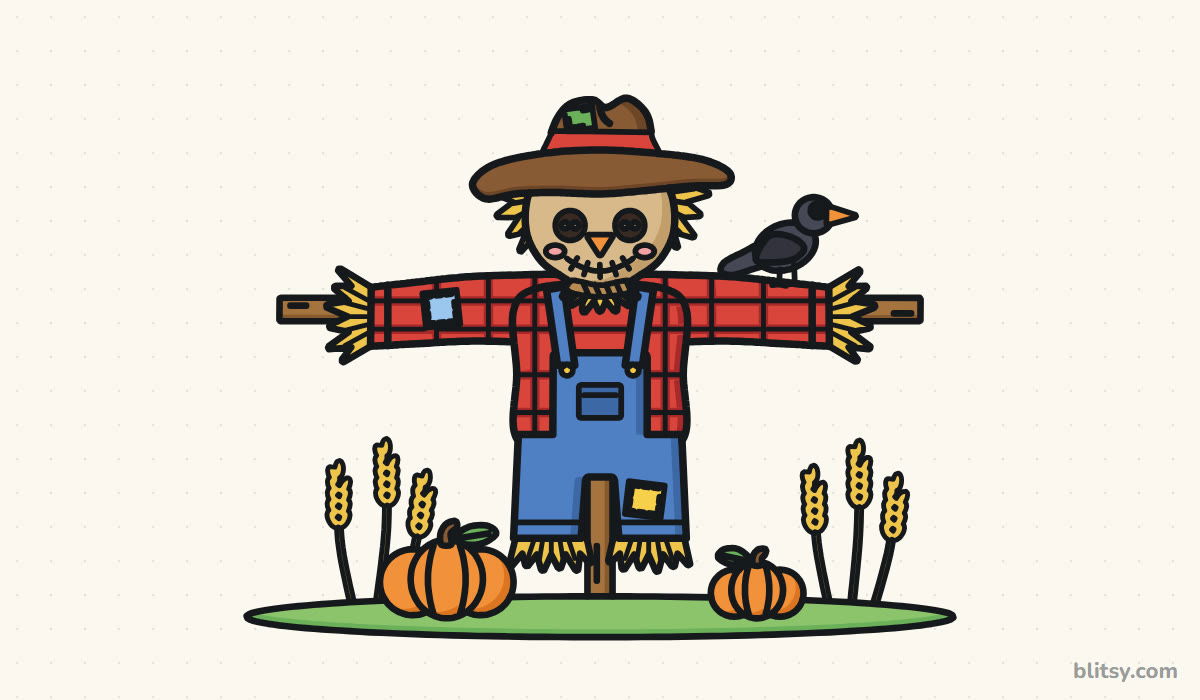
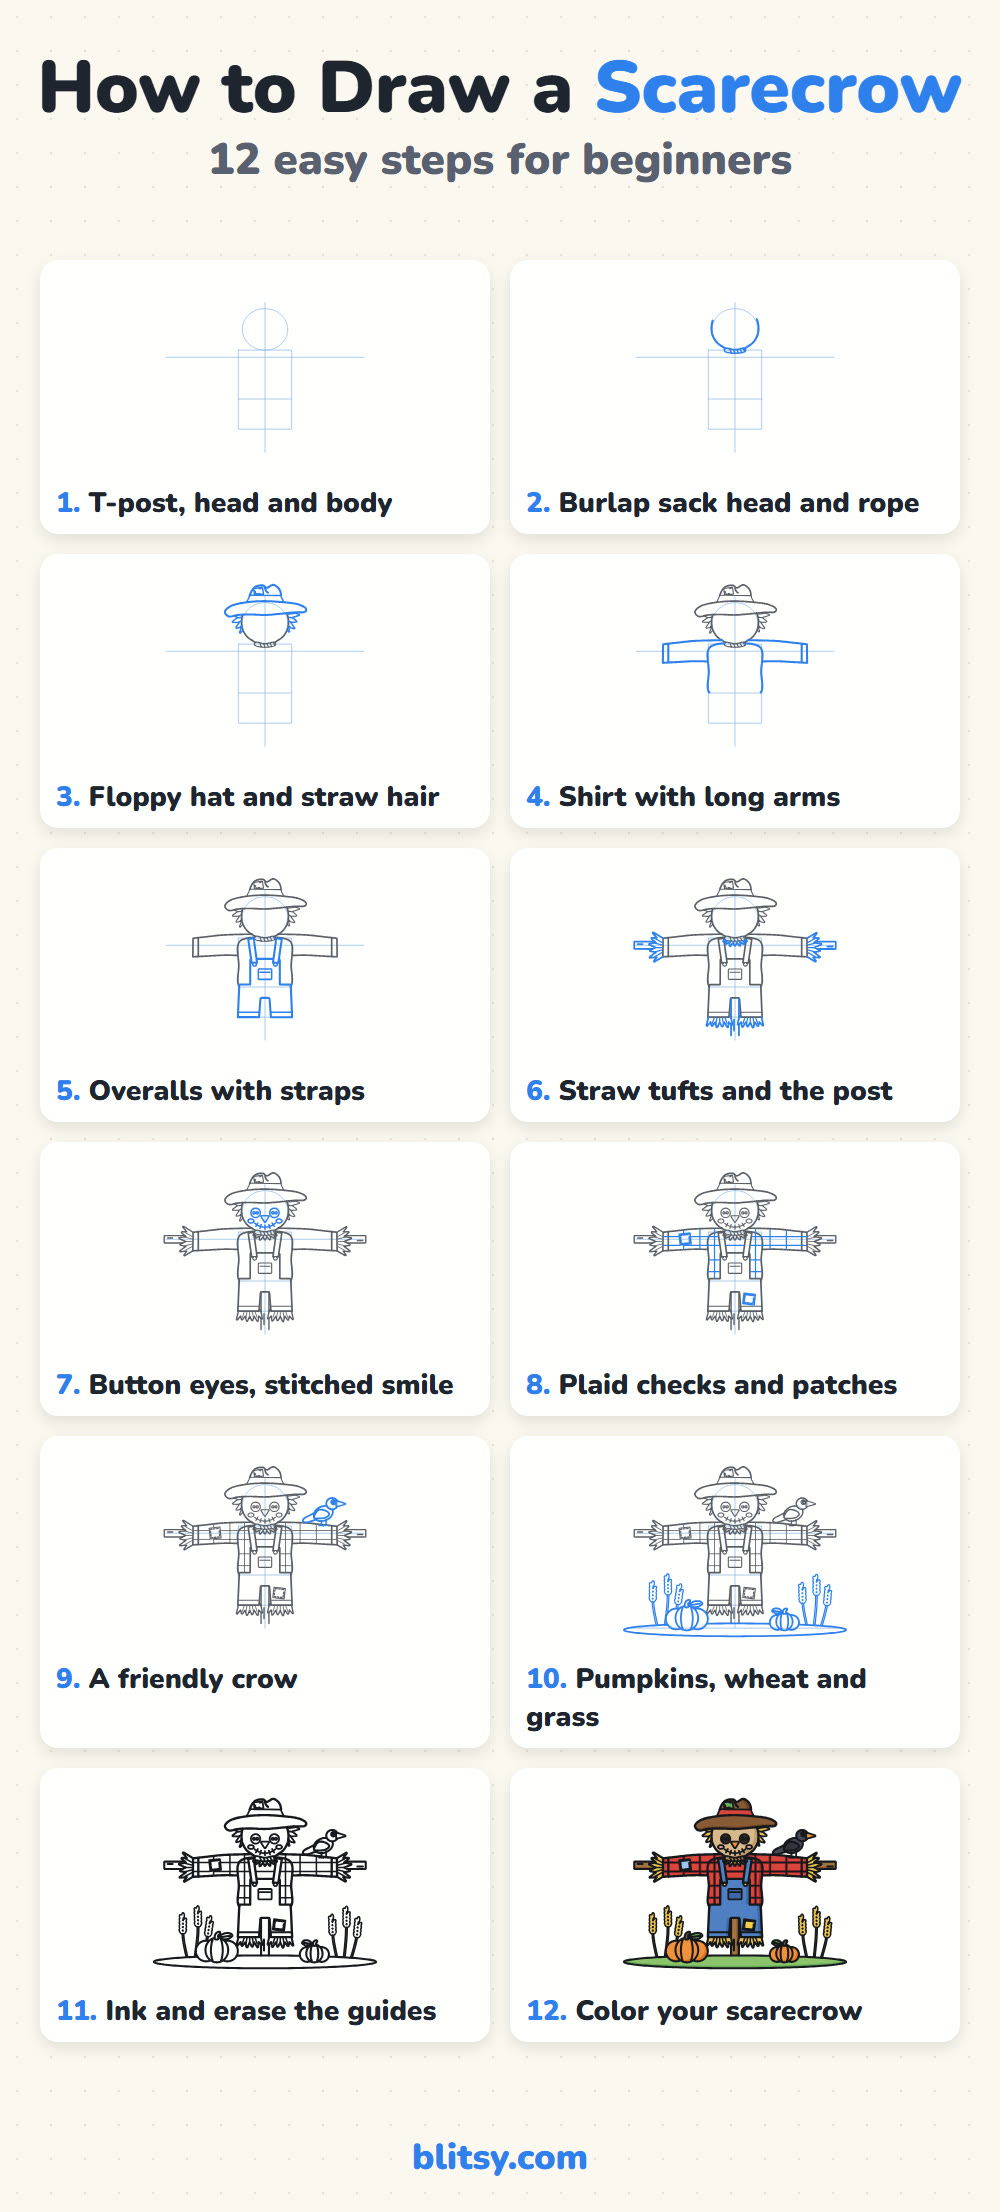
In each picture, the lines in blue are the ones you add in that step. Gray lines were drawn earlier, and the pale blue guides disappear in step 11 once the outlines are inked.
Quick overview
⏱️ Time: roughly 30 to 40 minutes with coloring
🎯 Level: easy, fine for kids around 6 and up
✏️ Steps: 12
🌾 You'll draw: a scarecrow on a wooden post in a floppy hat and plaid shirt, with a crow on his arm and pumpkins at his feet
Straw-Colored Pencils and Other Farm Supplies
- A regular pencil (HB works well)
- An eraser that won't smear
- A black marker or felt-tip pen for the outlines
- Colored pencils or markers in farm colors (see the color key on the coloring page)
- A sheet of white paper turned sideways, so the long arms fit
No dark red? Press harder with your regular red on the plaid stripes and it will look darker.
How to Draw a Scarecrow Step by Step
Step 1: Sketch a T, a circle and a tall box
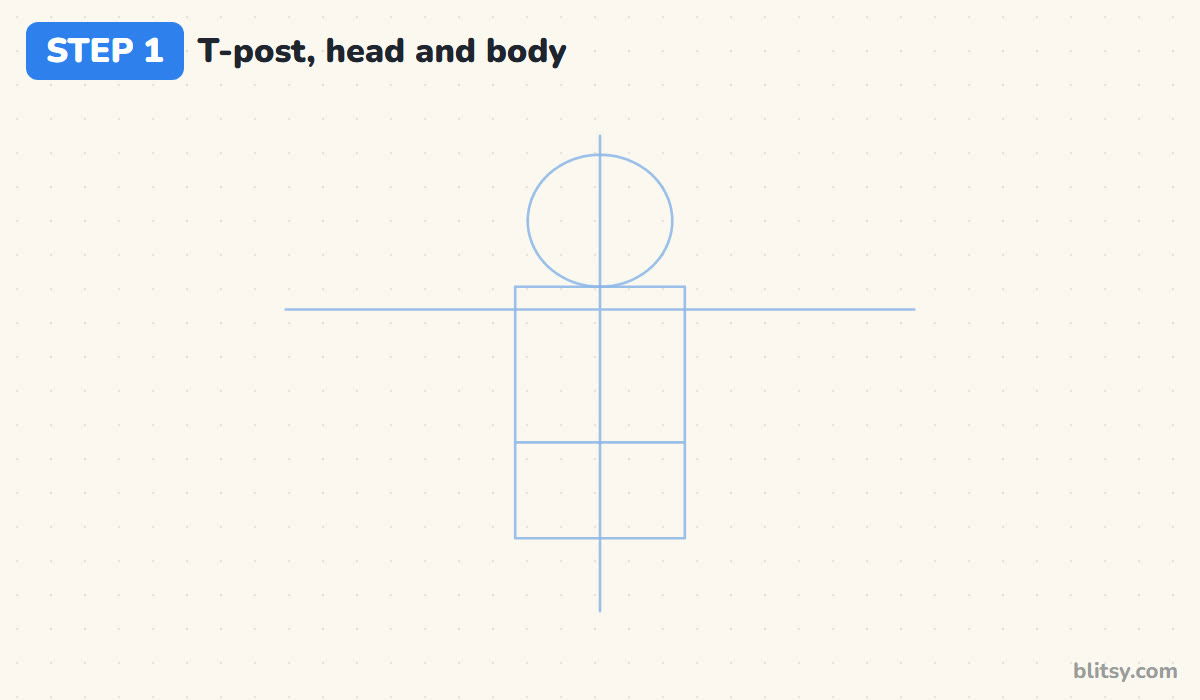
Draw a long vertical line down the middle of the page and cross it with a long horizontal line about a third of the way down. That's the wooden post. Put a circle on top of the crossing for the head, then hang a tall box below it for the body, with a line across its middle where the shirt will end. I make the crossbar much wider than the body so the sleeves have room.
💡 Tip: Press so lightly you can barely see the lines. They all get erased later.
Step 2: Draw the burlap sack head and a rope
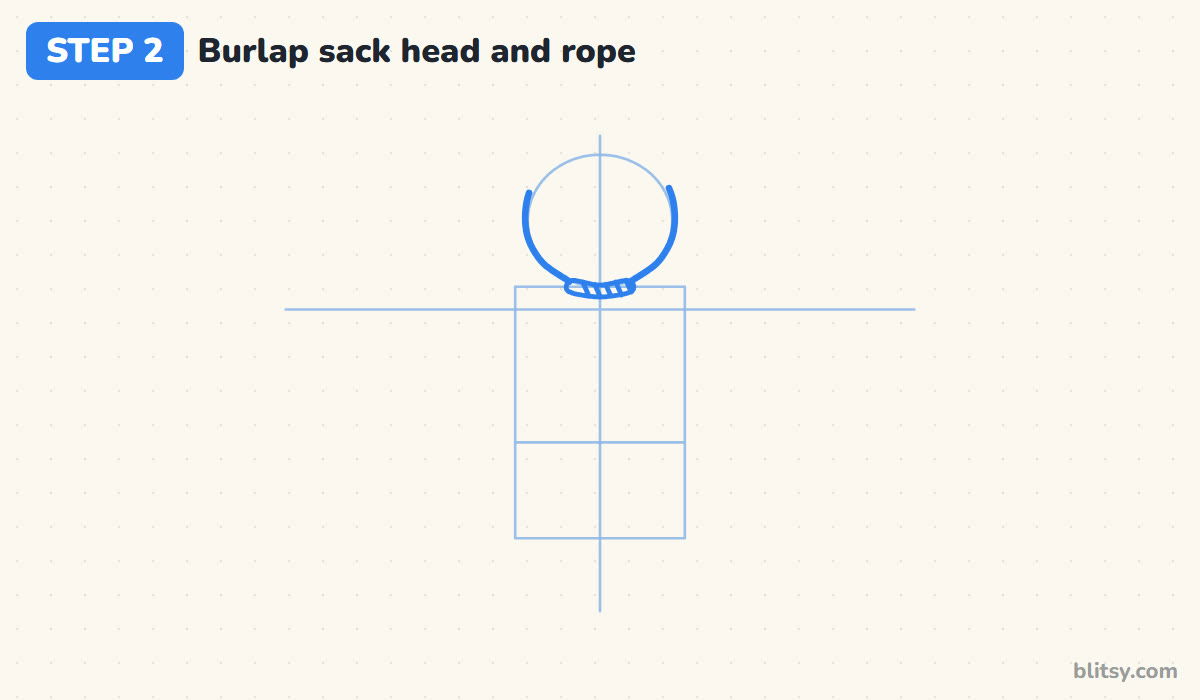
Follow the circle around the sides and bottom, then pinch it in at the bottom like a bag that's been tied shut. Leave the top open for the hat. Just under the pinch, draw a short flat oval for the rope and add a few slanted lines across it to show the twists.
💡 Tip: Keep the head a little wider than it is tall. A round, chubby sack looks friendlier.
Step 3: Add a floppy hat and straw hair
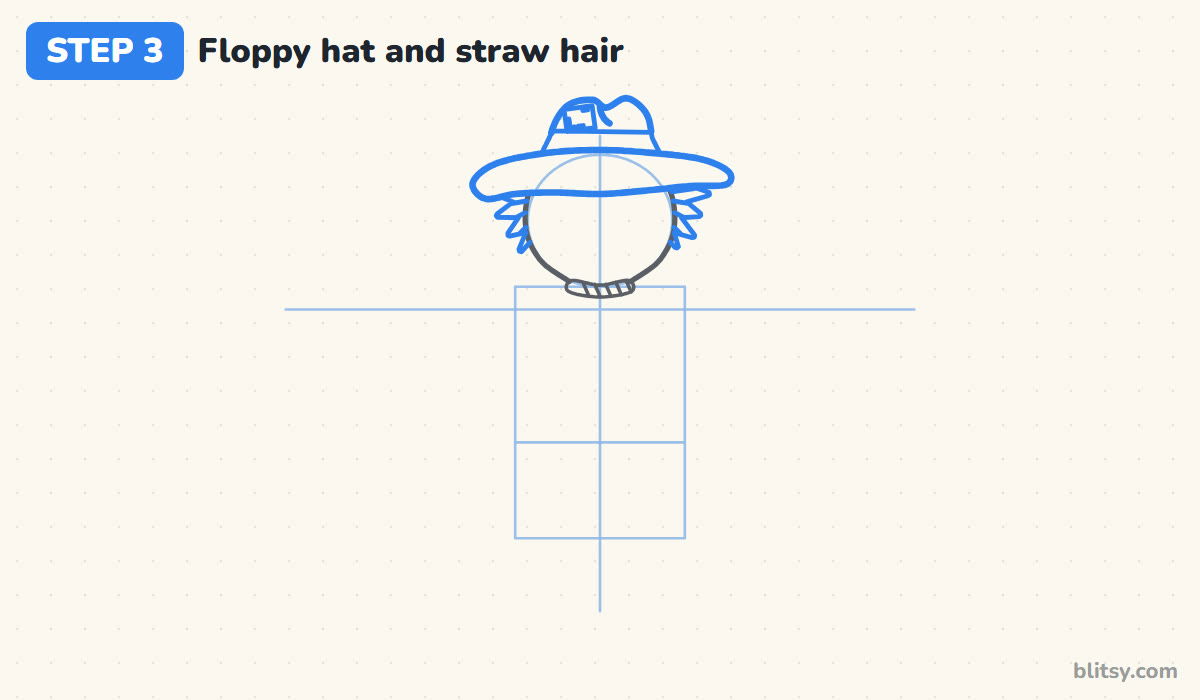
Across the top of the head, draw a wide, wavy brim that hangs past both sides of the circle, with the left end drooping a little lower. Sit a rounded crown on it with a small dent in the top, then draw a band where the crown meets the brim. Add a little square patch on the crown. Under the brim, on each side of the face, pull out a few pointy straw spikes.

💡 Tip: Make the brim about twice as wide as the head. That width is what makes it floppy.
Step 4: Draw the shirt with long arms
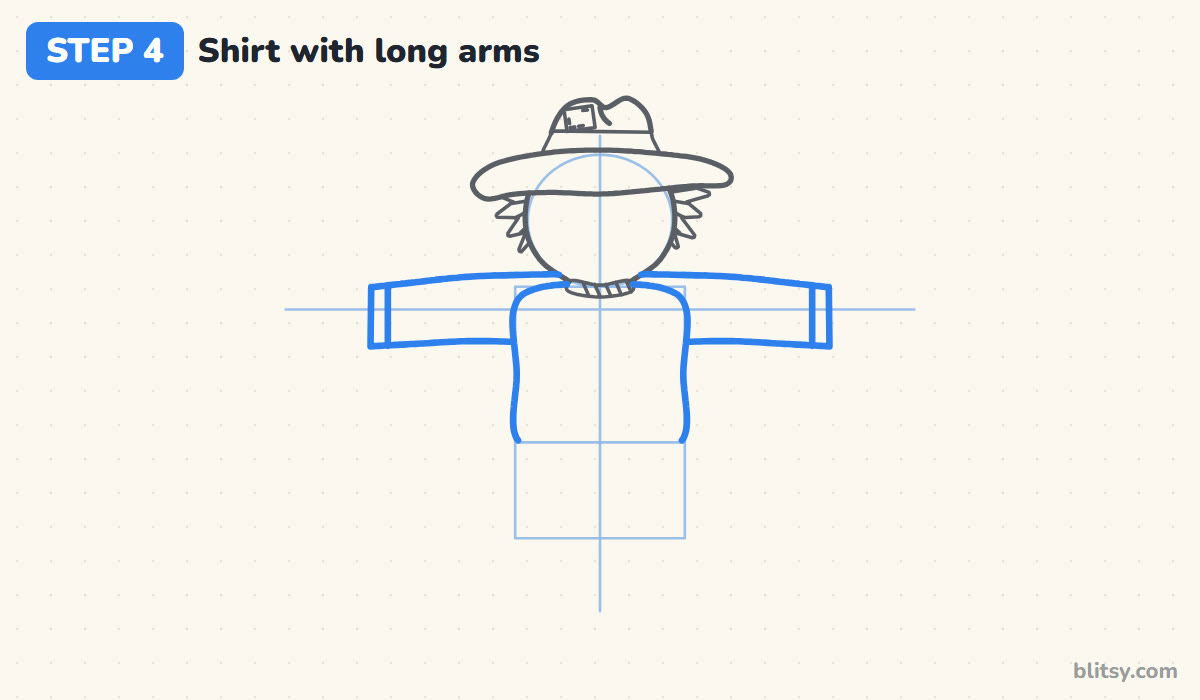
Start the shirt just under the rope and round its shoulders down into two straight sides that follow the box. From each shoulder, run a sleeve out along the crossbar line. Keep the top and bottom edges of each sleeve almost parallel, and end them with a flat cuff and a short line inside. I keep them stiff and straight, like real stuffed sleeves.
💡 Tip: Stop both cuffs the same distance from the post so the arms match.
Step 5: Add overalls with straps
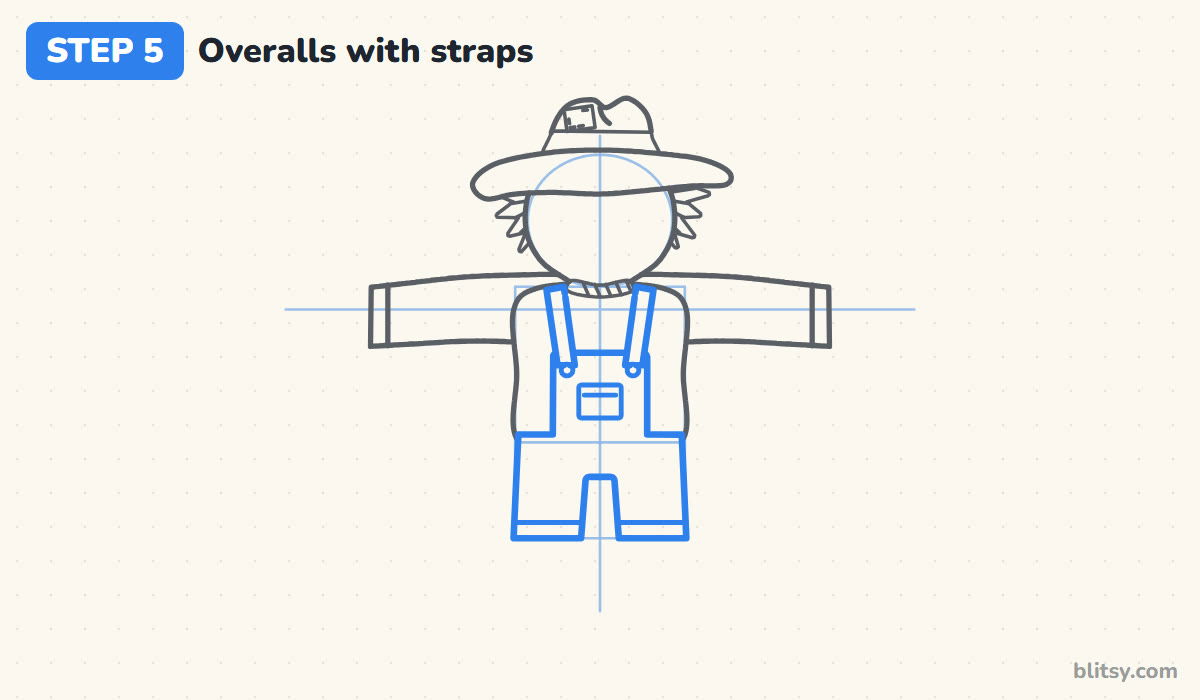
Draw a square bib on the chest, then wider pants below it that drop to the bottom of the box. Leave a gap between the legs, about as wide as the post. Two straps run from the top corners of the bib up over the shoulders. Add a button at each strap, a small pocket and a cuff line on each leg.
💡 Tip: Draw the straps slanting slightly outward. Straight up looks stiff and narrow.
Step 6: Draw straw tufts and the wooden post
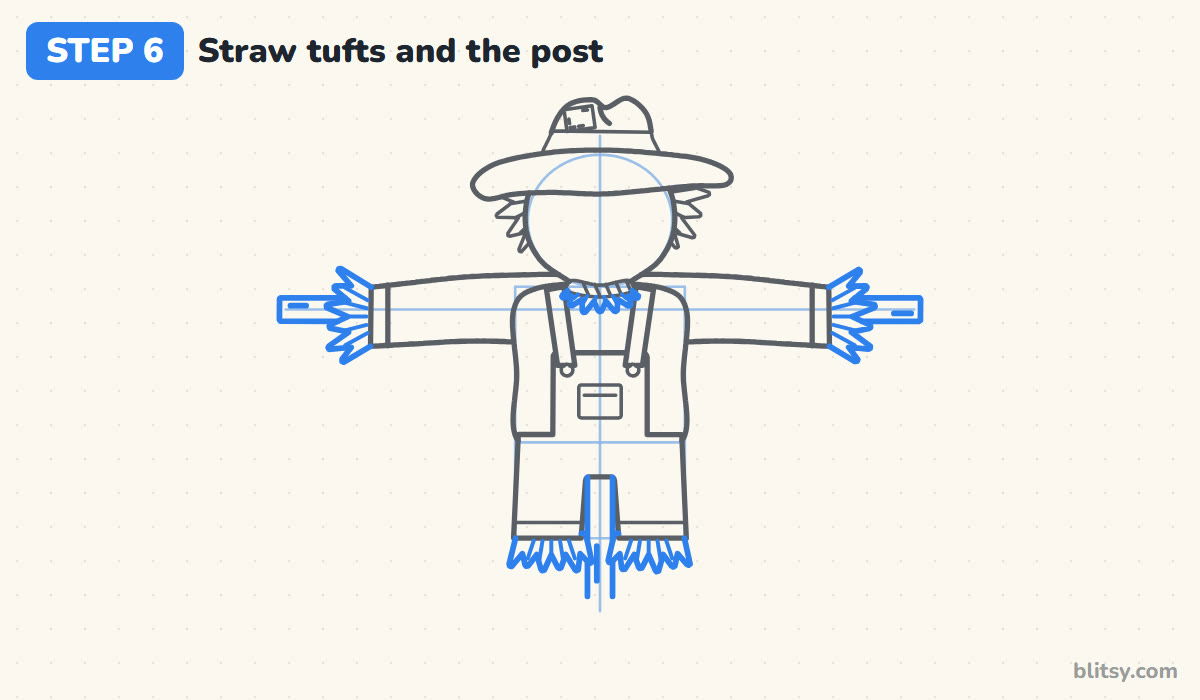
Now the straw. Zigzag a fan of pointed spikes out of each sleeve, more spikes out of the bottom of each pant leg, and a small ruffle of them at the neck under the rope. Then draw the post: the crossbar ends poking out past the arm tufts, and the pole showing between the legs and down to the ground.
💡 Tip: Vary the spike lengths a little. Perfectly even zigzags look like a saw blade.
Step 7: Give him button eyes and a stitched smile
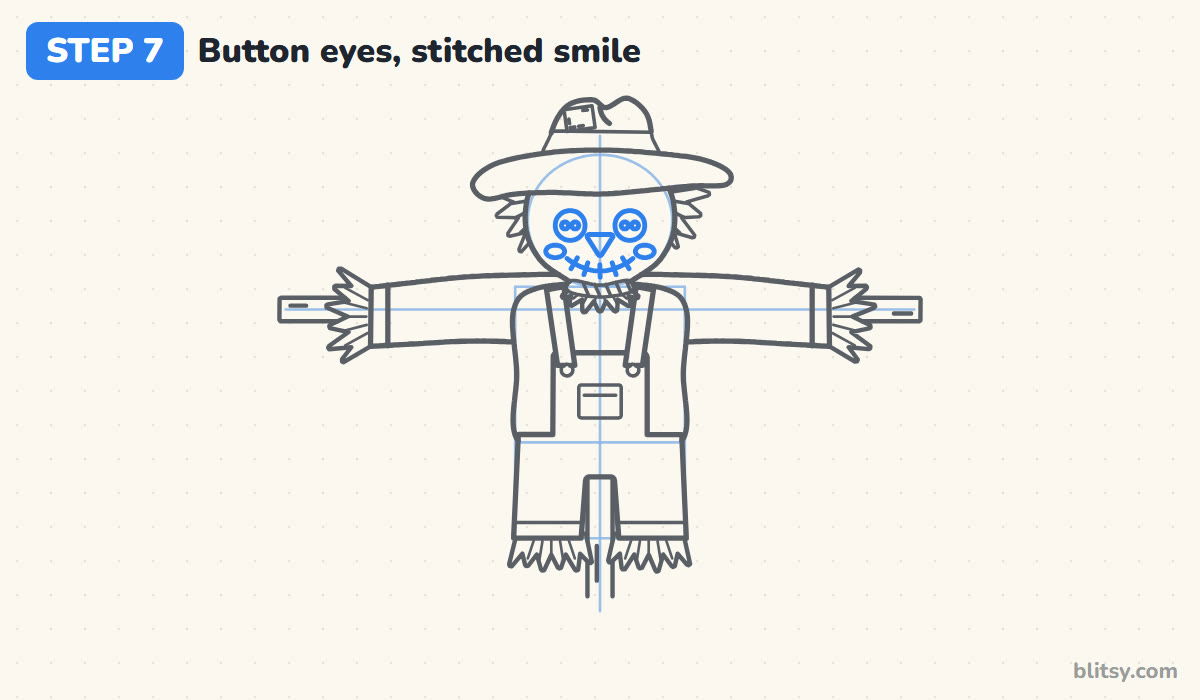
Draw two round button eyes a little above the middle of the face, with two small holes in each one. Add a small upside-down triangle nose between them. For the mouth, draw a wide curve like a bowl, then cross it with five short stitches. An oval on each cheek finishes the face. I keep the stitches short; long ones start to look like teeth.
💡 Tip: Place the eyes far enough apart that a third button could fit between them.
Step 8: Add the plaid checks and patches
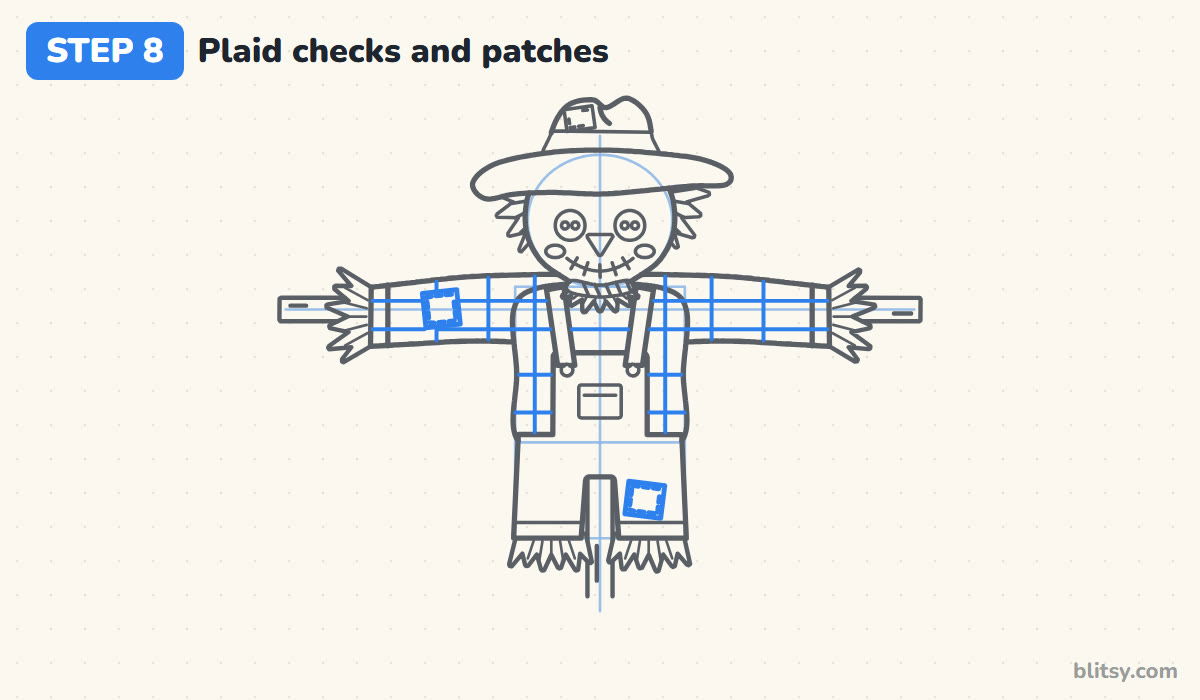
Plaid sounds tricky, but it's just crossing lines. Draw two lines along each sleeve, then a few lines across them at even spaces. Do the same on the shirt beside the bib. Then add a square patch on one sleeve and one on a pant leg, with dashed stitches inside.
💡 Tip: Use a ruler for the plaid if you like. Straight checks read as fabric best.
Step 9: Perch a friendly crow on one arm
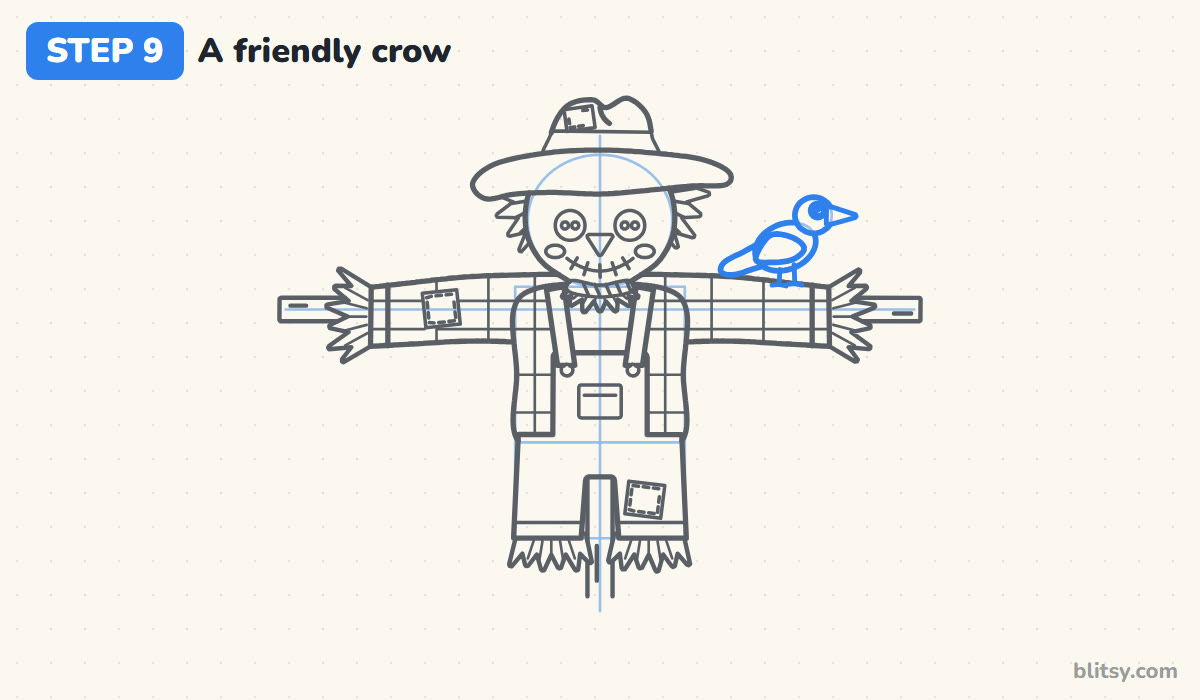
Sketch a tilted oval sitting on top of the right sleeve and a small circle above its front end. Trace them into a smooth bird body and head, add a pointed tail at the back and a wing shape on the side. Give the crow a big round eye with a shine, a triangle beak and two thin legs gripping the sleeve. Keep the beak about as long as the head is wide.
💡 Tip: A big eye with a white dot makes the crow look curious, not mean.
Step 10: Draw pumpkins and wheat in the grass
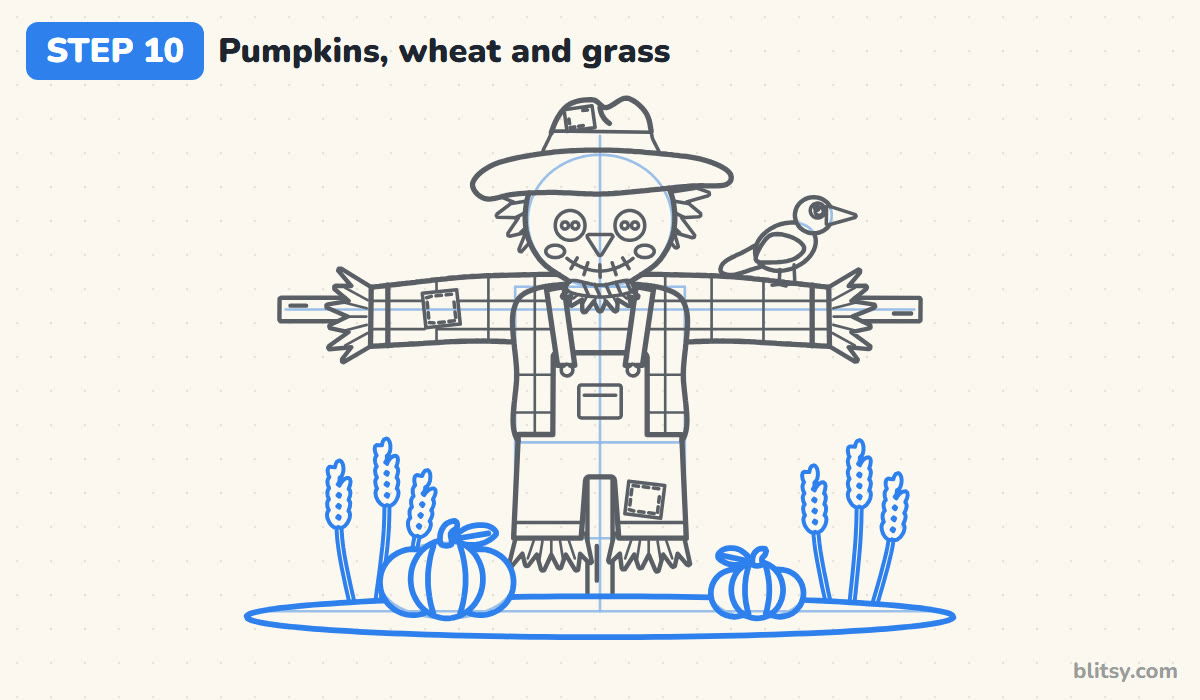
Place a wide oval guide on the left and a smaller one on the right, then turn each into a pumpkin with three round lobes, a curved stem and a leaf. Add a couple of curved lines on the middle lobe. Behind them, draw three thin wheat stalks on each side, topped with little seed shapes stacked in pairs. A long flat oval underneath is the grass.
💡 Tip: Keep the pumpkins smaller than the scarecrow's head so he stays the star.
Step 11: Ink the outlines and erase the guides
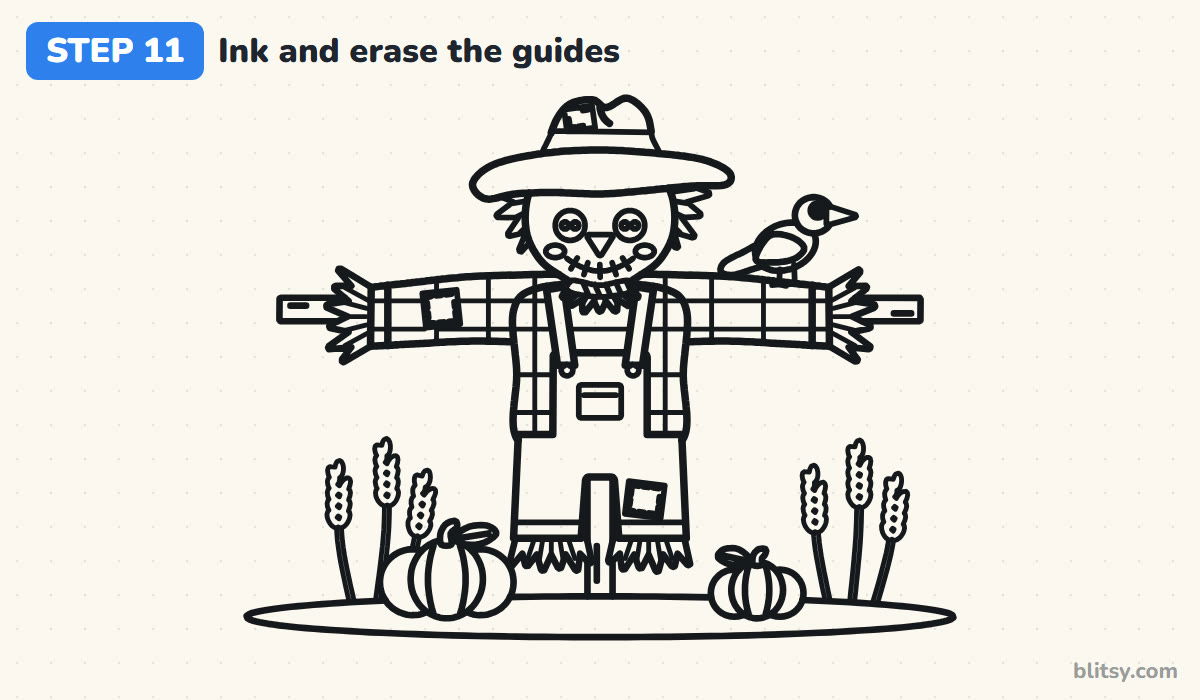
Go over every line you want to keep with a black marker, including the plaid and the stitches. Let it dry for a minute. Then erase the T, the circle, the box and the guide ovals. Go slowly around the straw corners.


💡 Tip: Turn the paper as you ink the tufts. It's easier to pull a line toward yourself.
Step 12: Color your scarecrow
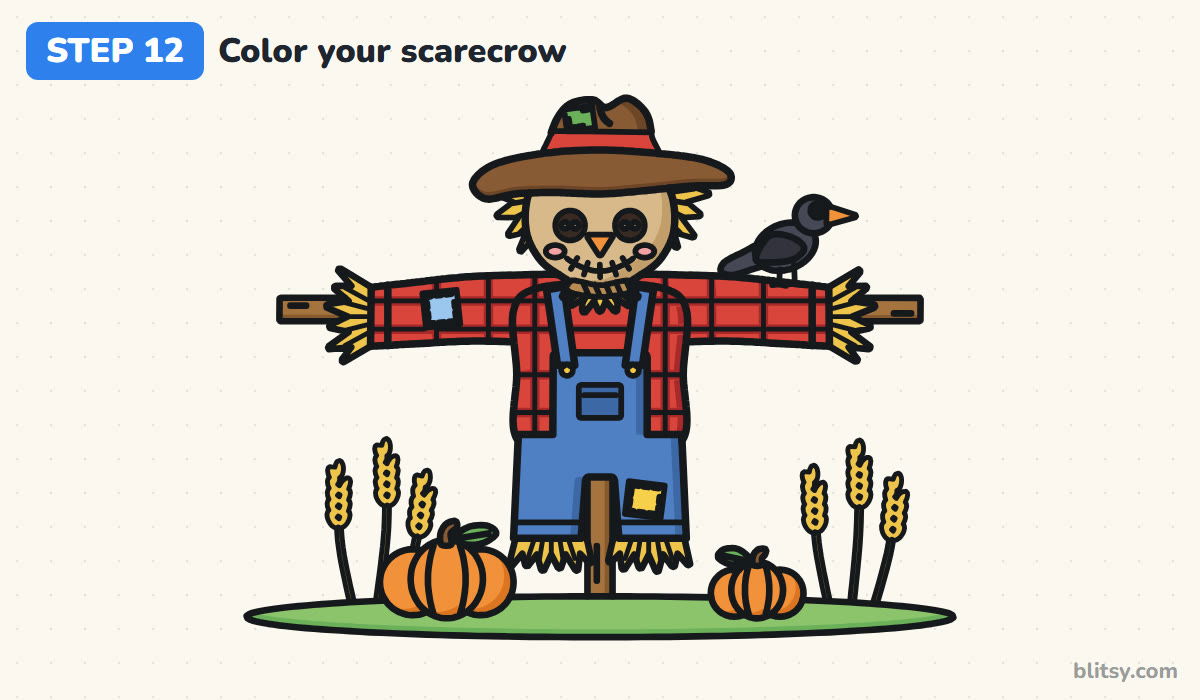
Color the head tan, the straw and wheat golden yellow, and the hat and post brown. The shirt is red, and the plaid stripes get a darker red. Make the overalls blue with a light blue sleeve patch and a yellow knee patch. Orange goes on the pumpkins, nose and beak. Use green for the hat patch and the grass, and dark gray for the crow.
💡 Tip: Color the plaid stripes first, then fill the red around them.
Scarecrow Slip-Ups That Turn Him Spooky
- Tiny eyes set close together. The face looks grumpy. Use big round buttons with plenty of space between them.
- A jagged, toothy mouth. It reads as a jack-o'-lantern grin. Draw one smooth curve and keep the stitches short.
- Arms that droop down. He stops looking like he's on a post. Keep the sleeves level along the crossbar.
- Straw spikes all the same size. The tufts look stiff and fake. Mix long and short points.
- Plaid lines that wobble everywhere. The shirt looks scribbled. Space the lines evenly and keep them straight.
Swap the Hat, the Shirt or the Bird
Give your scarecrow a green or purple plaid, a pointed witch hat for Halloween, or a sunflower tucked into the hat band. My favorite extra is a second crow on the other arm. If the crow was your favorite part, try the easy crow drawing tutorial, and fill the field with more round squash from this pumpkin drawing step by step lesson.
Free Scarecrow Coloring Page and PDF Guide
The scarecrow coloring page shows a small colored example at the top with the colors named, and a big bold outline underneath with room to add a sky. The step-by-step guide PDF holds all 12 steps with their tips, two per page. Both print fine on Letter or A4 paper.
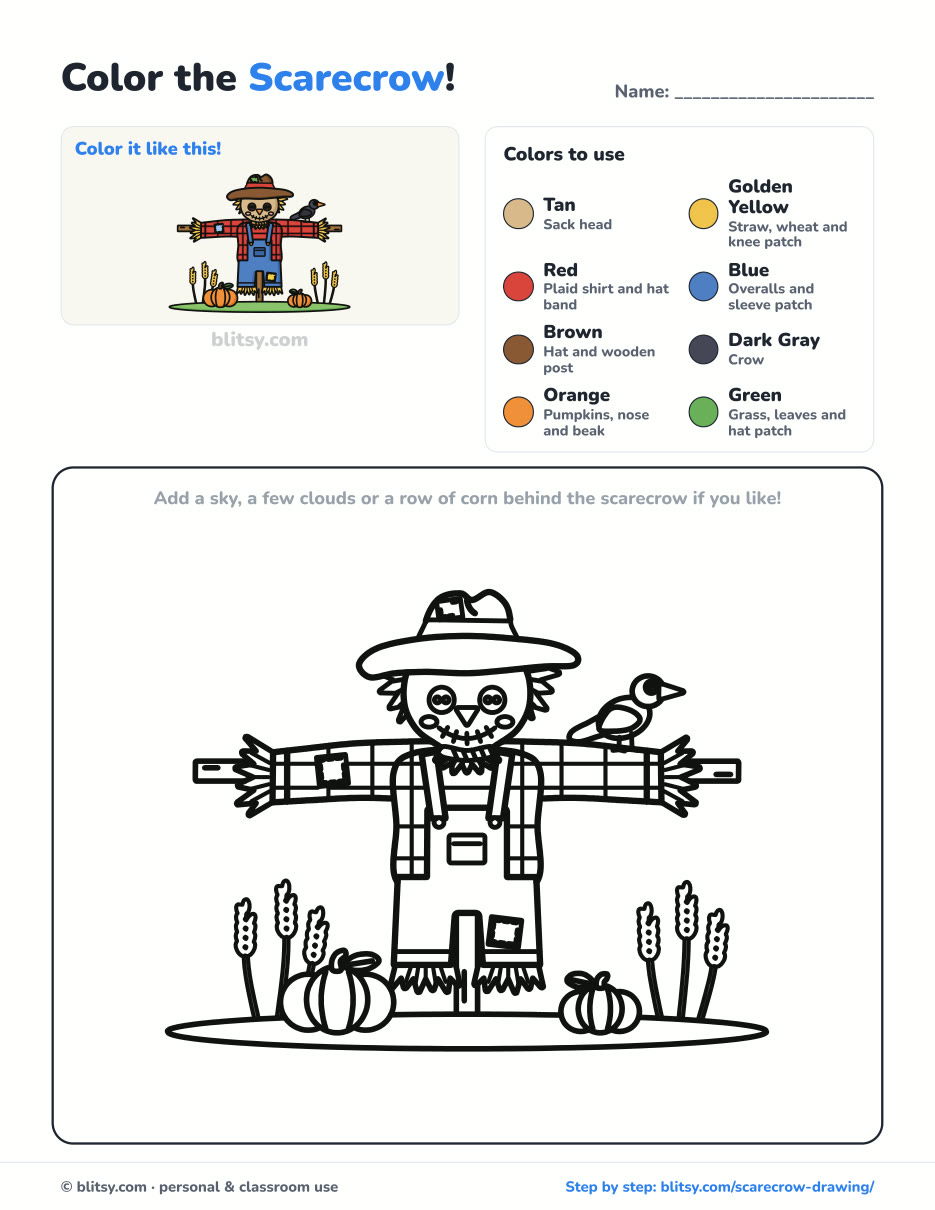
Black outlines with a colored example and the color names at the top. Ready to print and color.
⬇️ Download Coloring PageEvery step picture with its instructions and tips, to keep beside your paper while you draw.
⬇️ Download Drawing Guide📱 On a phone? Tap a download button, then open the file and choose Share → Save to Files or Print. On a computer, the PDF opens or saves straight to your Downloads folder.
Keep the Scarecrow Steps for Harvest Season
Scarecrow Questions from Young Artists
What is the easiest way to draw a scarecrow?
Start with a T for the post, a circle for the head and a box for the body. Then add the hat, the shirt and overalls, and the straw. The face comes last.
How do you draw a cute scarecrow for kids?
Use a round, chubby head, big button eyes, pink cheeks and a smooth stitched smile. A friendly crow and some pumpkins make the picture cheerful.
What colors is a scarecrow?
Usually a tan sack head, golden straw, a red plaid shirt, blue overalls and a brown hat and post.
How long does a scarecrow drawing take?
About 20 minutes to draw and ink, and another 10 to 20 to color. The plaid is the slowest part, so younger kids can leave it off.
Stand your scarecrow in the middle of the page, give him a new hat next time, and see how many crows you can fit on his arms. 🌾
Related posts:
 How to Draw a Fall Leaf Step by Step (Maple, Oak and Birch)
 How to Draw a Car Step by Step (Easy Drawing for Beginners)
 How to Draw a Rocket Step by Step (Easy Blast-Off Drawing)
 How to Draw Rocks Step by Step (Easy Boulder Drawing)
 How to Draw Flames Step by Step (Easy Campfire Drawing)
 Oil Pastel Drawing Step by Step (Easy Sunset for Beginners)
 Summer Drawing Step by Step (Easy Beach Scene for Beginners)
 Halloween Drawing Step by Step (Cute Haunted House for Kids)
 Realistic Drawing Step by Step (Shade a Shiny Apple)
 Love Drawing Step by Step: Two Hugging Bears (Easy)
 How to Draw a Whale Step by Step (Easy for Beginners)
 How to Draw Lungs Step by Step (Easy Science Diagram)

