
Crows are some of the smartest birds around, and they have a look that's easy to love once you notice the glossy feathers and that curious stare. In this lesson I'll walk you through how to draw a crow step by step, from two faint guide shapes to a colored bird standing next to a shiny coin. The hardest part of a crow isn't the shape at all. It's coloring something black without losing every detail, and I'll show you exactly how I handle that.

Think of the crow pictures as layers: whatever is new shows up in bright blue, so copy only those lines. Gray lines were drawn earlier. The very pale blue shapes are construction guides, and they get erased once the ink is down.
Quick overview
⏱️ Time: about 35 to 45 minutes
🎯 Level: easy, good for kids from around 7 and up
✏️ Steps: 12
🐦⬛ You'll draw: a friendly crow standing on the grass with a gold coin and a pumpkin
Black Pencils and Paper for a Clever Bird
- A light HB pencil for the guides
- A clean eraser
- A black fineliner or thin marker for inking
- Colored pencils or markers: black, blue-purple, two grays, gold, orange, green, brown
- Plain paper turned sideways
If you only own one gray, use it for both the beak and the feather edges and simply press harder on the beak.
How to Draw a Crow Step by Step
Step 1: Draw the ground line and guide shapes
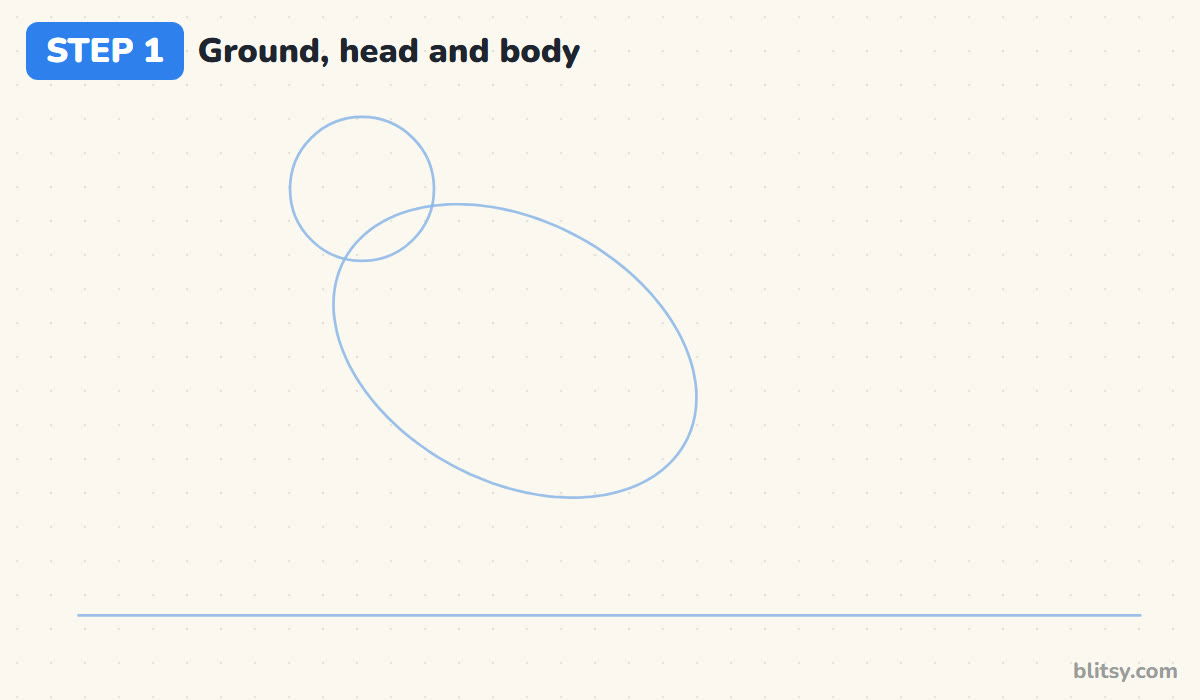
Start with a long flat line near the bottom of the page for the ground. Up on the left, draw a circle for the head. Then add a big oval for the body that overlaps the lower right of the circle and tilts down toward the right, like an egg lying at a slant.
💡 Tip: Leave a gap of about one head height between the oval and the ground line. That space becomes the legs.
Step 2: Add guides for the beak, the tail and the legs
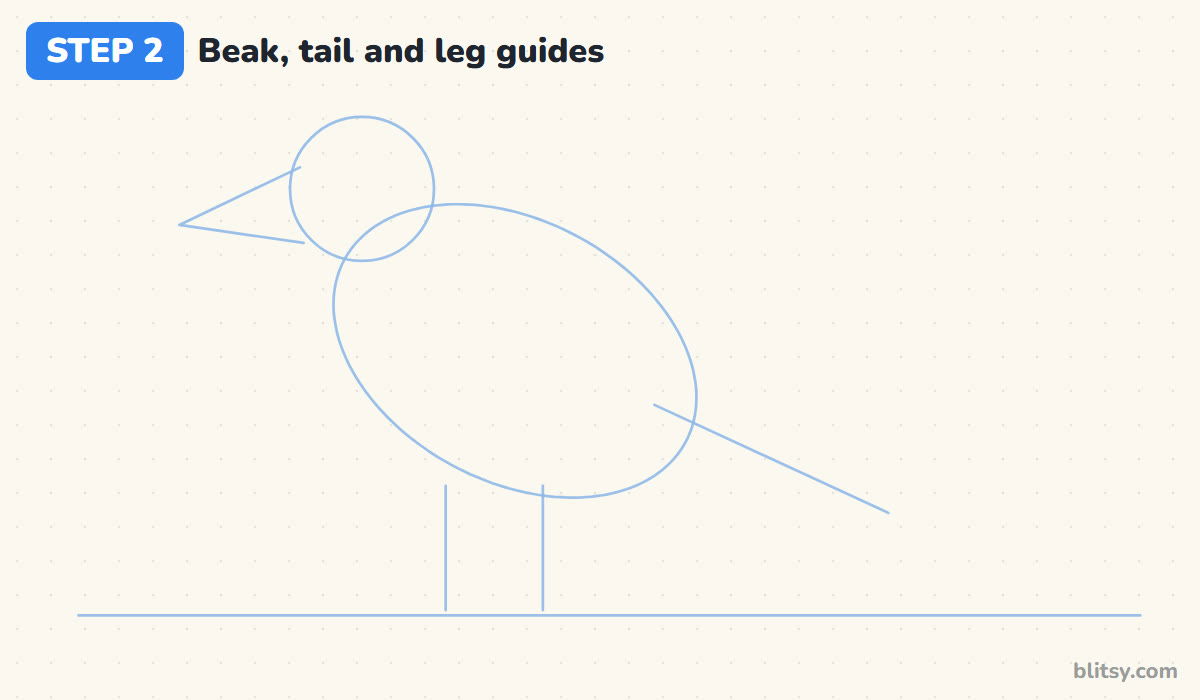
On the left side of the head, sketch a long, pointed triangle for the beak. From the lower back of the oval, draw a straight slanted line for the tail. Finish with two short upright lines from the belly down to the ground.
💡 Tip: Space the two leg lines a little apart. If they touch, the crow looks like it's balancing on one stick.
Step 3: Outline the crow head and body
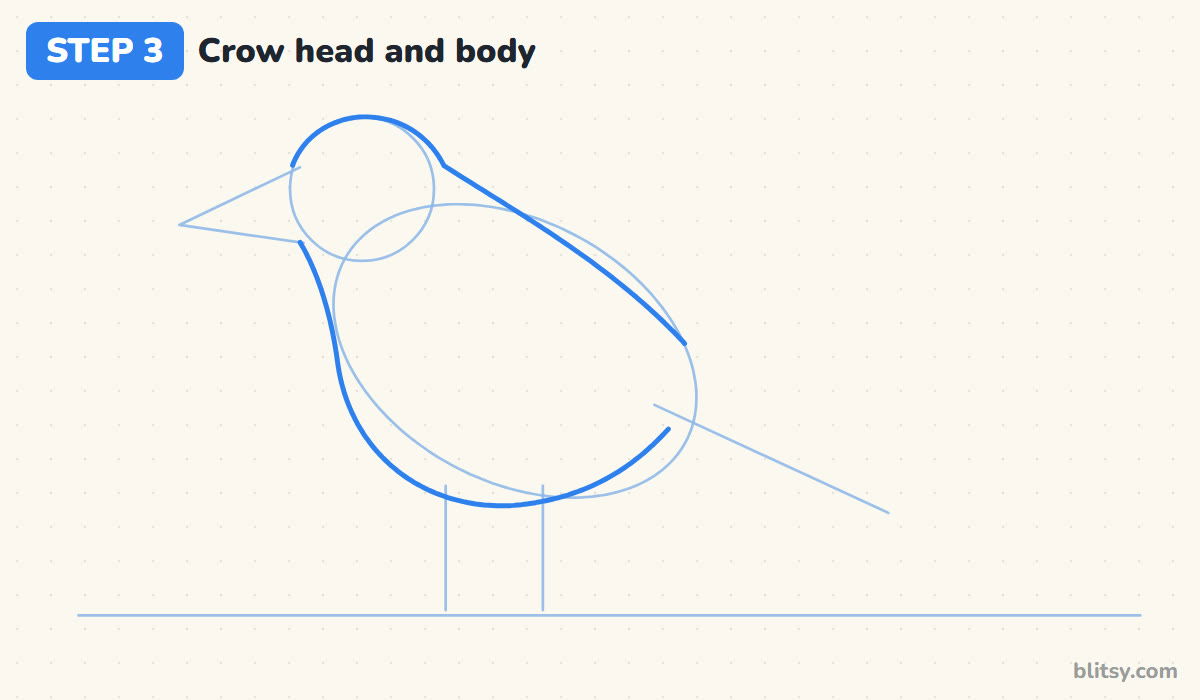
Follow the top of the head circle, then let the line slide down the back in one long curve. Go back to the beak and draw the throat and chest, bulging slightly past the oval, then sweep under the belly. I stop both lines short of the back end on purpose, since the wing will cover that spot in a few steps.




💡 Tip: Make the back almost straight. A crow looks sleek because its back doesn't hump like a songbird's.
Step 4: Draw the thick curved beak
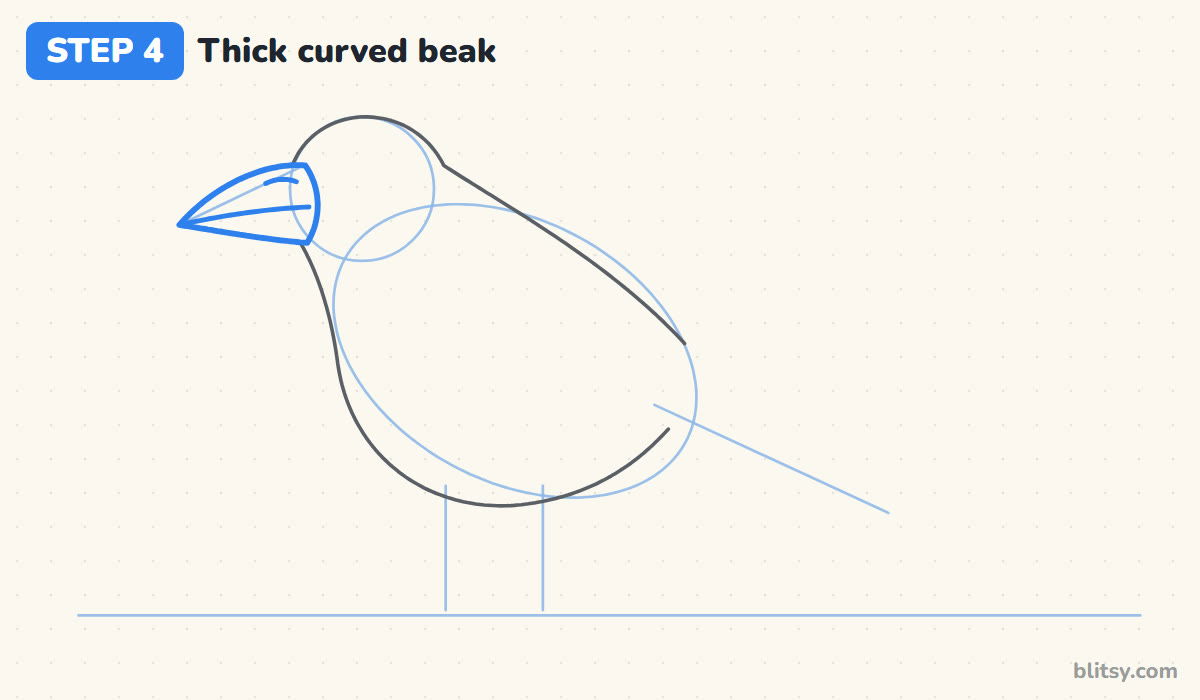
Over the triangle guide, draw a heavy beak with a top edge that curves gently down to the tip. The bottom edge stays nearly straight. Close the back of the beak against the face, then add one line through the middle and a small curve near the top for the nostril.
💡 Tip: Keep the base of the beak tall. A thin beak turns your crow into a blackbird.
Step 5: Add a bright eye with a shine
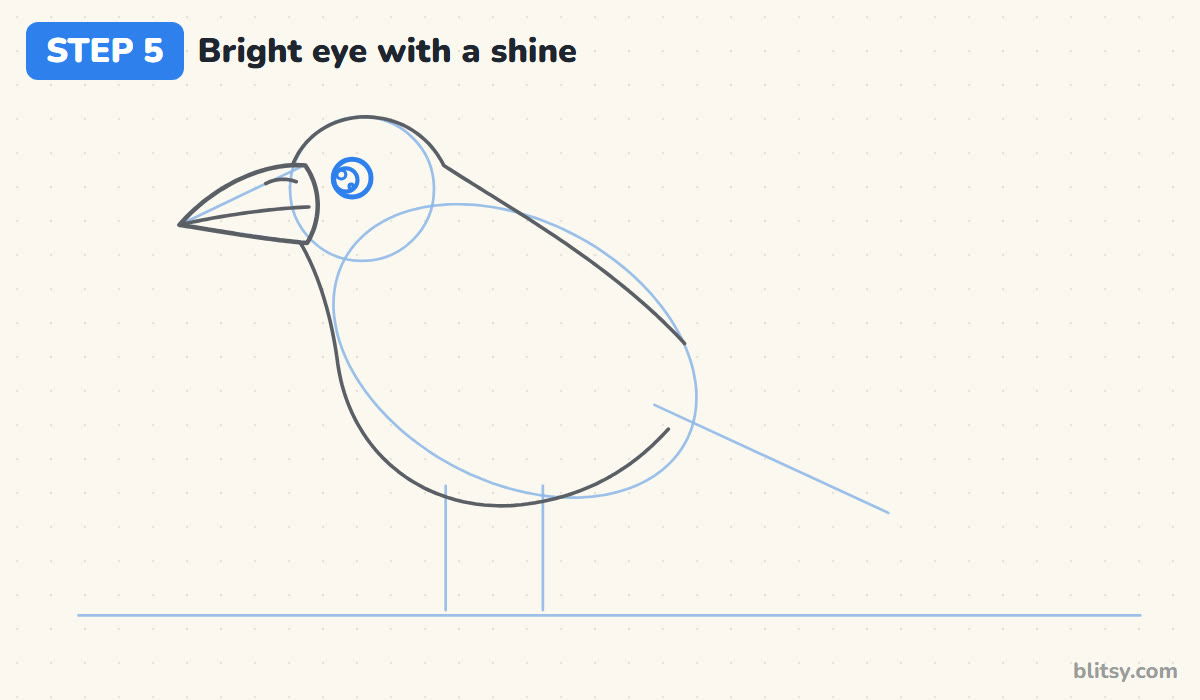
Place the eye just above the line of the beak, a little behind where the beak meets the head. Draw a round eye, then a smaller circle inside for the pupil, shifted toward the beak so the crow looks forward. Add one tiny circle for the shine and a dot below it.
💡 Tip: Make the eye bigger than a real crow's. That's what gives this one its friendly face.
Step 6: Draw the folded wing
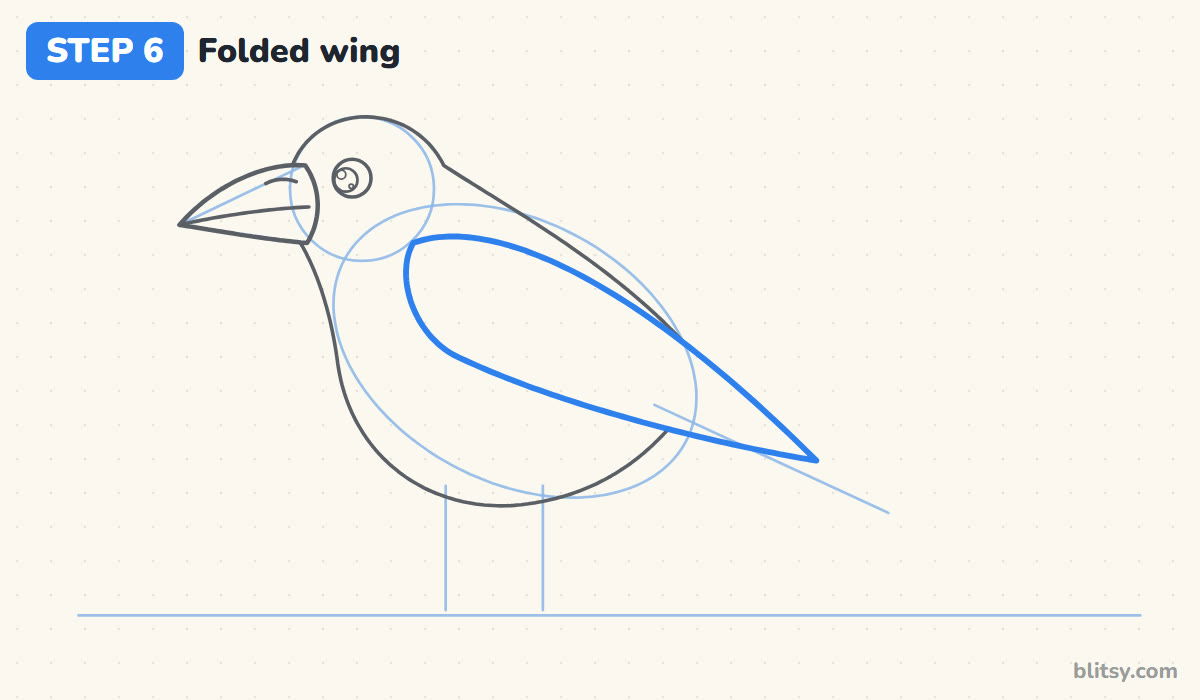
The wing is a long leaf shape lying on the body. Begin just behind the head, follow close to the back line and end in a sharp point that reaches past the oval toward the tail guide. Bring the lower edge back in a soft curve to the front.
💡 Tip: Let the wing tip go past the body. Crows have long wings, and a short one makes the bird look chubby.
Step 7: Add layered feather rows
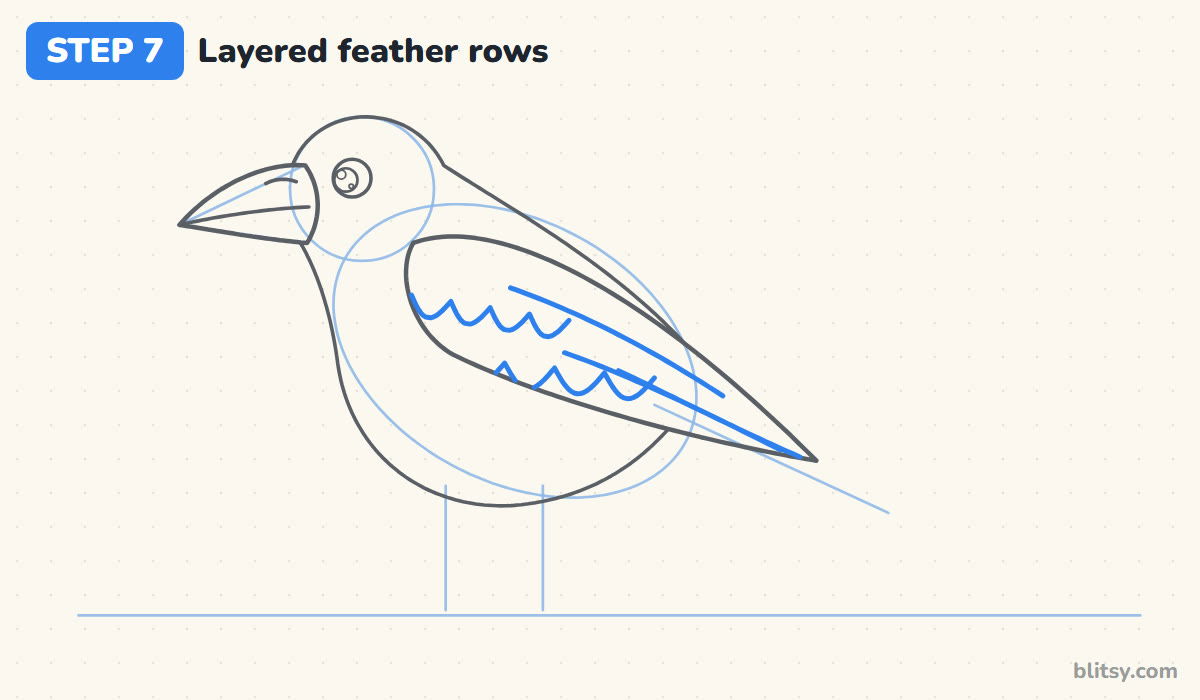
Near the top of the wing, draw a row of small bumps like a scalloped edge. Below it, draw a second row with slightly bigger bumps. These are the smaller wing feathers overlapping like roof tiles. Then pull three long lines toward the wing tip for the flight feathers.
💡 Tip: Draw each bump with the same little wrist motion. Matching bumps look neat even if they aren't perfect.
Step 8: Draw the fan-shaped tail
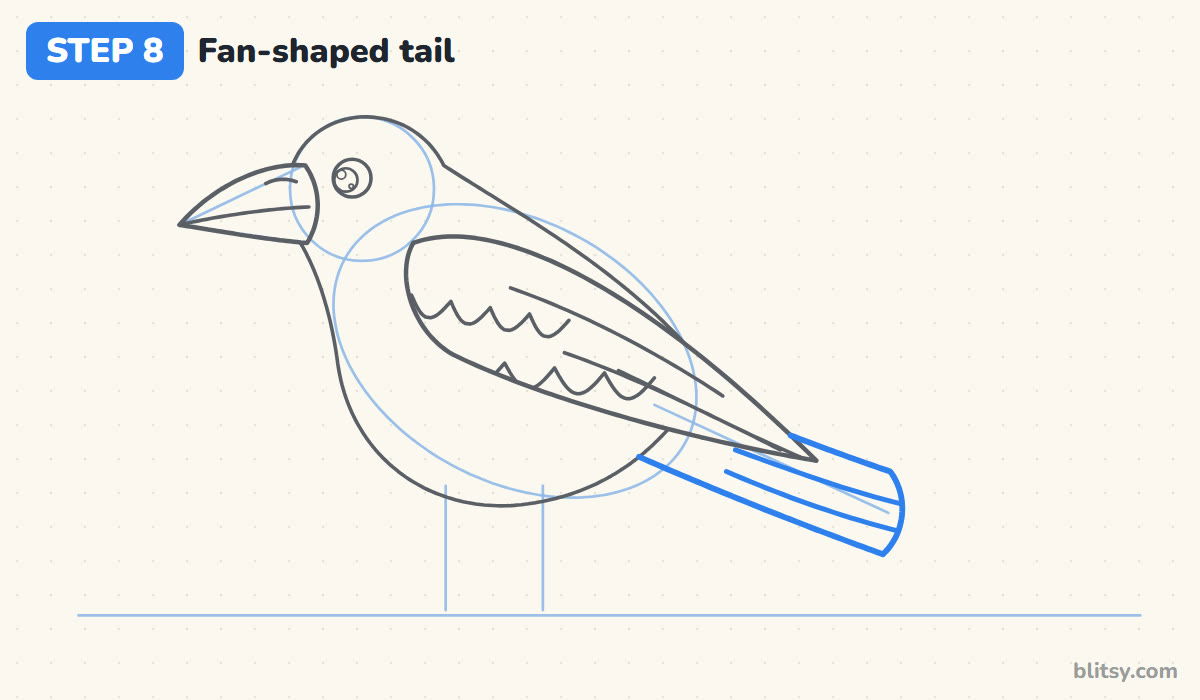
Follow the tail guide with two lines that start behind the body and spread slightly apart as they go out. Round off the end with a short curve. Inside, two long lines split the tail into separate feathers. Its upper edge disappears under the wing, so don't draw through it.
💡 Tip: Widen the tail toward its end. If both edges stay parallel, it looks like a stick.
Step 9: Draw strong legs and scaly toes
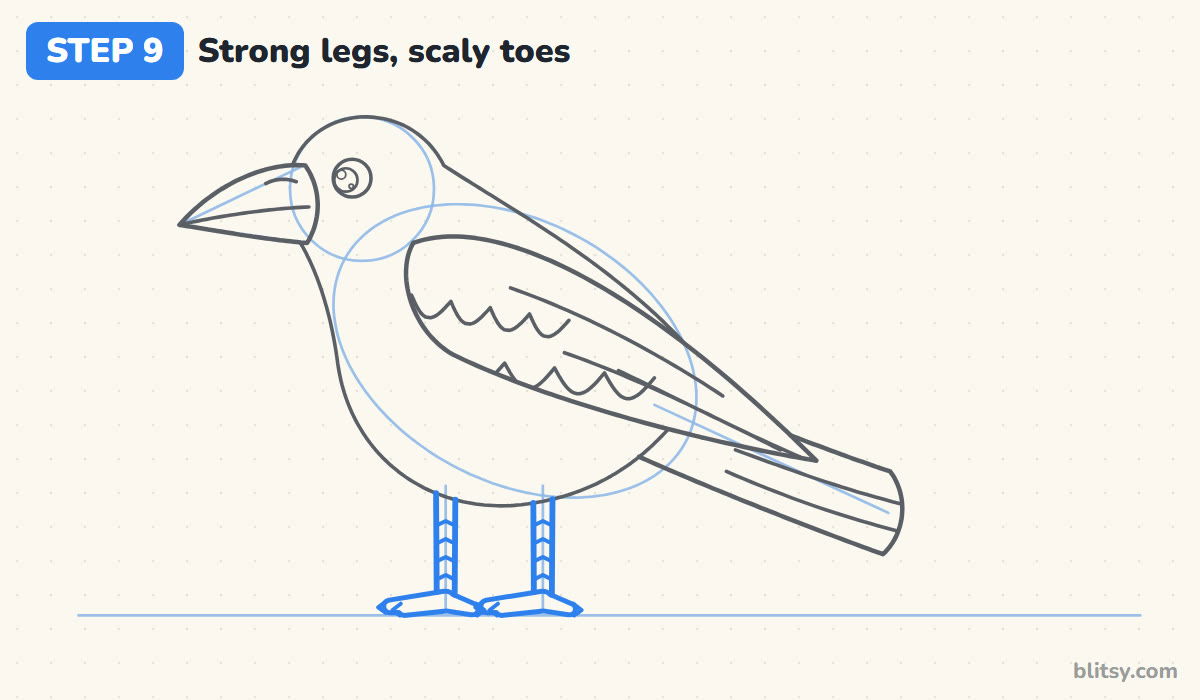
Go over each leg guide with two close lines. Crow legs are sturdy, so make them thicker than a sparrow's. At the bottom, draw two long toes pointing forward and one short toe pointing back, all flat on the ground, with a small hooked claw at each tip. Little V shapes up the legs show the scales.
💡 Tip: Rest the toes right on the ground line. Toes floating above it make the crow look like it's hovering.
Step 10: Add the coin, the pumpkin and the grass
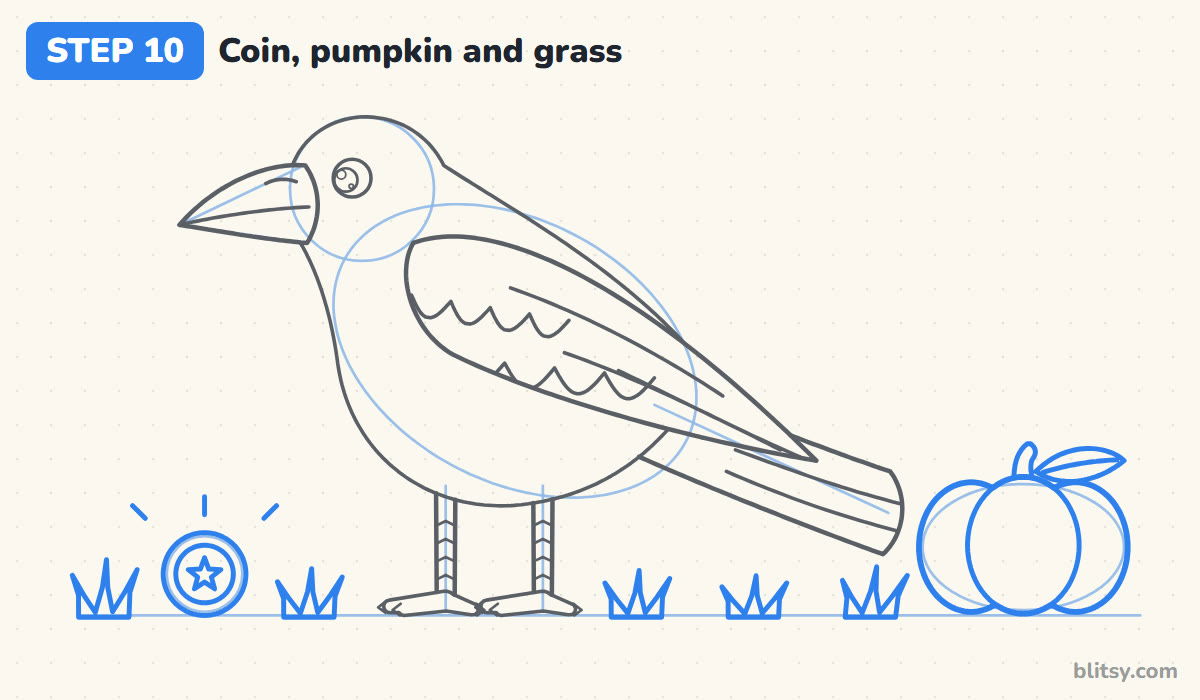
In front of the crow, draw a circle standing on the ground, a smaller circle inside and a little star in the center. Three short dashes above make it sparkle. On the right, draw a pumpkin from three overlapping round lobes with a curved stem and a leaf. Scatter a few grass tufts along the ground.
💡 Tip: Keep the pumpkin lower than the crow's back. A bigger prop steals attention from the bird.
Step 11: Ink the lines and erase the guides
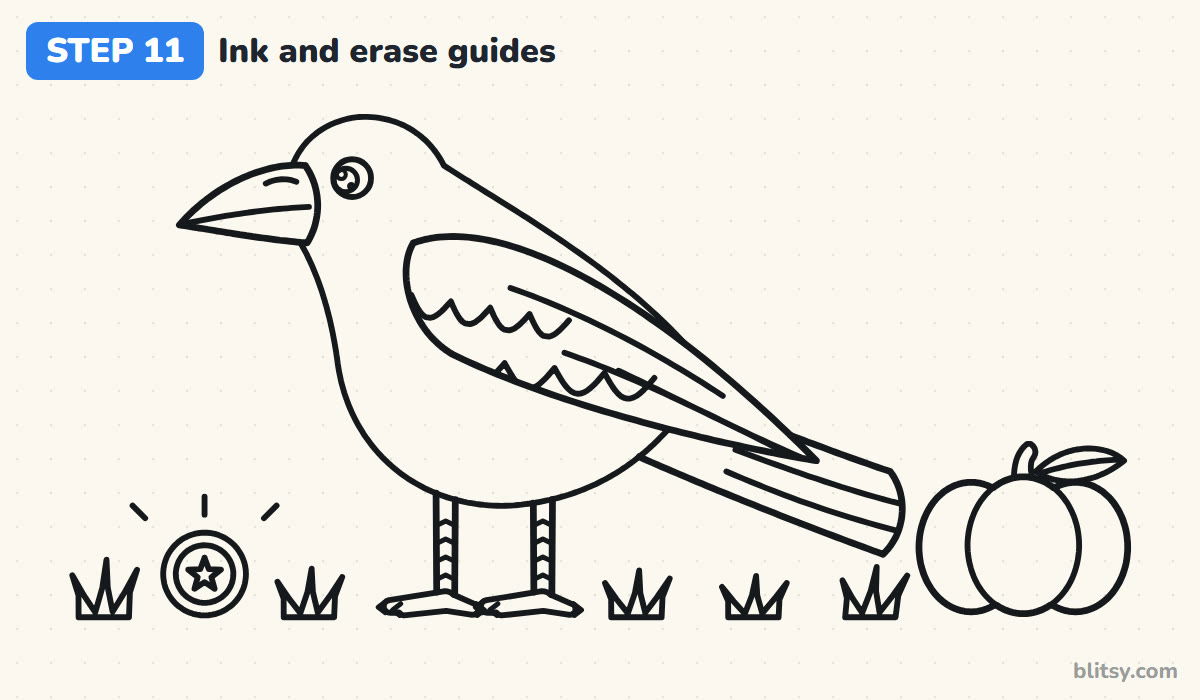
Trace all the keeper lines with your fineliner. I ink the face first while my hand is fresh, then the wing feathers, and leave the grass for last. Skip every pale guide. Let it dry fully before you erase the circle, the oval and the guide lines.

💡 Tip: Turn the paper as you ink the scallops so your hand always pulls the pen toward you.
Step 12: Color your crow
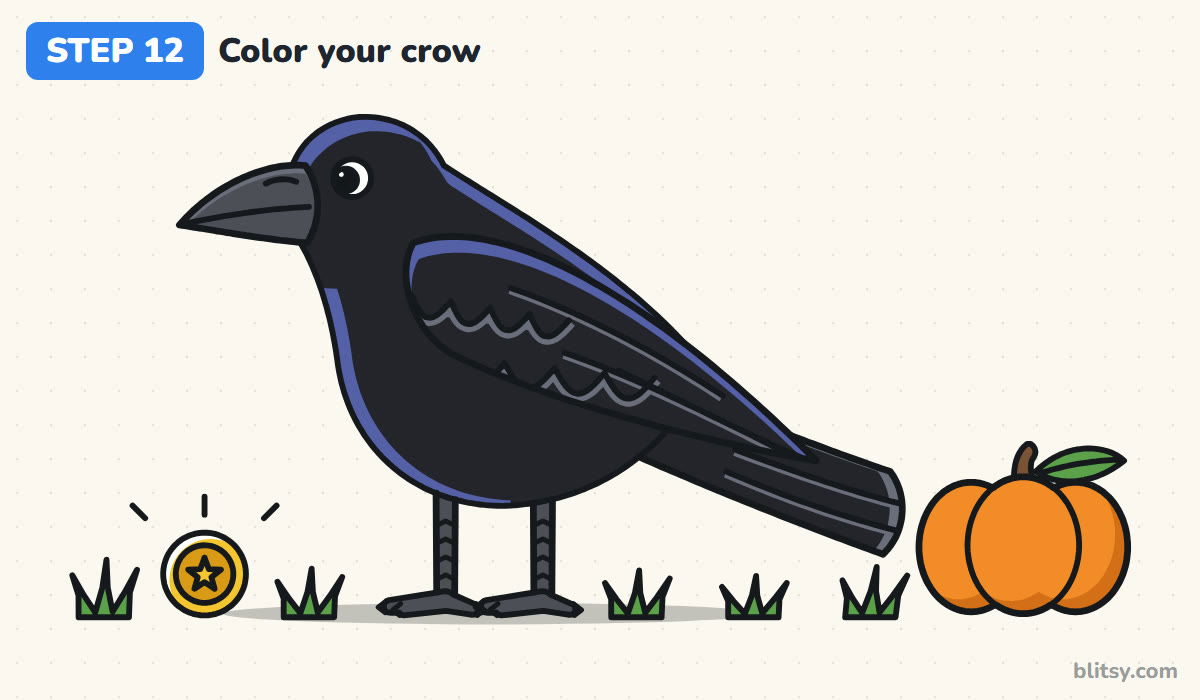
Here's my trick for a black bird. Before any black goes down, color a thin blue-purple strip along the top of the head, the back, the chest and the top edge of the wing. Add gray just above each feather row and along the flight feathers. Then fill the rest with black around those strips. Dark gray goes on the beak and legs, gold on the coin, orange on the pumpkin.
💡 Tip: Leave the eye white with its shine. On a black bird, that bright spot is what people notice first.
Crow Sketch Problems I See Most
- Coloring the whole bird flat black. Every feather line vanishes. Save the blue-purple and gray strips first, then fill around them.
- A short, thin beak. The bird stops looking like a crow. Make the beak long, thick at the base and gently curved on top.
- A round, puffy body. Crows are sleek. Keep the back line long and fairly straight from head to tail.
- Dark lines on top of dark color. Ink lines get lost on black. That's why the feather rows need gray next to them.
- Legs that are too thin. Spindly legs look weak under a heavy body. Give them some width and flat, spread toes.
Swapping the Coin, Pumpkin or Pose
Old stories say crows collect shiny things. Real crows care much more about food, so try a peanut or a piece of bread in place of the coin. For autumn, add a fence rail behind the bird, or put two crows side by side with one looking up. Small kids can skip the feather rows and just color the wing with a gray edge. The pumpkin you just drew has its own pumpkin drawing tutorial, and a crow makes a natural friend for a scarecrow drawing.
Print a Crow Coloring Page and the Step Guide
Prefer paper? The free crow coloring page has a colored sample at the top and a key that tells you which color goes on which part, with a big clean outline below. The PDF drawing guide collects all 12 steps with their tips, and it fits on Letter or A4.
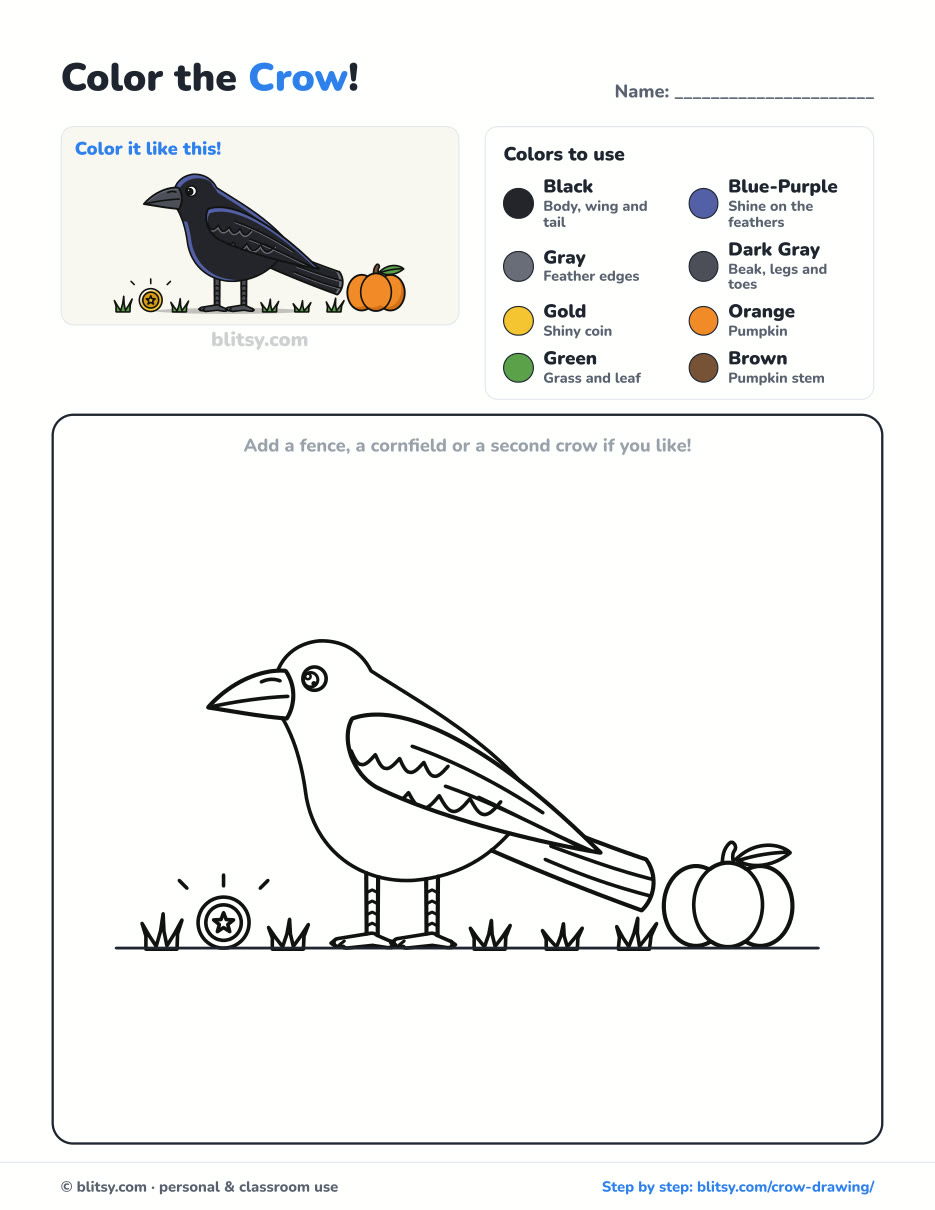
Black outlines with a colored example and the color names at the top. Ready to print and color.
⬇️ Download Coloring PageEvery step picture with its instructions and tips, to keep beside your paper while you draw.
⬇️ Download Drawing Guide📱 On a phone? Tap a download button, then open the file and choose Share → Save to Files or Print. On a computer, the PDF opens or saves straight to your Downloads folder.
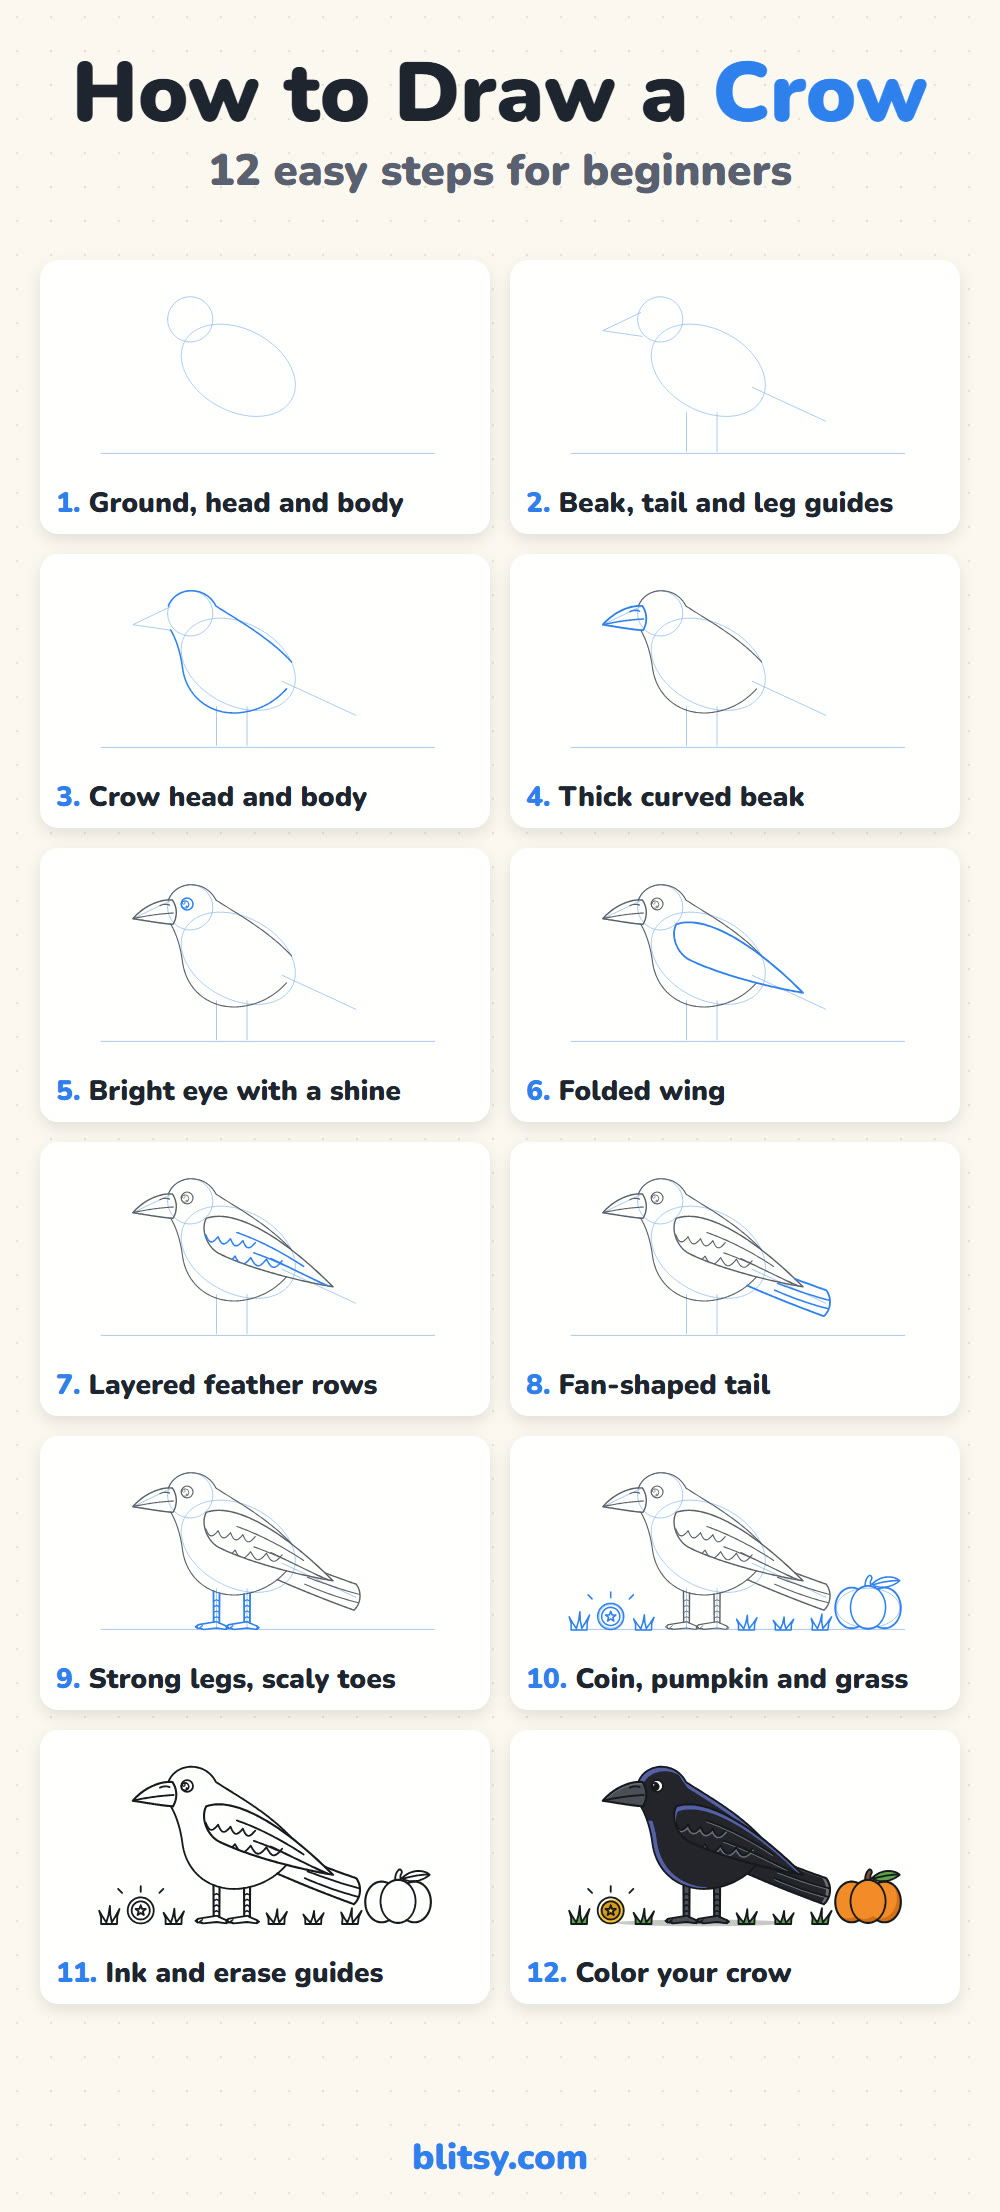
One Long Image With Every Crow Step
Crow Drawing Questions Worth Answering
What is the easiest way to draw a crow?
Begin with a circle for the head and a tilted oval for the body, then add a long thick beak and a long folded wing. Those two features make the bird read as a crow before you color anything.
How do you color a black bird so it doesn't look flat?
Leave thin strips for highlights. Blue-purple along the top edges copies the glossy sheen real crows have in sunlight, and gray above the feather rows keeps the wing details visible.
What is the difference between drawing a crow and a raven?
Ravens are bigger, with an even heavier beak, shaggy throat feathers and a wedge-shaped tail. A crow has a smoother throat and a tail that ends in a fan shape, like the one in this lesson.
Is this crow drawing good for kids?
Yes. Kids around 7 and up can follow all twelve steps. Younger children can draw the main shapes while an adult can help with the feather rows.
Your turn now. Give your crow something to guard, a coin, a peanut or a whole pumpkin patch. 🐦⬛🎃
Related posts:
 How to Draw a Car Step by Step (Easy Drawing for Beginners)
 How to Draw Godzilla Step by Step (Easy Kaiju for Beginners)
 How to Draw a Whale Step by Step (Easy for Beginners)
 How to Draw a Rat Step by Step (Easy for Beginners)
 How to Draw an Arctic Fox Step by Step (Easy for Beginners)
 How to Draw a Shark Step by Step (Easy for Beginners)
 How to Draw a Dog Step by Step (Easy Side View for Beginners)
 How to Draw a Chicken Step by Step (Easy for Beginners)
 How to Draw a Fish Step by Step (Easy Goldfish for Beginners)
 How to Draw a Light Bulb Step by Step (Easy for Beginners)
 How to Draw a Snowman Step by Step (Easy for Beginners)
 How to Draw an Eagle Step by Step (Easy for Beginners)

