
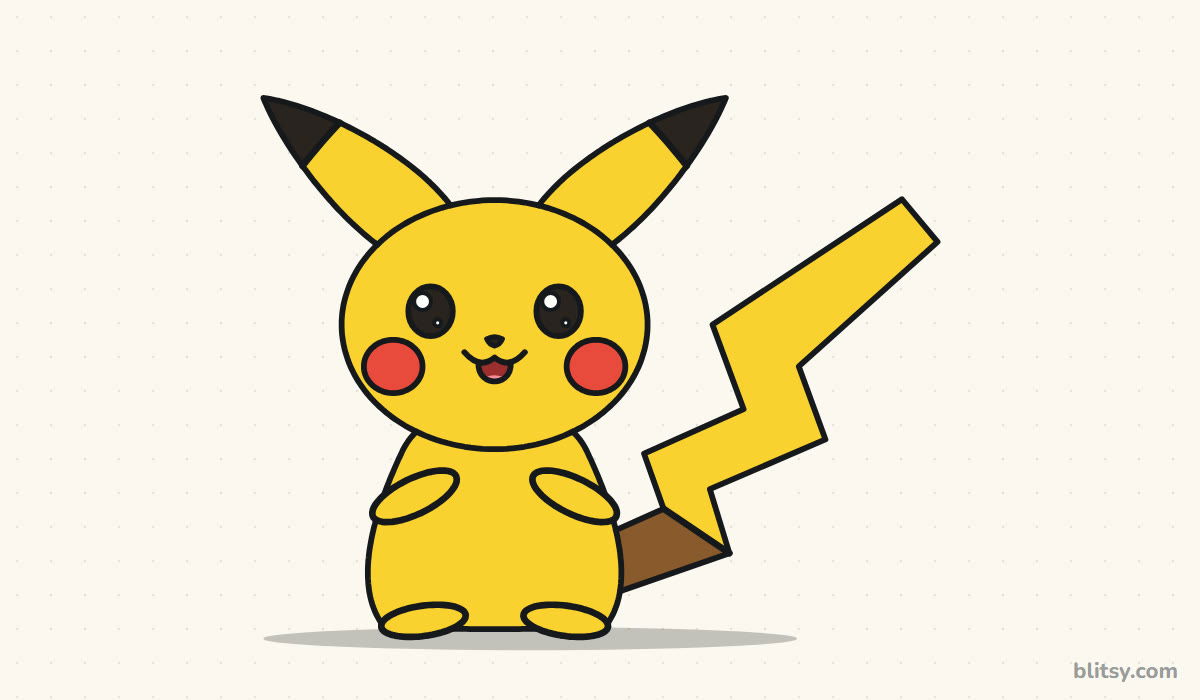
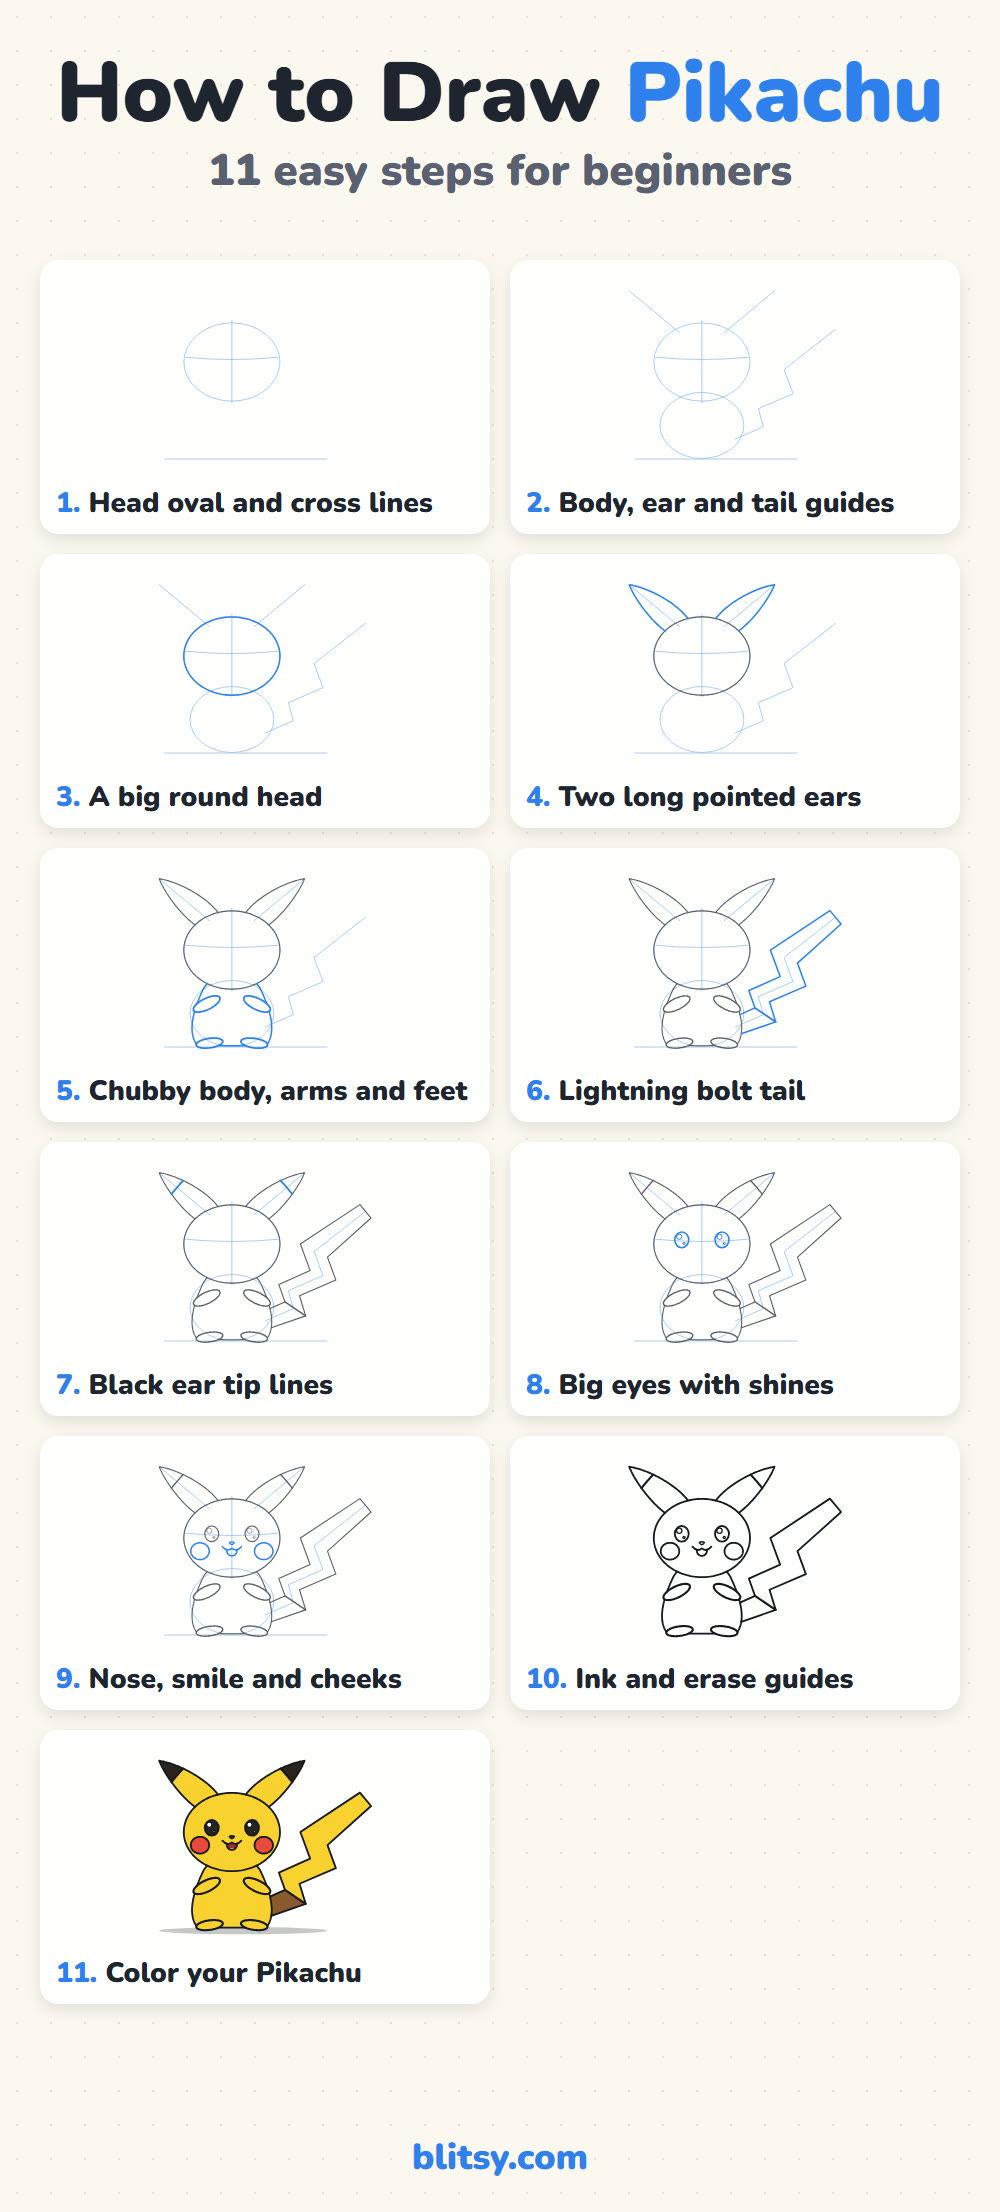
Two things make Pikachu instantly readable: ears that are almost as long as the head, and a tail shaped like a bolt of lightning. Get those right and the rest is mostly circles. Below I'll walk you through how to draw Pikachu step by step, starting from a head oval and ending with a colored, smiling character standing on the ground. This is my own simple fan-art version for practice, not official artwork, so feel free to change the pose once you know the shapes.
Blue in a step picture means draw it now. Gray parts were drawn in earlier steps, and the pale blue helper lines stay light until you rub them out in step 10.
Quick overview
⏱️ Time: about 25 to 35 minutes, coloring included
🎯 Level: easy, good for kids from about 6
✏️ Steps: 11
⚡ You'll draw: a standing Pikachu with long ears, rosy cheeks and a lightning bolt tail
Pikachu Supplies From Your Pencil Case
- A pencil you can press very lightly, HB is fine
- A soft eraser that won't smear
- A black marker or fineliner for the final outline
- A bright yellow pencil or crayon, the most important color here
- Red and black, plus brown and a little pink
- Plain paper turned sideways, so the tail has room
If your yellow is pale, color it twice in two directions and it will look much brighter.
How to Draw Pikachu Step by Step
Step 1: Draw a head oval and cross lines
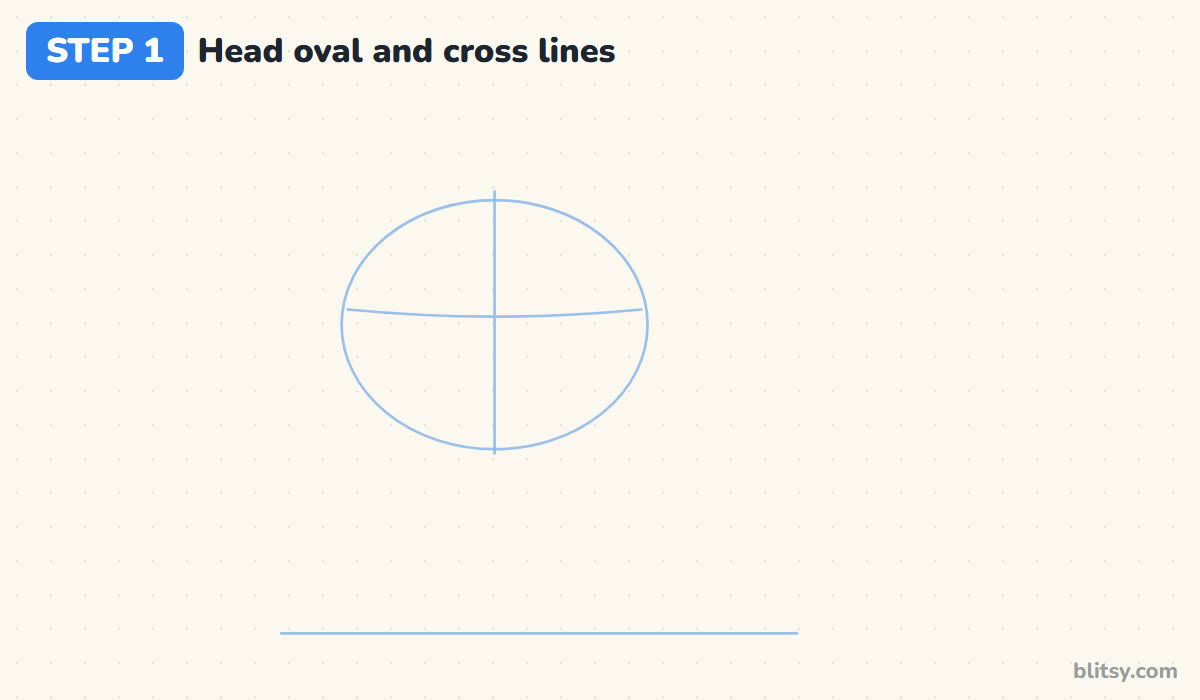
Leave room on the right side of the page for the tail, then draw a wide oval a little left of center. It should be wider than it is tall. Run a straight line down through the middle and a gentle curve across it, slightly above halfway. Finish with a long, flat ground line near the bottom of the page.
💡 Tip: Press so lightly that you can barely see the lines. Every one of them gets erased later.
Step 2: Sketch the body oval and helper lines
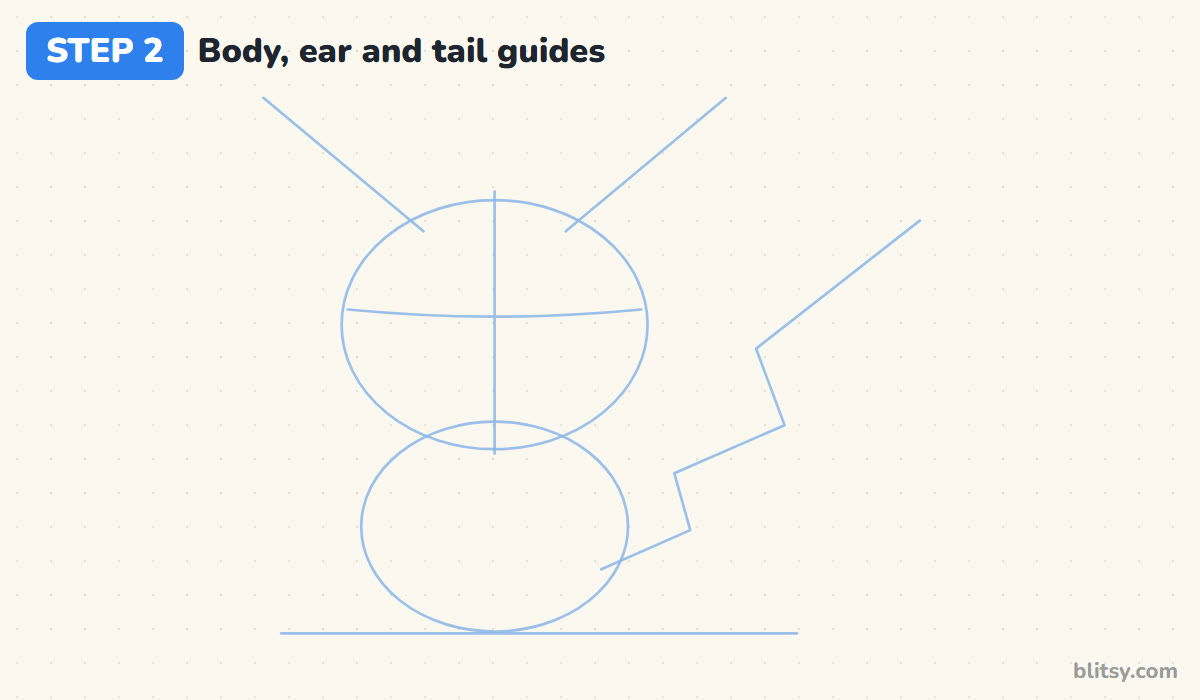
Under the head, draw a second oval that overlaps the chin a little and rests on the ground line. Make it slightly smaller than the head. From the top of the head, pull two straight lines up and outward like a wide letter V; these set the angle of the ears. On the right, sketch a zig-zag line climbing from the body toward the top corner. That one becomes the tail.
💡 Tip: Keep the head oval the biggest shape on the page. A big head is what makes Pikachu look young and cute.
Step 3: Outline the big round head
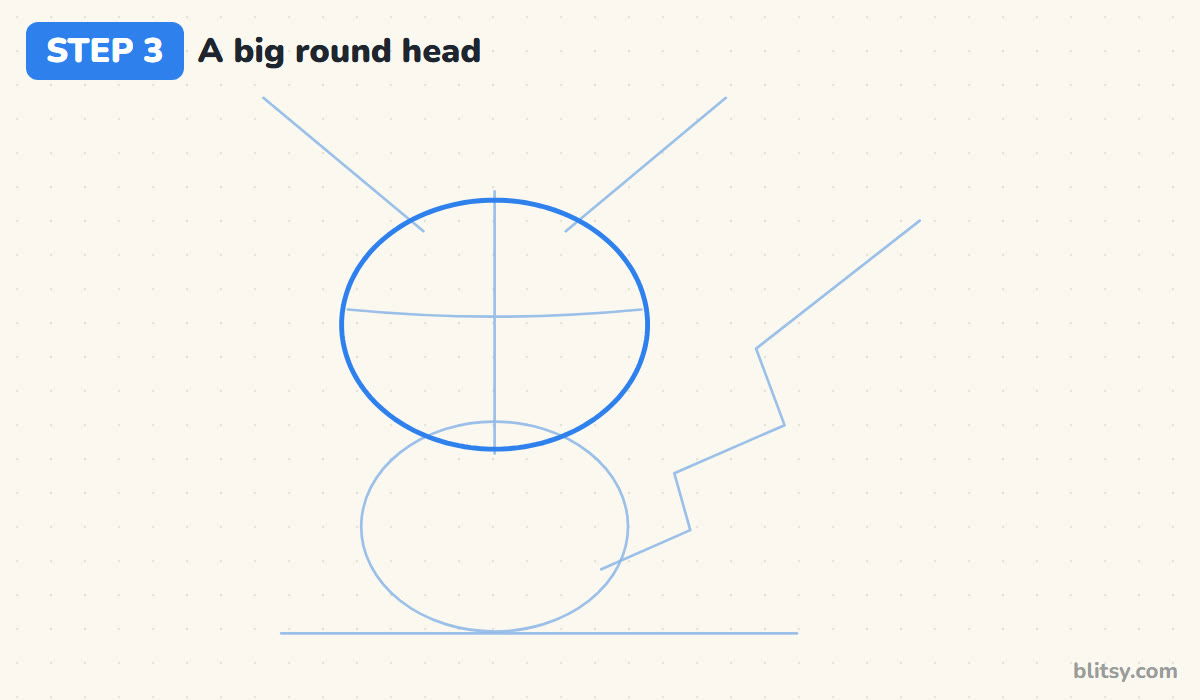
Go over the head oval with a firmer, smooth line. I like to draw it in two halves, left side first, turning the paper if my hand feels cramped. A slightly squashed circle is exactly what you want, so don't fight it if it comes out a bit wide.




💡 Tip: Keep your wrist loose and draw with your whole arm for rounder curves.
Step 4: Draw two long pointed ears
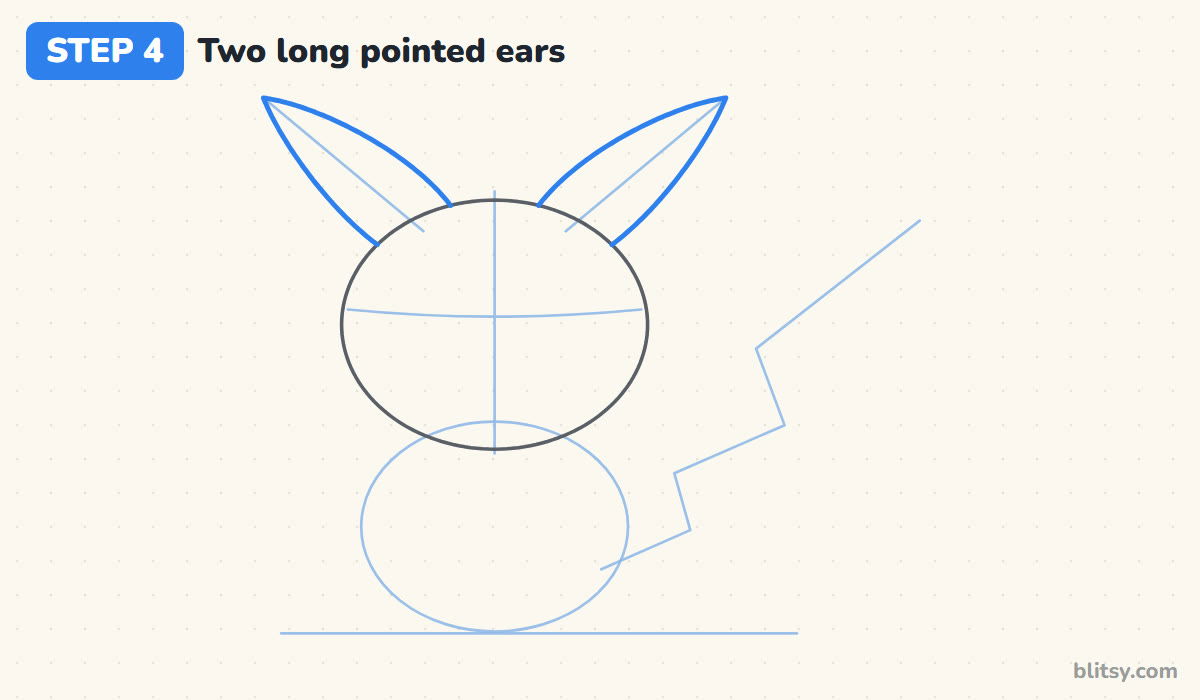
Follow each ear guide line from the top of the head out to a sharp point. The ear is shaped like a long leaf: narrow where it joins the head, a little wider in the middle, then tapering to the tip. Stop both lines where they meet the head outline, because the ears sit behind it. Most beginners make them too short, and short ears turn Pikachu into a hamster.
💡 Tip: Check the length. Each ear should be nearly as long as the head is tall.
Step 5: Shape the chubby body, arms and feet
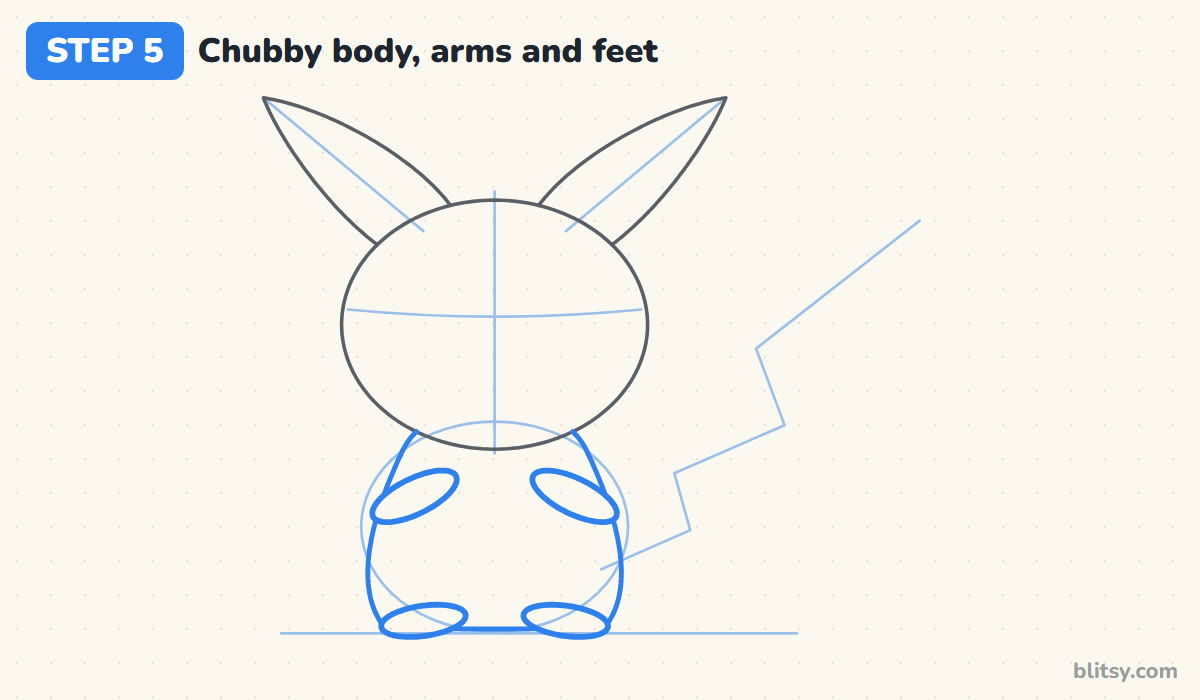
Trace the body oval into a soft pear: narrow at the chin and wide at the bottom, with a flat base on the ground line. Near the top of the chest, add two short sausage shapes for arms, tilted so the hands point in toward the middle. At the bottom, draw two flat ovals for feet. Leave out any body line hidden behind the arms or feet.
💡 Tip: Tuck the arms close to the chest. Arms that stick far out make the character look stiff.
Step 6: Draw the lightning bolt tail
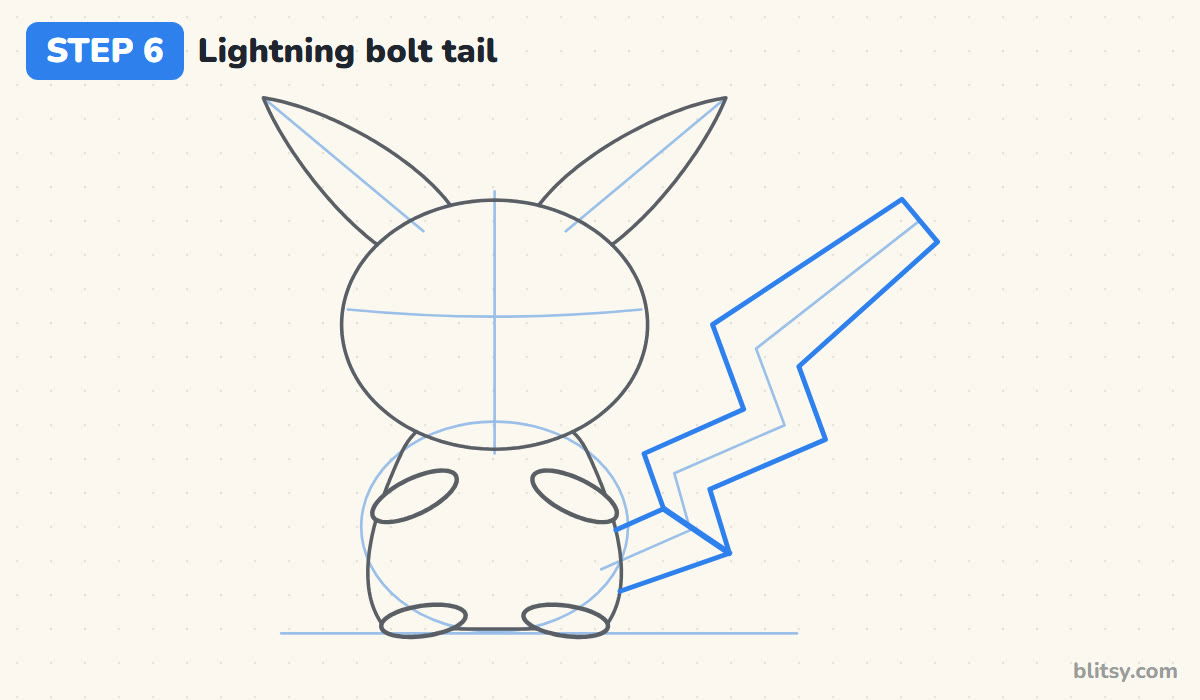
Here's the fun part. Use your zig-zag guide as the center of the tail and draw a line on each side of it, keeping the two edges parallel. The tail starts narrow behind the body and gets wider at the top, ending in a big flat block. Close the end with a short straight line. Then draw one slanted line across the narrow base, right where the first zig turns; that piece gets colored brown later.
💡 Tip: Use sharp corners on the tail, not round ones. Rounded corners make it look like a ribbon.
Step 7: Mark the black ear tips
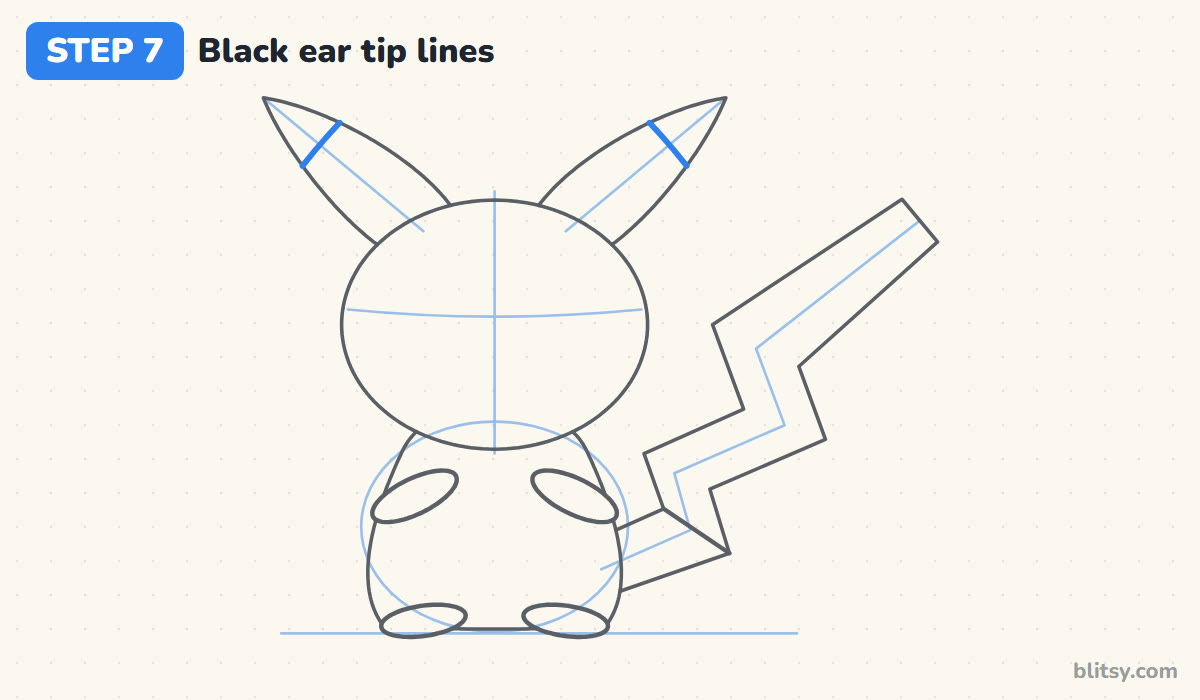
On each ear, about a third of the way down from the point, draw a short curved line straight across. Everything above that line will be black. Look at both ears together before you commit, because tips of different sizes are noticed right away.


💡 Tip: Measure the left tip with your pencil, then copy that length onto the right ear.
Step 8: Draw big eyes with shines
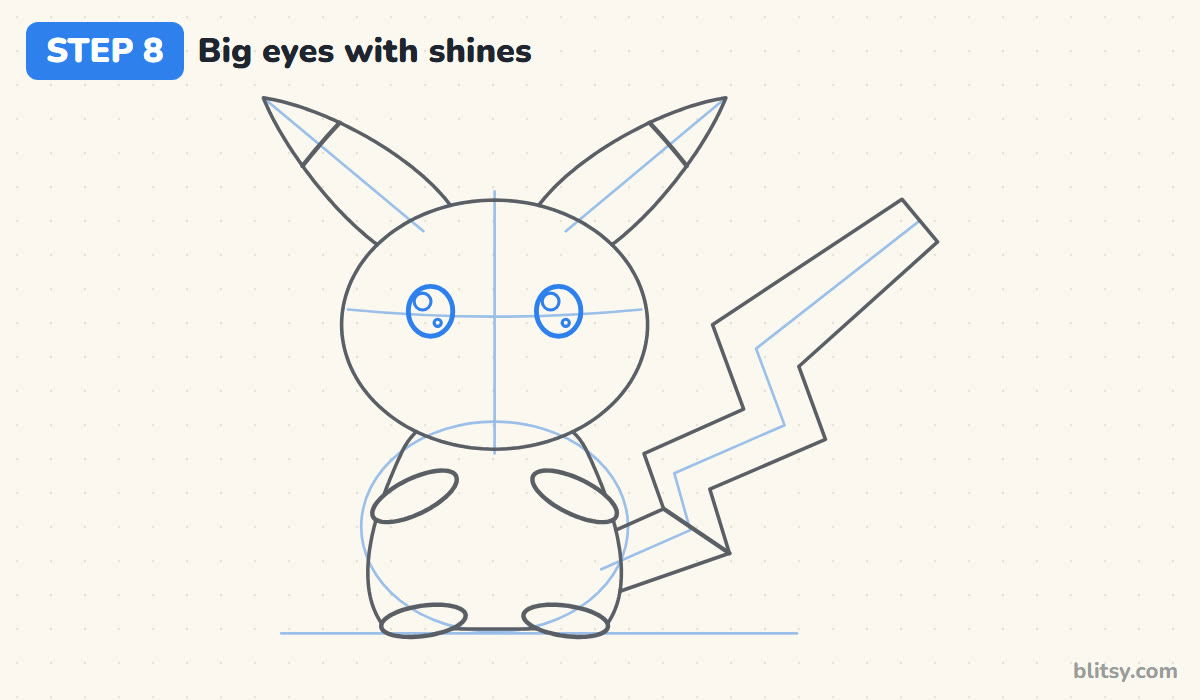
Place two tall ovals on the curved cross line, one on each side of the middle. Space them wide, with roughly three eye widths between them, since wide eyes look friendlier. Inside each eye, draw a large circle near the top left and a tiny dot lower on the right. Those white spots are what make the eyes sparkle, so don't skip them.
💡 Tip: Put the shine dots in the same corner of both eyes so the light seems to come from one direction.
Step 9: Add the nose, smile and red cheeks
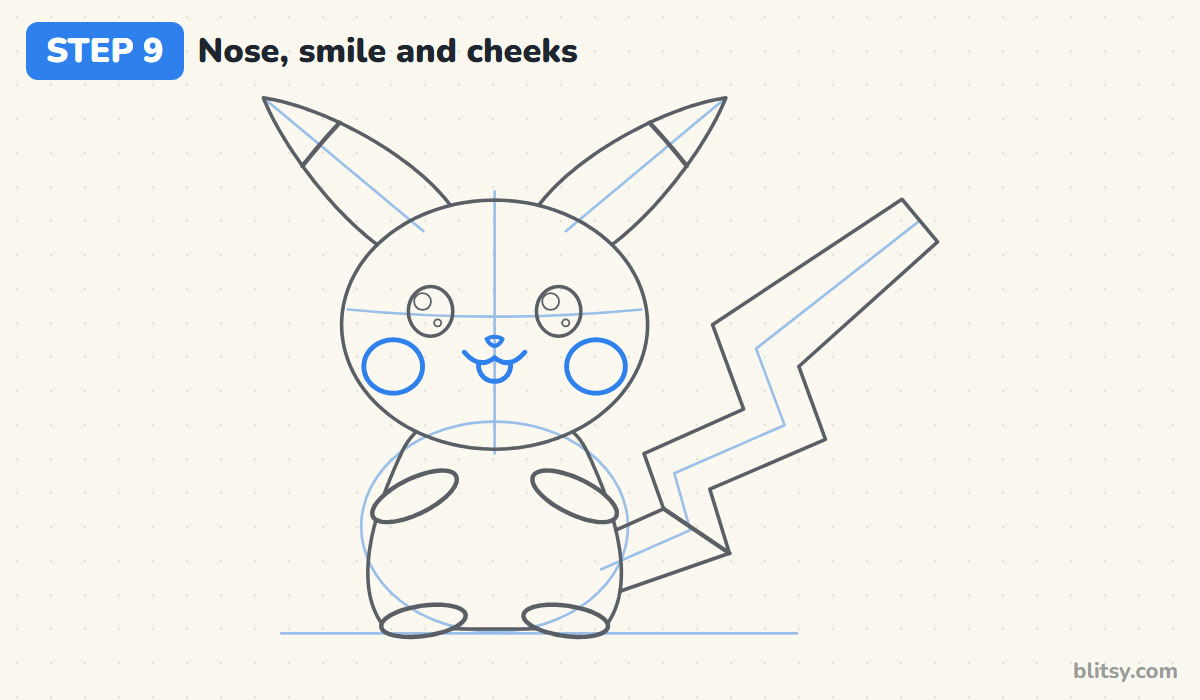
Right on the center line, a little below the eyes, put a very small nose. Under it, draw a wide, flat letter W for the smile. Hang a small U shape from the middle of the W to make an open mouth, and add a little curve inside for the tongue. Finally, draw a round cheek under each eye, close to the edge of the face. I make the cheeks about as big as the eyes.
💡 Tip: Keep the nose tiny. A big nose takes attention away from the cheeks and the smile.
Step 10: Ink the lines and erase the guides
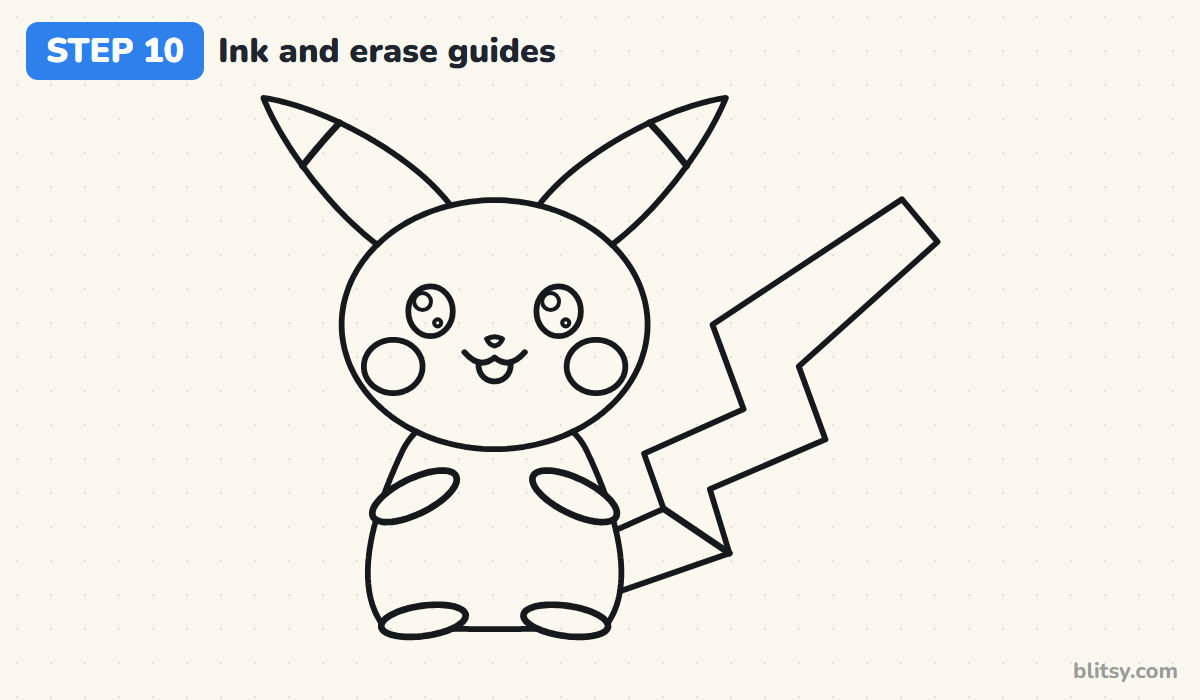
Trace every final line with a black marker. I start with the face while my hand is fresh, then do the ears, the body and the tail. Skip the guide ovals, the cross lines and the zig-zag helper. When the ink is completely dry, erase all the pencil marks so only the clean outline is left.
💡 Tip: Count to thirty before erasing. Wet marker smears into gray streaks.
Step 11: Color your Pikachu
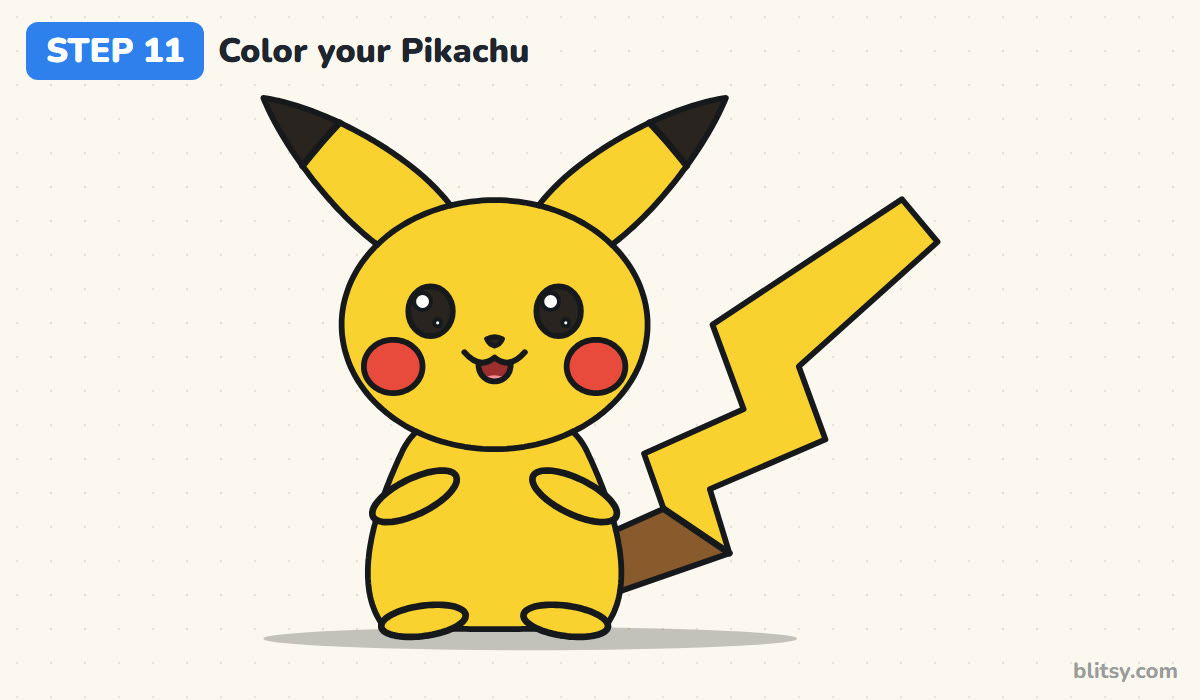
Yellow goes almost everywhere, from the ear bases down to the feet and over the tail. Color the ear tips black, then the eyes and nose, leaving the white shines empty. The cheeks are bright red, the bottom piece of the tail is brown, and the mouth is a dark red with a pink tongue. A soft gray shadow under the feet keeps Pikachu standing firmly on the ground.
💡 Tip: Color the yellow first and the black parts last, so dark pencil dust doesn't drag into the yellow.
When Pikachu Turns Into a Yellow Bunny or Bear
- Ears pointing straight up. Upright ears look like a rabbit. Lean them outward along the V guide lines.
- Ears that are too short. Stubby ears give you a teddy bear. Make each ear almost as long as the head.
- A wavy tail instead of a zig-zag. The tail needs sharp corners and straight edges to read as lightning.
- Cheeks drawn too small or too high. Put them low on the face, under the eyes, and make them about eye-sized.
- A body bigger than the head. Keep the body a bit smaller, so the character stays round and childlike.
Poses and Moods for Your Next Pikachu
Once you know the shapes, small changes give you a whole new picture. Raise one arm in a wave, close one eye for a wink, or add little yellow sparks around the cheeks as if it's about to use a thunder attack. Younger kids can skip the open mouth and draw only the W smile. If you enjoy the big-head look, the chibi drawing tutorial uses the same trick, and since Pikachu is a mouse at heart, the easy mouse drawing tutorial makes a fun comparison.
Pikachu Coloring Page and a Printable Step PDF
The free Pikachu coloring page shows a colored example at the top with a small key that says which color goes where, and a large outline underneath for coloring. The step-by-step PDF guide holds all 11 steps with pictures and tips. Both print on Letter or A4 paper.
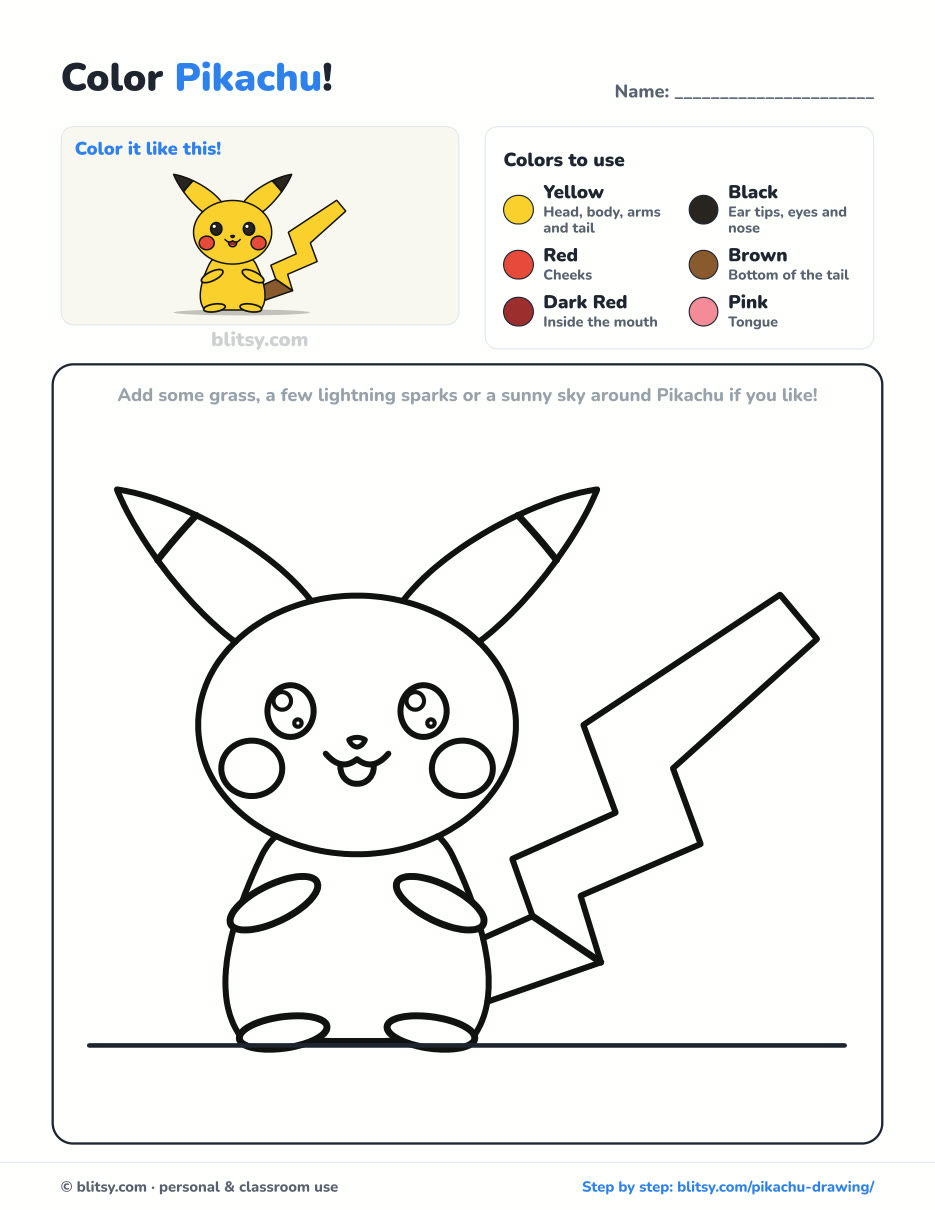
Black outlines with a colored example and the color names at the top. Ready to print and color.
⬇️ Download Coloring PageEvery step picture with its instructions and tips, to keep beside your paper while you draw.
⬇️ Download Drawing Guide📱 On a phone? Tap a download button, then open the file and choose Share → Save to Files or Print. On a computer, the PDF opens or saves straight to your Downloads folder.
Keep the Lightning Tail Lesson on a Pin
Pikachu Fans: Draw These Characters Next
Each one below is a full step-by-step tutorial, so you can move from Pikachu to another favorite without guessing the shapes.
- Juice WRLD Drawing: This Juice WRLD tribute portrait tutorial takes twelve steps and ends with soft colors and a quiet expression.
- Family Drawing: Four people, a puppy and a red balloon share the same few shapes in the family drawing step by step lesson.
- Kurama Drawing: Draw chibi Kurama grinning in front of all nine orange tails with the how to draw Kurama guide.
- Sharingan Drawing: A red iris with three tomoe sits inside a manga panel in this Sharingan eye drawing tutorial.
- Master Chief Drawing: The little Spartan with fists on hips and a gleaming visor comes from the Master Chief drawing tutorial.
- Care Bear Drawing: Learn how to draw a Care Bear, a pink bear with arms out and a rainbow between two clouds on its tummy.
- Disney Drawing: Nemo and his bubbles are the goal of this easy Disney character drawing tutorial, twelve small steps long.
- Stitch Drawing: Big ears out and a small grin finish the Stitch drawing step by step lesson.
- Anime Drawing: Spiky blue hair and green eyes with two shines grow from one circle in the anime boy face tutorial.
- Mickey Mouse Drawing: Draw Mickey with ears up, a wide grin and one glove in the air using how to draw Mickey Mouse step by step.
- Scarecrow Drawing: A patched, smiling scarecrow on his post starts from a T and a circle in this scarecrow drawing tutorial.
- Ariana Grande Drawing: The Ariana Grande chibi drawing tutorial gives her a round face, a swinging ponytail with a pink tie and a little cloud.
- Princess Drawing: A lavender ball gown, a golden crown and a star wand finish the princess drawing step by step guide.
- Chalk Art: Take the pencils outside and try this sidewalk chalk art tutorial with a hopscotch and a rainbow.
- Cerberus Drawing: Each of the three heads gets its own mood in the cute Cerberus drawing tutorial.
What Fans Ask Me About Drawing Pikachu
What is the easiest way to draw Pikachu?
Start with two ovals, a wide one for the head and a smaller one for the body. Add long ears in a V, then the face, and leave the zig-zag tail for after the body is done.
How do you draw a cute Pikachu for kids?
Make the head big, the eyes round with white shine dots and the cheeks low and red. Kids can draw the tail as one simple zig-zag shape and leave out the open mouth.
How long does it take to draw Pikachu?
Around half an hour including coloring. The ears and the tail need the most care; the face goes quickly once the cross lines are in place.
What colors do I need for Pikachu?
Mainly yellow, with black for the ear tips and eyes, red for the cheeks and brown for the base of the tail. A little pink and dark red finish the mouth.
Sharpen a yellow pencil, stretch those ears out wide and let your Pikachu flash its tail across the page. ⚡✏️
Related posts:
 How to Draw a Car Step by Step (Easy Drawing for Beginners)
 How to Draw a Whale Step by Step (Easy for Beginners)
 How to Draw a Rat Step by Step (Easy for Beginners)
 How to Draw an Arctic Fox Step by Step (Easy for Beginners)
 How to Draw a Raccoon Step by Step (Easy for Beginners)
 How to Draw Olaf Step by Step (Easy for Beginners)
 How to Draw a Ladybug Step by Step (Easy for Beginners)
 How to Draw a Dog Step by Step (Easy Side View for Beginners)
 How to Draw a Leopard Step by Step (Easy for Beginners)
 How to Draw a Light Bulb Step by Step (Easy for Beginners)
 How to Draw a Crow Step by Step (Easy for Beginners)
 How to Draw an Eagle Step by Step (Easy for Beginners)

