
Big round ears are what make a mouse a mouse. Get those right and even a rough sketch reads clearly, so this lesson spends its effort on the ears, the face and a cozy sitting pose. Here I'll walk you through how to draw a mouse step by step, from two light circles to a colored mouse holding a wedge of cheese in its tiny paws. If you can trace a coin, you can start.

Blue lines are the new ones in every picture. Anything from earlier steps turns gray, so you only copy the blue part.
Quick overview
⏱️ Time: about 30 to 40 minutes
🎯 Level: easy, good for kids from about 6
✏️ Steps: 12
🐭 You'll draw: a field mouse sitting on its back legs, holding a cheese wedge
Mouse Sketch Kit From Your Desk Drawer
- A pencil (an HB works, a 2B is softer for the guides)
- A clean eraser
- A black fineliner or thin felt-tip pen
- Colored pencils or markers in light brown, tan, cream, pink, black, yellow plus a gold or orange
- Plain paper, held upright or sideways
The tail swings out to the right, so start the mouse a little left of the middle of the page.
How to Draw a Mouse Step by Step
Step 1: Sketch the head and body guides
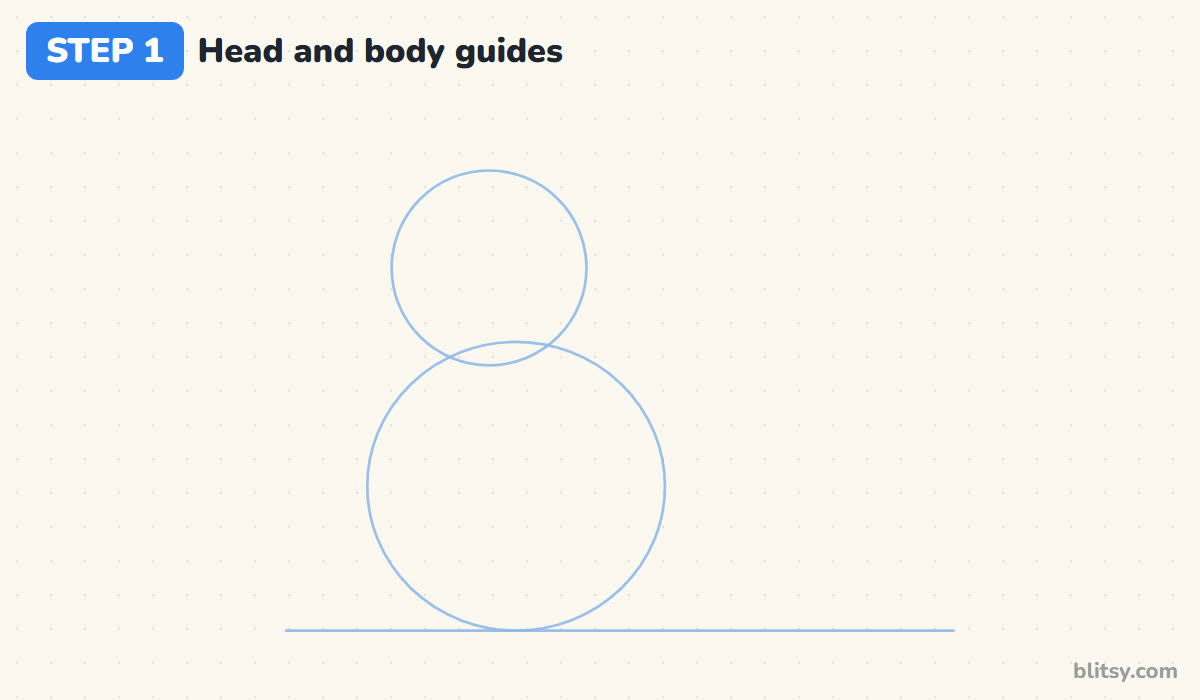
Draw a light ground line near the bottom of the page first. Resting on it, sketch a big round shape for the body. Then put a smaller circle on top for the head, overlapping the body a little. The head circle should be about two thirds as wide as the body, which keeps the mouse looking young and cute.
💡 Tip: Hold the pencil far back from the tip. You'll press lighter without trying.
Step 2: Add guides for the ears, snout, cheese and tail
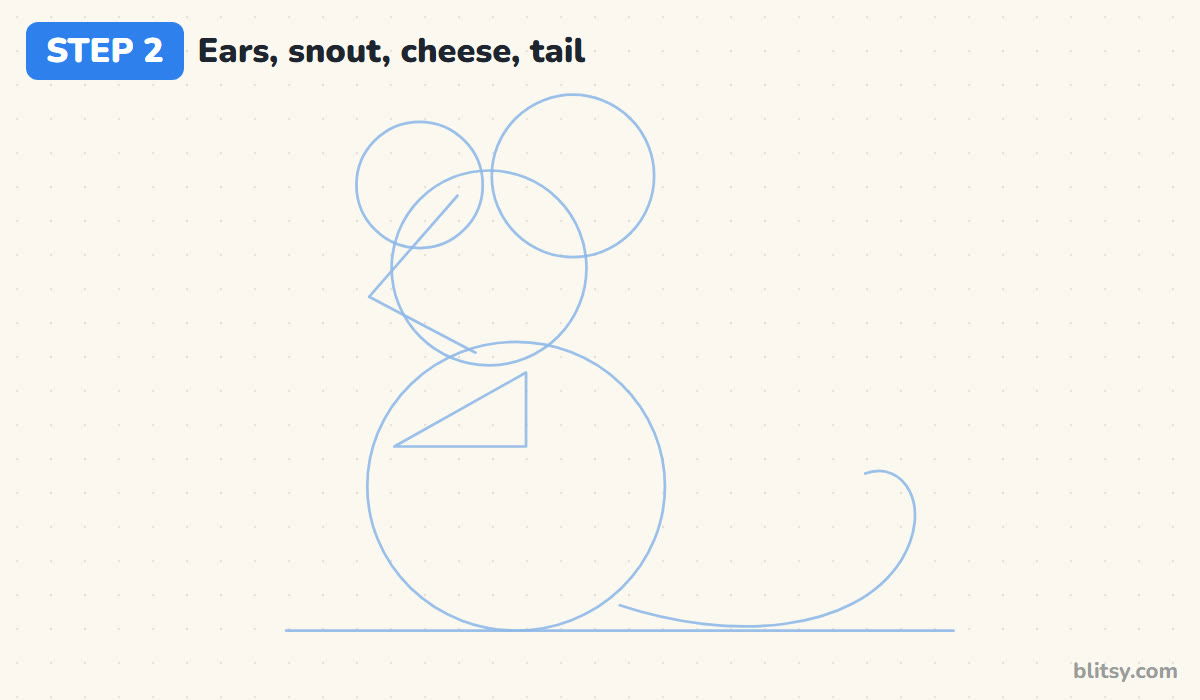
Now place two circles on top of the head for the ears. Make the right one large, almost as big as the head, and the left one a bit smaller because it's turned away from us. On the left of the head, sketch a pointed triangle for the snout. Below the chin, draw a small triangle where the cheese will go, then a long curving line from the bottom right for the tail.
💡 Tip: Let each ear circle overlap the head a little. Ears floating apart look pinned on.
Step 3: Draw the head with a pointy snout
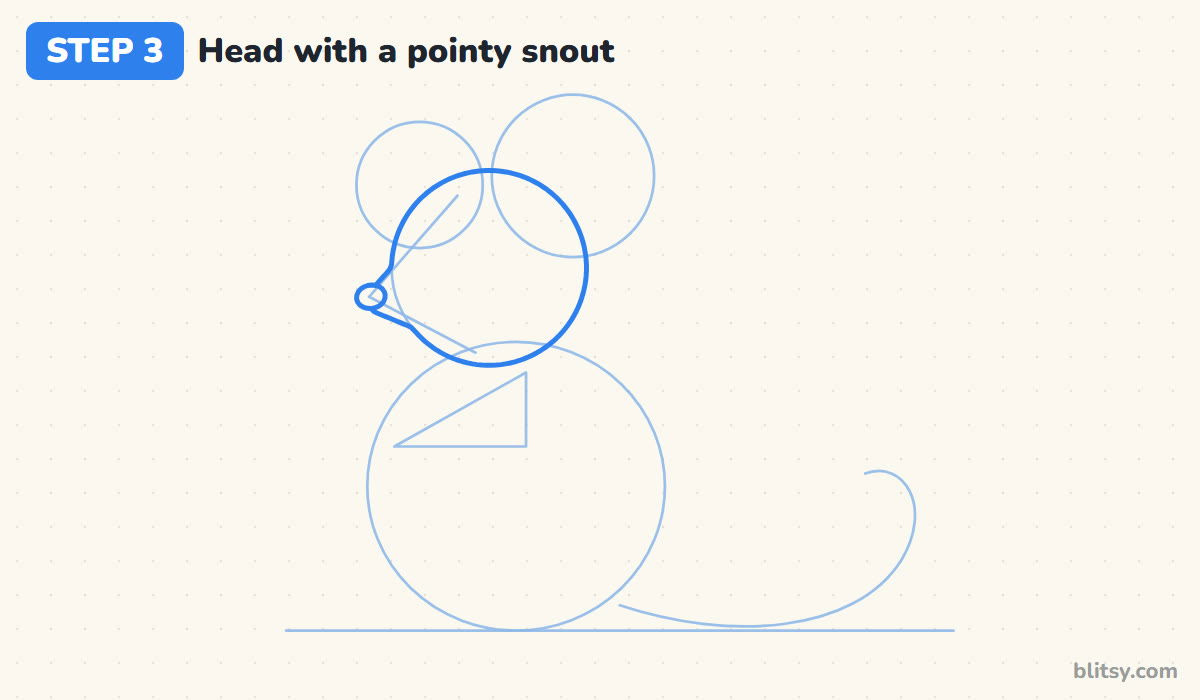
Go over the head circle with a firmer line, but where it meets the snout triangle, curve smoothly into the point instead of making a sharp corner. The snout should be short, roughly a third of the head's width. At the tip, draw a small oval for the nose. I sketch the snout's top edge first, because it sets the angle of the face.




💡 Tip: Round off the very tip of the snout. A needle point looks like a shrew.
Step 4: Shape the two big round ears
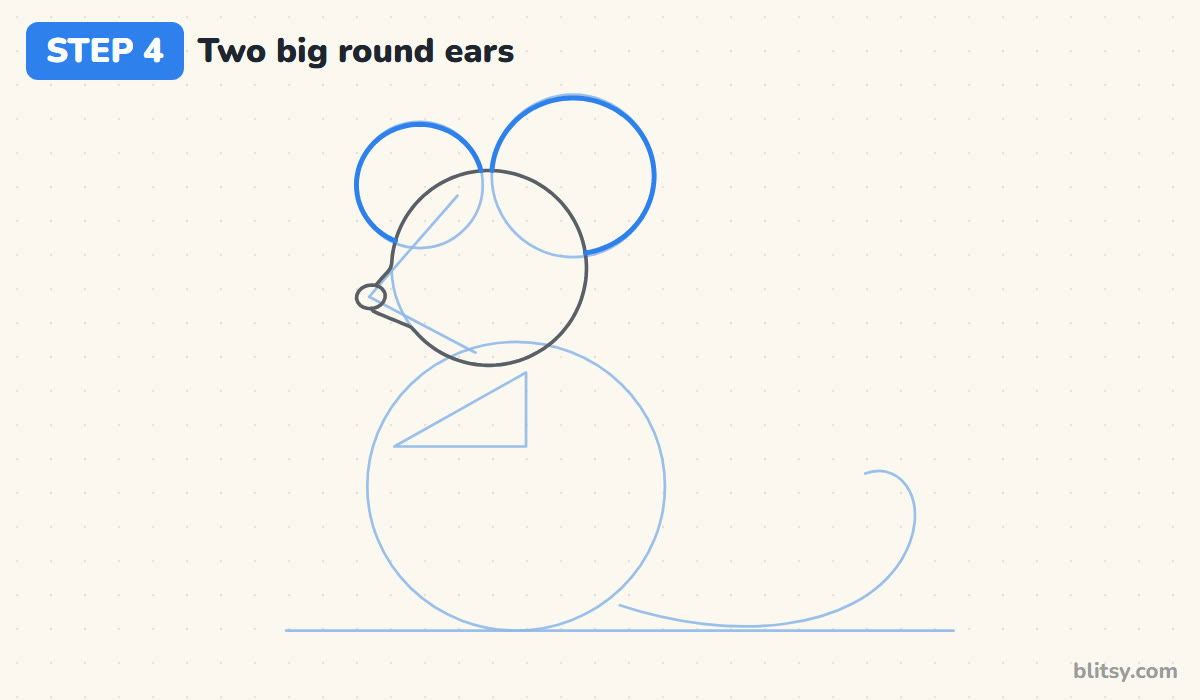
Trace the ear circles, stopping wherever the head covers them. Mouse ears are thin and very round, so keep the curves even all the way around. Most beginners make them too small, and the drawing slides toward a rat.
💡 Tip: If one ear comes out egg-shaped, turn the paper and draw the curve from another side.
Step 5: Draw the pear-shaped body
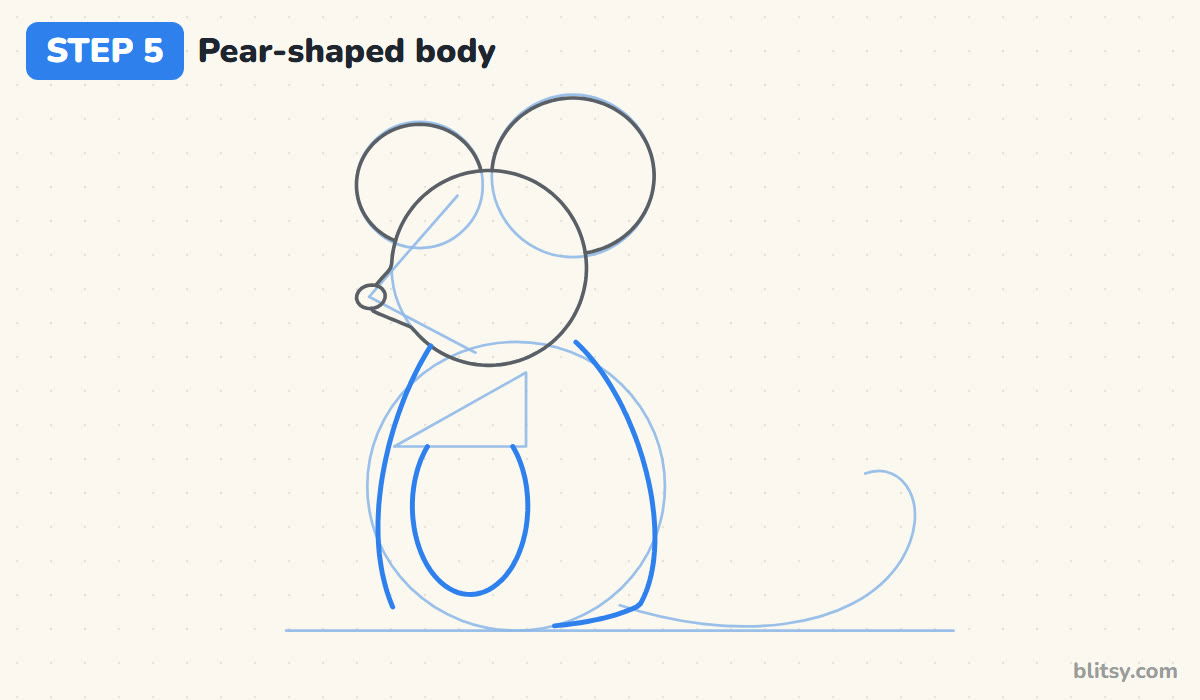
Start just under the head on each side and draw the body down and outward, like a pear that's wider at the bottom. Let the right side bulge out a bit more than the left, since that's the back. Flatten the bottom where it sits on the ground. Inside, draw a tall oval for the cream belly, a little left of center.
💡 Tip: Skip the bits where the feet will go. Short gaps there save erasing later.
Step 6: Add the back leg and tiny feet
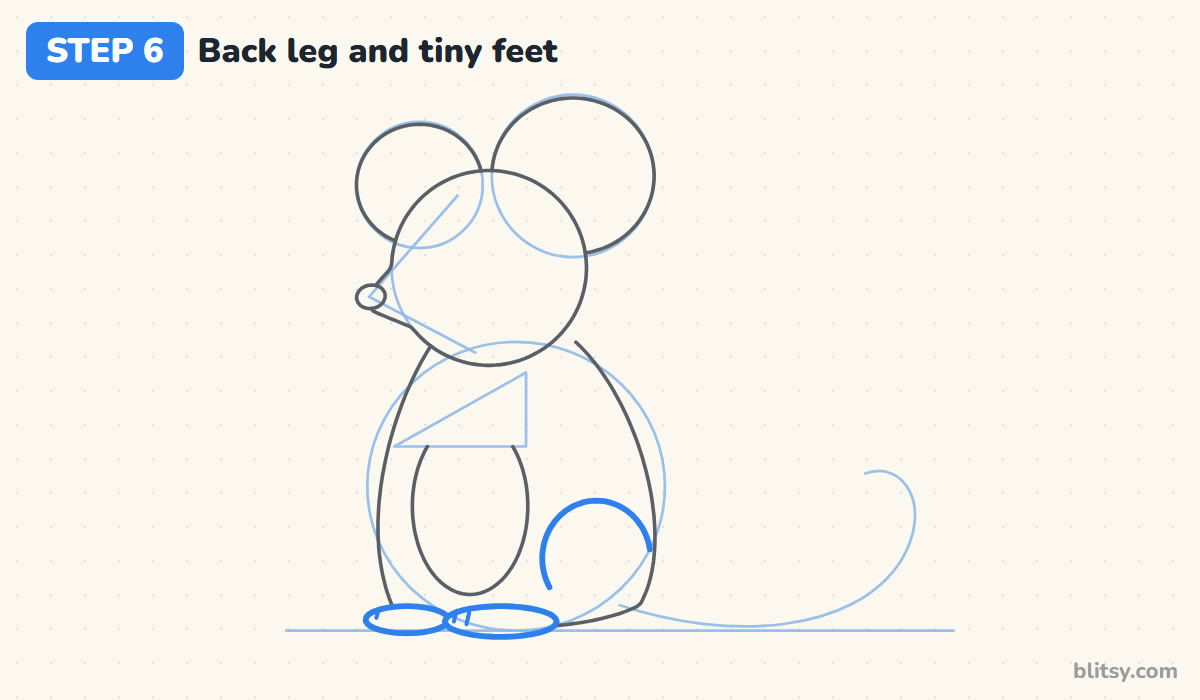
On the lower right of the body, draw a curved line like an upside-down U for the haunch. That one line tells the viewer the mouse is sitting on its back legs. Along the ground, add two flat ovals for the feet poking out at the front, the nearer one slightly bigger and overlapping the other. A couple of short lines on each foot hint at toes.
💡 Tip: Keep the feet small and long, more like jelly beans than circles.
Step 7: Draw the long curly tail
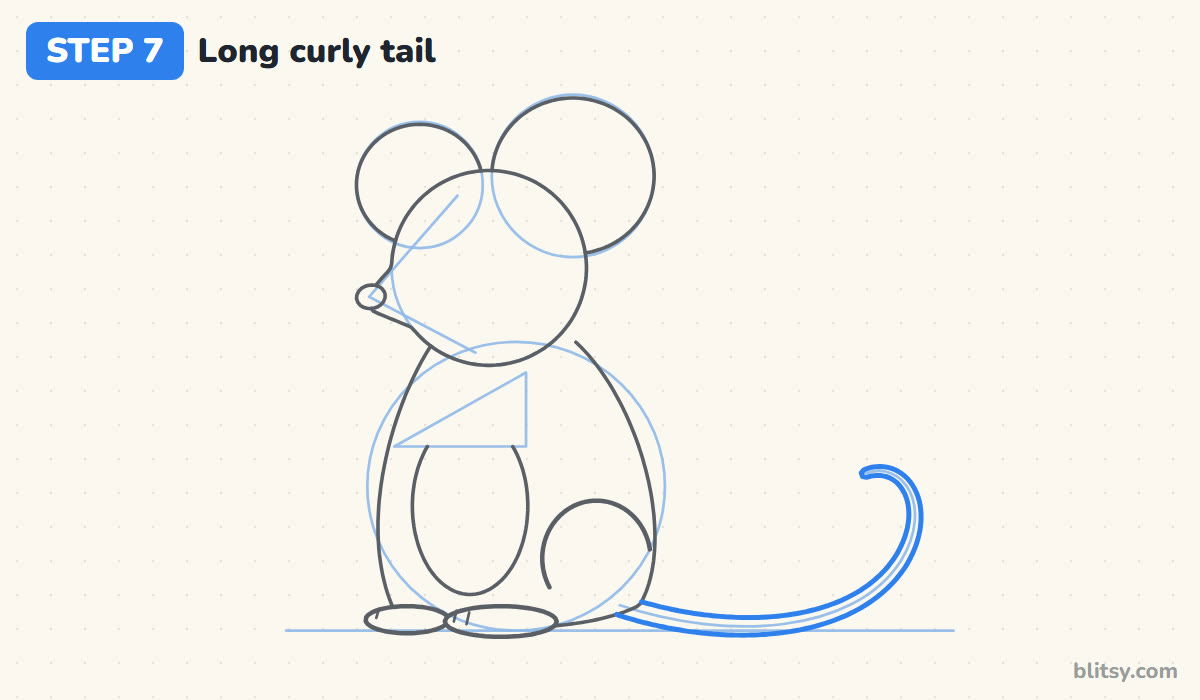
Follow the tail guide from behind the body, along the ground and up into a soft curl at the end. Draw it as two lines close together, slightly wider where it leaves the body and thin at the tip. A mouse's tail is about as long as its body, so don't cut it short.



💡 Tip: Draw the top line of the tail first, then copy it just below like a train track.
Step 8: Draw a cheese wedge with holes
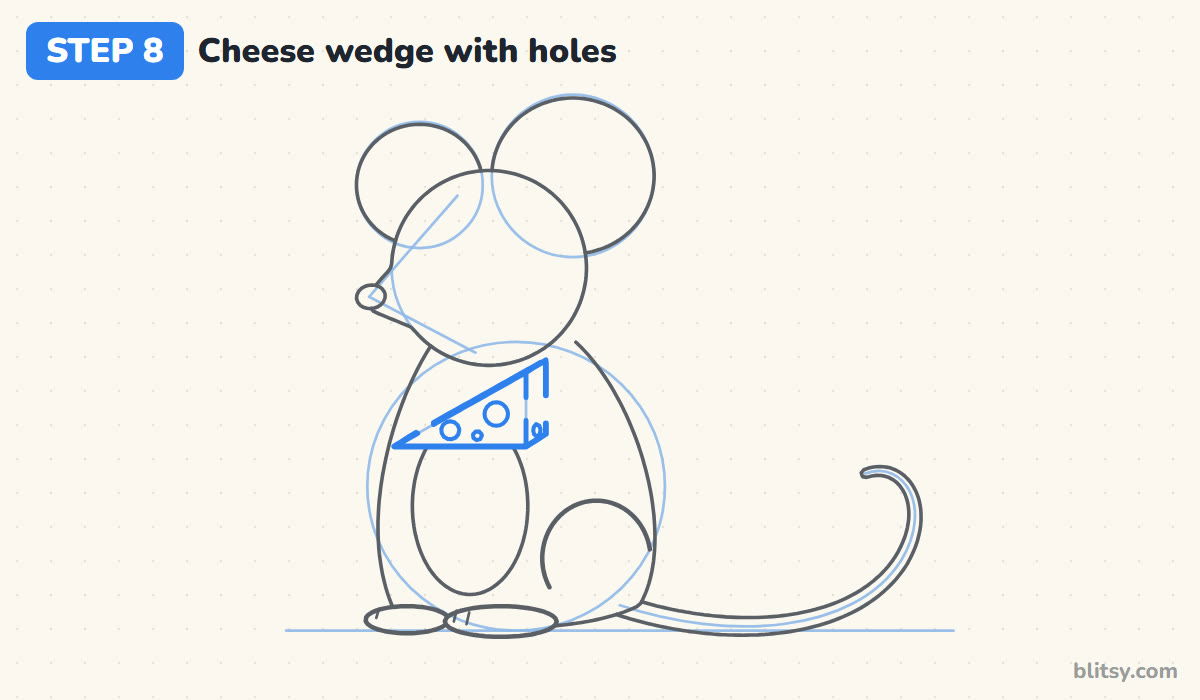
Over the cheese guide, draw a triangle with its point to the left. To make it solid, add a thin side face on the right and a narrow strip along the slanted top, both shifted up and to the right by the same small amount. Add three or four round holes. Real mice prefer grains and seeds; the cheese idea comes from cartoons, but it's fun to draw.
💡 Tip: Vary the hole sizes. Matching holes make the cheese look like a button.
Step 9: Add the arms and little paws
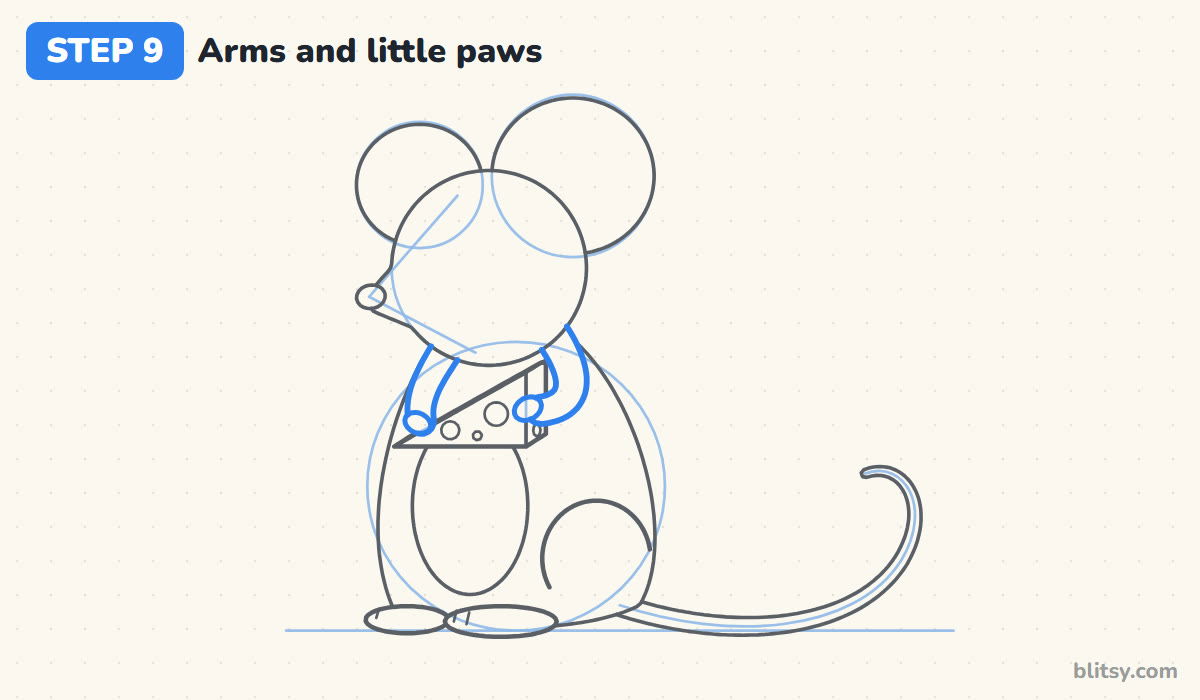
From just under each cheek, bring a short chubby arm down to the cheese. The right arm bends out a little before its paw reaches the side of the wedge. The left one reaches the tip. Finish each arm with a small oval paw that overlaps the cheese, which is what makes it look held instead of floating.
💡 Tip: Tuck the top of each arm under the head. No shoulder line is needed.
Step 10: Draw the eyes, inner ears and whiskers
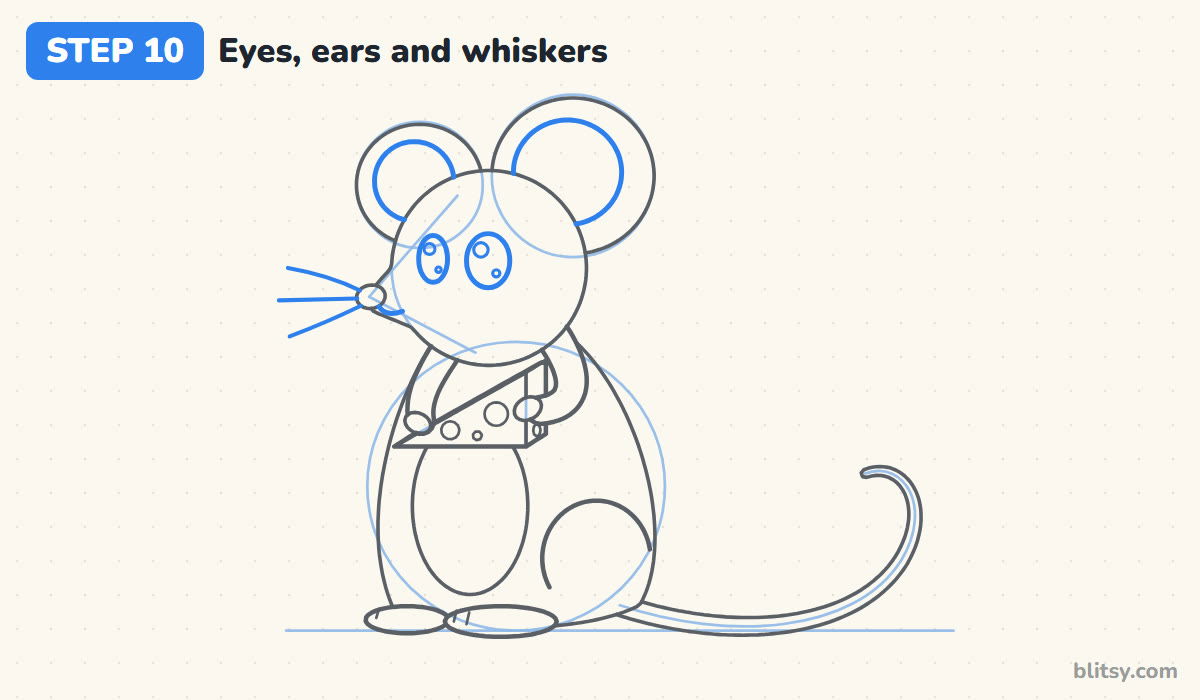
Place two big oval eyes on the face. The right eye is the full-size one; the left eye is a little narrower and sits closer to the snout, because the head is turned. Leave a round shine near the top of each, plus a tiny one lower down. Add a small smile under the nose, a circle inside each ear for the pink part, and three whiskers fanning out from the nose.
💡 Tip: Flick each whisker outward in one quick stroke so it tapers.
Step 11: Ink the lines and erase the guides
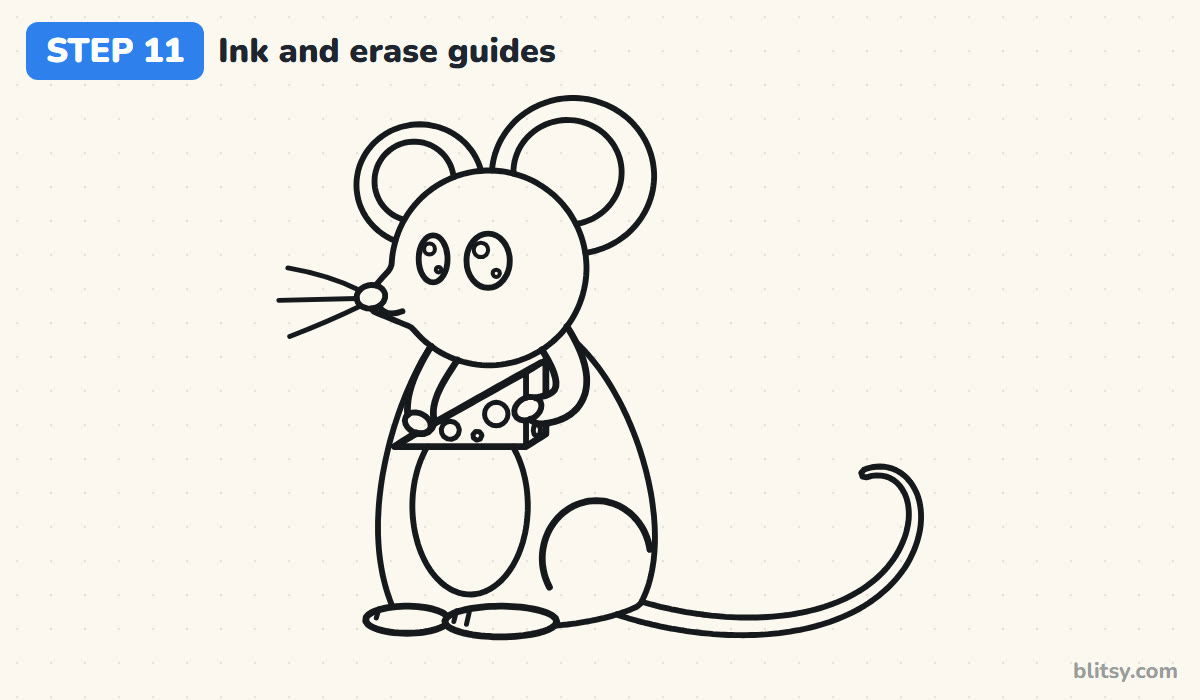
With the black pen, trace every line you want to keep, face included. Leave all the guide shapes in pencil. Wait a minute for the ink to dry before you erase. I usually ink the eyes first, while my hand is still fresh.

💡 Tip: Erase in one direction, not back and forth, so the paper stays smooth.
Step 12: Color your mouse
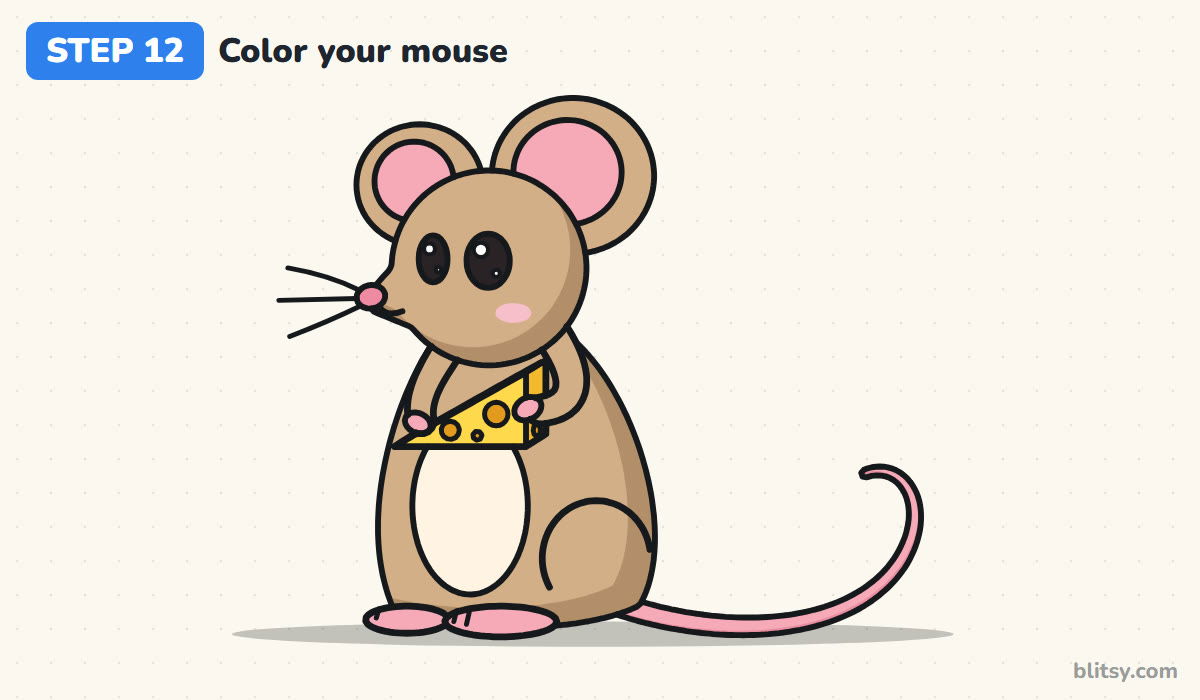
Color the fur light brown, including the ears and arms. Add tan along the right side of the body and head for shading. Fill the belly cream, then switch to pink for the inner ears and nose. Use it on the paws, the feet and the tail too, plus a soft spot on the cheek. The eyes go black around the white shines. Finish the cheese in yellow, with gold on the side face and orange in the holes.
💡 Tip: Lay down the light brown first, then go over the shade edge with tan.
Mouse Drawing Slip-Ups and How to Fix Them
- Ears that are too small. Small ears make it look like a rat. Draw each ear circle close to the size of the head.
- A long, pointed face. Too much snout makes the mouse look sharp and older. Keep the snout short and the head round.
- A thick tail. A mouse tail is thin and long. Keep the two lines close together and let it taper.
- Cheese that floats. If the paws don't overlap the wedge, it looks glued on. Let each paw cover a bit of the cheese.
- Both eyes the same size. In this three-quarter pose, the far eye should be a little narrower. Matching eyes flatten the face.
Mouse Ideas to Try Next: New Snacks and Poses
Swap the cheese for a strawberry, a sunflower seed or an acorn, which is closer to what real mice eat. You can color your mouse soft gray instead of brown, or add a white tummy patch that runs up to the chin. Younger kids can skip the cheese holes and toes. Want to compare it with its bigger cousin? Try the rat drawing tutorial, or give the mouse a friend with this easy cat drawing tutorial.
Free Mouse Coloring Page and Printable Steps
The mouse coloring page shows a colored example at the top, next to a key with every color word and the part it goes on. The step-by-step PDF guide has all 12 steps with their tips and prints on Letter or A4 paper.
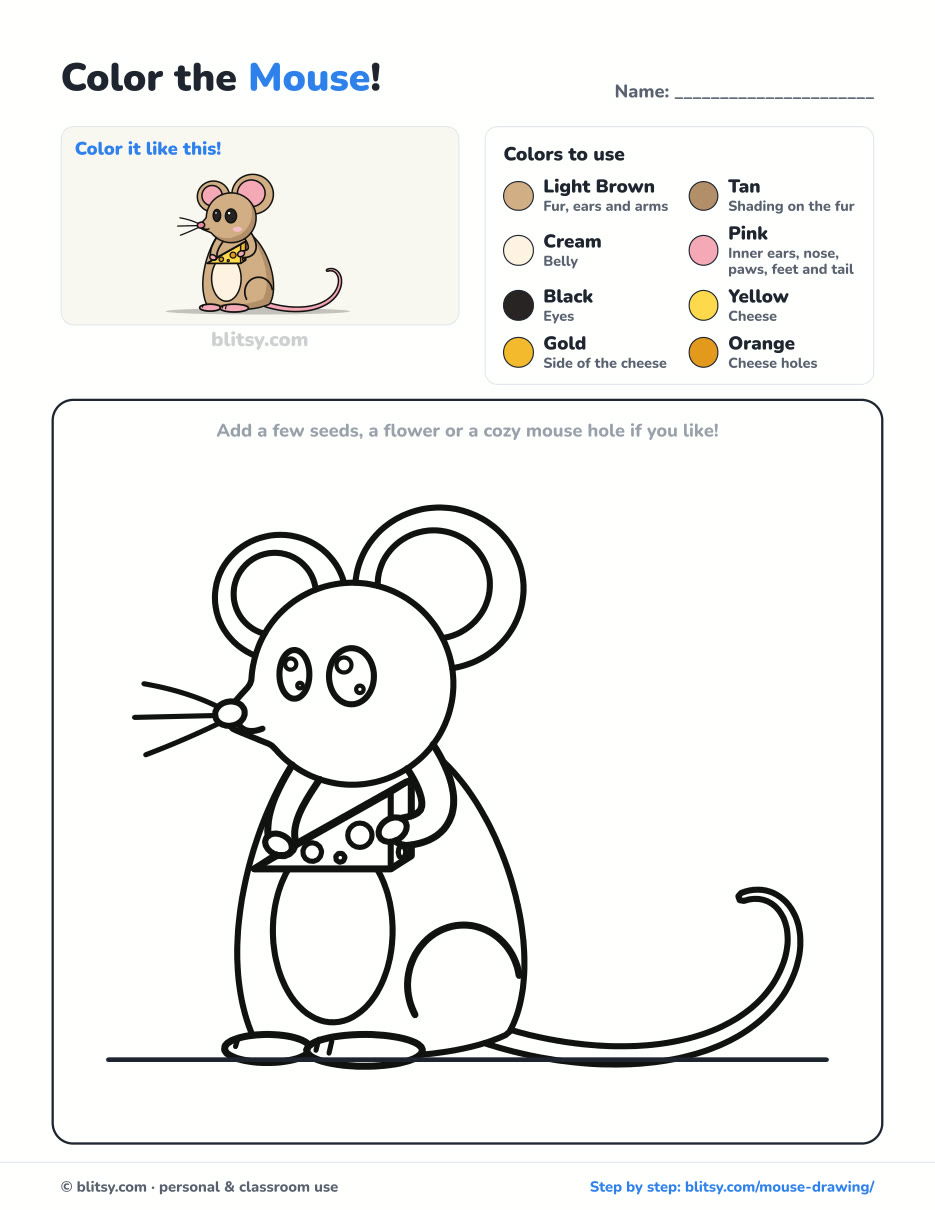
Black outlines with a colored example and the color names at the top. Ready to print and color.
⬇️ Download Coloring PageEvery step picture with its instructions and tips, to keep beside your paper while you draw.
⬇️ Download Drawing Guide📱 On a phone? Tap a download button, then open the file and choose Share → Save to Files or Print. On a computer, the PDF opens or saves straight to your Downloads folder.
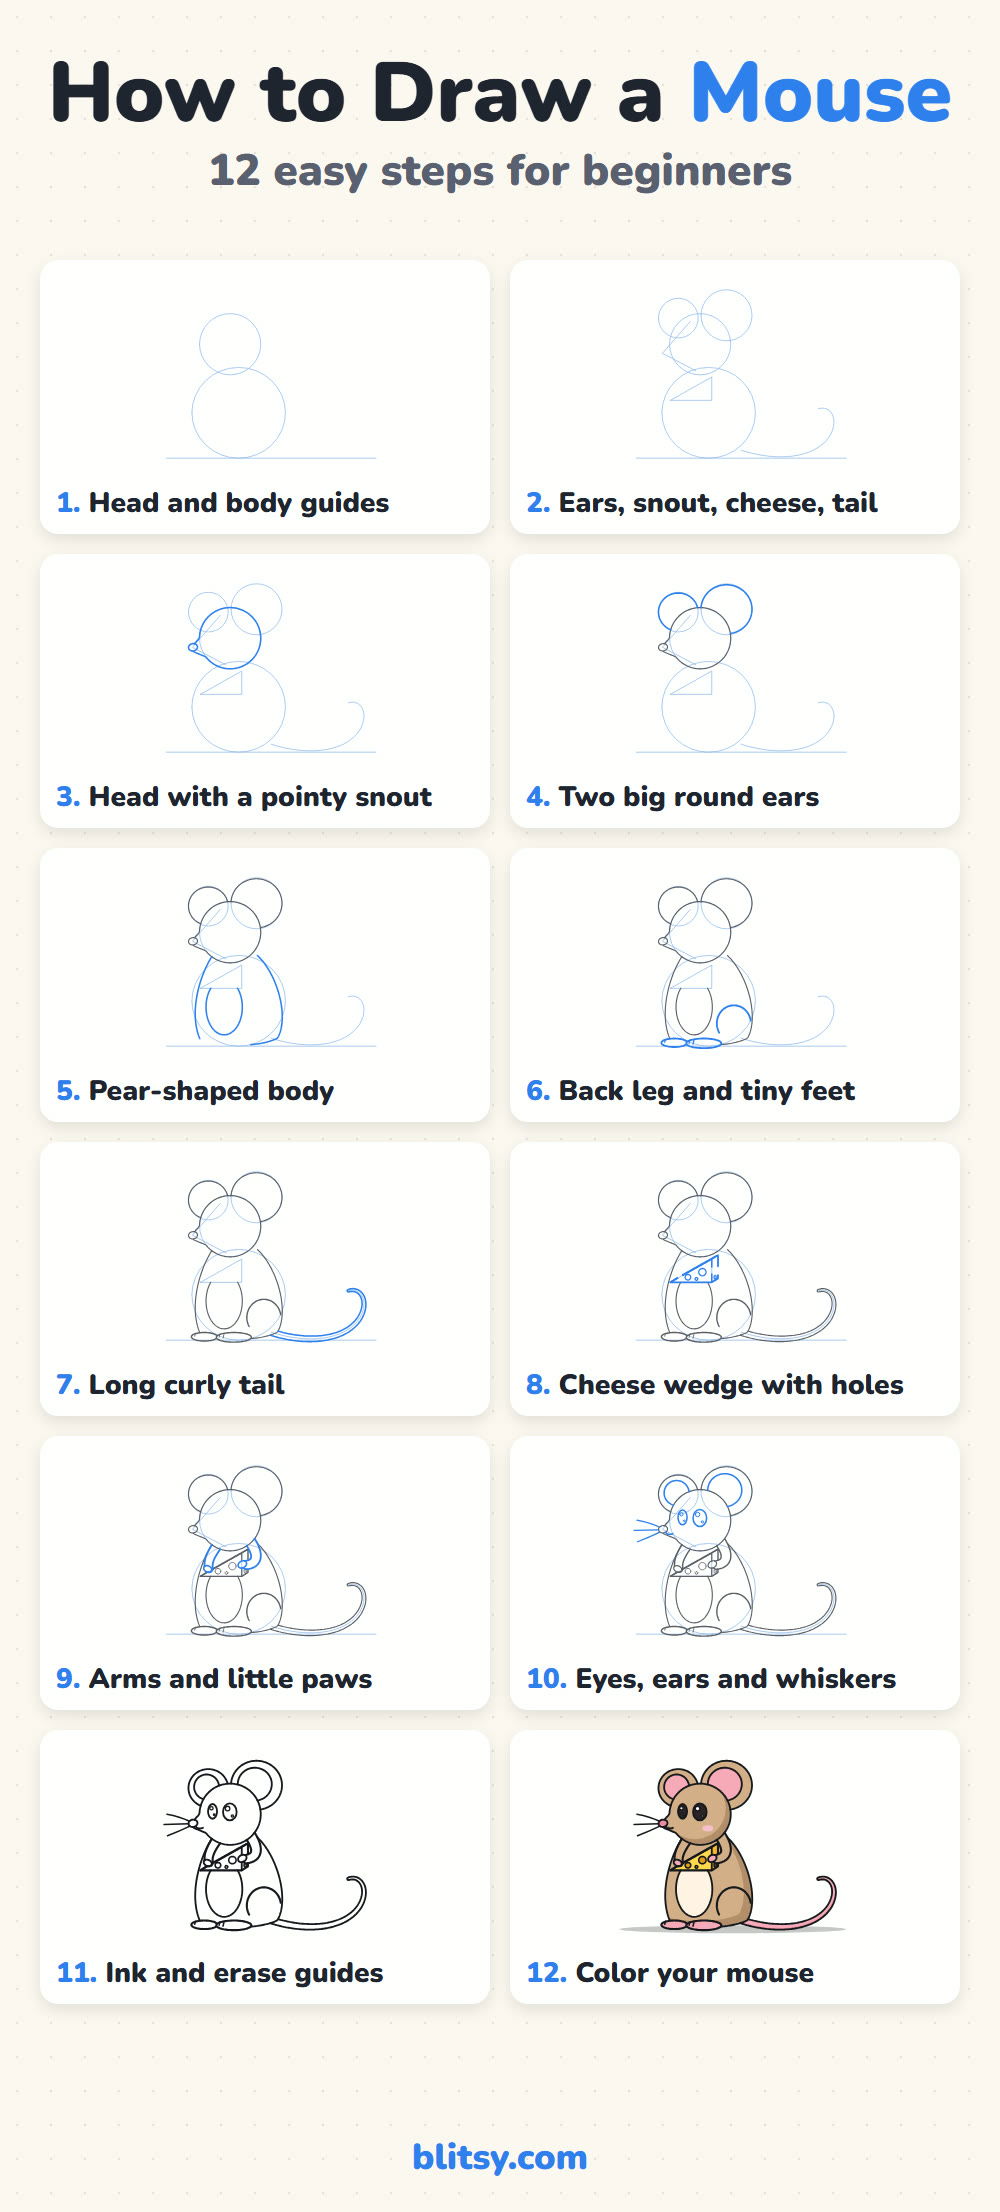
Every Mouse Step Stacked on One Pin
Little Questions About Drawing a Mouse
What is the easiest way to draw a mouse?
Start with a circle for the head and a bigger round shape for the body, then add two large circle ears. A short pointed snout and a long thin tail finish the basic mouse.
How do you make a mouse drawing look cute?
Use a big head, very round ears and large eyes with white shines. A small smile, a pink cheek and tiny paws add to it.
How is drawing a mouse different from drawing a rat?
A mouse has bigger ears for its head, a smaller and rounder body, and a thinner tail. A rat has a longer face and a heavier body.
Do mice really eat cheese?
Not by choice. Mice mostly eat grains, seeds and plants. The cheese idea comes from cartoons, which is why it works well in a drawing.
Two soft circles are all it takes to begin. What snack will your mouse be holding? 🐭🧀
Related posts:
 How to Draw Mickey Mouse Step by Step (Easy Cute Version)
 How to Draw a Car Step by Step (Easy Drawing for Beginners)
 How to Draw a Whale Step by Step (Easy for Beginners)
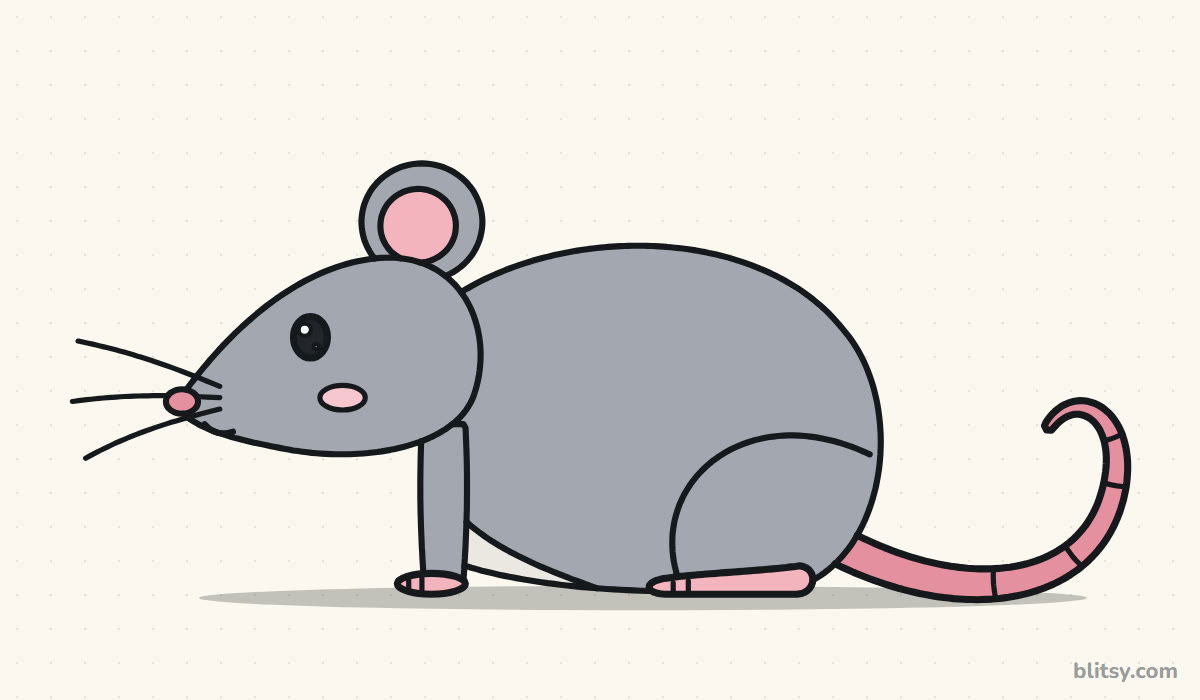 How to Draw a Rat Step by Step (Easy for Beginners)
 How to Draw an Arctic Fox Step by Step (Easy for Beginners)
 How to Draw a Shark Step by Step (Easy for Beginners)
 How to Draw a Chicken Step by Step (Easy for Beginners)
 How to Draw a Fish Step by Step (Easy Goldfish for Beginners)
 How to Draw a Snowman Step by Step (Easy for Beginners)
 How to Draw a Crow Step by Step (Easy for Beginners)
 How to Draw Hands Step by Step (Easy Palm View for Beginners)
 How to Draw an Airplane Step by Step (Easy Jet for Beginners)

