
Nine tails sounds like a lot to draw, and that number is usually what scares people off the Nine-Tailed Fox. Here's the good news: once you sketch nine straight lines in a fan shape, every tail already has a place to go. This lesson shows you how to draw Kurama step by step as a chibi, with a big head, a small body and a grin full of attitude. It's my own simple fan-art version for practice, so it doesn't copy any official artwork.
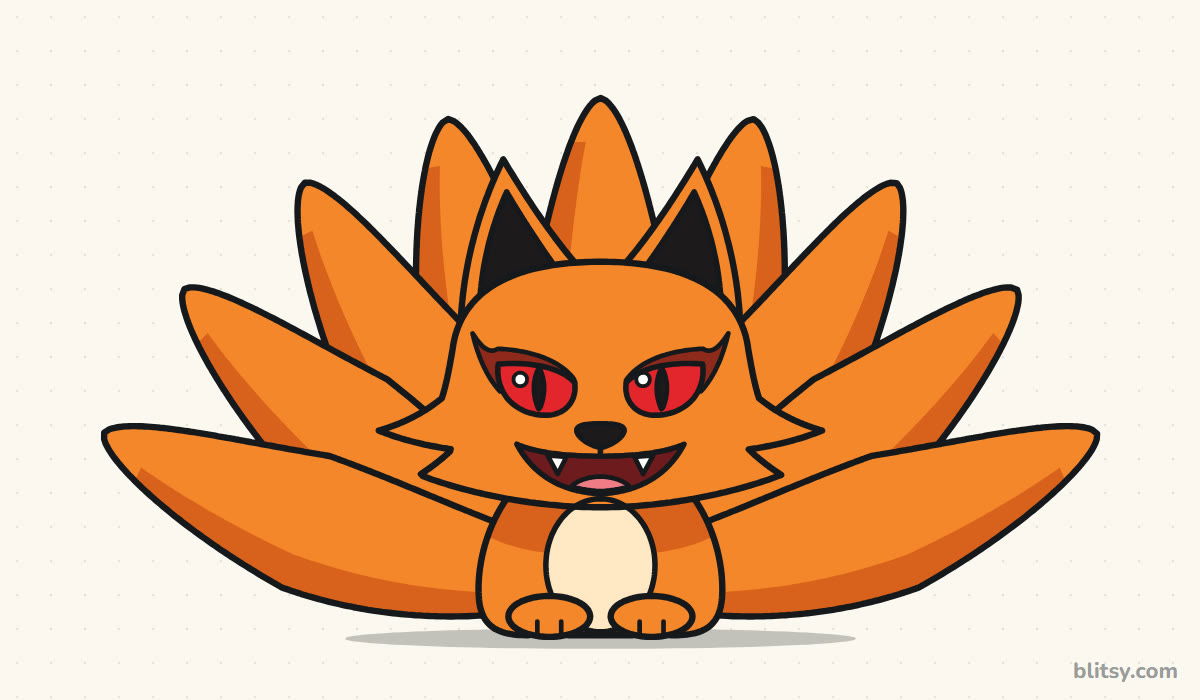
Watch the colors in each step picture: whatever is new shows up in blue, and older work turns gray. Pale blue helpers like the fan lines get erased in step 10, so sketch them softly.
Quick overview
⏱️ Time: around 25 to 35 minutes with coloring
🎯 Level: easy to medium, fine for ages 8 and up
✏️ Steps: 11
🦊 You'll draw: a sitting chibi Kurama with tall ears, red slit eyes, small fangs and nine fanned tails
Supplies for a Nine-Tailed Chibi Fox
- A regular pencil (HB or 2B) for the soft guides
- A kneaded or soft eraser
- A ruler for the nine fan lines (optional)
- A black marker or fineliner for the final outline
- Orange and dark orange pencils or markers for the fur
- Red, dark red, black, cream and a little pink for the face and belly
- Paper turned sideways, since the tails need width
Two oranges make a big difference here, but if you only own one, press harder for the shaded parts.
How to Draw Kurama Step by Step
Step 1: Sketch a head oval and a body oval
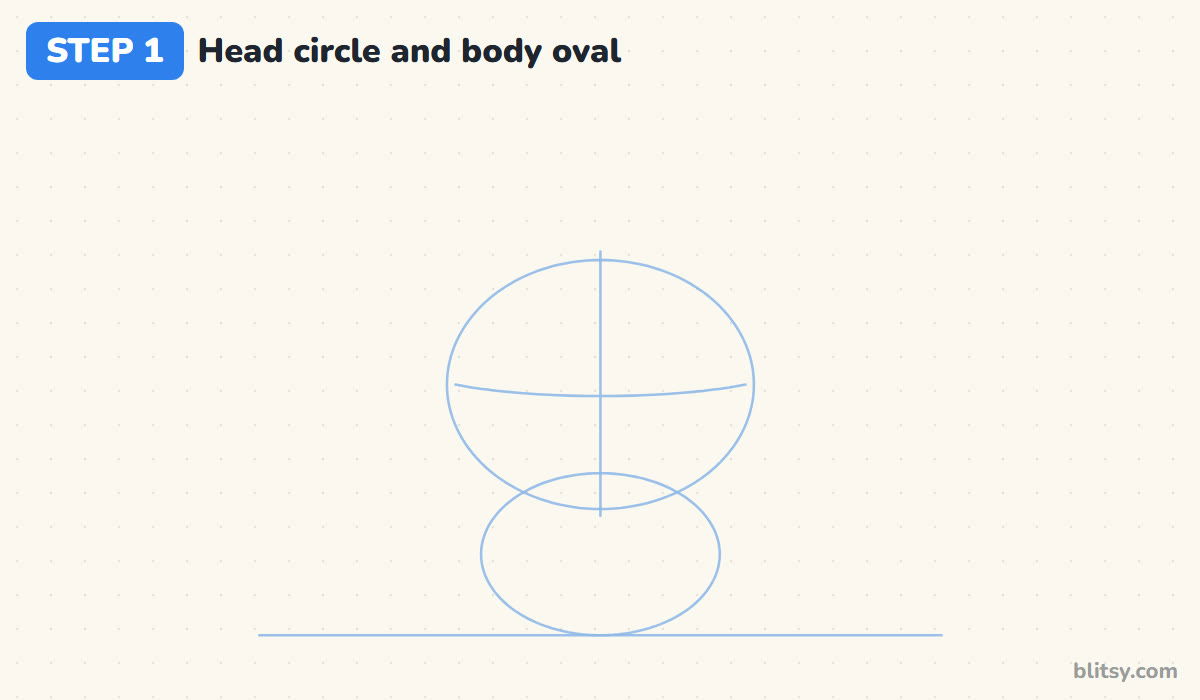
Turn your page sideways and draw a flat ground line near the bottom. Just above it, sketch a small oval for the body, then a bigger oval on top that overlaps it for the head. In chibi style the head is the star, so make it about twice as wide as the body. Add an upright line down the head and a gently curved line across it for the eyes.
💡 Tip: Press so lightly that you can barely see the lines. They're only scaffolding.
Step 2: Add nine fan lines for the tails
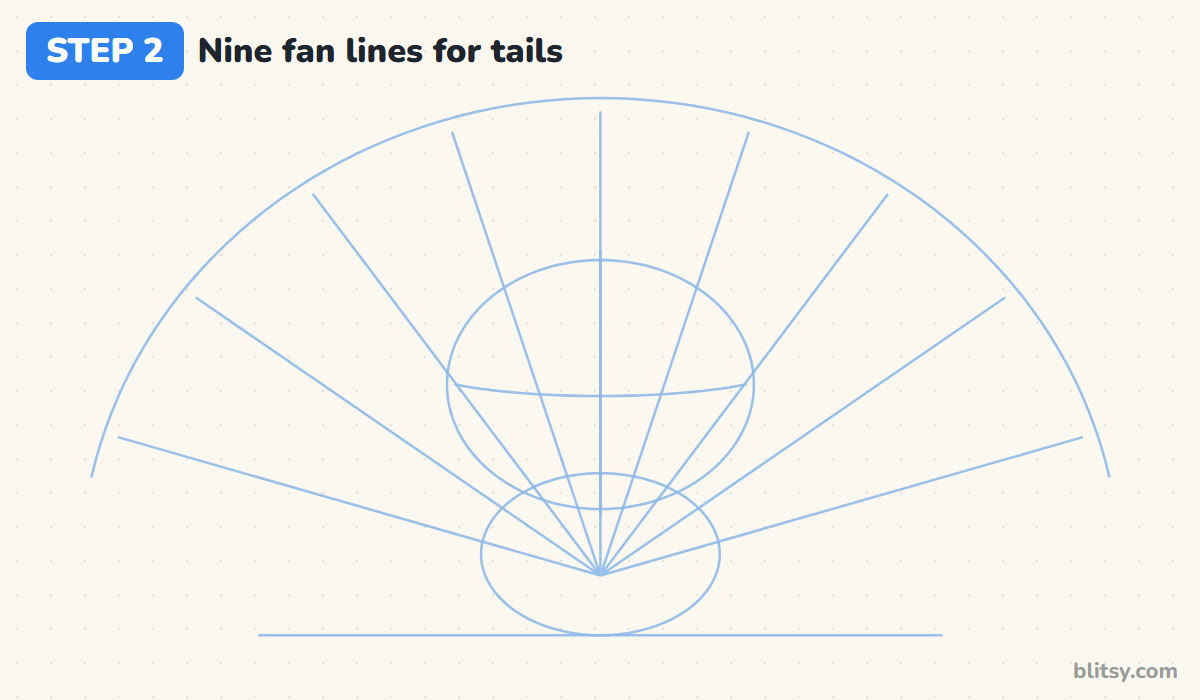
This is the step I never skip when I teach Kurama. From a point in the middle of the body oval, draw nine straight lines spreading out like the ribs of a hand fan: one straight up and four on each side, with the lowest pair almost sideways. Join their outer ends with one big arc so you know how far each tail reaches.
💡 Tip: Count out loud as you draw the lines. It's surprisingly easy to end up with eight or ten.
Step 3: Shape the wide head and cheek fur
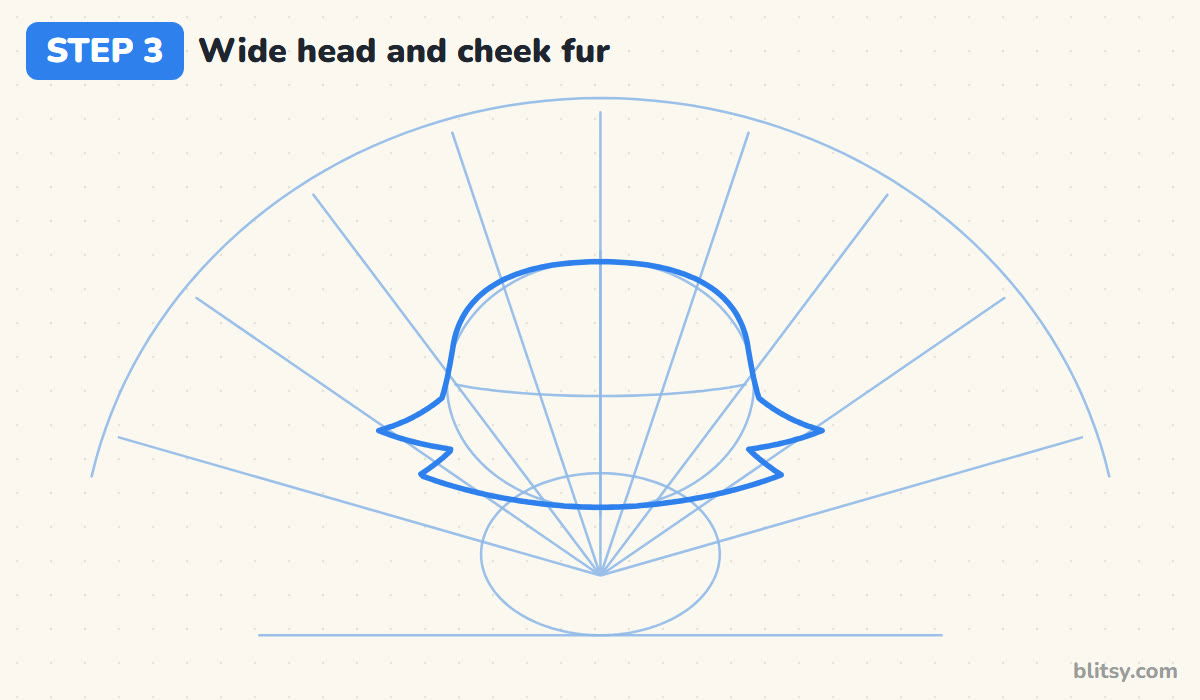
Go around the head oval with a rounder, wider shape. Keep the top smooth, then let the sides drop down. Near the bottom, pull out a pointed tuft of fur on each side with a smaller spike under it, and close the chin with a long, gentle curve. The tufts make the head look wider, which gives Kurama his bold look.




💡 Tip: Draw both cheek tufts before you fix either one, so you can compare their size side by side.
Step 4: Draw the tall pointed ears
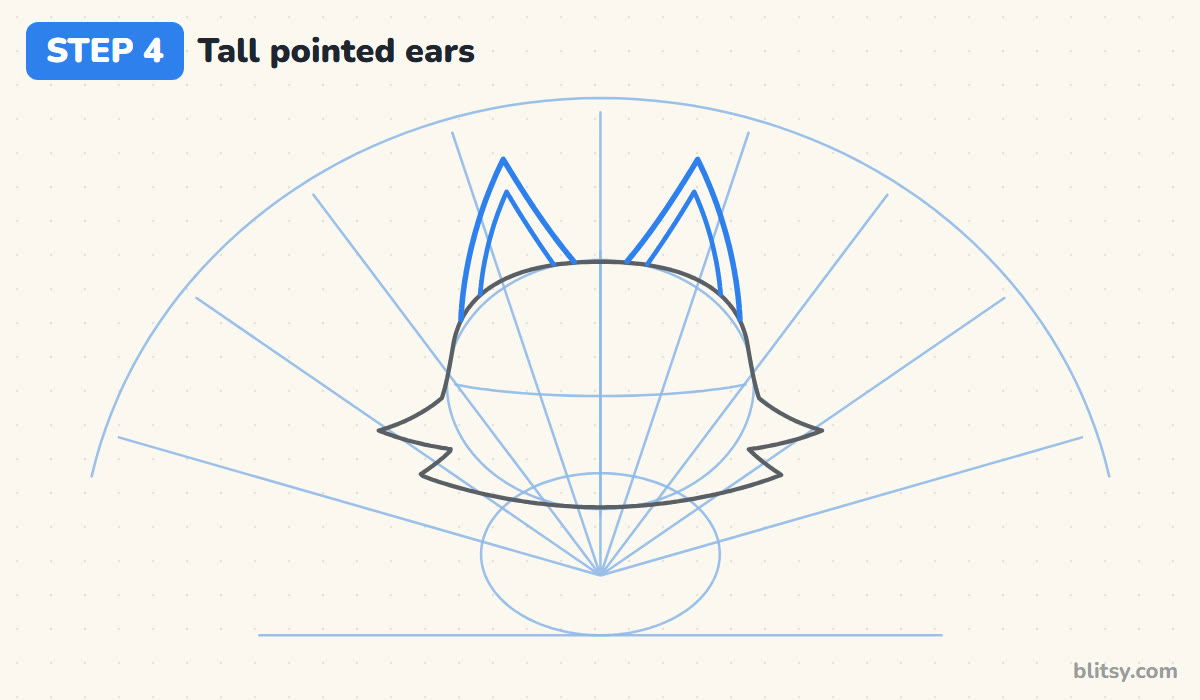
Kurama's ears are long and sharp, nothing like the soft ears of a pet fox. Start each one on top of the head, a little in from the side, and draw a tall narrow triangle with slightly curved edges, about as tall as the upper half of the head. Inside each, draw a smaller triangle for the dark inner part.
💡 Tip: Tilt the ears a touch outward. Perfectly upright ears can look stiff.
Step 5: Draw the little body and paws
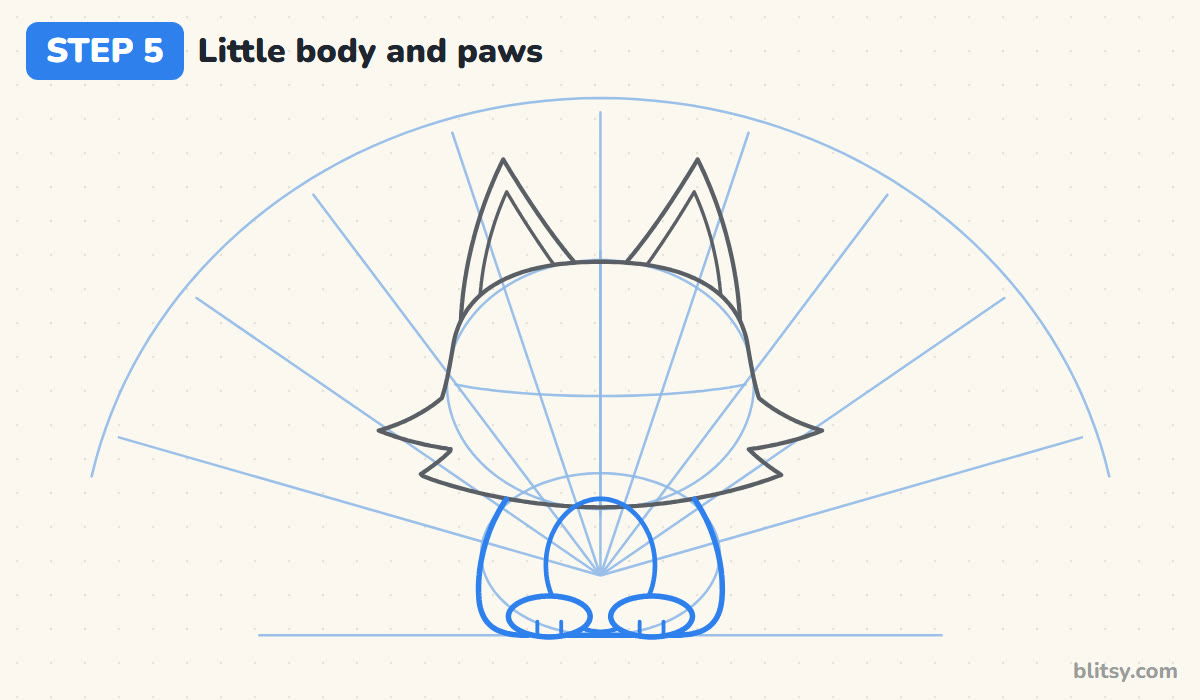
Under the chin, draw the body as a short pear shape sitting on the ground line. Add two wide oval paws in front with two tiny toe lines each, and a tall oval in the middle for the belly. Keep the body small, because the big head and tails are what read as chibi.
💡 Tip: If the body gets too big, the cute look disappears. When in doubt, go smaller.
Step 6: Draw the four front tails first
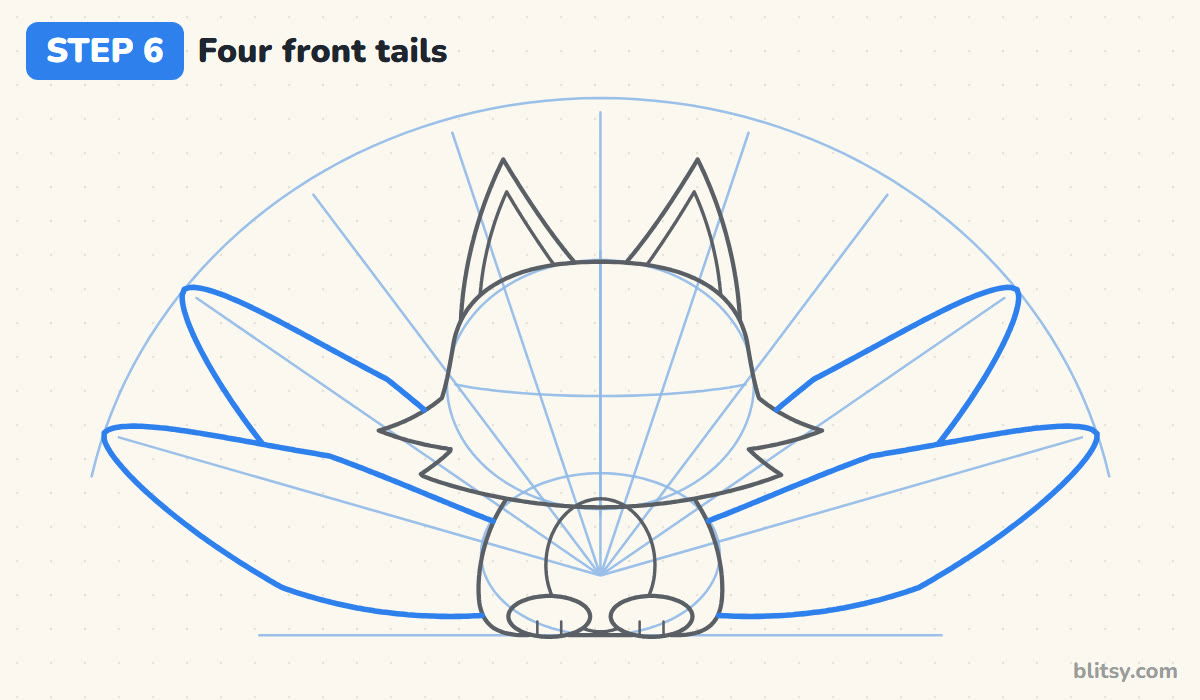
Start with the two lowest fan lines on each side. Around each, draw a long tail that's narrow at the body, swells in the middle and tapers to a soft point at the arc, bowing outward a little. These four sit in front of the others, so draw their full outline and stop where they reach the body.
💡 Tip: Think of each tail as a long leaf or a candle flame. That shape is easier than fur.
Step 7: Tuck five tails in behind
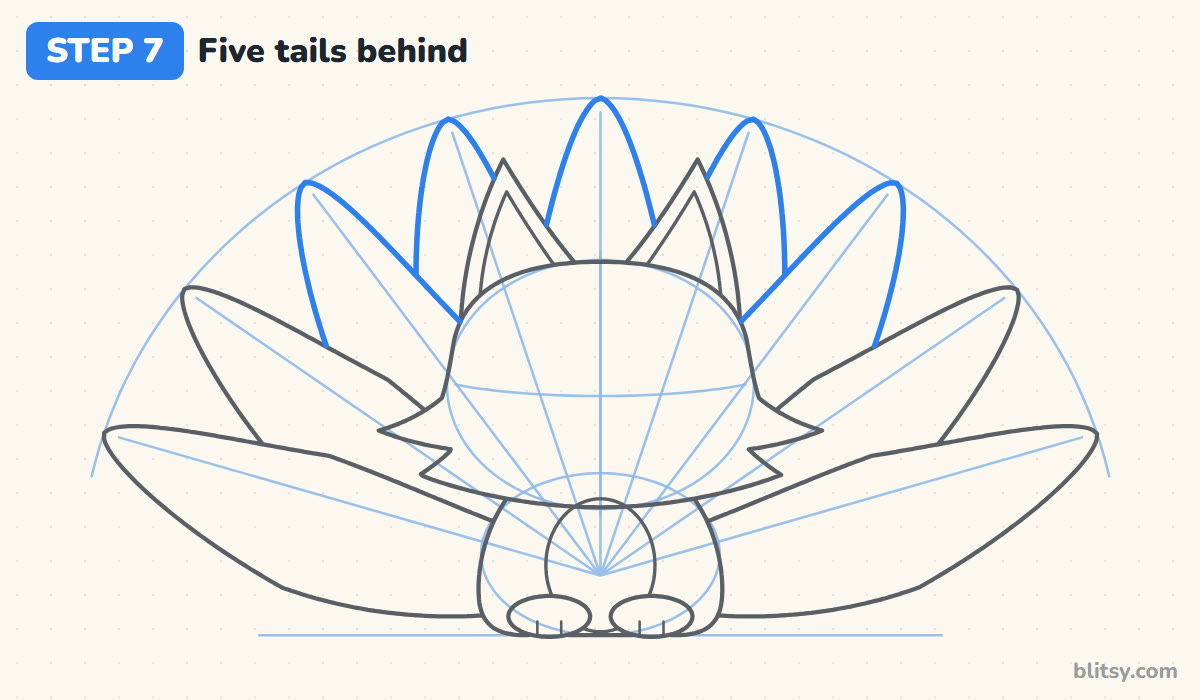
Now use the five middle fan lines. Draw the same flame shape on each, but stop wherever the line touches a tail in front, an ear or the head. The middle tail shows only its tip, peeking up between the ears. Overlapping like this makes the fan look full, and it's the part that takes the most patience.


💡 Tip: I stop and count the tails right after this step. Nine tips on the arc means you're on track.
Step 8: Draw the fierce eyes and markings
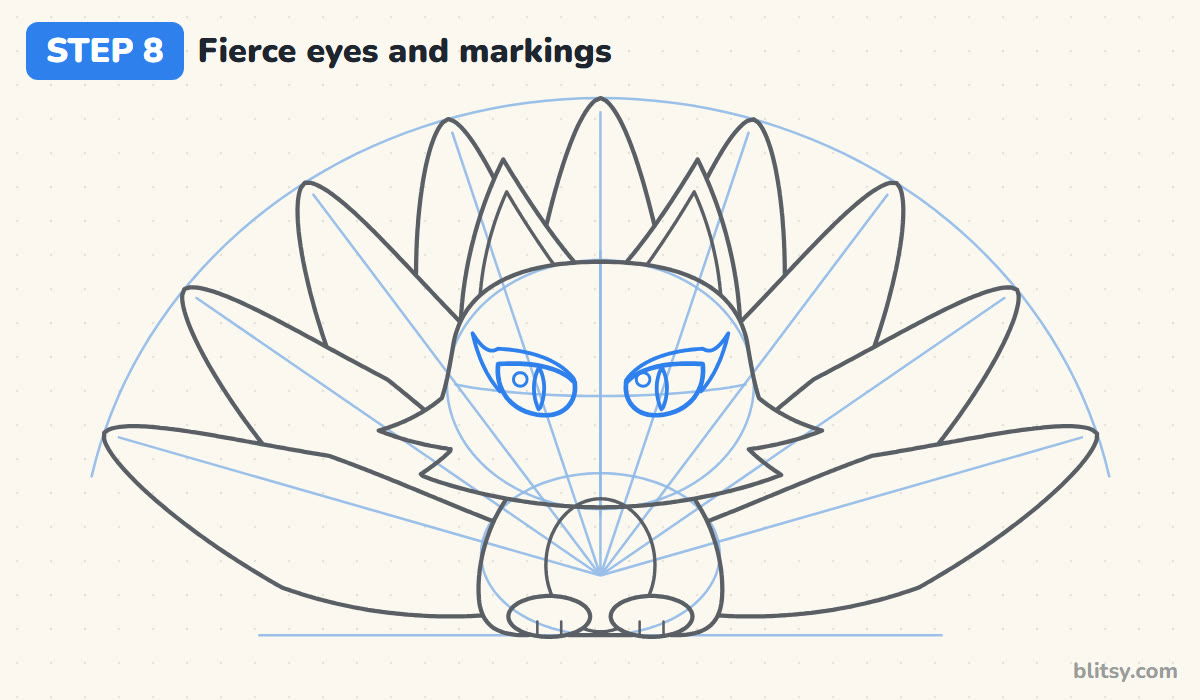
On the curved eye line, draw two large rounded eyes with a flatter top edge that slopes down toward the nose. That small slope makes him look determined, not mean. Add a thin pointed slit for each pupil and a little circle for the shine. Above each eye, draw a dark marking that sweeps outward into a point, like a wing.
💡 Tip: Keep the shine circles on the same side in both eyes, or he'll look cross-eyed.
Step 9: Add the nose and a toothy grin
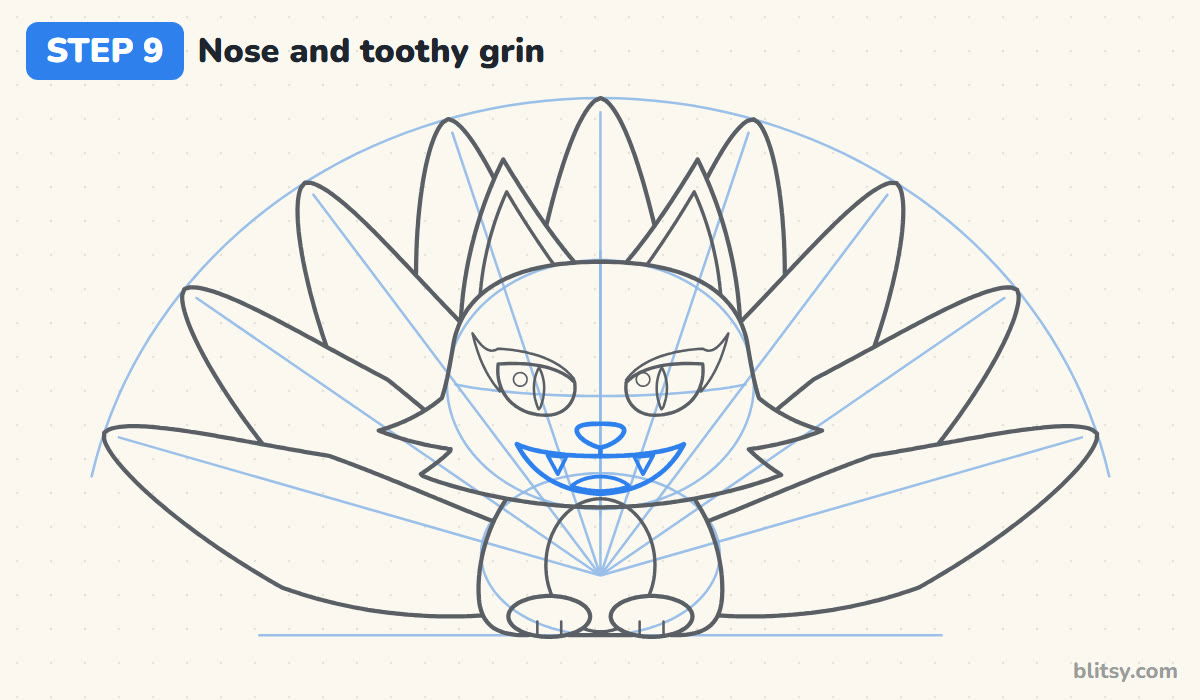
On the middle line under the eyes, draw a small rounded nose and a short line down from it. Below, draw a wide grin: a flat top line with curled-up ends and a deep U-shaped bottom. Hang two small triangle fangs from the top line and add a curve for the tongue. The open grin keeps chibi Kurama playful.
💡 Tip: Leave a little space between the fangs and the corners of the mouth so the grin stays readable.
Step 10: Ink your lines and erase the guides
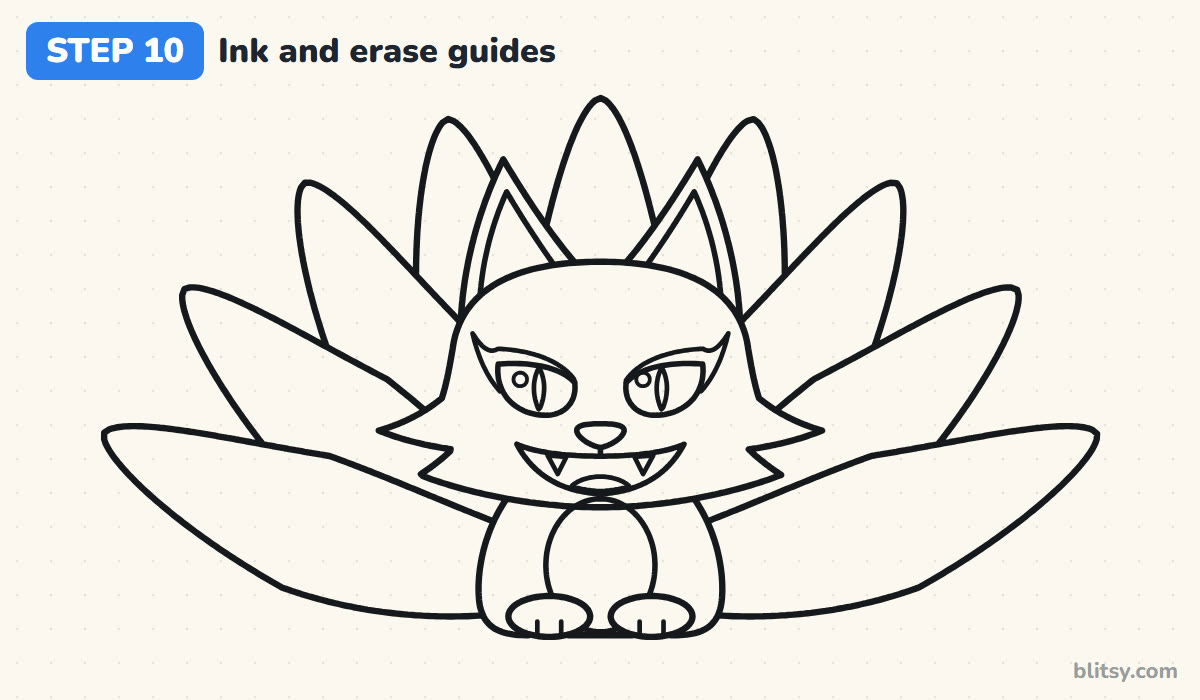
Trace every keeper line with your black marker: the head, ears, body, paws, all nine tails and the face. Skip the ovals, the fan lines and the arc. Let the ink dry for a minute, then erase all the pencil. The tails will suddenly stand out on their own.
💡 Tip: Ink the tails with long, steady strokes from base to tip, not lots of short ones.
Step 11: Color Kurama
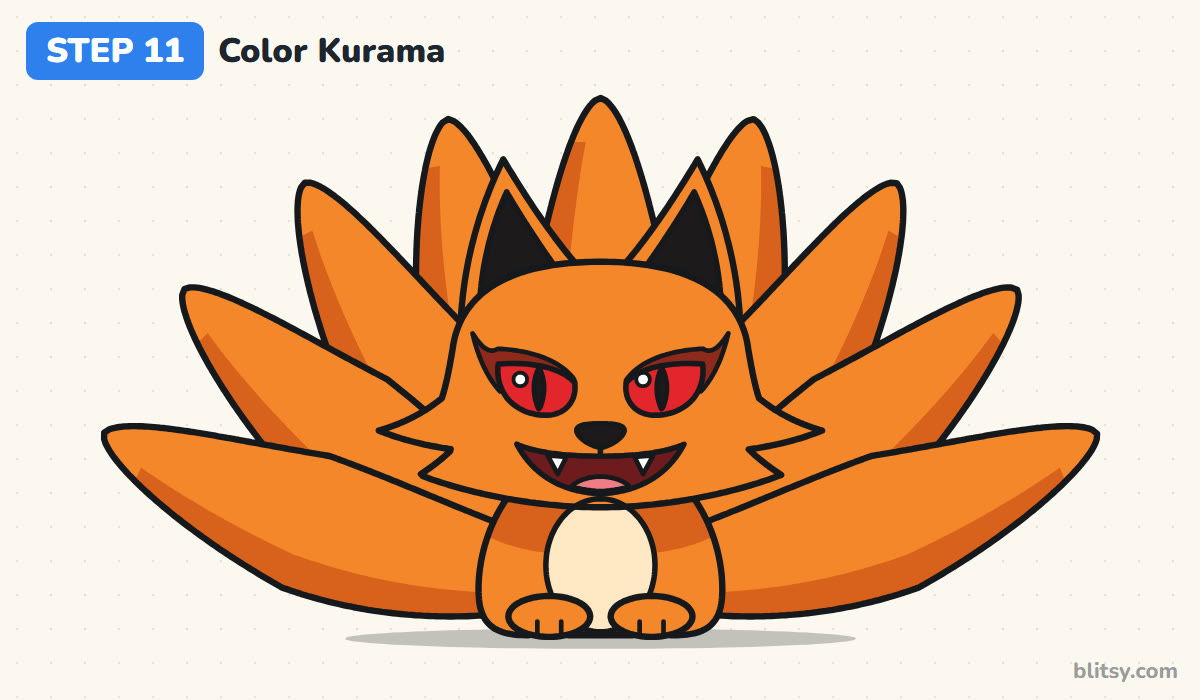
Fill the head, ears, body, paws and every tail with orange. Go over the lower edge of each tail and the spot under the chin with darker orange for shading. Color the ear insides black, the eyes red with black pupils, and the markings and mouth dark red. Finish with a cream belly, a pink tongue and white fangs, leaving the eye shine as bare paper.


💡 Tip: Color all nine tails in the same direction, from base to tip. The strokes then look like fur.
Where Nine-Tails Drawings Usually Get Messy
- Losing count of the tails. Without guides, most people end up with seven or ten. The nine fan lines from step 2 fix this for good.
- Tails all the same width from start to end. They turn into sticks or bananas. Keep them narrow at the body, full in the middle and pointed at the tip.
- Drawing every tail outline completely. The lines cross and the fan becomes a tangle. Stop each back tail where it meets the one in front.
- Eyes that slant too much. Kurama can easily look angry instead of cheeky. A small slope on the top edge is enough.
- One flat orange everywhere. With no darker orange, the tails melt into one shape. A shaded band on each tail keeps them apart.
Playful Changes to Your Kurama Sketch
Once this feels easy, try curling the tail tips into spirals, or let two tails swirl in front of the body for more motion. You can close the mouth into a sly smirk, too. Younger kids can skip the markings and tongue and just focus on getting nine tails down. To stay in the same world, the Sharingan drawing tutorial makes a fun next project, and the chibi drawing step by step lesson helps you shrink any character into this cute style.
Free Kurama Coloring Page and Printable Step Guide
Want to color right away? The free Kurama coloring page has a small colored example at the top with a key beside it. The step-by-step PDF guide holds all 11 steps and tips, two per page, and prints on Letter or A4.
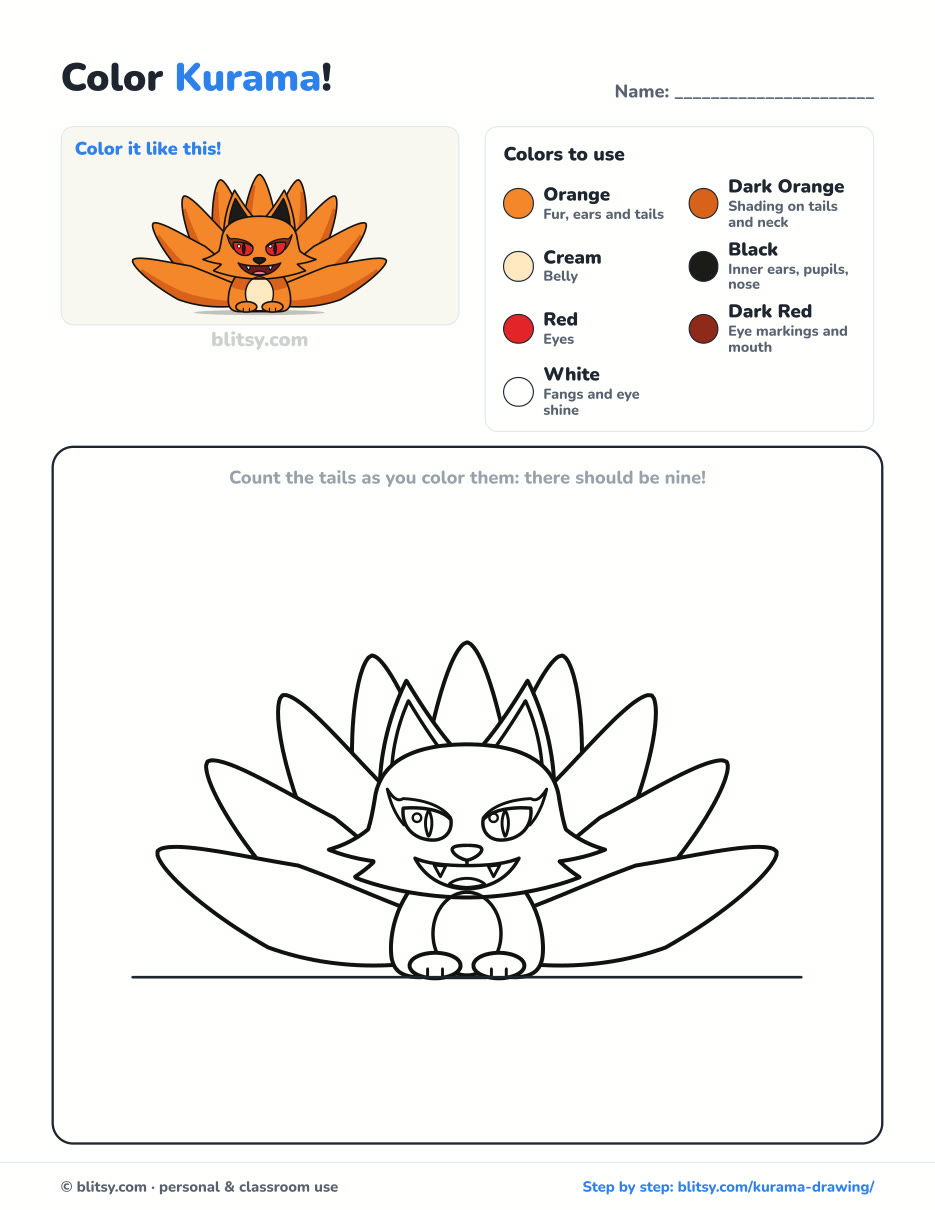
Black outlines with a colored example and the color names at the top. Ready to print and color.
⬇️ Download Coloring PageEvery step picture with its instructions and tips, to keep beside your paper while you draw.
⬇️ Download Drawing Guide📱 On a phone? Tap a download button, then open the file and choose Share → Save to Files or Print. On a computer, the PDF opens or saves straight to your Downloads folder.
Pin the Nine-Tails Steps for Later
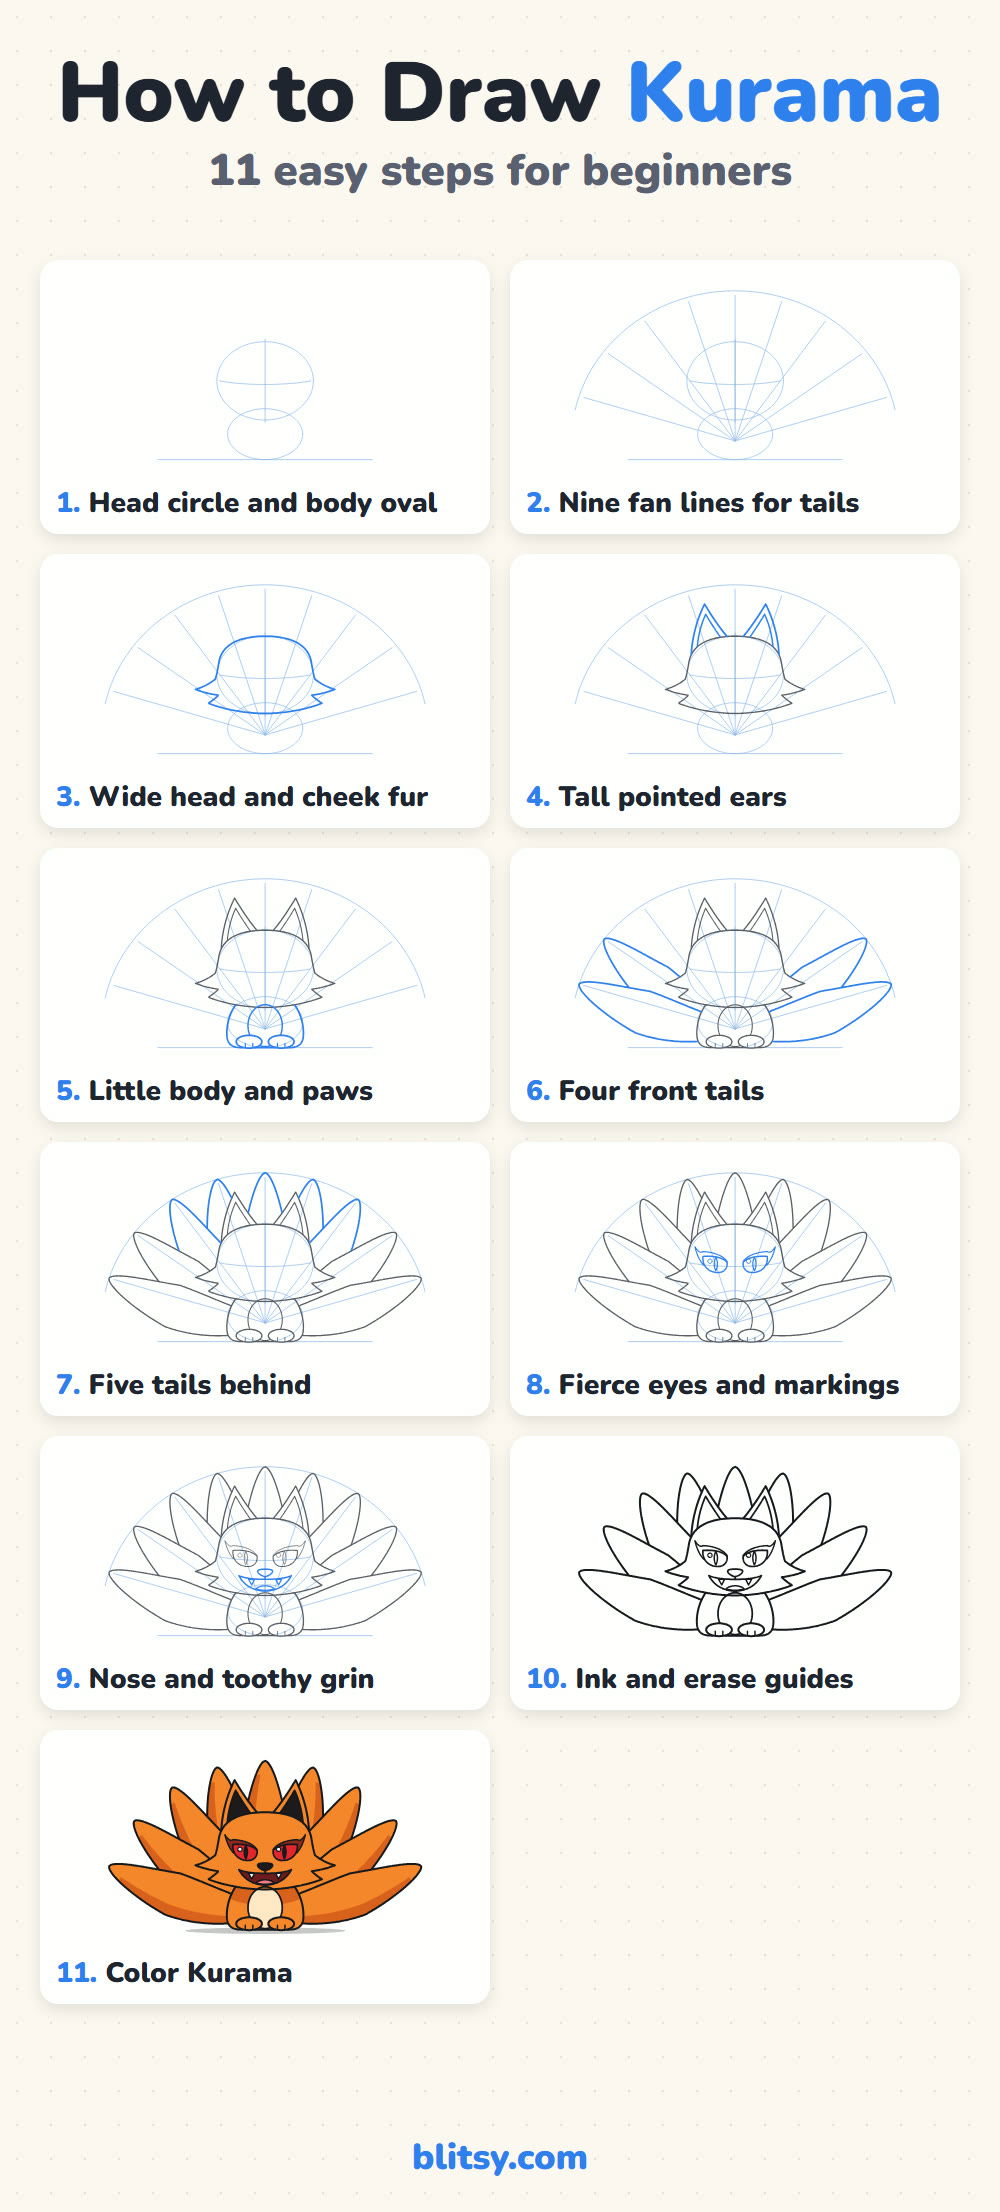
Nine Tails Done? Draw These Cartoon and Anime Characters
Every link here is a step-by-step character tutorial, drawn in the same friendly style with a picture for each step.
- Iron Man Drawing: A sturdy little Iron Man in red and gold armor, chest light glowing, fills this how to draw Iron Man step by step lesson.
- Juice WRLD Drawing: Draw a calm cartoon tribute portrait with short twists, a hoodie and a small 999 pendant in this Juice WRLD drawing tutorial.
- Sharingan Drawing: Stay in the Naruto world with this Sharingan drawing tutorial, a close-up eye with a red iris and three tomoe.
- Pikachu Drawing: Black-tipped ears, red cheeks and a zig-zag tail come from two ovals in this Pikachu drawing step by step guide.
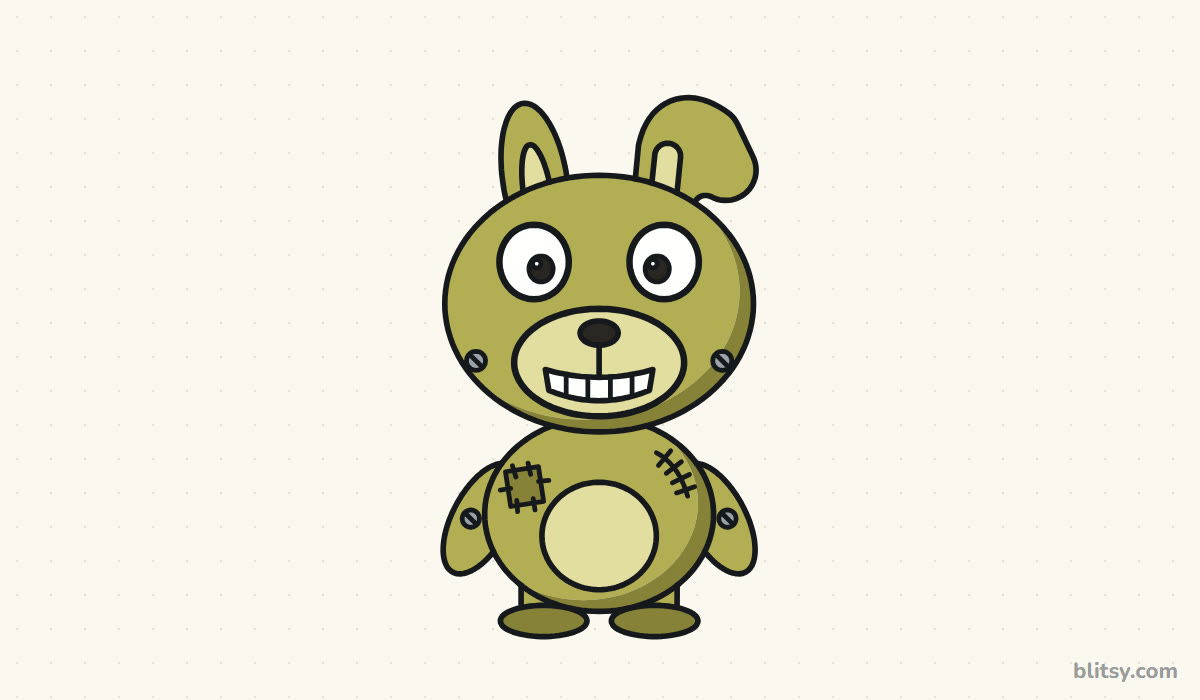
- Springtrap Drawing: A friendly chibi Springtrap with one floppy ear and a stitched patch is the goal of this Springtrap drawing tutorial.
- Bart Simpson Drawing: Spikes up and smirk ready, Bart takes 11 beginner steps in this how to draw Bart Simpson lesson.
- Disney Drawing: Draw a chubby clownfish with three white stripes, Nemo style, in this Disney character drawing tutorial.
- Stitch Drawing: Giant ears and big shiny eyes grow from two light ovals in this Stitch drawing step by step lesson.
- Anime Drawing: Learn the core anime face rules on one cheerful boy with spiky blue hair in this how to draw anime tutorial.
- Mickey Mouse Drawing: Three circles become a smiling Mickey waving hello in this Mickey Mouse drawing tutorial.
Kurama Drawing Questions Answered
What is the easiest way to draw Kurama?
Draw him as a chibi. A big head, a small body and simple flame-shaped tails are much easier than the full-size fox, and nine fan lines tell you exactly where each tail goes.
How many tails does Kurama have?
Nine. That's why he's called the Nine-Tailed Fox. Count your fan lines before you draw any tails, and count the tips again once they're done.
What colors do I need to color Kurama?
Orange and darker orange for the fur, red for the eyes, black for the pupils, nose and inner ears, dark red for the markings and mouth, and cream for the belly.
Is Kurama hard to draw for kids?
The tails take some patience, but kids around 8 and up usually manage it with the fan lines. Younger children can draw fewer details on the face and still count out all nine tails.
Nine fan lines, one big grin, and your own little Nine-Tails is ready to show off. 🦊🧡
Related posts:
 How to Draw Wonder Woman Step by Step (Chibi for Kids)
 How to Draw the Hulk Step by Step (Easy Chibi for Kids)
 How to Draw Nezuko Step by Step (Cute Chibi for Beginners)
 How to Draw Iron Man Step by Step (Easy Chibi for Kids)
 How to Draw Springtrap Step by Step (Cute Chibi for Kids)
 How to Draw Mario Step by Step (Easy Chibi Version)
 How to Draw Cat Noir Step by Step (Easy Chibi Hero)
 How to Draw Master Chief Step by Step (Easy Chibi Armor)
 How to Draw Tinkerbell Step by Step (Easy Flying Chibi)
 How to Draw Tanjiro Step by Step (Easy Demon Slayer Chibi)
 How to Draw a Chibi Step by Step (Easy 2-Head Method)
 How to Draw Darth Vader Step by Step (Easy Chibi Version)

