
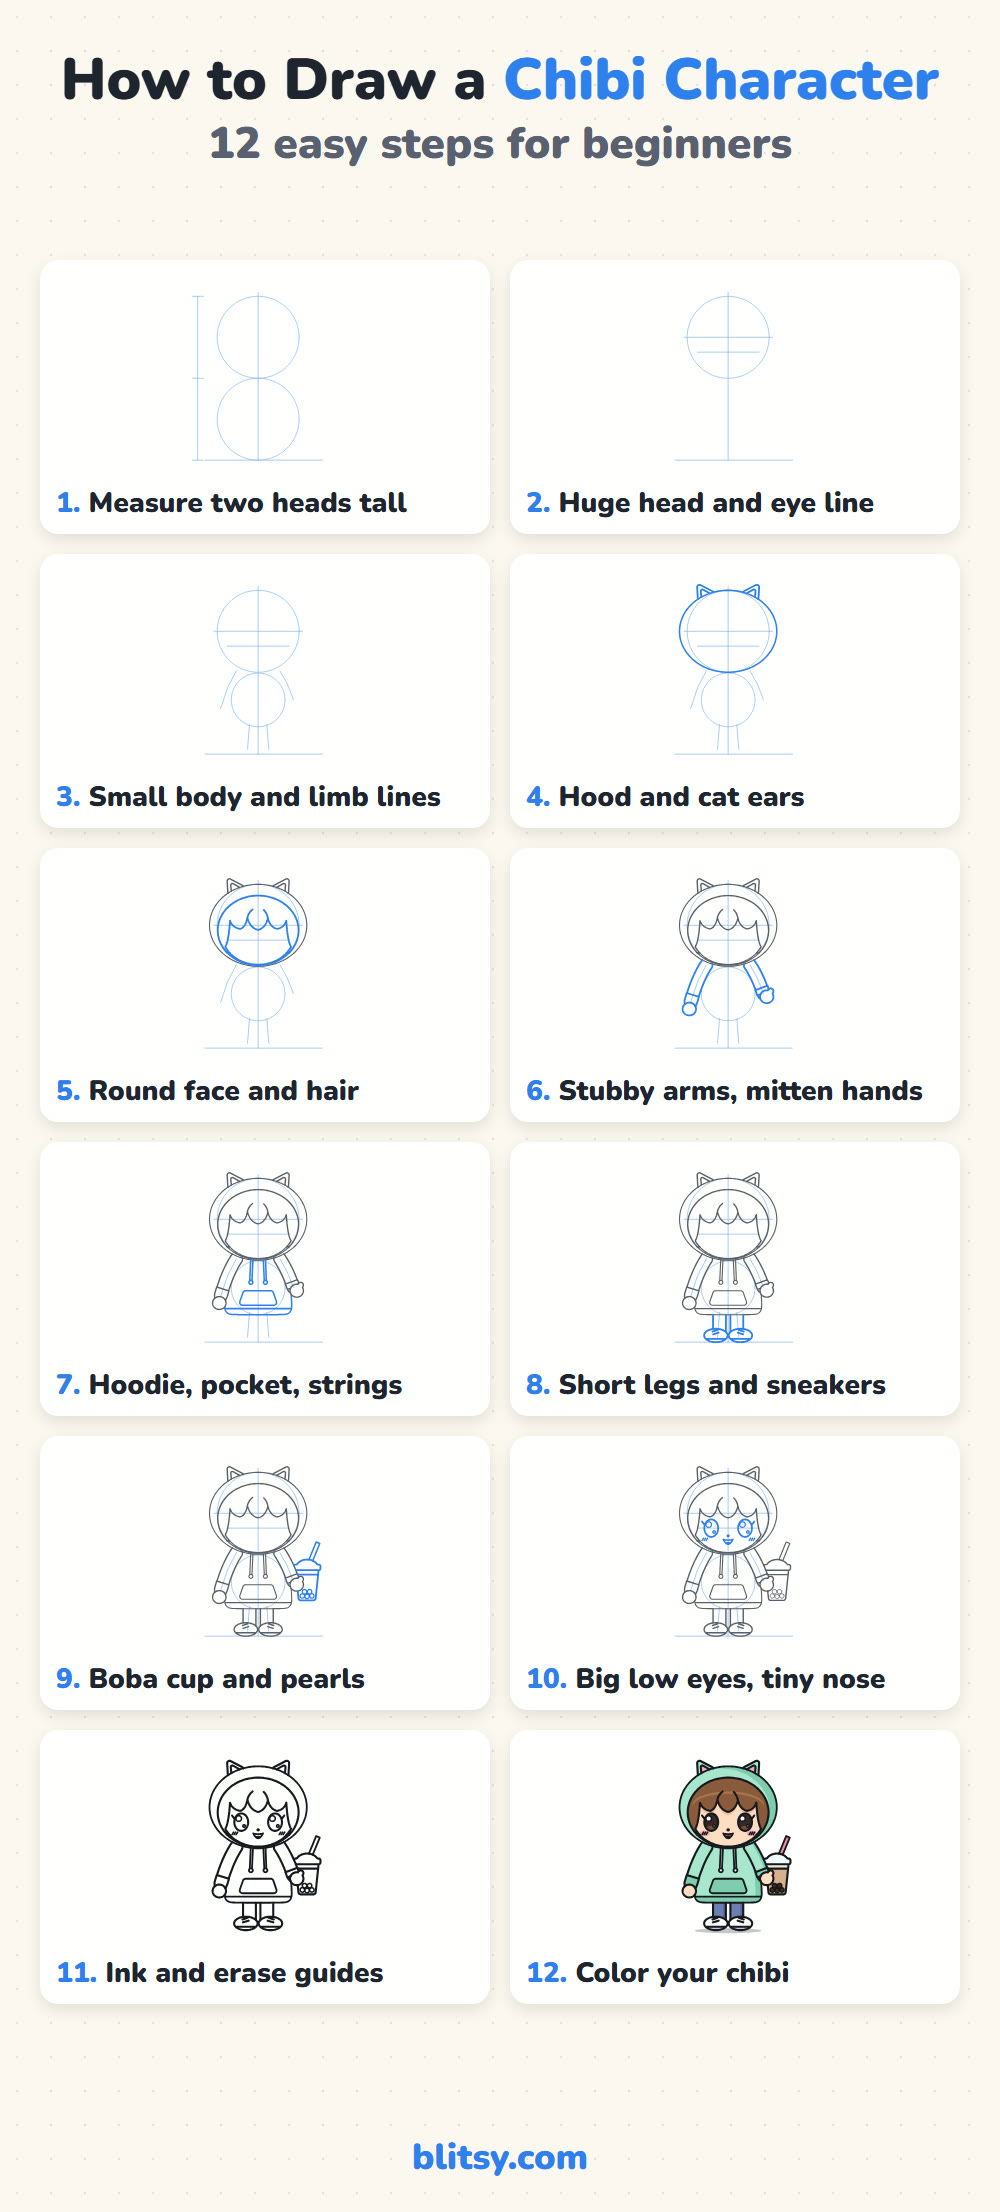
Chibi characters break the normal rules of the body on purpose: the head gets huge, everything else shrinks, and suddenly the drawing looks cute. Once you know which parts to stretch and which to squash, you'll see that how to draw a chibi step by step comes down to a short recipe you can use on any character. I'll teach it on one original kid in a cat-ear hoodie with a boba drink, and I'll explain each choice as we go.
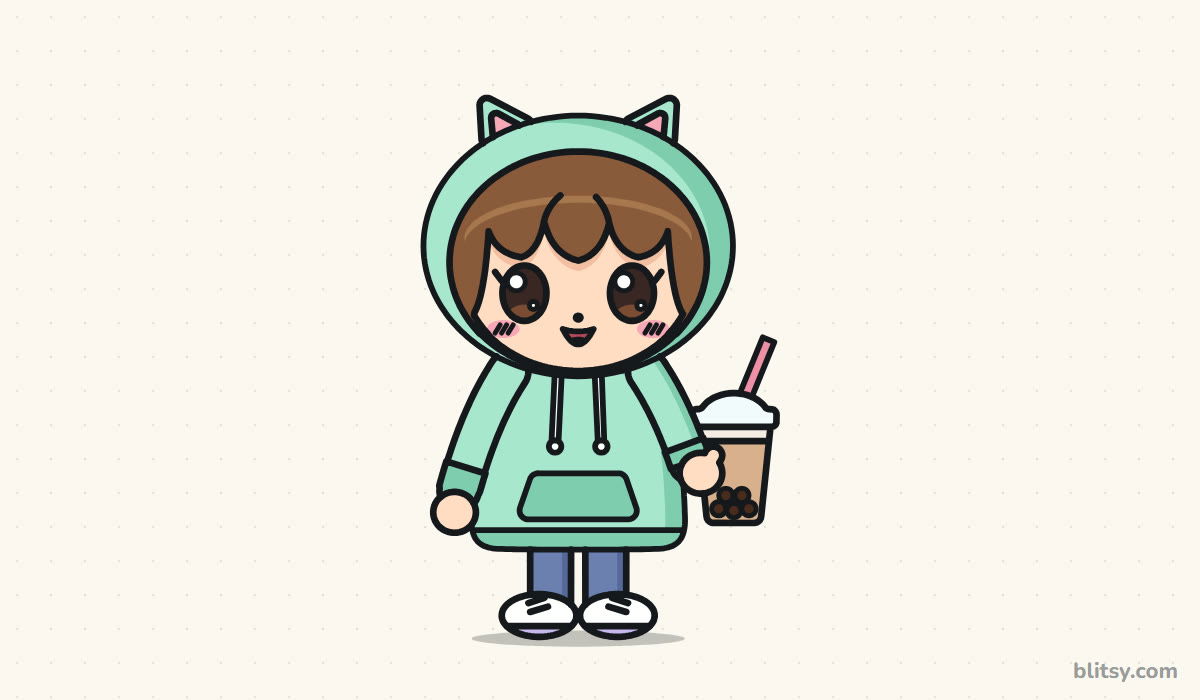
Watch the colors in the pictures: blue marks the lines you add right now, and gray marks the ones from earlier steps. Light blue shapes are measuring guides, so keep them faint, because step 11 rubs them out.
Quick overview
⏱️ Time: about 30 to 45 minutes, coloring included
🎯 Level: easy, good for ages 8 and up
✏️ Steps: 12
🧋 You'll draw: a chibi kid about two heads tall in a cat-ear hoodie and sneakers, holding a boba drink
Tools for Tiny, Round Chibi Lines
- A light pencil such as HB, for guides you can erase
- A soft eraser that won't smudge
- A black marker or fineliner for the final outline
- Colored pencils or markers (mint, peach, brown, pink, tan, blue)
- A white gel pen if you want extra eye shines
- Smooth paper, held upright
Any pencil works for the guides as long as you press lightly enough to erase them later.
How to Draw a Chibi Step by Step
Step 1: Measure two heads tall
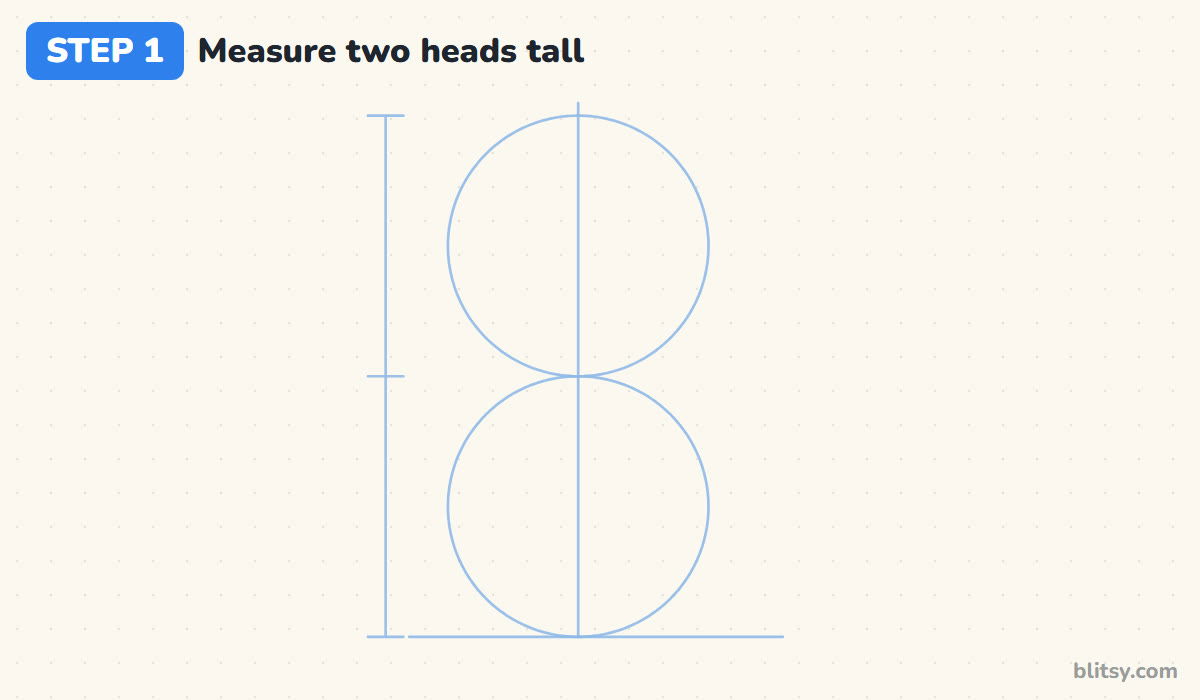
Draw a flat ground line near the bottom of the page and a straight center line rising from it. Right on that center line, stack two equal circles from the ground up, and add a short measuring bar beside them with a tick at the top, the middle and the ground. That stack is the whole chibi rule in one picture: the top circle becomes the head, and the body plus the arms and legs fit in the bottom one.
💡 Tip: Make both circles the same size; if the bottom one is bigger, your chibi turns into a toddler instead of a tiny doll.
Step 2: Keep the top circle as the head and add the eye line
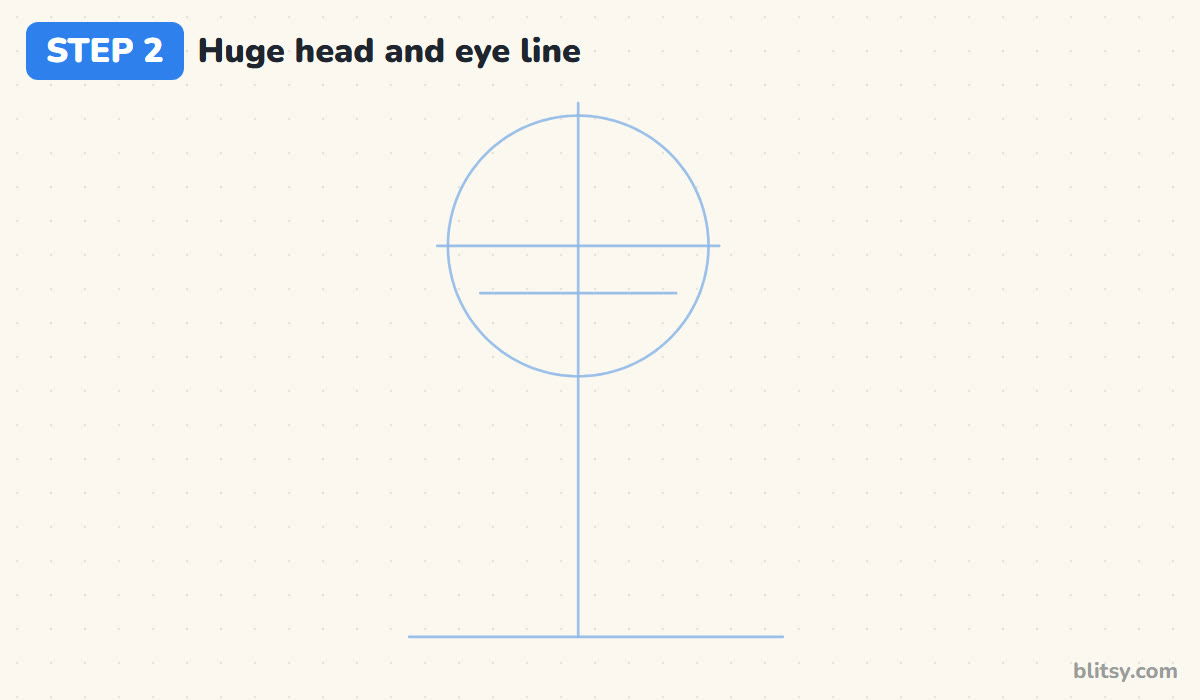
Erase the bottom circle and the measuring bar, and keep the top circle: it is already the right size for the head. Cut it in half with a level middle line. Then add a second, shorter line a little below the middle. In chibi faces the eyes sit on or below the halfway mark, and that low placement is what makes the face read as young and round.
💡 Tip: If the head looks too big, it's probably right; resist shrinking it.
Step 3: Sketch a small body and limb lines
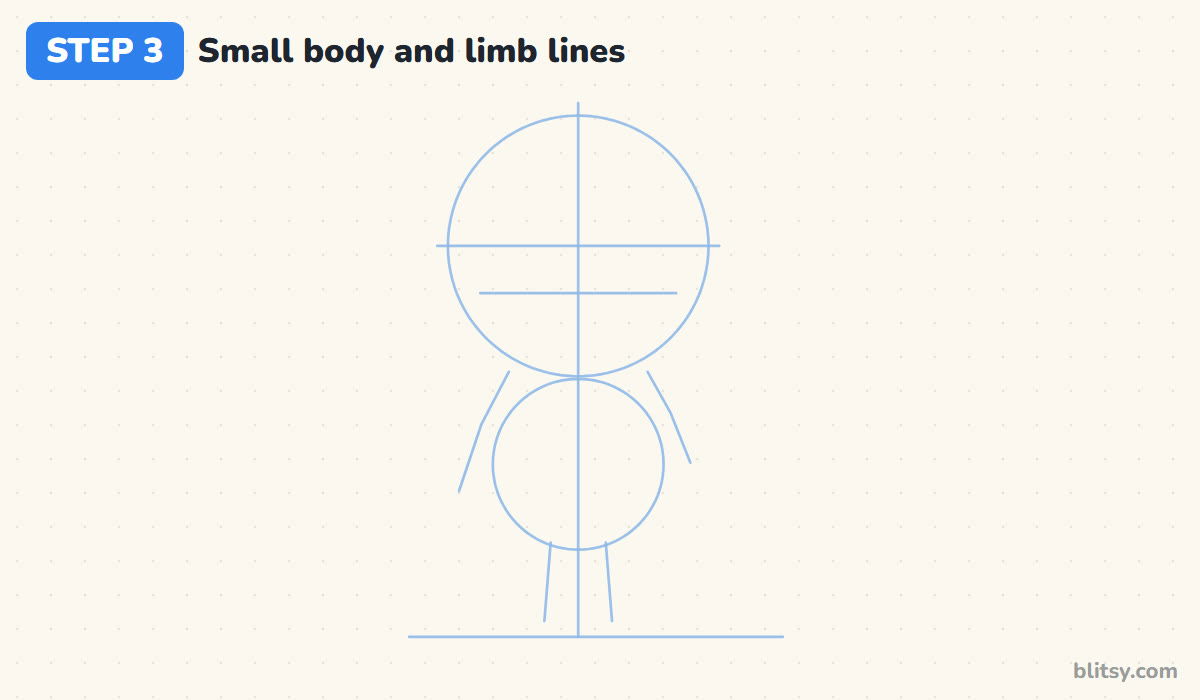
Under the head, draw a small circle for the body. It should be narrower than the head and touch its bottom edge. Add short slanted lines for the arms from the shoulders, and two short lines for the legs that stop at the ground. Keep every limb short. Long arms or legs are the quickest way to lose the chibi look.


💡 Tip: Check the arm lines: the hands should end around the bottom of the body circle, not lower.
Step 4: Outline the hood and the cat ears
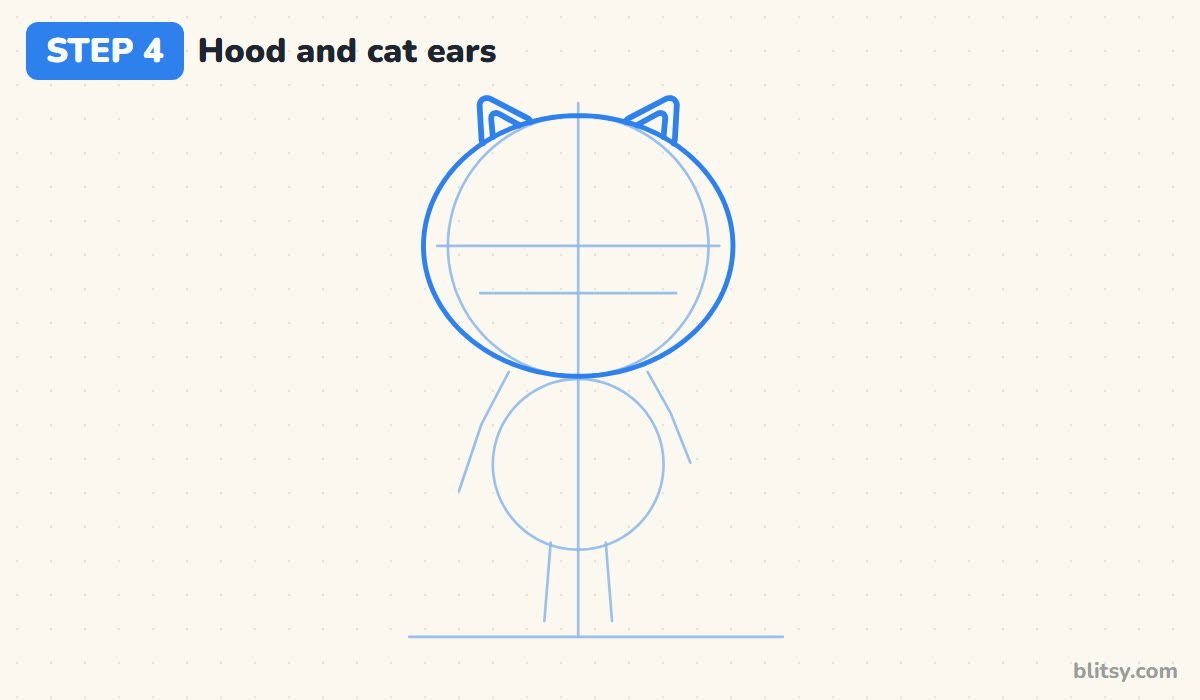
Draw the hood as a wide oval around the head circle, a bit wider than the circle on each side so it looks puffy. On top, add two rounded triangles for the cat ears, set far apart, with a smaller triangle inside each one. I round the ear tips slightly, because sharp points make the hood look stiff.
💡 Tip: Start each ear from the hood line and lean it outward a little.
Step 5: Add the round face and the hair
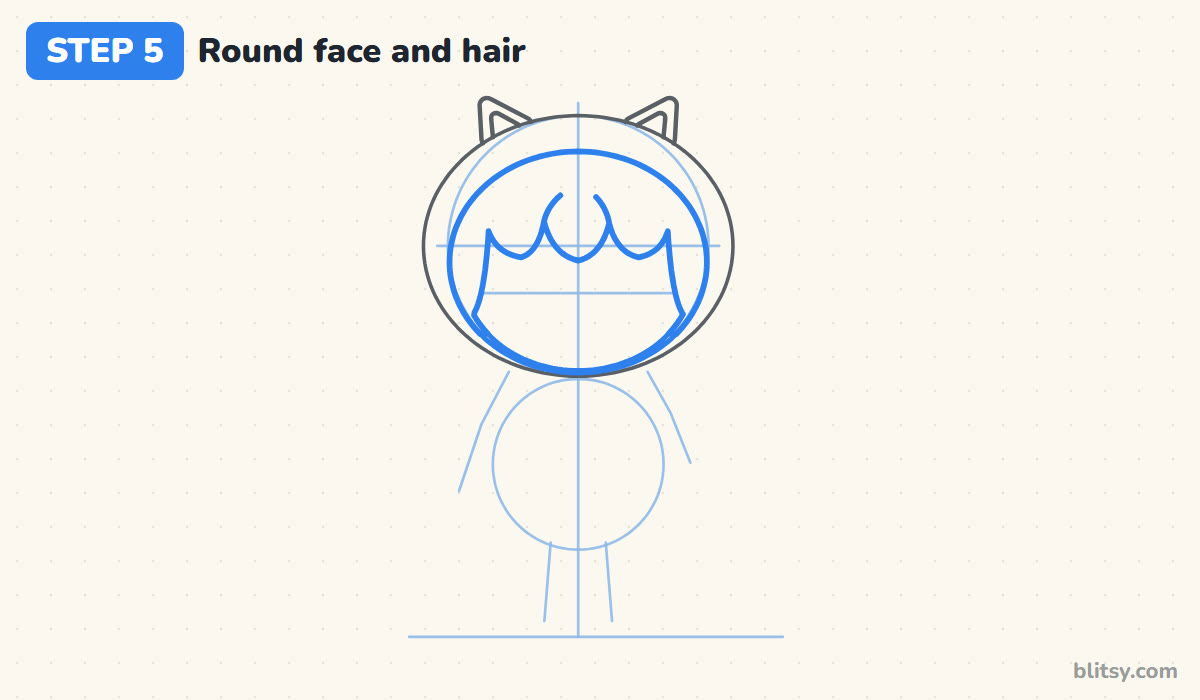
Inside the hood, draw a second oval for the opening, then a round face that fills most of it and touches the bottom. For the hair, draw three soft clumps of bangs that hang across the forehead, with a longer lock down each cheek. The bangs stop just above the eye line, so leave that space clear.
💡 Tip: Make the bang clumps different widths; perfect copies look like a paper crown.
Step 6: Draw stubby arms and mitten hands
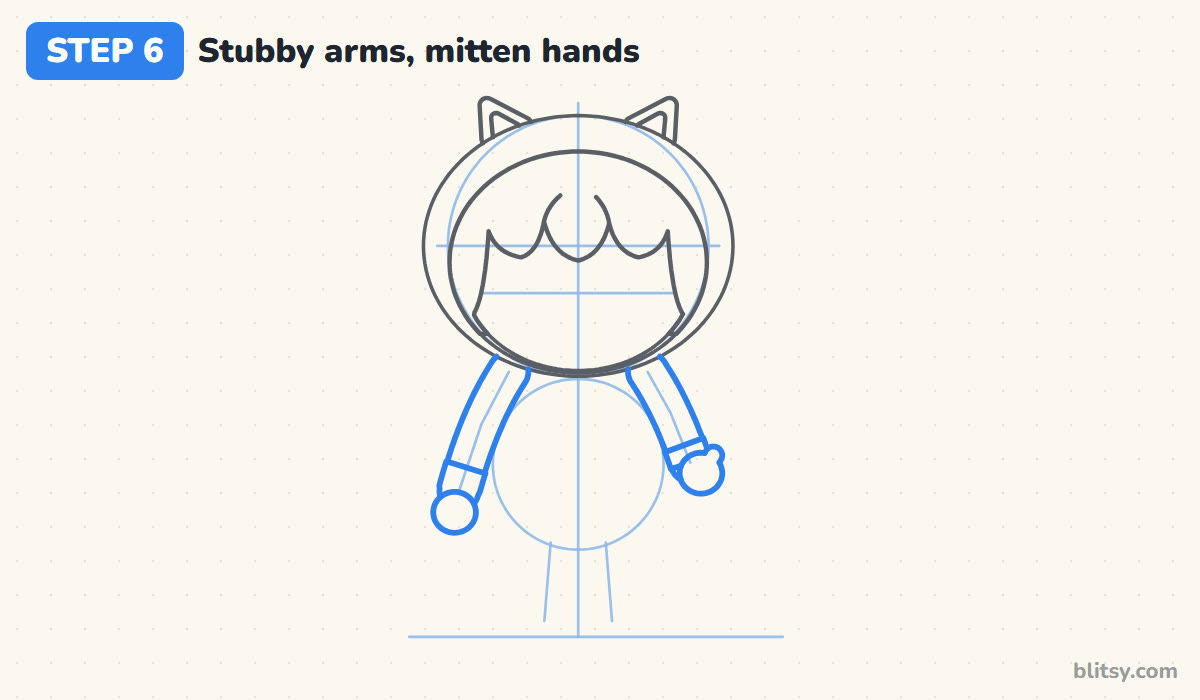
Turn each arm line into a soft, wide sleeve that starts under the hood. Close each sleeve with a short cuff, and finish with a round mitten hand. The right hand gets a small thumb bump on top, since it will hold the drink. Arms this thick feel squishy and toylike, which suits the style much better than thin sticks.
💡 Tip: Draw the sleeve as two curves that stay the same distance apart, like a sausage.
Step 7: Shape the hoodie with its pocket and strings
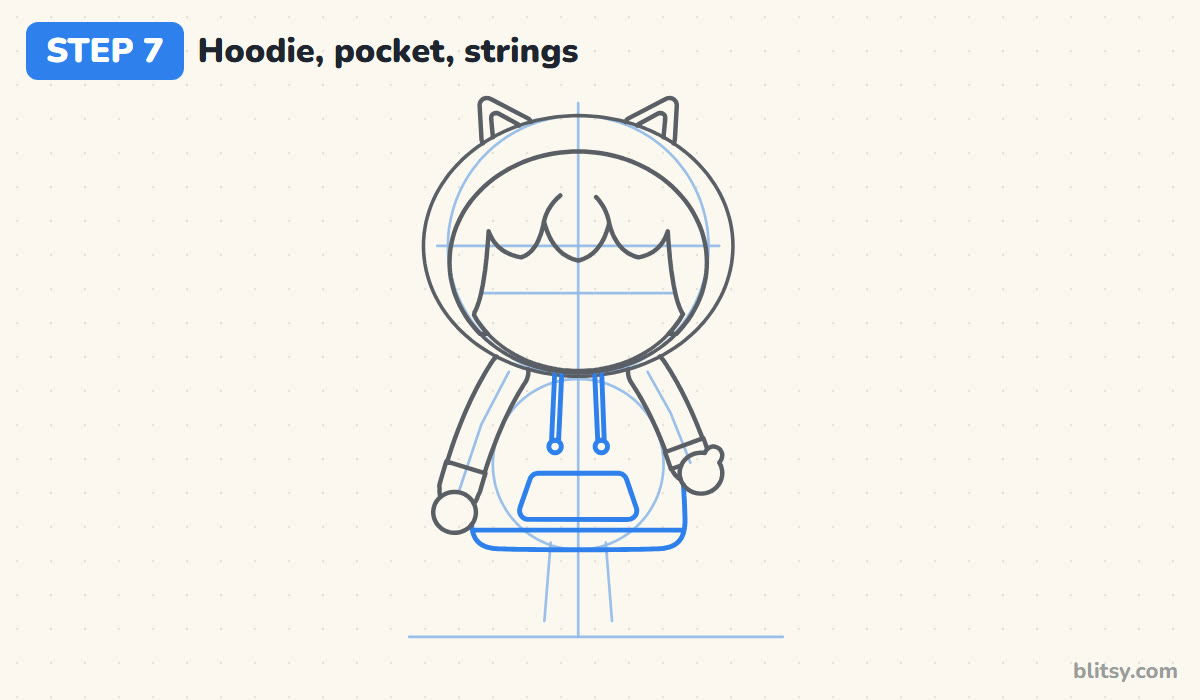
Now draw the hoodie body around the arms: a short, rounded shape that flares slightly toward a flat hem. Add a line for the hem band, a wide pocket across the tummy, and two strings hanging from under the chin with little round tips. Notice that the hoodie is barely taller than it is wide.



💡 Tip: Keep the bottom corners curved; square corners make the body look like a box.
Step 8: Draw short legs and sneakers
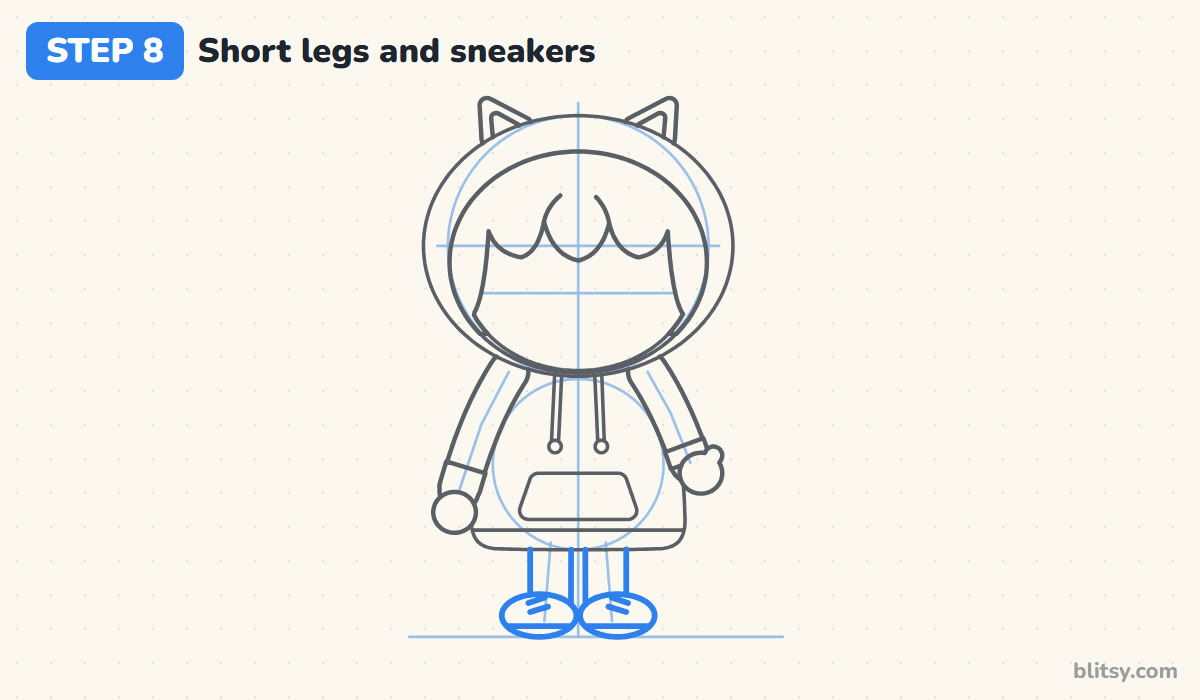
Below the hem, draw two short legs, each a narrow rounded rectangle. Put a rounded sneaker over the bottom of each one, with its toe pointing slightly outward, and add a sole line and two small lace marks. The shoes should touch the ground line so your chibi stands steadily instead of floating.
💡 Tip: Big shoes help balance a big head, so draw them wider than the legs.
Step 9: Add the boba cup and pearls
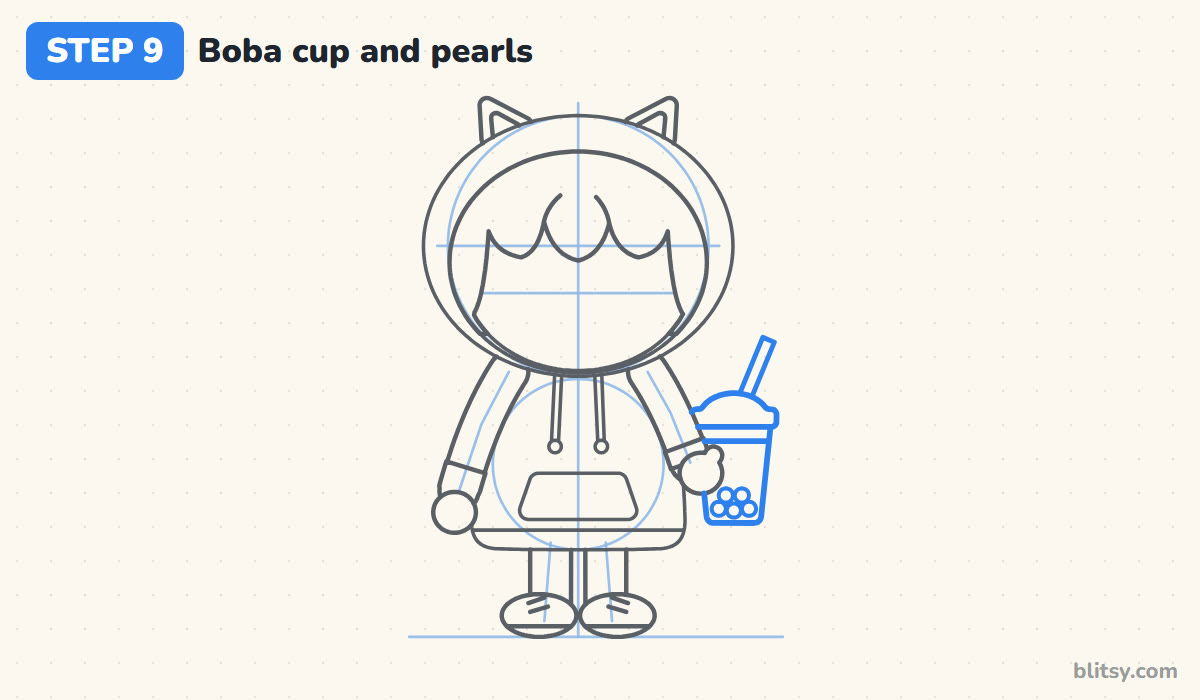
Draw a tapered cup beside the right hand, wider at the top, so the mitten overlaps its edge. Add a domed lid, a straw poking out at an angle, a line for the tea level, and five little circles at the bottom for the tapioca pearls. Overlapping the hand in front of the cup is what makes it look held.
💡 Tip: Draw the pearls in a small pile, two on top of three, rather than in a straight row.
Step 10: Draw big low eyes, a tiny nose and a smile
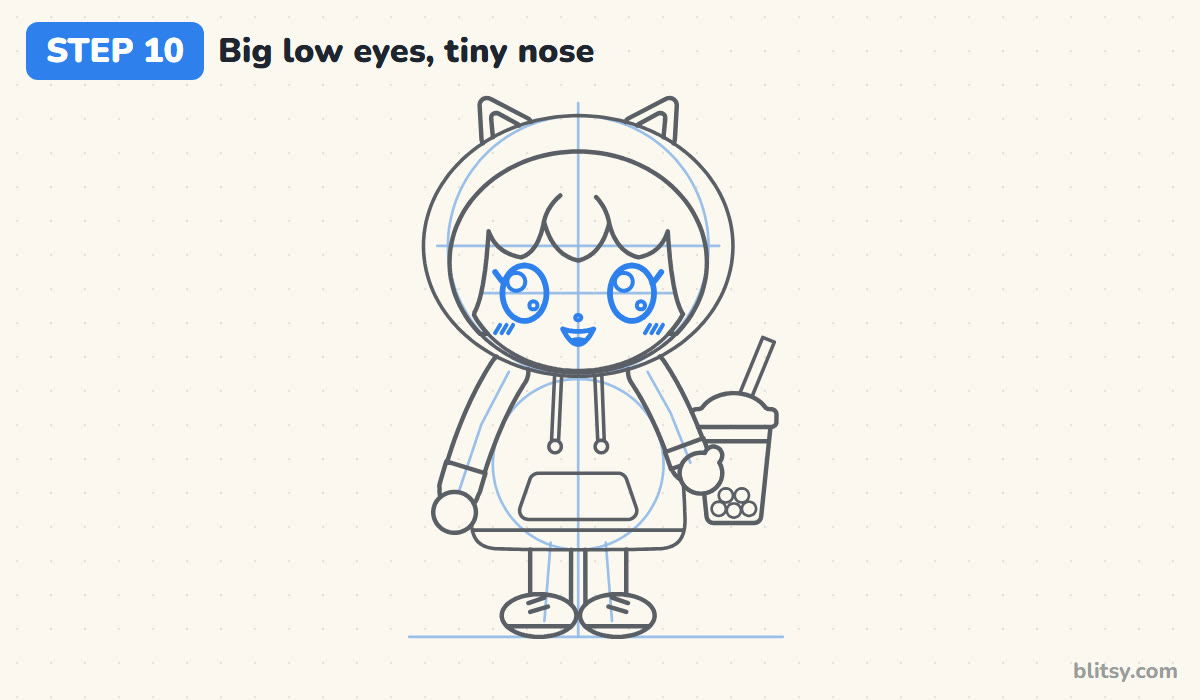
Center each eye on the low eye line. They're tall ovals, almost as tall as the space between the bangs and the cheeks, with a small lash flick at the outer corner. Add a big round shine and a tiny one in each eye. Below them, place a dot for the nose, a small open smile, and blush marks on the cheeks.
💡 Tip: Put the big shine on the same side of both eyes, so the light seems to come from one direction.
Step 11: Ink the outline and erase the guides
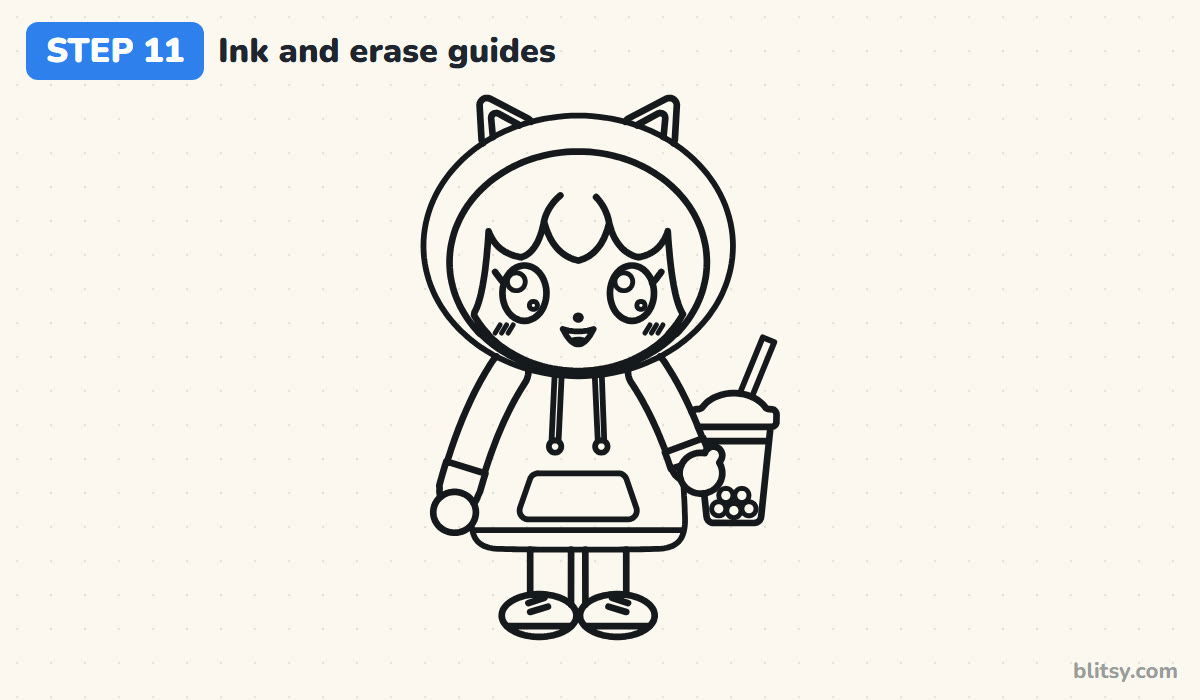
Trace every keeper line with a black marker: the hood, ears, face and hair, then the clothes and hands, the shoes and the drink. Wait a minute for the ink to dry, then erase the circles, the center line and the limb lines. Most beginners rush this part and smear the marker, so give it time.

💡 Tip: Ink the face last, when your hand has warmed up and your lines are steadiest.
Step 12: Color your chibi
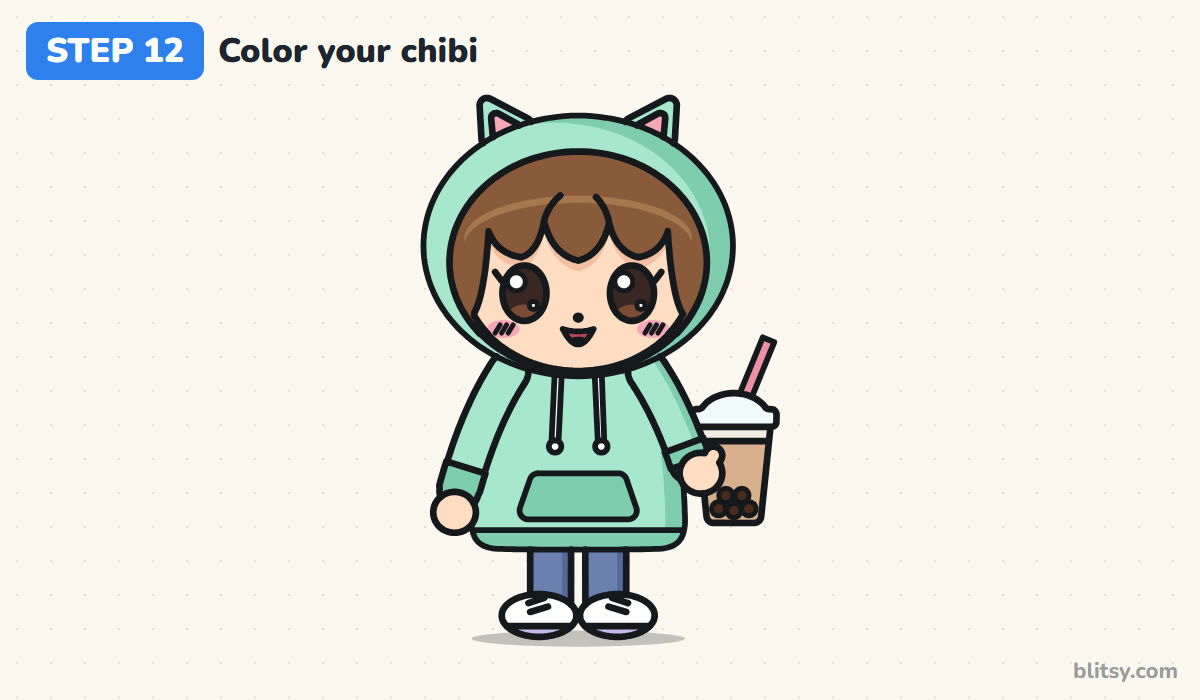
Color the hoodie and ears mint, with a darker mint on the right side, the pocket and the cuffs for soft shading. Use peach for the face and hands, brown for the hair, dark brown for the eyes and pearls, and tan for the tea. Finish with pink cheeks, blue pants and white sneakers with light purple soles.
💡 Tip: Leave the eye shines white paper; coloring around them is easier than adding white later.
Chibi Proportion Slips and How to Fix Them
- The head is too small. If your character looks like a normal kid, measure again: the head alone should be about as tall as everything below it.
- The eyes sit too high. Eyes up near the forehead make the face look older. Move them down to the middle line or a little below.
- Arms and legs are thin sticks. Give every limb a soft width and round ends, and keep the hands as simple mittens.
- Too many tiny details. Chibi art is about simple shapes. Skip fingers, folds and patterns until the proportions feel right.
- Pressing hard on the guides. Dark guide lines won't erase cleanly, so sketch them so faintly you can barely see them.
Change the Hoodie, Keep the Recipe
Once the two-head body feels easy, swap the outfit and props. Try bunny or bear ears on the hood, a striped scarf, or a tiny backpack, and trade the boba cup for a plush, an ice cream or a book. The proportions stay the same, so every version still reads as chibi. When you want to compare chibi with the taller anime look, the anime drawing tutorial and the anime girl drawing tutorial make a good next stop.
Chibi Coloring Page and a Printable Step Guide
Print the coloring page if you'd like to color the chibi without drawing it first, or grab the PDF guide with all 12 steps to keep beside you while you practice.
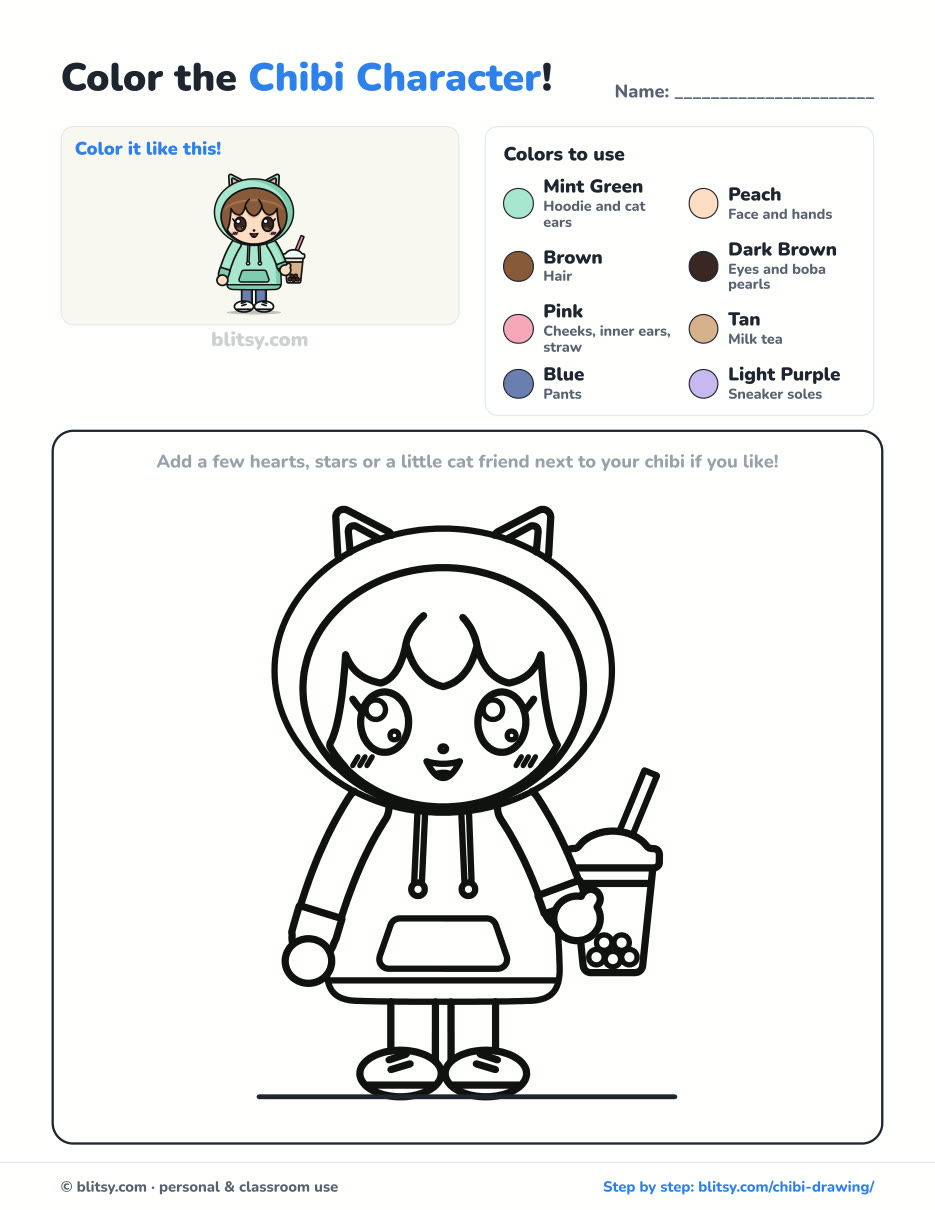
Black outlines with a colored example and the color names at the top. Ready to print and color.
⬇️ Download Coloring PageEvery step picture with its instructions and tips, to keep beside your paper while you draw.
⬇️ Download Drawing Guide📱 On a phone? Tap a download button, then open the file and choose Share → Save to Files or Print. On a computer, the PDF opens or saves straight to your Downloads folder.
Pin the Chibi Steps for Your Next Sketch
More Step-by-Step Drawings to Try Next
Each of these is a full tutorial like this one, with step pictures, tips and a free coloring page.
- Music Note Drawing: Learn how to draw music notes step by step, from the curly treble clef to a ribbon of bright notes.
- Hello Kitty Drawing: Follow this easy Hello Kitty drawing tutorial to draw her in blue overalls with the red bow on her left ear.
- Love Drawing: Draw two teddy bears sharing a hug and a heart balloon with this love drawing step by step guide.
- Joker Drawing: Turn the famous DC villain into a friendly chibi with this how to draw the Joker tutorial, card in hand.
- Valentine's Day Drawing: Make a card, a box of chocolates and a rose with this Valentine's Day drawing tutorial.
- Demon Slayer Drawing: Draw Tanjiro in his checkered haori, chibi size, with this Demon Slayer drawing tutorial.
- Dragon Head Drawing: Build a green dragon head from a plain circle with this dragon head drawing tutorial, horns and frills included.
Chibi Questions I Hear Most Often
What does chibi mean?
Chibi is Japanese slang for someone small or short. In drawing, it names the style with an oversized head, a tiny body and short limbs.
How many heads tall is a chibi?
Most chibis are about 2 to 2.5 heads tall. This one uses 2 heads, which gives the cutest, most compact look.
Is chibi drawing good for kids and beginners?
Yes. The shapes are mostly circles and rounded rectangles, and small wobbles still look cute, so it's a forgiving style to start with.
How do I turn any character into a chibi?
Keep their hair, colors and one key item, then redraw them on the two-head frame with big low eyes and stubby limbs.
Grab a pencil, stack those two circles, and see who your first chibi turns out to be. 🧋
Related posts:
 How to Draw a Rose Step by Step (Spiral Method for Beginners)
 How to Draw Wonder Woman Step by Step (Chibi for Kids)
 How to Draw the Hulk Step by Step (Easy Chibi for Kids)
 How to Draw Iron Man Step by Step (Easy Chibi for Kids)
 How to Draw Kurama Step by Step (Easy Chibi Nine-Tails)
 How to Draw Cat Noir Step by Step (Easy Chibi Hero)
 How to Draw Goku Step by Step (Easy Chibi Version)
 How to Draw Freddy Krueger Step by Step (Cute Chibi Version)
 How to Draw Ariana Grande Step by Step (Cute Chibi Fan Art)
 How to Draw Master Chief Step by Step (Easy Chibi Armor)
 How to Draw the Joker Step by Step (Easy Chibi for Beginners)
 How to Draw Tinkerbell Step by Step (Easy Flying Chibi)

