
Those ears give him away. Draw two huge, notched ears sticking out from a wide blue head and nearly anyone will guess who it is before the face is even there. This lesson shows you how to draw Stitch step by step, from two light ovals to a chubby, colored character with shiny eyes and tiny claws. It's my own simple fan-art version for practice, not official artwork, so don't worry about matching the movie exactly.
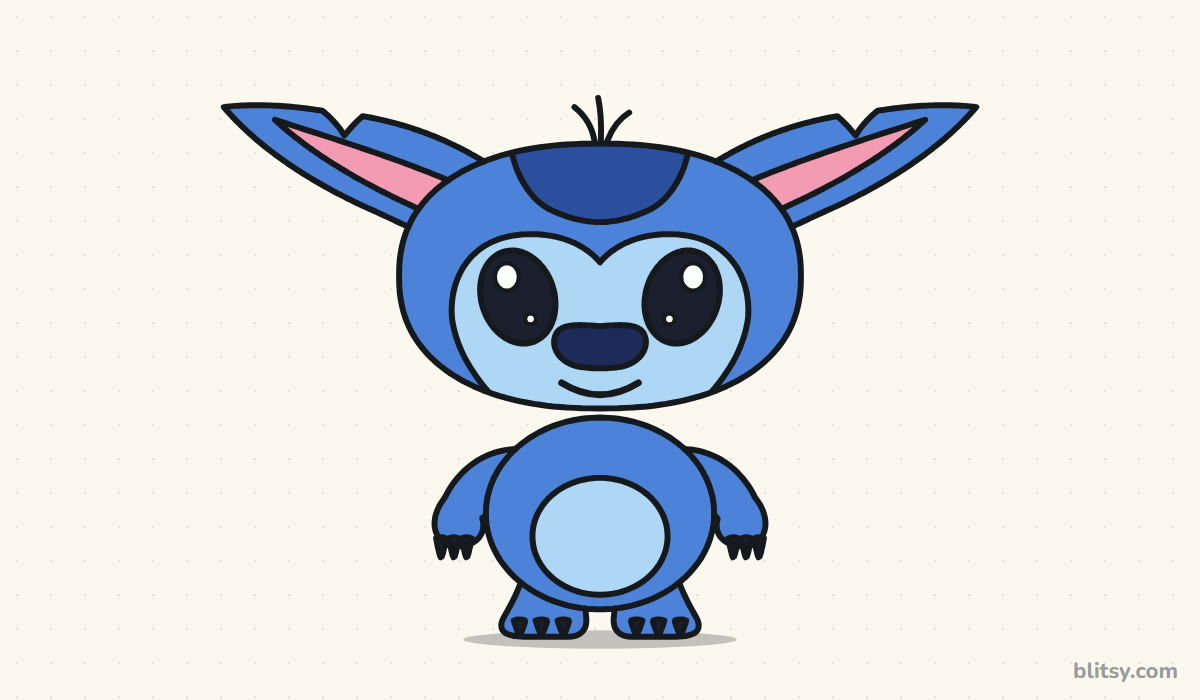
Every picture marks the new part in blue. Gray lines are things you've already drawn, so you can check your page against the picture before moving on.
Quick overview
⏱️ Time: about 35 minutes with coloring
🎯 Level: easy, good for kids from about 6
✏️ Steps: 12
👽 You'll draw: a chibi Stitch standing with a light blue belly
Pencils and Blues for Your Stitch
- A pencil you can press lightly with
- An eraser that doesn't smear
- A black marker or fineliner
- Two blues plus a light blue for coloring
- Pink for the insides of the ears
- Plain paper turned sideways
Turn the paper sideways before you start, because the ears stretch out much wider than the body.
How to Draw Stitch Step by Step
Step 1: Draw a head oval and a body circle
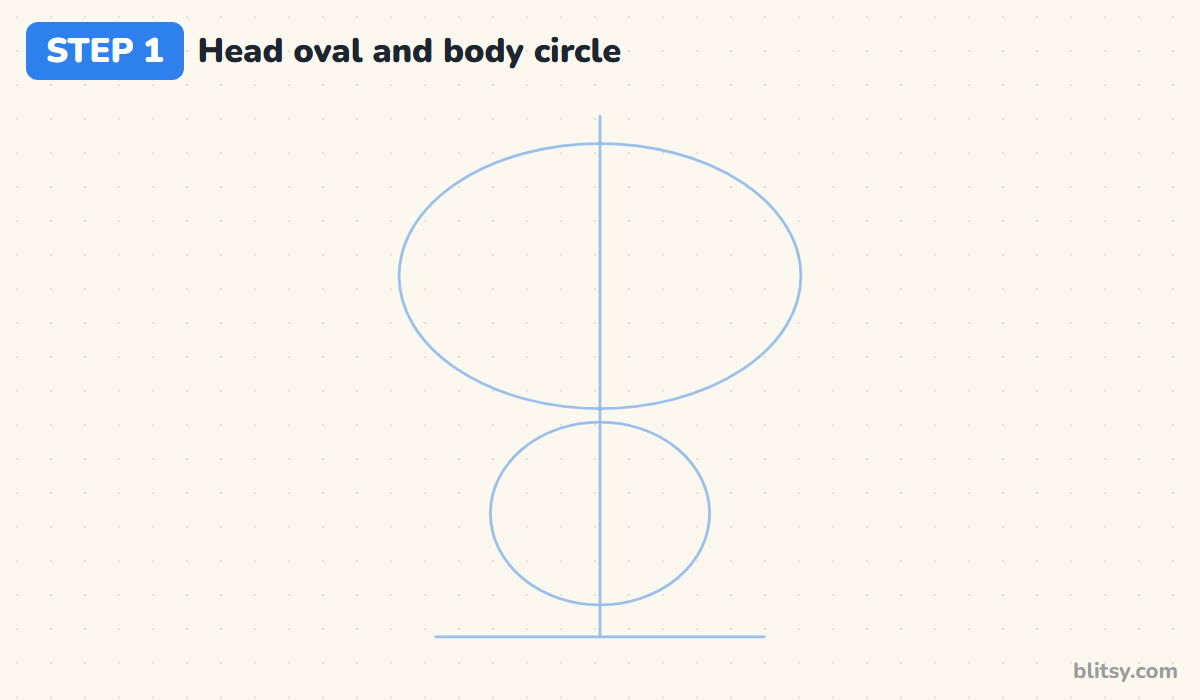
Start low on the page with a short ground line. Draw a straight center line up from it, then a wide oval near the top for the head. Under the head, sketch a smaller circle for the body that sits on the ground line. The head should be about twice as wide as the body, which is what makes the drawing look cute.
💡 Tip: Press so lightly that you can barely see the lines. They all get erased at the end.
Step 2: Add ear, eye and limb lines
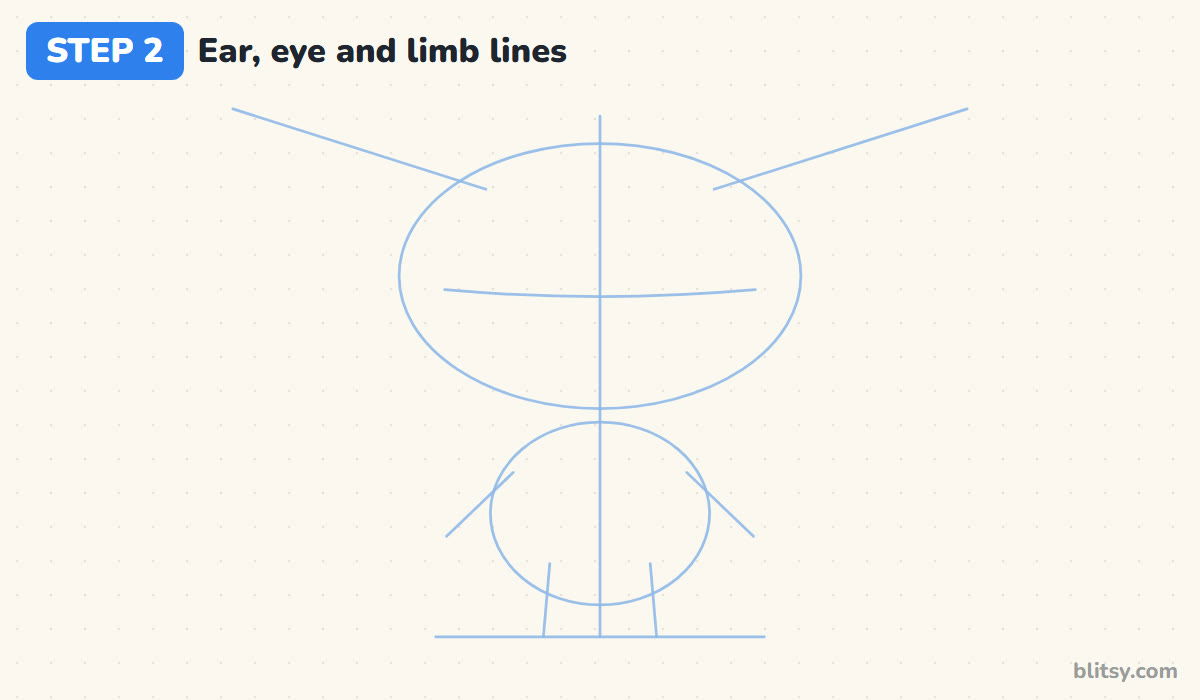
From the top corners of the head, draw two long lines slanting up and outward. They show where the ears will point. Add a soft curve across the middle of the head for the eyes. Then draw four short lines: two angled down from the body for the arms, and two down to the ground for the legs.
💡 Tip: Check that both ear lines tilt at the same angle. Uneven ears are the first thing people notice.
Step 3: Outline a wide head
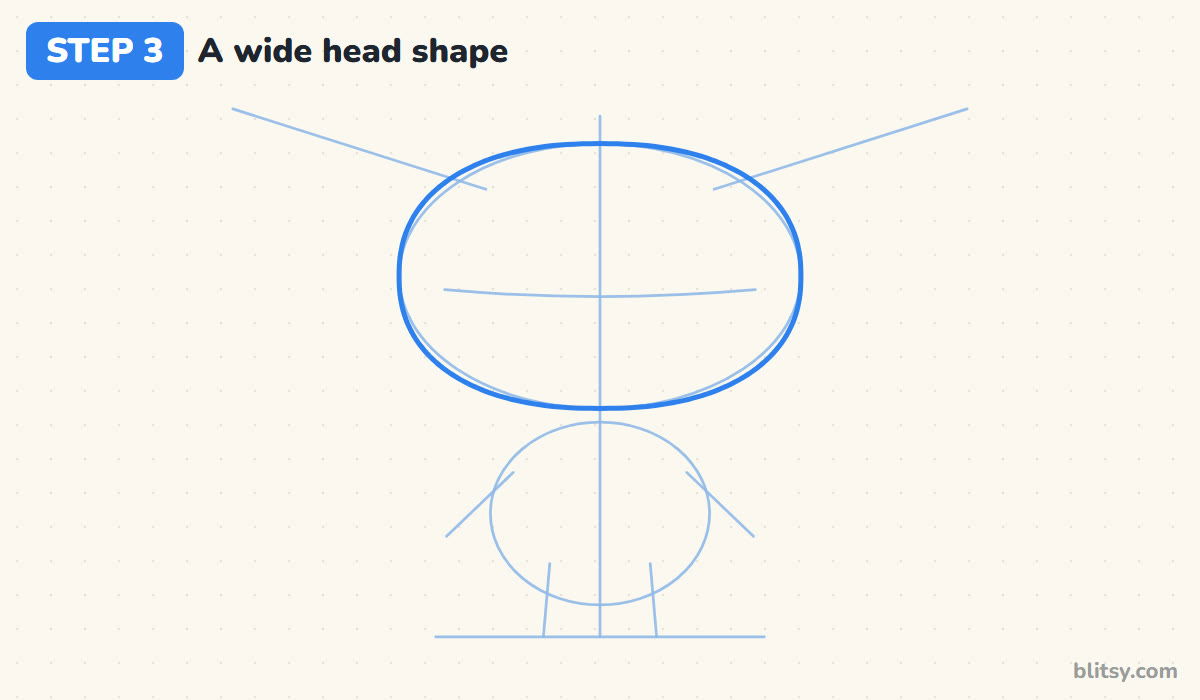
Go over the head oval with a firmer line, but let the sides bulge a little so it feels slightly square. Stitch has full cheeks, and a perfect egg shape makes him look more like a bug. Keep the top and bottom of the head fairly flat compared with the sides.



💡 Tip: Turn your paper as you go around the oval. Curves come out smoother when your hand isn't twisted.
Step 4: Draw the big notched ears
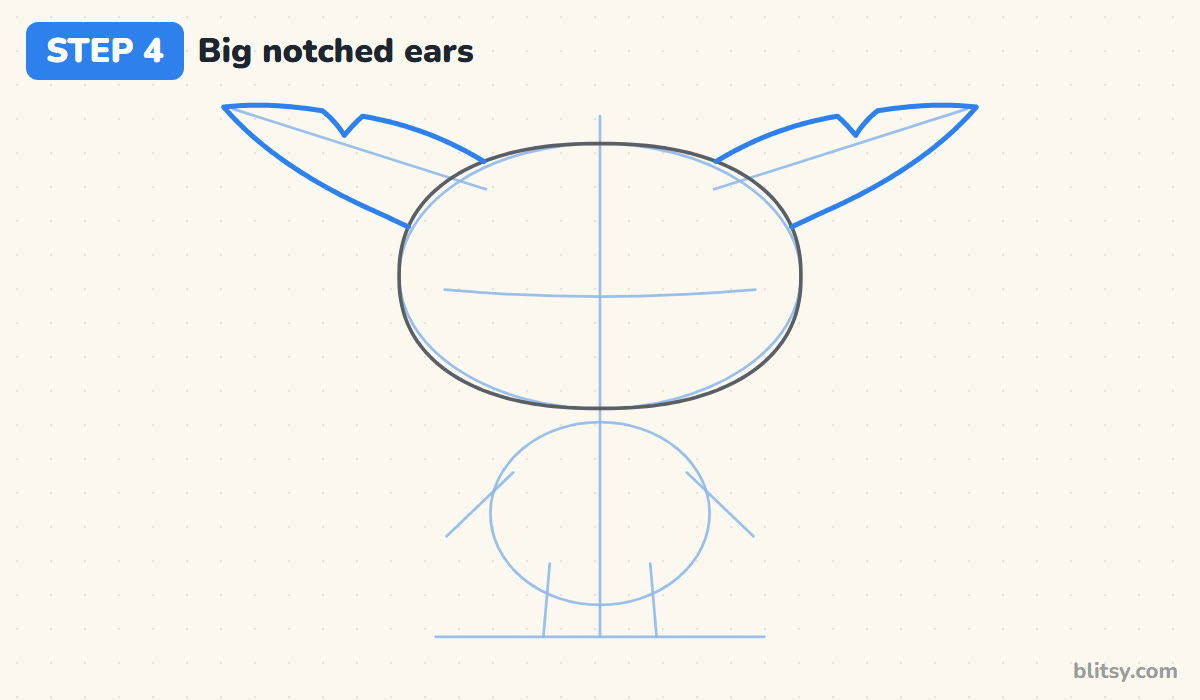
Each ear starts at the top of the head and follows your guide line out to a sharp point. Draw the top edge first, and partway along it cut a small V into the edge, like a bite taken out. Then bring the lower edge back from the point in a gentle curve until it tucks behind the side of the head. I make the ears long and leaf shaped, because short ears turn him into a mouse.
💡 Tip: Stop the ear lines where they touch the head. The head sits in front, so you shouldn't see the ear base.
Step 5: Sketch the inner ears
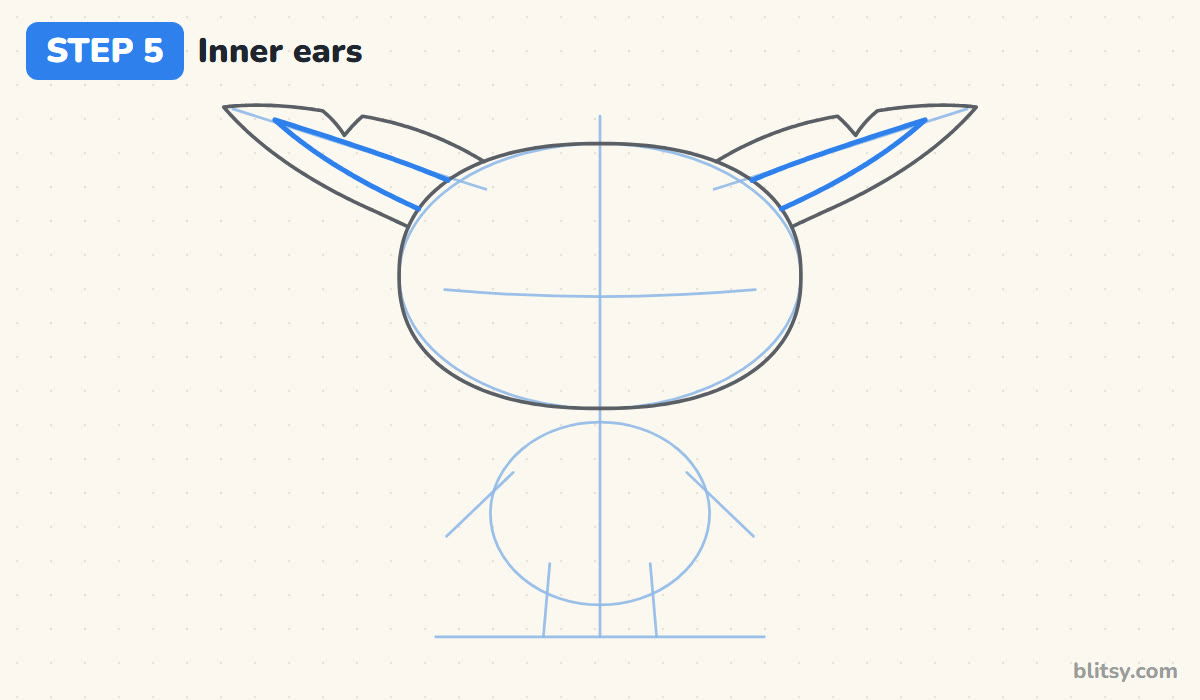
Inside each ear, draw a thinner pointed shape that follows the same direction. Leave a band of space between it and the outer edge on all sides, and keep it below the notch. Like the outer ear, it disappears behind the head instead of closing.
💡 Tip: Stay a finger width inside the ear edge. If the inner shape touches the outline, it won't read as an inner ear.
Step 6: Draw the round body and belly
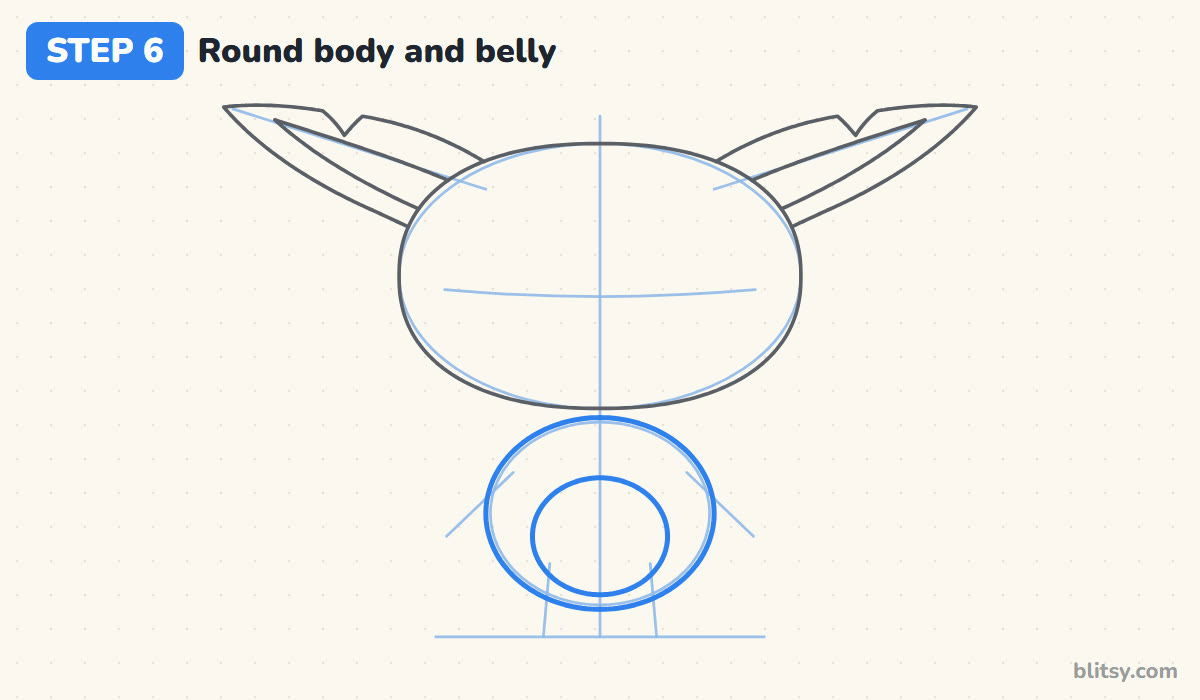
Trace the body circle firmly from one side of the chin to the other. The head overlaps the top of it, so skip that part. Inside the body, draw a smaller oval a bit below the middle for the belly patch. Leave a thick ring of body around the belly, since that strip is where the blue fur goes.
💡 Tip: Set the belly slightly low. Centered too high, it starts to look like a bib.
Step 7: Add short arms and legs
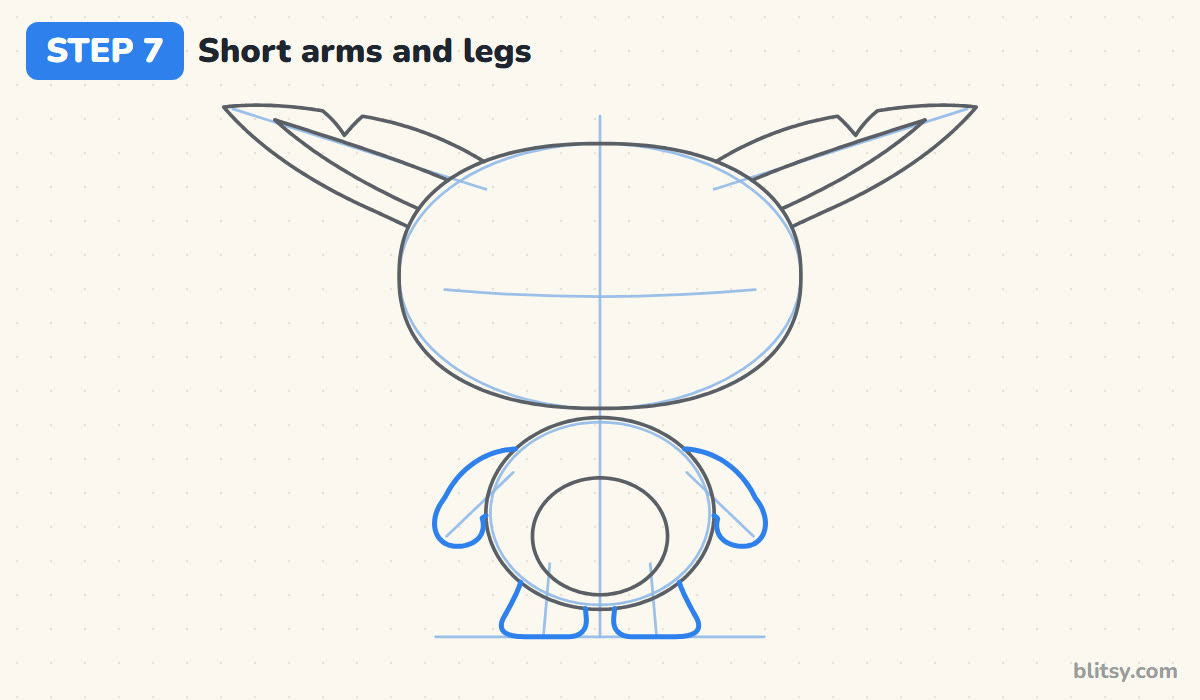
Arms come out from behind the body at the top of each side. Curve them down along the arm guides and finish each one with a rounded hand. For the legs, drop two short, stubby shapes from under the body with flat feet resting on the ground line. Most beginners draw these limbs too long. Short is cuter here.

💡 Tip: Draw the outside of each arm first, then the inside line. It keeps both arms the same thickness.
Step 8: Draw the face patch and head marking
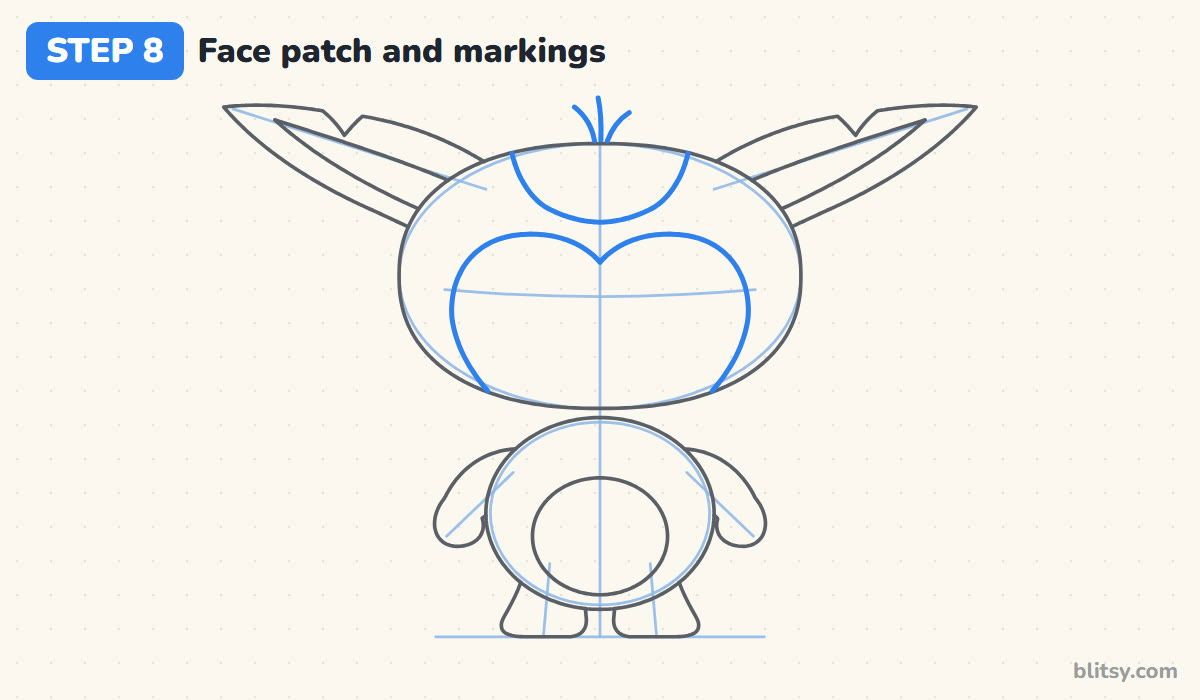
Now the face. Draw a soft heart shape around the eye area: two rounded bumps on top with a little dip in the center, then curves that run down the cheeks to the bottom of the head. At the top of the head, add a rounded marking shaped like a drop, hanging down toward the face. Finish with three short hairs sticking up from the very top.
💡 Tip: Keep a strip of head between the marking and the face patch. If they touch, the forehead disappears.
Step 9: Add big eyes with shines
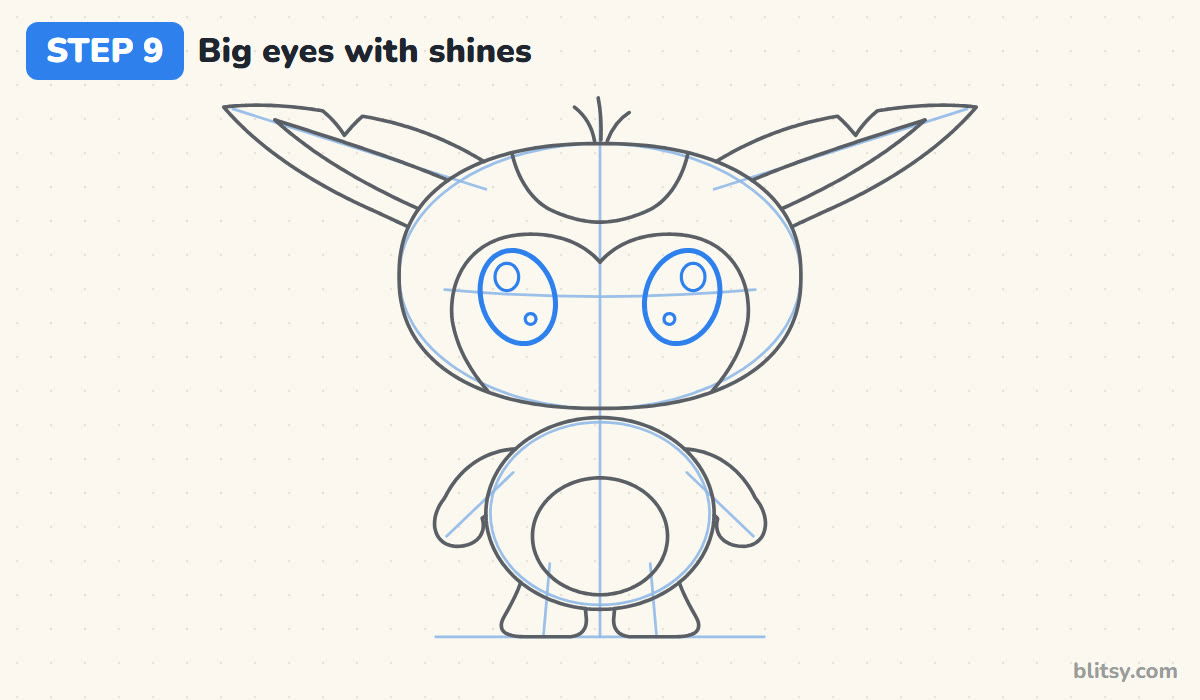
Draw two large ovals on the eye line, one in each bump of the face patch. Tilt each oval slightly so the tops lean outward, which gives Stitch that cheeky look. Inside each eye, add a big shine circle near the top and a tiny dot lower down. Make the eyes bigger than seems right, since small eyes look sleepy on this character.
💡 Tip: Put both shines on the same side of each eye, so the light seems to come from one place.
Step 10: Draw the nose, smile and claws
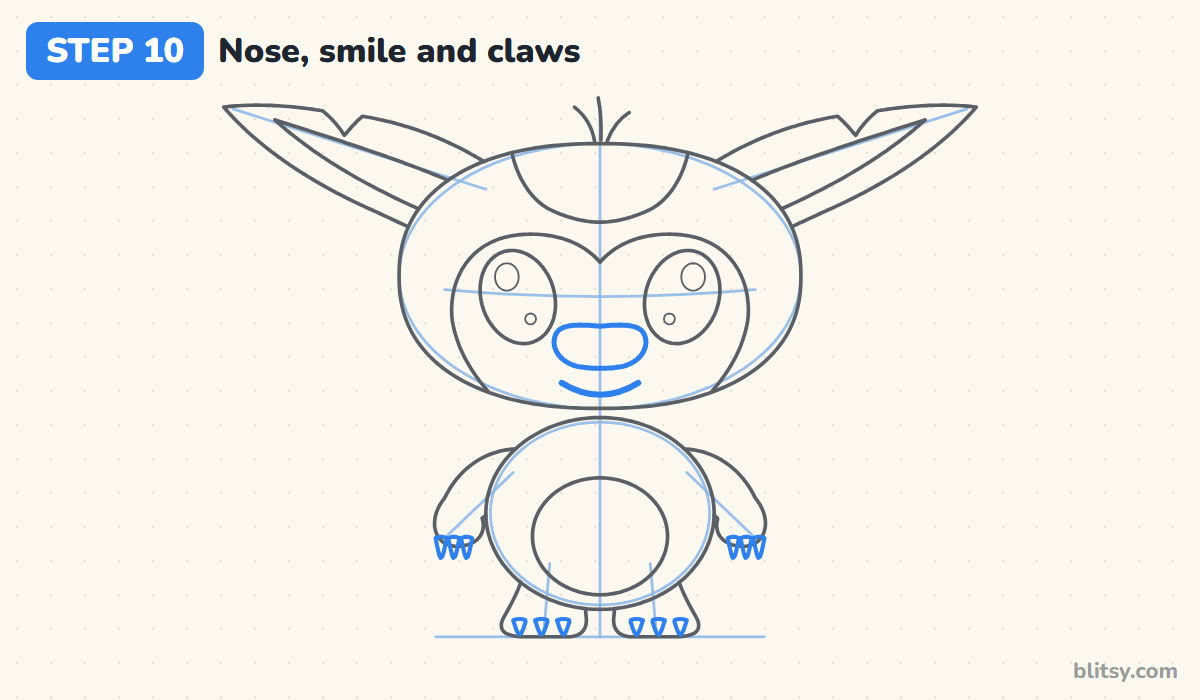
Between the eyes and a little lower, draw a wide, flat nose with rounded corners. It's much wider than tall. Under it, a gentle curve makes a small smile. Then add three tiny pointed claws under each hand and three inside the front of each foot.
💡 Tip: Small kids can skip the claws completely. He still looks like Stitch without them.
Step 11: Ink the lines and erase the guides
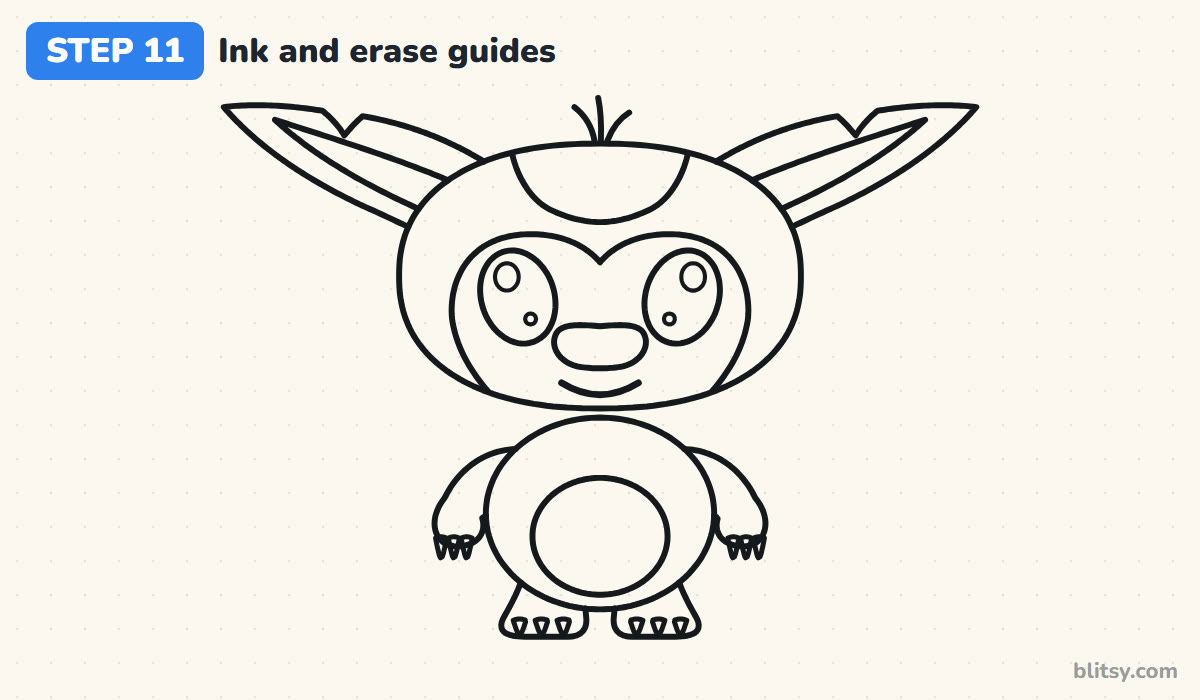
Trace all the final lines with your marker. I start with the eyes and nose while my hand is steady, then work outward. Skip the guide ovals and the straight lines. Once the ink has dried for a minute, erase all the pencil marks underneath.
💡 Tip: Give each ear line one long, confident stroke. Little scratchy strokes look hairy once they're inked.
Step 12: Color your Stitch
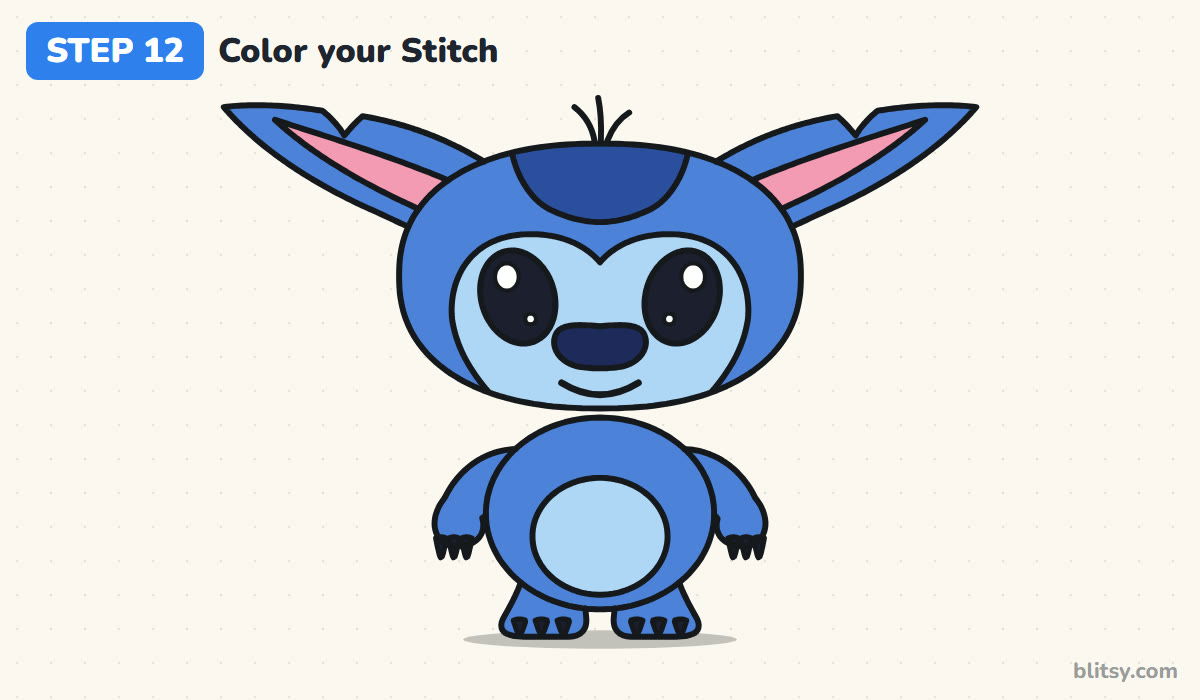
Use a medium blue for the head, ears, arms, legs and body. Color the drop on top of the head dark blue, and the face patch and belly light blue. The insides of the ears go pink. Make the nose navy, the eyes and claws black, and keep the shine circles white. A gray smudge under the feet grounds him.
💡 Tip: Color the light blue areas before the darker blue, so dark color doesn't drag into the pale parts.
Where Stitch Sketches Go Sideways
- Ears that are too small. Tiny ears lose the character right away. Let each ear stretch out nearly as far as the head is wide.
- Forgetting the ear notch. Without the little V cut, the ears look like a rabbit's. One small notch per ear is enough.
- Eyes placed too close together. Squeezed eyes look worried. Keep the nose space between them.
- A nose that is too small. A dainty nose makes him look like a teddy. Draw it wide and flat.
- A body as big as the head. The chibi look needs a small body. If the body grows, shrink it before you ink.
New Moods and Props for Stitch
After the first try, change his mood. Tilt the eyebrows down and open the mouth wide for a mischievous face, or let one ear flop down for a sleepy look. You could give him a flower lei, a surfboard or an ice cream cone, and a pink version turns him into a friend of his. For other characters from the same studio, the easy Disney drawing tutorial is a good next stop, and a snowman friend is waiting in the how to draw Olaf lesson.
Free Stitch Coloring Page and Step Guide PDF
The Stitch coloring page has a colored example at the top, a small key that tells you which color goes on which part, and a large outline to fill in. The step-by-step PDF guide holds all 12 steps with their pictures and tips. Both print fine on Letter or A4 paper.
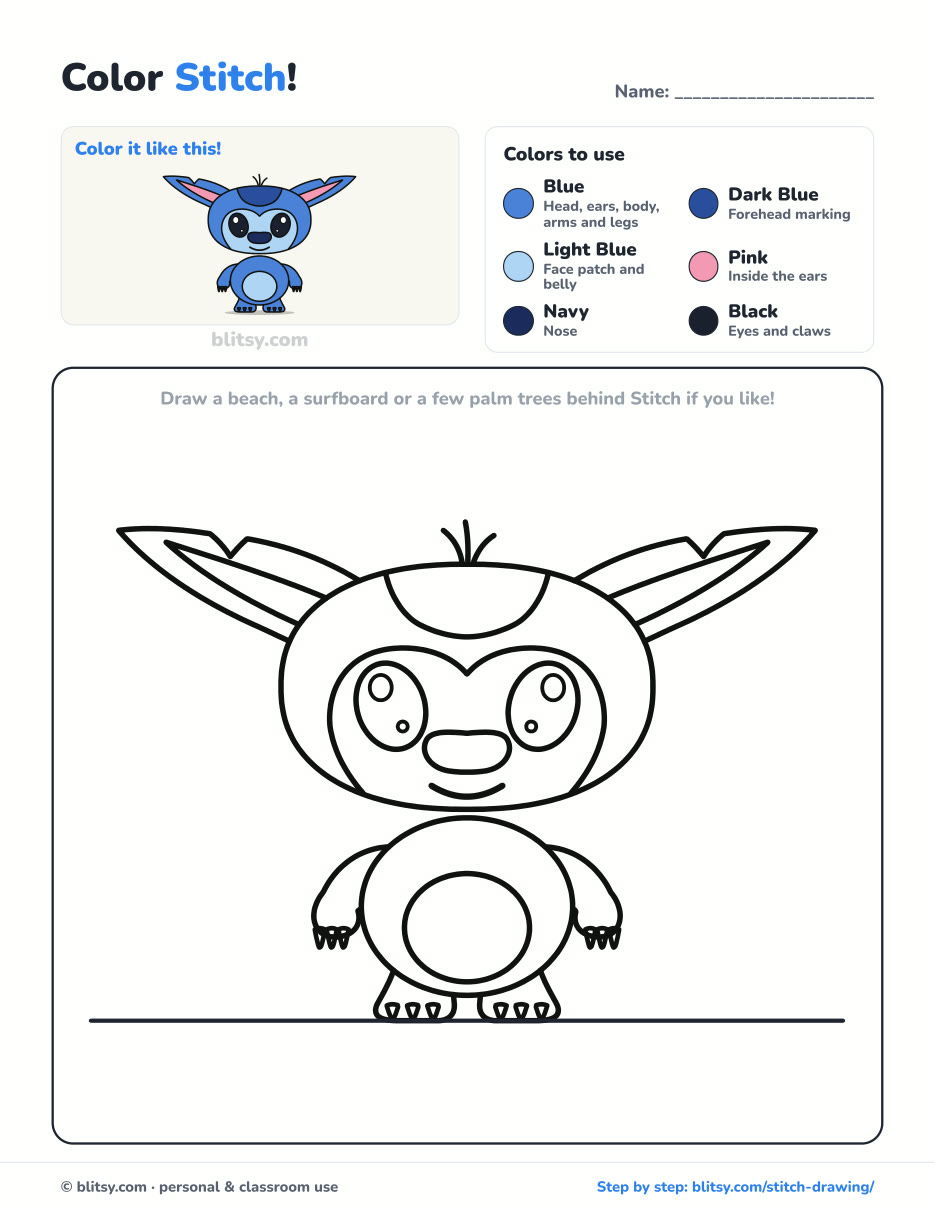
Black outlines with a colored example and the color names at the top. Ready to print and color.
⬇️ Download Coloring PageEvery step picture with its instructions and tips, to keep beside your paper while you draw.
⬇️ Download Drawing Guide📱 On a phone? Tap a download button, then open the file and choose Share → Save to Files or Print. On a computer, the PDF opens or saves straight to your Downloads folder.
Twelve Stitch Steps on a Single Pin
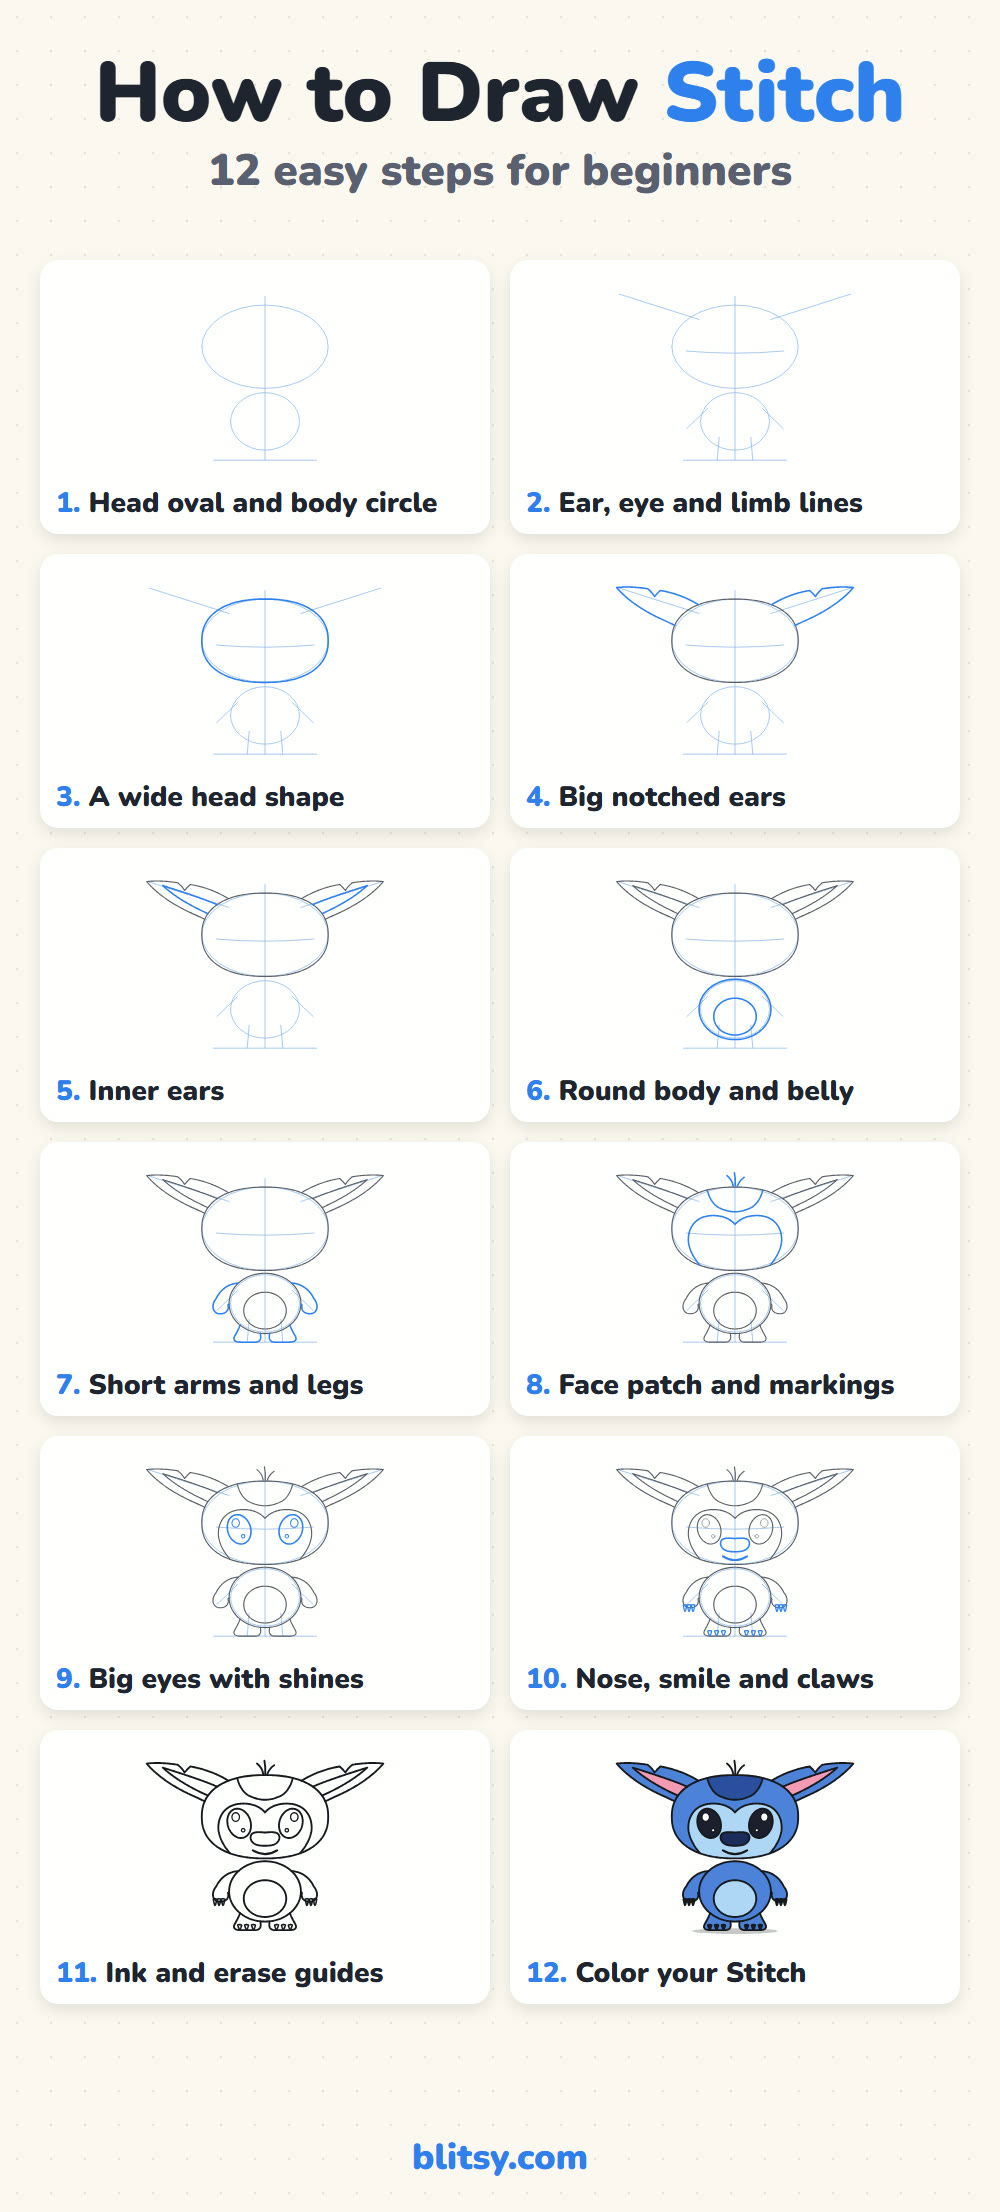
Stitch Fans Can Try These Characters Next
Each one is a step-by-step character tutorial, cartoon and anime friends drawn the same easy way as Stitch.
- Mickey Mouse Drawing: Draw a cute Mickey with ears up and one glove in the air in this Mickey Mouse drawing tutorial.
- Sharingan Drawing: The how to draw Sharingan step by step lesson draws a red iris with three tomoe inside a manga-style panel.
- Disney Drawing: Nemo and his bubbles are the subject of this easy Disney character drawing tutorial.
- Pikachu Drawing: Learn how to draw Pikachu with red cheeks and the tail flashing to the side, in 11 steps.
- Kurama Drawing: The Kurama drawing step by step guide shows a grinning chibi fox in front of nine orange tails.
- Anime Drawing: Build an anime boy face with spiky blue hair and green eyes on one circle with this anime drawing tutorial.
- Springtrap Drawing: A chibi Springtrap with a floppy ear comes together in the Springtrap drawing tutorial.
- Iron Man Drawing: Draw a small armored hero with a glowing reactor in this how to draw Iron Man step by step lesson.
- Juice WRLD Drawing: The Juice WRLD drawing tutorial is a quiet tribute portrait in soft colors.
- Bart Simpson Drawing: Spikes up and smirk ready, Bart is the goal of the Bart Simpson drawing step by step guide.
Stitch Drawing Questions From Young Artists
What is the easiest way to draw Stitch?
Start with two shapes: a wide oval head and a small circle for the body. Add the big ears from the top of the head, then the face. Building from shapes is much easier than drawing the outline in one go.
How do you draw a cute Stitch for kids?
Give him a large head, huge shiny eyes and a short body. Kids can leave out the claws and the hairs, and a thick marker makes the coloring easier.
How long does it take to draw Stitch?
Around half an hour, plus a few minutes for coloring. The ears and the face take the most care, and the body goes quickly.
What colors do I need to color Stitch?
Medium blue, dark blue and light blue cover most of him. Add pink for the inner ears, navy for the nose and black for the eyes and claws.
Sharpen that pencil, stretch those ears out wide and see what kind of mischief your Stitch gets up to. 💙✏️
Related posts:
 How to Draw a Car Step by Step (Easy Drawing for Beginners)
 How to Draw a Whale Step by Step (Easy for Beginners)
 How to Draw a Rat Step by Step (Easy for Beginners)
 How to Draw an Arctic Fox Step by Step (Easy for Beginners)
 How to Draw a Raccoon Step by Step (Easy for Beginners)
 How to Draw Olaf Step by Step (Easy for Beginners)
 How to Draw a Ladybug Step by Step (Easy for Beginners)
 How to Draw a Dog Step by Step (Easy Side View for Beginners)
 How to Draw a Leopard Step by Step (Easy for Beginners)
 How to Draw a Light Bulb Step by Step (Easy for Beginners)
 How to Draw a Crow Step by Step (Easy for Beginners)
 How to Draw an Eagle Step by Step (Easy for Beginners)

