
Anime faces look tricky because the eyes are huge and the nose almost vanishes, yet the style rests on a few placement rules. Here you'll learn how to draw an anime girl step by step, from one circle and a pointed chin to big shining eyes, layered bangs and a sailor collar with a bow. She's an original character I drew for practice, so change her look however you like.
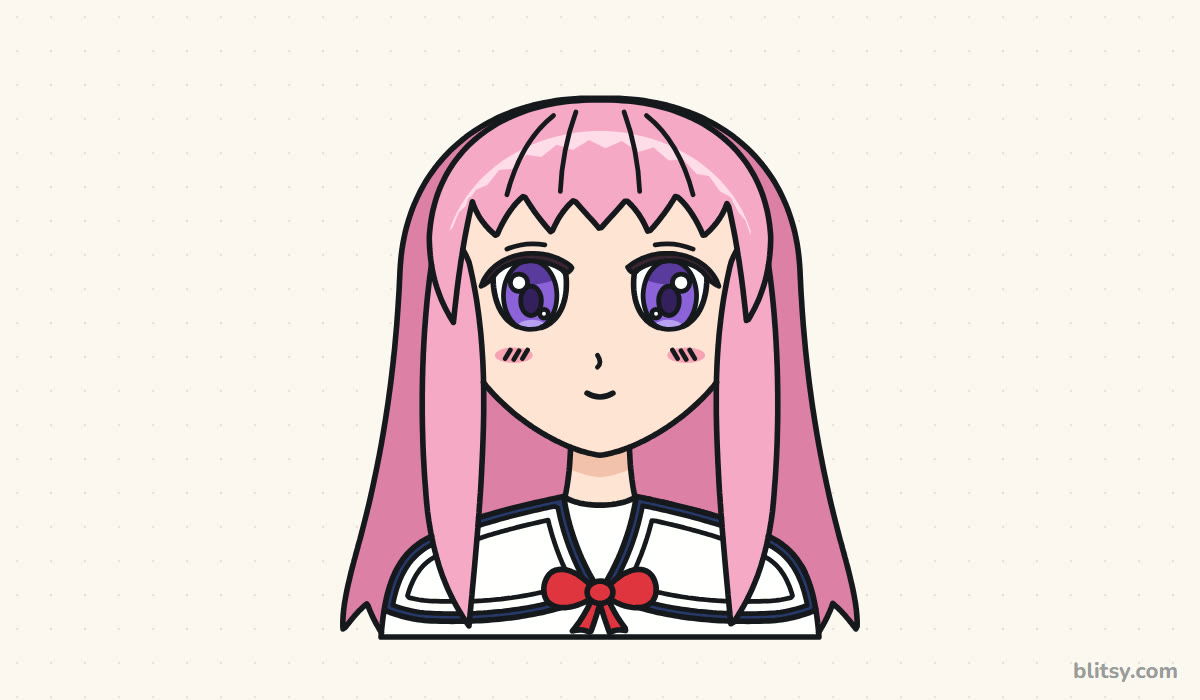
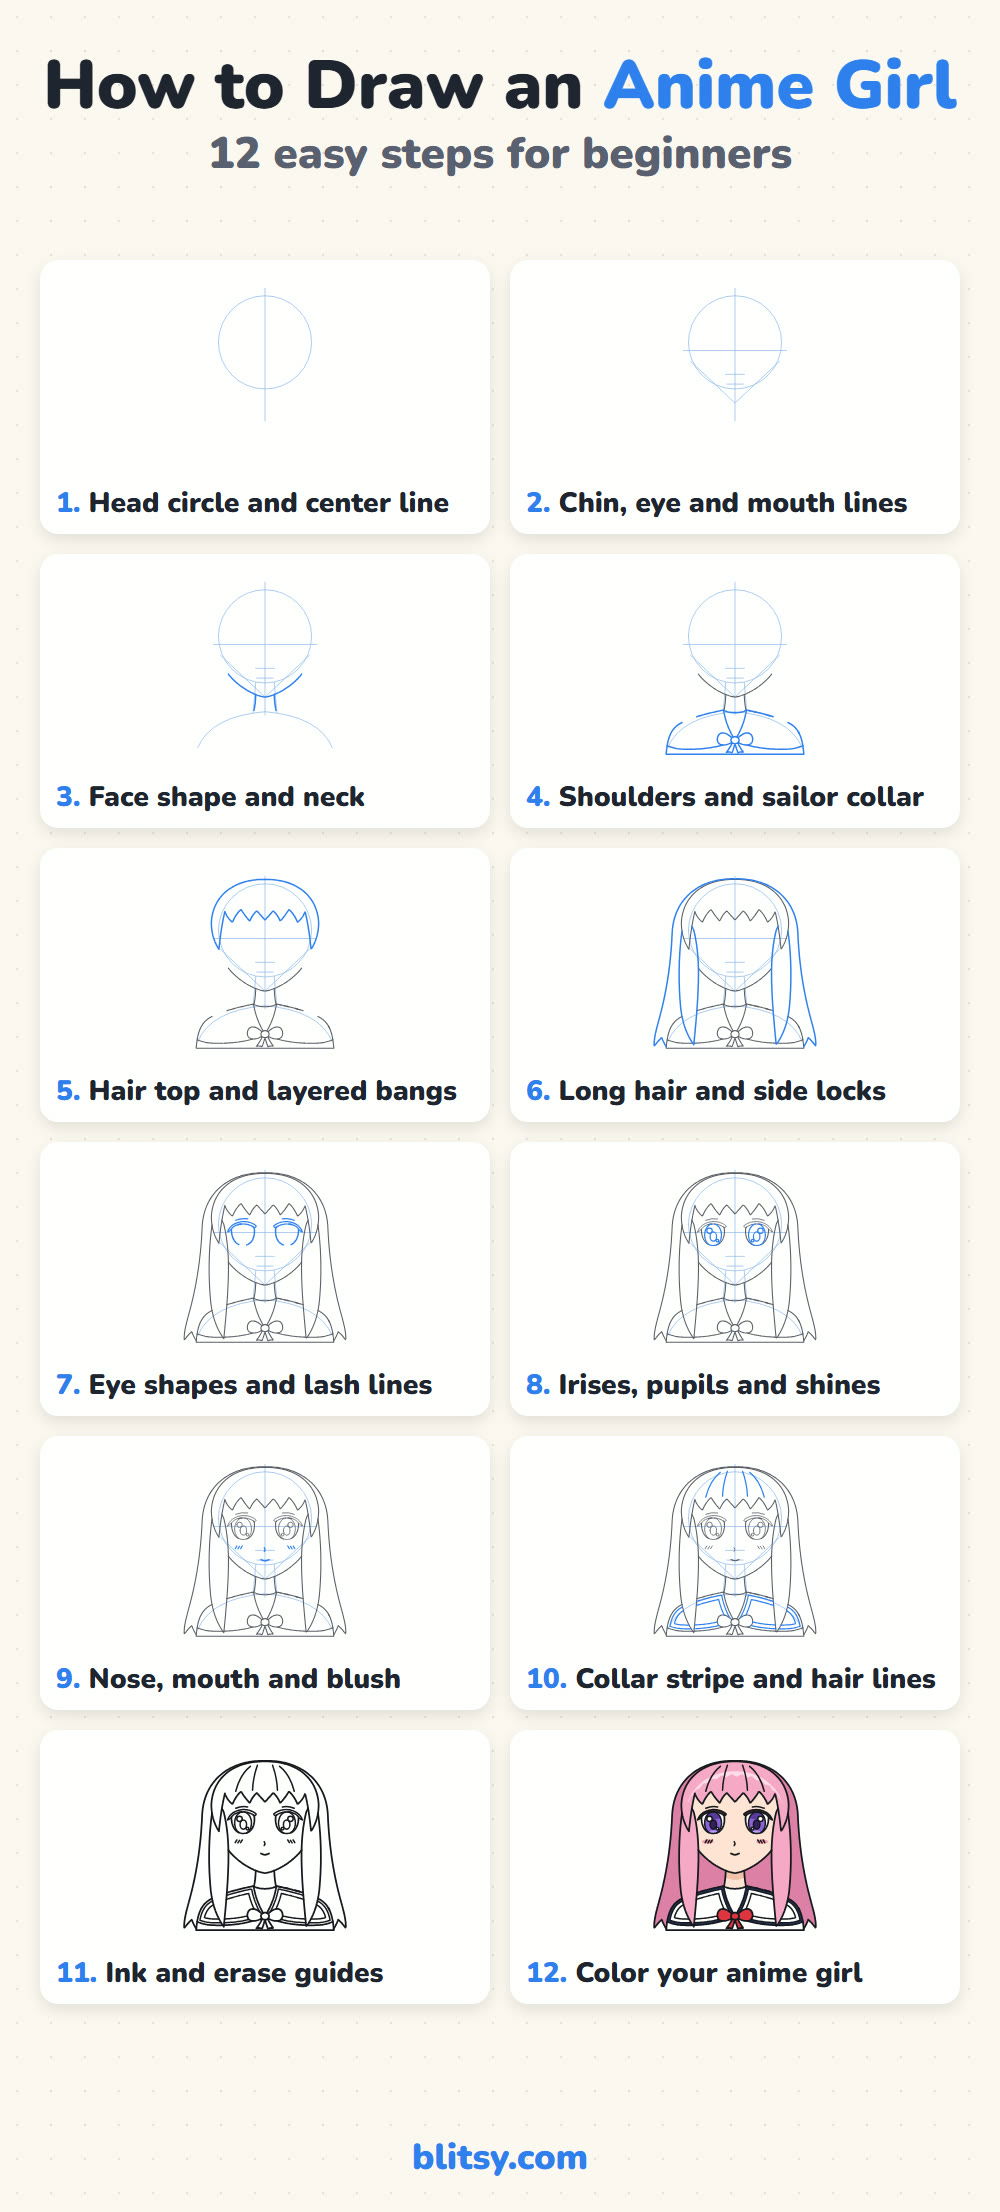
In each step picture, blue marks the lines you add right then, and gray shows earlier work. The pale blue circle and lines are helpers, so draw them softly; they get erased in step 11.
Quick overview
⏱️ Time: around 30 to 40 minutes with coloring
🎯 Level: easy to medium, best for ages 9 and up
✏️ Steps: 12
🌸 You'll draw: a head-and-shoulders anime girl with long pink hair, big purple eyes and a school sailor collar
Supplies for a Clean Anime Portrait
- An HB or 2B pencil that you can press lightly
- A soft or kneaded eraser
- A black fineliner or thin marker for the final lines
- Colored pencils or markers: pinks, peach, purple, navy and red
- A dark brown or black pencil for the lash lines
- Plain white paper, turned upright
A ruler helps with the center line, but a hand-drawn one works fine for this face.
How to Draw an Anime Girl Step by Step
Step 1: Draw a head circle and a center line
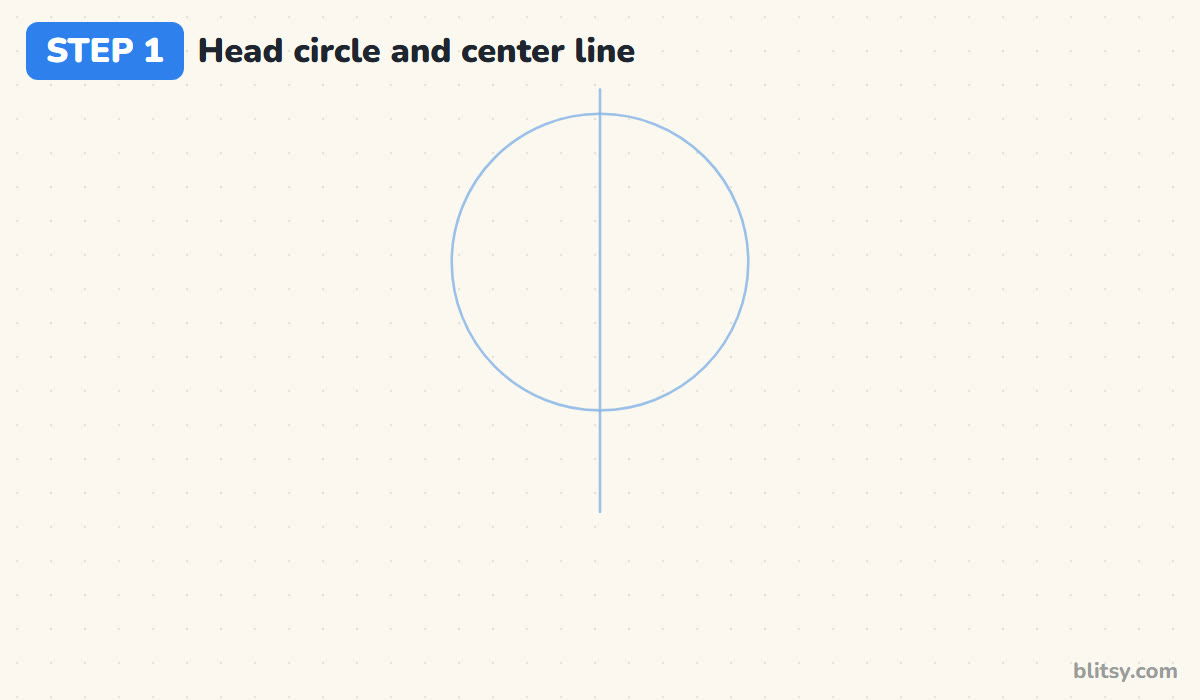
Start near the top of the page with a circle about as wide as your palm. Run a straight line down through its middle and well below it, since the chin and neck hang from it. This line keeps both halves of the face even.
💡 Tip: Keep your pencil pressure light enough that the line almost disappears when you squint.
Step 2: Add the chin point, eye line and mouth marks
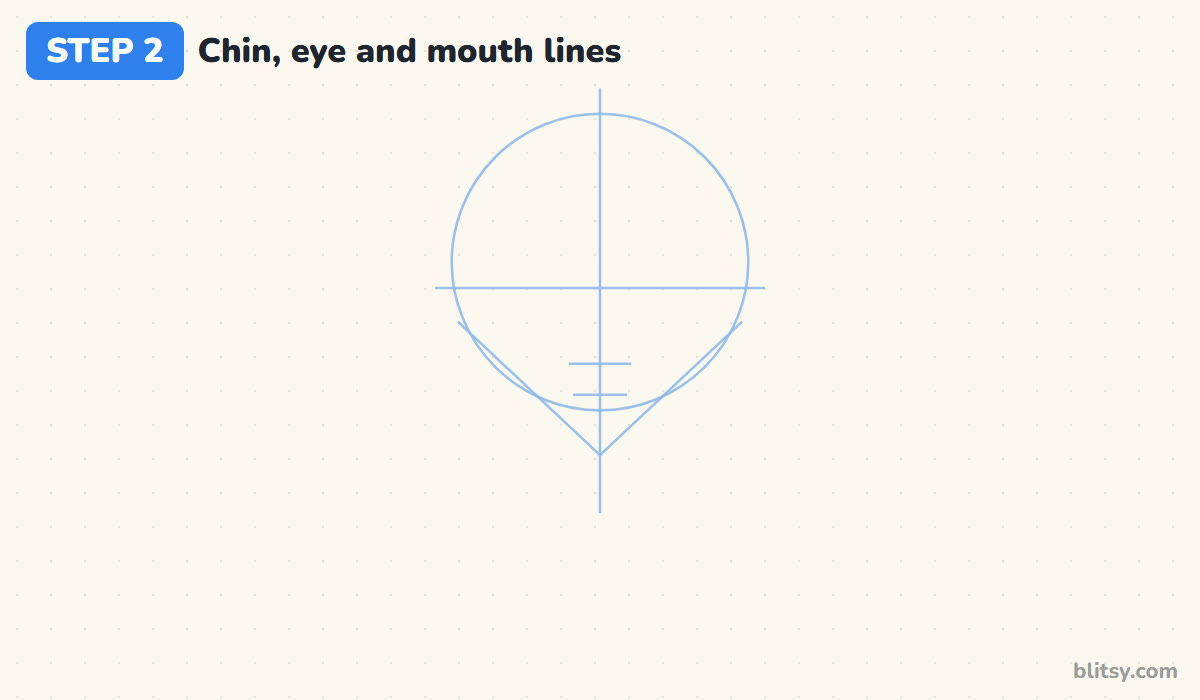
Mark a point on the center line a little below the circle and draw a line to it from each side, so the head ends in a soft V. Halfway between the top of the circle and the chin, draw a level eye line. Add two short marks low on the face: one for the nose and one, very close under it, for the mouth.
💡 Tip: Anime eyes sit on the halfway line, not up near the forehead, so measure before you draw it.
Step 3: Shape the face and the neck
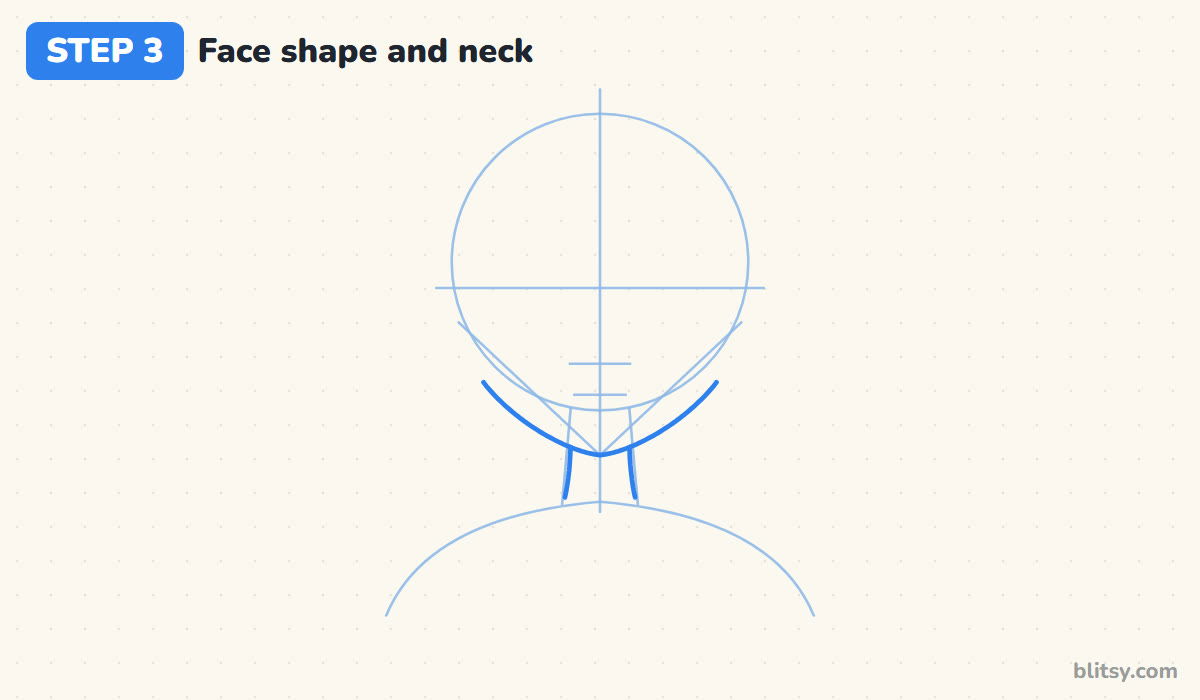
Round off the V into a jaw. The cheeks curve in gently and meet in a chin that's pointed but not sharp. Below it, draw a narrow neck, then a wide, faint curve for the shoulders. I keep the neck slim, about a third of the face width, because a thick neck makes the face look older at once.
💡 Tip: If the jaw looks too square, pull the lower cheek curve a little closer to the center line.
Step 4: Draw the shoulders and the sailor collar
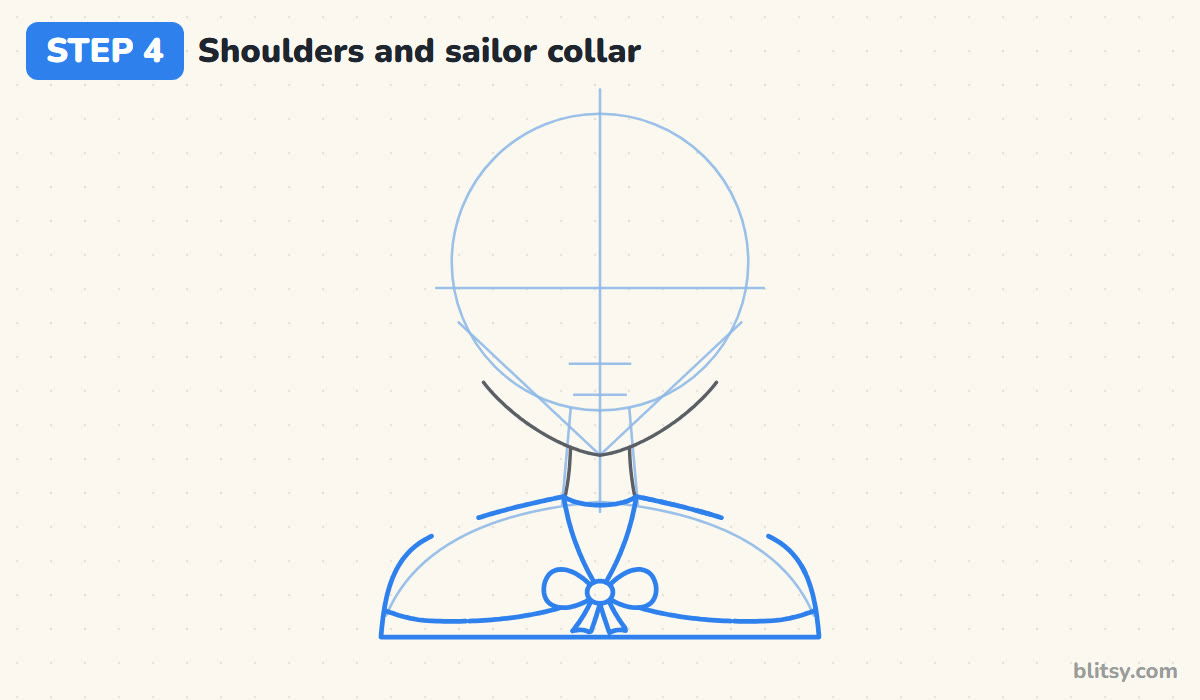
Follow the shoulder curve for the top of her shirt, ending in a flat line at the bottom. For the collar, draw a V from each side of the neck down to the middle of the chest, then the wide flaps over the shoulders. At the point of the V, sketch a bow: a small knot, two loops and two short tails.
💡 Tip: Draw the bow knot first and hang the loops off it, so both sides stay the same size.
Step 5: Outline the top of the hair and the bangs
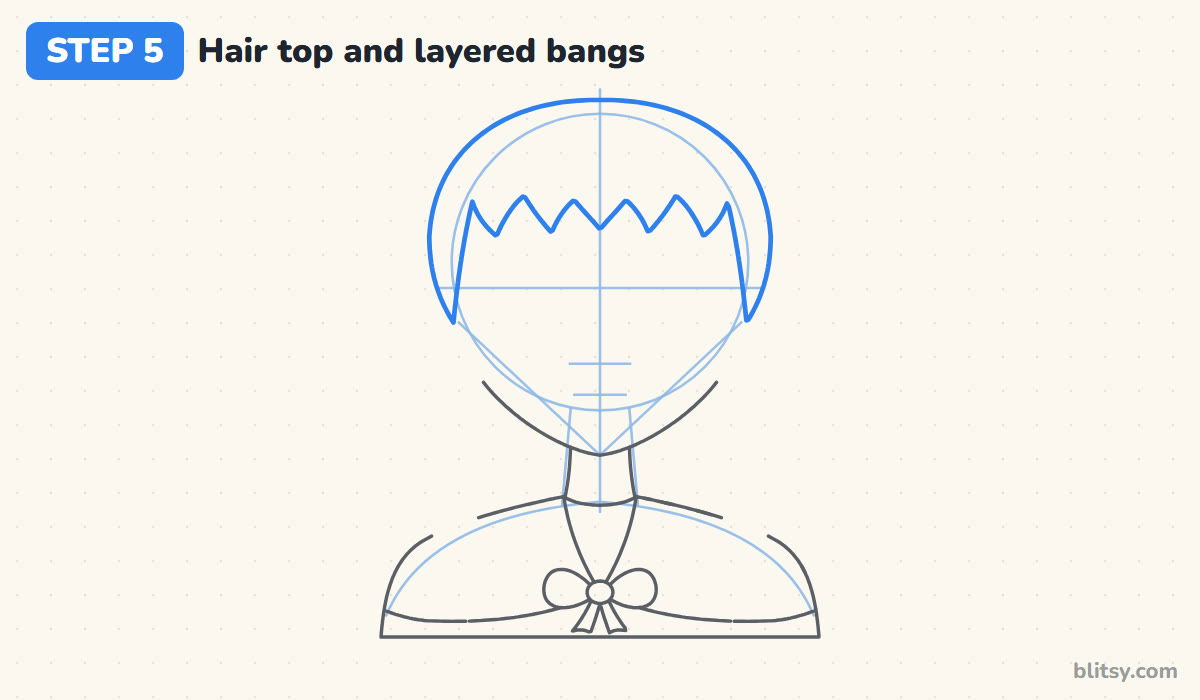
Hair sits above the skull, so start the outline a little higher and wider than the head circle and bring it down past the temples. Across the forehead, draw the bangs as a row of pointed locks. Let the tips stop just above the eye line, with one longer lock near each cheek. Uneven points look more natural than a perfect saw blade.
💡 Tip: Curve each lock slightly toward its tip instead of drawing straight zigzag lines.
Step 6: Add the long hair and the side locks
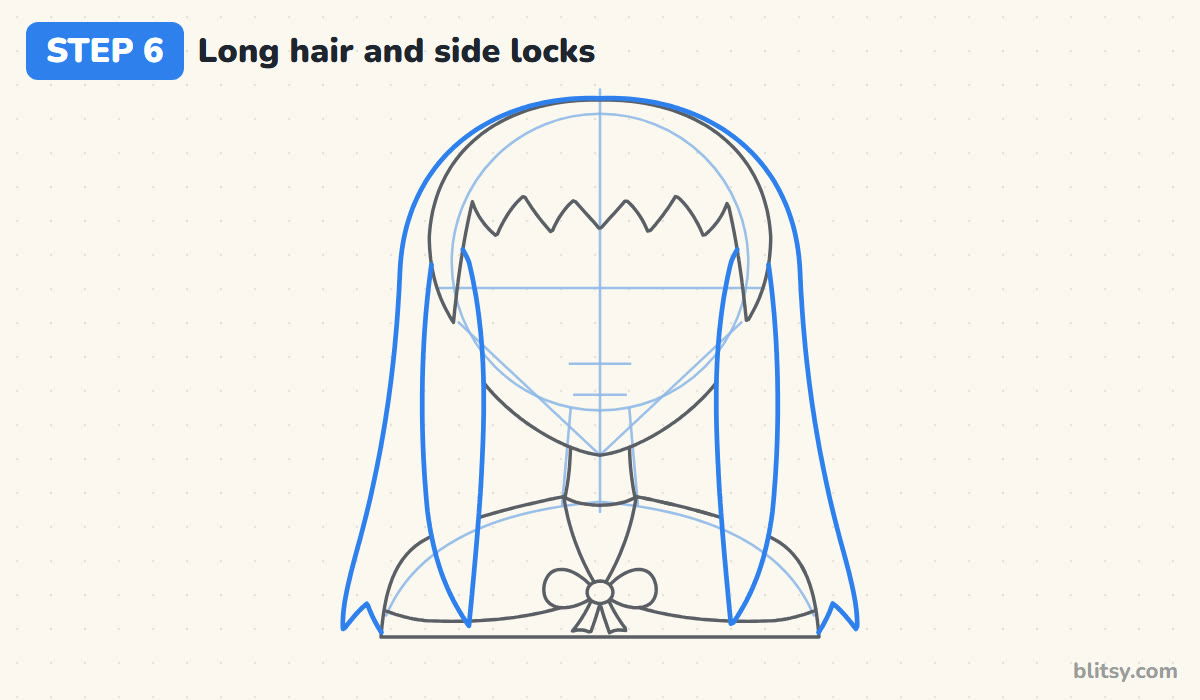
From the sides of the hair top, draw two long curves that fall behind the shoulders and end in pointed tips. Then add a narrow lock in front of each side of the face, running over the collar to a point. Most beginners stop the hair at the chin, but the extra length is what makes the portrait feel finished.
💡 Tip: Draw each long lock in one smooth pull of the arm, not with lots of short scratchy strokes.
Step 7: Shape the eyes and the lash lines
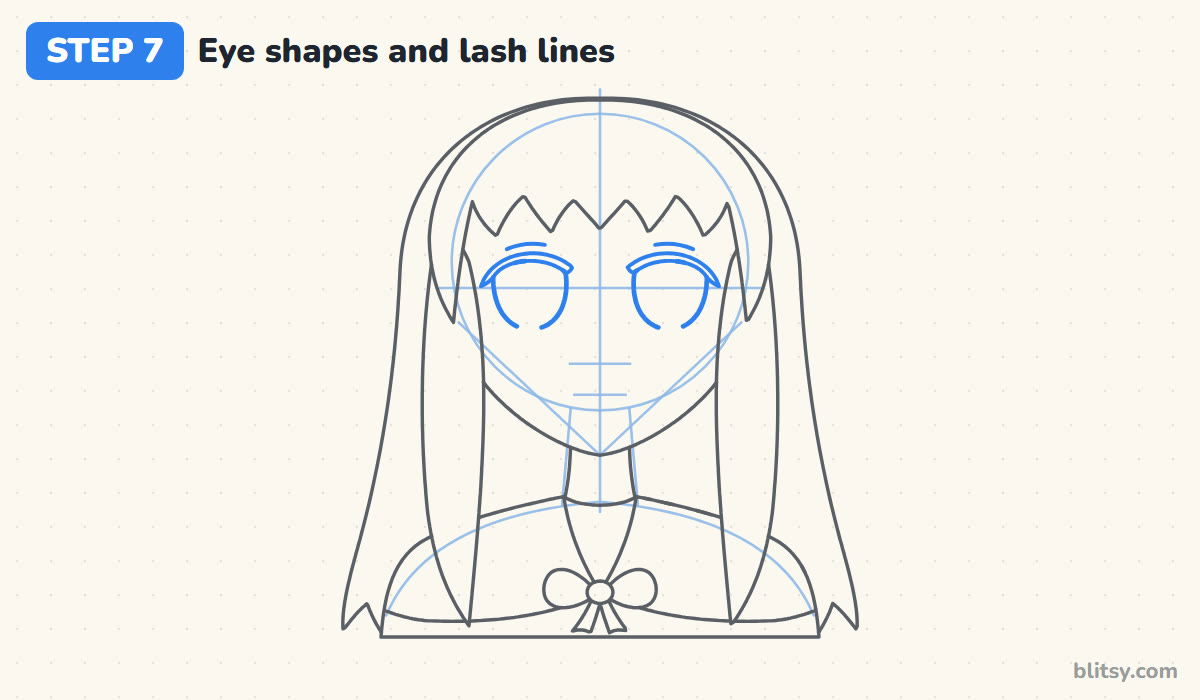
Each eye is tall and rounded and sits right on the eye line. Leave a gap between them about one eye wide; that big spacing is a key part of the anime look. Over each eye, draw a thick curved lash line that flicks out at the outer corner, then a thin, short brow just under the bangs.




💡 Tip: I draw both lash lines before filling in either eye, which makes uneven heights easy to spot.
Step 8: Draw big irises and two shines
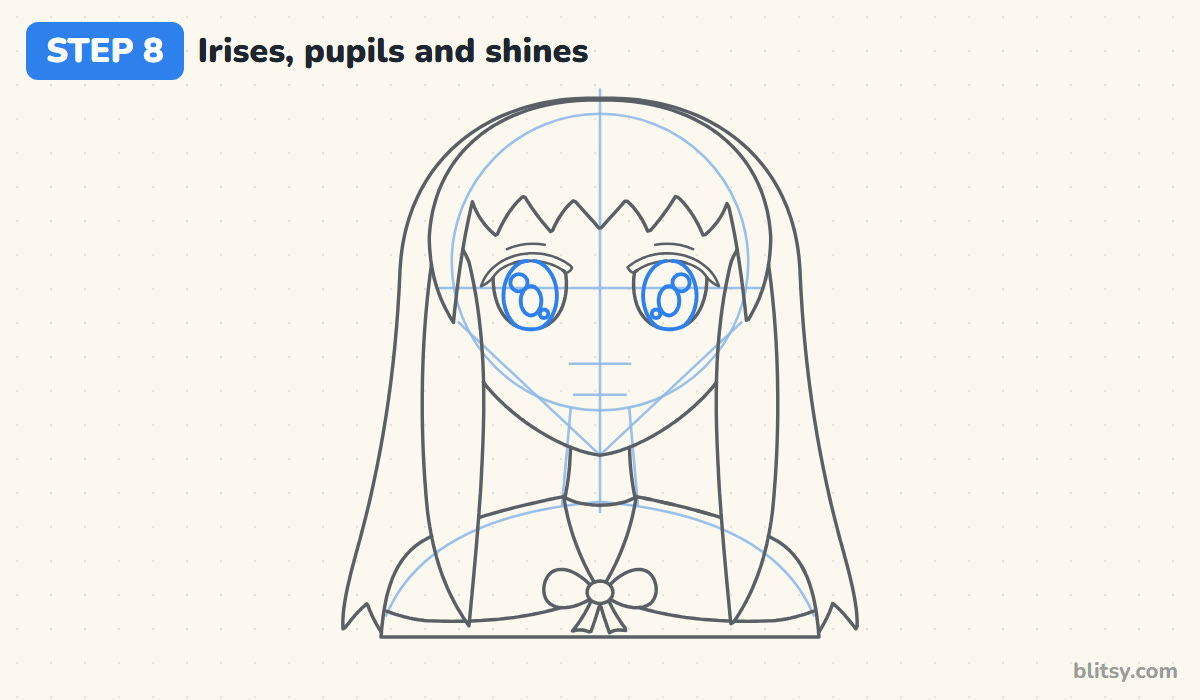
Inside each eye, draw a tall oval iris that fills most of the space and tucks up under the lash line, with a smaller oval pupil in its middle. Then place two shines on the same side in both eyes: a bigger circle at the upper left and a tiny one lower right. Shines facing different ways make the eyes look crossed.
💡 Tip: Leave the shine circles empty from now on, since that bare paper becomes the sparkle.
Step 9: Add a tiny nose, a small mouth and blush
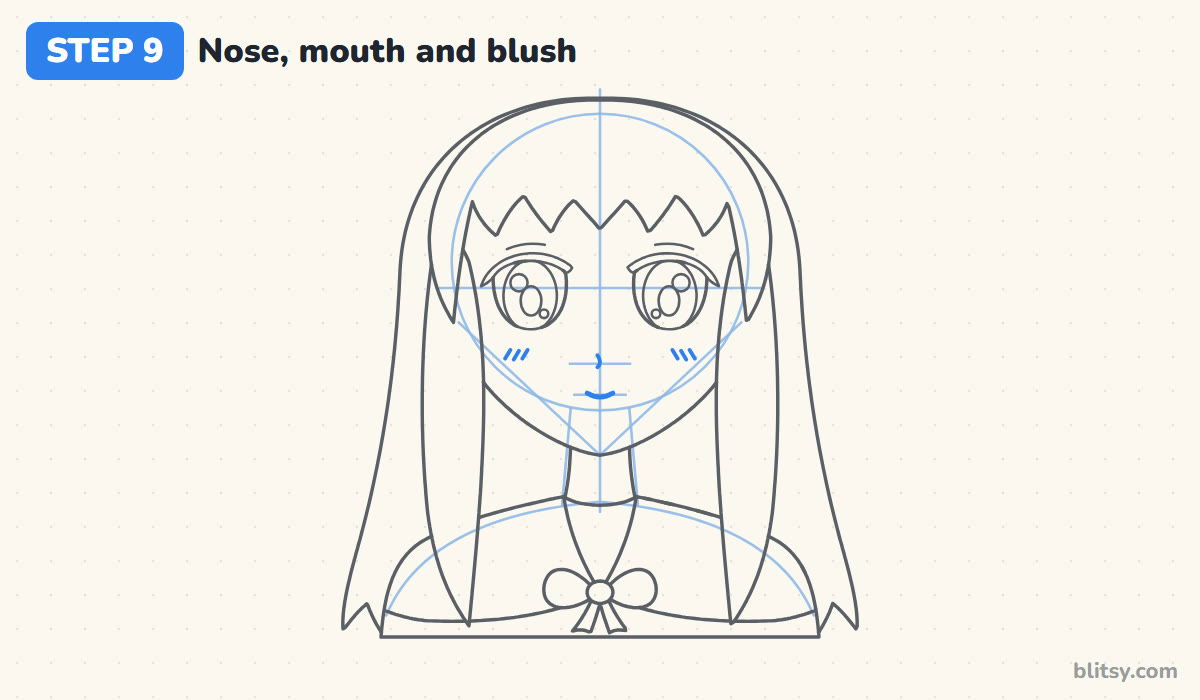
On the nose mark, draw one small hooked line. That's the whole nose. Just below it, add a short smile, and under each eye three little slanted strokes for blush. A common trap is putting the mouth far down near the chin. In anime the nose and mouth sit close together, with most of the space below the mouth.
💡 Tip: Make the mouth narrower than the space between the pupils.
Step 10: Add the collar stripe and a few hair lines
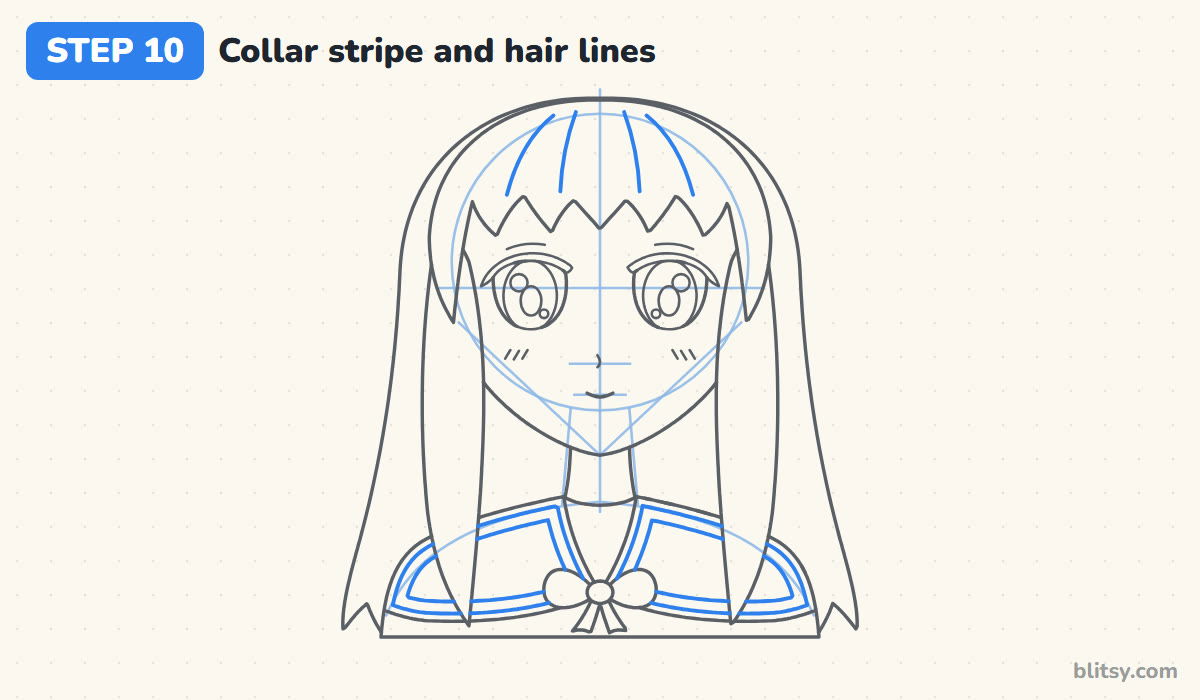
Draw a second line just inside the edge of each collar flap, following its shape all the way around. That band is the white trim every sailor collar has. On the hair top, add three or four long strands curving from the crown toward the bangs. More than that makes shiny hair look messy.
💡 Tip: Space the trim line evenly from the edge, roughly the width of your pencil tip twice over.
Step 11: Ink the drawing and erase the guides
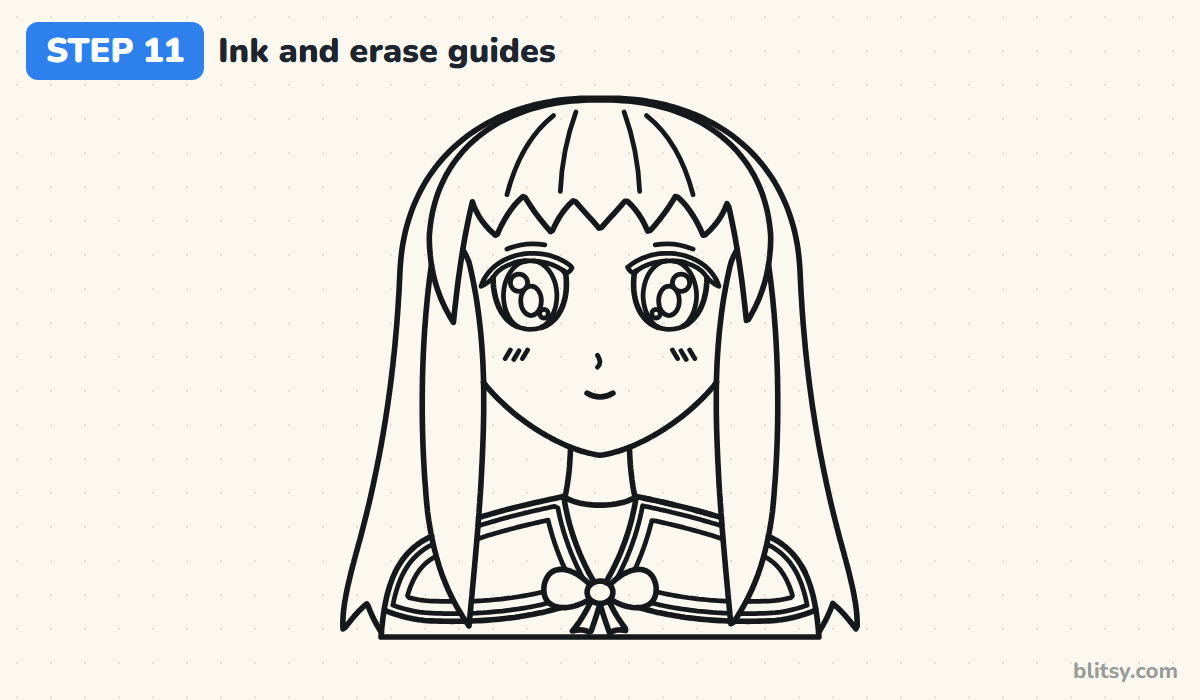
Trace the keeper lines with your fineliner. I ink the face and eyes first, while my hand is fresh, then the hair and the collar. Skip the circle, the chin lines and the eye line. Let the ink dry for a minute, then erase every pencil mark.

💡 Tip: Press a little harder on the lash lines than anywhere else so they read as the boldest marks.
Step 12: Color your anime girl
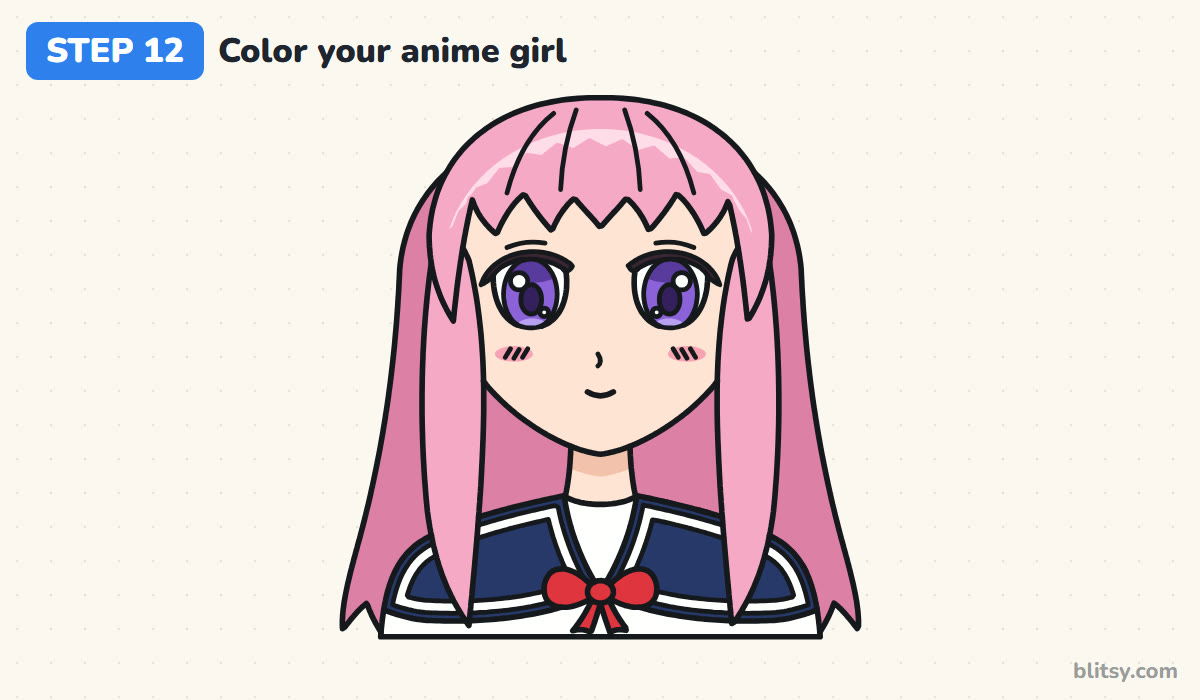
Color the bangs and front locks pink and the long back hair a darker pink, which pushes it back in space. Leave a jagged pale band across the top as a shine. Use peach for the face and neck, a bit darker under the chin. Give the irises a darker purple top and a lighter bottom. The collar goes navy, the bow red, and the shirt stays white.
💡 Tip: Color the dark top of the iris before the main purple, then blend downward into it.
Spotting Odd Proportions in Anime Faces
- Eyes placed too high. They end up on the forehead and the face looks stretched. Keep them on the halfway line from step 2.
- Eyes too close together. The face starts to look cross or worried. Leave a full eye width between them.
- A long gap from nose to mouth. It reads as an older, more realistic face. Tuck the mouth just under the nose.
- Bangs as one flat line. A straight fringe looks like a helmet. Break it into pointed locks of different lengths.
- Shines facing different ways. One shine left and one right makes the eyes look crossed. Put both on the same side.
Giving Your Anime Girl Her Own Style
Once this face feels easy, change one thing at a time. Swap the long hair for twin tails, try green eyes, or trade the collar for a hoodie. Younger artists can skip the collar trim and the hair strands and still end up with a clear anime girl. If you'd like a rounder, smaller version next, the chibi drawing tutorial uses the same big eyes on a tiny body, and the anime boy drawing tutorial keeps the shines in the eyes but adds spiky hair and a wide grin.
Free Anime Girl Coloring Page and Printable Drawing Steps
Want to color right away? The free anime girl coloring page has the inked outline plus a small colored version with a color key. The step-by-step PDF guide holds all 12 steps and tips, two per page, for Letter or A4 paper.
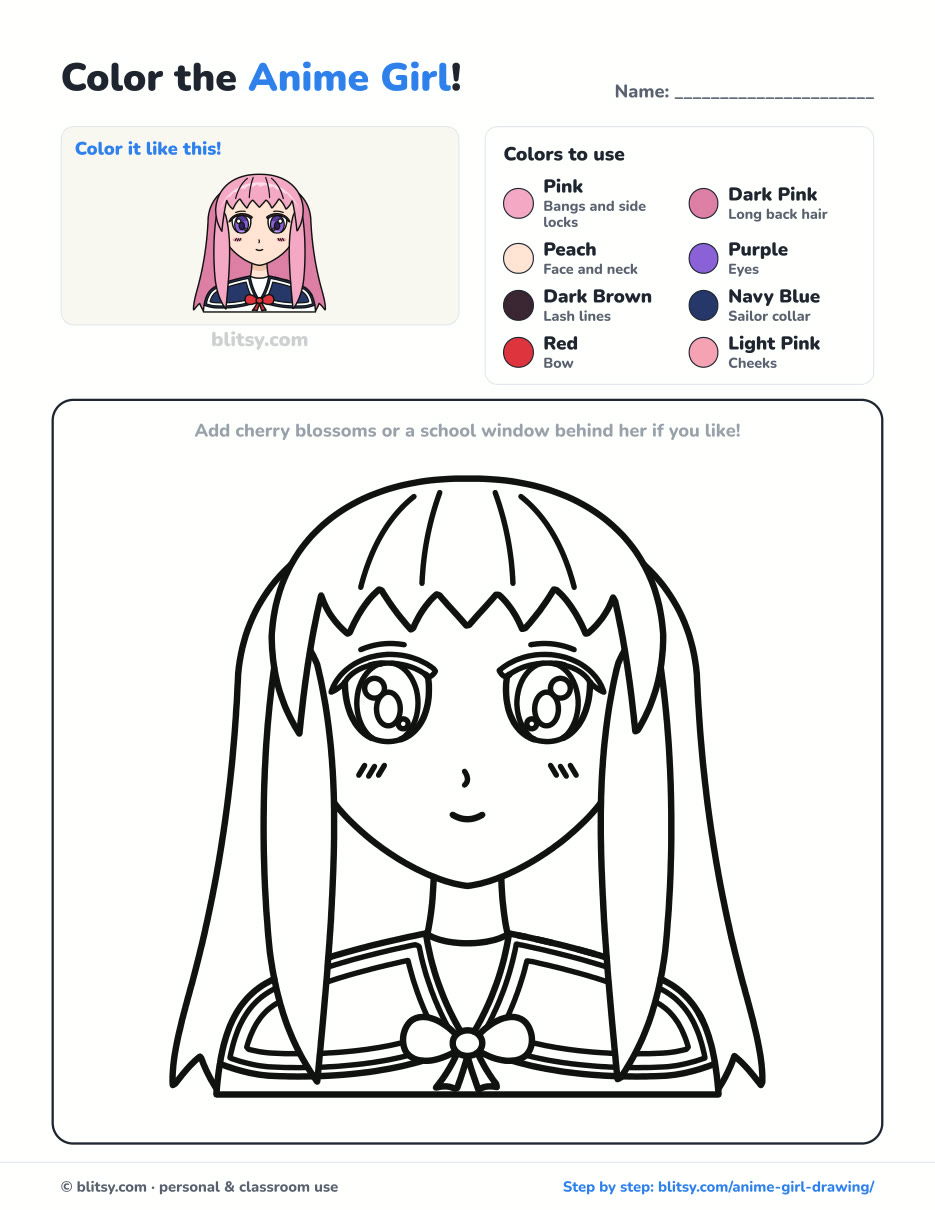
Black outlines with a colored example and the color names at the top. Ready to print and color.
⬇️ Download Coloring PageEvery step picture with its instructions and tips, to keep beside your paper while you draw.
⬇️ Download Drawing Guide📱 On a phone? Tap a download button, then open the file and choose Share → Save to Files or Print. On a computer, the PDF opens or saves straight to your Downloads folder.
Pin All 12 Anime Girl Steps
Anime Girl Complete? Draw These Characters Next
Every one of these is a step-by-step tutorial, mostly characters, with a few animals and scenes.
- Raccoon Drawing: Mask on and tail up, the raccoon drawing tutorial takes 12 steps.
- Phoenix Drawing: Draw a fire bird with raised wings and a blazing tail in how to draw a phoenix step by step.
- Chalk Art: The chalk art tutorial puts a hopscotch grid and a rainbow on the sidewalk.
- Family Drawing: Four people, a puppy and a balloon share the page in the family drawing step by step lesson.
- Rosa Parks Drawing: Draw a calm portrait with glasses, a white collar and a gold brooch in the Rosa Parks drawing tutorial.
- Scarecrow Drawing: Learn how to draw a scarecrow, a patched-up figure on a post built from a T and a circle.
- Fortnite Llama Drawing: The Fortnite drawing tutorial draws the piñata llama standing on four stubby legs.
- Mario Drawing: Cap on and one glove waving, the Mario drawing step by step guide makes a chibi version.
- Olaf Drawing: Follow how to draw Olaf step by step for the snowman with his arms up and a big grin.
- Luffy Drawing: Another anime face: the Luffy drawing tutorial covers the straw hat, the scar under his eye and his wide grin.
- Hulk Drawing: A chibi Hulk with both fists up comes together when you learn how to draw the Hulk in eleven steps.
- Ariana Grande Drawing: Draw a chibi with a swinging ponytail and a pink tie in the Ariana Grande drawing tutorial.
- Princess Drawing: The princess drawing step by step lesson ends with a lavender ball gown, a golden crown and a star wand.
Anime Girl Drawing Questions Beginners Ask
What is the easiest way to draw an anime girl?
Begin with a circle, a center line and a V-shaped chin, then put the eyes on the halfway line. Once the eyes are placed right, everything else is simple shapes.
Where do the eyes go on an anime face?
On a level line halfway between the top of the head and the chin, with about one eye width of space between them.
How do you make anime eyes look shiny?
Leave two small circles uncolored in each iris, a bigger one high and a smaller one low, on the same side in both eyes. A darker iris top makes them stand out more.
How long does it take to draw an anime girl?
About 30 to 40 minutes with coloring. A first try often takes longer because of the eyes, and the second goes much faster.
Grab a pencil, start with that first light circle, and see what color you give her hair. 🌸✏️
Related posts:
 How to Draw Anime Step by Step (Easy Anime Boy Face)
 How to Draw a Cat Face Step by Step (Easy Tabby Guide)
 How to Draw a Face Step by Step (Easy Proportions Guide)
 How to Draw Sharingan Step by Step (Easy Anime Eye)
 How to Draw a Male Face Step by Step (Easy Proportions)
 How to Draw a Sad Cat Step by Step (Easy Sad Face Lesson)
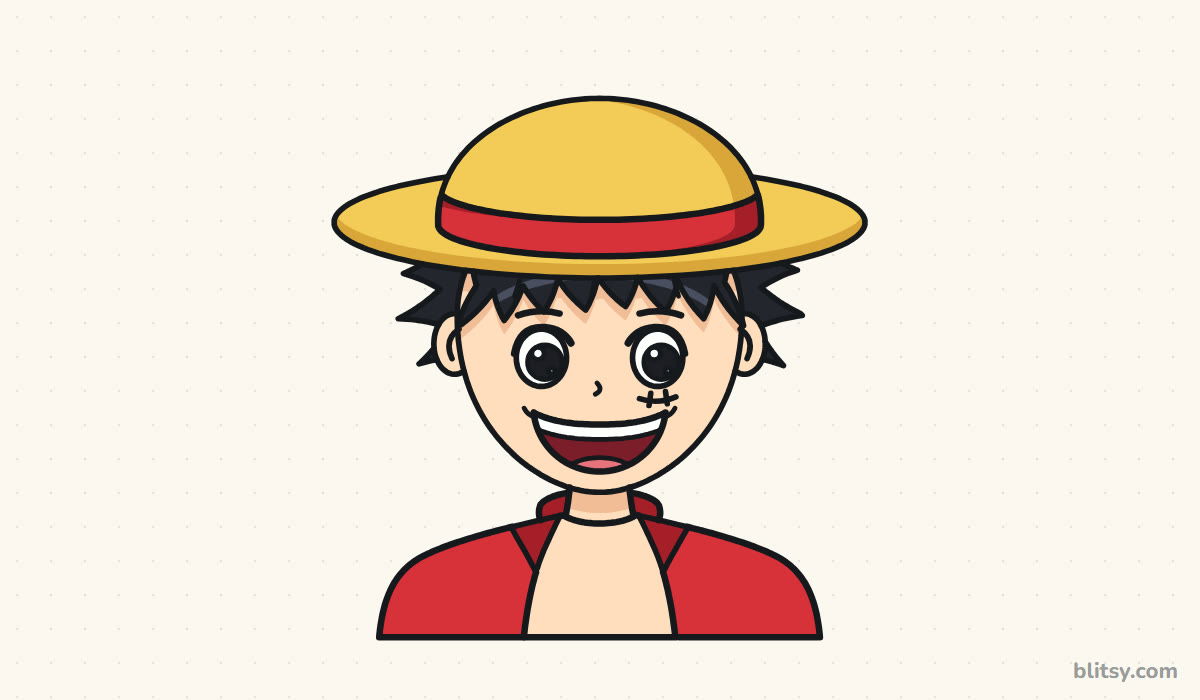 How to Draw Luffy Step by Step (Easy Straw Hat Guide)
 How to Draw Todoroki Step by Step (Easy Fire and Ice Guide)
 How to Draw a Snow Leopard Step by Step (Easy Guide)
 How to Draw a Side Profile Step by Step (Easy Head Guide)
 How to Draw a Jellyfish Step by Step (Cute, Easy Guide)
 How to Draw a Magnolia Flower Step by Step (Easy Guide)

