
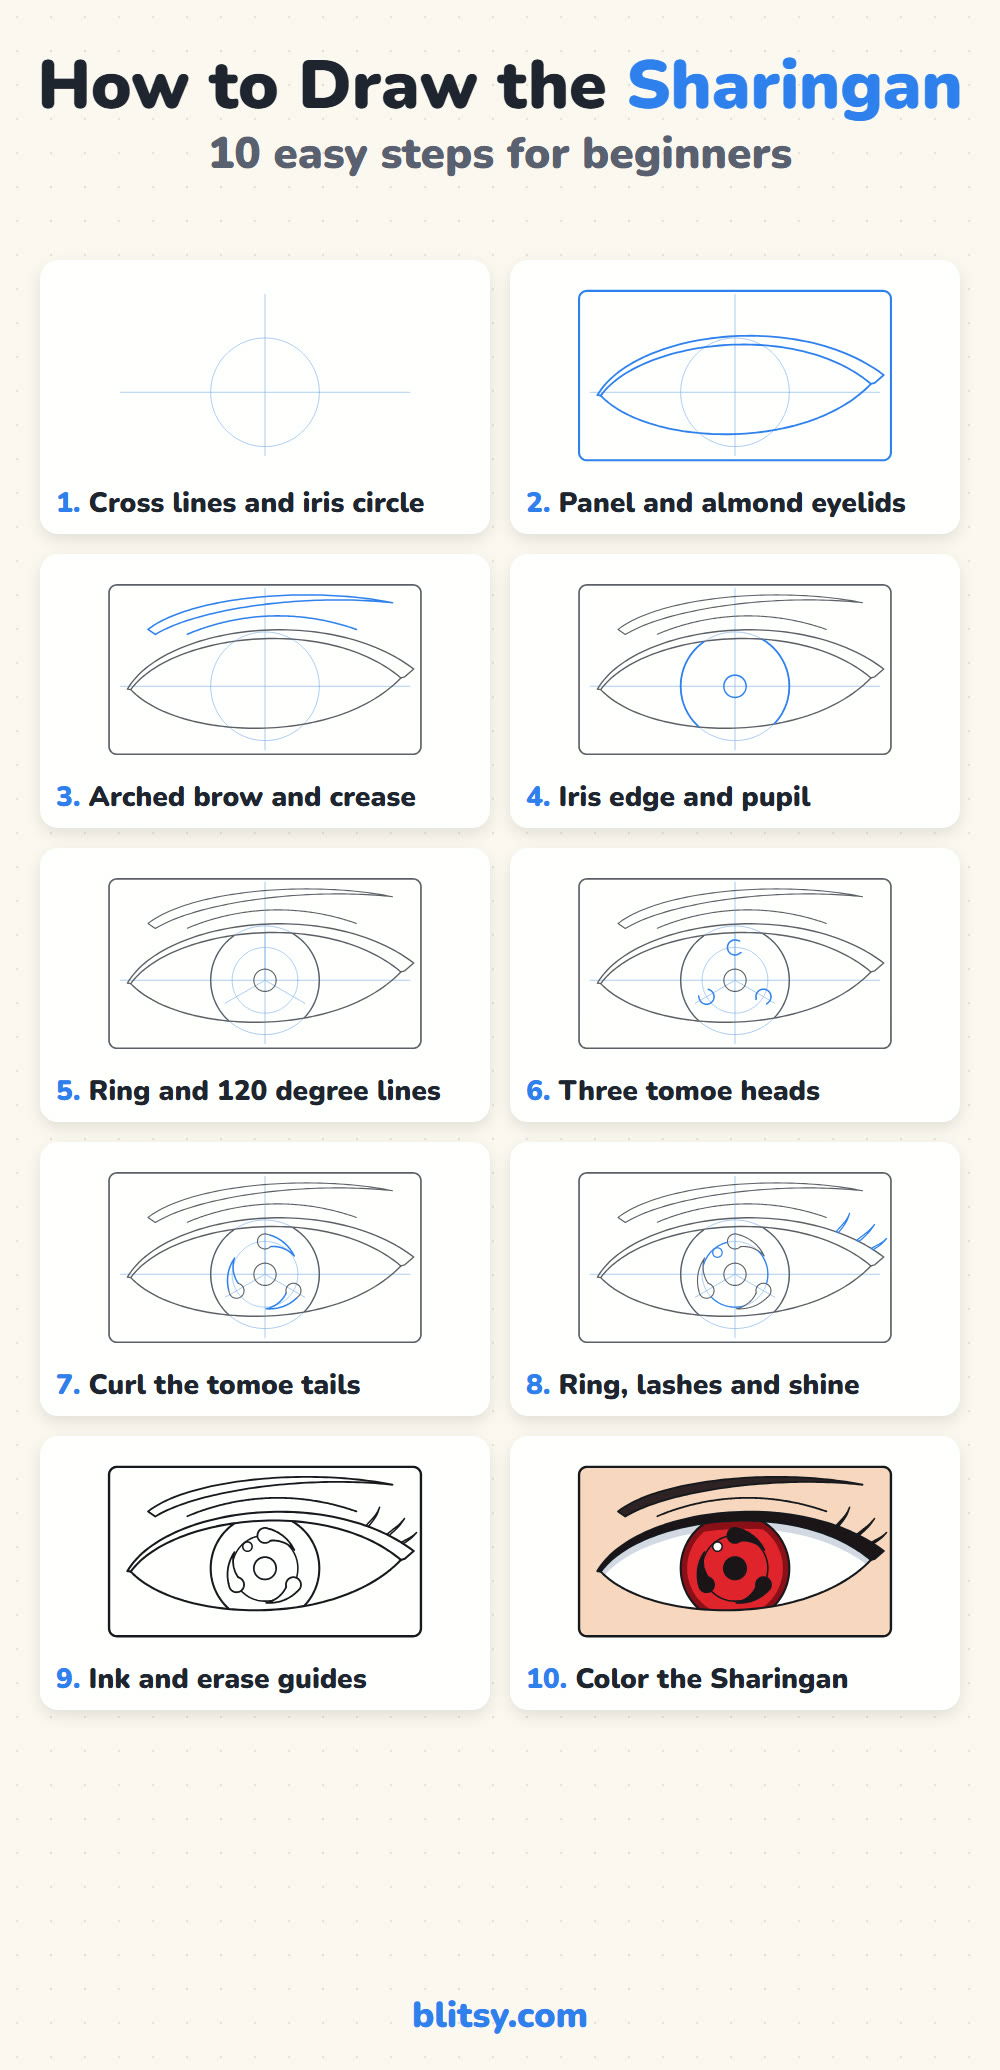
Three black commas circling a red iris: that small pattern is all it takes for anyone who has watched Naruto to name the eye on your page. The hard part is getting the commas evenly spaced, and that's exactly where most first attempts wobble. In this lesson you'll learn how to draw Sharingan step by step, using a cross, two circles and three straight guide lines that do the spacing for you. What you see here is my own simple fan-art version, drawn for practice and not taken from official art.
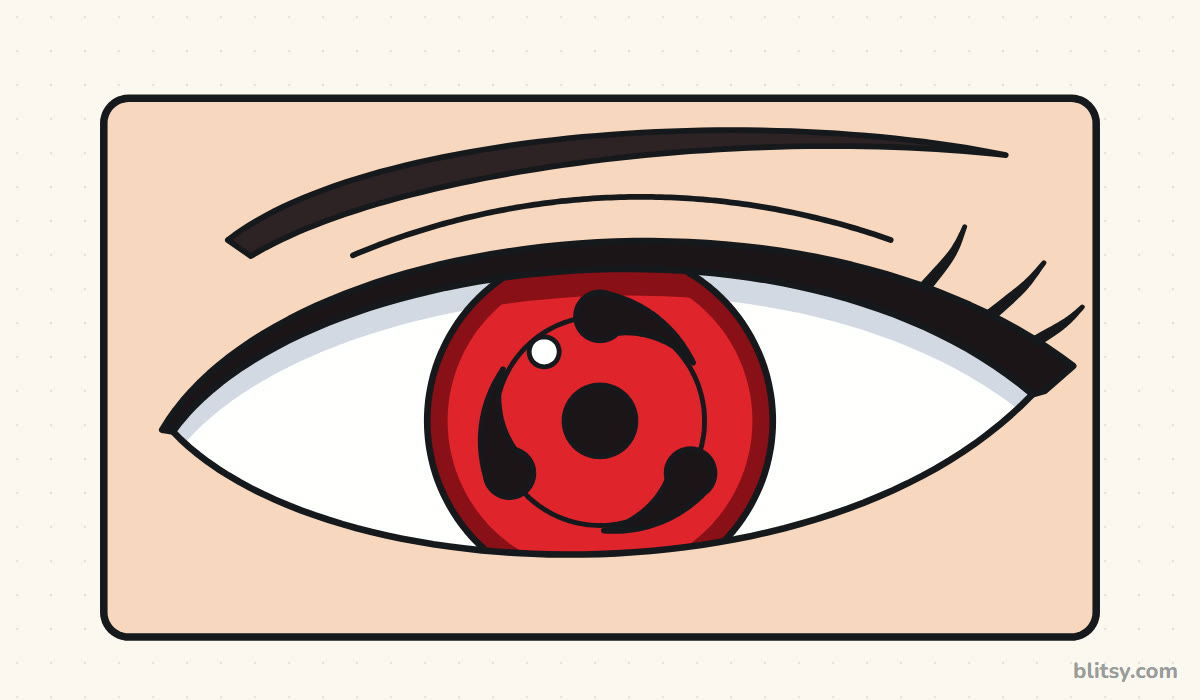
Every step picture shows the new lines for that step in blue. Gray lines are from earlier steps. The pale blue cross, circles and spokes are helpers, so keep them faint, since they disappear in step 9.
Quick overview
⏱️ Time: about 20 to 30 minutes, coloring included
🎯 Level: easy to medium, good for ages 8 and up
✏️ Steps: 10
👁️ You'll draw: one large anime eye with a three-tomoe Sharingan, framed like a manga panel
Tools for a Crisp Red Anime Eye
- A light pencil (HB works well) for the guides
- A kneaded or soft eraser
- A ruler for the panel and the three spoke lines
- Something round to trace if you like, such as a cup or a coin
- A black fineliner or marker for the final lines
- Red, dark red, black, light gray and peach pencils or markers
- Smooth white paper turned sideways
The ruler is optional for older kids, but it makes the 120 degree lines far easier to get right.
How to Draw Sharingan Step by Step
Step 1: Draw a cross and the iris circle
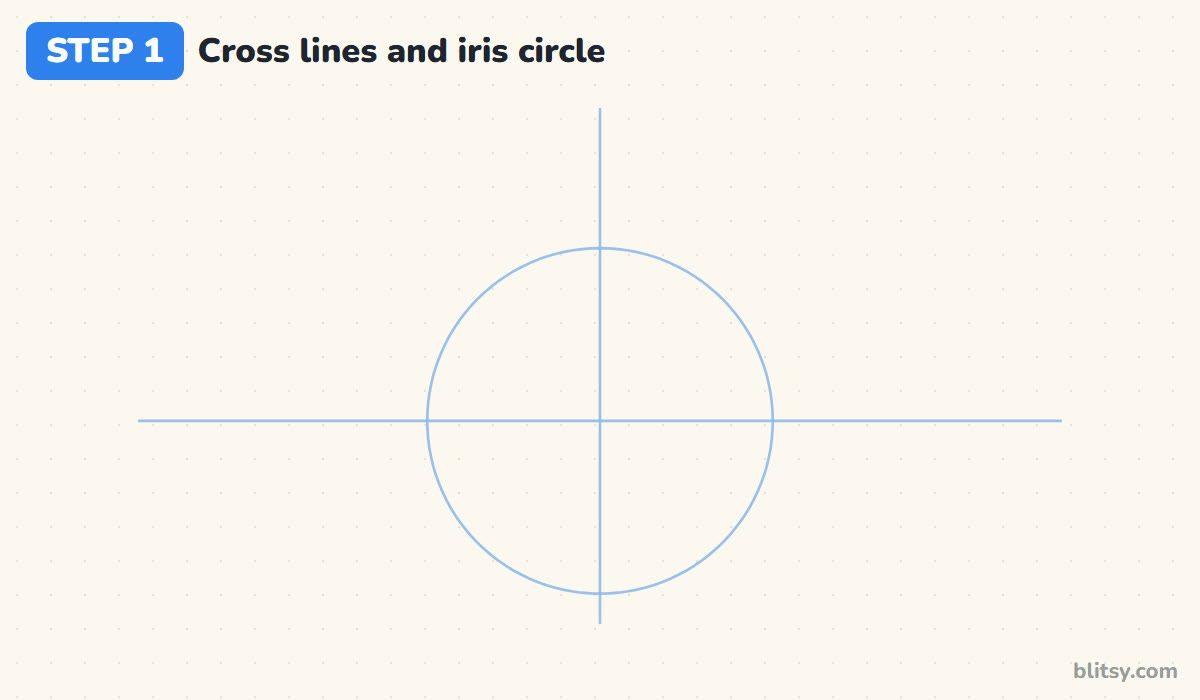
Turn your paper sideways. Draw one long level line across the middle and a shorter upright line through its center. Where they cross, draw a circle about a third as wide as the whole page. That circle becomes the iris, and the cross keeps everything else lined up with it.
💡 Tip: Trace around a cup if your circles come out egg-shaped.
Step 2: Add the panel and the almond eyelids
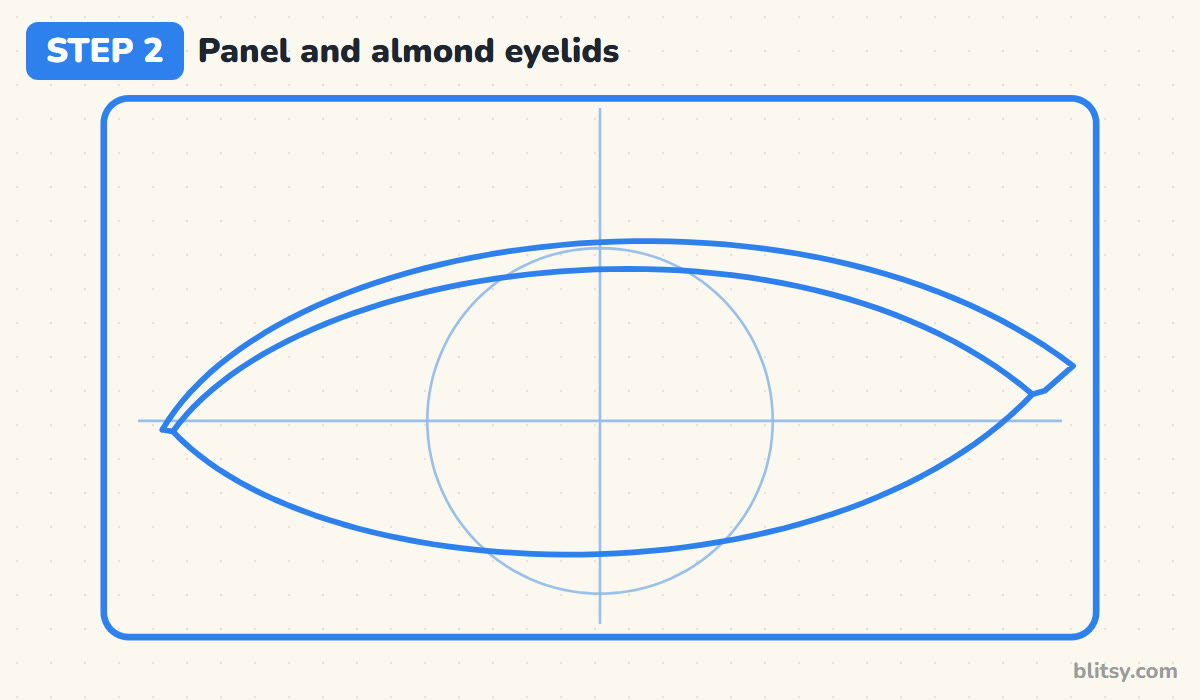
Frame the page with a rectangle that has softly rounded corners. Now shape the eye: a thin lower lid that dips just past the bottom of the circle, and a thicker upper lid that arches over the top of it. The two lids meet in a point at the left, while the upper lid flicks out a little past the right corner. I let the lids cut off a sliver of the circle top and bottom. A fully visible iris makes the eye look startled.
💡 Tip: Draw the upper lid as two close curves that meet at the inner corner. The space between them becomes the black lash line later.
Step 3: Draw the arched brow and the lid crease
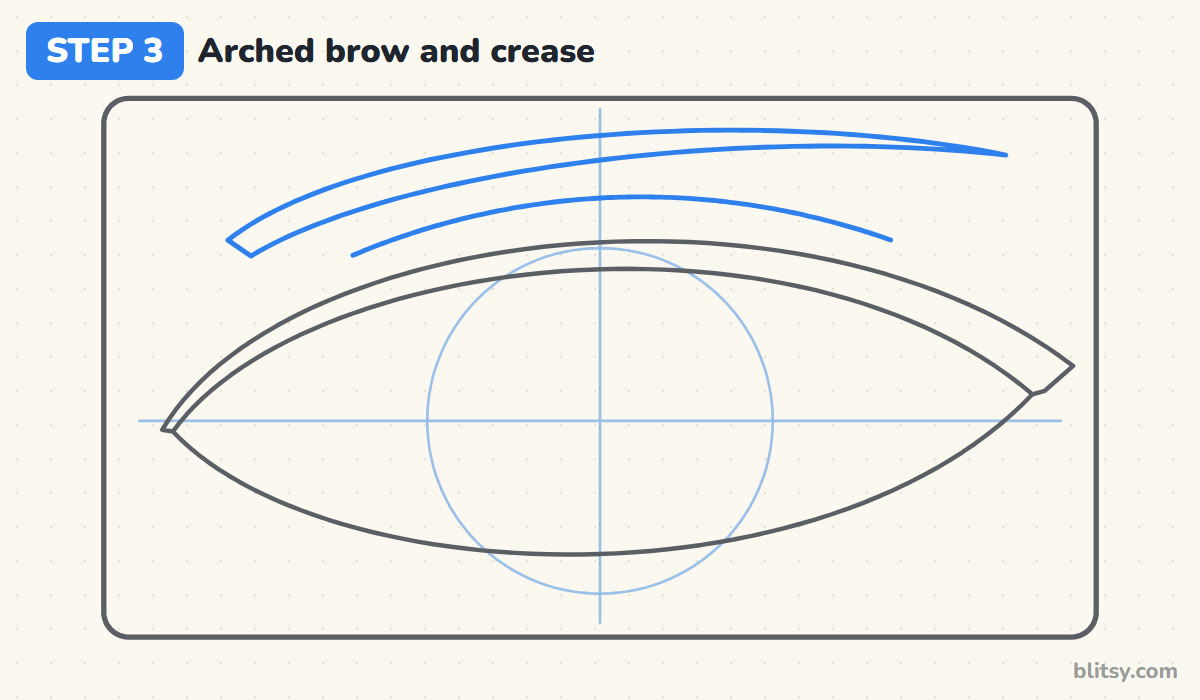
Above the eye, draw a long tapered brow. It starts thick near the inner corner, rises gently, and thins to a point over the outer corner. Between the brow and the eye, add one curved line that follows the shape of the upper lid. This crease gives the lid some depth without any shading at all.




💡 Tip: Leave a clear gap between brow and crease. When they crowd each other the eye looks angry, which might be the mood you want, but decide on purpose.
Step 4: Outline the iris and the pupil
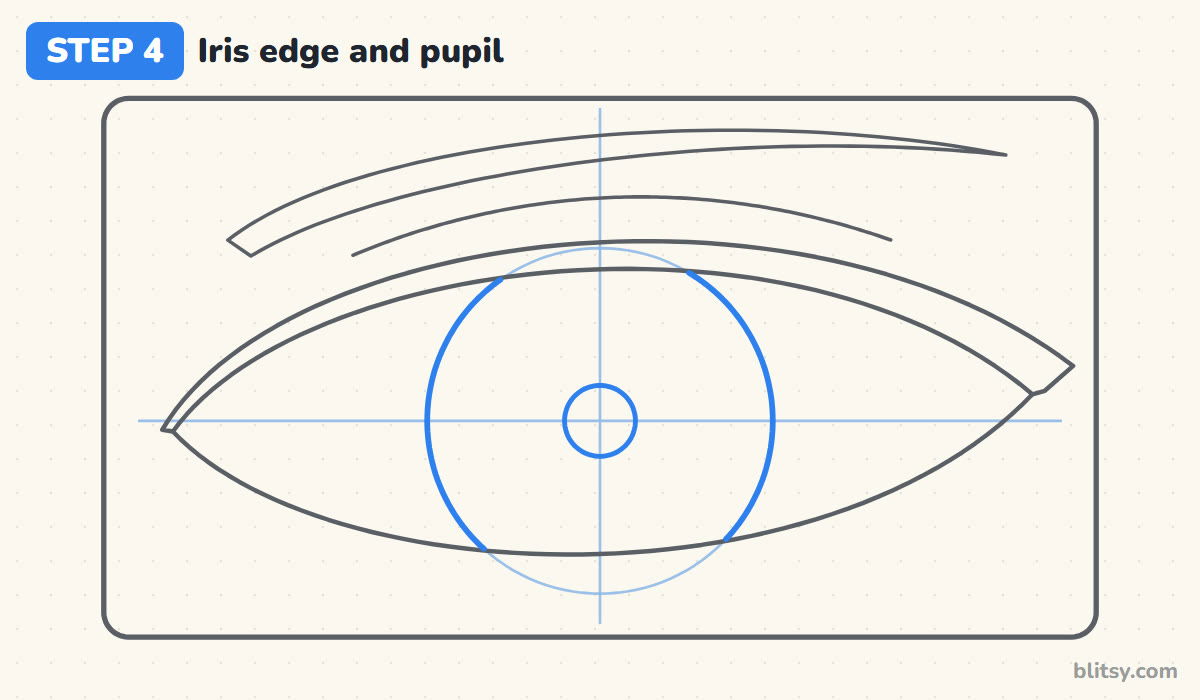
Go over the iris guide only where it shows inside the eye, stopping at the lids. Then draw a small circle right on the center of the cross for the pupil. Keep it small, about a fifth of the iris width. A large pupil fills the space the tomoe need.
💡 Tip: Check the pupil against both guide lines. Even a slight drift off center throws off all three tomoe later.
Step 5: Place the ring and the 120 degree lines
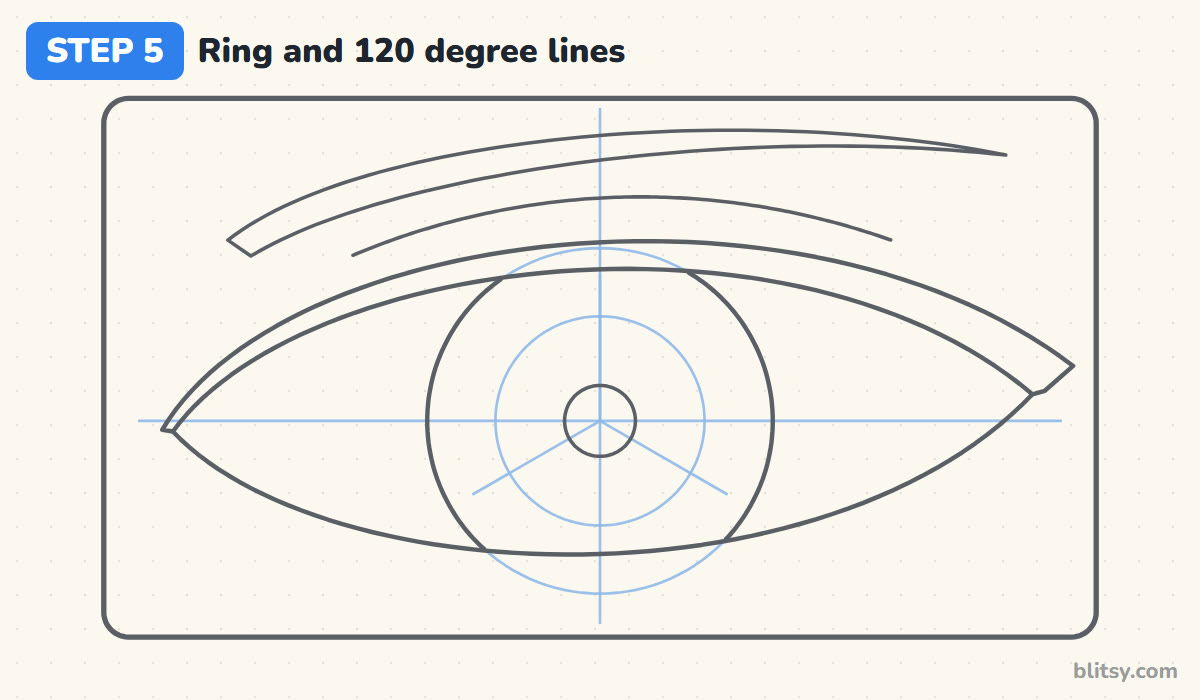
When I teach this eye, this is the step I slow down for. Draw a faint ring between the pupil and the iris edge, roughly halfway out. Next, draw three straight lines from the pupil's center: one straight up, and the other two pointing down to the lower left and lower right. Each line sits 120 degrees from its neighbors, so together they look like the letter Y turned upside down.
💡 Tip: Not sure about your angles? The two lower lines should land at the same height, mirrored across the upright line.
Step 6: Draw three tomoe heads on the ring
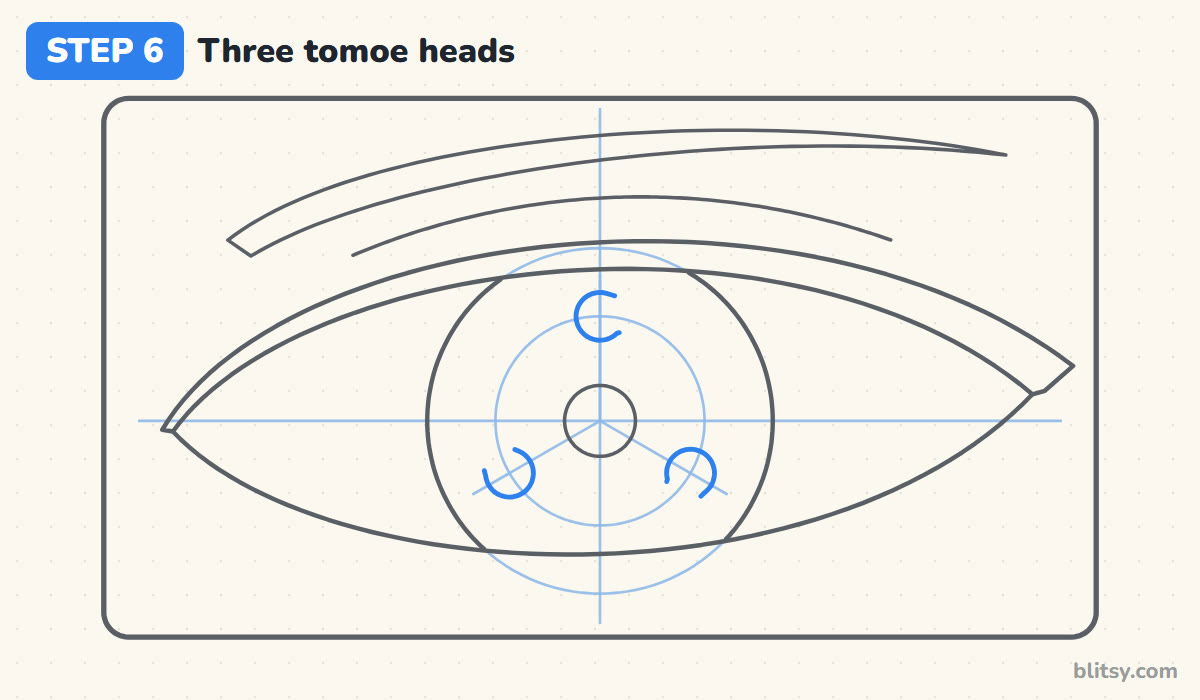
Where each spoke crosses the ring, draw a small round head centered on that spot. All three should be the same size, a little smaller than the pupil. Leave a small opening on one side of each circle, all facing the same way around the ring, because that's where the tail will join.
💡 Tip: I draw the top head first, then copy its size to the other two by eye before you commit.
Step 7: Curl each tomoe tail along the ring
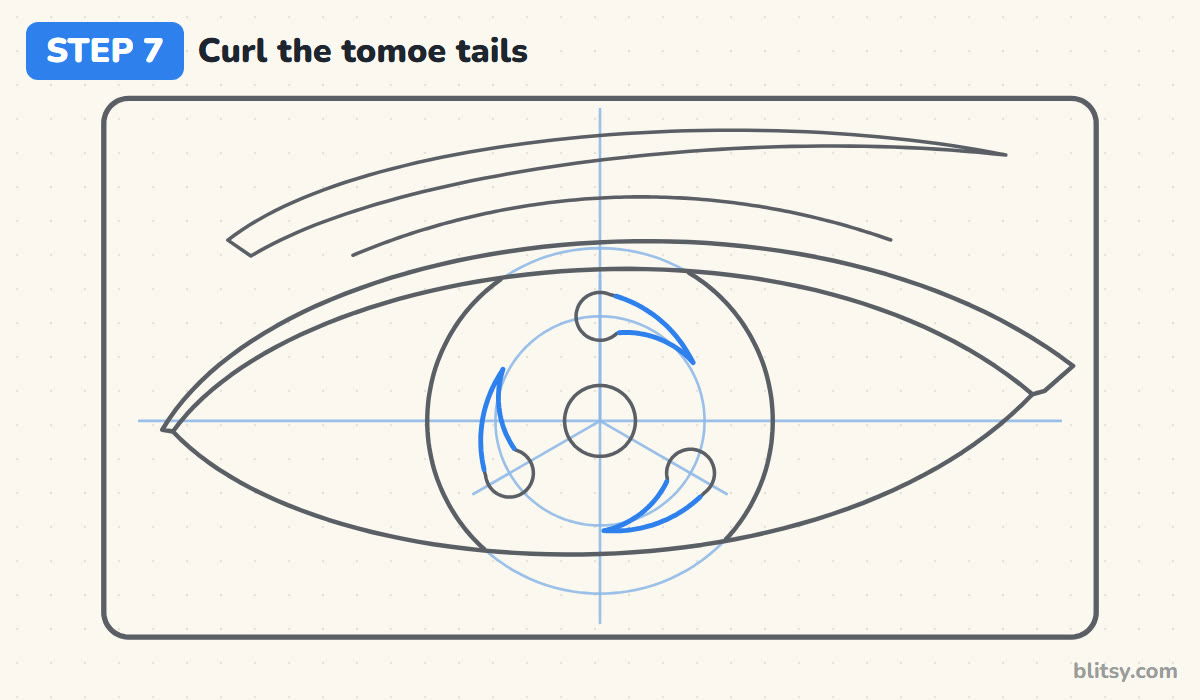
From the opening in each head, pull a curved tail that hugs the ring and thins to a sharp point. Every tail should travel the same direction, clockwise in this drawing, and cover about the same distance. Each one ends roughly halfway to the next head. That shared direction is what makes the Sharingan look like it's spinning.




💡 Tip: Draw the tail in one confident stroke from head to point. Slow, short strokes leave a hairy edge.
Step 8: Finish the ring, lashes and shine
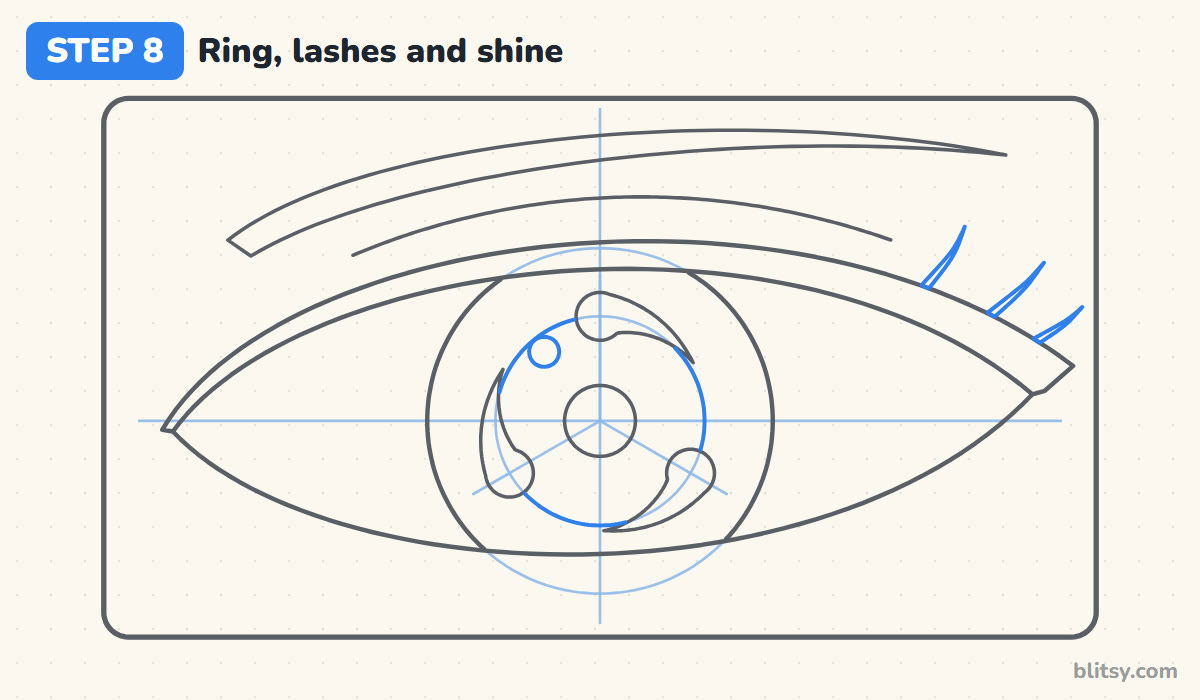
Trace the ring in the gaps between the tomoe, stopping where it meets each one so the ring seems to pass behind them. Add three curved lashes rising from the outer end of the upper lid, each a little longer than the last. Then place a tiny circle between the pupil and the top tomoe for a light reflection.
💡 Tip: Keep the lashes on the outer third of the lid only. Lashes all the way along start to look like a fringe.
Step 9: Ink the lines and erase the guides
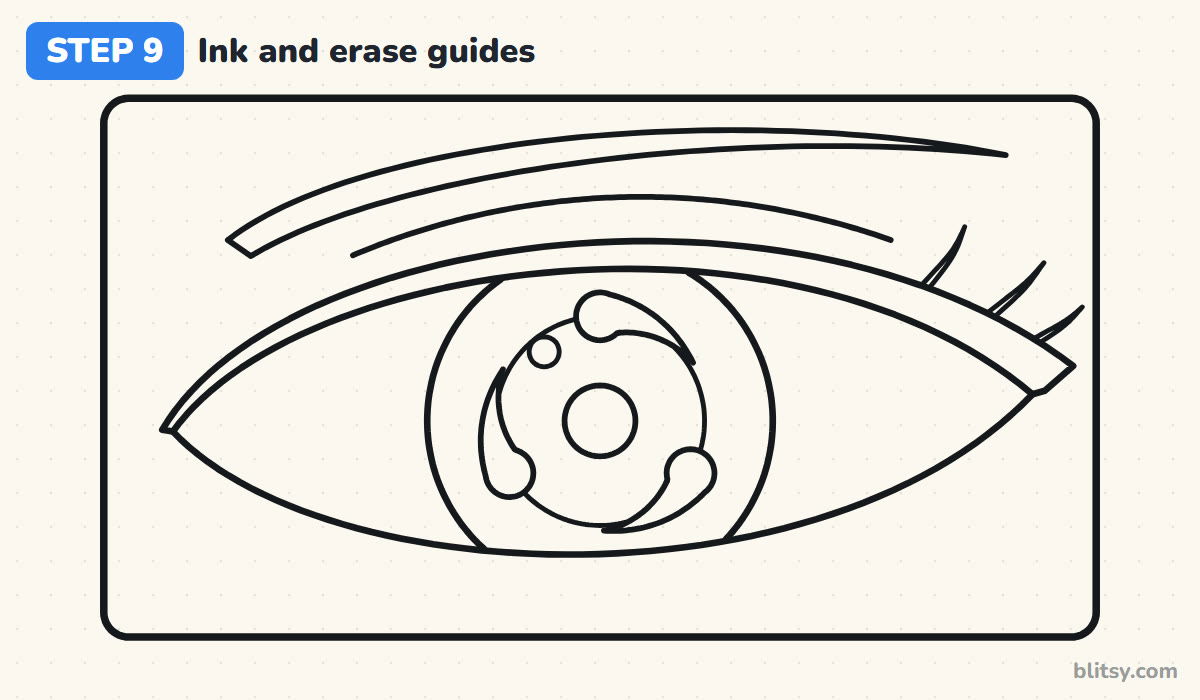
I ink in the same order I drew: the panel, the lids, the brow and crease, then the iris details. Skip the cross, the iris guide, the ring guide and the three spokes. Give the ink a minute to dry, and then erase all the pencil underneath.
💡 Tip: Ink the tiny shine circle with the tip barely touching the paper. A heavy hand fills it in by accident.
Step 10: Color the Sharingan
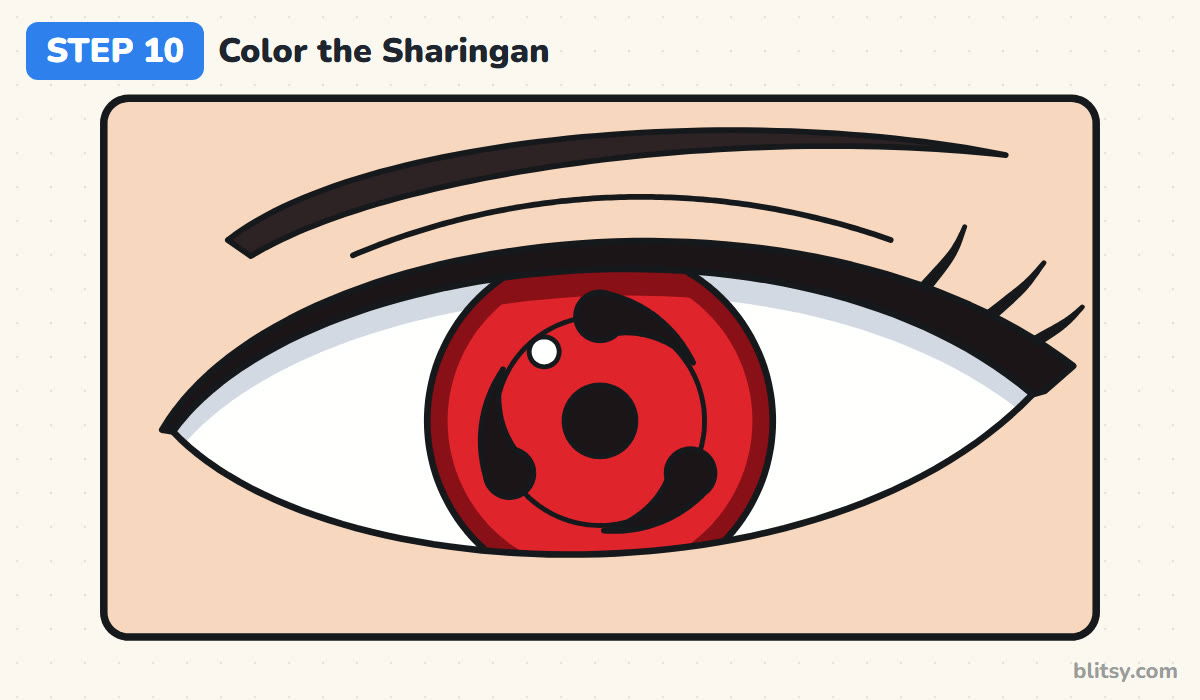
Fill the iris with bright red, then add dark red around its outer edge and in a band just under the upper lid, where the lid would cast a shadow. Color the pupil, the tomoe, the lash line, the lashes and the brow black. The eye white stays white, with a strip of light gray under the upper lid. Finish with peach skin. Leave the shine as bare paper.
💡 Tip: I color the dark red edge before the bright red. Blending inward toward the pupil hides the seam better than blending outward.
Where Sharingan Sketches Tend to Slip
- Tomoe spaced by guesswork. Two of them always end up closer together. Use the three 120 degree lines from step 5, every time.
- Tails curling in different directions. One backwards tail breaks the spinning look. Pick clockwise or counterclockwise and stick to it for all three.
- A pupil that's too big. It squeezes the tomoe against the iris edge. Keep it about a fifth of the iris width.
- The whole iris showing. A full circle floating in the white looks surprised or scared. Let the lids cover a sliver at the top and bottom.
- One flat red. Without the darker edge the iris looks like a sticker. Even a thin dark red rim adds depth.
Changing Up Your Sharingan Eye
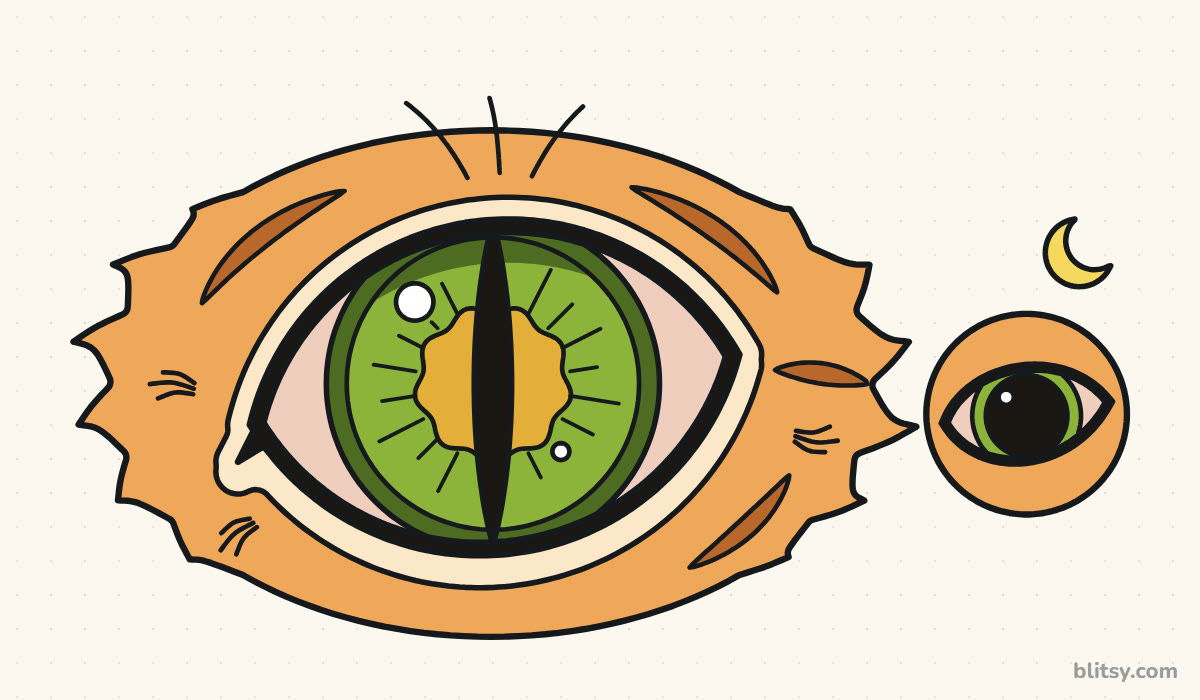
Once the three-tomoe version feels easy, try an eye with only one or two tomoe on the ring, which is good practice for spacing in a different way. You can also draw a pair of eyes side by side, or narrow the lids into a sharper, more serious look. Younger artists can leave out the panel, the crease and the lashes and still end up with a clear Sharingan. If you'd like a whole character from the same world next, the Kurama drawing tutorial is a fun follow-up, and the cat eye drawing tutorial is great for more practice with irises and pupils.
Free Sharingan Coloring Page and Step Guide PDF
Want the outline ready to go? The free Sharingan coloring page has a small colored eye at the top with the color key beside it, so it's easy to match the reds. The step-by-step PDF guide holds all 10 steps with their tips, two per page, and prints on Letter or A4.
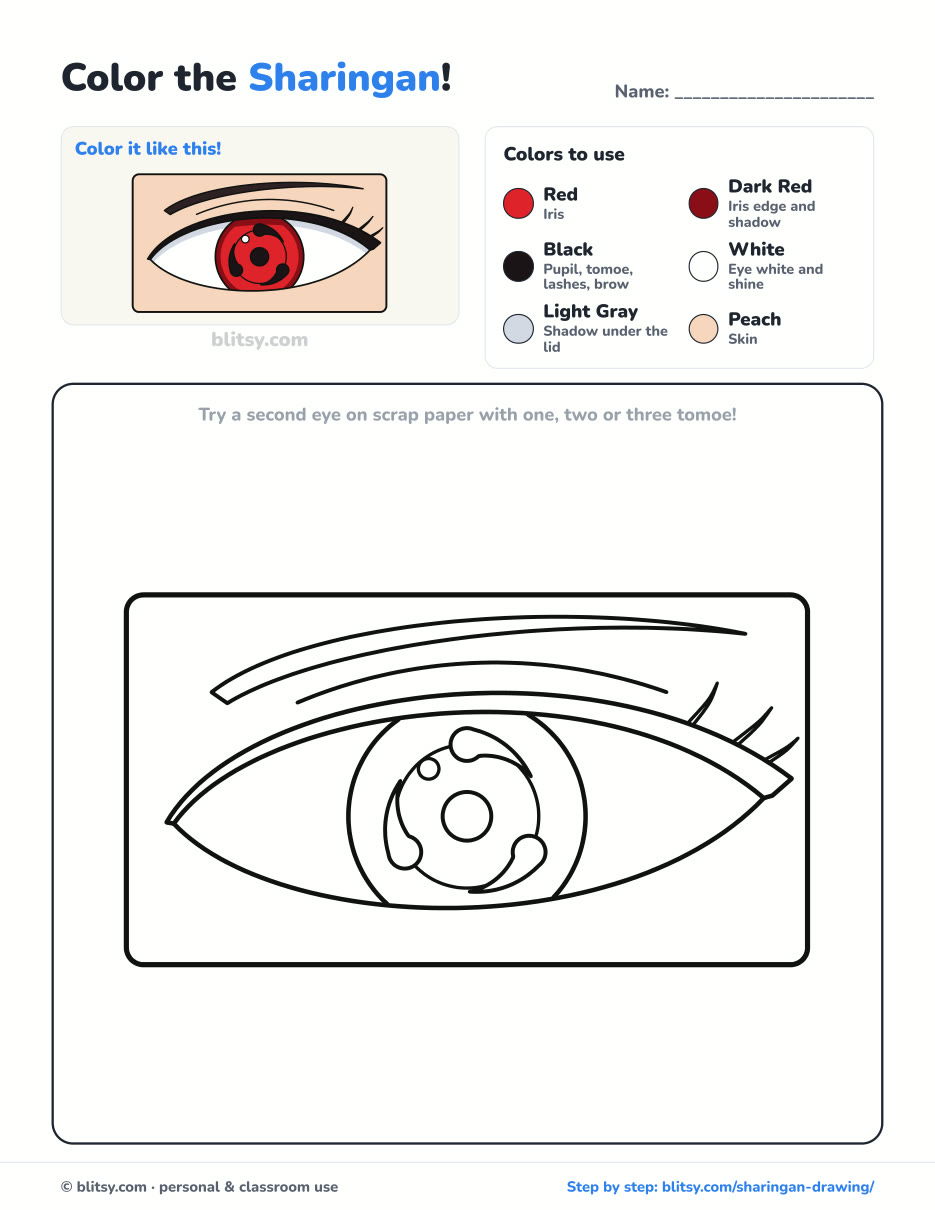
Black outlines with a colored example and the color names at the top. Ready to print and color.
⬇️ Download Coloring Page



Every step picture with its instructions and tips, to keep beside your paper while you draw.
⬇️ Download Drawing Guide📱 On a phone? Tap a download button, then open the file and choose Share → Save to Files or Print. On a computer, the PDF opens or saves straight to your Downloads folder.
All Ten Sharingan Steps in One Pin
From One Anime Eye to Whole Characters
These are step-by-step tutorials, one character or shape per page, so you can go from this eye to a full figure.
- Heart Drawing: The heart drawing tutorial is good symmetry practice, the same skill you used to space the tomoe.
- Side Profile Drawing: Measuring lines do most of the work in this side profile drawing step by step lesson.
- Pikachu Drawing: Learn how to draw Pikachu with ears up, red cheeks and the zigzag tail.
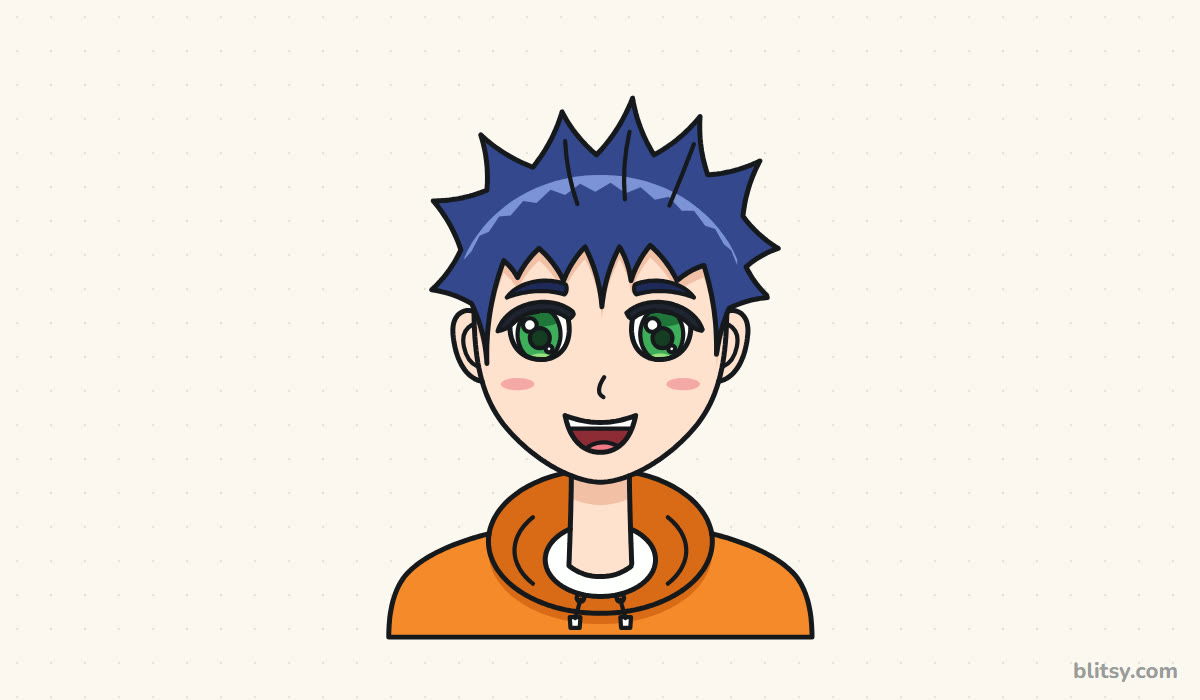
- Anime Drawing: The anime boy face tutorial builds spiky blue hair and green eyes on one plain circle.
- Stitch Drawing: Draw Stitch with his big ears out and a small grin in this Stitch drawing tutorial.
- Disney Drawing: This Disney character drawing tutorial draws Nemo the clownfish with a few bubbles.
- Iron Man Drawing: A chibi Iron Man with a glowing reactor takes eleven steps in the Iron Man drawing tutorial.
- Kurama Drawing: From the same world as the Sharingan, the chibi Kurama drawing tutorial fans out all nine tails.
- Bart Simpson Drawing: Spiky hair and a smirk come together in the how to draw Bart Simpson guide.
- Skull Drawing: The front-view skull drawing tutorial uses dark eye sockets, more practice with round shapes.
- Springtrap Drawing: Draw a chibi Springtrap, floppy ear and all, with the Springtrap drawing tutorial.
- Mickey Mouse Drawing: This Mickey Mouse drawing step by step lesson ends with ears up and one glove waving.
- Juice WRLD Drawing: The Juice WRLD drawing tutorial is a calm tribute portrait in soft colors.
Sharingan Drawing Questions Fans Often Ask
What is the easiest way to draw the Sharingan?
Start with a cross and a circle, then draw a smaller ring inside and three lines from the center, 120 degrees apart. The tomoe go where those lines meet the ring, so the spacing takes care of itself.
How do you space the three tomoe evenly?
Draw one line straight up from the pupil and two more down to the lower left and lower right, so all three are 120 degrees apart. Check that the two lower lines end at the same height.
What colors do I need for a Sharingan?
A bright red and a darker red for the iris, black for the pupil and tomoe, white or bare paper for the eye, plus light gray and a skin color if you draw the area around the eye.
Can kids draw the Sharingan?
Yes. Kids around 8 and up usually manage it, especially with a ruler for the spokes and a cup to trace the circles. Younger children can skip the lashes and crease and just draw the iris with its three tomoe.
Three faint lines and a ring are all the spacing help you need, so try your own Sharingan today. 👁️✏️
Related posts:
 How to Draw Anime Step by Step (Easy Anime Boy Face)
 How to Draw an Anime Girl Step by Step (Easy Face Guide)
 How to Draw a Cat Eye Step by Step (Slit and Round Pupil)
 How to Draw a Whale Step by Step (Easy for Beginners)
 How to Draw Lungs Step by Step (Easy Science Diagram)
 How to Draw a Pineapple Step by Step (Easy Crown and Slice)
 How to Draw the Fortnite Llama Step by Step (Easy Fan Art)
 How to Draw a Hoodie Step by Step (Front and Back View)
 How to Draw a Parrot Step by Step (Easy Scarlet Macaw)
 How to Draw a Jellyfish Step by Step (Cute, Easy Guide)
 How to Draw Cerberus Step by Step (Cute and Easy)
 How to Draw a Taco Step by Step (Easy Kawaii Taco)

