
Hand-drawn cakes make the best birthday cards, and a round cake is easier than it looks once you know one small secret. This lesson shows you how to draw a birthday cake step by step, from three light ovals all the way to a frosted two-tier cake with candles glowing on top. The secret is the cylinder: an oval on top, two straight sides and a curved bottom. Learn it once and you can draw cups and drums too.

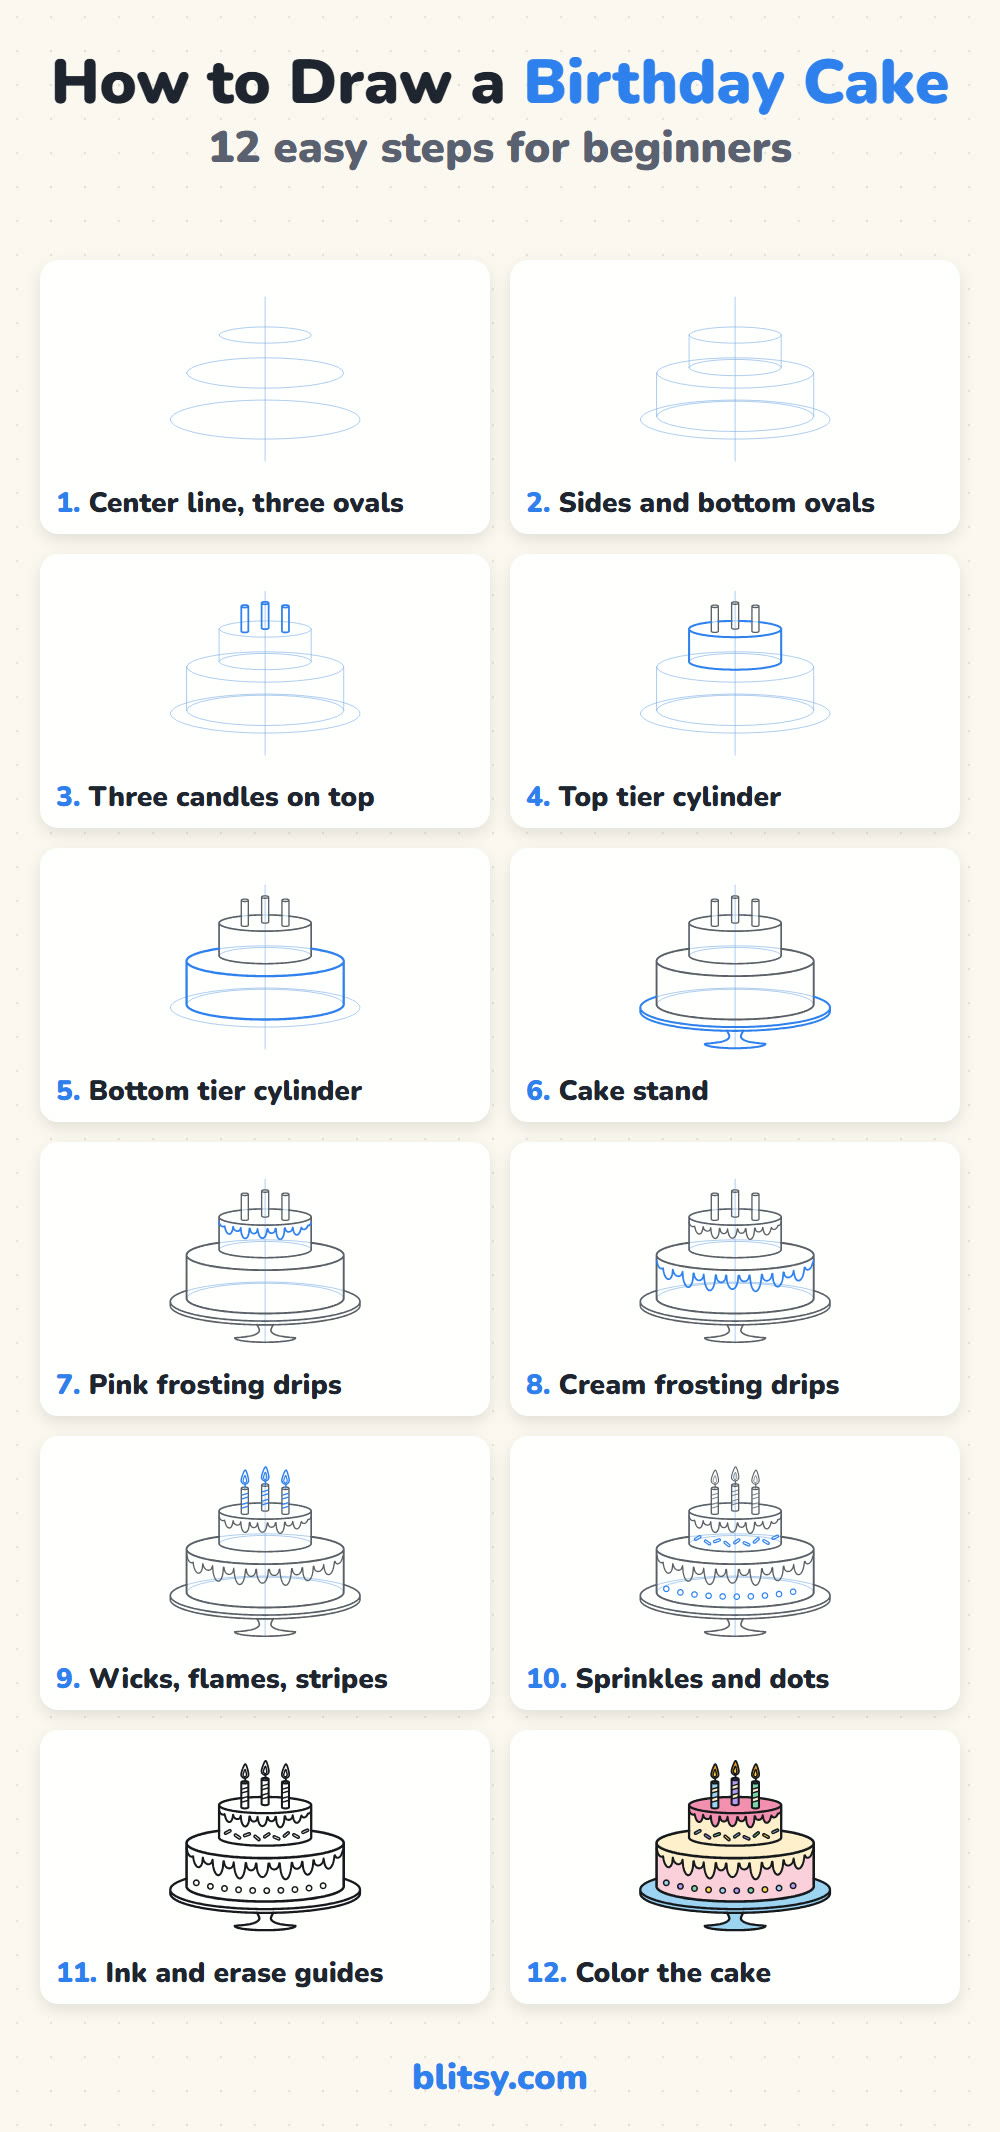
Each step picture adds something new, and that new part is always drawn in blue. Gray lines come from the steps before, so you can check your paper against them. The pale blue ovals and lines are construction helpers; sketch them faintly, because they disappear in step 11.
Quick overview
⏱️ Time: around 25 to 30 minutes
🎯 Level: easy, best for kids from about 6 and up
✏️ Steps: 12
🎂 You'll draw: a two-tier round birthday cake on a stand, with frosting drips and three candles
Party Supplies for Your Cake Sketch
- A sharp pencil for light guide lines
- A soft eraser
- A black fineliner or thin marker
- Colored pencils or markers in pink, light pink, cream, light blue, purple, green, yellow and orange
- A sheet of plain paper, held upright
- A ruler for the straight cake sides (optional)
No cream pencil? Leave those parts as white paper and the cake still looks frosted.
How to Draw a Birthday Cake Step by Step
Step 1: Draw a center line and three ovals
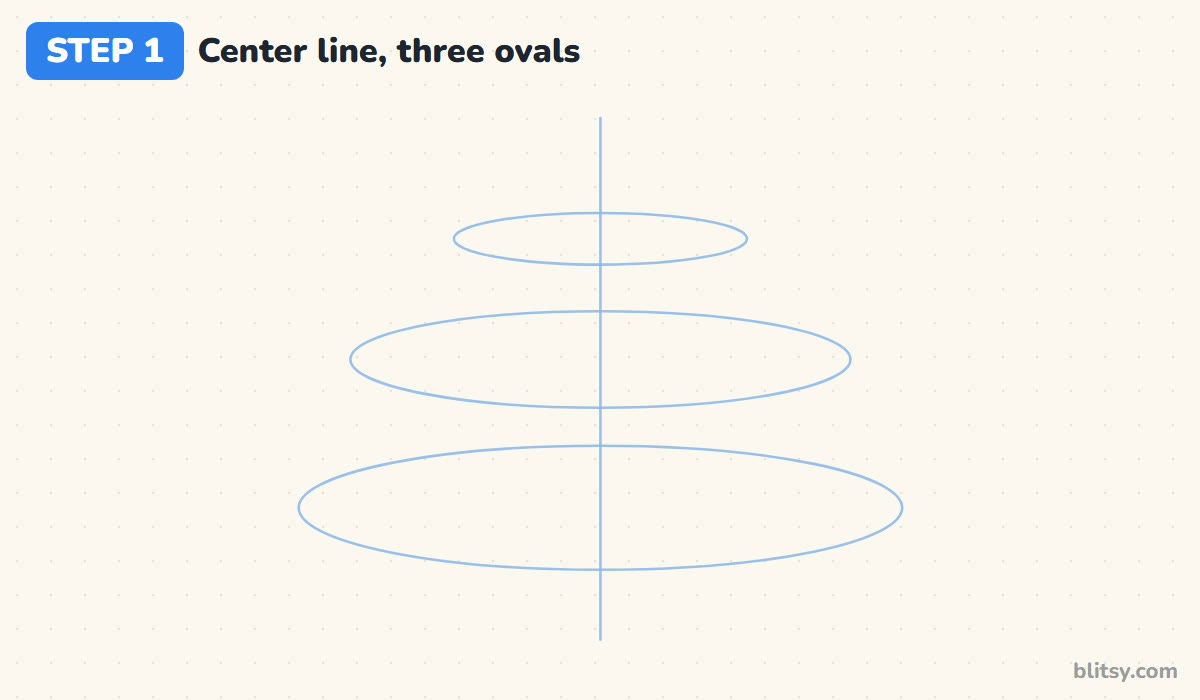
Sketch a light vertical line down the middle of your page. Stack three flat ovals on it: a small one near the top, a wider one in the middle and the widest near the bottom. They become the small tier, the big tier and the cake stand. Keep each oval centered on the line so the cake won't lean.
💡 Tip: Draw each oval in one loose, quick loop. Slow ovals come out bumpy.
Step 2: Add the sides and bottom ovals
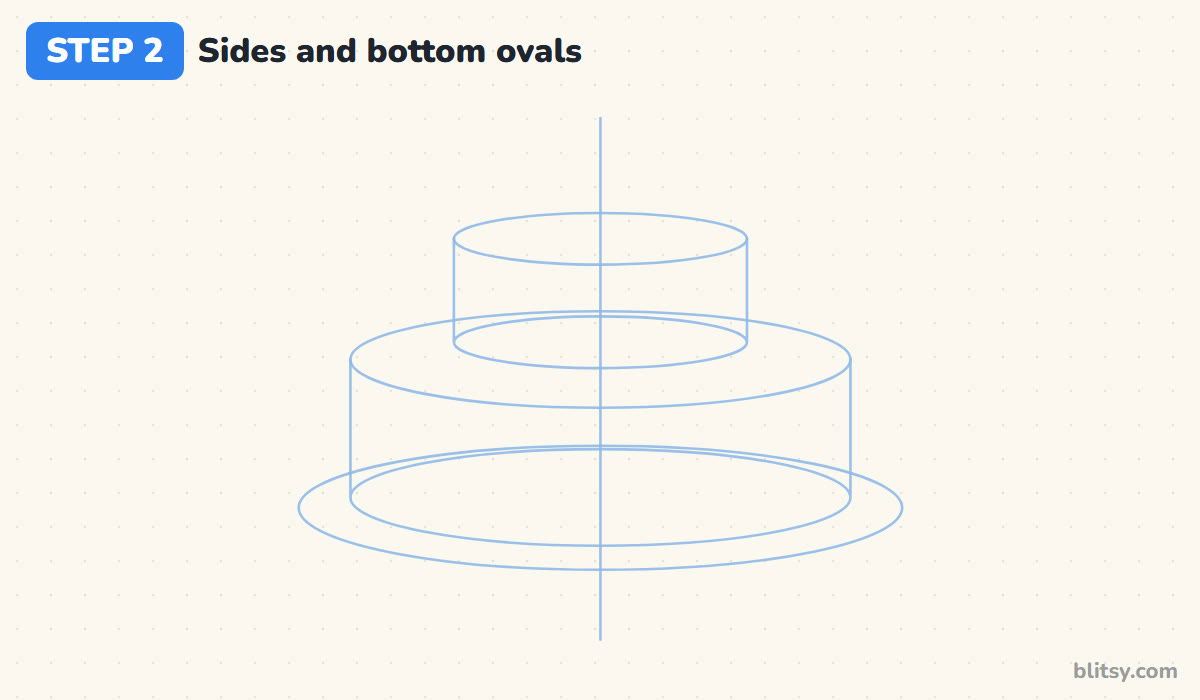
Here's the cylinder trick. From the left and right ends of the small oval, drop two straight lines down. Then draw a matching oval at the bottom of those lines. Do the same for the middle oval. I make the bottom tier a little taller than the top one, because a heavy base makes the cake look steady.
💡 Tip: Keep both side lines perfectly upright. A ruler helps if they start to tilt.
Step 3: Draw three candles on the top tier
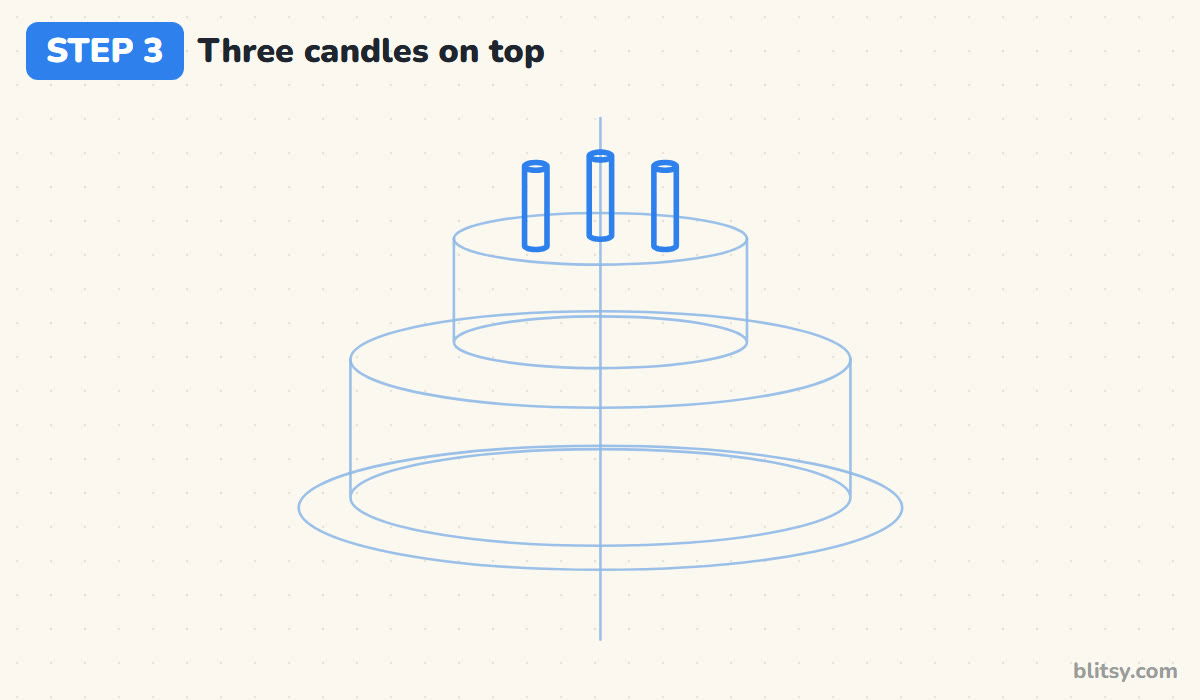
Each candle is a tiny cylinder: a small oval on top, two short sides and a curved bottom. Stand them on the top oval, one in the middle and one on each side, with the middle one a touch higher because it sits farther back. I draw the candles before the tier, so I never have to draw a rim line behind them and rub it out.




💡 Tip: Space the candles evenly by eye, then check that the middle one sits right on the center line.
Step 4: Turn the top guides into the top tier
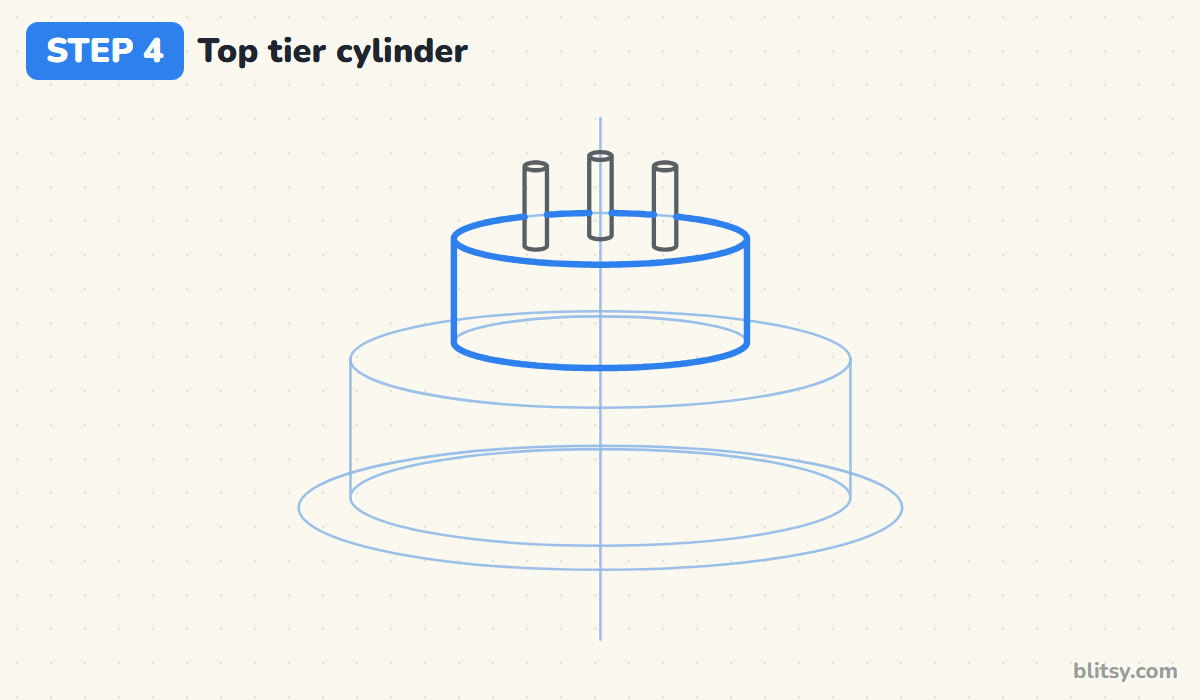
Now go over the small tier with firmer lines. Trace the whole top oval, skipping the short bits that pass behind the candles. Trace both sides, then only the front half of the bottom oval. The back half of that bottom oval is hidden inside the cake, and leaving it out is what makes the shape look solid.
💡 Tip: Press a bit harder than for the guides, but not so hard that you dent the paper.
Step 5: Draw the bottom tier around it
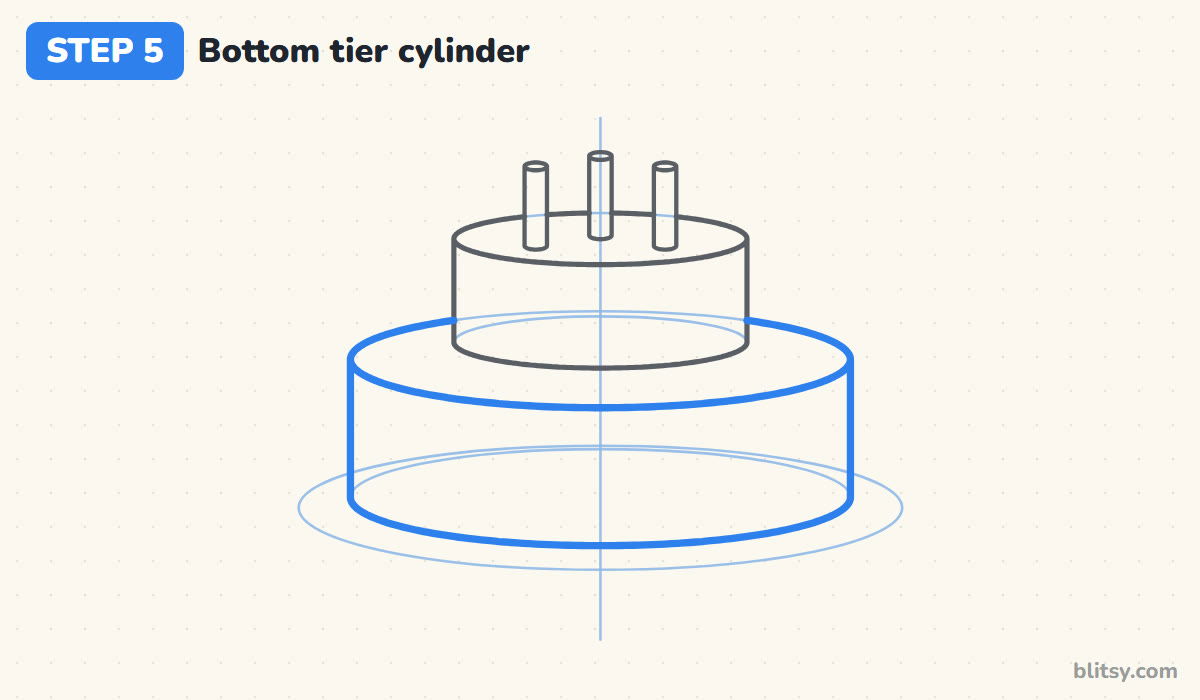
Trace the big tier the same way. This time, the back of its top oval goes behind the small tier, so stop the line where it meets the small tier's sides and pick it up again on the other side. Add the two tall sides and the front half of the bottom oval. Most beginners trace the full oval here and end up with a line cutting through the top tier.
💡 Tip: Before tracing, ask yourself which lines you could really see on a real cake.
Step 6: Add the cake stand
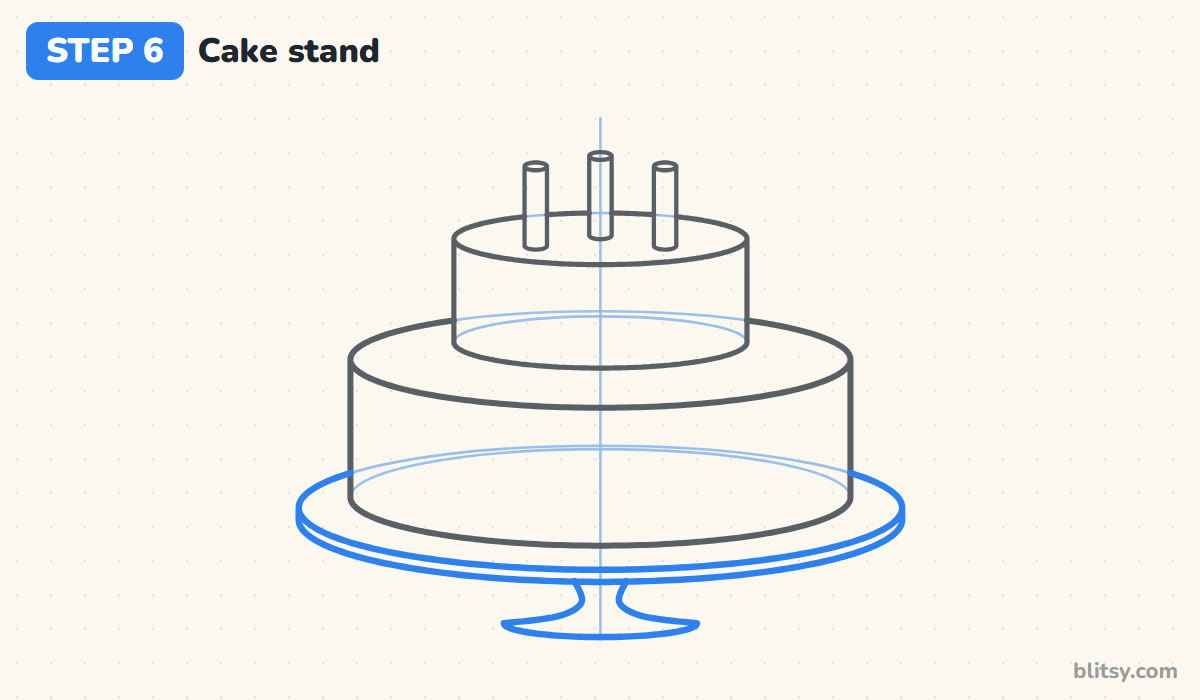
Trace the front of the widest oval to make the plate, leaving out the part hidden behind the cake. Give the plate a thin edge with short sides and a second curve just below. Under the middle, draw a narrow stem that flares into a wide, flat foot. I keep the foot about as wide as the top tier, so the stand looks balanced.
💡 Tip: Keep the plate edge thin. A thick rim makes the stand look like a second cake.
Step 7: Draw pink frosting drips on the top tier
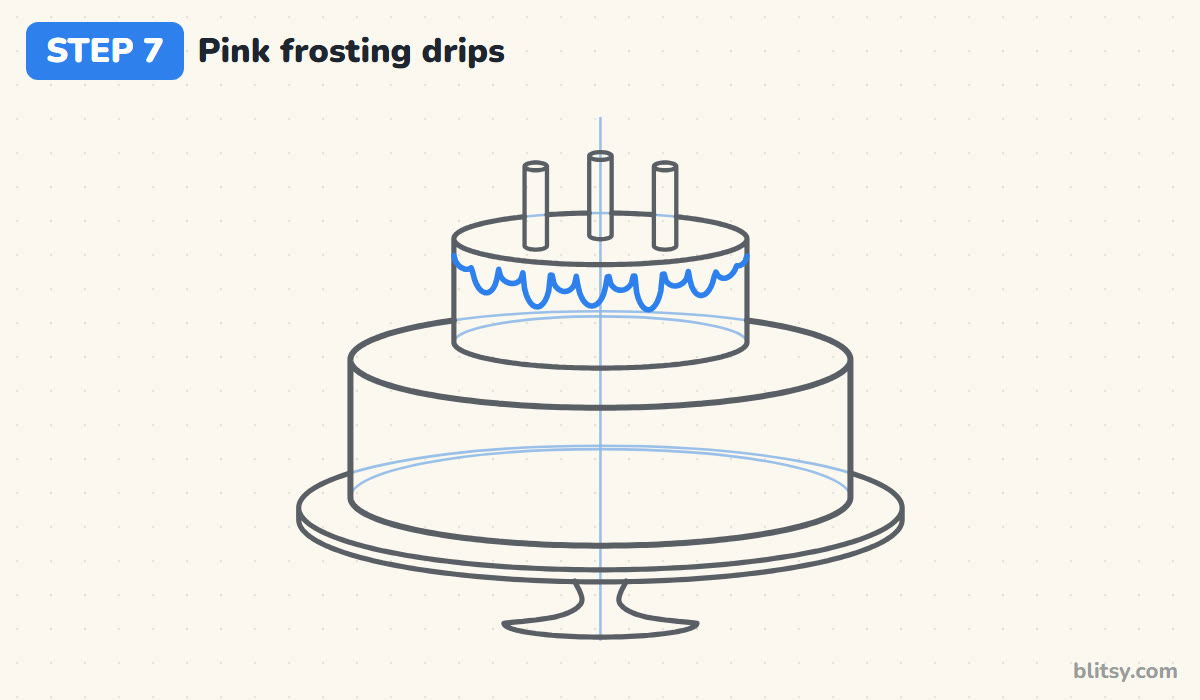
Start just under the top tier's front edge and draw a wavy line from one side to the other. Let it hang down in rounded drips, some long and some short. Mixing the lengths is what makes frosting look runny. I like to alternate one long drip with one short one, then break the pattern now and then so it doesn't look stamped.


💡 Tip: Round off the bottom of every drip. Pointed ends look like icicles.
Step 8: Add cream drips to the bottom tier
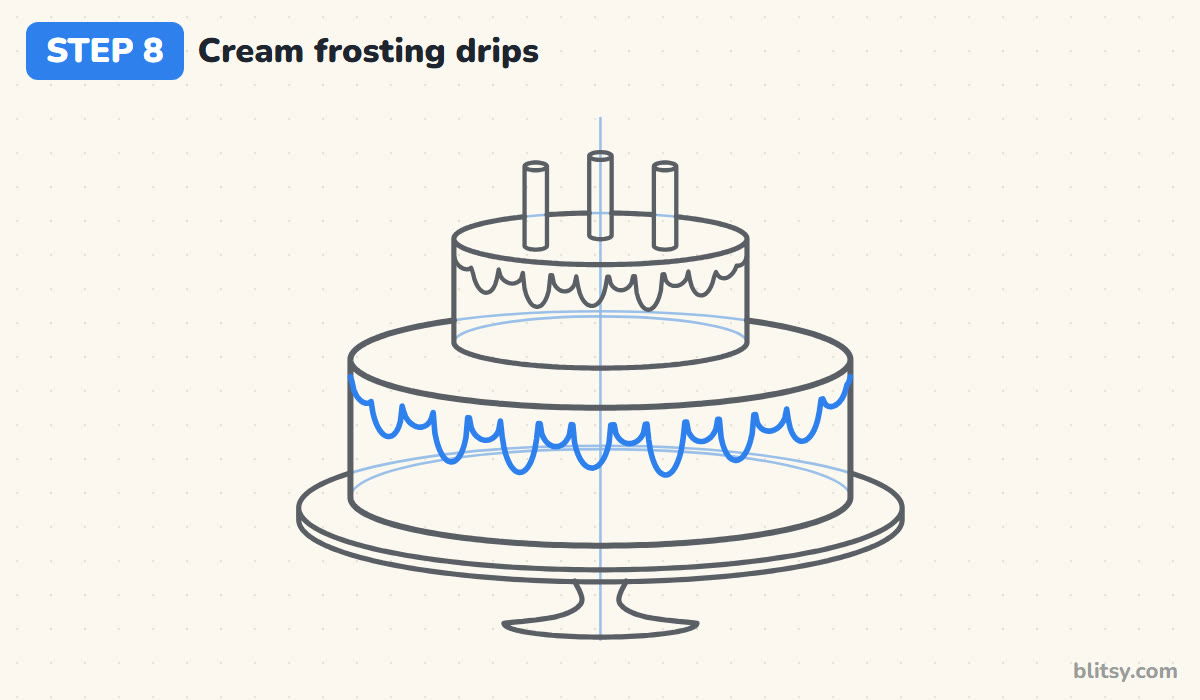
Repeat the drips on the big tier, following the curve of its front edge. I let these drips run longer, because the tier is taller, but I stop them well above the bottom to leave room for decorations. The drip line bends with the oval: lower in the middle, higher toward the sides.
💡 Tip: Follow the curve of the rim, not a straight ruler line, or the tier will look flat.
Step 9: Top the candles with wicks and flames
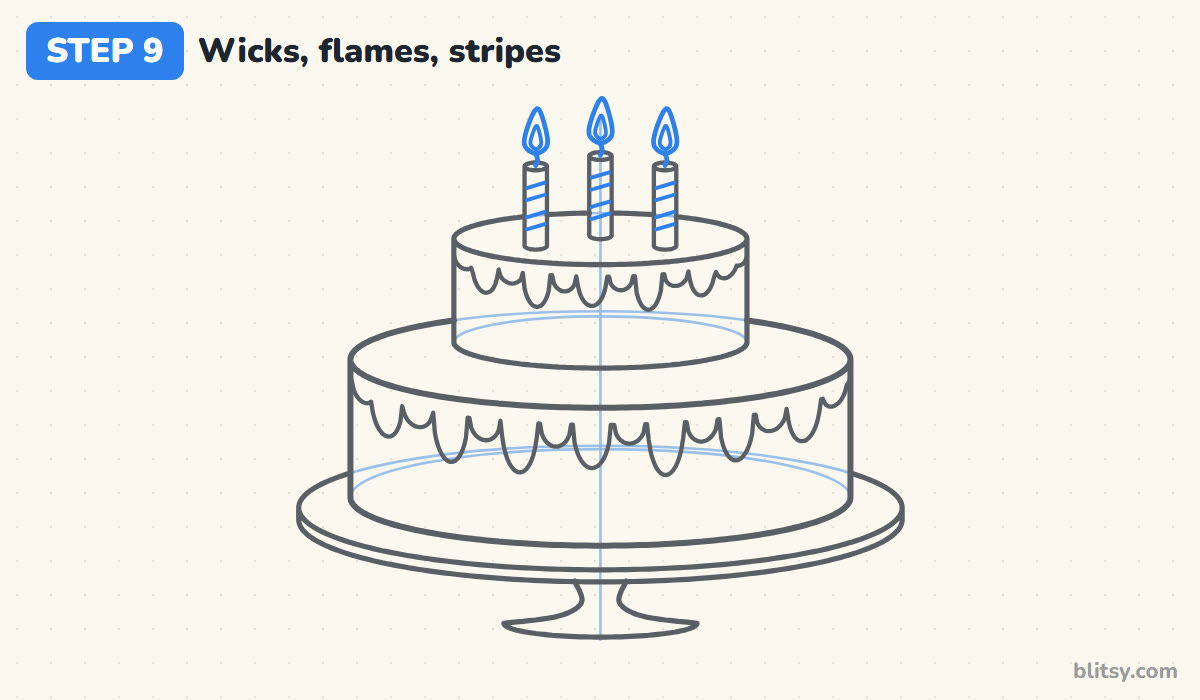
Add a short wick on top of each candle. Above it, draw a teardrop flame with a round bottom and a pointed tip, then a smaller teardrop inside it. Finish each candle with two slanted stripes, both leaning the same way. Small flames work best; huge ones crowd the top of the page.
💡 Tip: Tilt every stripe the same way so the candles look twisted, like real party candles.
Step 10: Scatter sprinkles and add a row of dots
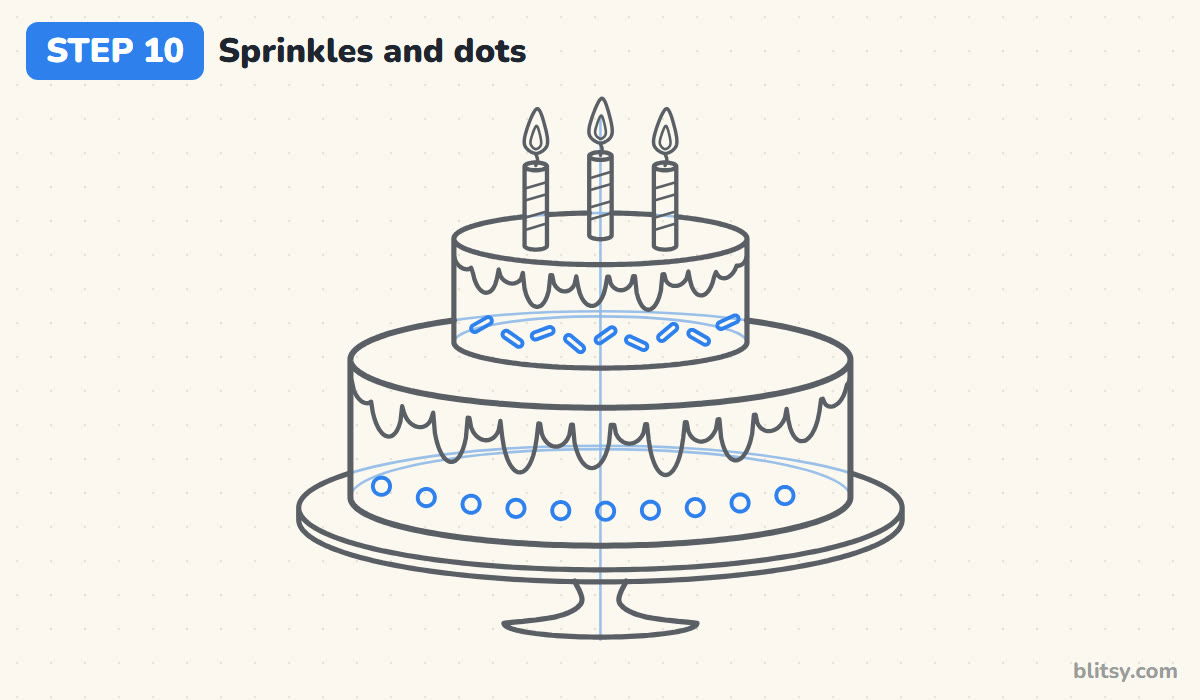
On the top tier, under the drips, draw tiny rounded sprinkles pointing in different directions. On the bottom tier, add a row of small circles that follows the curve of the cake, all the same size and evenly spaced. Leave a little gap between the decorations and the drips so nothing touches.
💡 Tip: Draw the middle dot first, then work outward to both sides for even spacing.
Step 11: Ink the cake and erase the guides
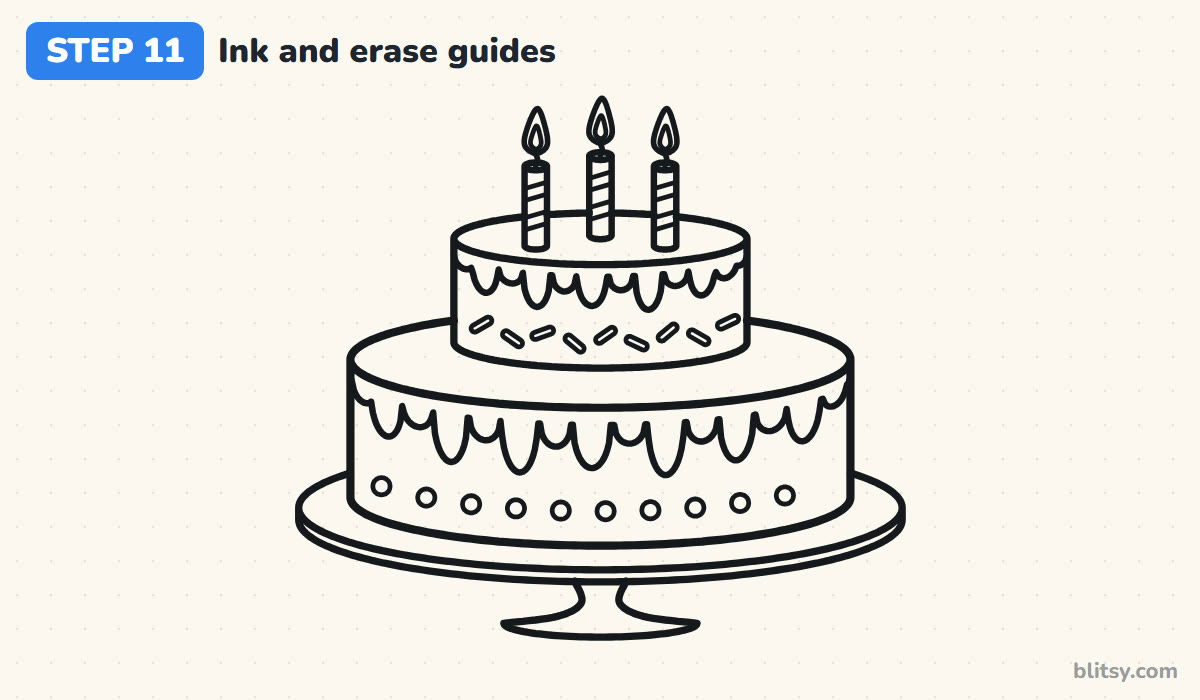
Go over every keeper line with your black fineliner, from the candle flames down to the foot of the stand. Give the ink a minute to dry. Then erase the center line and all the guide ovals. The hidden lines vanish and the cake suddenly reads as a solid, round shape.


💡 Tip: Ink the long outlines with one steady stroke each, turning the page as you go.
Step 12: Color the birthday cake
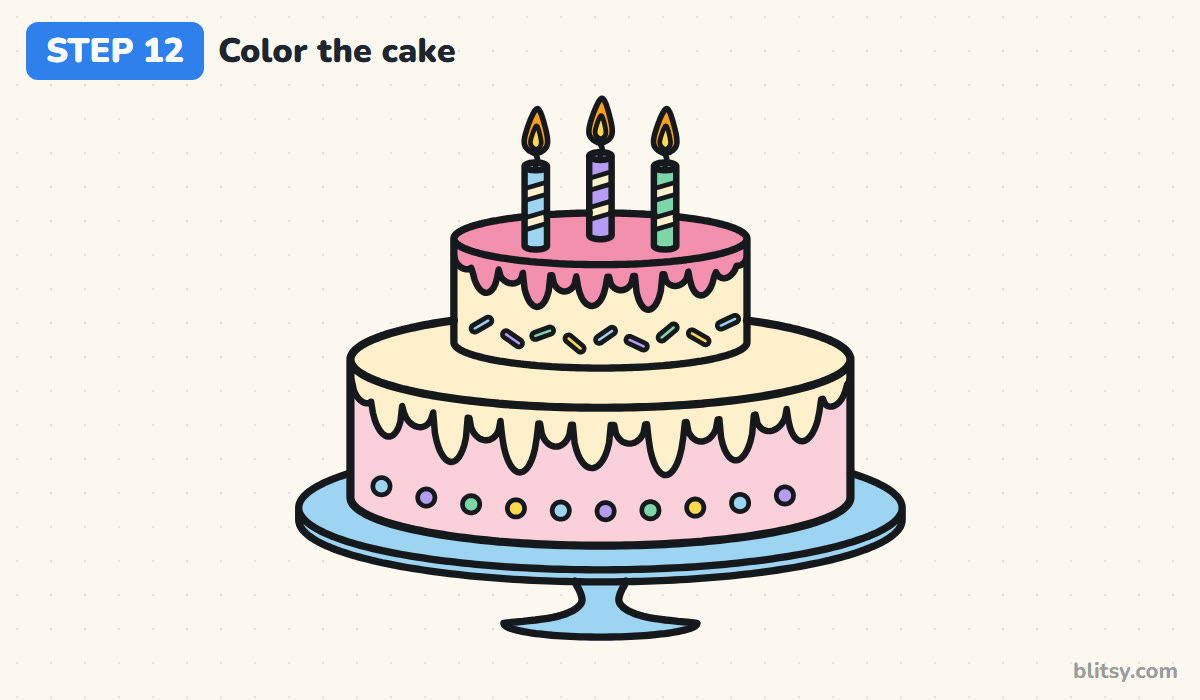
Color the stand light blue first. Fill the bottom cake light pink with cream drips and a cream top. Make the small tier cream with pink frosting. Use light blue, purple, green and yellow for the candles and all the little decorations, and cream for the candle stripes. Orange goes on the outer flames with yellow inside, which makes them glow.
💡 Tip: Color the pale shades before the dark ones so your pencils stay clean.
Where a Party Cake Drawing Can Wobble
- Pointy oval ends. Ovals that end in sharp corners make the cake look like a lemon. Keep the left and right ends round.
- Drawing hidden lines. Tracing the full bottom oval or the back rim behind the top tier makes the cake look see-through. Only ink what you'd really see.
- Drips all the same length. Even drips look like a fence. Mix long and short ones.
- Tilted tiers. If the side lines lean, the cake looks ready to fall. Check them against the center line before inking.
- Giant candles. Candles taller than the top tier squash the cake. Keep them about two thirds of its height.
Ways to Decorate Your Cake Differently
Once the two cylinders feel easy, play with the toppings. Swap the candles for big number candles showing a real age, add a third tier, or crown the cake with strawberries and swirls of whipped cream. A chocolate version just needs brown frosting and white drips. A cupcake uses the same frosting tricks on a smaller scale, so try this cupcake drawing tutorial next, and float a few shapes from the how to draw a balloon bunch lesson around your cake to finish the party scene.
Free Birthday Cake Coloring Page and Step Guide PDF
Planning a party table activity? Print the birthday cake coloring page: a small colored sample and a color key sit at the top, and a big bold outline fills the rest of the sheet. The step-by-step guide PDF has all 12 steps with their tips for drawing away from a screen. Both print on Letter or A4.
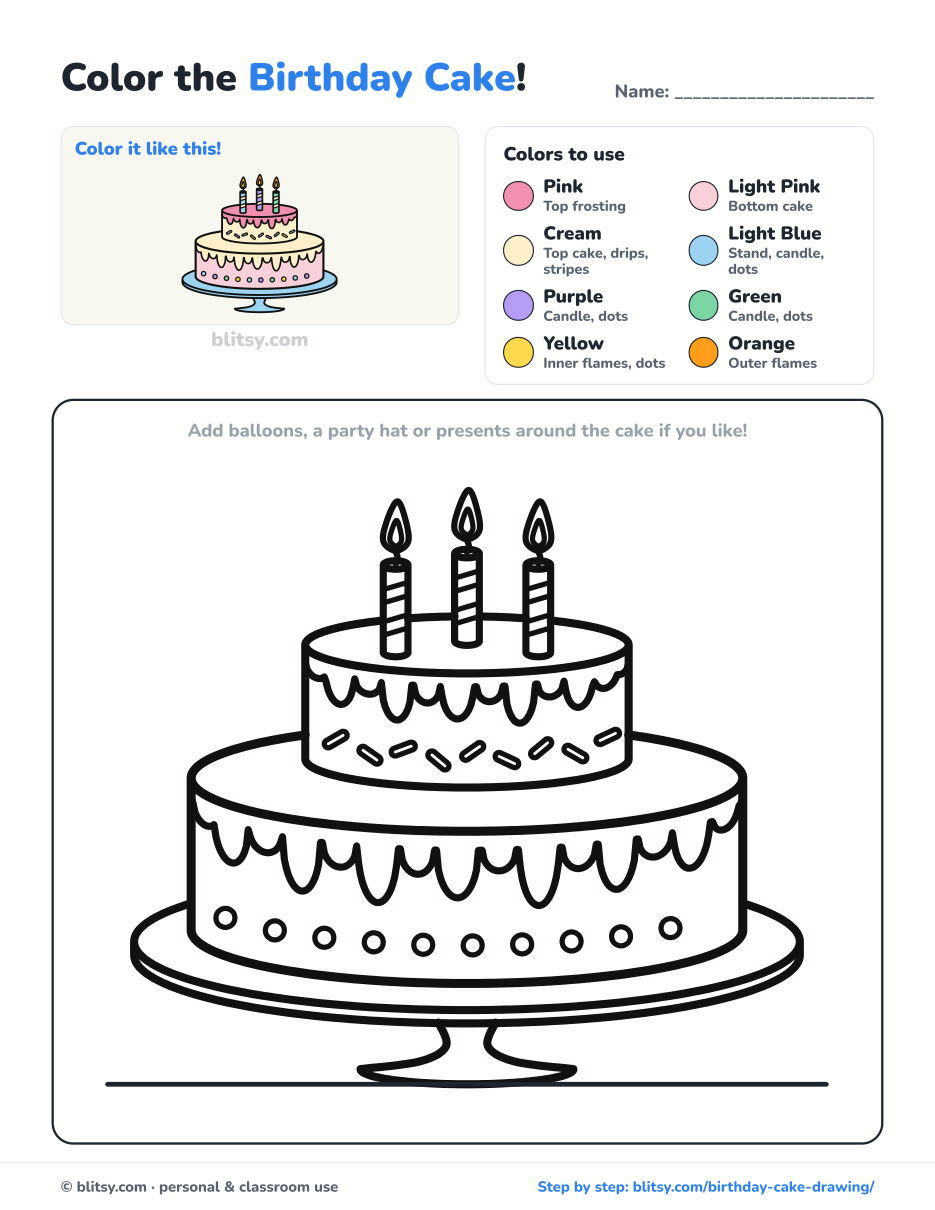
Black outlines with a colored example and the color names at the top. Ready to print and color.
⬇️ Download Coloring PageEvery step picture with its instructions and tips, to keep beside your paper while you draw.
⬇️ Download Drawing Guide📱 On a phone? Tap a download button, then open the file and choose Share → Save to Files or Print. On a computer, the PDF opens or saves straight to your Downloads folder.
Pin the Twelve Cake Steps for Party Day
Cake Finished? Try These Sweet and Leafy Tutorials
Every page linked here is its own step-by-step tutorial with numbered pictures, from fruit and flowers to a sunset.
- Sunflower Drawing: A big sunflower, a younger bloom and a bee looping in fill the page in this sunflower drawing tutorial.
- Pumpkin Drawing: Stack three pumpkins on golden hay with the how to draw a pumpkin step by step still life.
- Tulip Drawing: Draw red, pink and yellow tulips leaning different ways in this easy tulip drawing tutorial.
- Pizza Drawing: Another party food: this pizza drawing step by step ends with one cheesy slice pulling away from the pie.
- Garden Drawing: Build a sunny flower bed with a fence and a watering can in the garden drawing tutorial.
- Pineapple Drawing: Learn how to draw a pineapple with a leafy crown and a fresh slice standing beside it.
- Hibiscus Drawing: Five red petals turn around a dark center in this hibiscus drawing tutorial, with a bud waiting on the side.
- Oil Pastel Drawing: Pick up oil pastels for this oil pastel sunset tutorial: glowing sky bands, a sinking sun and a dark palm.
- Dandelion Drawing: Draw a yellow flower next to a fluffy seed head in the dandelion drawing step by step lesson.
- Cell Drawing: For a science day, the how to draw a cell tutorial walks you through a labeled animal cell.
- Succulent Drawing: Sage leaves with pink tips sit in a clay pot in this succulent drawing tutorial.
- Rose Drawing: Start from a tight spiral and open it into a red rose with the rose drawing step by step method.
- Strawberry Drawing: Strawberries go on plenty of cakes. This strawberry drawing tutorial shows a whole berry and a cut half.
- Fruit Drawing: Arrange five fruits in a blue bowl with the how to draw fruit step by step still life.
- Mushroom Drawing: Finish with a storybook toadstool scene in this easy mushroom drawing tutorial.
Cake Drawing Questions Kids Often Ask
What is the easiest way to draw a birthday cake?
Start with ovals. An oval on top, two straight sides and a curved bottom make a round cake layer. Stack two of these and the hard part is done.
How do you draw a cake that looks 3D?
Show the top as an oval and draw only the front half of the bottom curve. Hiding the lines you couldn't really see makes the cake look solid and round.
How long does it take to draw a birthday cake?
About 25 to 30 minutes including coloring. A one-tier cake with plain candles takes around 15.
Can little kids draw this cake?
Yes. Children around 6 can follow it, and younger kids can skip the stand and draw a single tier with one candle.
Draw one for the next birthday in your family and write their age on the candles. 🎂
Related posts:
 How to Draw a Whale Step by Step (Easy for Beginners)
 How to Draw Lungs Step by Step (Easy Science Diagram)
 How to Draw a Plant Step by Step (Easy Potted Monstera)
 How to Draw the Fortnite Llama Step by Step (Easy Fan Art)
 How to Draw a Police Car Step by Step (Easy for Kids)
 How to Draw a Volcano Step by Step (Easy Erupting Volcano)
 How to Draw a Crow Step by Step (Easy for Beginners)
 How to Draw a Tiger Step by Step (Easy Walking Pose)
 How to Draw a Heart Step by Step (Even, Symmetric Shape)
 How to Draw a Jellyfish Step by Step (Cute, Easy Guide)
 How to Draw Cerberus Step by Step (Cute and Easy)
 How to Draw a Taco Step by Step (Easy Kawaii Taco)

