
Sirens, flashing lights and a shiny star on the door: few vehicles get kids reaching for a pencil faster than a patrol car. This lesson shows you how to draw a police car step by step, starting with two circles on a line and ending with a crisp black-and-white cruiser. I designed it as a low, sporty sedan with a sloping back window, so it looks fast even while it's parked. You don't need any car-drawing experience, only the patience to keep your first lines light.
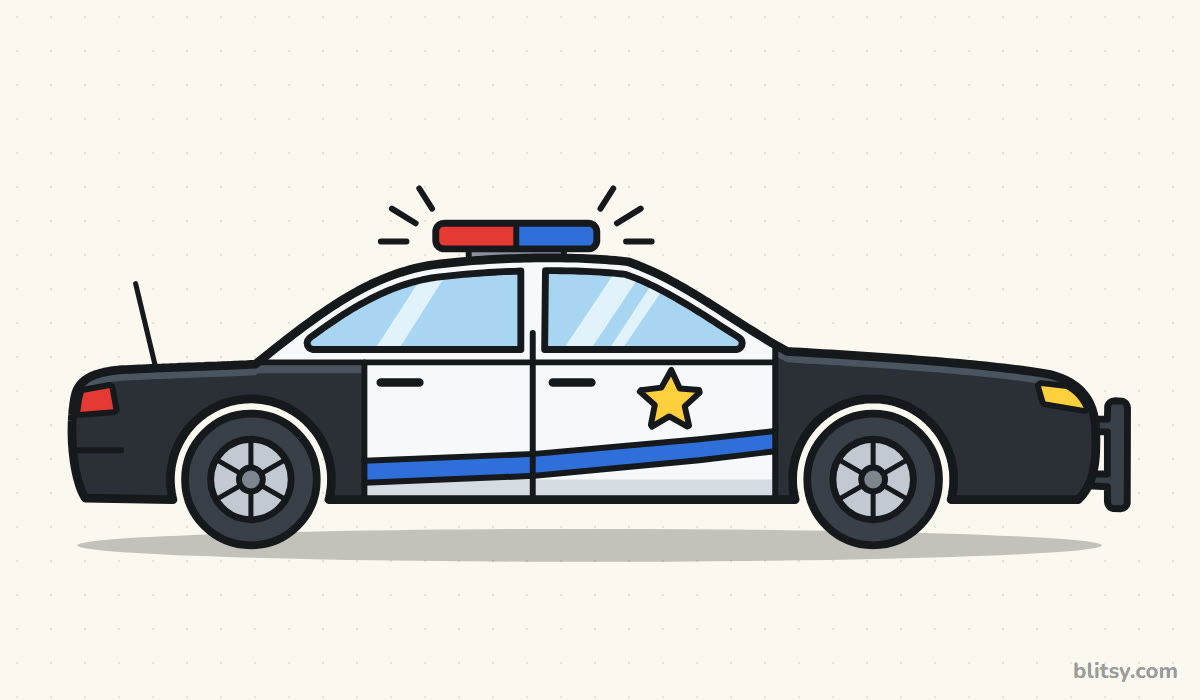
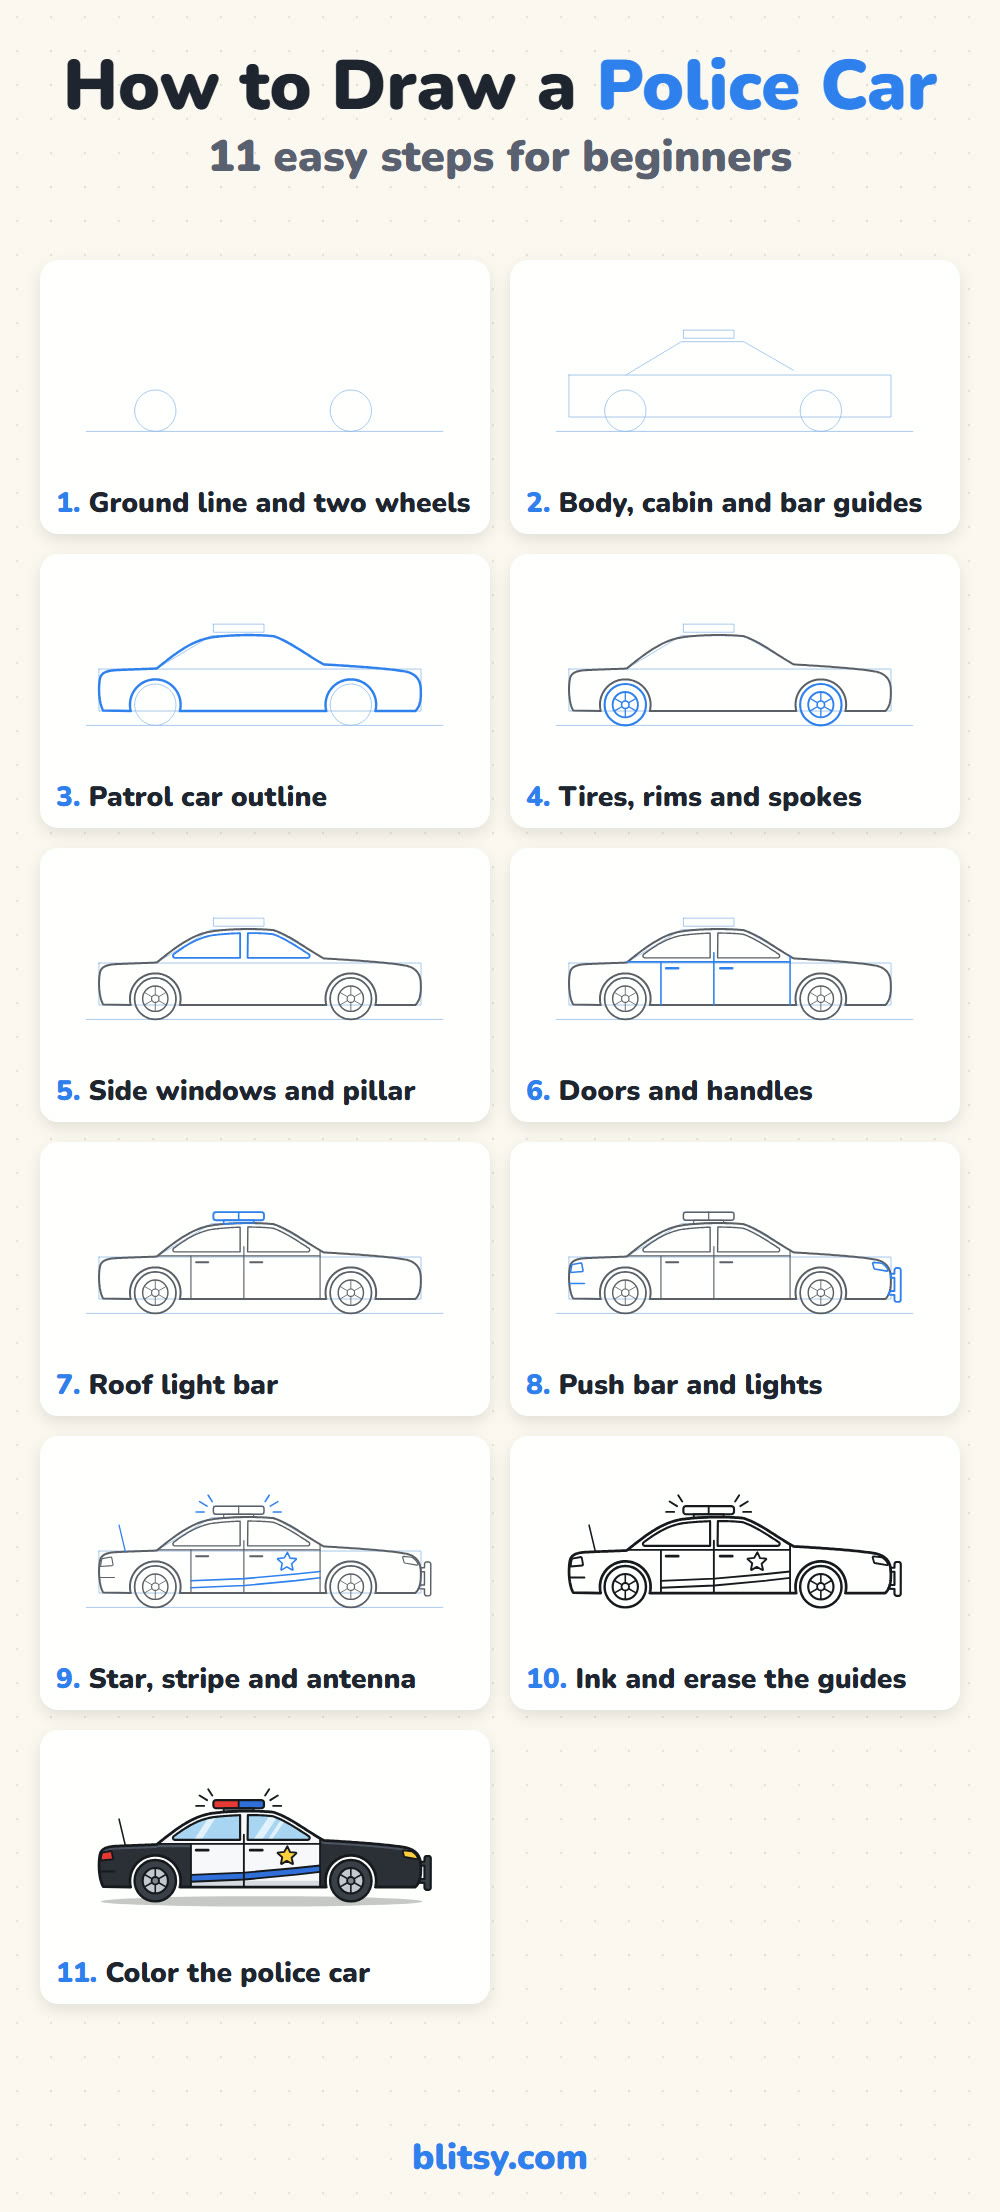
Squad car pictures below follow one simple code: fresh lines are blue, older ones are gray. The pale helper shapes in steps 1 and 2 are only there to guide you. Sketch them softly, since they disappear in step 10.
Quick overview
⏱️ Time: about 30 minutes, coloring included
🎯 Level: easy, good for kids around 6 and up
✏️ Steps: 11
🚓 You'll draw: a black-and-white patrol car with a red and blue light bar
Gear for Your Patrol Car Sketch
- A pencil with a sharp point
- A clean eraser
- A black marker or fineliner for inking
- Colored pencils or markers (black, red, blue, yellow plus grays)
- A sheet of paper turned sideways
- A ruler for the ground line and door lines (optional)
Short on black? Make it a blue-and-white car instead; plenty of real patrol cars look that way.
How to Draw a Police Car Step by Step
Step 1: Draw a ground line and two wheel circles
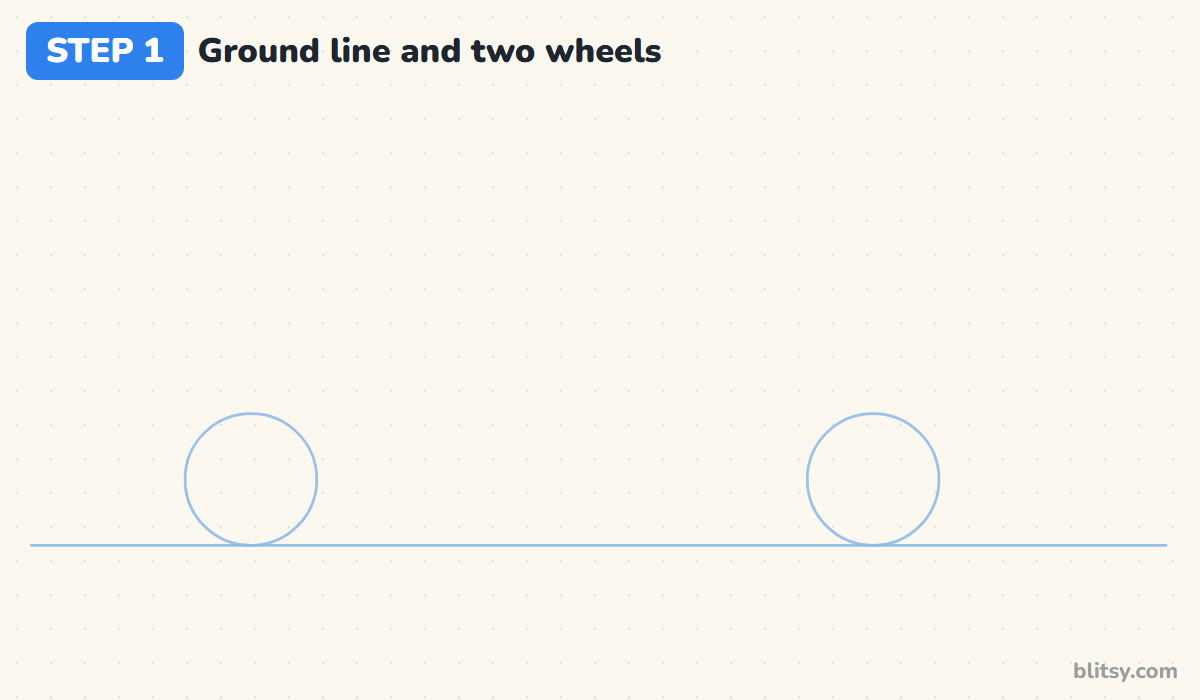
Run one long, straight line across the lower third of your sideways page. Then sit two circles on top of it, one near each end. The space between them should be about four and a half wheels wide. That gap makes it a long sedan, not a hatchback.
💡 Tip: Draw each circle in two halves if one sweep feels wobbly.
Step 2: Sketch the body box and cabin guides
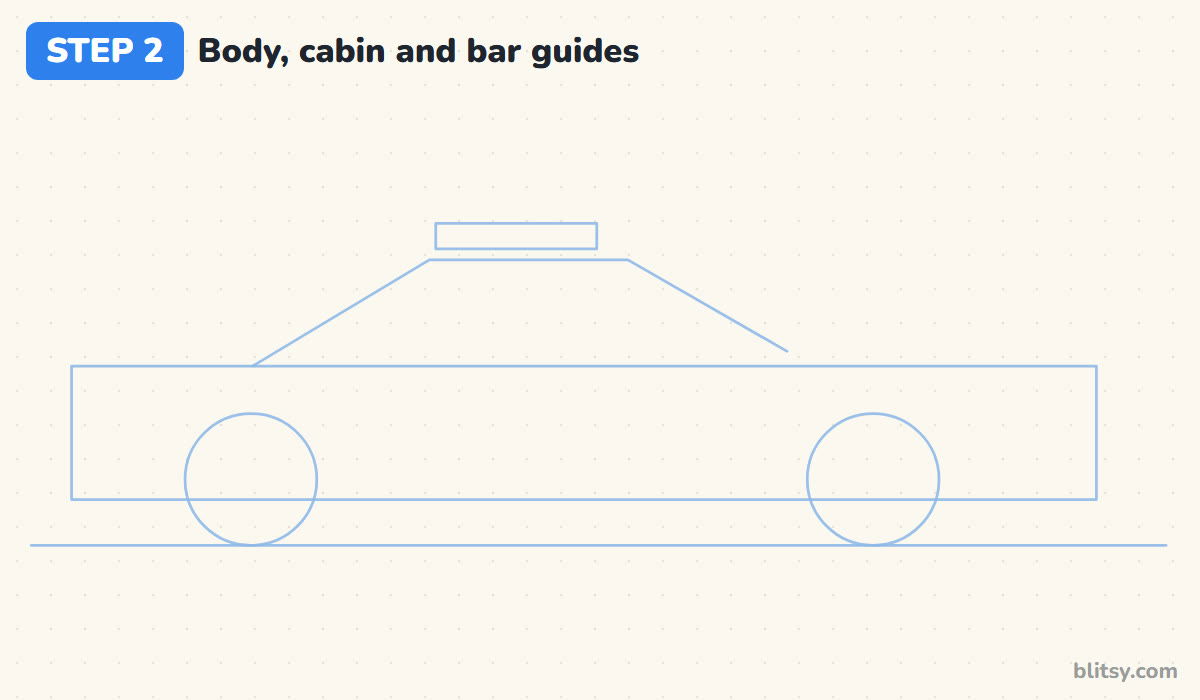
Draw a long, flat rectangle whose bottom edge crosses the middle of both wheels. On top of it, sketch a low cabin: a slanted line up from the back, a flat roof, and a longer slanted line down toward the front. I keep this cabin noticeably lower than a family car's, because a low roof is what makes a patrol car look quick. Finish with a thin rectangle floating just above the roof for the light bar.
💡 Tip: Slant the front of the cabin more than the back.
Step 3: Trace the patrol car's outline
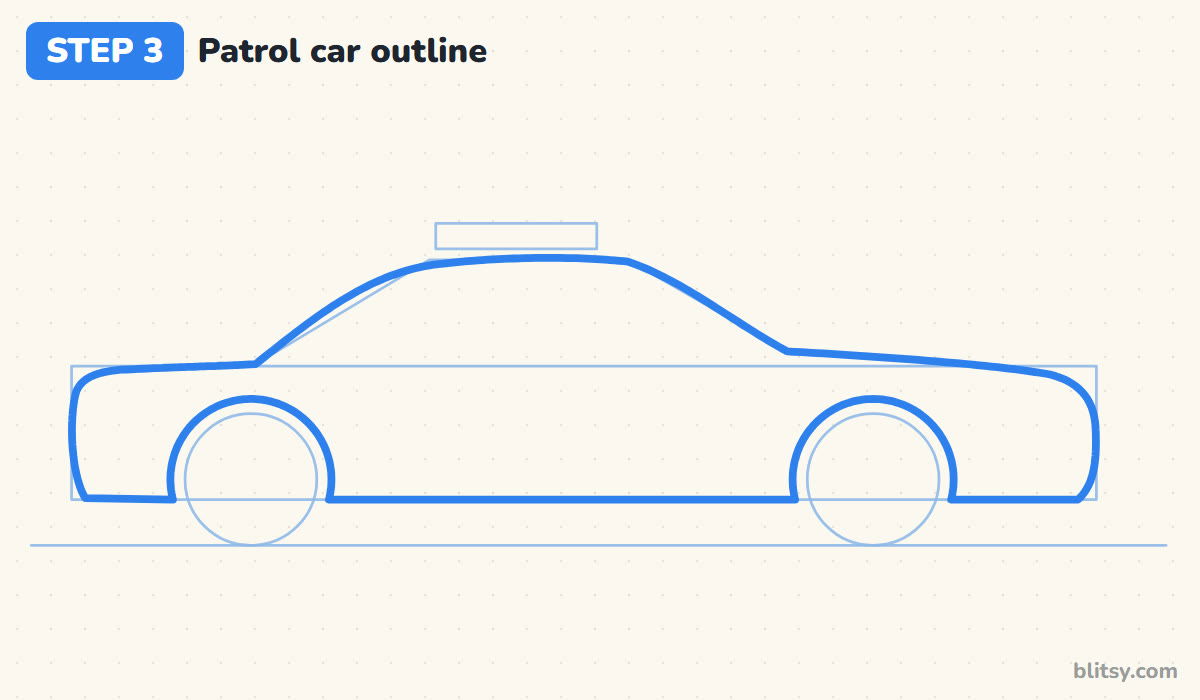
Now draw the real shape in one slow trip around the guides. Start at the rounded back bumper, run along the short trunk, then sweep up the long sloping back window. Cross the roof, slide down the windshield and stretch out along the hood to a rounded nose. Along the bottom, curve up and over each wheel, leaving a small, even gap.

💡 Tip: Stop and lift your pencil at each corner, then carry on.
Step 4: Give each wheel a tire and rim
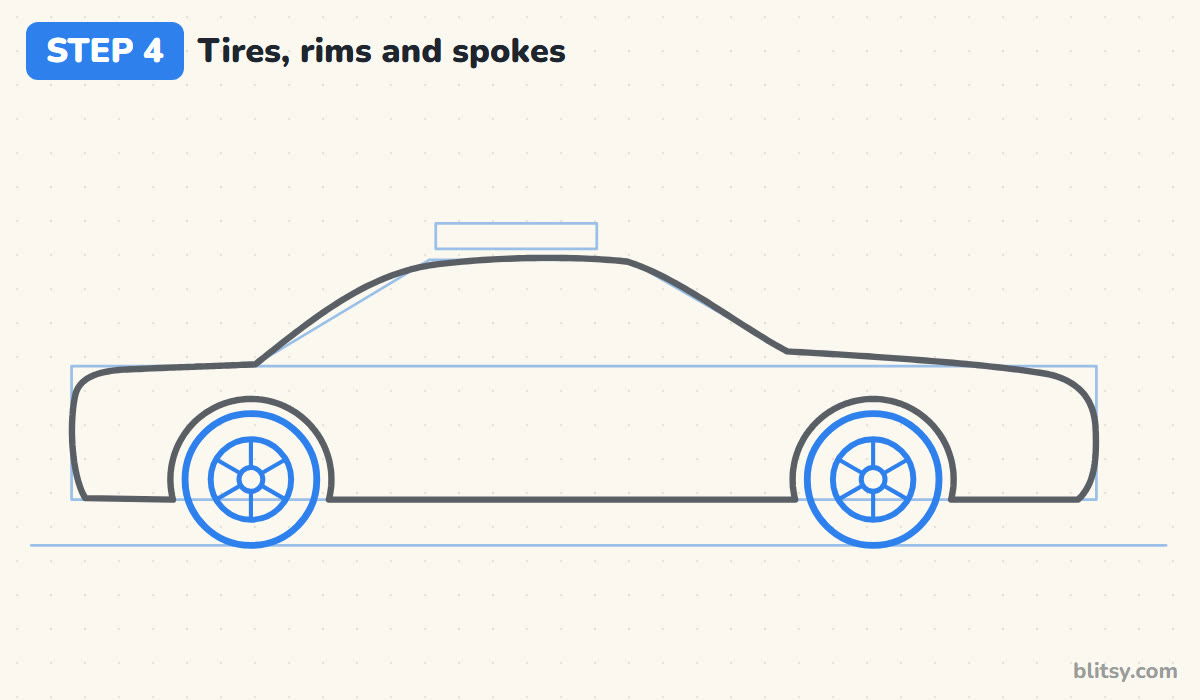
Go over each wheel guide with a firm circle for the tire. Inside, draw a smaller circle for the rim, about two thirds as wide, and a tiny one in the very center. Connect the center to the rim with six short spokes. Spacing them evenly is fiddly, so I place the top and bottom spokes first and fill the rest in between.
💡 Tip: Turn your paper as you draw circles; your hand curves better that way.
Step 5: Draw the side windows and the middle pillar
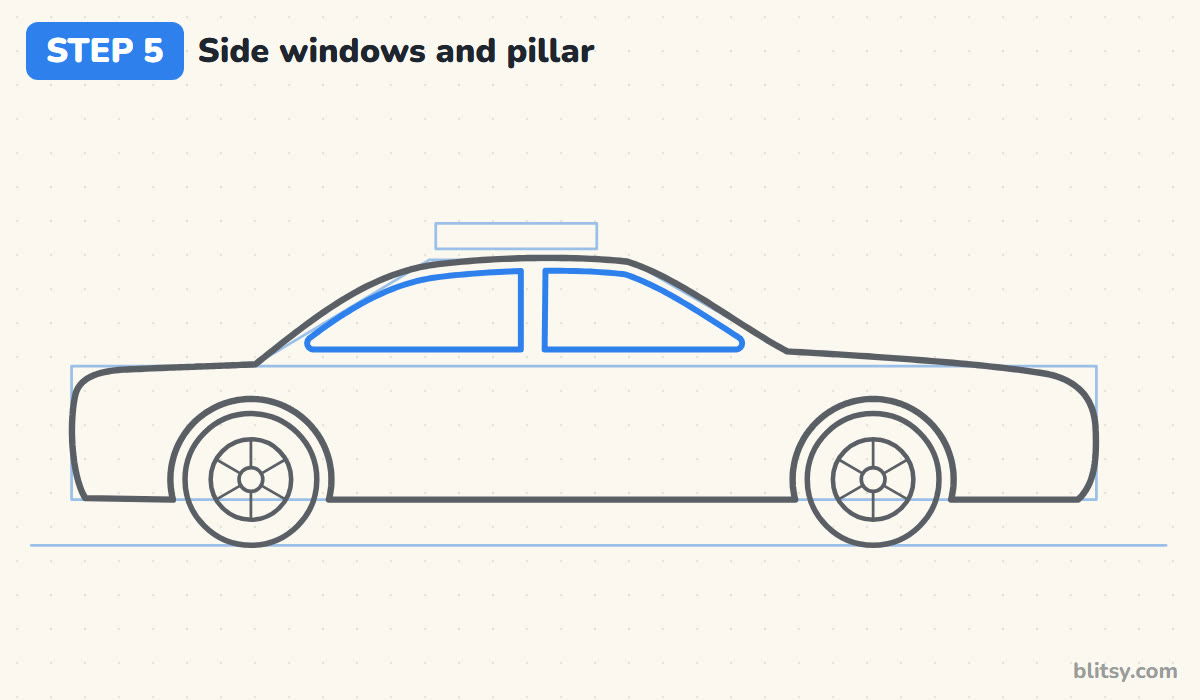
Follow the roofline about a finger's width inside it to draw the window shape. Its bottom edge is a straight line a little above the body box. Leave a narrow upright gap near the middle so you end up with two windows: a long, slanted one at the back and a shorter one at the front. That gap is the pillar between the doors.
💡 Tip: Keep the window gap the same width all the way along the roof.
Step 6: Mark the doors and handles
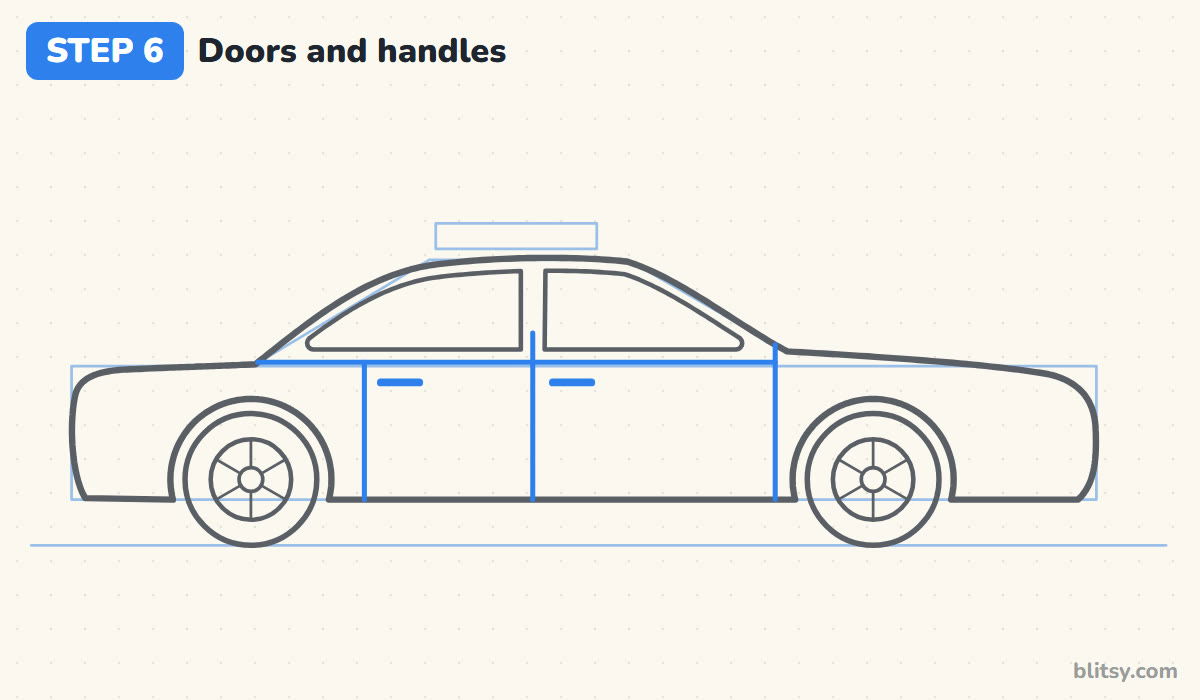
Draw a straight line across the car just under the windows, from the back glass to the windshield. Add three upright lines: one behind the rear door, one under the window pillar, and one in front of the front door. Each door gets a short, thick handle near its back edge.
💡 Tip: Line up the middle door line with the window pillar above it.
Step 7: Build the roof light bar
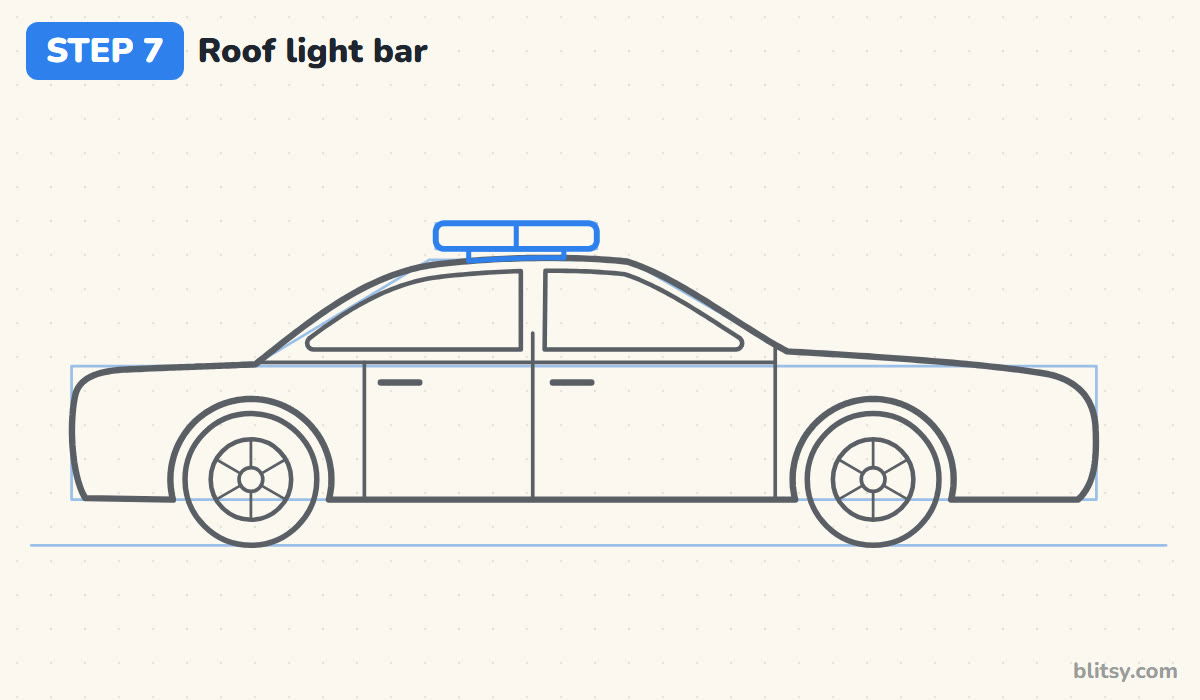
Turn the floating rectangle into a rounded bar with soft corners. Split it in half with one upright line, because one side will glow red and the other blue. Then connect it to the roof with a short, flat base. Kids love this part, so I let them make it a bit oversized.

💡 Tip: Round the bar's corners so it looks like plastic, not a brick.
Step 8: Add the push bar and the lights
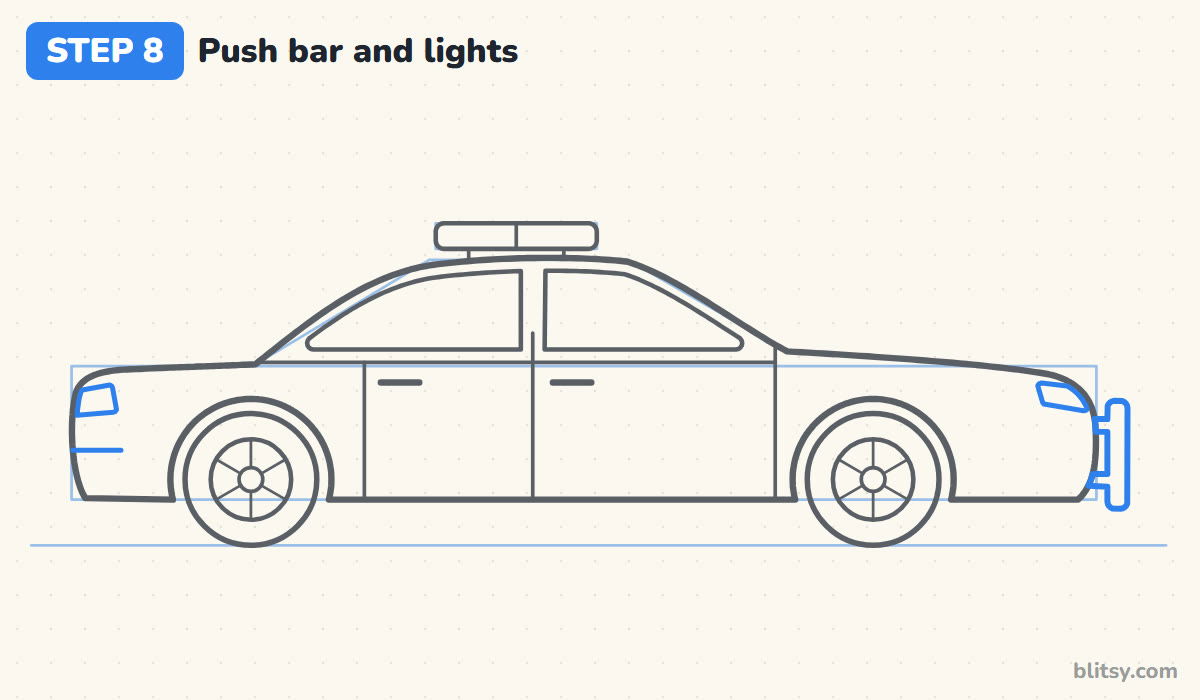
In front of the nose, draw a tall, narrow post with rounded ends, then join it to the bumper with two short arms. This push bar is a detail that instantly says police. Next, add a slanted headlight on the upper corner of the nose and a small tail light shape at the back. A short line across the rear bumper finishes the back end.
💡 Tip: Keep the push bar about as tall as the wheel.
Step 9: Draw the star badge and a stripe
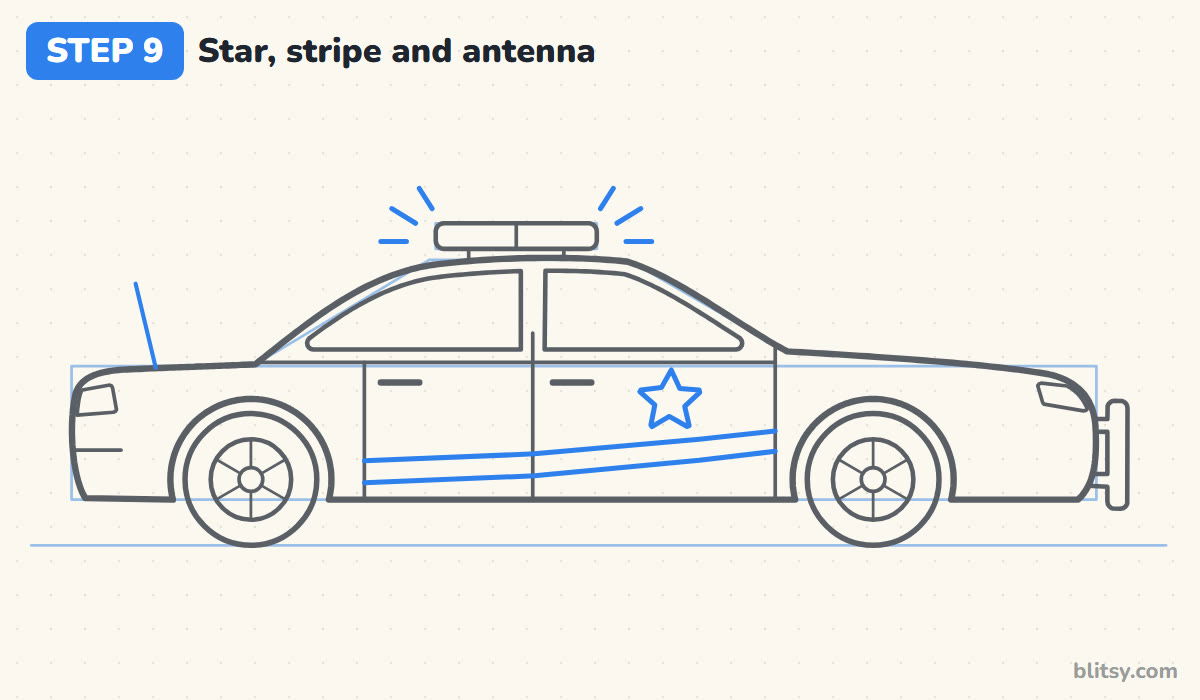
Place a five-point star on the front door, above where the stripe will go. Below it, draw two long lines that sweep across both doors and climb slightly toward the front, like a swoosh. Add a thin antenna leaning back from the trunk, then a few short flash marks on both sides of the light bar. Younger kids can draw a simple circle badge instead of the star.
💡 Tip: Start the star with an upside-down V, then add the arms.
Step 10: Ink the lines and erase the guides
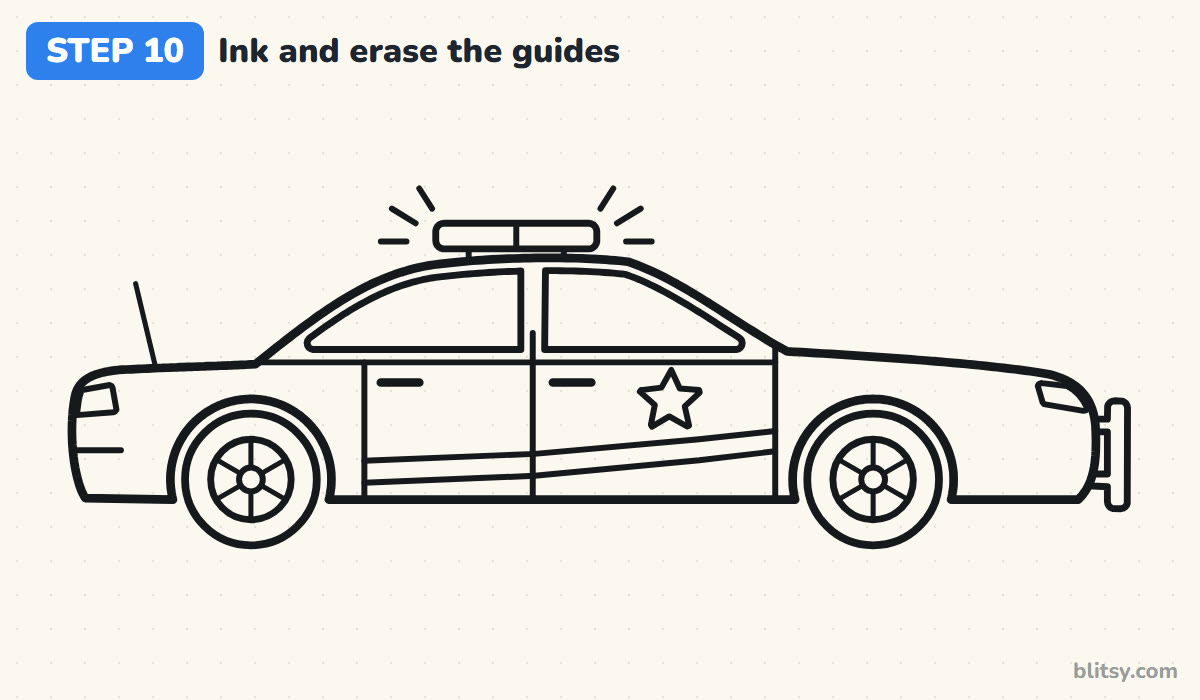
Trace every line you want to keep with your black marker. I always ink the big outline first, then the windows and doors, and leave the wheel spokes for last because they need the steadiest hand. Give the ink a minute to dry. After that, erase the box, the cabin lines, the light bar rectangle and the wheel guides.
💡 Tip: Rest your hand on a scrap of paper so it doesn't smear the ink.
Step 11: Color the police car
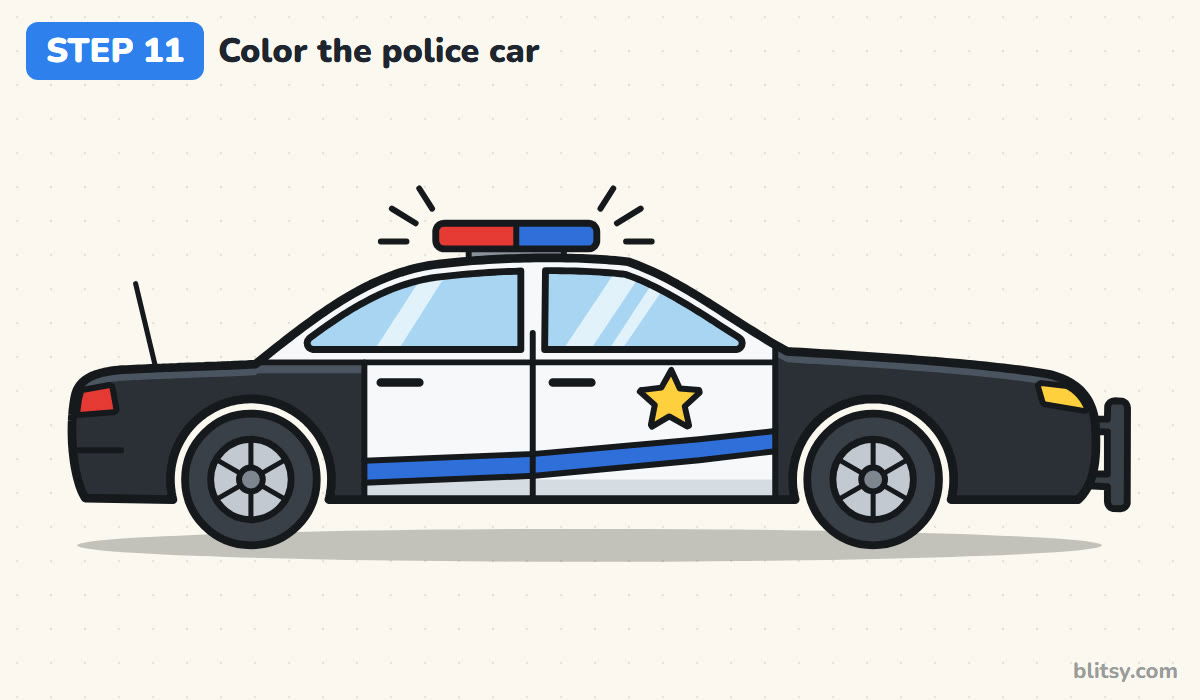
Color the hood, the front fender and the trunk black, and leave the doors and roof white. Add a soft gray strip along the bottom of the doors so the white looks solid. The windows go light blue with a couple of white streaks. Make the back of the light bar red and the front blue, use the same blue for the stripe, and pick yellow for the star and headlight. Finish with dark gray tires, light gray rims and a faint shadow underneath.

💡 Tip: Color the black areas last, so dark pencil dust can't smudge the white.
Where Police Car Drawings Tend to Go Wrong
- Wheels too close together. The car ends up short and toy-like. Measure the gap first and leave room for four and a half wheels between them.
- A tall, boxy roof. It turns the cruiser into a van. Keep the cabin low and stretch the back window into a long slope.
- Wheel arches that hug the tires. With no gap, the wheels look glued on. Leave a thin, even space between each arch and its tire.
- The light bar floating in the air. Without a base it looks like a sticker. Join it to the roof with a short, flat mount.
- Black paint everywhere. A fully black car hides all your door lines. Keep the doors and roof white so the classic pattern shows.
Patrol Car Variations Worth Trying
Once the basic car feels easy, give it a story. Swap the black for dark blue, draw an officer's cap peeking through the front window, or add speed lines behind the bumper for a chase scene. You can also draw a second car parked behind the first one, slightly smaller, to show distance. If your young artist wants a whole emergency team, the fire truck drawing tutorial makes a great partner, and the race car drawing tutorial suits anyone who loved drawing the low, sporty shape.
Police Car Coloring Page and Printable Drawing Steps
Need something for a quiet afternoon or a classroom table? The police car coloring page has a colored example and a color key at the top, so kids can match the black-and-white pattern, plus a big bold outline with a road line underneath. The step-by-step PDF guide holds all 11 steps and their tips. Both print well on Letter or A4 paper.
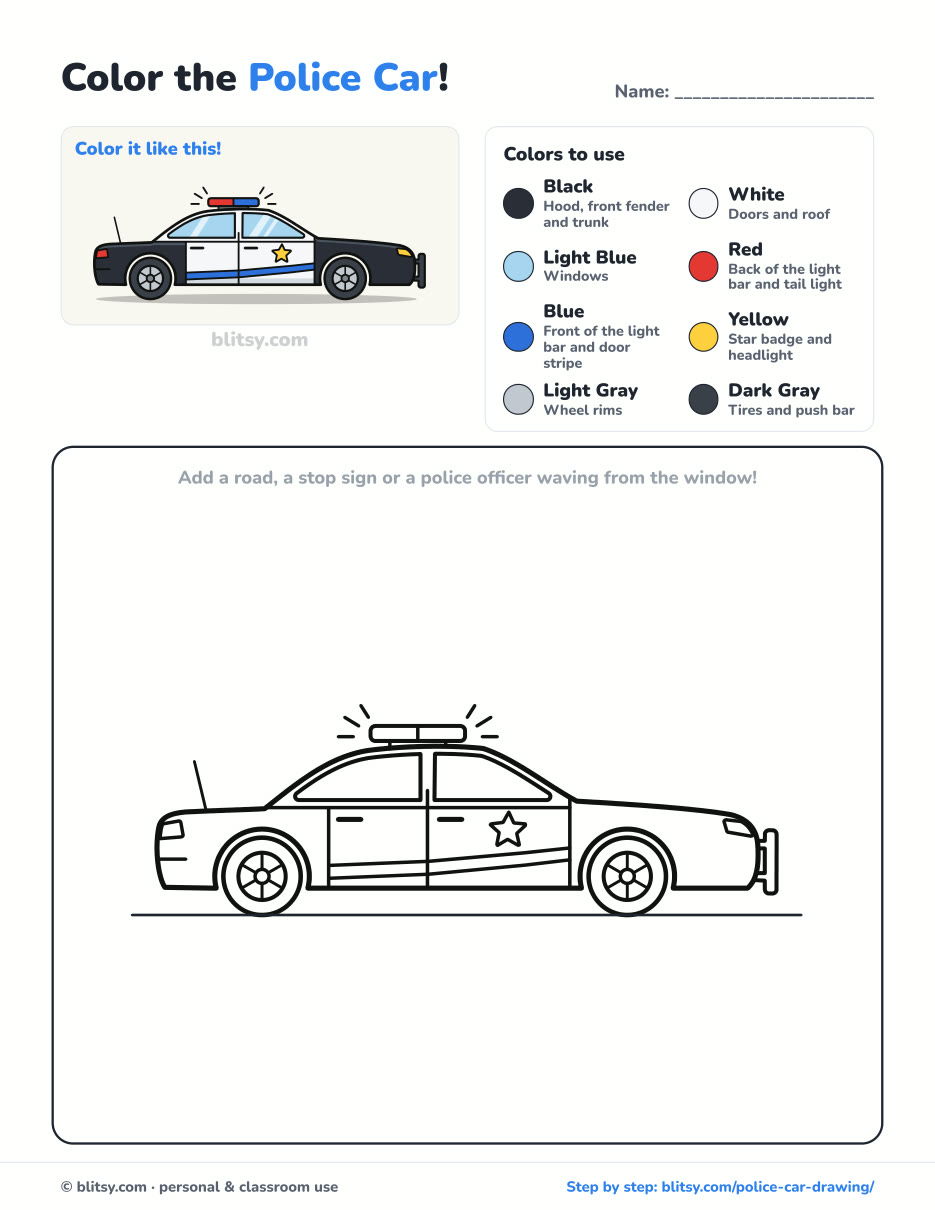
Black outlines with a colored example and the color names at the top. Ready to print and color.
⬇️ Download Coloring PageEvery step picture with its instructions and tips, to keep beside your paper while you draw.
⬇️ Download Drawing Guide📱 On a phone? Tap a download button, then open the file and choose Share → Save to Files or Print. On a computer, the PDF opens or saves straight to your Downloads folder.
Pin the Police Car Steps for Later
Patrol Car Parked? Try These Vehicles and Scenes
Every link here is a complete step-by-step tutorial, from vehicles to whole scenes, taught one stage at a time.
- Halloween Drawing: A cute haunted house with glowing windows and a grinning pumpkin starts from one hill line in the Halloween drawing tutorial.
- Realistic Drawing: Learn real shading on one shiny apple under a lamp with the realistic drawing step by step lesson.
- Diamond Drawing: Straight lines build a brilliant-cut diamond and two small gems in this diamond drawing tutorial.
- Volcano Drawing: Draw an island volcano in full eruption, palm trees and all, with how to draw a volcano step by step.
- Solar System Drawing: Every planet gets its own curved path, from the Sun to Neptune, in the solar system diagram tutorial.
- School Drawing: The school drawing tutorial builds a brick schoolhouse with a bell tower, a clock and a picket fence.
- Race Car Drawing: A red number 7 formula car grows from two circles in this race car drawing step by step guide.
- Summer Drawing: Draw a sunny beach with toys on the sand and an umbrella using the summer beach drawing tutorial.
- Fire Truck Drawing: Learn how to draw a fire truck with a ladder on top, a hose reel and lights ready to flash.
- Room Drawing: One vanishing point holds a whole bedroom together in the one-point perspective room tutorial.
Police Car Drawing Questions From Young Artists
What is the easiest way to draw a police car?
Draw a long rectangle with two wheels, put a smaller trapezoid on top for the cabin and add a little bar with a red and a blue half on the roof. Color the ends black and the middle white, and anyone will recognize it.
How do you draw a police car for kids?
Keep the big shapes and skip the fiddly parts. Small children can leave out the spokes, the antenna and the push bar arms, and draw the star as a simple circle badge.
How long does it take to draw a police car?
Most beginners finish in about 30 minutes with coloring. The outline and the wheels take the most care; the details go quickly.
What colors is a police car?
The classic look is black and white with a red and blue light bar, but many patrol cars are blue and white or all white with a colored stripe. Choose the version from your own town if you like.
Park your finished cruiser on the fridge, and next time try drawing it racing past with its lights flashing. 🚓
Related posts:
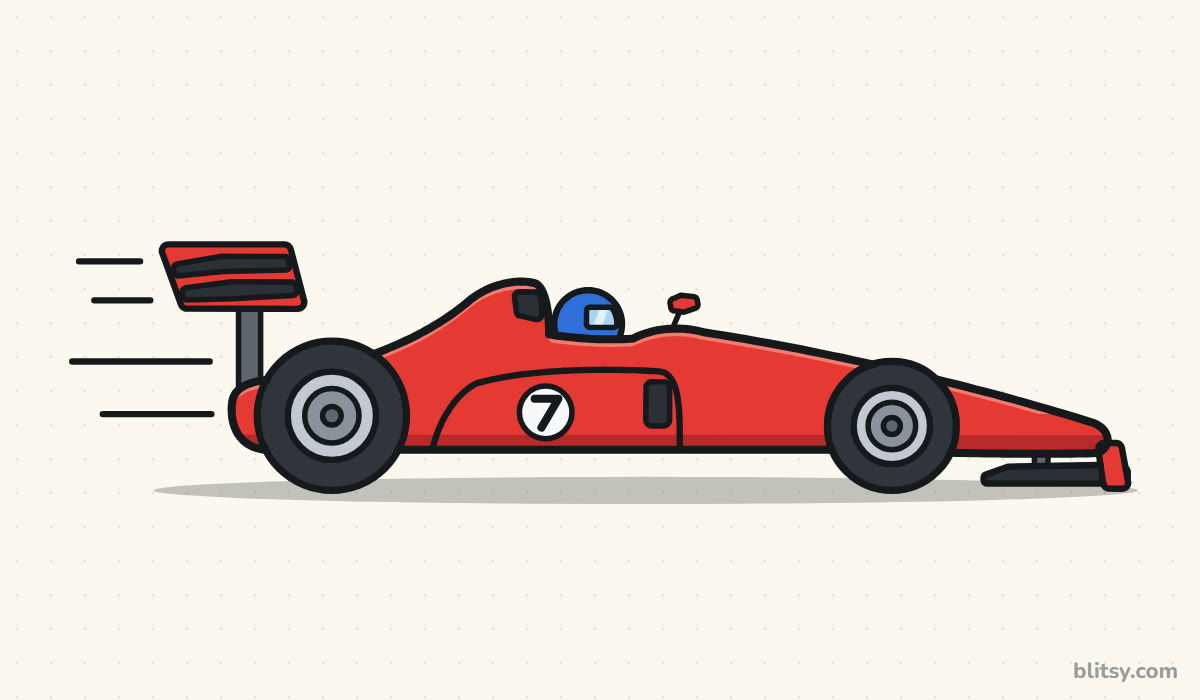 How to Draw a Race Car Step by Step (Easy Formula Car)
 How to Draw a Car Step by Step (Easy Drawing for Beginners)
 How to Draw a Tooth Step by Step (Cute and Easy for Kids)
 How to Draw a Mother and Daughter Step by Step (Easy for Kids)
 How to Draw Wonder Woman Step by Step (Chibi for Kids)
 How to Draw the Hulk Step by Step (Easy Chibi for Kids)
 How to Draw Iron Man Step by Step (Easy Chibi for Kids)
 How to Draw a Monster Truck Step by Step (Easy for Kids)
 How to Draw a Mermaid Step by Step (Easy Cartoon for Kids)
 How to Draw a Boat Step by Step (Easy Sailboat for Kids)
 How to Draw a Care Bear Step by Step (Cute Fan Art for Kids)
 How to Draw Hello Kitty Step by Step (Easy for Kids)

