
A balloon is often one of the very first things kids ask to draw, and a whole bunch of them makes any birthday card look ready for a party. In this lesson I'll show you how to draw a balloon step by step, starting from one plain oval, and then we'll gather five balloons and a gold foil star into a cheerful bunch. You don't need any drawing experience for this. A pencil you can press lightly is enough to begin.

In the balloon pictures, whatever you add in that step is drawn in blue. Earlier lines turn gray, and the pale blue helper shapes vanish once we ink, so draw them softly.
Quick overview
⏱️ Time: about 20 to 30 minutes
🎯 Level: easy, fine for kids around 6 and up
✏️ Steps: 10
🎈 You'll draw: five party balloons and a foil star tied with a bow
What to Grab Before the Balloons Float Away
- A pencil you can press lightly with (HB is a good choice)
- An eraser, ideally a soft white one that won't smudge
- A black marker or a fine felt-tip pen for the final lines
- Coloring pencils or markers in the six balloon colors (red, yellow, blue, green, pink, gold), plus darker shades if you have them
- A sheet of plain paper, held upright
No gold pencil? A deep yellow with a touch of orange on the darker star facets reads as foil from across the room.
How to Draw a Balloon Step by Step
Step 1: Sketch ovals and a meeting dot
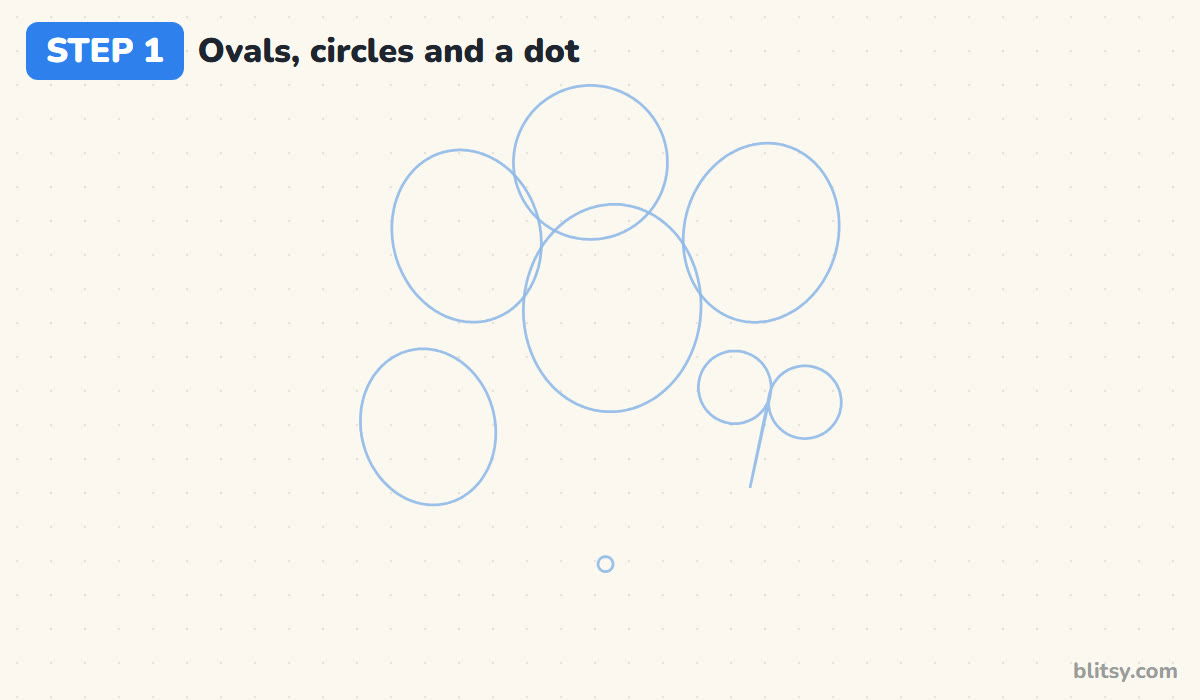
Lightly draw four ovals in a loose bunch: a big one in the middle, two leaning outward above it, and a smaller one low on the left. For the heart, put two small circles side by side on the lower right with a V hanging under them. Add one more circle on top for the star. Then place a tiny dot well below the middle oval. Every string will meet there.
💡 Tip: Keep these shapes so faint that one swipe of the eraser would lift them.
Step 2: Outline the big front balloon
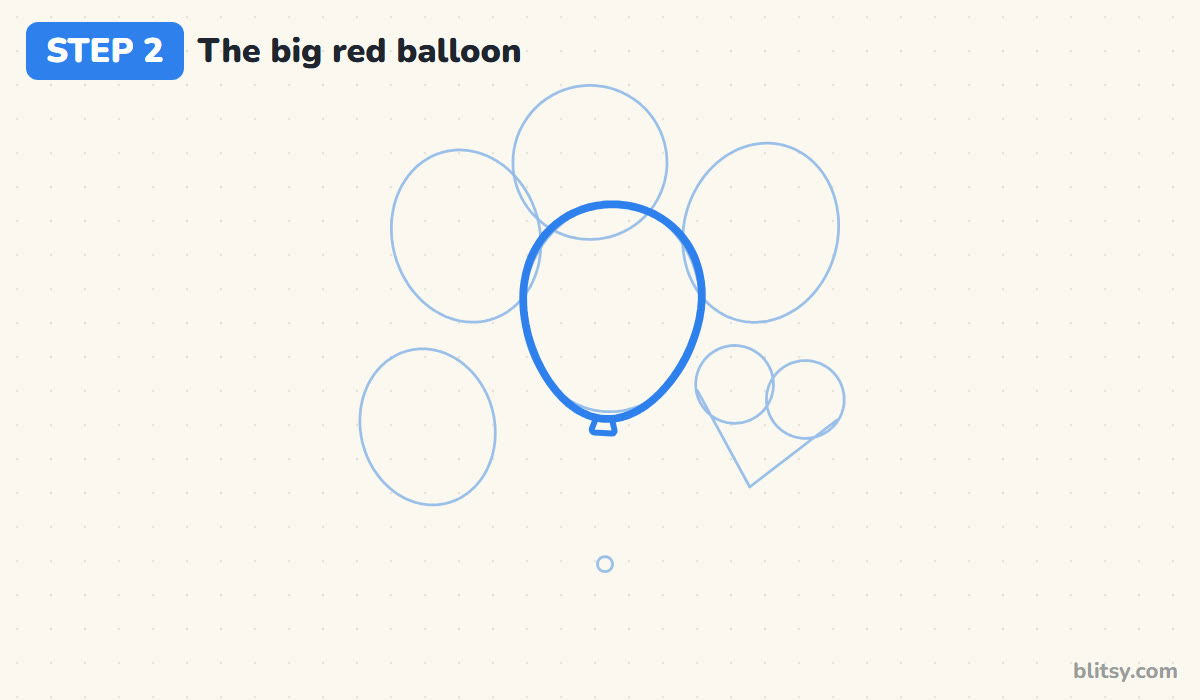
Go over the middle oval, but pull the bottom in a little so it narrows toward the base, like an egg standing on its wide end. Real balloons taper where the rubber gathers at the neck, and that small change stops yours from looking like a plain circle. At the bottom point, draw a tiny knot: a short shape that's wider at the bottom than the top. I always draw this front balloon first, because nothing covers it.
💡 Tip: Turn the paper as you go around so your hand pulls the curve toward you.
Step 3: Add the green egg and the heart
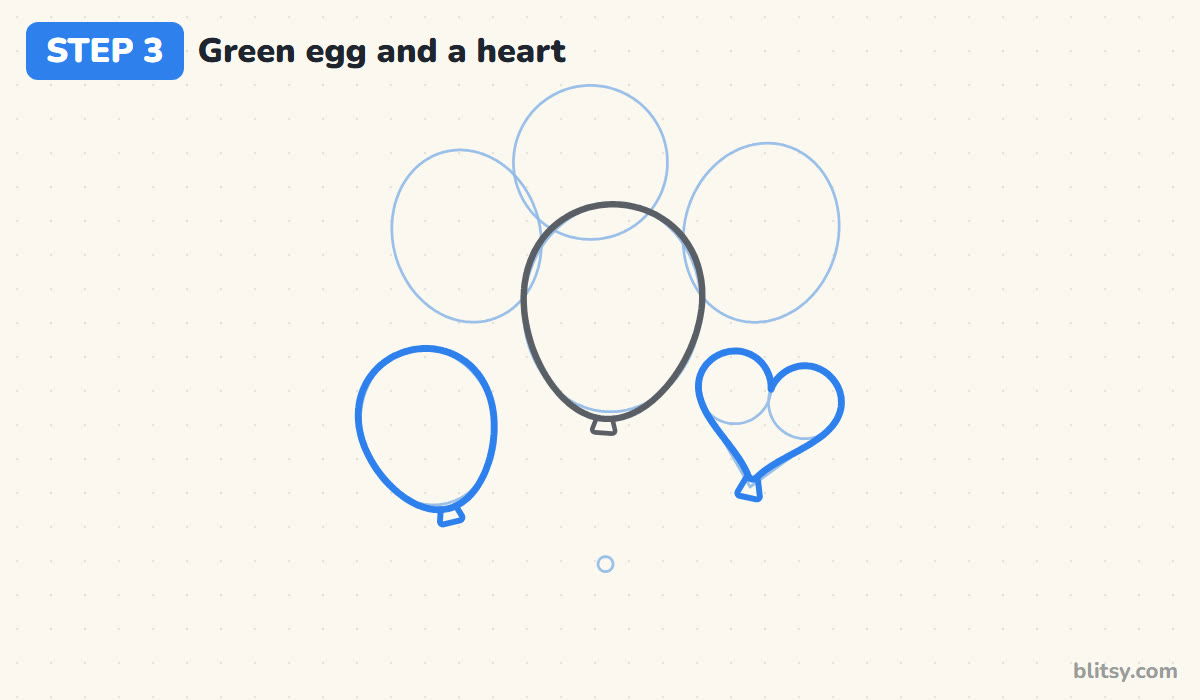
The green balloon on the lower left gets the same egg shape and knot as the red one, only smaller and tipped a little to the left. For the heart, trace around the outside of both circles, dip into a soft notch where they meet, and follow the V lines down to a rounded point. Hang a little knot from that point too.




💡 Tip: Round off the bottom of the heart slightly, or it starts to look like a playing card.
Step 4: Draw the gold foil star
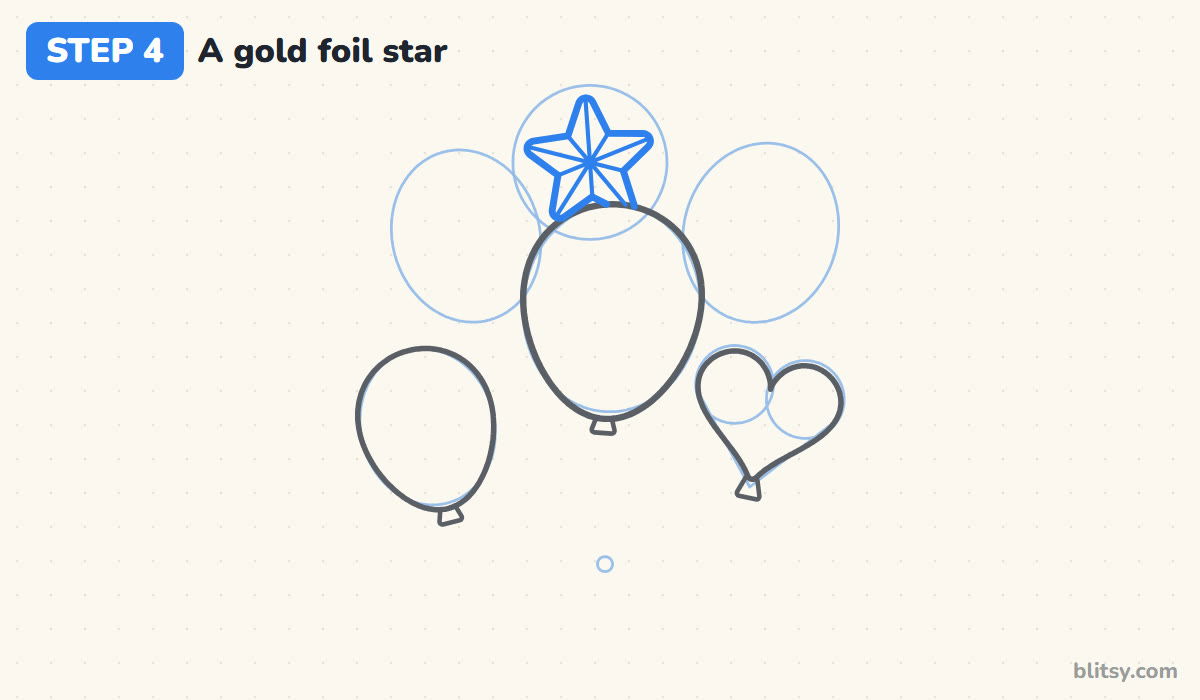
Inside the top circle, mark five points around the edge, evenly spaced, with one pointing straight up. Join them through five inner corners to make the star, and soften every tip, since foil balloons are puffy rather than sharp. Where the star meets the red balloon, stop your line; the star floats behind it. Finish with a thin line from the middle out to each tip and each inner corner. Those ten lines make the foil facets.
💡 Tip: Count the points out loud as you place them. A sixth one sneaks in surprisingly often.
Step 5: Draw the two balloons behind
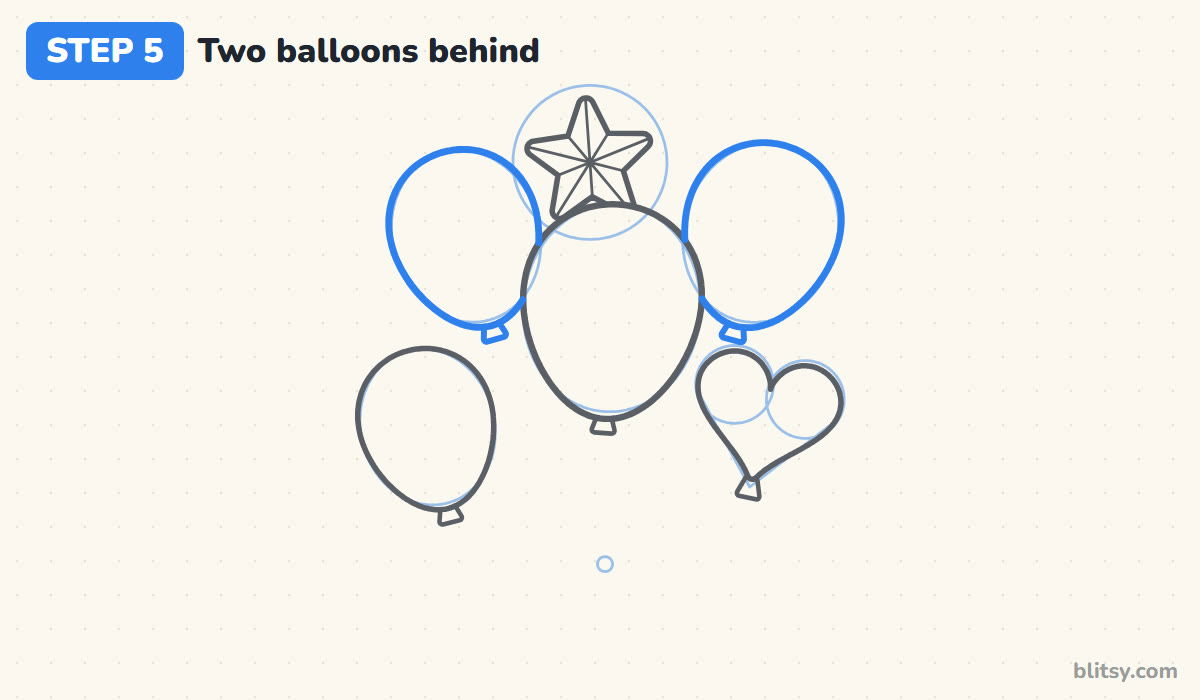
Now trace the upper left and upper right ovals for the yellow and blue balloons. Wherever a balloon passes behind the red one or the star, stop at the edge and don't draw through it. Give each one its own knot at the bottom, tilted the same way the balloon leans. Most beginners want to finish the whole oval here, and that's what makes a bunch look see-through.
💡 Tip: Unsure which line to skip? Ask yourself which balloon is closer to you.
Step 6: Add shine marks and shadow lines
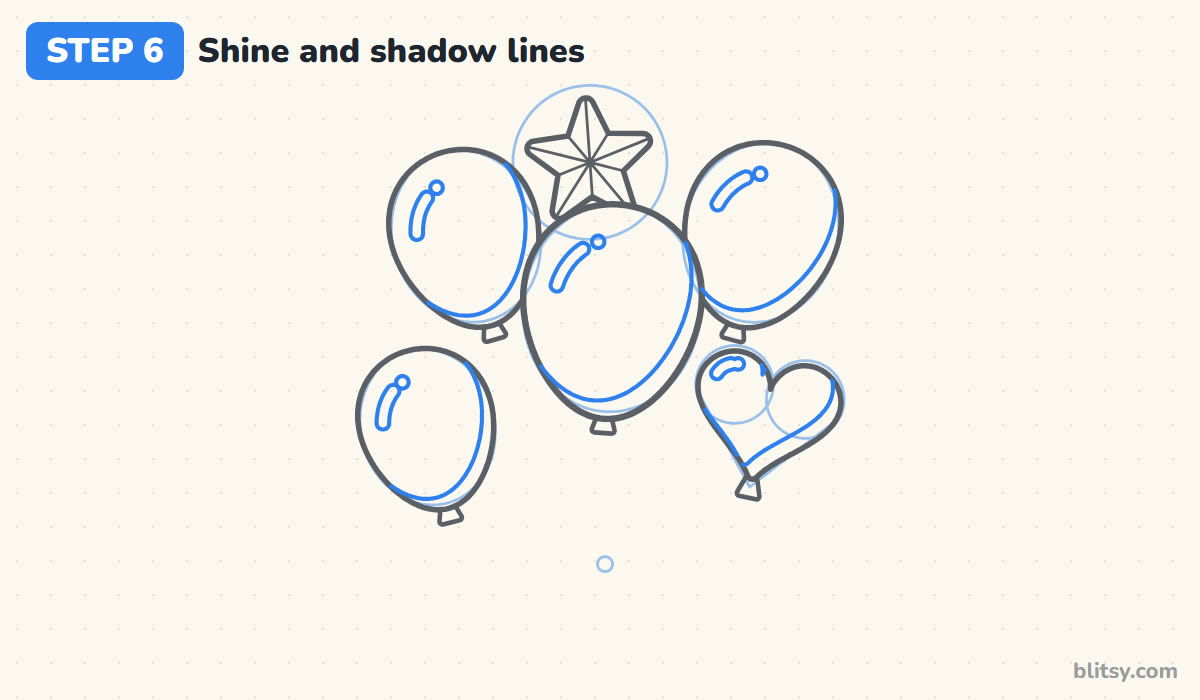
On every round balloon and on the heart, draw a short curved shine near the upper left, shaped like a narrow loop, with a small dot just past its end. You'll leave these white later. Next, draw one long curve just inside the lower right edge of each balloon. The thin strip between that curve and the outline becomes the shadow. I put the shine and the shadow on the same sides every time, so the light seems to come from one place.
💡 Tip: Place the shine well away from the middle of each balloon, up near its shoulder.
Step 7: Let the strings wave down
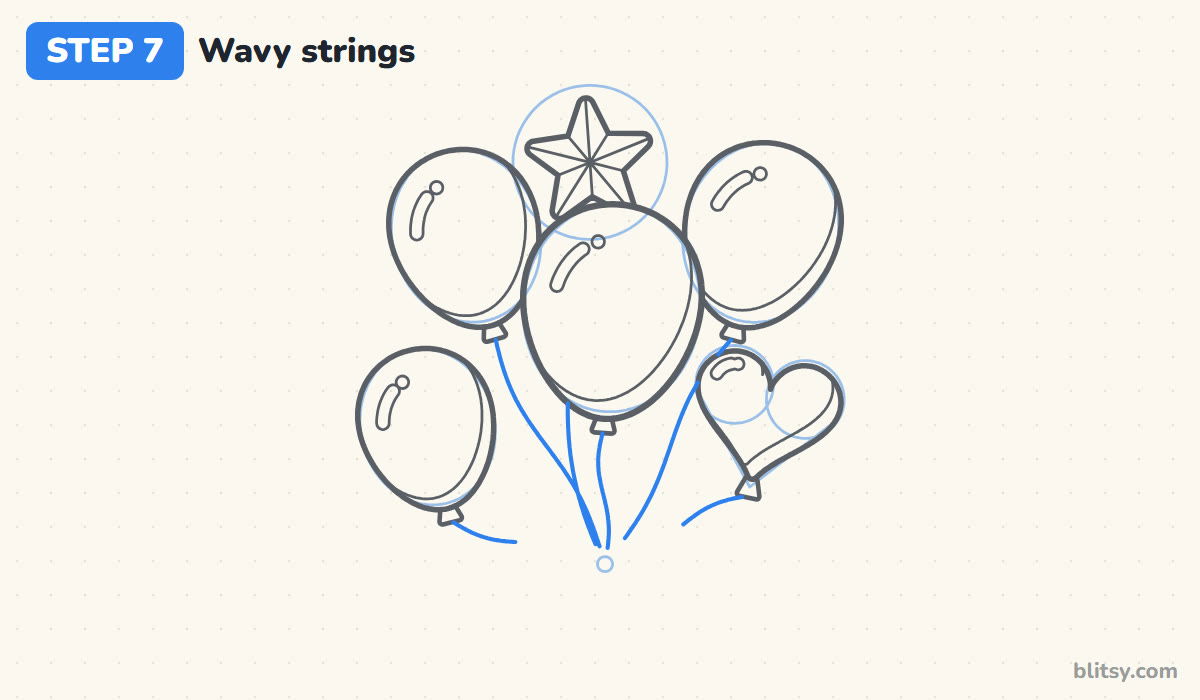
From each knot, draw a thin string down toward the meeting dot. Let it wave gently, bending one way and then the other, rather than running ruler-straight. A string that passes behind a lower balloon disappears and comes out again below it; the star's string hides behind the red one. Stop each one a little before the dot, because the bow will cover the ends.




💡 Tip: Use a quick, relaxed stroke for strings. Slow lines tend to wobble.
Step 8: Tie a ribbon bow
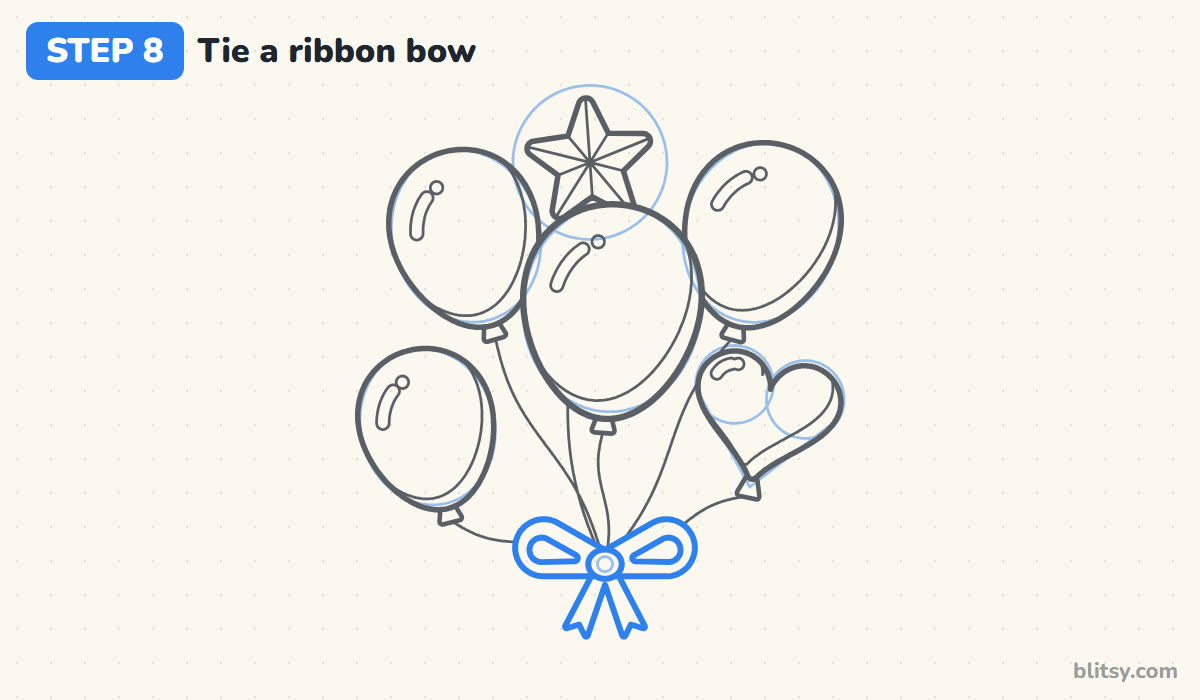
Over the meeting dot, draw a small oval for the bow's knot. On each side, add a loop shaped like a fat teardrop lying on its side, with a smaller teardrop inside for the opening. Under the knot, draw two short ribbon tails that spread apart like an upside-down V, and cut a notch into each end. I keep the bow about as wide as the green balloon; any bigger and it steals attention from the balloons.
💡 Tip: Make each notch from two tiny slanted lines that meet in a point.
Step 9: Ink the lines and erase guides
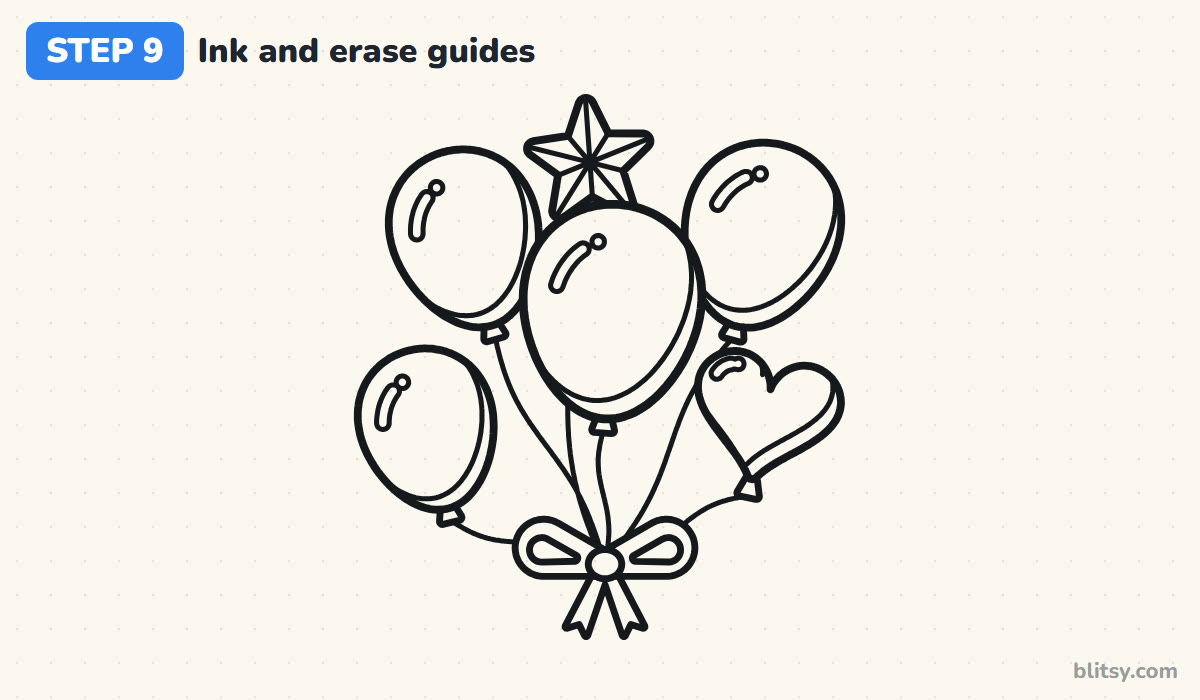
Trace every line you want to keep with a black marker, starting with the big outlines and saving the small shines and the strings for last. Give the ink a full minute to dry. With so many shapes close together, your hand will cross wet lines more than once. Then erase the ovals, circles, the V and the dot. A guide left inside a balloon will show through light colors like yellow, so check each one.
💡 Tip: Rest your hand on a scrap of paper so it never drags across fresh ink.
Step 10: Color the party balloons
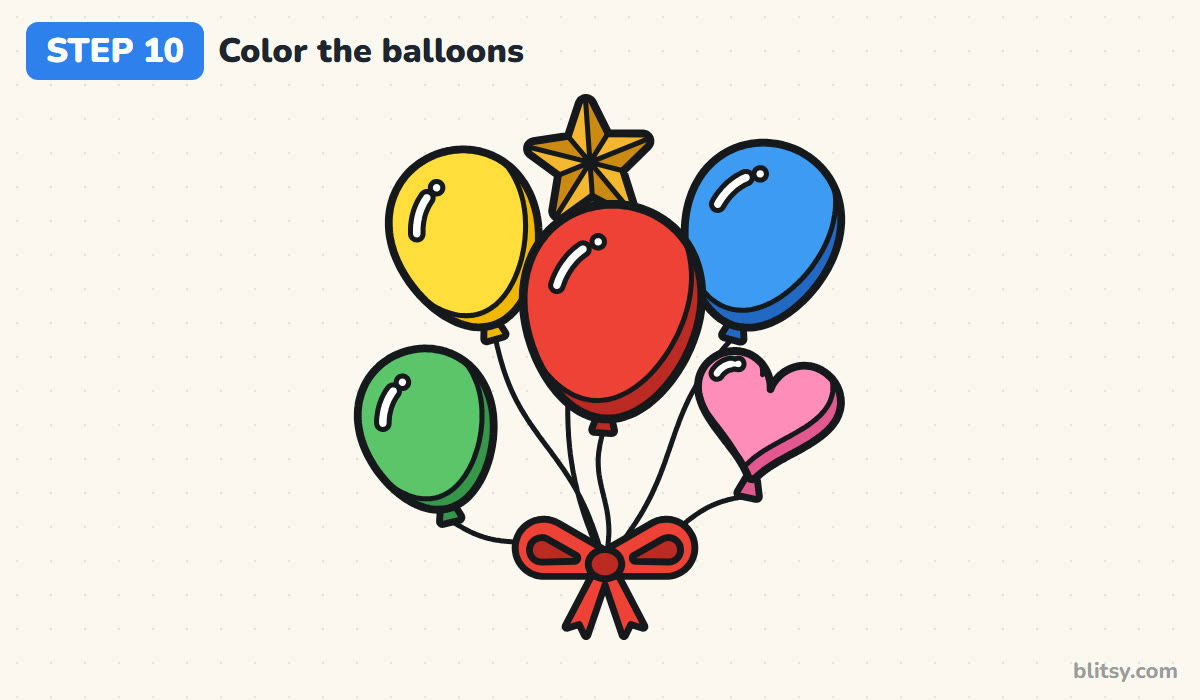
Color the middle balloon and the bow red, the back two yellow and blue, the low one green and the heart pink. Use gold or a deep yellow for the star. In every shadow strip, switch to a darker shade of the same color, or simply press much harder with the normal one. The darker star facets get the same treatment. Leave every shine white, and the balloons will suddenly look round and glossy.
💡 Tip: Color carefully around the white shines first, then fill the rest freely.
Where a Balloon Bunch Goes Wrong
- Drawing perfect circles. Round shapes read as bubbles or beach balls. Narrow each balloon slightly toward its knot.
- Drawing lines through the front balloon. If the edge of a back balloon crosses the red one, the bunch looks see-through. Stop at the edge and carry on beyond it.
- Putting the shines on different sides. Then the light seems to come from everywhere at once. Pick one side for every shine and the opposite side for every shadow.
- Ruler-straight strings. Stiff lines look like sticks propping the balloons up. A gentle wave tells the eye it's string.
- Strings that cross each other. Crossed strings look tangled. Aim each one at the meeting dot from its own direction.
Turning Your Bunch Into a Birthday Picture
Once the bunch feels easy, I like to personalize it. Write a big number on the red balloon for someone's age, add stripes or polka dots to the back balloons, or swap the bow for a small gift box with the strings tied to its lid. A party picture also needs something to celebrate, so try the birthday cake drawing tutorial beside your bunch, and if the heart balloon was your favorite part, the heart drawing tutorial has plenty more to practice.
Free Balloon Coloring Page and Printable Drawing Guide
The balloon coloring page has a small colored example at the top with the color key beside it, so kids can match each balloon. The big outline underneath leaves space for confetti, a banner or a sky. The step-by-step guide PDF holds all 10 steps with their tips. Both print on Letter or A4 paper.
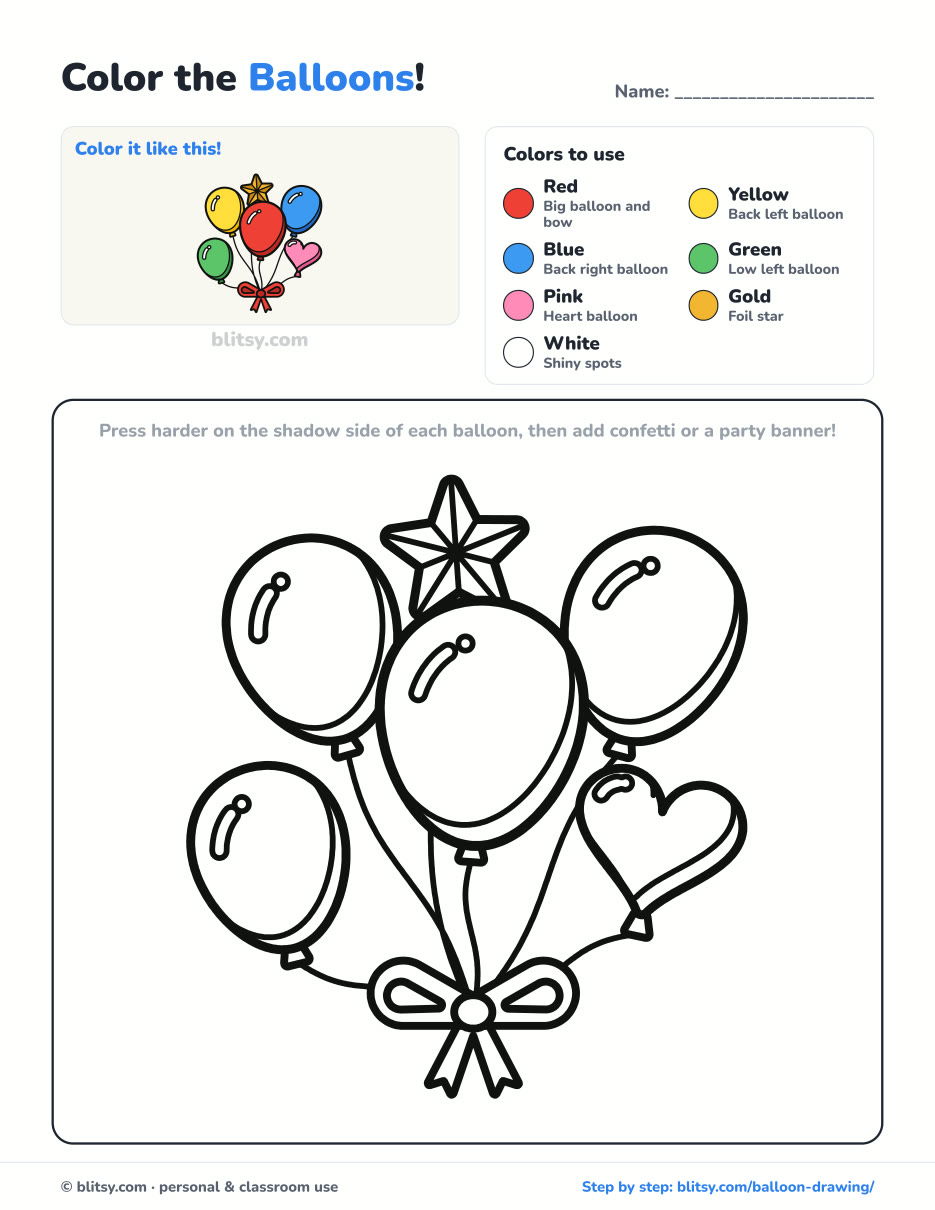
Black outlines with a colored example and the color names at the top. Ready to print and color.
⬇️ Download Coloring Page



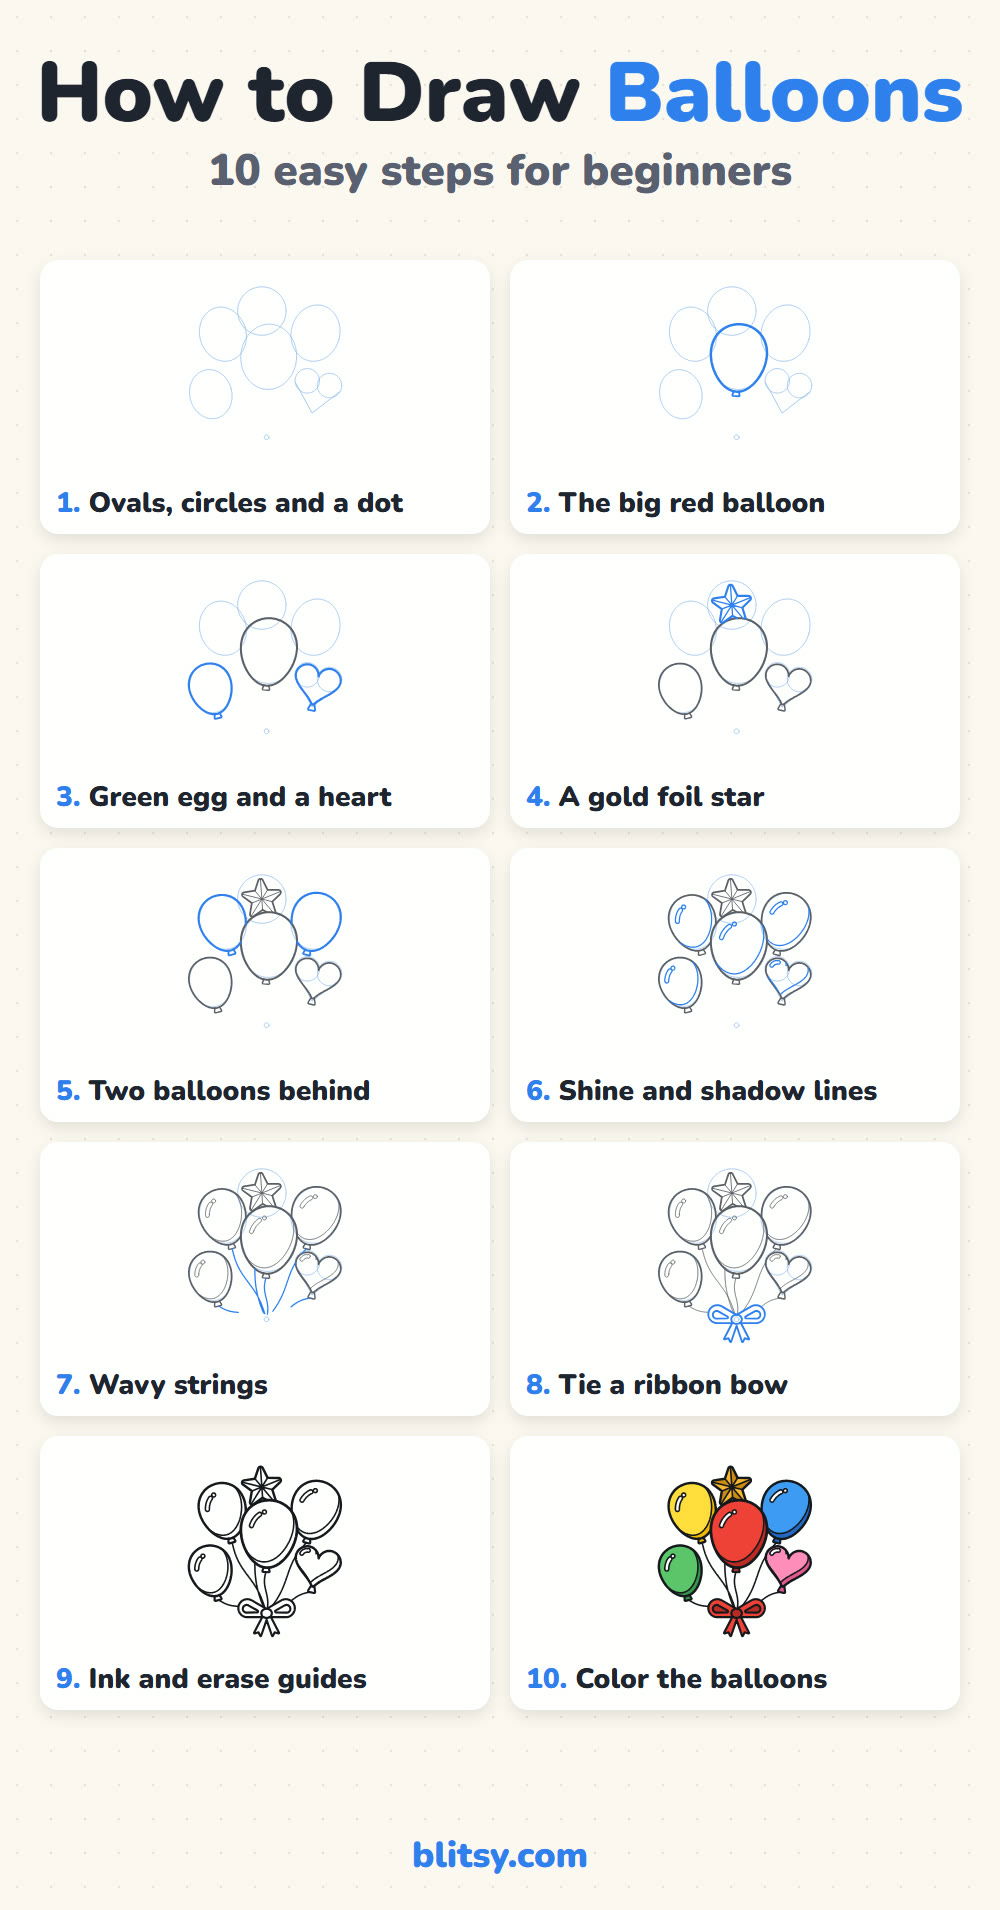
Every step picture with its instructions and tips, to keep beside your paper while you draw.
⬇️ Download Drawing Guide📱 On a phone? Tap a download button, then open the file and choose Share → Save to Files or Print. On a computer, the PDF opens or saves straight to your Downloads folder.
Pin the Balloon Steps for the Next Party
Balloon Drawing Questions Kids Often Ask
What is the easiest way to draw a balloon?
Draw an oval that narrows a little at the bottom, add a tiny knot under it and a wavy string. A white shine near the top makes it look shiny.
Why do balloons float?
Party balloons that float are filled with helium, which is lighter than air, so the air around them pushes them up. Balloons blown up by mouth hold ordinary breath, so they sink.
How do you make a balloon drawing look 3D?
Keep a white shine on one side and a darker strip of the same color on the opposite side. Overlapping balloons adds depth as well.
Can young kids draw this balloon bunch?
Yes. Kids around six can follow it. Younger ones can draw a single balloon using only step 2, step 6 and step 7.
Tomorrow, draw one more balloon in a color you skipped today and give it a happy face. 🎈
Related posts:
 How to Draw a Dress Step by Step (Easy Party Dress)
 How to Draw a Whale Step by Step (Easy for Beginners)
 How to Draw Lungs Step by Step (Easy Science Diagram)
 How to Draw a Pineapple Step by Step (Easy Crown and Slice)
 How to Draw Iron Man Step by Step (Easy Chibi for Kids)
 How to Draw a Chicken Step by Step (Easy for Beginners)
 How to Draw a UFO Step by Step (Cute Alien Saucer)
 How to Draw Flames Step by Step (Easy Campfire Drawing)
 How to Draw a Moon Step by Step (Sleepy Crescent + Phases)
 How to Draw a Sunflower Step by Step (Big and Bright)
 How to Draw a Fall Leaf Step by Step (Maple, Oak and Birch)
 How to Draw a Mushroom Step by Step (Easy Storybook Toadstool)

