
A sunflower looks busy at first glance, with all those petals and seeds, but underneath it's only a circle inside a bigger circle. Here you'll learn how to draw a sunflower step by step, from those two circles to a full, sunny bloom on a thick stem. I've added a smaller flower, two broad leaves and a bee, so the page feels like a corner of a summer field. No drawing experience needed.
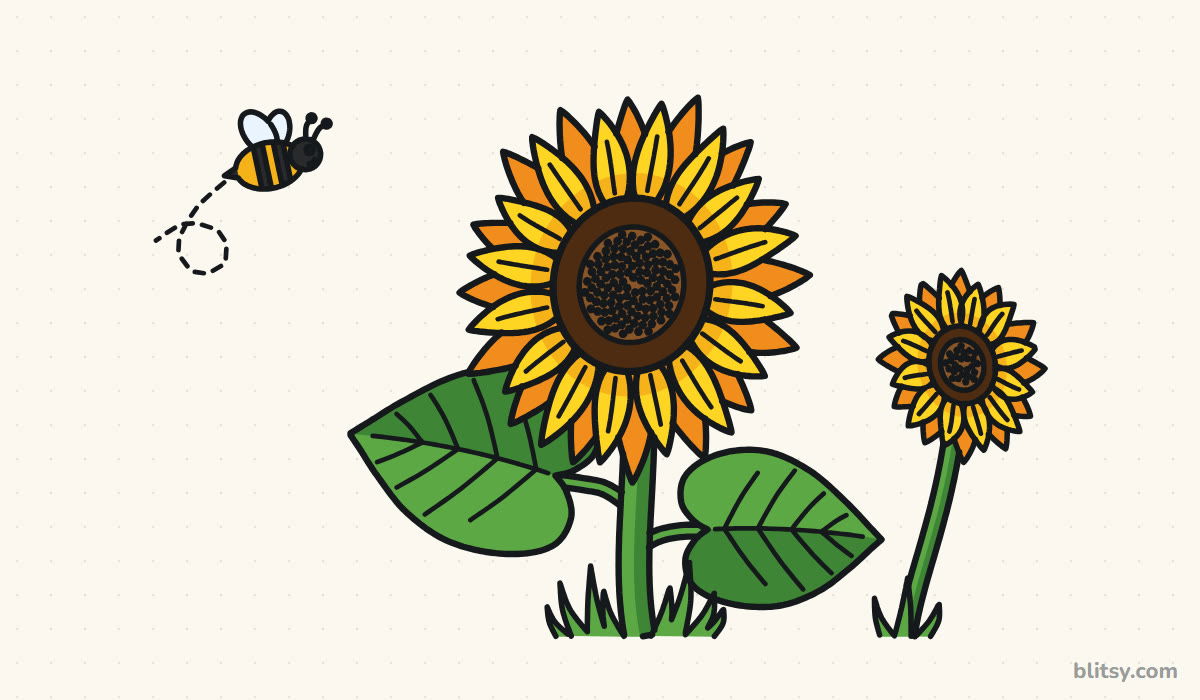
Copy whatever is blue in each picture; that's the new part. Gray lines are already on your page, and the pale blue circles are soft helper guides you'll erase in step 11.
Quick overview
⏱️ Time: around 40 minutes with coloring
🎯 Level: beginner, good for kids from about 7 (younger ones can skip the bee)
✏️ Steps: 12
🌻 You'll draw: a large sunflower, a smaller one, two heart-shaped leaves, grass and a bee
Tools for a Sunny Sunflower Sketch
- An HB pencil for light guides
- A soft eraser that won't smudge
- A black fineliner or felt-tip pen
- Colored pencils or markers in yellow, golden yellow, orange, brown, dark brown, green, dark green and black
- A sheet of paper laid sideways
Plain printer paper is fine; a sideways page just gives the leaves and the second flower room to breathe.
How to Draw a Sunflower Step by Step
Step 1: Draw two circles and cross lines
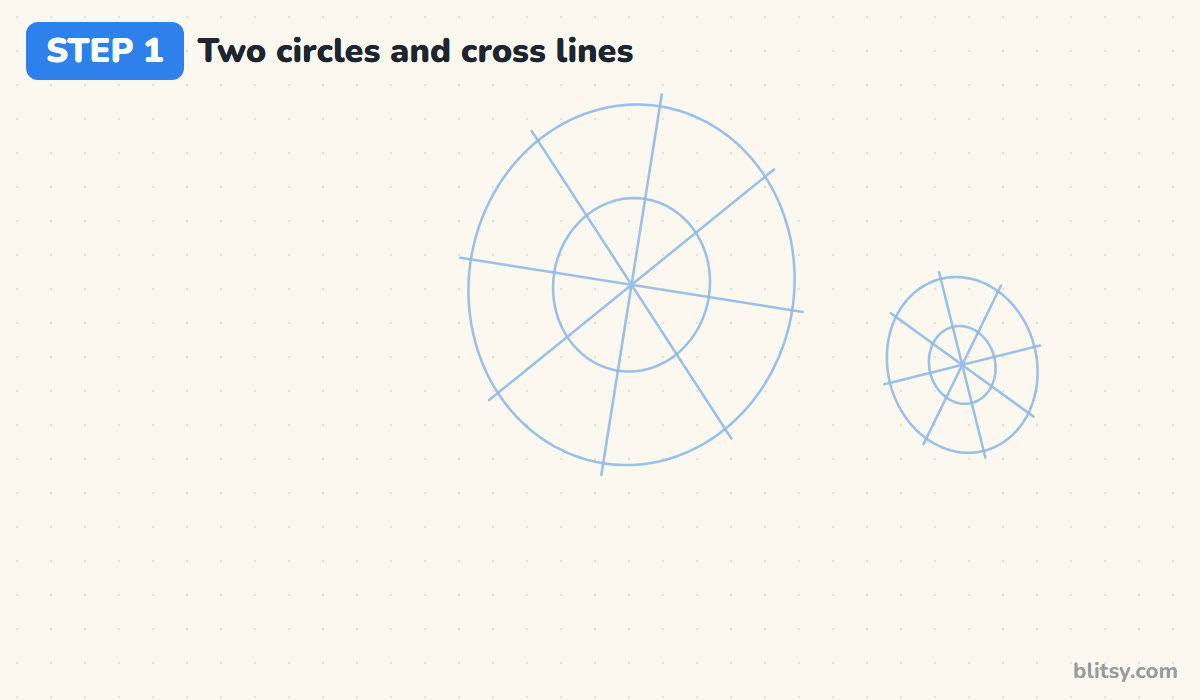
Sketch a large circle a little left of centre and a smaller one lower on the right. Inside each, add a second circle about half as wide for the seed centre. Then draw four lines through the big flower, like cutting a pie into eight slices. I squash both circles slightly into ovals so the flowers look turned a touch to the side, which feels more natural than a flat face.
💡 Tip: Hold the pencil far back from the tip; your guides will come out lighter on their own.
Step 2: Add the stem and leaf guide lines
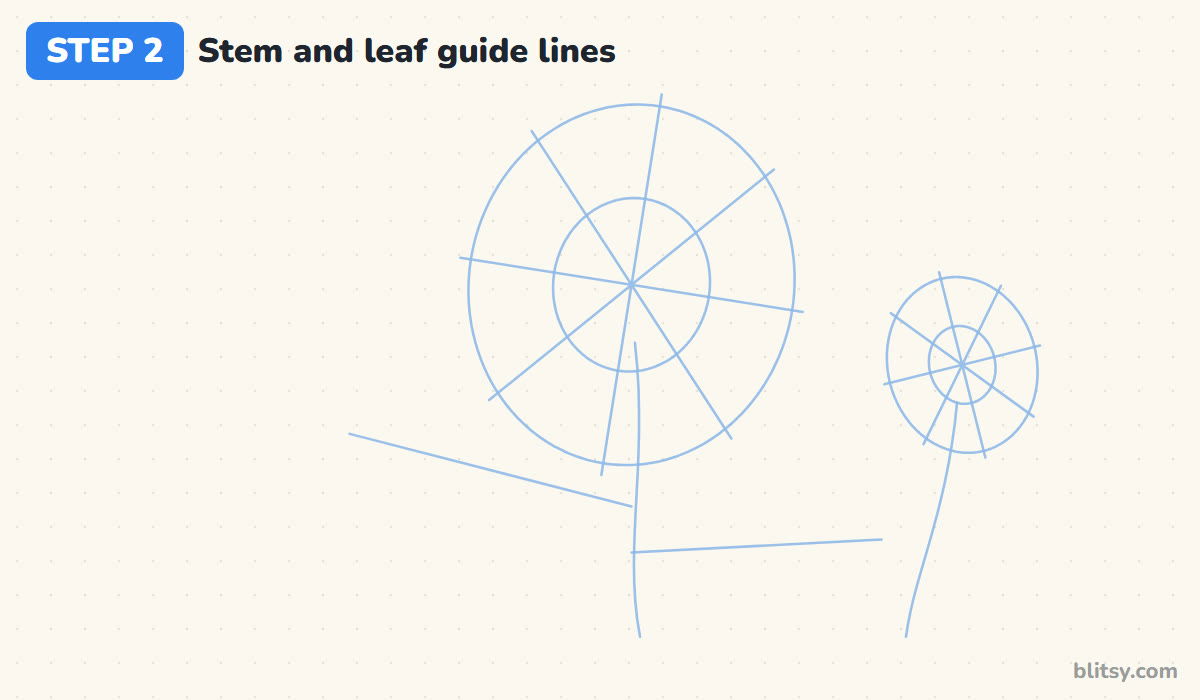
From the bottom of the big circle, run a long, slightly wavy line down the page. Do the same for the small flower. Now mark two leaf directions from the main stem: one up and to the left, one lower down pointing right. Leaves at different heights keep the plant from looking like a stiff letter T.
💡 Tip: Leave a finger's width between the right leaf line and the small flower's stem.
Step 3: Draw the big round seed centre
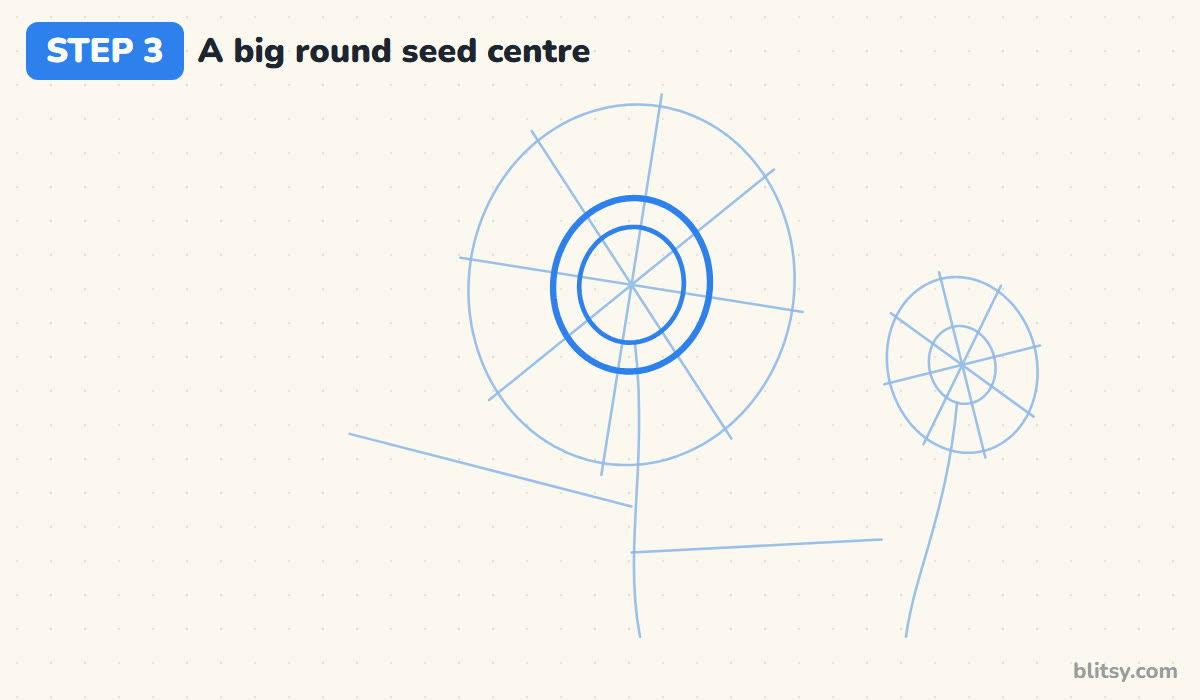
Go over the inner oval of the big flower with a firm line. Then draw one more ring inside it, a little smaller, to make a thick border around the middle. That border becomes the darker outer ring of seeds. A small wobble is fine; real sunflower centres are rarely perfect circles.



💡 Tip: Draw circles in two halves, top then bottom, instead of one nervous loop.
Step 4: Add the front ring of pointed petals
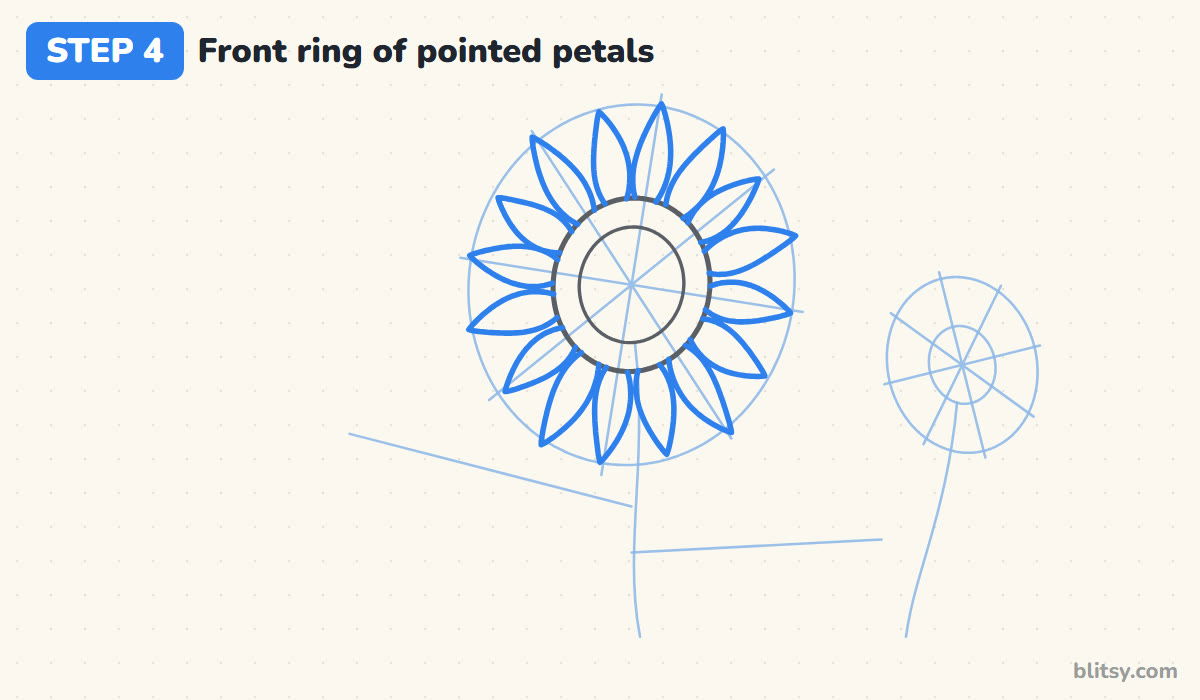
Around the seed centre, draw sixteen long petals that end in sharp points at the outer guide. Put one petal on each cross line and one halfway between, and you'll land on sixteen without counting. Each petal is narrow at the base, widest a third of the way out, then tapers to a point. Leave small gaps between them for the back petals.
💡 Tip: Draw every petal from the centre outward so the points all flick the same way.
Step 5: Fit the back petals into the gaps
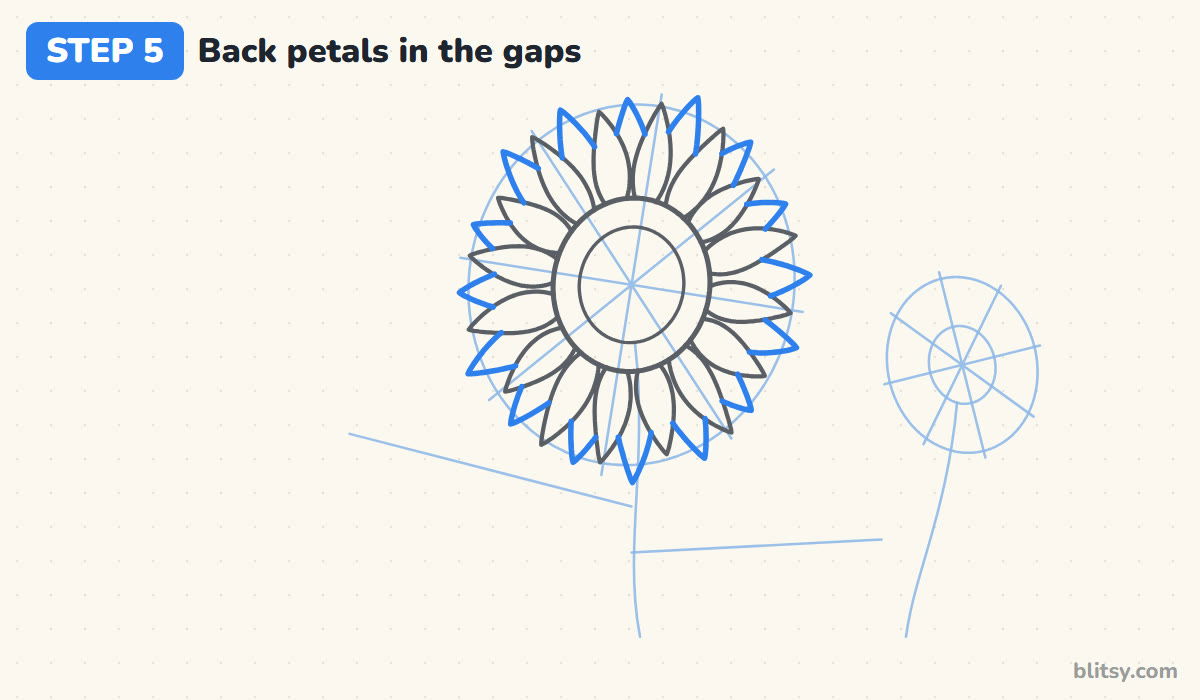
Now draw a second ring of petals behind the first. Each one peeks out of a gap, so you only draw its tip and sides until they disappear behind the front petals. Make these a little longer. This step turns a flat daisy into a full sunflower, and it's the one most people skip.
💡 Tip: Stop each back petal line the moment it touches a front petal; never draw over it.
Step 6: Draw the smaller sunflower
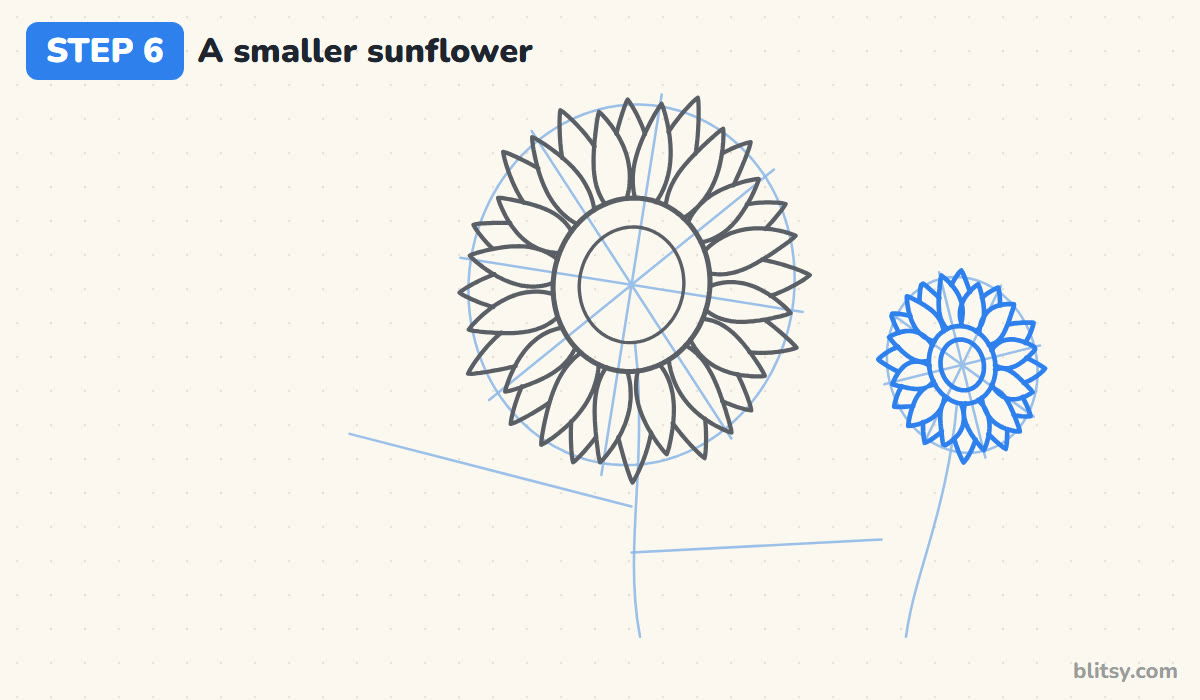
Repeat the same recipe on the small circle: a seed centre with an inner ring, twelve front petals, then back petals peeking between them. Fewer petals means chunkier shapes, which suits a smaller flower. I tilt this one the opposite way, so the two blooms seem to turn toward each other.
💡 Tip: Draw the big flower's petals over the small one wherever they touch, so the big bloom sits in front.
Step 7: Thicken the stems and add grass
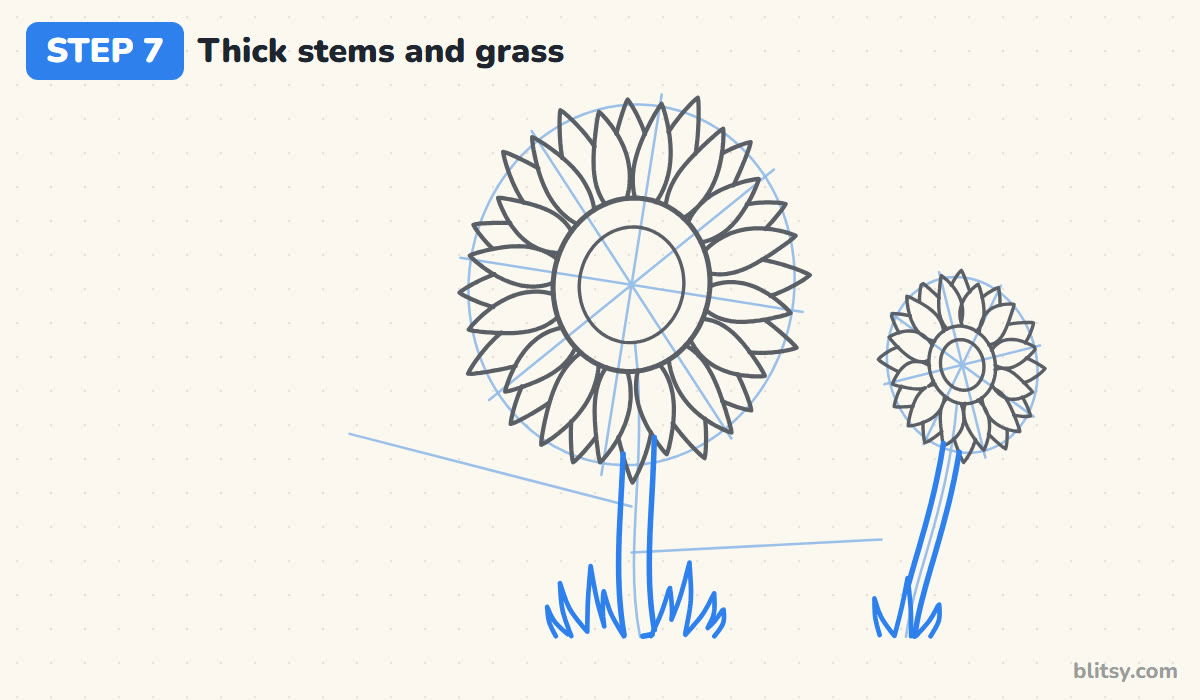
Trace both sides of each stem guide to turn it into a tube. A sunflower stem holds up a heavy head, so make the main one sturdy, about a third as wide as the seed centre. The small stem can be thinner. At the bottom, add a few pointed grass blades around each stem to hide where they end.




💡 Tip: Grass blades look best when a few lean left, a few lean right and none are the same height.
Step 8: Draw two big heart-shaped leaves
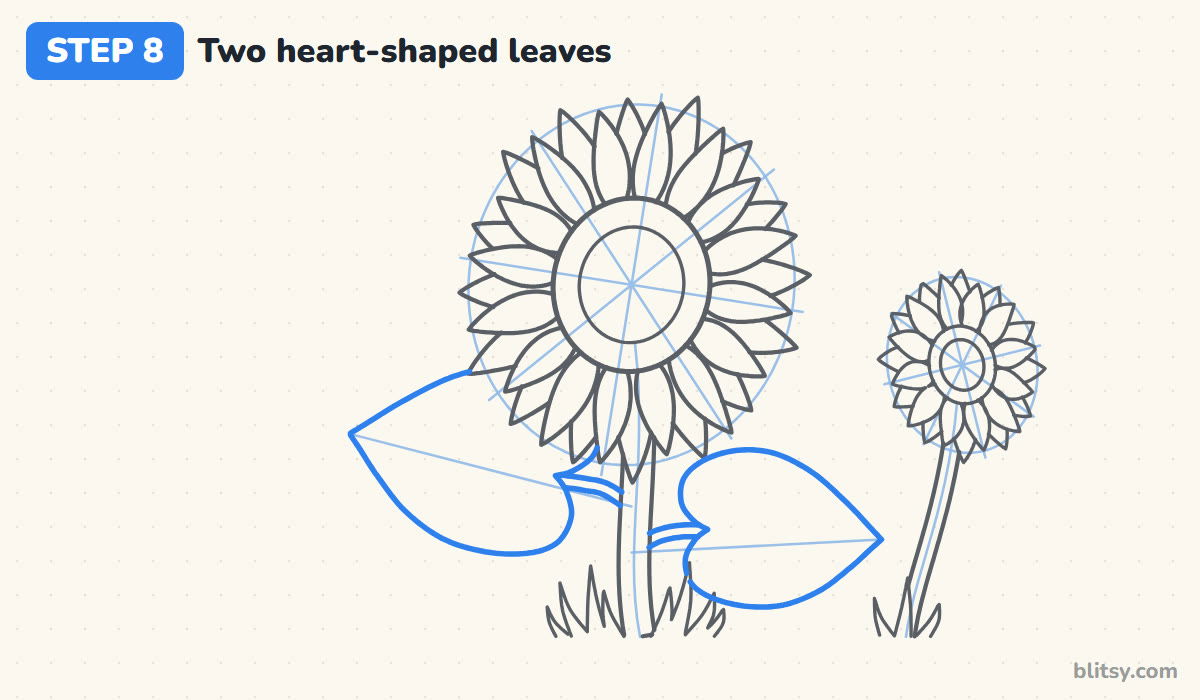
Sunflower leaves are broad hearts with a pointed tip. Start each one with a short stalk coming out of the main stem. At its end, draw two rounded lobes, then sweep both edges out wide and back in to a point along the leaf guide. Let the left leaf tuck behind the petals and the right one droop a little, the way heavy leaves do.
💡 Tip: Make the widest part of each leaf sit closer to the stalk than to the tip.
Step 9: Add seeds, petal creases and leaf veins
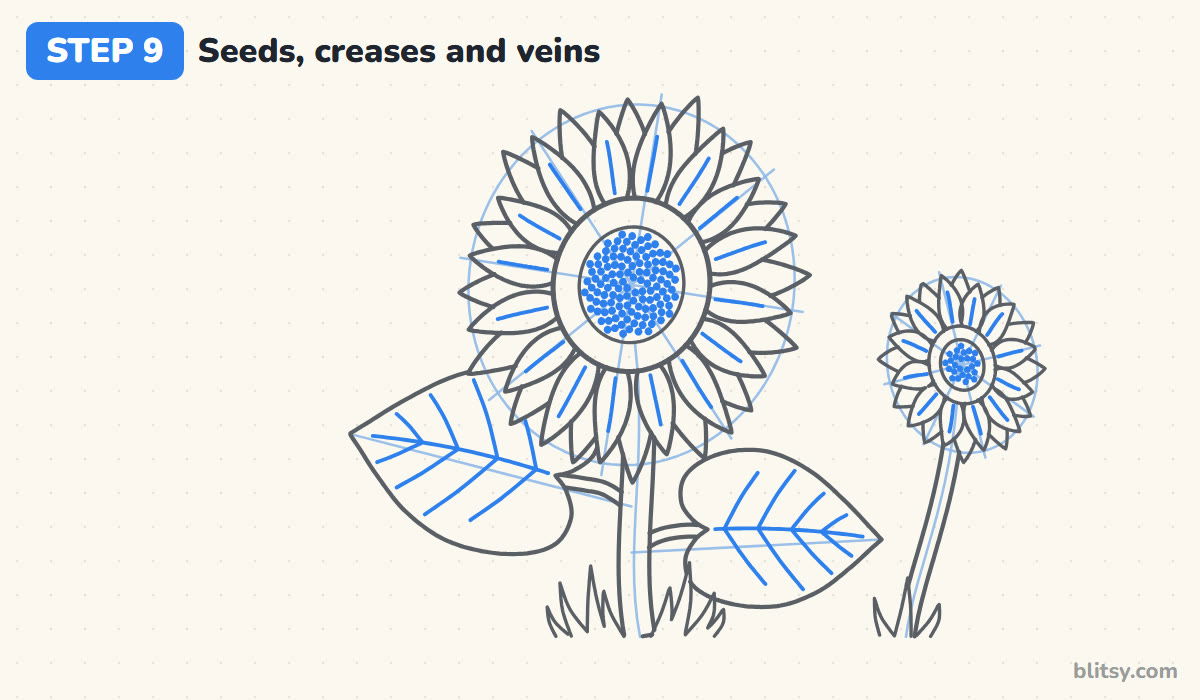
Fill the middle of each seed centre with small dots, working outward from the very middle in a loose swirl. Real sunflower seeds grow in curving spiral rows, so even a rough swirl reads as a seed head. Then draw a short line down each front petal, and give each leaf a central vein with four angled side veins on each side.
💡 Tip: Keep the dots small and evenly spaced; big blobs turn the centre into a black hole.
Step 10: Draw a busy little bee
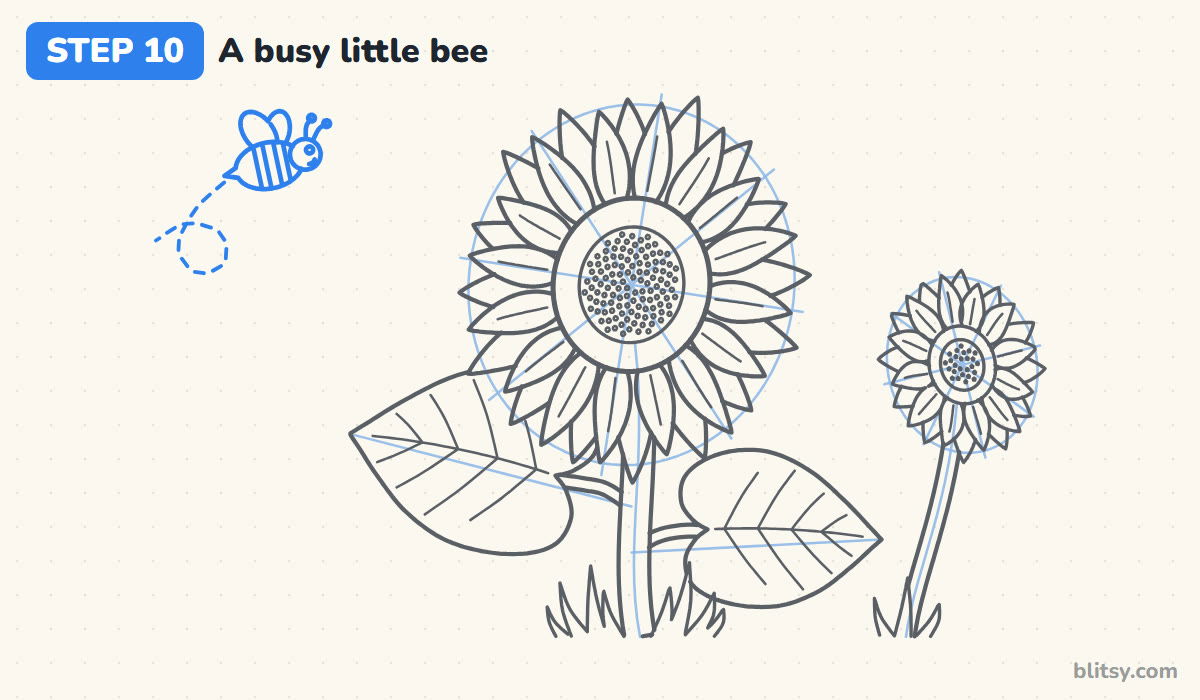
In the empty left corner, draw a small oval body with two stripes and a pointy stinger. Add a round head facing the flowers, a dot eye, a tiny smile and two curly antennae, then two teardrop wings on top. A dashed, looping flight path finishes it. Little kids can leave the bee out.
💡 Tip: Point the bee's head toward the big flower so it looks like it's on its way somewhere.
Step 11: Ink the lines and erase the guides
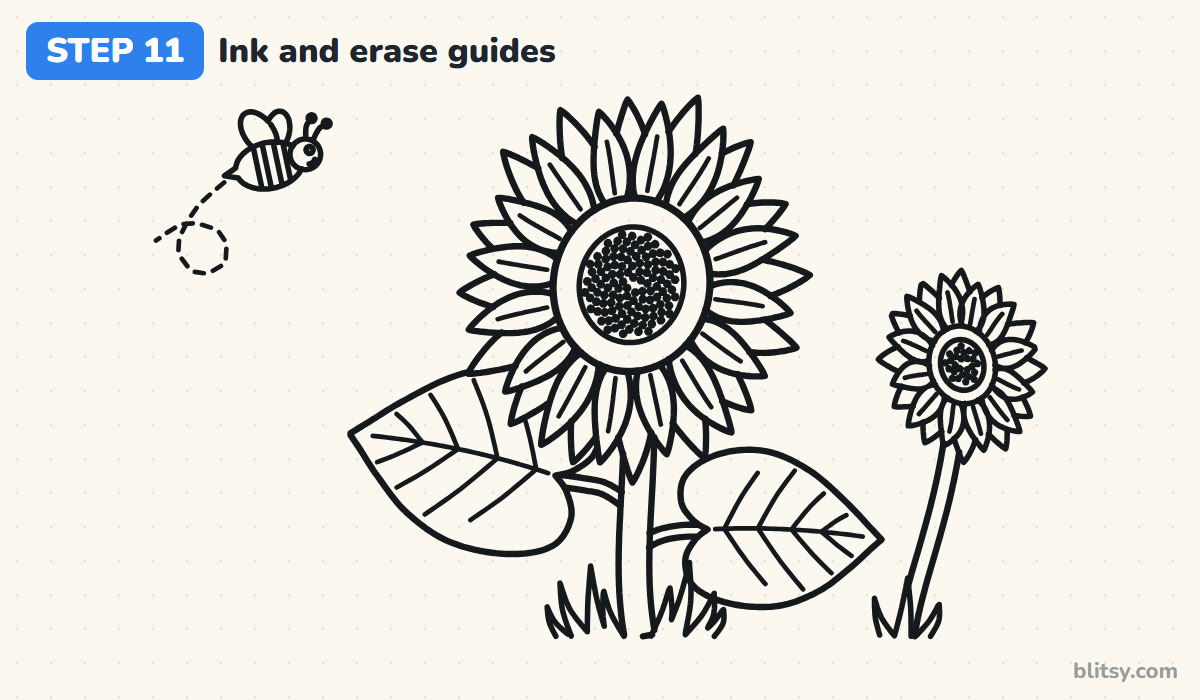
Trace every keeper line with your black pen: seed centres first, then petals, stems, leaves and the bee. Skip the guide circles, cross lines and stem guides. Once the ink has dried, erase all the pencil underneath. With so many petals, this is where the drawing snaps into focus.




💡 Tip: Rest your hand on a scrap of paper while inking so you don't smear the wet lines.
Step 12: Color your sunflowers
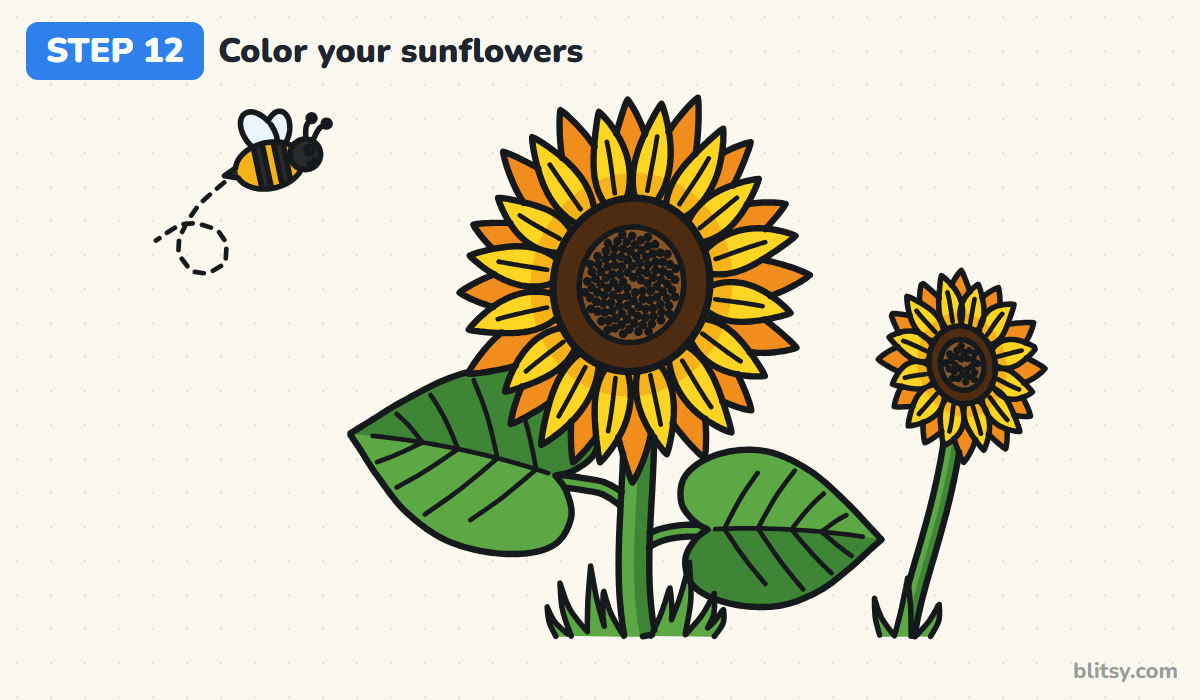
Color the front petals bright yellow and the back petals orange, which pushes the back ring behind and adds depth. Add golden yellow near the centre on each front petal. The outer seed ring is dark brown, the middle lighter brown. Stems, leaves and grass are green, with dark green on the lower half of each leaf. The bee gets golden yellow, black stripes and pale wings.
💡 Tip: Color the yellow first and the brown last, so dark pencil never drags into the petals.
Sunflower Slip-Ups That Make a Daisy
- A seed centre that's too small. The flower starts to look like a daisy. Make the centre about half as wide as the whole flower.
- Only one ring of petals. The bloom looks thin and flat. A second ring peeking out from behind fills it out.
- Round, floppy petal tips. Sunflower petals end in points, so taper each one to a clear tip.
- A thin stem under a huge head. It looks ready to snap. Draw the main stem as a sturdy tube.
- Petals drawn one after another without a plan. They bunch up on one side. Use the cross lines to space them evenly.
Sunflower Ideas Worth Trying Next
Try a sunflower seen from the side, where the seed centre becomes a thin oval and the petals fan out in front of it. You could draw a row of them along a fence or one giant bloom in a glass jar. Red and bronze sunflowers exist too, so a dark red petal ring is a fun change. If you liked the bee, the bee drawing tutorial gives it a bigger role, and how to draw a flower step by step is handy when you want to fill a whole garden page.
Summer Sunflower Coloring Page and PDF Steps
Print the free sunflower coloring page for a sunny afternoon at the table. A small colored copy at the top shows where each color goes, and a key names every one, so kids can match them without guessing. The PDF drawing guide collects all 12 steps with their tips and prints on Letter or A4 paper.
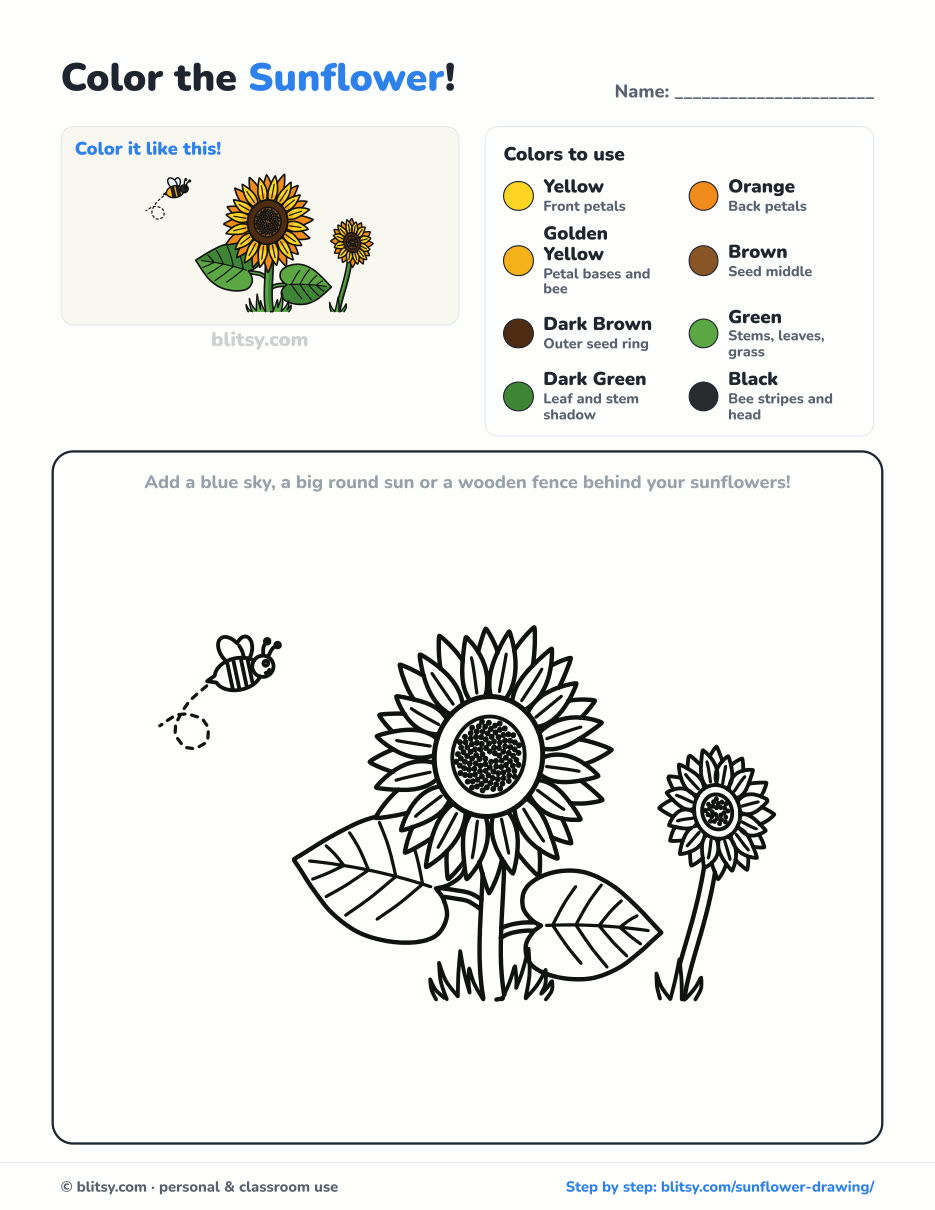
Black outlines with a colored example and the color names at the top. Ready to print and color.
⬇️ Download Coloring PageEvery step picture with its instructions and tips, to keep beside your paper while you draw.
⬇️ Download Drawing Guide📱 On a phone? Tap a download button, then open the file and choose Share → Save to Files or Print. On a computer, the PDF opens or saves straight to your Downloads folder.
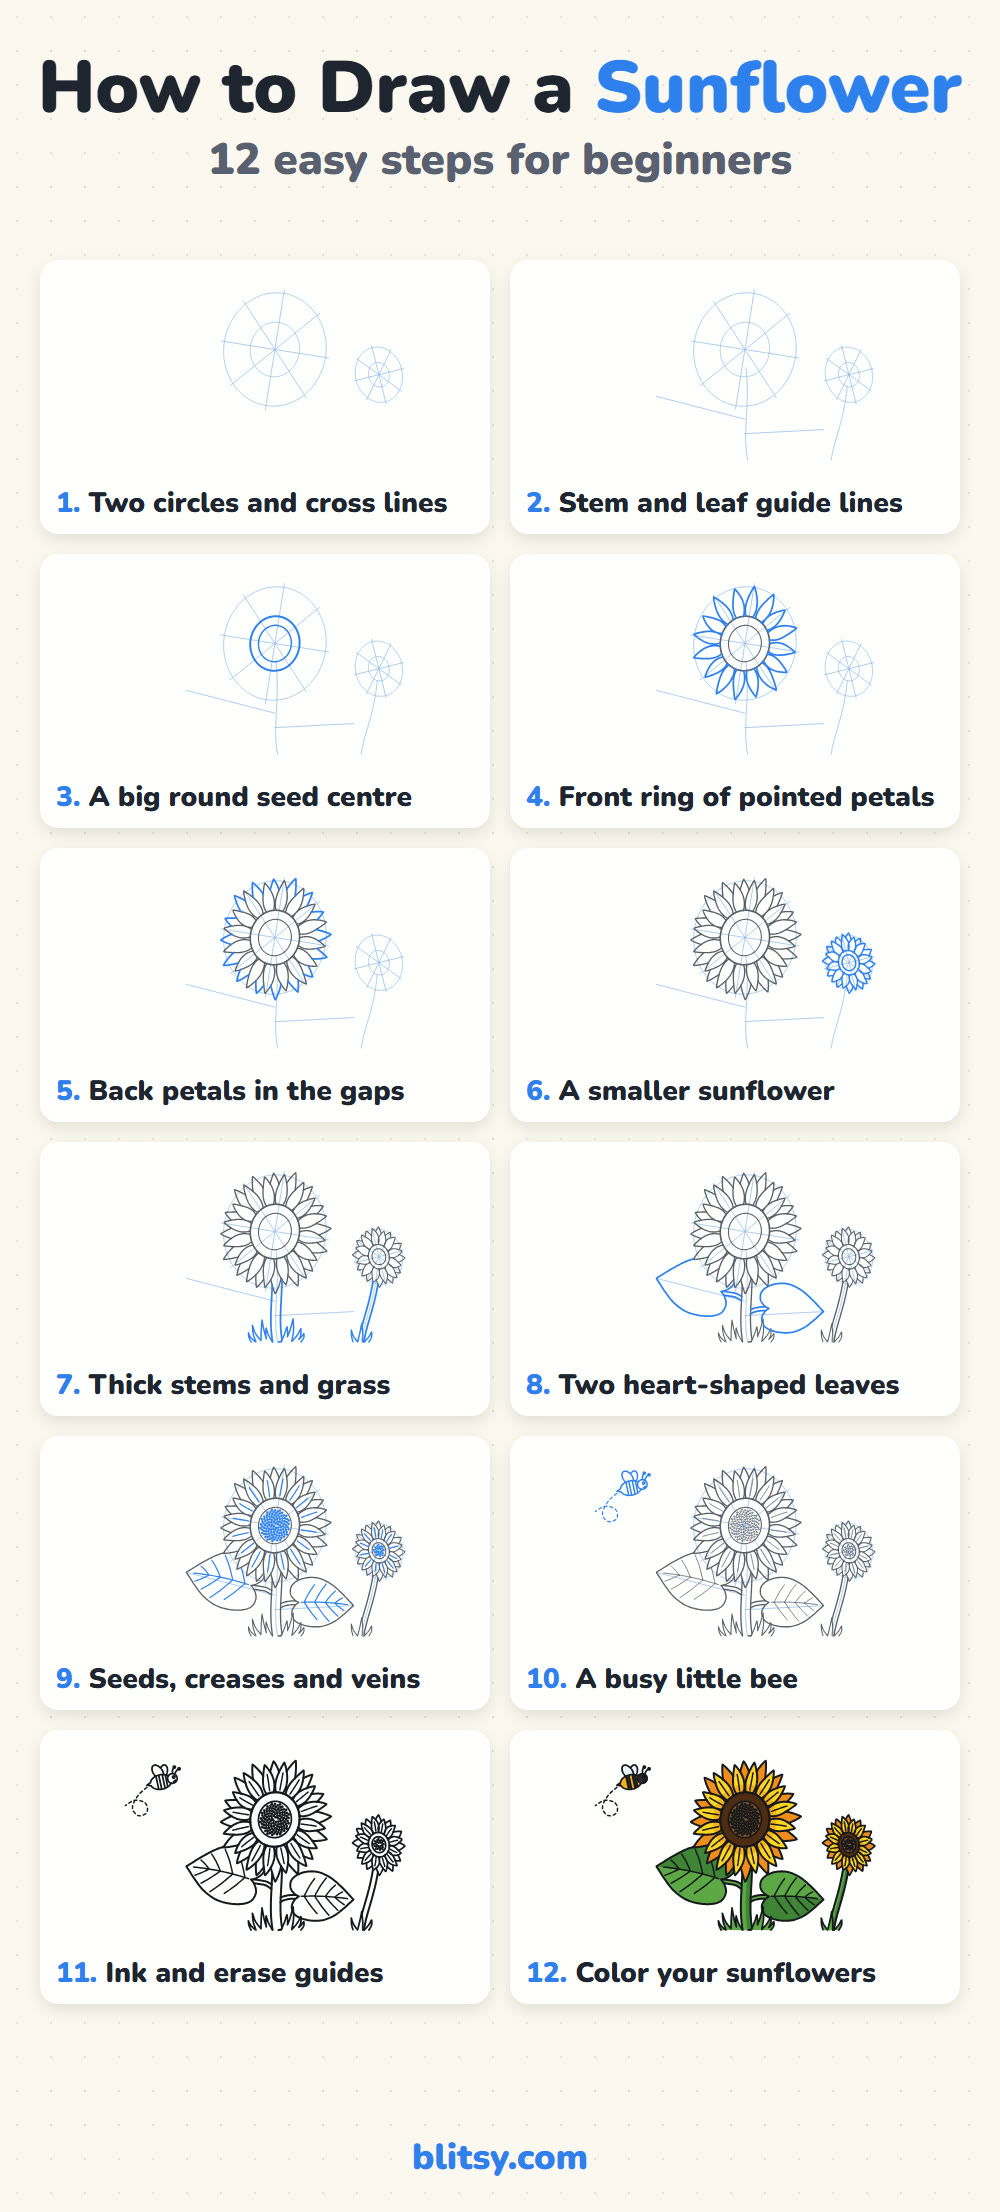
Pin the Sunflower Steps for Summer
Sunflower Done? Draw a Smiling Star Next
Here is one more step-by-step tutorial to try after your sunflower.
- Star Drawing: Learn how to draw a star step by step with five even points, then add a chubby smiling friend, a shooting star and four twinkles.
Sunflower Drawing Questions I Hear Often
What is the easiest way to draw a sunflower?
Draw a circle for the centre, add pointed petals all the way around it and finish with a straight stem and one leaf. You can add the second petal ring once that feels easy.
How do you draw sunflower seeds?
Fill the centre with small dots that swirl out from the middle. Real seeds grow in spiral rows, so a rough swirl of dots is enough to look right.
How do I draw a sunflower for kids?
Use one flower, one ring of petals and skip the bee and the leaf veins. A big brown circle with yellow petals is already a cheerful sunflower.
Why do sunflowers face the sun?
Young sunflowers turn their heads to follow the sun across the sky during the day. Once fully open, most stop moving and face east.
Hang your finished sunflower somewhere it can catch the morning light, then see if the bee wants a second flower to visit. 🌻
Related posts:
 How to Draw a Whale Step by Step (Easy for Beginners)
 How to Draw Lungs Step by Step (Easy Science Diagram)
 How to Draw a Pineapple Step by Step (Easy Crown and Slice)
 How to Draw Iron Man Step by Step (Easy Chibi for Kids)
 How to Draw a Dress Step by Step (Easy Party Dress)
 How to Draw a Chicken Step by Step (Easy for Beginners)
 How to Draw a UFO Step by Step (Cute Alien Saucer)
 How to Draw Flames Step by Step (Easy Campfire Drawing)
 How to Draw a Moon Step by Step (Sleepy Crescent + Phases)
 How to Draw a Jellyfish Step by Step (Cute, Easy Guide)
 How to Draw Cerberus Step by Step (Cute and Easy)
 How to Draw a Taco Step by Step (Easy Kawaii Taco)

