
A cupcake is mostly a bucket with a cloud on top, which is why it's one of the first sweets I hand to a nervous beginner. Here you'll learn how to draw a cupcake step by step, starting from a trapezoid and three stacked ovals. From there we pile on a curly frosting swirl, a shiny cherry, sprinkles and a shy little smile. A second, smaller cupcake joins at the end so the first one has company.
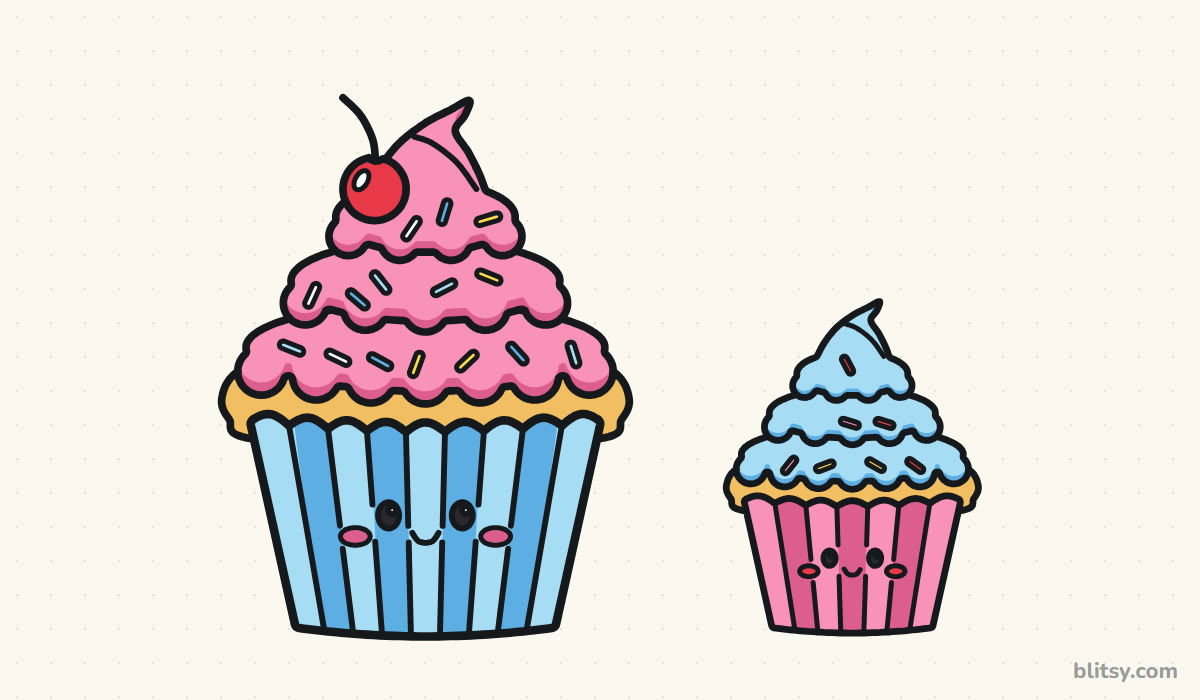
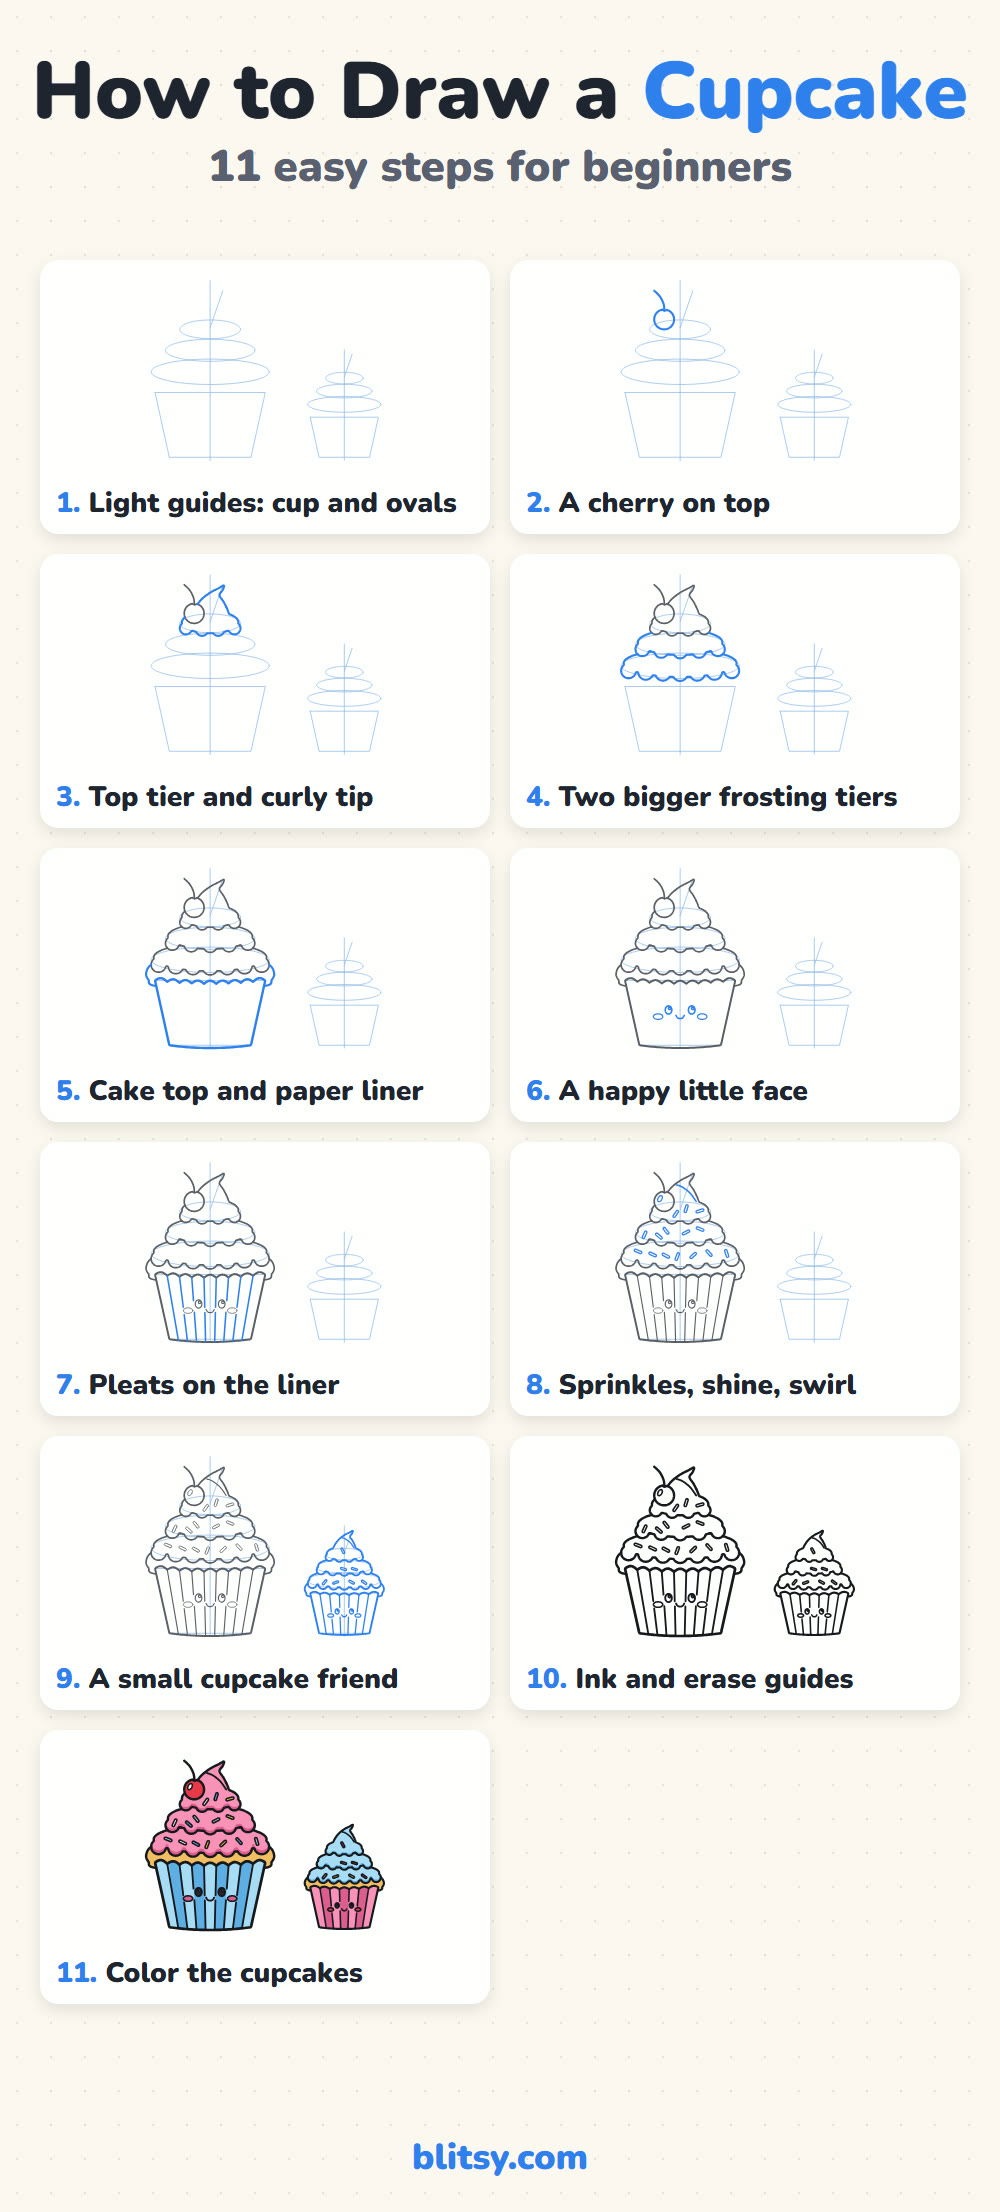
Watch for the blue lines in each picture: they're the part you add in that step. The gray lines were drawn in earlier steps, so you can match your paper to them. The pale blue shapes are construction guides; keep them faint, since they get rubbed out in step 10.
Quick overview
⏱️ Time: roughly 25 minutes, coloring included
🎯 Level: easy, fine for kids around 6 and older
✏️ Steps: 11
🧁 You'll draw: a big kawaii cupcake with a cherry and sprinkles, plus a small cupcake friend
Bakery Box of Drawing Supplies
- A pencil you can hold loosely for faint guides
- A clean eraser
- A black fineliner or thin felt-tip pen
- Colored pencils or markers: pink, dark pink, light blue, blue, golden yellow, red, yellow and black
- Plain paper turned sideways, so both cupcakes fit
- A ruler for the liner sides, if you like straight edges
Any pink and blue you own will do; the shading only needs a slightly darker version of each.
How to Draw a Cupcake Step by Step
Step 1: Sketch a cup shape and three ovals
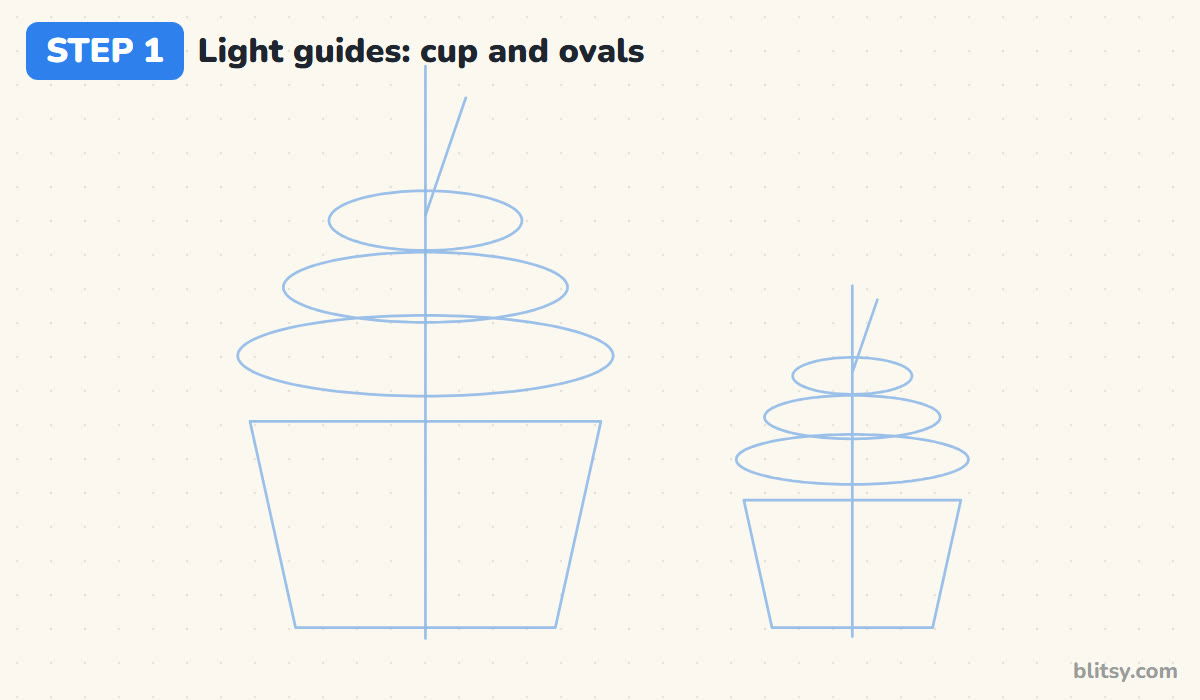
Draw a light vertical line a little left of center. Around its lower half, sketch a trapezoid that is wider at the top than at the bottom: that's the paper liner. Stack three flat ovals above it, each one smaller than the one below, and add a short slanted line on top for the frosting tip. Put a smaller copy of the same guides on the right for the second cupcake.
💡 Tip: Make the trapezoid's top roughly a third wider than its bottom. Too much slant looks like a flowerpot.
Step 2: Place the cherry first
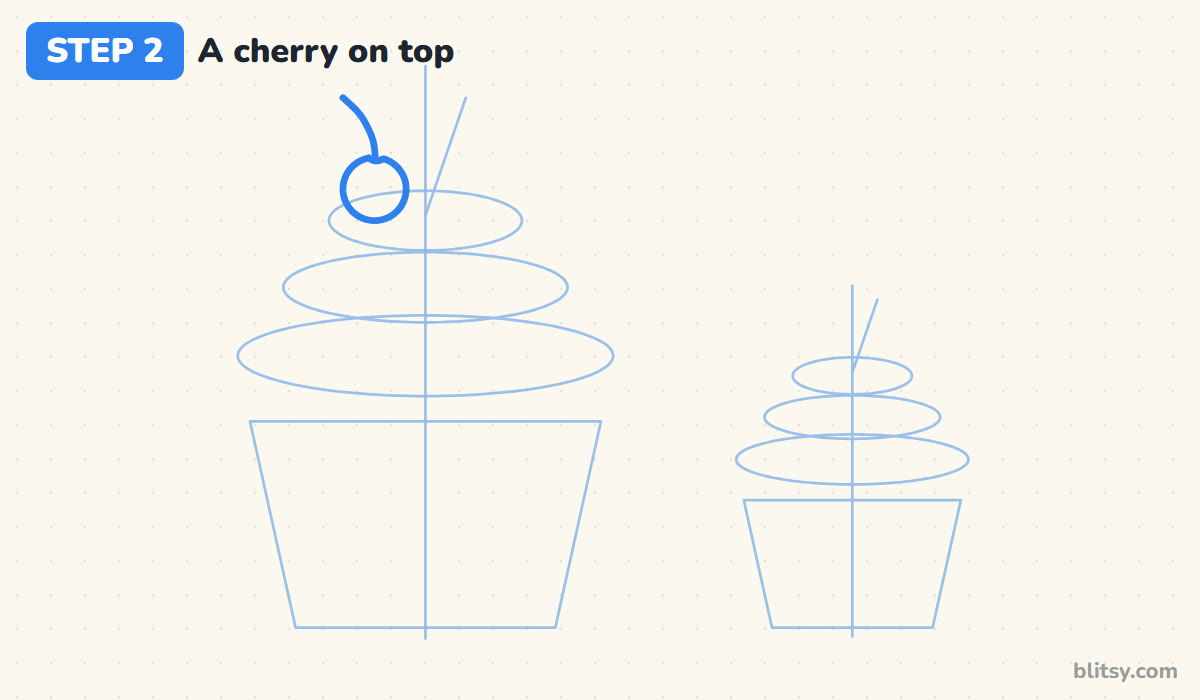
On the left side of the top oval, draw a circle about as wide as a fingertip on your page. Give it a small dip at the top where the stem goes in, then pull a curved stem up and to the left. I always start with the cherry, because it sits in front of the frosting. Drawing it first means you never have to erase frosting lines that would run behind it.
💡 Tip: Curve the stem in one smooth pull. Two short strokes leave a visible kink.
Step 3: Draw the top tier and the curly tip
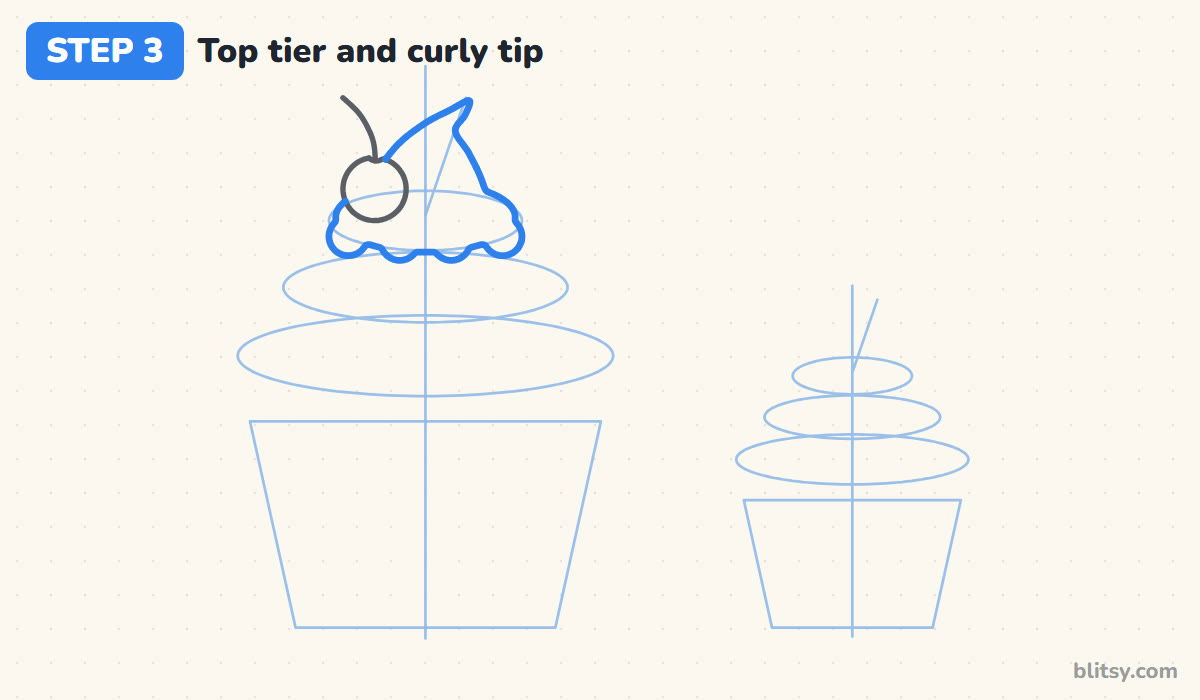
Starting from the cherry, draw the smallest ring of frosting over the top oval. Its bottom edge is a row of four soft bumps, a bit like a cloud. From the top of this ring, rise into a pointed tip that leans right and hooks over at the end. Add one curved line inside the tip later; for now keep the outline simple.




💡 Tip: Round every bump at the bottom. Sharp points turn soft frosting into spiky leaves.
Step 4: Add the two lower frosting tiers
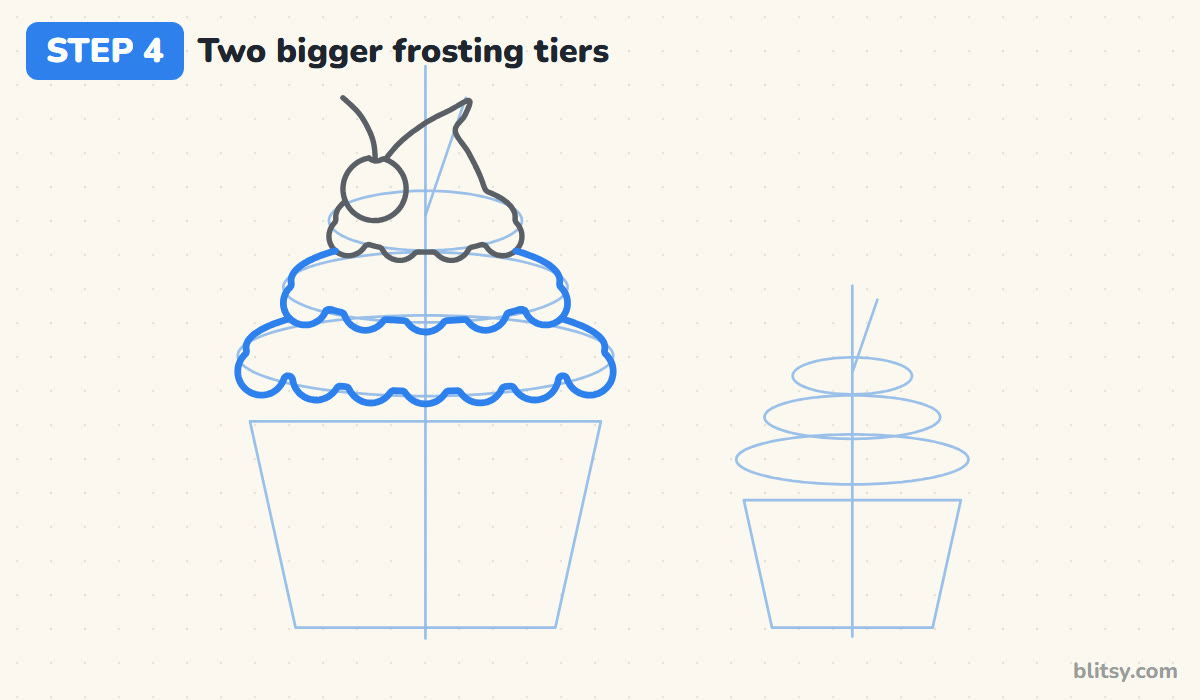
Under the top ring, draw a wider one with five bumps, then the widest ring with seven. Each new ring tucks under the one above, so start its line where it touches the ring above and stop on the other side. That overlap is what makes the swirl look piled up rather than flat. Most beginners make the rings the same width; let each one stick out clearly past the one above.
💡 Tip: Keep the bumps on each ring about the same size so the swirl looks piped by hand.
Step 5: Draw the cake top and the paper liner
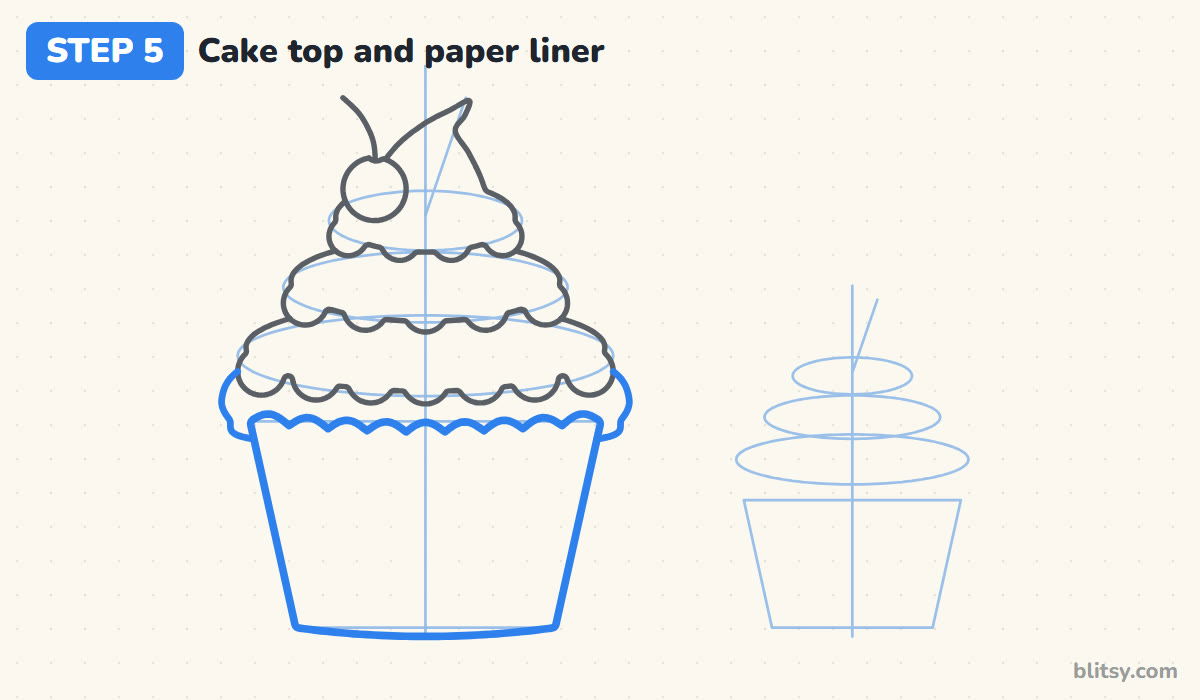
Peeking out under the bottom ring, draw a golden cake dome that bulges a little past the liner on both sides, like a muffin top. Then trace the liner over the trapezoid. Give its top edge a row of small bumps, keep the sides straight, and curve the bottom gently downward in the middle. That small curve hints that the cupcake is round.
💡 Tip: I show only a thin strip of cake. A tall band hides the frosting.
Step 6: Give the liner a happy face
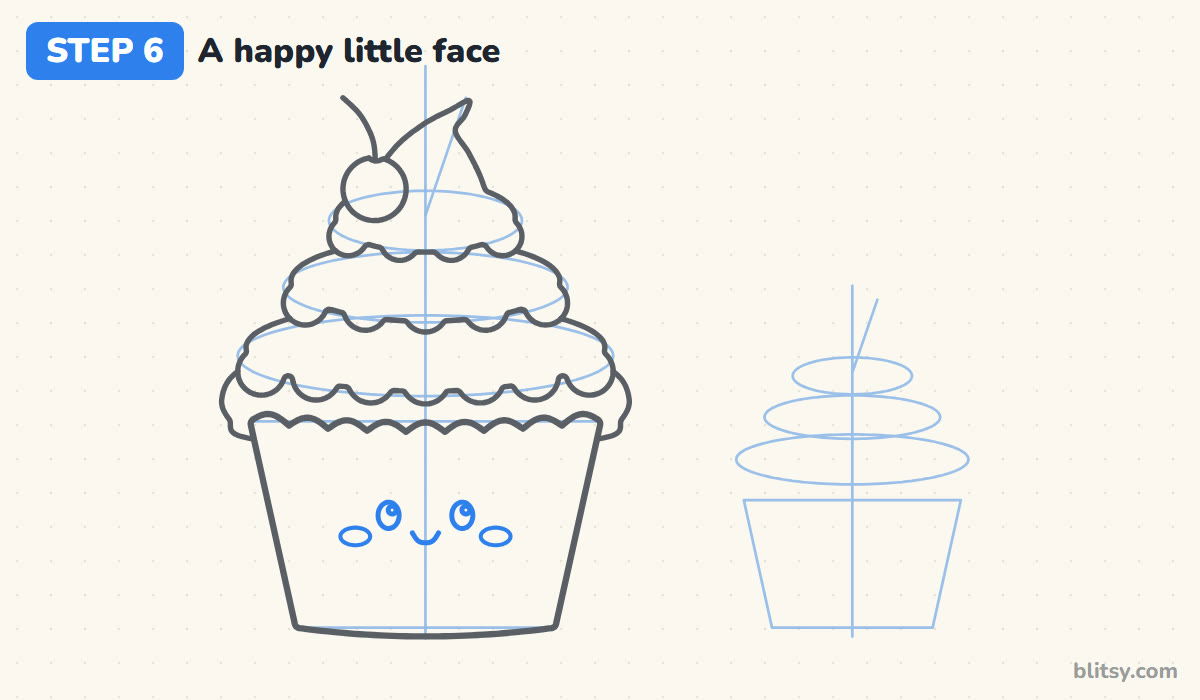
In the middle of the liner, a little above halfway, draw two tall oval eyes with a tiny circle in each for a sparkle. Set a small U-shaped smile between them and lower down, then add a flat oval cheek under each eye, toward the sides. I keep the features close together; spreading them wide makes the face look surprised rather than sweet.
💡 Tip: Put both eye sparkles on the same side, so the face looks lit from one direction.
Step 7: Add the pleats
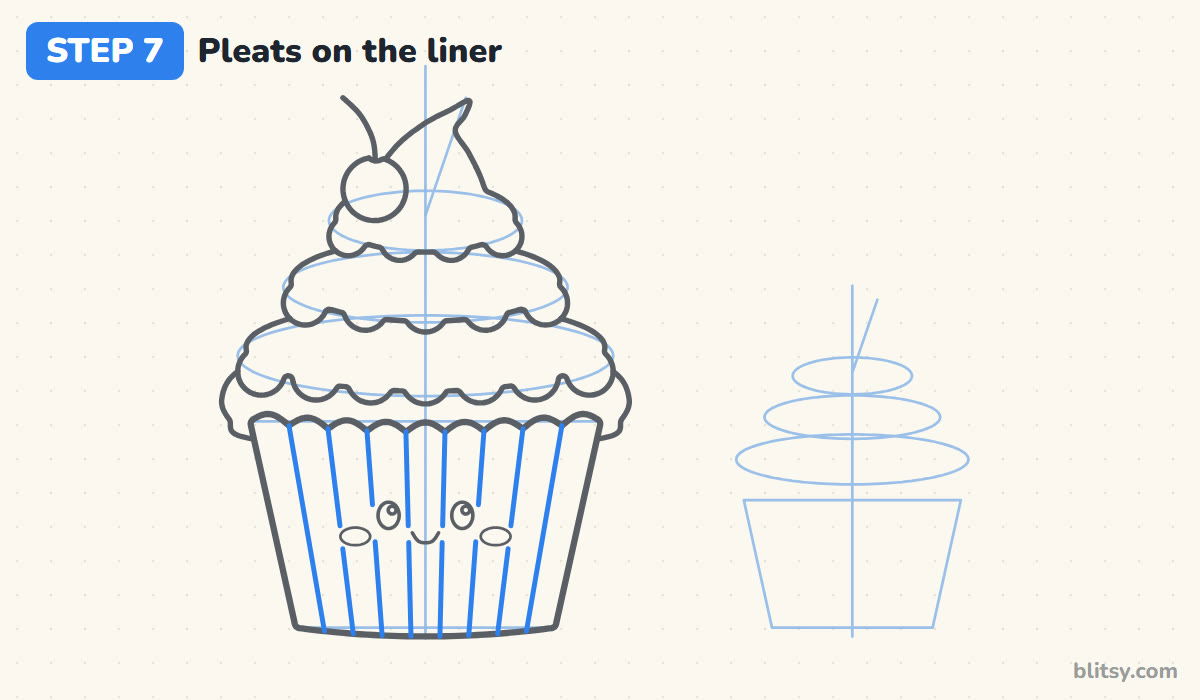
Split the liner into nine equal panels with eight straight lines. Start each line at a dip between two rim bumps and run it down to the bottom edge. Because the bottom is narrower, the lines lean in slightly, which is exactly what real paper pleats do. Stop each line just before it touches the face, then continue it below.




💡 Tip: Mark the middle line first, then space the others outward in pairs.
Step 8: Scatter sprinkles and add the shine
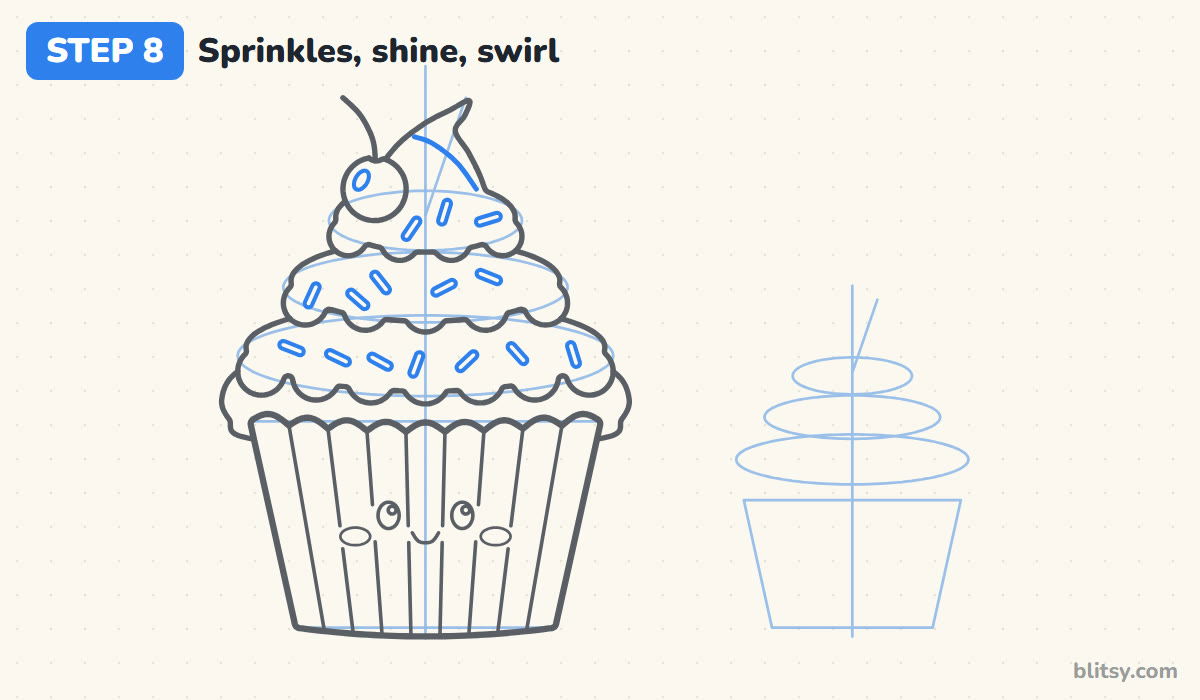
Dot short rounded rods over all three frosting rings, tilted in different directions, and leave some space around each one. Keep them off the very bottom of every ring, since that strip gets darker shading later. Add a small oval shine on the cherry's upper left and one curved line inside the tip to show the twist.
💡 Tip: If two sprinkles point the same way side by side, turn one of them.
Step 9: Draw a small cupcake friend
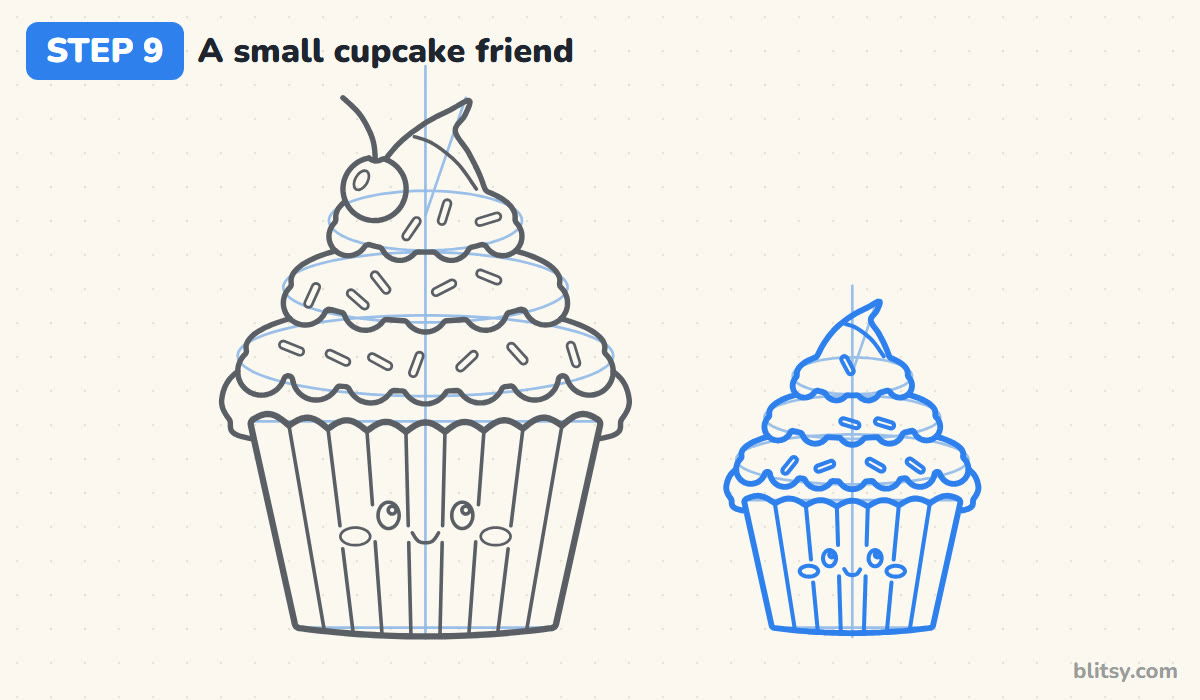
Now repeat the whole build on the right, smaller: three frosting rings with a curly tip, the cake top, the liner with seven pleats, a few sprinkles and a tiny face. Skip the cherry so the two cupcakes look different. I like this step because it tests everything you just learned, and the second cupcake always goes quicker.
💡 Tip: Line up both liner bottoms on the same level so the cupcakes stand on one table.
Step 10: Ink the lines and erase the guides
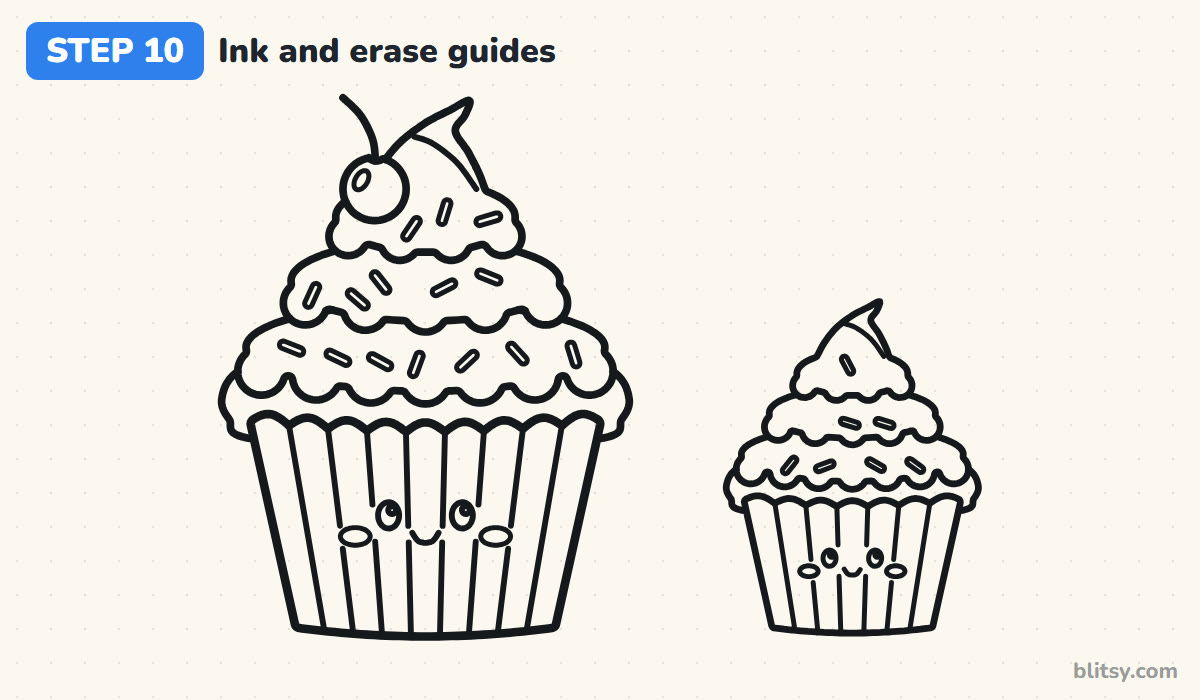
Trace every keeper line with your black pen: cherry, frosting rings, cake, liner, pleats, sprinkles and both faces. Let the ink dry for a minute before erasing. Then rub out the center lines, the trapezoids and the ovals. With the guides gone, the frosting suddenly reads as soft and puffy.
💡 Tip: Ink the long liner sides with the paper turned so you pull the pen toward you.
Step 11: Color the cupcakes
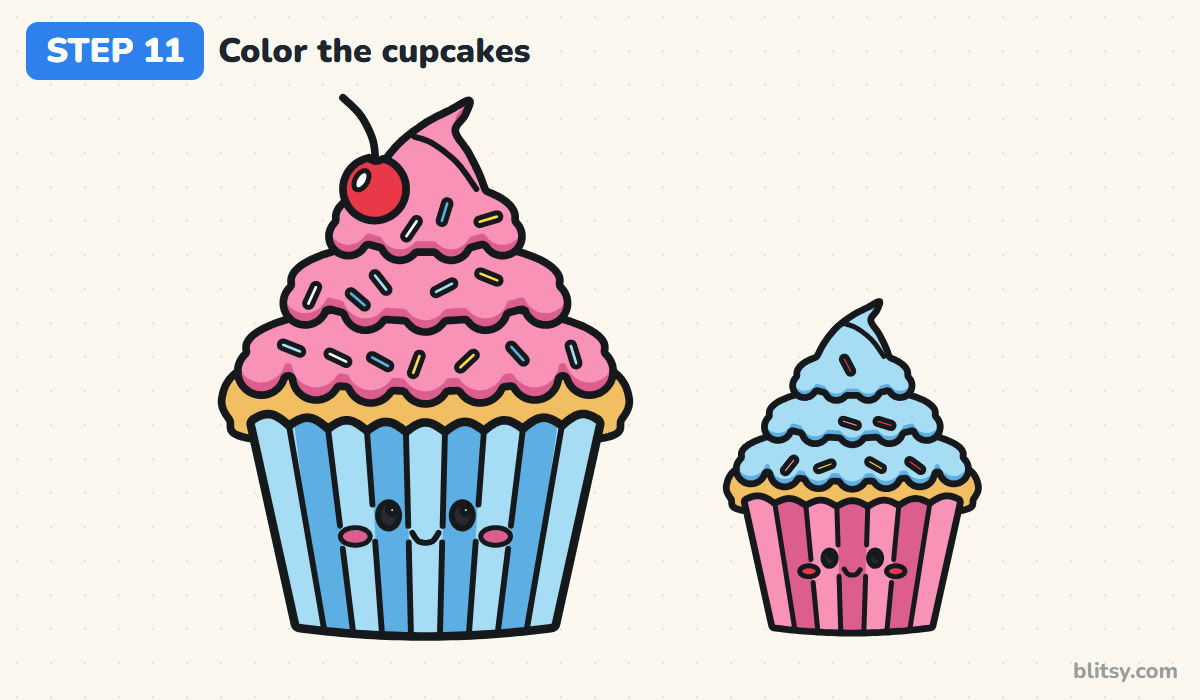
Fill the big swirl pink and run dark pink along the bumpy underside of each ring. Color the cake tops golden yellow. Make the big liner light blue with every second panel in blue, and the cherry red with its shine left white. For the small cupcake, swap the colors: light blue frosting with blue shading, and a pink liner with dark pink panels. Finish with black eyes and bright sprinkles.




💡 Tip: Color the pale shades first, then add the darker strips on top so they blend.
Cupcake Slip-Ups and How to Rescue Them
- A liner that's a rectangle. Straight-down sides make it look like a mug. Keep the top wider than the bottom.
- Frosting rings all the same size. Equal rings stack into a tower. Shrink each ring as you go up.
- Pleats that fan out. If the lines spread wider at the bottom, the liner looks upside down. Let them lean inward a little.
- A face too high on the liner. Eyes jammed under the rim look squashed. Keep the face near the middle of the liner.
- Sprinkles everywhere. Too many crowd the swirl and hide its shape. A dozen or so on the big cupcake is plenty.
Frosting Flavors and Other Swaps to Try
Once the swirl feels easy, change the flavor. Brown frosting with white sprinkles becomes chocolate, mint green with dark chips becomes mint chip, and a strawberry on top instead of a cherry gives you a summer version. You can also stick a candle in the swirl for a birthday card. If you want to scale up to a full party treat, try this birthday cake drawing tutorial next, and add a berry to your cupcake with the strawberry drawing step by step lesson.
Free Cupcake Coloring Page and Printable Step Guide
Need a quiet activity for a rainy afternoon or a party table? Print the cupcake coloring page: it shows a small colored example with a color key at the top and a big bold outline of both cupcakes below. The step-by-step guide PDF holds all 11 steps and their tips, so kids can draw away from a screen. Both fit Letter or A4 paper.
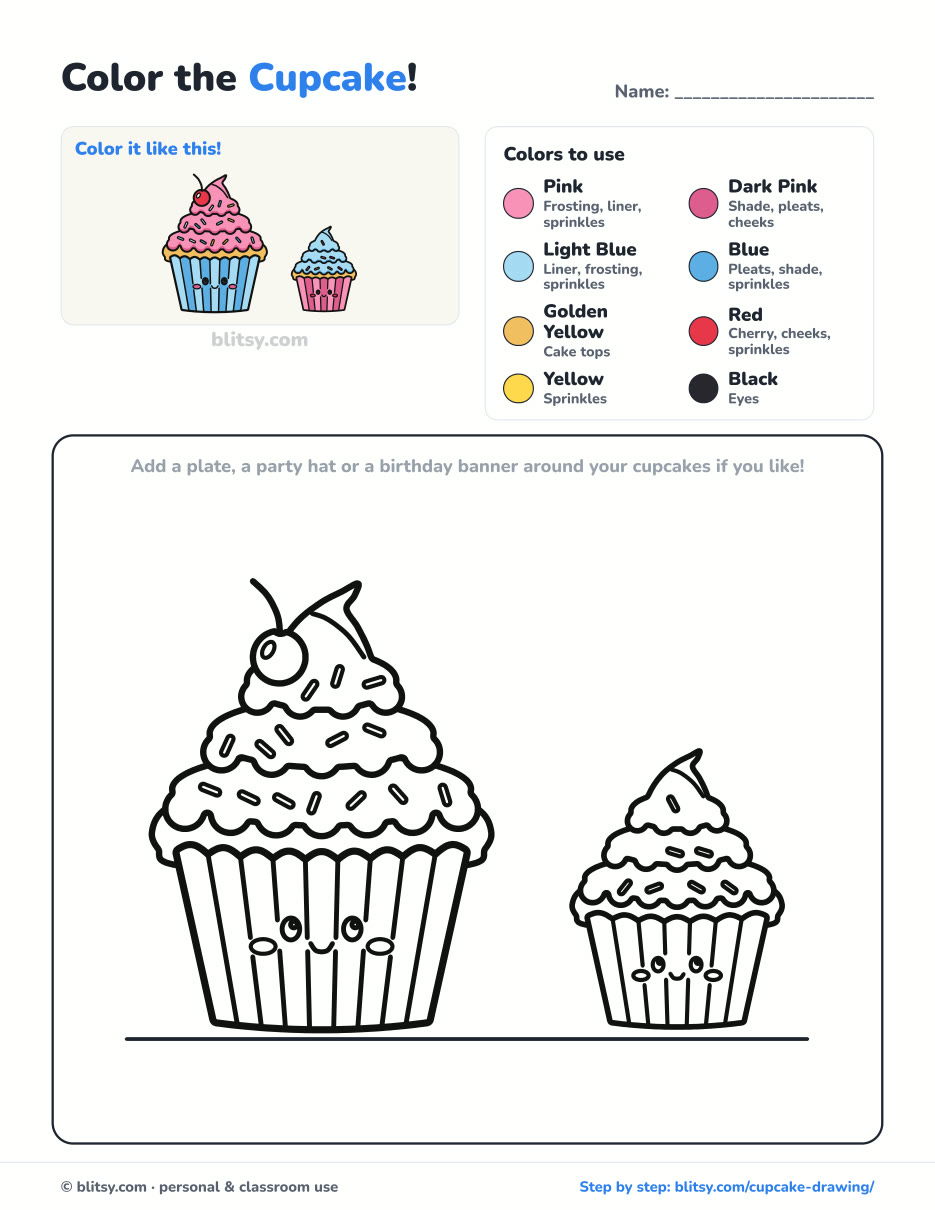
Black outlines with a colored example and the color names at the top. Ready to print and color.
⬇️ Download Coloring PageEvery step picture with its instructions and tips, to keep beside your paper while you draw.
⬇️ Download Drawing Guide📱 On a phone? Tap a download button, then open the file and choose Share → Save to Files or Print. On a computer, the PDF opens or saves straight to your Downloads folder.
Stick the Cupcake Steps on Your Pinboard
Sweet Questions About Drawing Cupcakes
What is the easiest way to draw a cupcake?
Start with a trapezoid for the liner and a puffy cloud shape on top for the frosting. Add a few lines for pleats and you already have a cupcake. The tiers and cherry are extras.
How do you draw cupcake frosting?
Stack rings with bumpy bottom edges, each smaller than the one below, and finish with a pointed tip. Darken the underside of each ring to make it look thick.
How long does it take to draw a cupcake?
About 25 minutes for both cupcakes with coloring. One plain cupcake without a face or sprinkles takes around 10.
Is this cupcake drawing good for young kids?
Yes. Kids around 6 can follow it, and younger ones can draw one frosting ring instead of three and skip the pleats.
Draw a cupcake for each person in your family and give them all different flavors. 🧁
Related posts:
 How to Draw a Taco Step by Step (Easy Kawaii Taco)
 How to Draw a Whale Step by Step (Easy for Beginners)
 How to Draw Lungs Step by Step (Easy Science Diagram)
 How to Draw a Pineapple Step by Step (Easy Crown and Slice)
 How to Draw Iron Man Step by Step (Easy Chibi for Kids)
 How to Draw a Dress Step by Step (Easy Party Dress)
 How to Draw a Chicken Step by Step (Easy for Beginners)
 How to Draw a UFO Step by Step (Cute Alien Saucer)
 How to Draw Flames Step by Step (Easy Campfire Drawing)
 How to Draw a Moon Step by Step (Sleepy Crescent + Phases)
 How to Draw a Sunflower Step by Step (Big and Bright)
 How to Draw a Fall Leaf Step by Step (Maple, Oak and Birch)

