
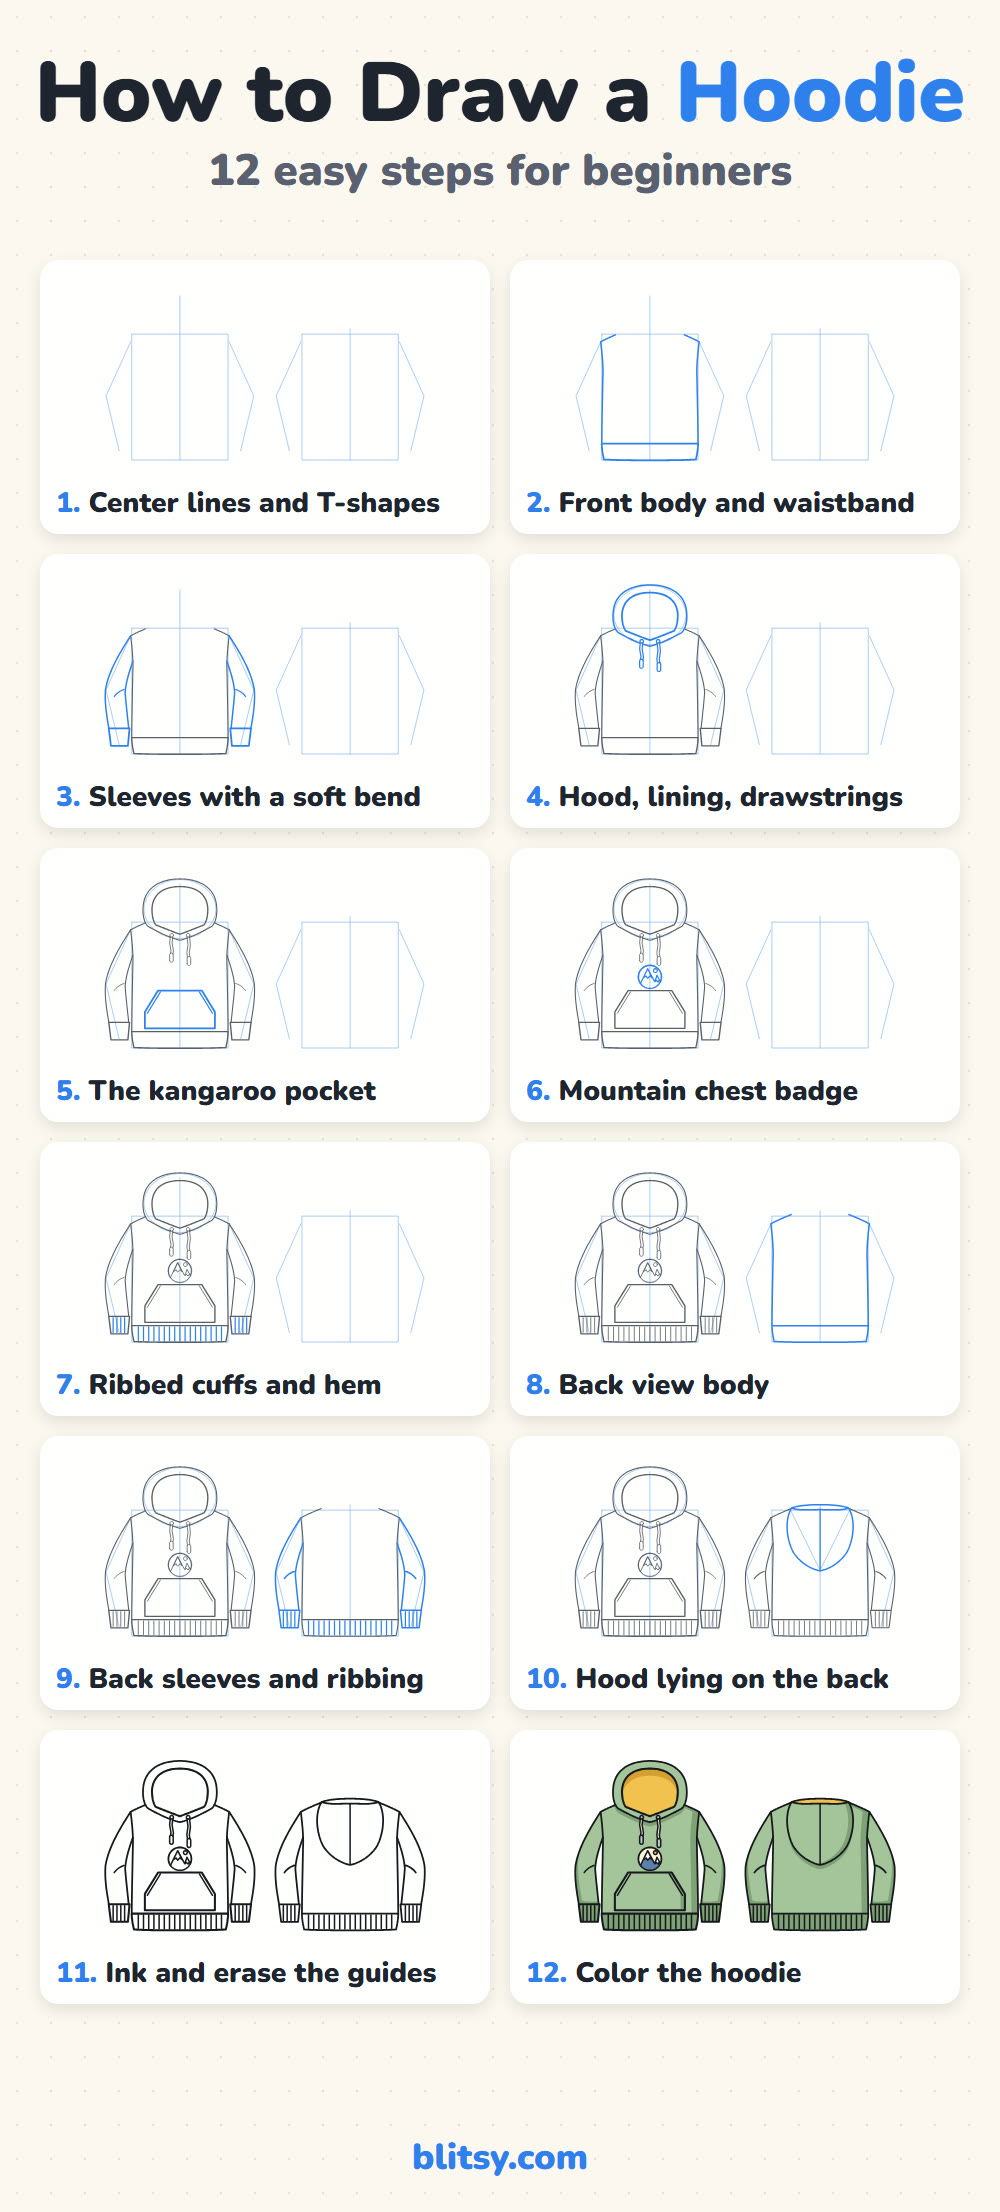
A hoodie is the comfiest thing in most closets, and it's also one of the friendliest clothes to draw. In this lesson you'll learn how to draw a hoodie step by step, first from the front with the hood standing up behind the neck, then from the back with the hood lying flat. Both views grow out of the same simple T-shape, so the second one goes quickly.
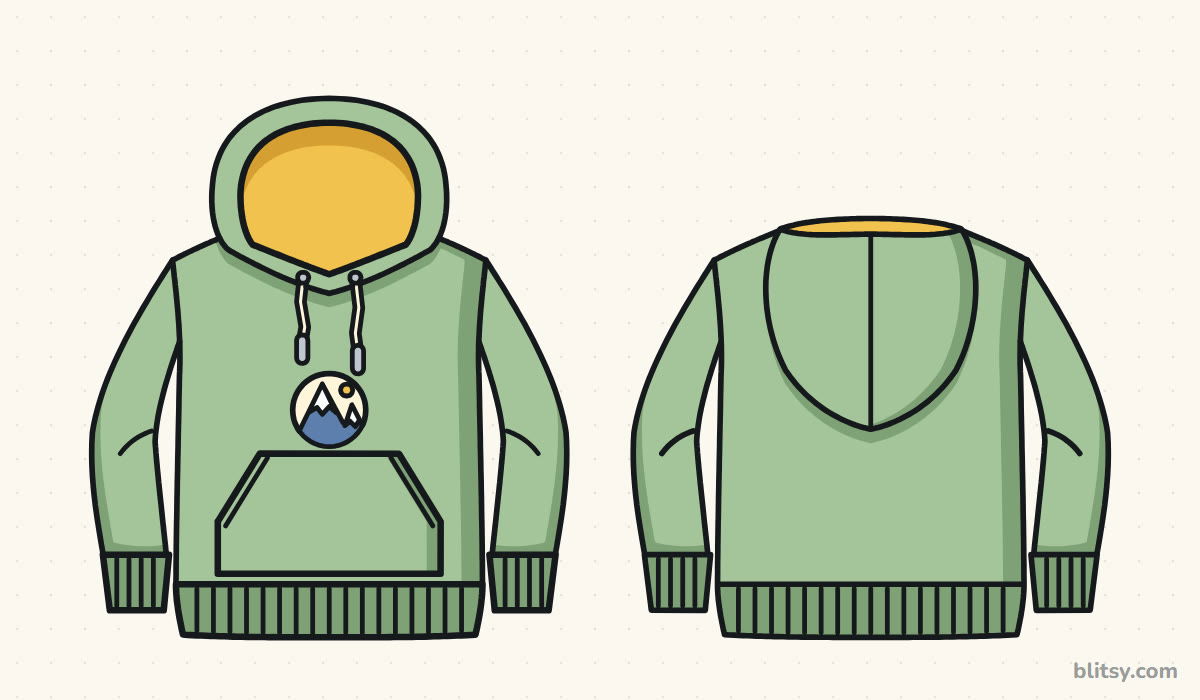
Every picture here colors the new work blue. Gray shows what you already finished, and the thin pale blue helpers get rubbed out near the end.
Quick overview
⏱️ Time: roughly 30 to 40 minutes with coloring
🎯 Level: beginner; kids from about 7 can manage the front view on its own
✏️ Steps: 12
🧥 You'll draw: a pullover hoodie from the front and from the back
Hoodie Sketching Supplies
- A pencil you can press lightly with (HB is fine)
- An eraser that won't smudge
- A ruler for the center lines, if you like straight guides
- A black marker or fineliner for the final lines
- Colored pencils or markers in greens, yellow, cream, gray and blue
- Plain paper turned sideways, so both views fit
Only want the front? Skip steps 8 to 10 and you'll still end up with a finished hoodie.
How to Draw a Hoodie Step by Step
Step 1: Sketch two center lines and two T-shapes
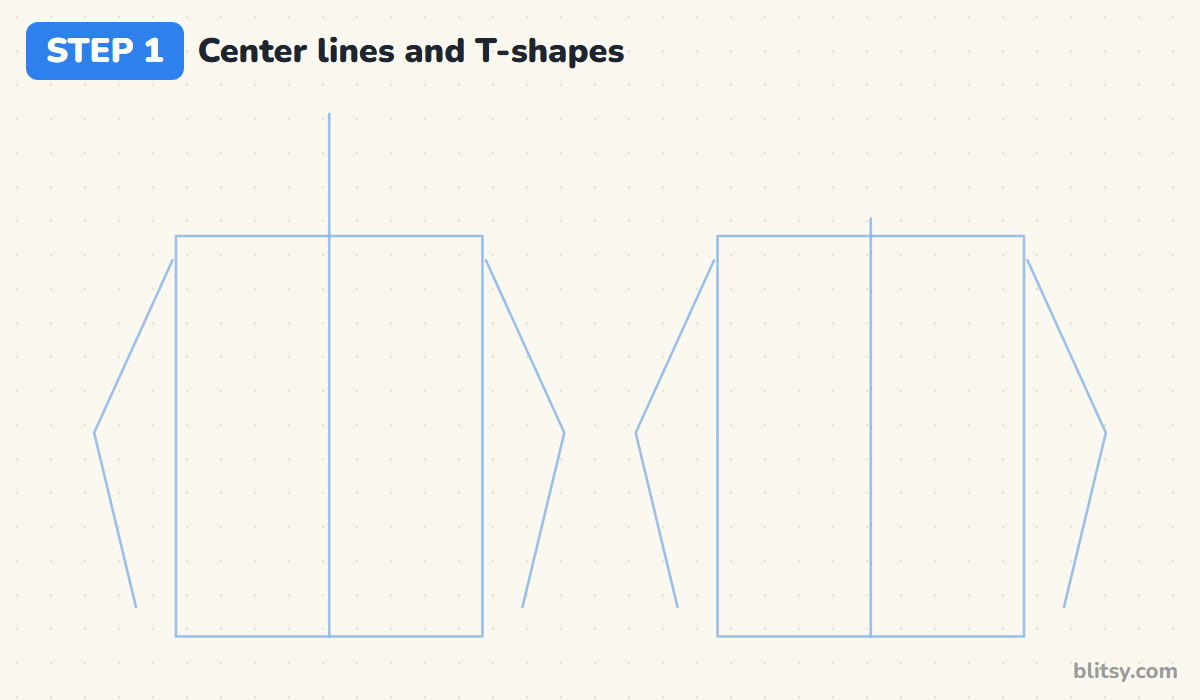
Lay the paper sideways and draw one upright line on each half. Around each line, sketch a tall rectangle for the body. From the top corners, add arms that slant outward to about halfway down, then bend back in. That bend is what makes the sleeves look relaxed later. The left line runs higher than the box, because the hood will sit up there.
💡 Tip: Keep the two rectangles the same size; they're the front and the back of one hoodie.
Step 2: Draw the front body and the waistband
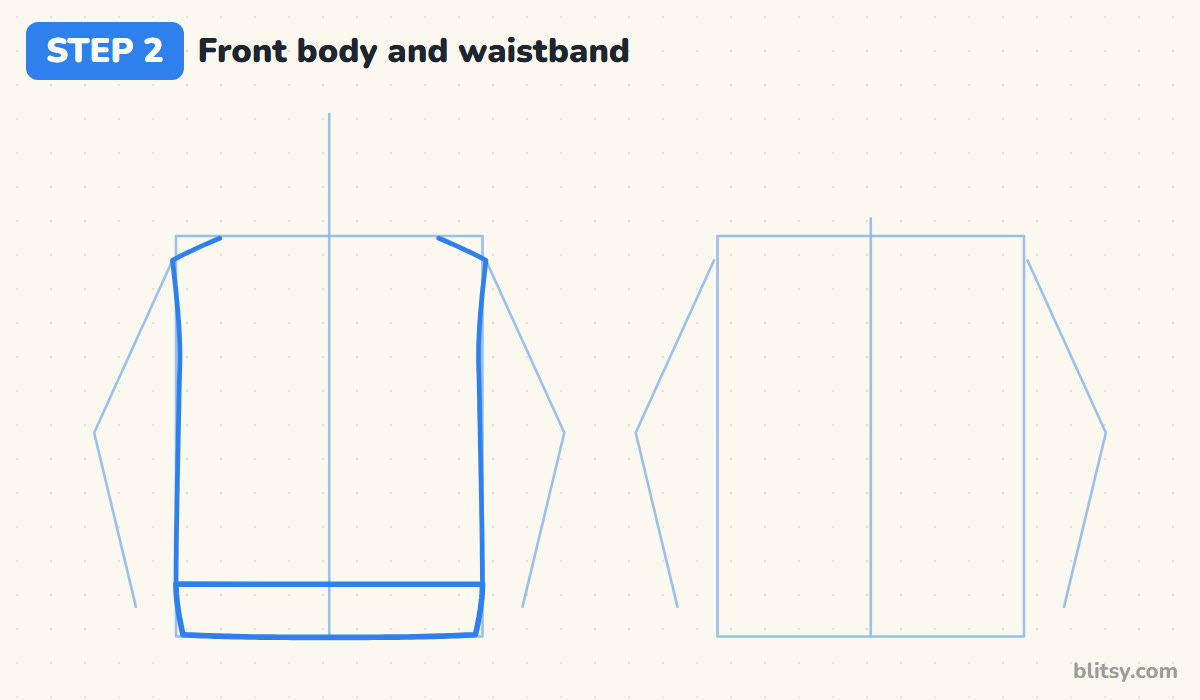
On the left T, draw short shoulders that slope gently down from the neck to the corners. Then run the sides almost straight down. Leave the neck open: the hood covers it in step 4. Underneath, add a band about a finger tall, slightly narrower at the bottom. Hoodie bands hug the hips, which gives that gathered look.
💡 Tip: Curve the very bottom of the band a little, like a soft smile.
Step 3: Add the sleeves with a soft bend
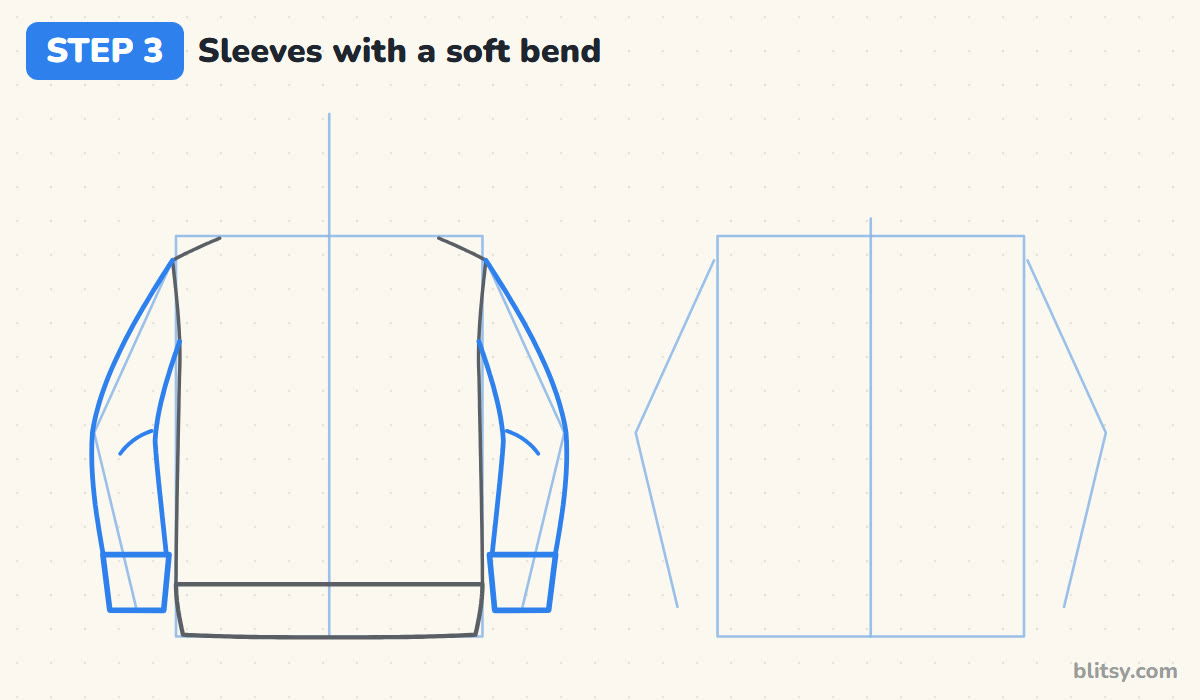
Follow your bent guide arms. Each sleeve swells out to the elbow and then narrows toward the wrist. I draw the outer edge first and only then the inside edge from the armpit, so both bend at the same height. Finish each sleeve with a small rectangle for the cuff, plus a short curve inside the elbow where the fabric folds.


💡 Tip: Make the cuff a little narrower than the sleeve just above it.
Step 4: Draw the hood, its lining and the drawstrings
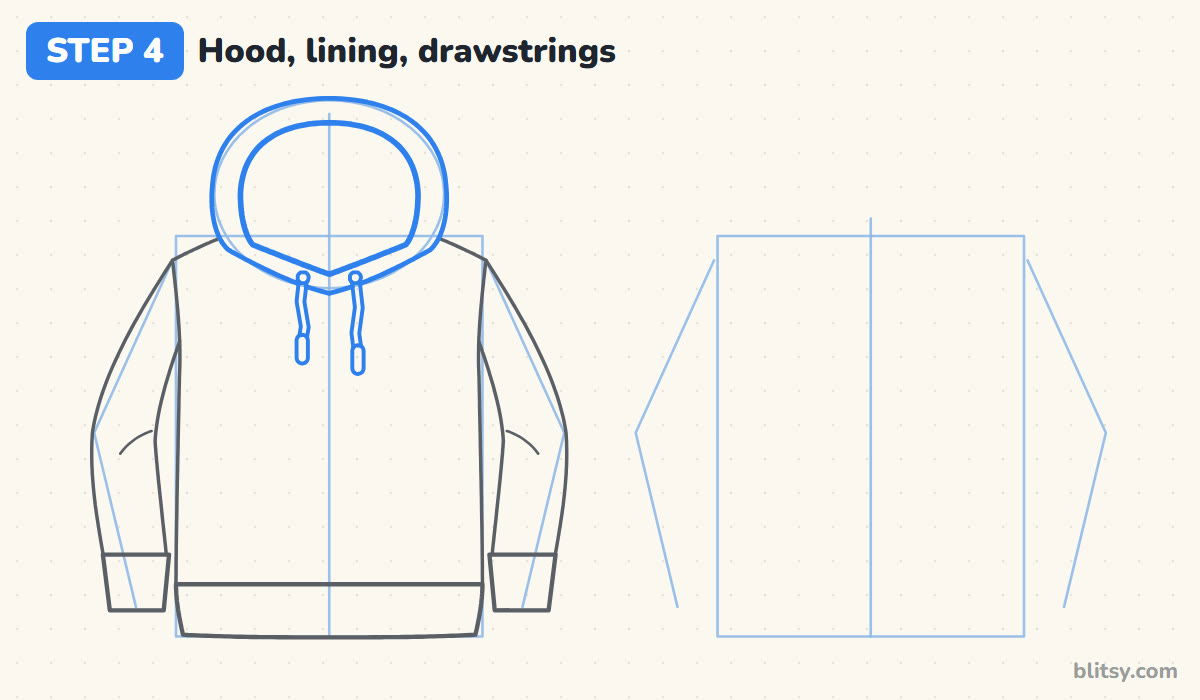
Sketch a light oval over the neck, about two thirds as wide as the body. Trace the outside of the hood around it, letting the bottom dip into a soft V on the chest. Inside, draw a second line that follows the first: that's the opening, where the lining shows. Two tiny circles near the V hold the strings, which wiggle down and end in small capsules for the metal tips.
💡 Tip: Leave a rim between the two hood lines that's thicker on the sides than at the top.
Step 5: Draw the kangaroo pocket
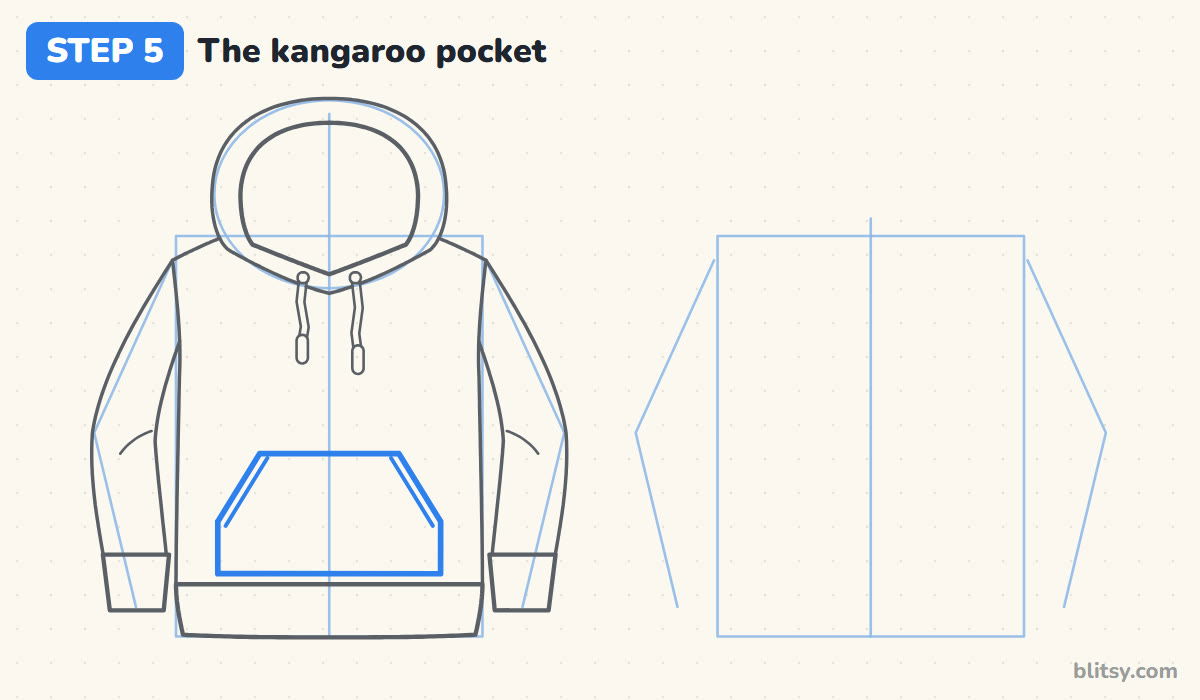
This big front pocket sits low, just above the waistband. Its top edge is shorter than its bottom edge, and the two sides slant out, because those slanted edges are where hands slide in. Most beginners make the pocket too small, and I did too at first. Aim for one that reaches most of the way across the body. Then draw a stitch line just inside each slanted opening.
💡 Tip: Stop the pocket a hair above the waistband so the two lines don't merge.
Step 6: Put a mountain badge on the chest
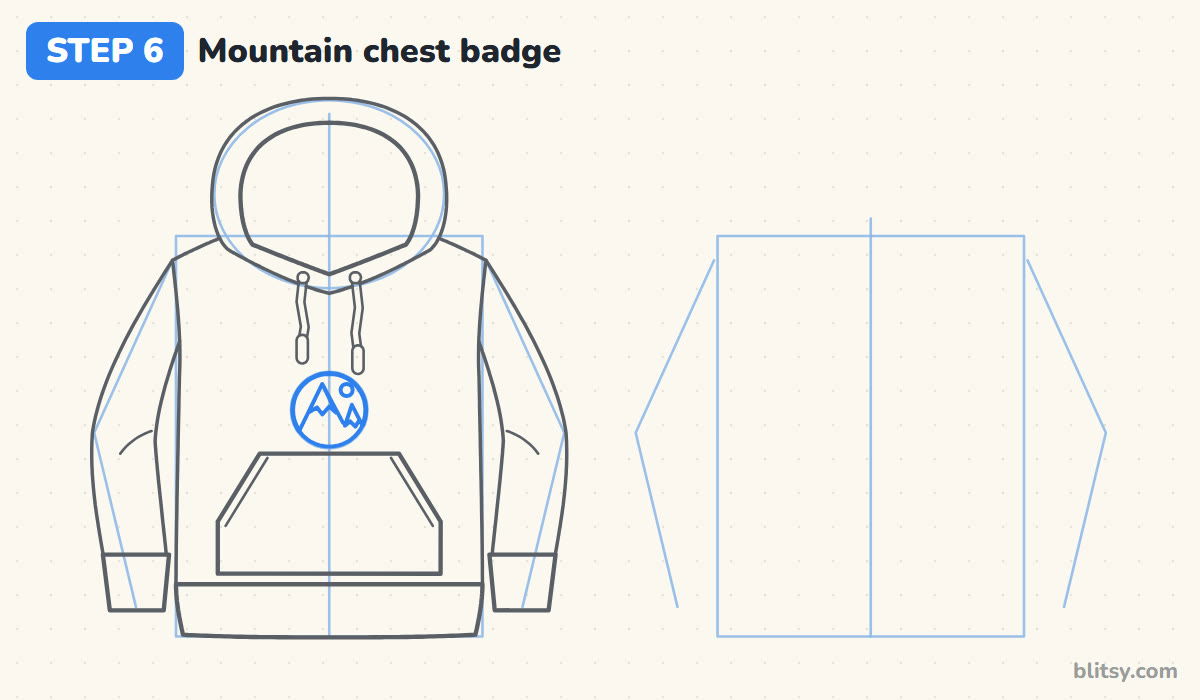
Halfway between the string tips and the pocket, draw a small guide circle. Inside it, draw one tall triangle and a smaller one overlapping on the right, then give each peak a zigzag snow cap. A little sun in the empty top corner balances it. I keep the badge small; a giant logo makes a hoodie look like a costume.
💡 Tip: Draw the bigger mountain first and tuck the small one behind it.
Step 7: Add ribbing to the cuffs and the hem
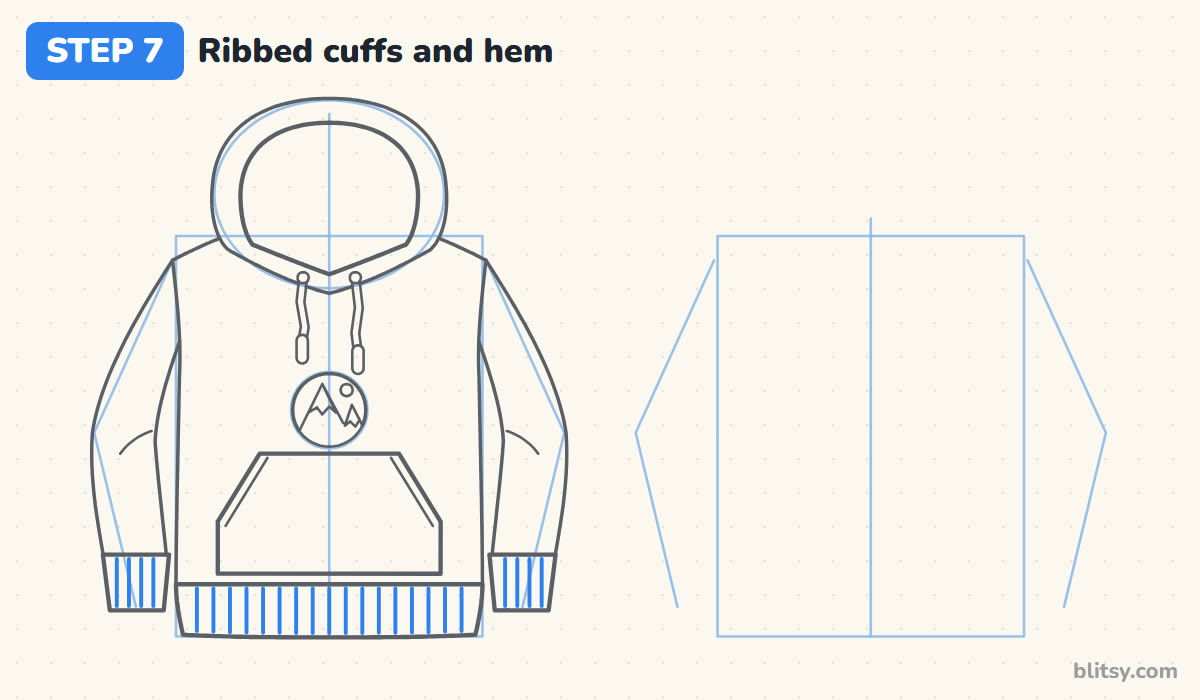
Ribbed knit is easy to suggest: short upright lines spaced evenly across the waistband and both cuffs. I space them roughly a pencil's width apart. They don't need to be perfect, and real ribbing is a bit uneven anyway. This small detail tells people the fabric is stretchy and soft.



💡 Tip: Start in the middle of the band and work outward, so the spacing stays even on both sides.
Step 8: Copy the body for the back view
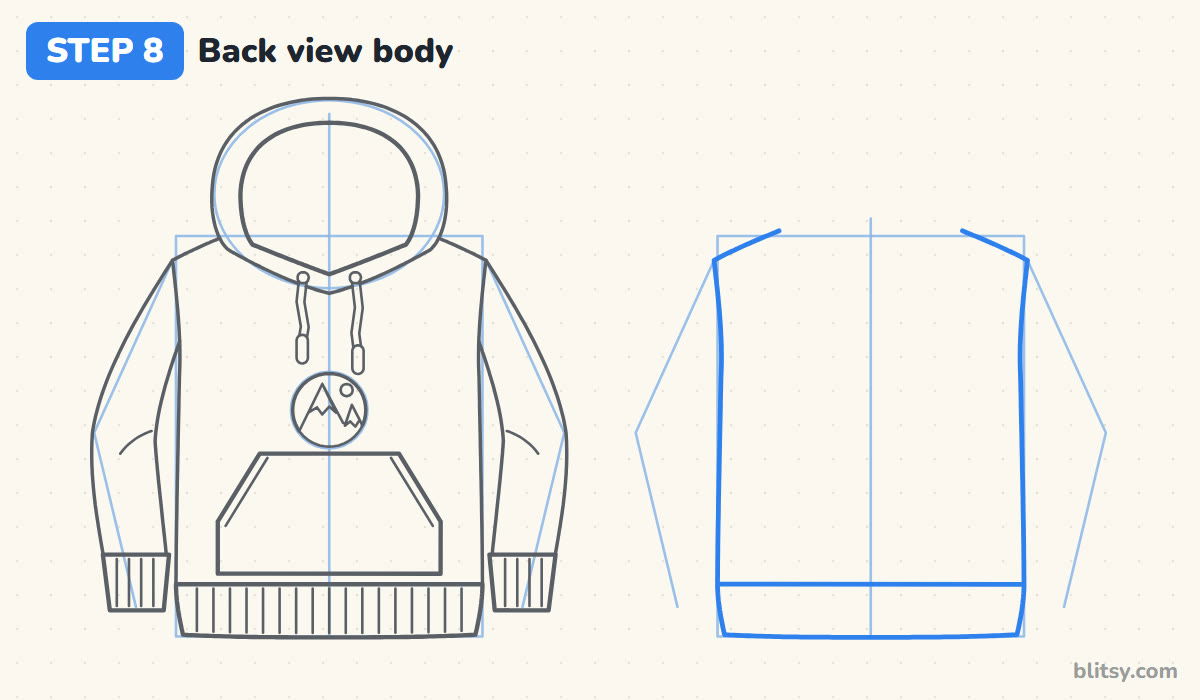
Now move to the right T-shape. The back of a hoodie has the same outline as the front, so copy the shoulders and sides, then the waistband. Compare often: if the back looks wider or shorter, the pair won't feel like one garment. Leave the top of the neck open here too.
💡 Tip: Glance between the two drawings and match the shoulder height first.
Step 9: Add the back sleeves and ribbing
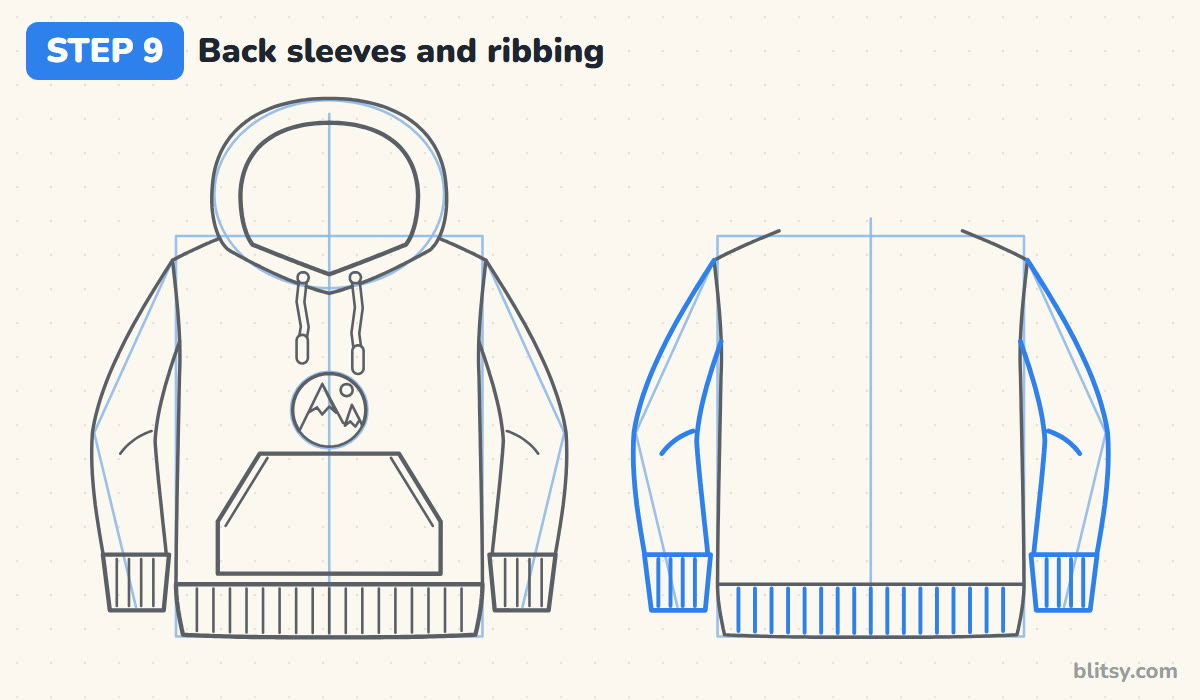
Repeat the bent sleeves on the back view, with their cuffs and elbow folds, then the ribbing lines across the cuffs and band. Doing this right after the body keeps the two views matched. If one side came out thicker, fix it now while it's still in light pencil.
💡 Tip: Draw the left sleeve, then flip your attention to the right one and mirror every bump.
Step 10: Draw the hood lying on the back
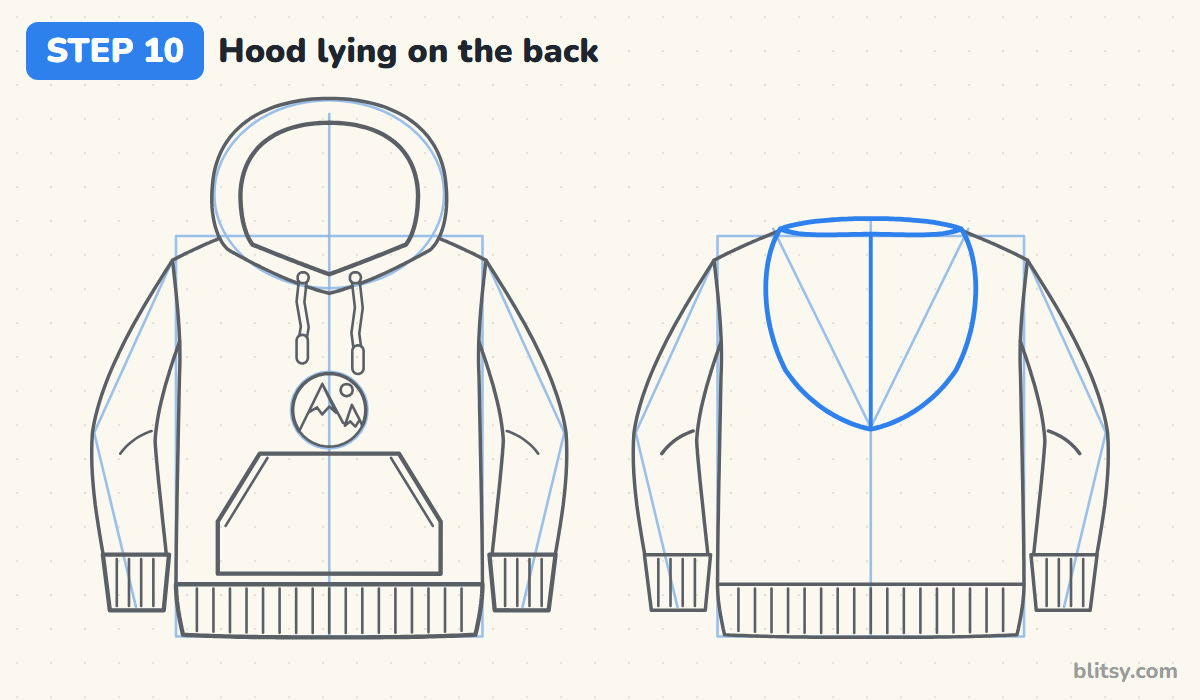
From behind, a hood that's down hangs like a rounded shield. Sketch a V guide from both sides of the neck down to the center line, roughly a third of the way down the back. Then I draw a curve that bulges outward on each side and meets the point of the V. Across the top, add a thin crescent; that's the edge of the lining peeking out. A straight seam down the middle finishes it.
💡 Tip: Round off the bottom point a little; a sharp tip looks like a cape.
Step 11: Ink your lines and erase the guides
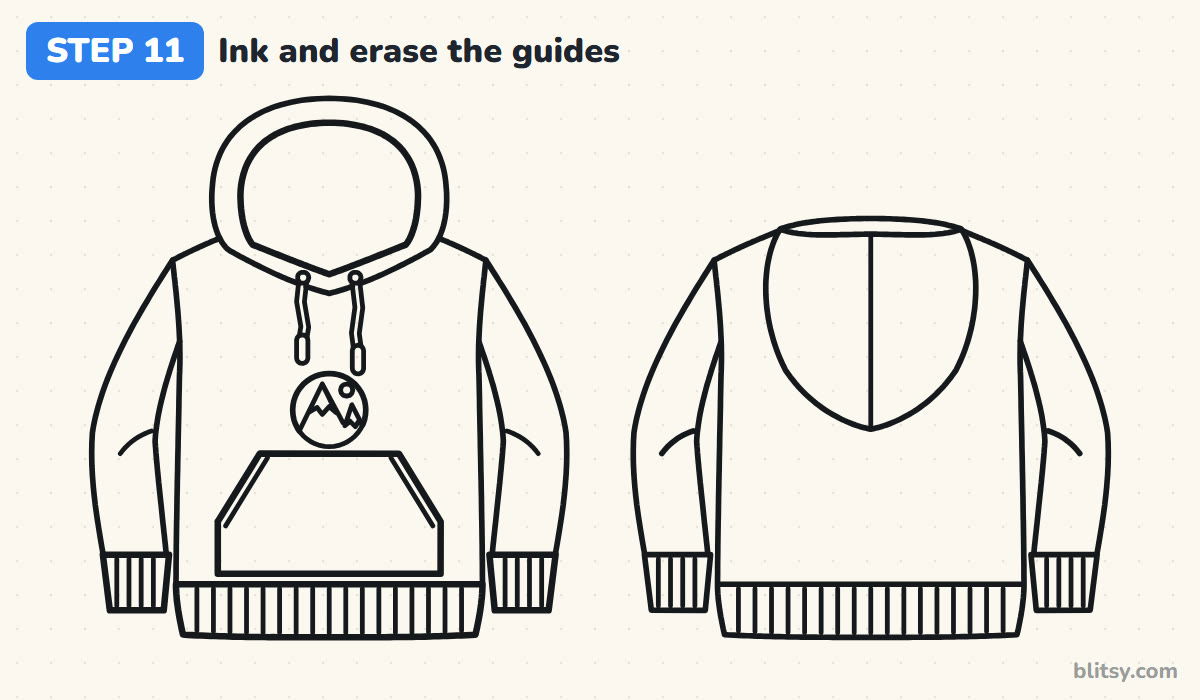
Trace every keeper line with the black marker, big outlines first and ribbing last. Leave the T-shapes, the oval, the circle and the V alone. Once the ink is dry, erase all the pencil, and give faint guides a second pass so no ghost lines show through the color.



💡 Tip: Wait a full minute before erasing, since fresh marker smears.
Step 12: Color the hoodie
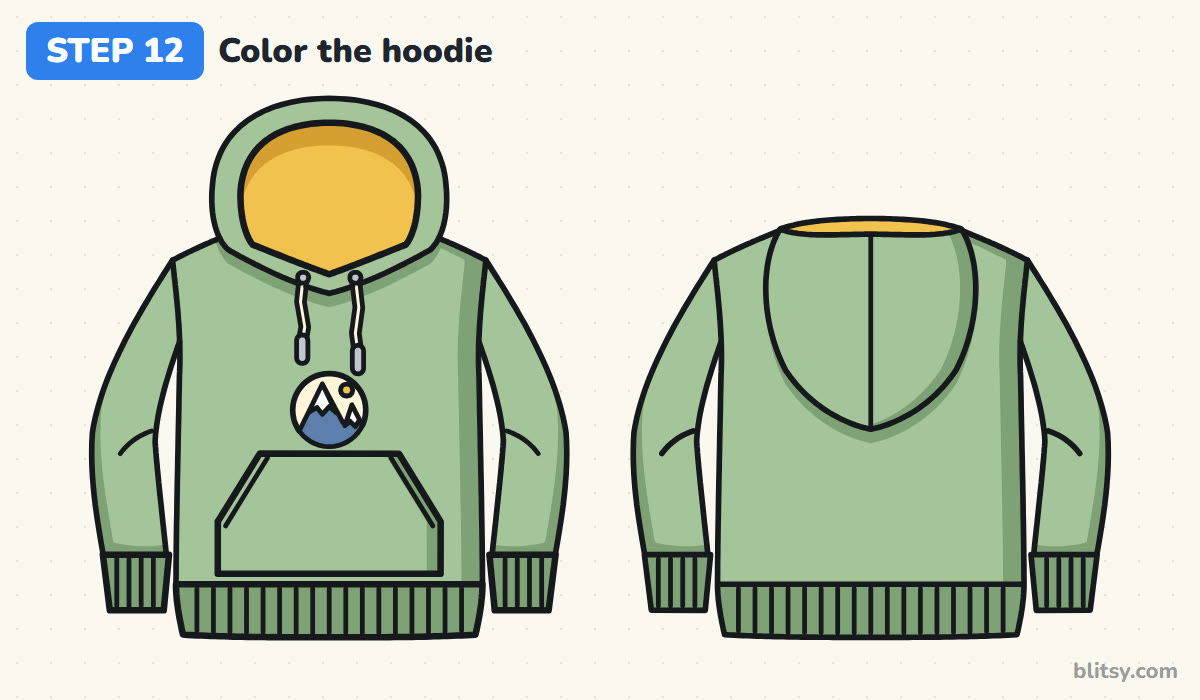
Use light green for the body and sleeves on both views, plus both hoods. Dark green goes on the cuffs and waistband, down the right side of each body and under the sleeves and hood, where shadows fall. The lining is yellow with a darker top edge. Make the strings and badge cream and the tips gray; the mountains get blue with white snow.
💡 Tip: Press harder with the same green instead of switching colors if you only have one shade.
Where Hoodie Drawings Go Lumpy
- A hood that's too small. A tiny hood looks like a collar. Make the oval about two thirds as wide as the body.
- No inner line on the hood. Without the opening, the hood reads as a lump on the shoulders. Always draw the second line for the lining.
- Stiff, straight sleeves. Hoodie sleeves are baggy. A slight bend at the elbow and a narrower cuff fix the robot look.
- A pocket floating in the middle. The kangaroo pocket belongs low on the body, just above the waistband.
- Front and back that don't match. Check shoulder height and band width on both views before you ink.
Restyling Your Hoodie Drawing
Once the pullover feels easy, change it up. Draw a zipper down the middle and split the pocket in two for a zip-up, or give the hood bunny ears. Stripes across the chest, a pastel color-block, or your school initials in place of the mountain all work on the same outline. And if you want to build a full outfit, my shirt drawing tutorial starts from the same T-shape, while the shoe drawing tutorial gives you sneakers to go with it.
Free Hoodie Coloring Page and Step-by-Step PDF
The hoodie coloring page shows both views in bold outlines, with a small colored example and the color key at the top. Kids can copy those colors or pick their own team colors. The printable drawing guide puts all 12 steps and their tips on a few pages that fit Letter or A4 paper.
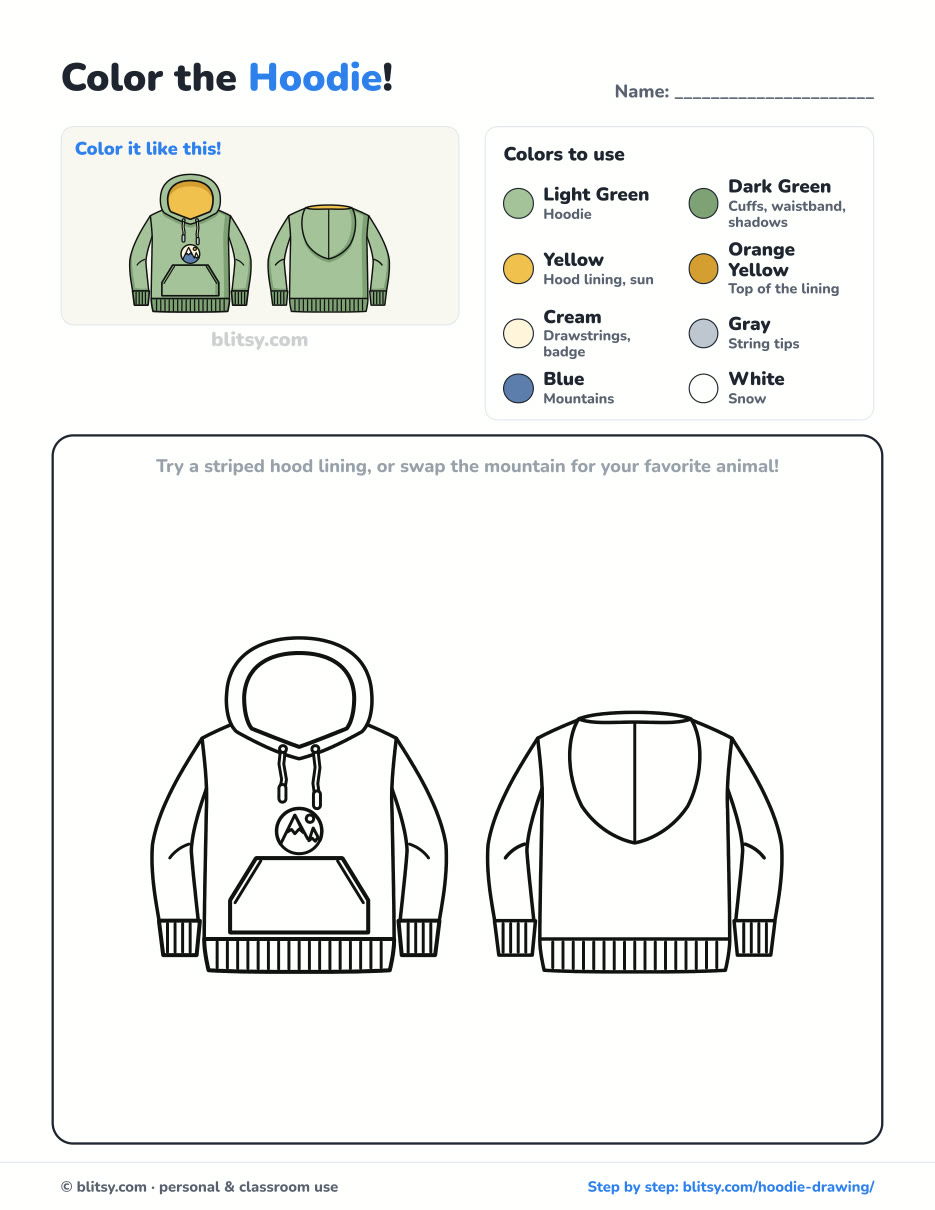
Black outlines with a colored example and the color names at the top. Ready to print and color.
⬇️ Download Coloring PageEvery step picture with its instructions and tips, to keep beside your paper while you draw.
⬇️ Download Drawing Guide📱 On a phone? Tap a download button, then open the file and choose Share → Save to Files or Print. On a computer, the PDF opens or saves straight to your Downloads folder.
Pin the Hoodie Steps
Hoodie Drawn? Build a Whole Outfit Next
Below are more step-by-step tutorials, mostly clothes and people, that you can follow one stage at a time.
- Shoe Drawing: Draw a red high-top with a heart patch and a low-top facing the other way in the sneaker drawing tutorial.
- Realistic Drawing: Shade one shiny apple under a single lamp with the realistic drawing step by step lesson.
- Feather Drawing: A teal feather and a small orange one each start from a curved line and a leaf shape in this feather drawing tutorial.
- Chalk Art: Draw a hopscotch, a rainbow on two clouds and a corner sun with how to do chalk art step by step.
- Family Drawing: Four people, one puppy and a red balloon fill the cartoon family portrait tutorial.
- Dress Drawing: A twirly pink party dress and a lavender sundress on its hanger sit side by side in the dress drawing tutorial.
- Suit Drawing: Learn how to draw a suit with a navy jacket, a red striped tie and a yellow pocket square.
- Mask Drawing: The masquerade mask drawing tutorial trims a purple mask in gold, with a teal gem, pearls and three feathers.
- Shirt Drawing: Draw a coral tee with a star and a plaid button-up with rolled sleeves using the shirt drawing step by step guide.
Hoodie Drawing Questions, Answered
What is the easiest way to draw a hoodie?
Start with a T-shape for the body and sleeves, then put an oval on top for the hood. Draw a second line inside the oval for the opening, and you already have a recognizable hoodie.
How do you draw a hood that looks real?
Draw two lines: the outside of the hood and the opening inside it. Let them meet in a soft V on the chest, and color the inside a different shade.
How do you draw a hoodie from the back?
Use the same body and sleeves as the front. Then draw the hood hanging down the back as a rounded V shape with a seam down the middle.
Is a hoodie hard for kids to draw?
Not really. The front view uses simple shapes, and I'd let younger kids leave out the ribbing and the badge. The back view is a nice extra step for older kids.
Your first hoodie only needs a light T-shape and an oval to get going, so pick a color and start sketching. 🧥✏️
Related posts:
 How to Draw a School Step by Step (Easy Front View)
 How to Draw a Nose Step by Step (Front and Side View)
 How to Draw a Skull Step by Step (Easy Front View)
 How to Draw a Dog Step by Step (Easy Side View for Beginners)
 How to Draw an Alligator Step by Step (Easy Side View)
 How to Draw a Horse Step by Step (Easy Side View)
 How to Draw Hands Step by Step (Easy Palm View for Beginners)
 How to Draw a Brain Step by Step (Easy Side View)
 How to Draw a Dragon Head Step by Step (Easy Side View)
 How to Draw a Whale Step by Step (Easy for Beginners)
 How to Draw Lungs Step by Step (Easy Science Diagram)
 How to Draw a Pineapple Step by Step (Easy Crown and Slice)

