
Pizza is round, flat and covered in small shapes, which makes it a friendly first food drawing. Here you'll find out how to draw a pizza step by step, from one squashed oval to a pepperoni pizza with a slice pulled out and cheese dripping off its edge. When I teach this, the tilted view is the part that wins kids over, because it makes the pizza look real enough to eat.
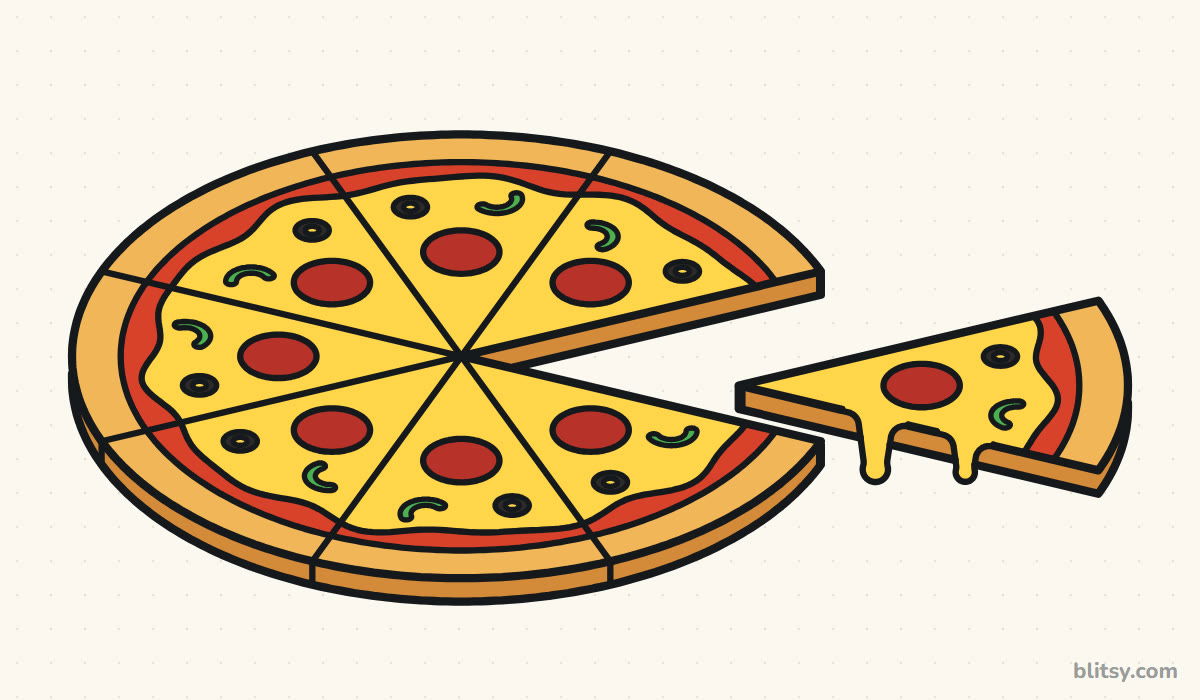
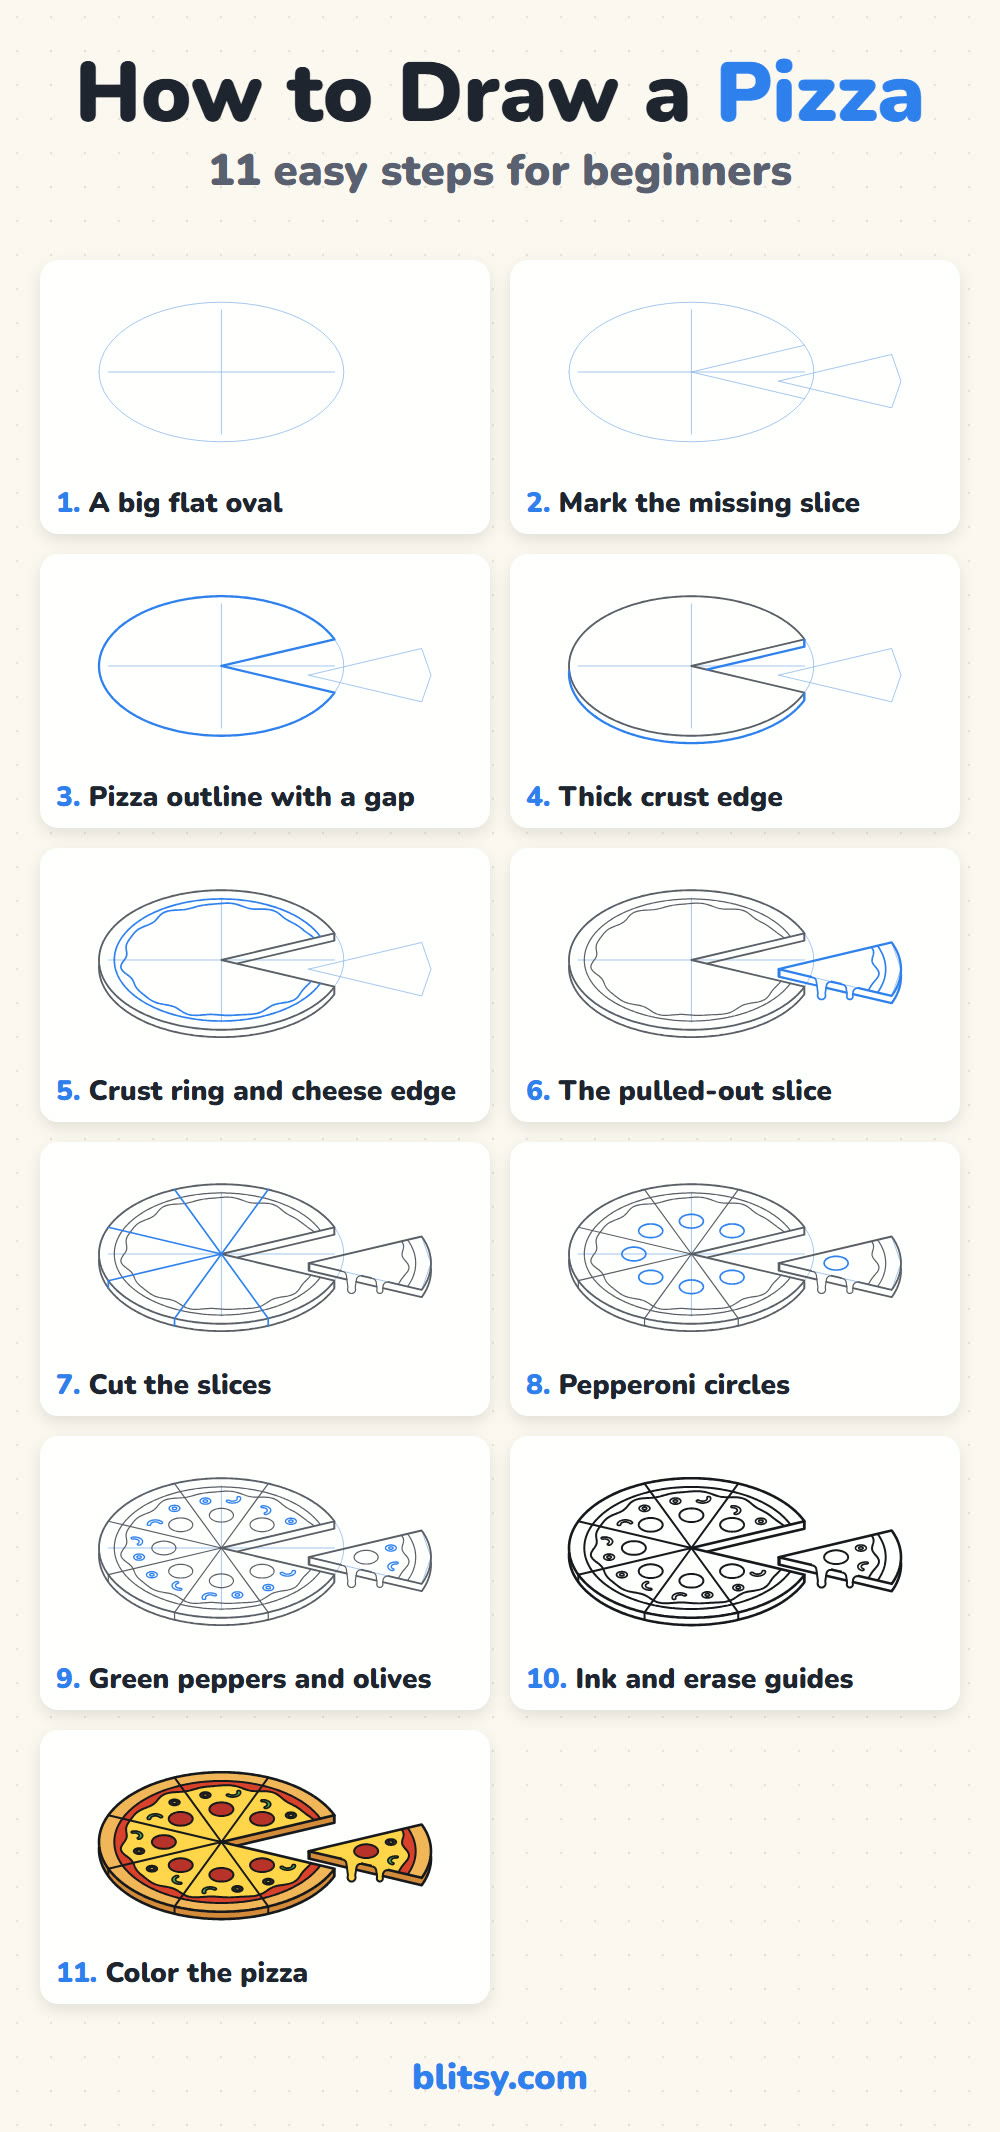
In every picture the part you add in that step is blue. Anything gray was drawn before, so you can compare it with your own paper. Thin pale blue lines are helpers only; keep them faint, since you rub them out in step 10.
Quick overview
⏱️ Time: about 30 minutes, coloring included
🎯 Level: easy to medium, good for kids around 7 and older
✏️ Steps: 11
🍕 You'll draw: a whole pepperoni pizza in a tilted view, with one slice pulled out and two cheese drips
Pencils and Colors for a Pizza Night Sketch
- A pencil you can hold loosely for faint lines
- An eraser that lifts pencil without smearing ink
- A black fineliner or a thin felt pen
- Colored pencils or markers: golden yellow, light brown, red, yellow, dark red, green and black
- A sheet of plain paper turned sideways
- A ruler for the cut lines, if you like them very straight
Only have a basic set of crayons? Yellow, red, brown, green and black already cover the whole pizza.
How to Draw a Pizza Step by Step
Step 1: Draw a big flat oval
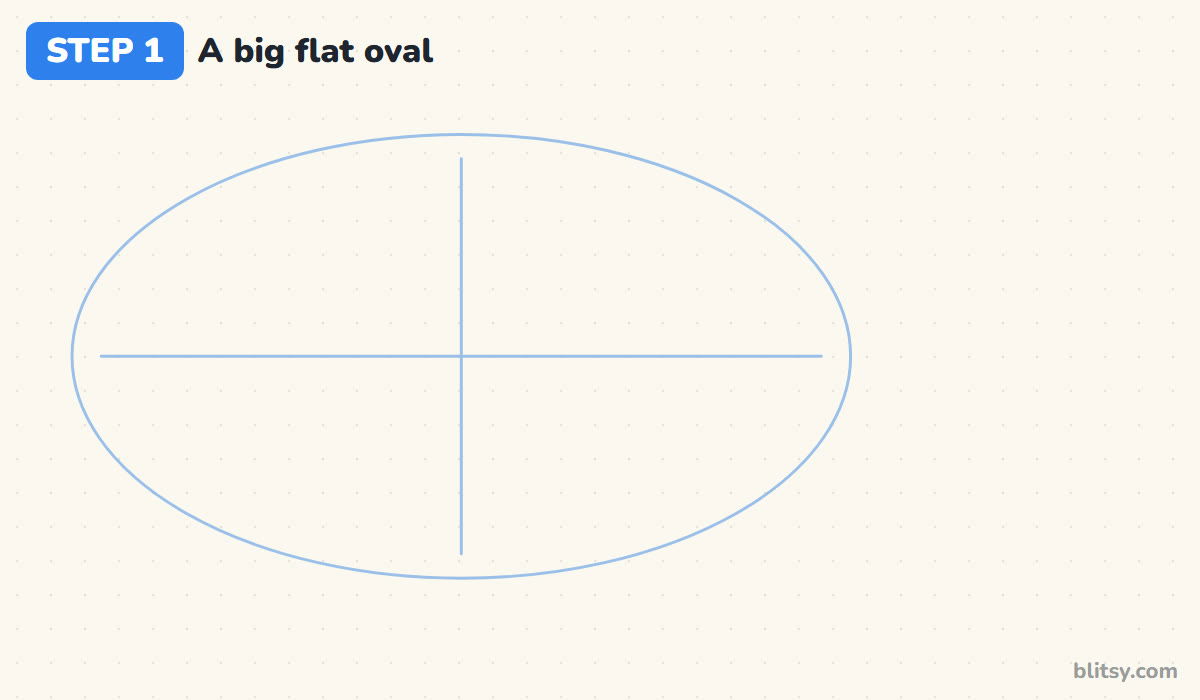
Sketch a wide oval on the left two thirds of your paper, about twice as wide as it is tall. A flat oval is how a round pizza looks from a little above. Add a light cross through the middle; where the lines meet is the center.
💡 Tip: Leave an empty strip on the right side of the paper. The loose slice will need that room.
Step 2: Mark where the missing slice goes
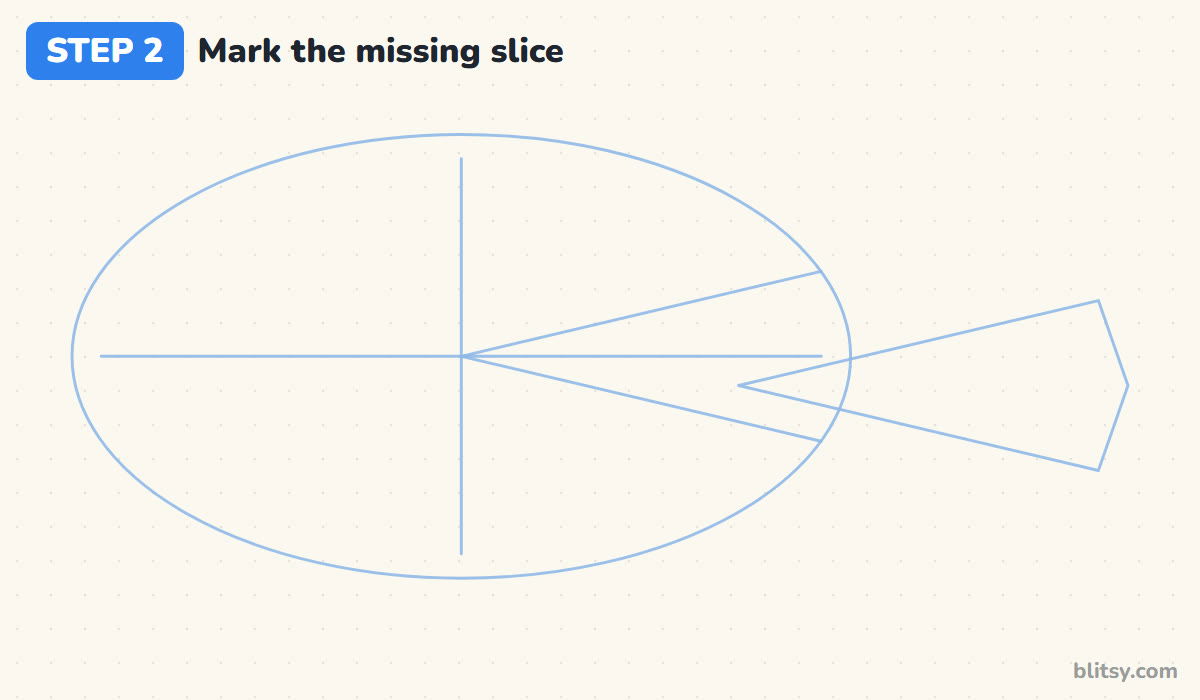
From the center, draw two lines out to the right edge of the oval, one tilting up and one tilting down, like a narrow open mouth. That gap is the slice somebody has already taken. Then, to the right of the oval, sketch a long triangle pointing back toward the pizza. I place its tip just inside the gap so the slice looks like it was only just pulled away.
💡 Tip: Make the gap about as wide at the edge as one eighth of the oval's outline.
Step 3: Outline the pizza with a gap
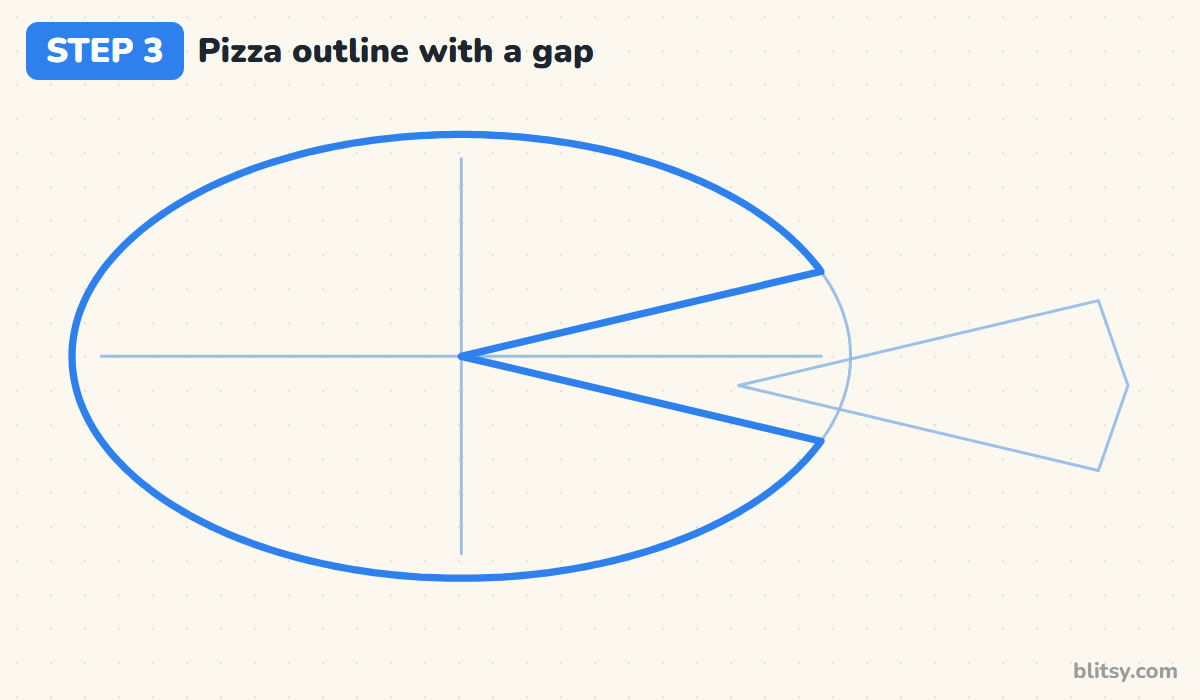
Go over the oval with a firmer line, but stop at the two gap lines and travel along them into the center and back out. Skip the part of the oval that runs across the gap. It isn't there anymore, and drawing it would make the pizza look whole again.



💡 Tip: Turn the paper as you go around the oval, so your hand always draws the curve from the inside.
Step 4: Give the pizza a thick crust edge
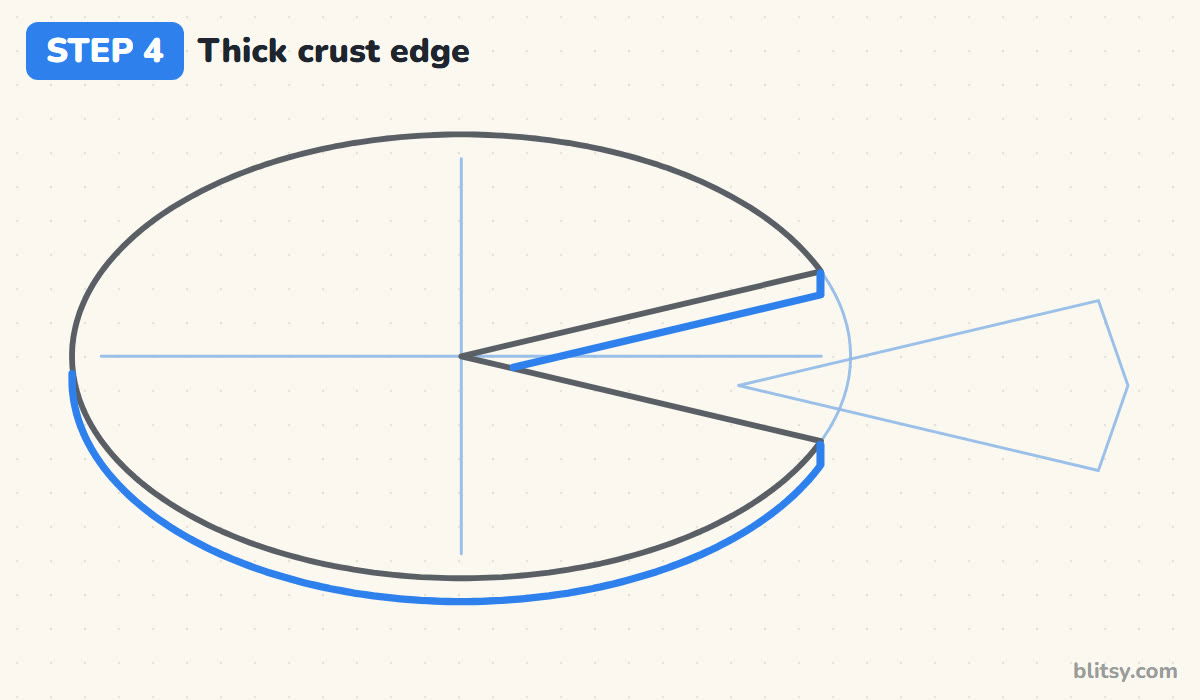
A pizza has some height, and this step shows it. Draw a second curve just under the front half of the outline, from the far left around to the gap. Inside the gap, add a thin strip of the same thickness under the upper cut line. That's the cut side of the next slice.
💡 Tip: Keep the edge thin, roughly a finger's width. A tall edge turns the pizza into a cake.
Step 5: Add the crust ring and the cheese edge
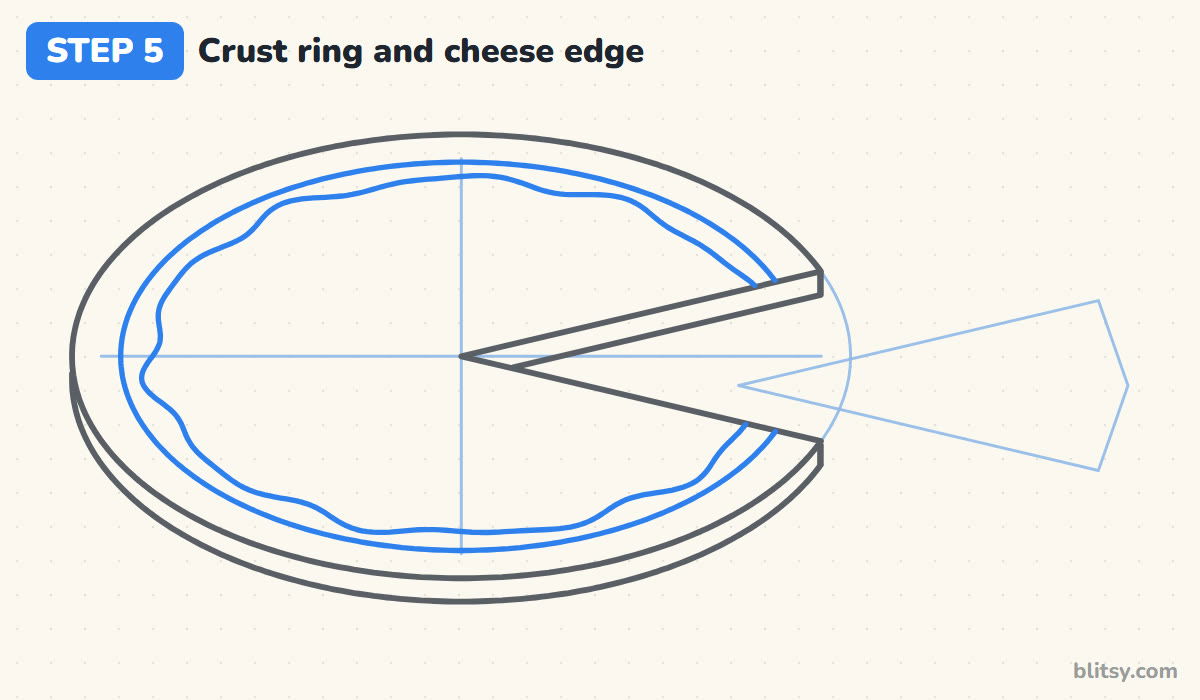
Draw a smaller oval inside the outline for the inner side of the crust. I leave the crust a little wider on the left and right than at the top and bottom, because the tilt squashes the front and back. Inside that, draw a wobbly line for the edge of the melted cheese. The narrow space between becomes the sauce.
💡 Tip: Make the cheese wobble small and uneven. Big regular waves look like a flower.
Step 6: Draw the pulled-out slice and its drips
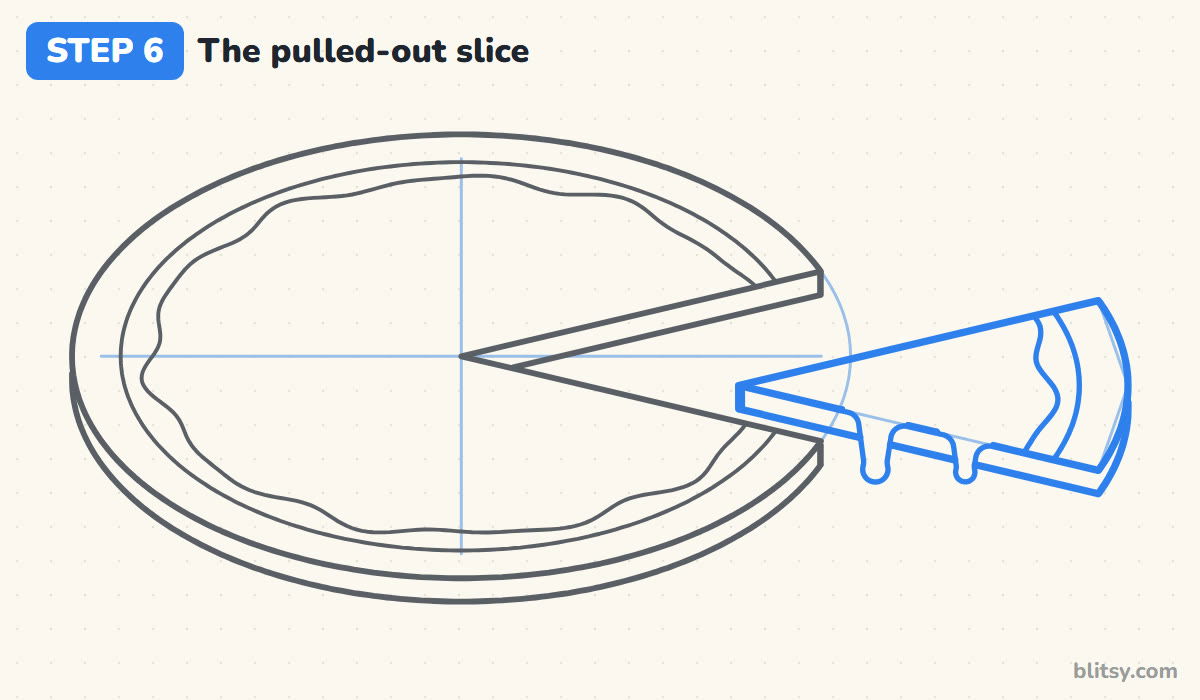
Turn the triangle guide into a real slice: a pointed tip, two straight sides and a curved crust end that matches the curve of the pizza. Give it the same thin edge underneath, then copy the crust line and cheese line onto the wide end. Along the front edge, let two cheese drips hang down over the side. I make one drip longer than the other, because matching drips look stuck on.
💡 Tip: Round off the bottom of each drip like a drop of honey. Pointy drips look like teeth.
Step 7: Cut the rest of the pizza into slices
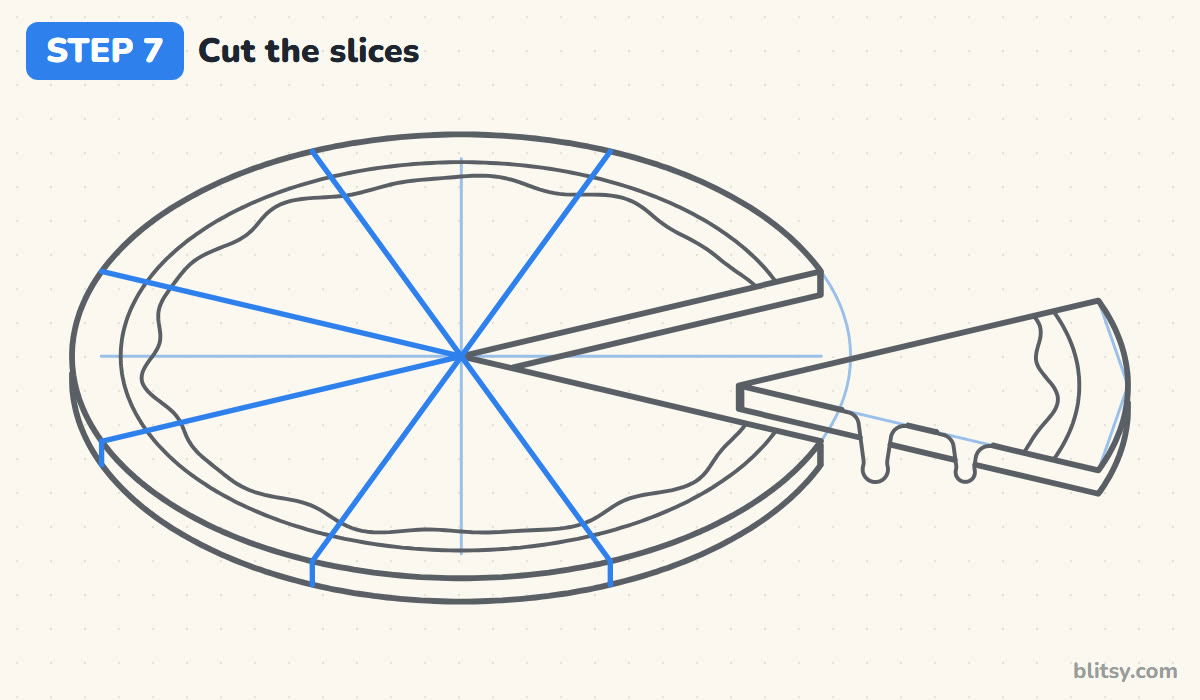
Draw six straight lines from the center out to the edge, spaced evenly. Together with the gap, that makes eight slices. Where a cut reaches the front edge, add a tiny upright line through the thick crust so the cut goes all the way down.


💡 Tip: Draw the cuts that go straight up and down first, then split each half into thirds by eye.
Step 8: Add the pepperoni
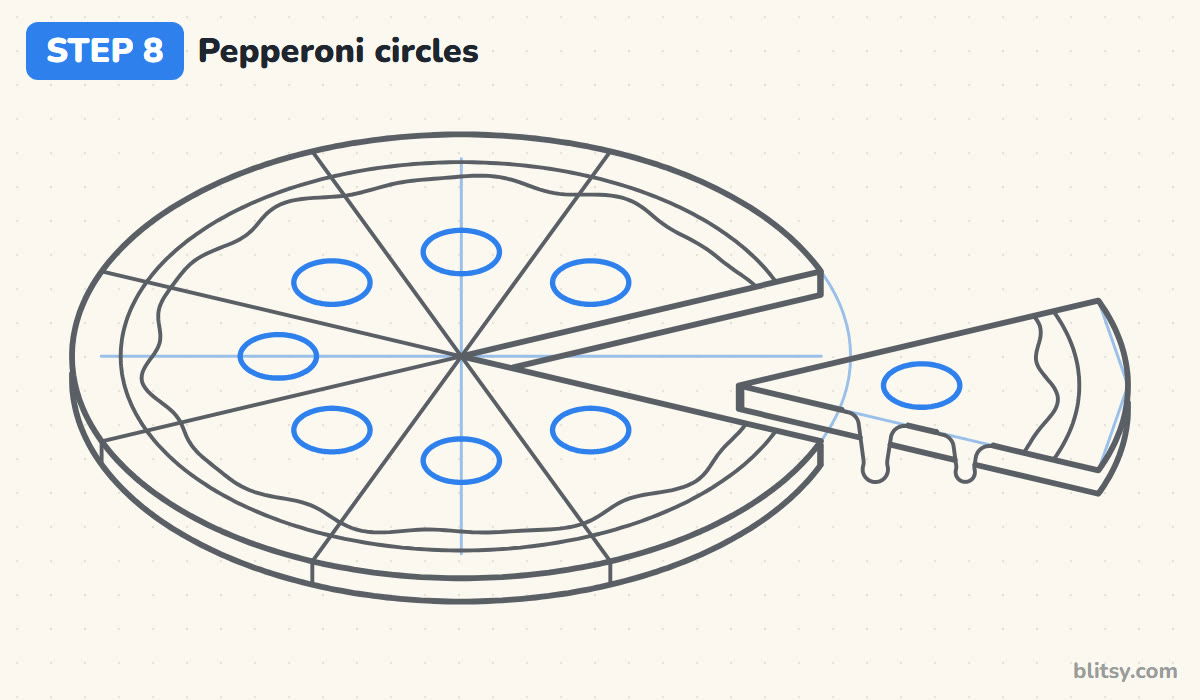
Put one pepperoni in the middle of every slice, the loose one too. Draw them as flat ovals, not circles, since they lie on the tilted pizza just like the pizza itself. Keep each one well inside its slice so no cut line runs through it. Most beginners draw these too small; on this pizza each one fills about half the width of its slice.
💡 Tip: Match the pepperoni's tilt to the big oval. Round circles here make them look like they're standing up.
Step 9: Scatter green peppers and olives
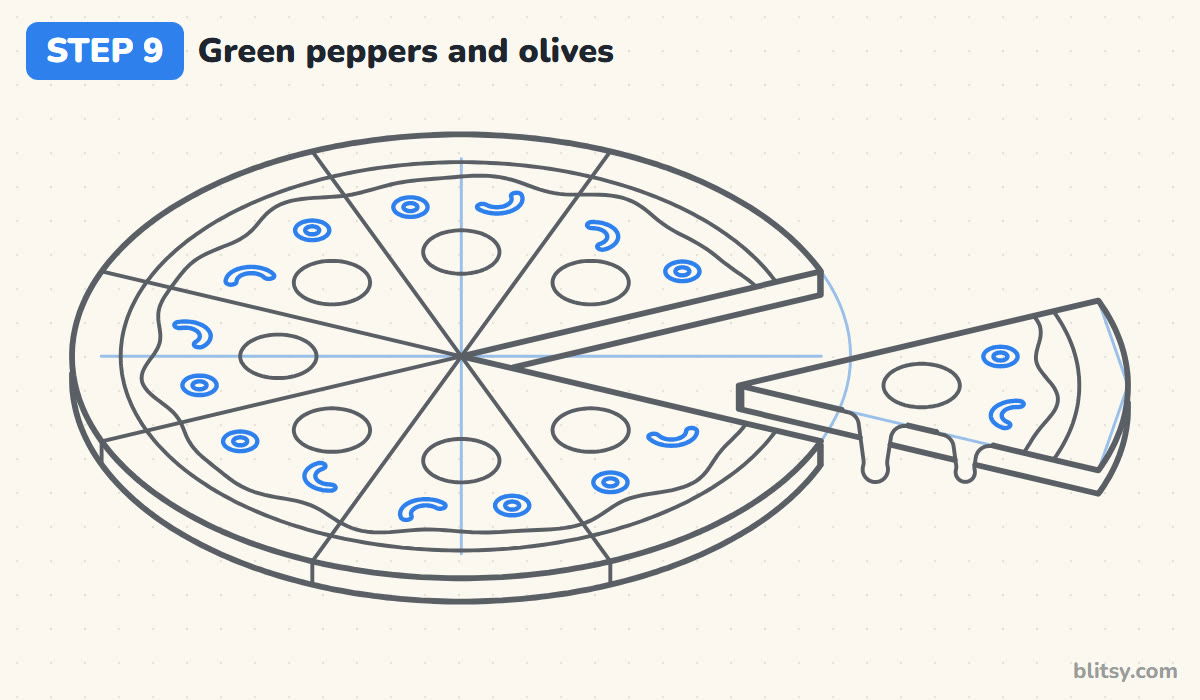
Near the outer part of each slice, add one small curved strip for a green pepper and one tiny ring for a sliced olive. A ring is just a little oval with a smaller oval inside. Swap their sides from slice to slice, which stops the pizza from looking like wallpaper.
💡 Tip: Bend the pepper strips in different directions, the way real ones fall onto a pizza.
Step 10: Ink the lines and erase the guides
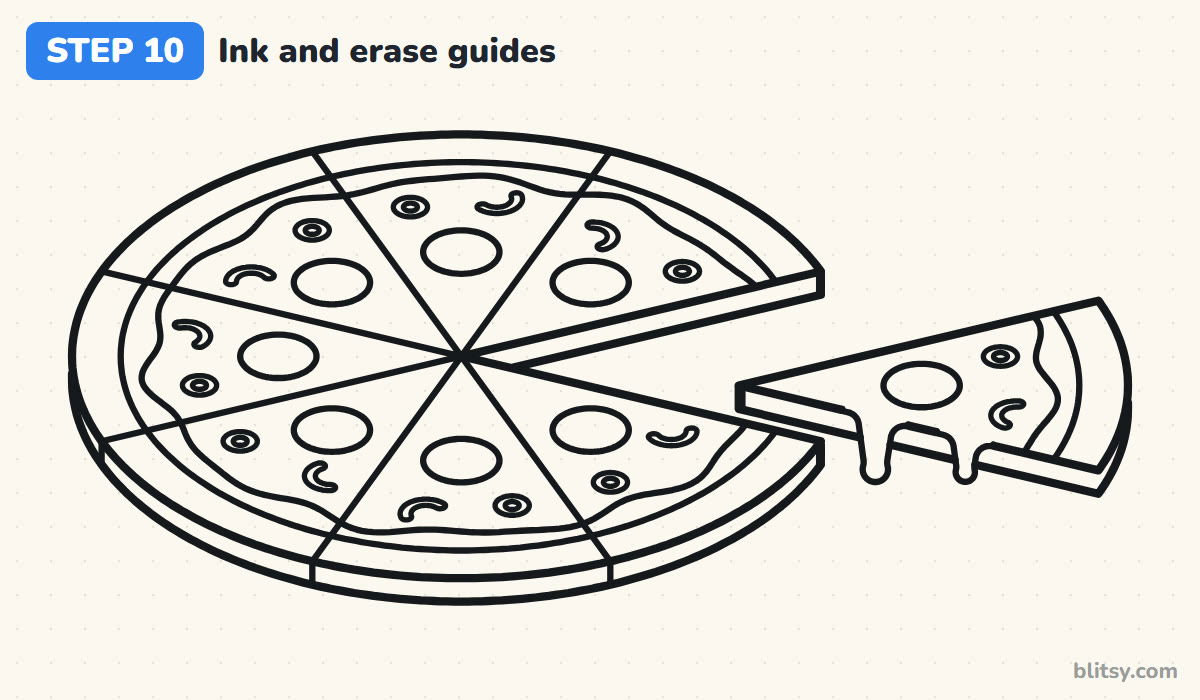
Trace every line you want to keep with your black pen: the outline, the thick edge, the crust ring, the cheese, the slice, the drips, the cuts and all the toppings. Wait a moment for the ink to dry. Then erase the cross, the gap lines and the triangle guide. Honestly, this is the step where it starts to look like food.
💡 Tip: Use a slightly heavier stroke on the outside edges than on the toppings. It makes the shape pop.
Step 11: Color the pizza
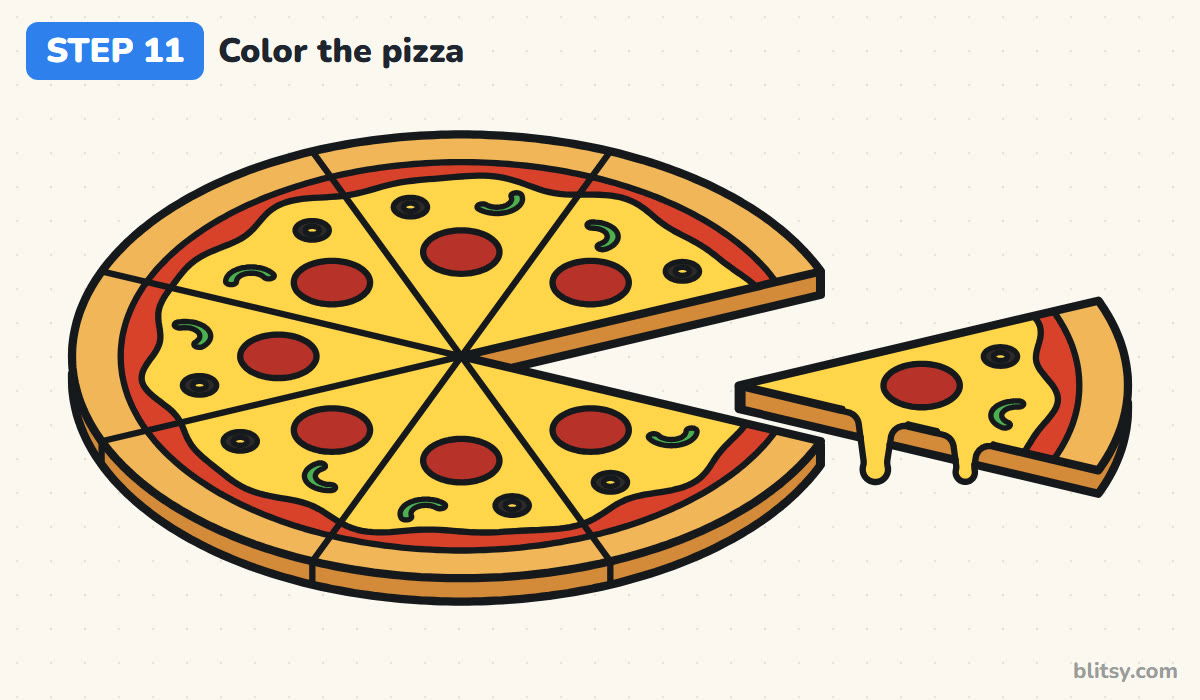
Start with the crust: golden yellow on top and light brown on the thick edge and the cut sides. Fill the thin ring between crust and cheese with red for the sauce. Color all the cheese, drips included, a bright yellow. Finally, I go dark red on the pepperoni, green on the peppers and black on the olives, leaving their little holes yellow.



💡 Tip: Press harder near the crust's outer edge and lighter toward the cheese for a baked look.
Slip-Ups That Make a Pizza Look Flat
- Starting with a perfect circle. A circle shows the pizza from straight above, so the edge and the drips have nowhere to go. Squash it into an oval about twice as wide as tall.
- Closing the oval across the gap. If the outline runs across the missing slice, the pizza looks whole with a line drawn on it. Stop at the cut lines.
- Round pepperoni on a tilted pizza. Circles look like coins balanced on their edges. Flatten them into ovals.
- Toppings sitting on the cut lines. A pepperoni split by a line looks like a mistake rather than a cut. Place toppings first in your head, then keep them inside their slice.
- A crust edge thicker than the sauce ring. When the edge is too tall, the pizza starts to read as a pie. Keep it thin.
Pizza Toppings to Swap In
This pizza works with any topping you like. Swap the pepperoni for mushroom slices (a small dome on a short stem), try a plain cheese pizza with just a few basil leaves, or turn it into a pineapple pizza with tiny yellow triangles. If you liked the oval trick, the tiers in the birthday cake drawing tutorial use the same thinking, and the strawberry drawing tutorial makes a sweet follow-up for a food sketchbook page.
Pizza Coloring Page and Printable Step Guide
Rainy afternoon or pizza party? Print the free pizza coloring page: a small colored example and the color key sit at the top, with the big outline underneath ready for crayons. The step-by-step guide PDF holds all 11 steps and their tips, so you can draw without a screen. Both fit Letter and A4 paper.
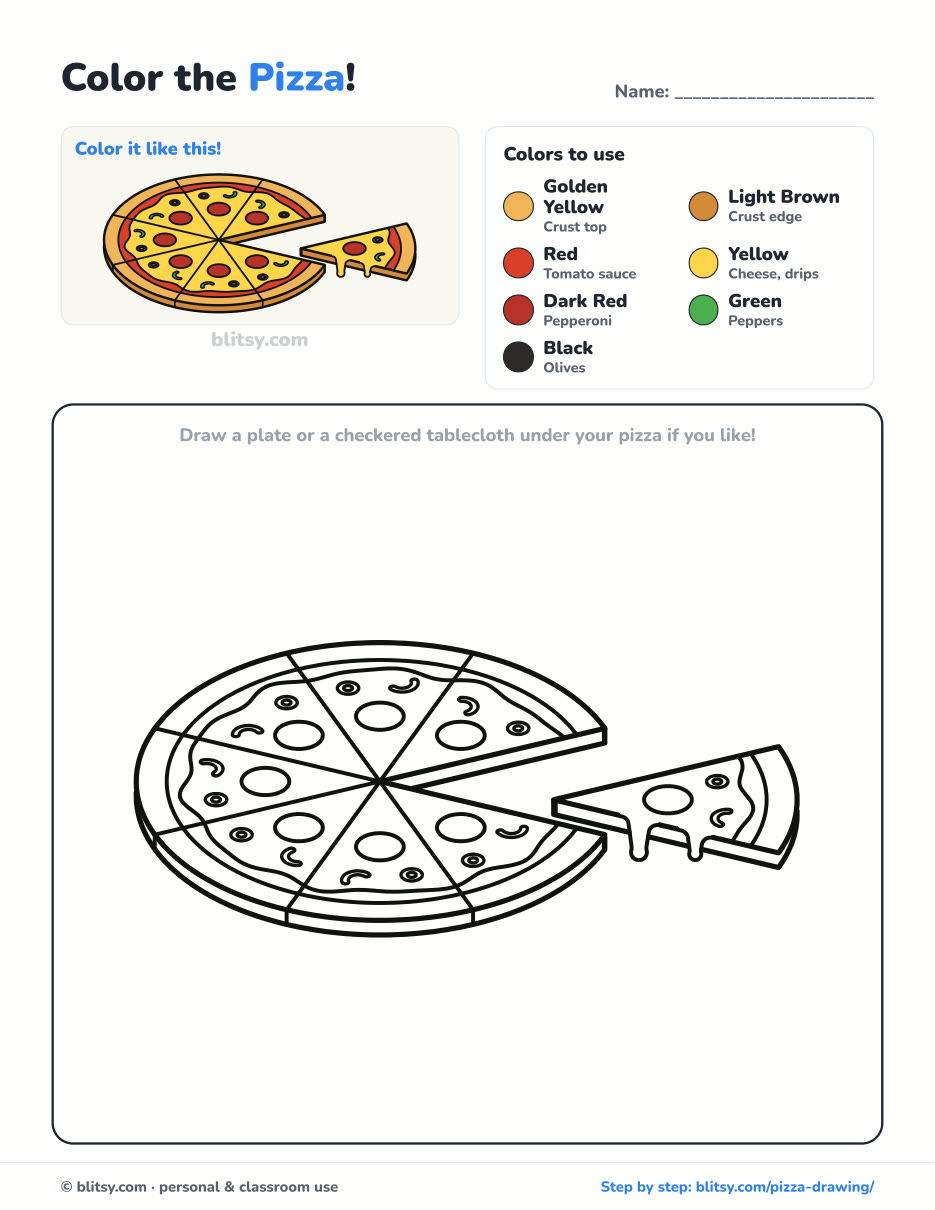
Black outlines with a colored example and the color names at the top. Ready to print and color.
⬇️ Download Coloring PageEvery step picture with its instructions and tips, to keep beside your paper while you draw.
⬇️ Download Drawing Guide📱 On a phone? Tap a download button, then open the file and choose Share → Save to Files or Print. On a computer, the PDF opens or saves straight to your Downloads folder.
Keep All 11 Pizza Steps on One Pin
Hungry for More? Food and Garden Tutorials
Below are single step-by-step tutorials, mostly food, fruit and flowers, each with its own set of step pictures.
- Tree Drawing: Learn how to draw a tree step by step, from leafy clusters to a knothole and apples ready to pick.
- Cell Drawing: The animal cell drawing tutorial labels the membrane, nucleus, ER, Golgi and mitochondria in 12 steps.
- Succulent Drawing: Draw a potted echeveria with pink tips and a clay pot in the succulent drawing tutorial.
- Pineapple Drawing: A golden pineapple and a fresh slice stand side by side in this pineapple drawing step by step lesson.
- Fruit Drawing: The fruit bowl drawing tutorial arranges five fruits and a leaning banana in a blue bowl.
- Jack O Lantern Drawing: One oval turns into a ribbed pumpkin with a glowing grin in the jack o lantern drawing tutorial.
- Tulip Drawing: Three tulips lean in different directions in this how to draw a tulip guide, with one leaf twisting to show its back.
- Hibiscus Drawing: Five red petals circle a maroon center in the hibiscus drawing tutorial.
- Rose Drawing: The rose drawing step by step lesson opens a red rose from a tight spiral and adds a bud.
- Strawberry Drawing: Draw a whole berry next to a cut half with the strawberry drawing tutorial, a natural partner for this pizza on a food page.
- Plant Drawing: A potted monstera with five split leaves takes 11 steps in this plant drawing tutorial.
- Birthday Cake Drawing: The two-tier birthday cake tutorial uses ovals for its tiers, much like your pizza did.
- Avocado Drawing: Two cut halves, one with a smiling pit, come from two circles in the avocado drawing tutorial.
- Magnolia Flower Drawing: Learn how to draw a magnolia flower fully open, half closed and in bud.
- Grass Drawing: The grass drawing step by step lesson grows a meadow patch from one bending blade.
- Flower Drawing: Finish with a potted bouquet of three kinds of flowers in this easy flower drawing tutorial.
Pizza Drawing Questions from Young Artists
What is the easiest way to draw a pizza?
Draw a flat oval, cut it into eight slices with lines through the center, then add round pepperoni. Leave out the missing slice and the thick edge if you want a very quick version.
How do you draw a pizza slice by itself?
Draw a long triangle with a curved short side for the crust. Add a thin edge under it, a crust line near the curved end, and a few toppings.
How long does it take to draw this pizza?
Around 30 minutes with coloring. The toppings take the longest, so fewer toppings means a faster drawing.
Is this pizza drawing good for kids?
Yes. Kids from about 7 can manage all 11 steps. Younger children can skip the loose slice and the drips and still end up with a proper pizza.
Grab a pencil before dinner tonight and see if your pizza looks as good as the real one. 🍕
Related posts:
 How to Draw a Pineapple Step by Step (Easy Crown and Slice)
 How to Draw a Whale Step by Step (Easy for Beginners)
 How to Draw Lungs Step by Step (Easy Science Diagram)
 How to Draw a Plant Step by Step (Easy Potted Monstera)
 How to Draw the Fortnite Llama Step by Step (Easy Fan Art)
 How to Draw a Hoodie Step by Step (Front and Back View)
 How to Draw a Parrot Step by Step (Easy Scarlet Macaw)
 How to Draw a Police Car Step by Step (Easy for Kids)
 How to Draw a Volcano Step by Step (Easy Erupting Volcano)
 How to Draw a Jellyfish Step by Step (Cute, Easy Guide)
 How to Draw Cerberus Step by Step (Cute and Easy)
 How to Draw a Taco Step by Step (Easy Kawaii Taco)

