
Fruit is the classic first still life, and for good reason: almost every piece starts as a circle. Since "fruit" covers a lot of ground, I picked one composition that teaches the most, a bowl holding an apple, an orange, a pear, a bunch of grapes and a banana. Here you'll learn how to draw fruit step by step, and the real skill hiding inside it is overlapping, where one shape sits in front of another. Once that clicks, you can arrange any fruit you like.
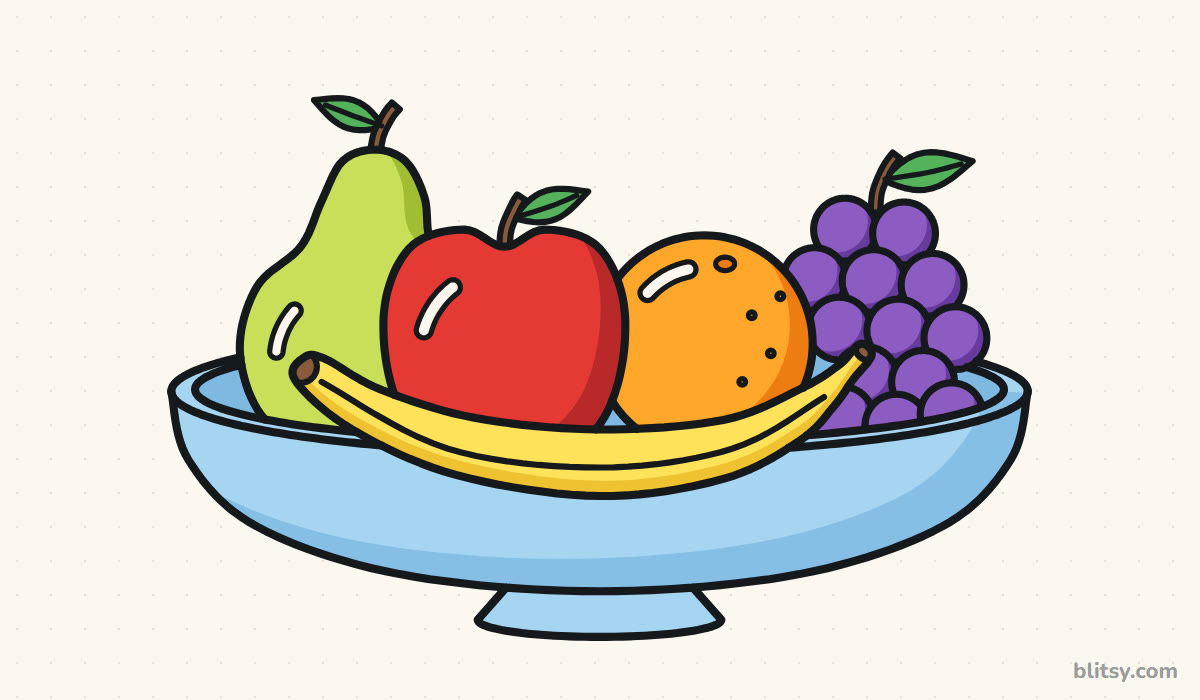
Read the pictures like a map. Blue lines are your job for that step, and gray lines are already on your paper from earlier. The faint blue circles and ovals are construction guides, so draw them softly; they get erased in step 11.
Quick overview
⏱️ Time: roughly 30 to 40 minutes, coloring included
🎯 Level: easy to medium, good for kids around 7 and older
✏️ Steps: 12
🍎 You'll draw: a fruit bowl with an apple, an orange, a pear, a bunch of grapes and a banana
Bowl and Fruit Basics to Set Out First
- A regular pencil (HB is fine) for soft guide circles
- A clean eraser
- A black fineliner or thin marker for the final lines
- Colored pencils or markers: red, orange, yellow, yellow green, purple, green, brown, light blue
- A sheet of plain paper turned sideways, because the bowl is wide
If you only have a few colors, the apple and the banana alone already make the bowl look bright.
How to Draw Fruit Step by Step
Step 1: Sketch a wide oval and a bowl curve
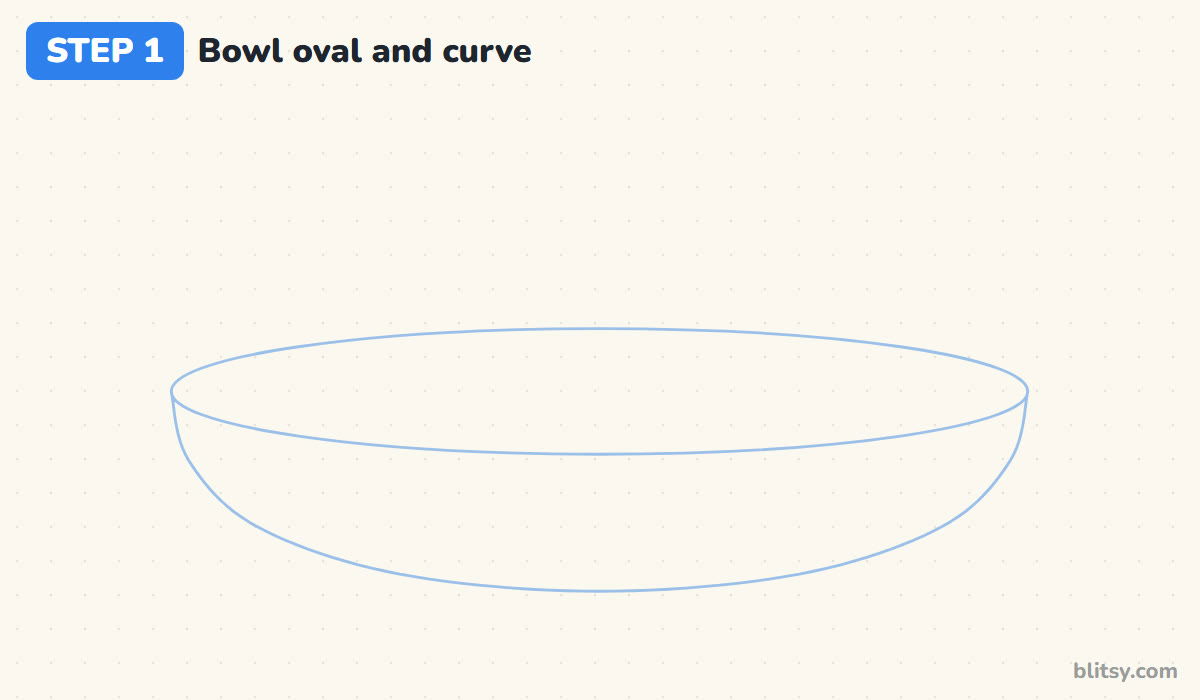
Turn your paper sideways and draw a long, flat oval across the middle. That's the top of the bowl. Under it, add a big U-shaped curve that joins both ends of the oval and dips down toward the bottom of the page. I make the oval about three times wider than the U is deep, because a deep bowl would swallow most of the fruit.
💡 Tip: Keep the oval flat. A tall, round oval makes the bowl look like it's tipping toward you.
Step 2: Add circles for the round fruit
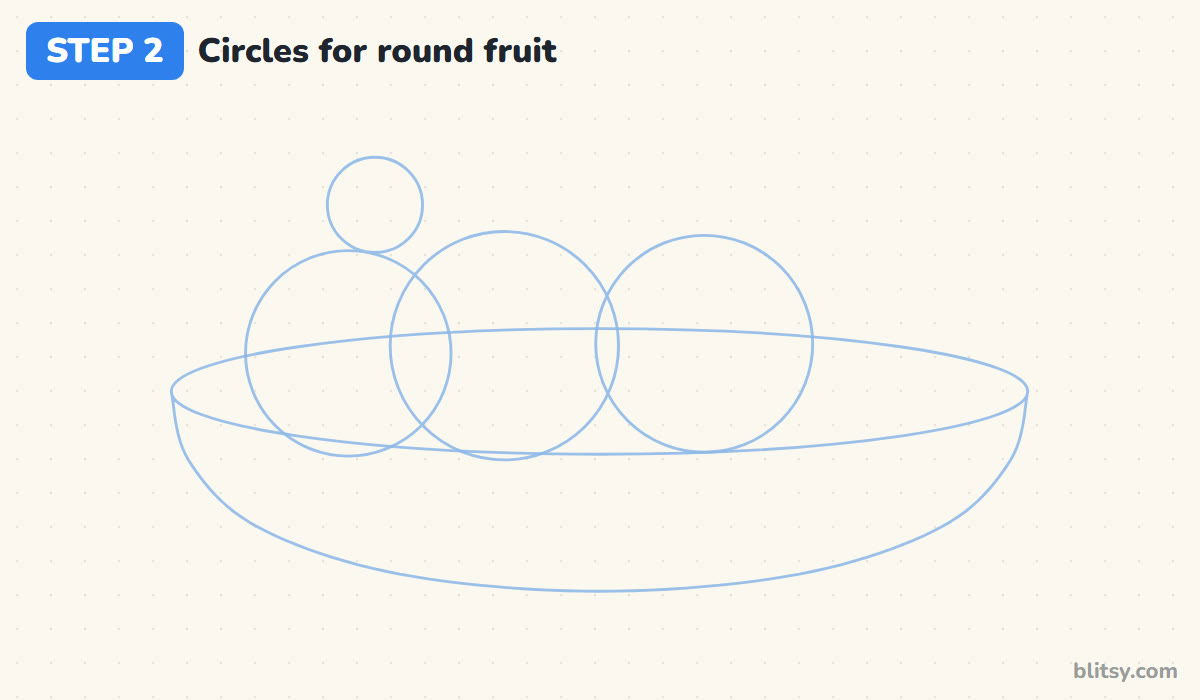
Now place the fruit. Draw a large circle a little left of center for the apple and a slightly smaller one to its right for the orange. For the pear, put a big circle on the left with a small circle on top of it. Let all of them sink into the bowl oval, as if they're sitting inside it.
💡 Tip: Draw circles with your whole arm, not just your fingers, and they'll come out rounder.
Step 3: Place the grape oval and the banana curve
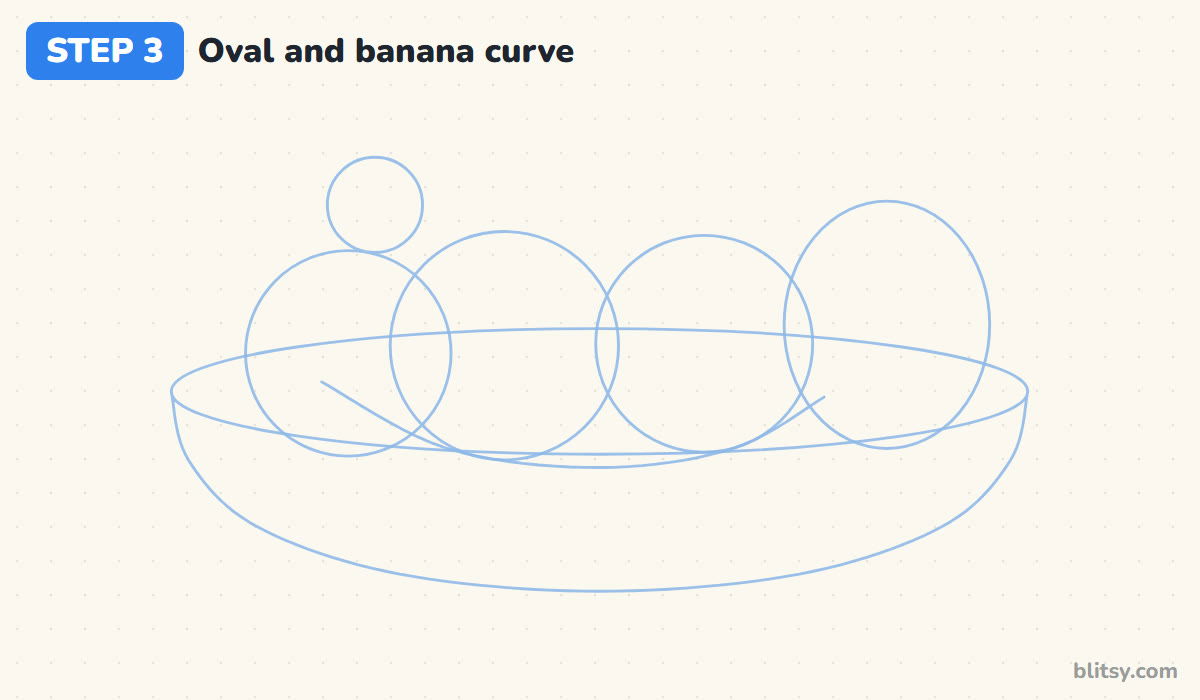
On the right side, sketch a tall oval for the bunch of grapes, tucked partly behind the orange circle. Then draw one long, smiling curve across the front of the bowl. That single line is the banana's backbone.


💡 Tip: If the banana curve looks too straight, bend the middle down a bit more before you move on.
Step 4: Draw the banana resting in front
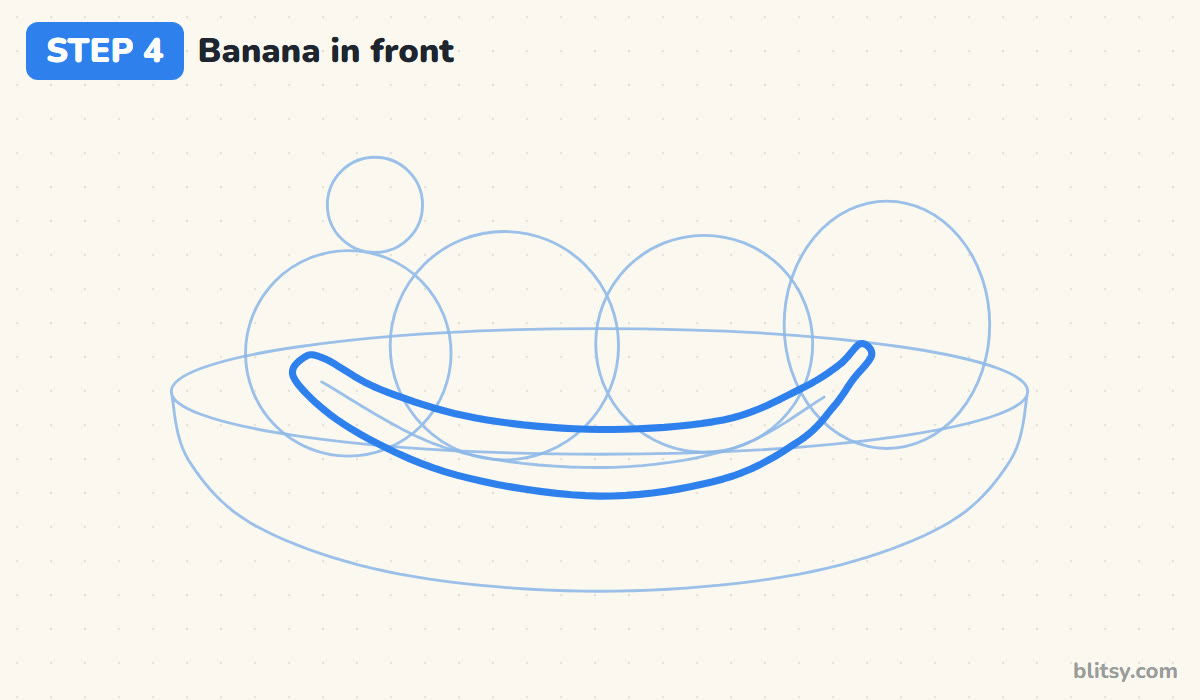
Build the banana around that curve: a thicker lower edge and a thinner upper edge that meet at a rounded tip on the left. On the right end, narrow it into a short stalk with a flat end. I always draw the banana first, before the bowl or the other fruit, because it sits in front of everything. That way I never have to erase lines that would run behind it.
💡 Tip: Make the banana fattest in the middle and slim toward both ends, like a crescent moon.
Step 5: Outline the bowl and its foot
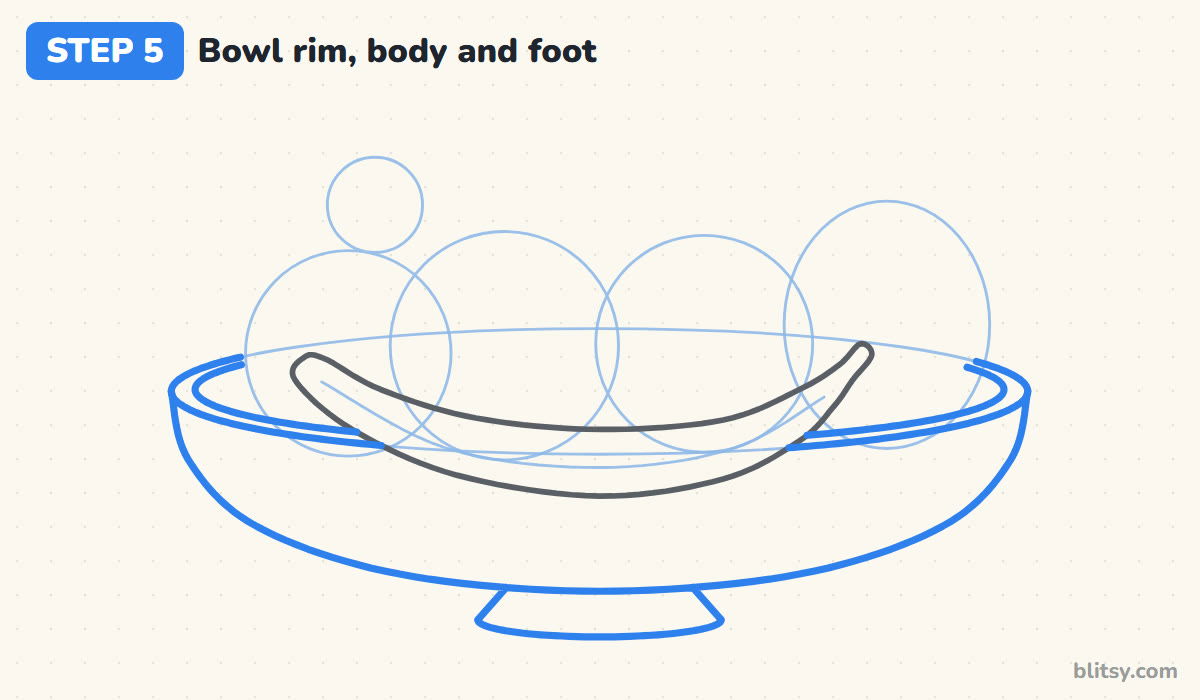
Trace the bowl oval with a firm line, then draw a second, slightly smaller oval just inside it to give the rim some thickness. Stop both lines where they meet the banana. Go over the U curve for the bowl's body, and finish with a short, flared foot underneath.
💡 Tip: Leave a small, even gap between the two rim ovals; a wobbly gap makes the bowl look dented.
Step 6: Shape the apple, then the orange
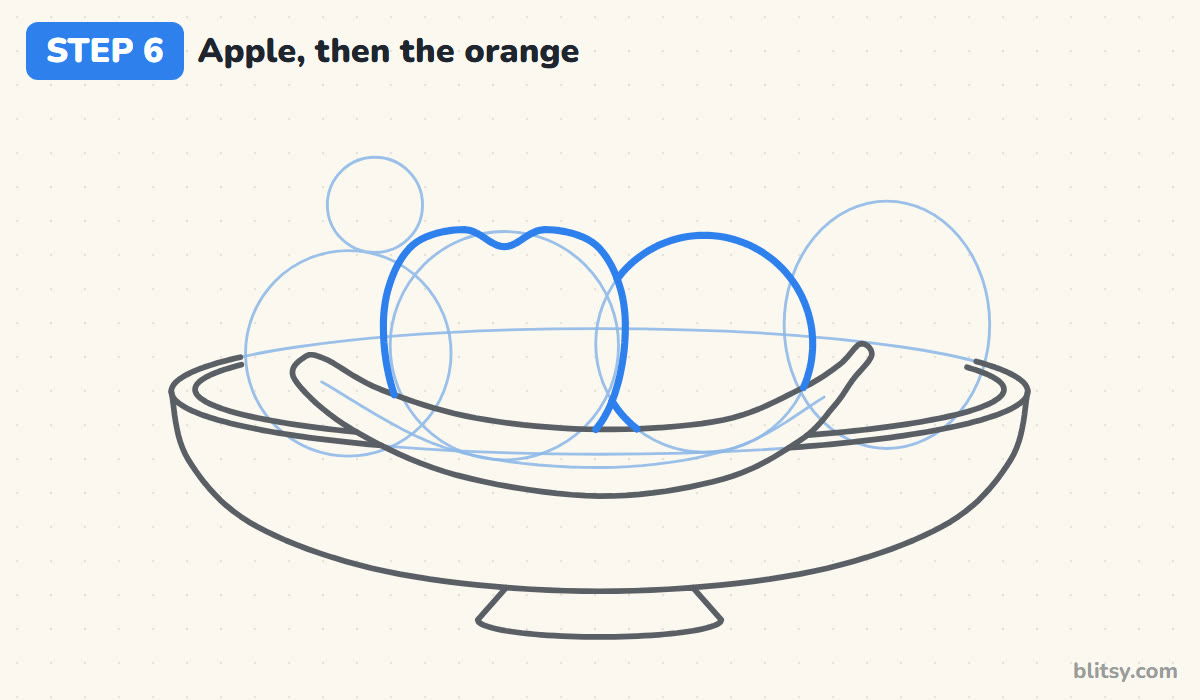
Turn the apple circle into an apple by pulling in a soft dip at the top, with two rounded shoulders on each side of it. Its sides bulge out a little and its lower half drops behind the bowl rim. Next, trace the orange circle, but stop where the apple overlaps it. The apple is in front, so its outline wins.
💡 Tip: Ask one question at every overlap: which fruit is closer to me? Only that one keeps its full line.
Step 7: Draw the pear at the back
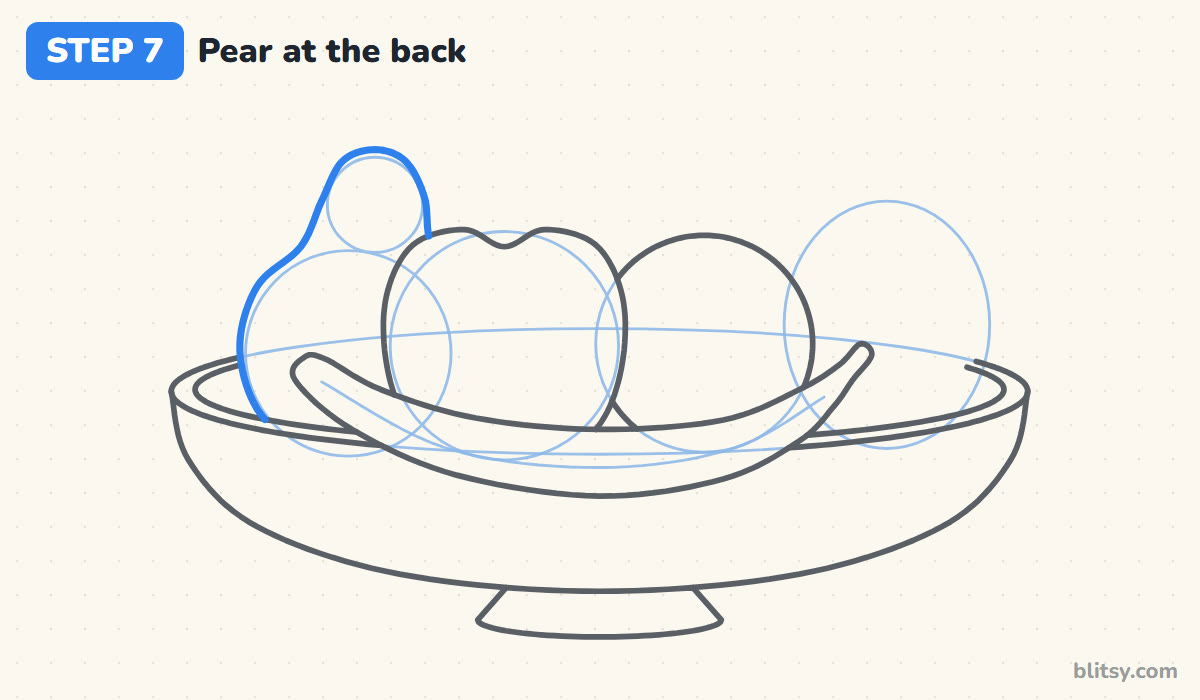
Connect the pear's two circles with a smooth, inward-curving neck, so it narrows at the top and swells at the bottom. A slight lean keeps it from looking stiff. Stop the line where it reaches the apple, since the pear sits behind it.

💡 Tip: Draw the neck curves as one slow S on each side rather than many short strokes.
Step 8: Fill the oval with a bunch of grapes
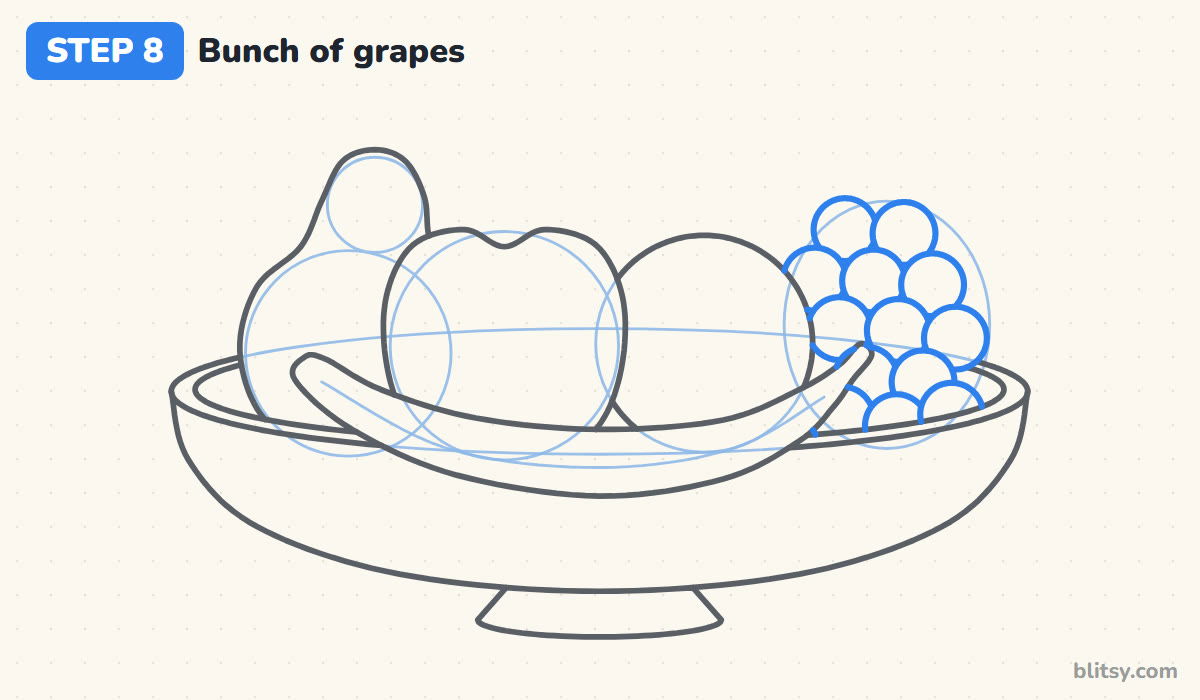
Inside the grape oval, draw small circles in rows, starting at the bottom of the bunch and working up. Each grape in a back row only shows its top part, peeking over the grapes in front of it. Most beginners draw every grape as a complete circle, which turns the bunch into a flat pile of coins.
💡 Tip: Work from front to back so each new circle simply stops when it bumps into one you've drawn.
Step 9: Add stems and leaves
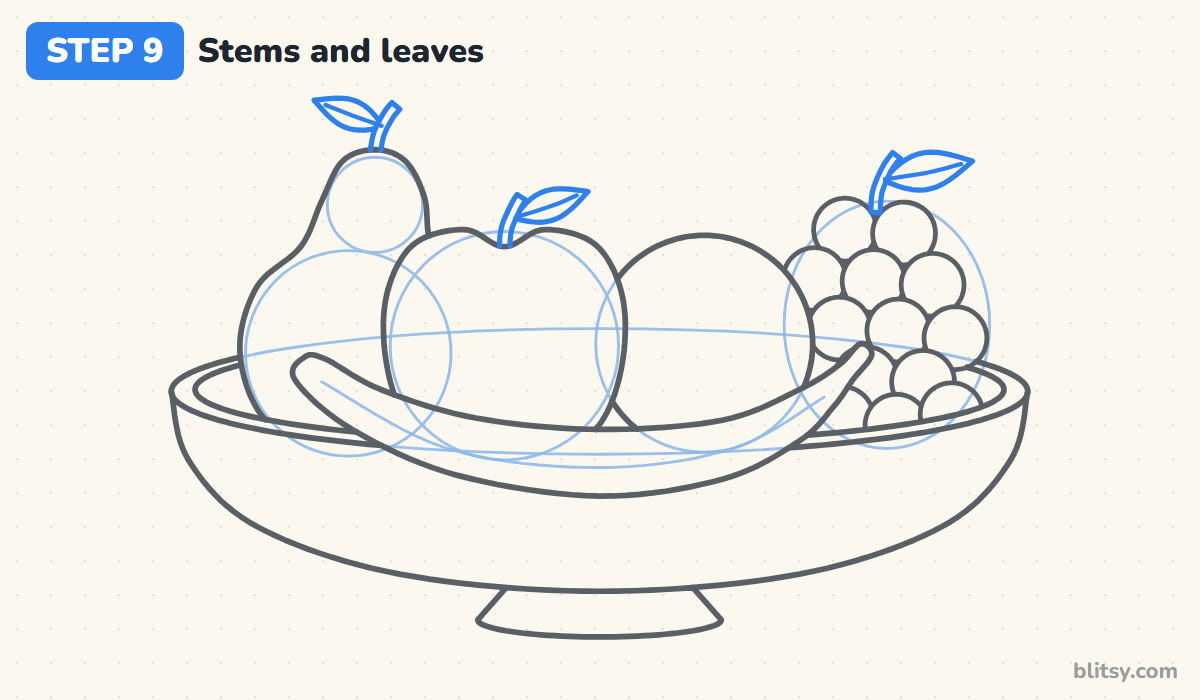
Give the apple a short stem rising out of its dip, the pear a stem on its narrow top, and the grapes a stem poking out above the bunch. Add one simple leaf to each stem with a center vein down the middle. I point the leaves in different directions, so the top of the picture doesn't look stamped.
💡 Tip: Stems are short. If one is taller than a grape, trim it down before inking.
Step 10: Finish the banana tips and add shines
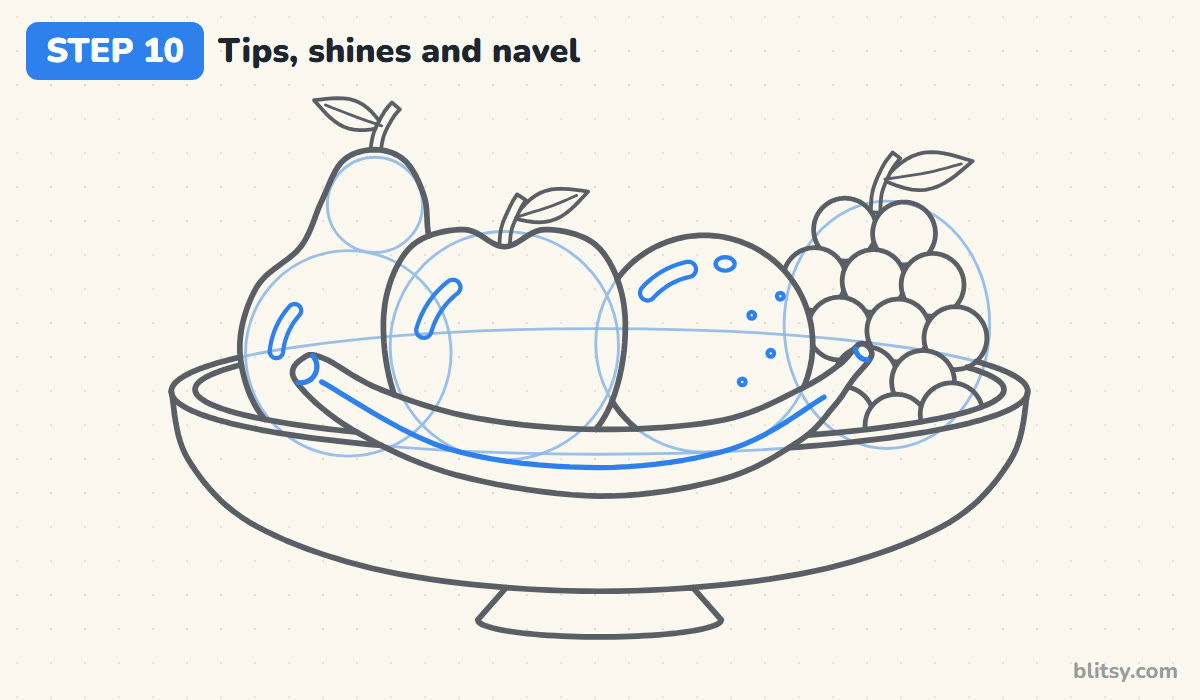
Draw a little cap at each end of the banana and one long line along its body to show the ridge. Give the apple, the orange and the pear each a curved shine on the upper left. Finish the orange with a small navel near the top and a few dots for the peel texture.
💡 Tip: Put every shine on the same side, so the light seems to come from one window.
Step 11: Ink the lines and erase the guides
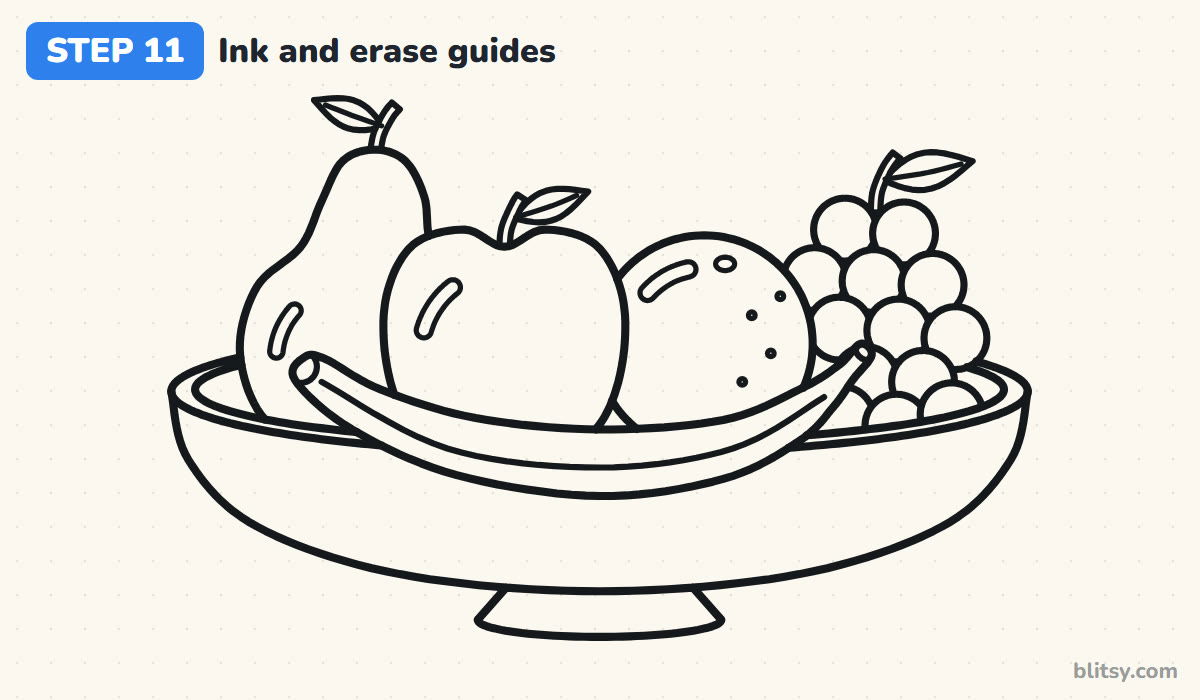
Go over every keeper line with your black pen, starting with the banana and working back to the grapes. Then erase all the guide circles and ovals. This is the step where the drawing suddenly looks finished, because the hidden lines vanish.




💡 Tip: Ink in the same order you drew, so you don't smudge fresh lines with your hand.
Step 12: Color the fruit bowl
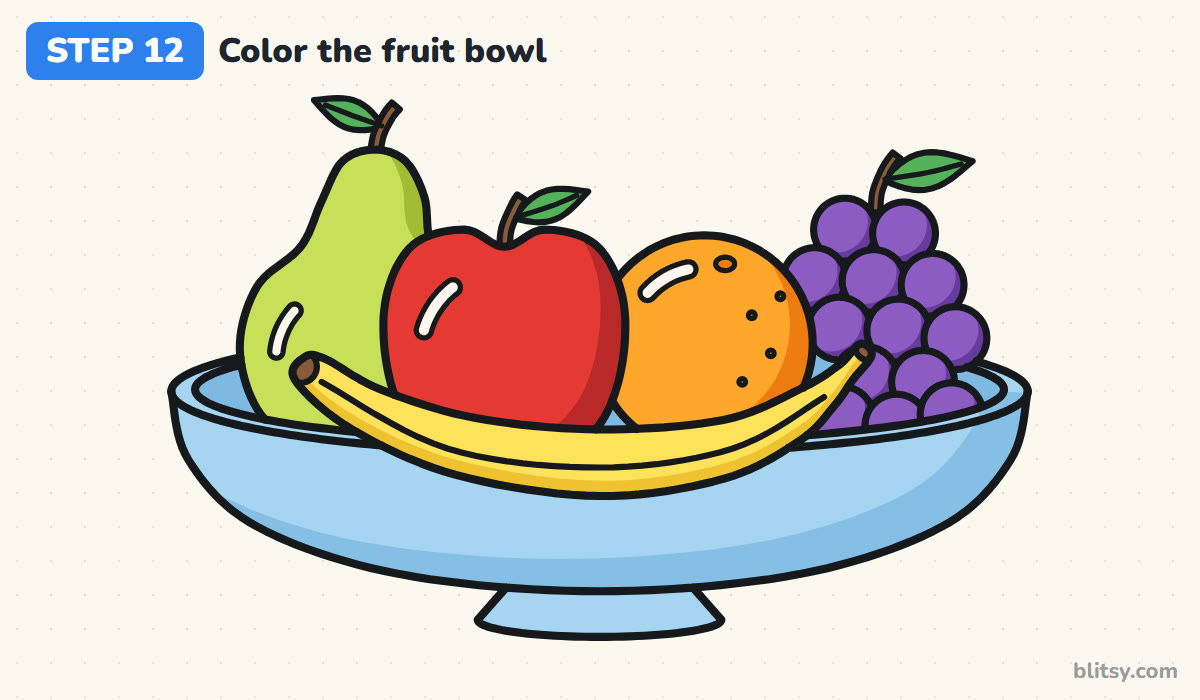
Color the bowl light blue, a slightly darker blue inside, and add a deeper shade along the bottom. Then go fruit by fruit: red apple, orange orange, yellow green pear, purple grapes and a yellow banana with brown tips. Press harder on the lower right side of each fruit for a soft shadow. Stems are brown and leaves are green, while the shines stay white.
💡 Tip: Color around the white shines first, so you don't cover them by accident.
Overlaps That Trip Up a Fruit Bowl Sketch
- Every fruit drawn as a full shape. When outlines run through each other, the bowl looks like a glass case of floating fruit. Erase the part of any line that would be hidden behind something closer.
- Fruit sitting on top of the rim. If the bottom of each fruit is visible, it hovers above the bowl. Let the front rim cut across the lower part of the fruit.
- All fruit the same size. An apple and an orange of equal size look cloned. Make the orange a touch smaller and the grapes much smaller.
- A stick-thin banana. A banana drawn as two close lines reads as a twig. Give it a fat middle and slim ends.
- Shines facing different ways. Highlights on random sides confuse the eye. Keep them all on one side.
Swapping the Fruit, the Bowl or the Season
This bowl works like a template for any fruit you love. Replace the pear with a lemon, tuck strawberries between the apple and orange, or make an autumn version with a pumpkin and red leaves. If strawberries are a favorite, the strawberry drawing tutorial pairs well with this lesson, and this free fruit coloring page set is handy when you'd rather just color.
Still Life Coloring Page Plus a Step-by-Step PDF
Need a quiet table activity? Print the fruit bowl coloring page, which shows a small colored sample and a color key at the top with a big, bold outline below. The step-by-step guide PDF holds all 12 steps and their tips, so you can draw without a screen. Both fit Letter and A4 paper.
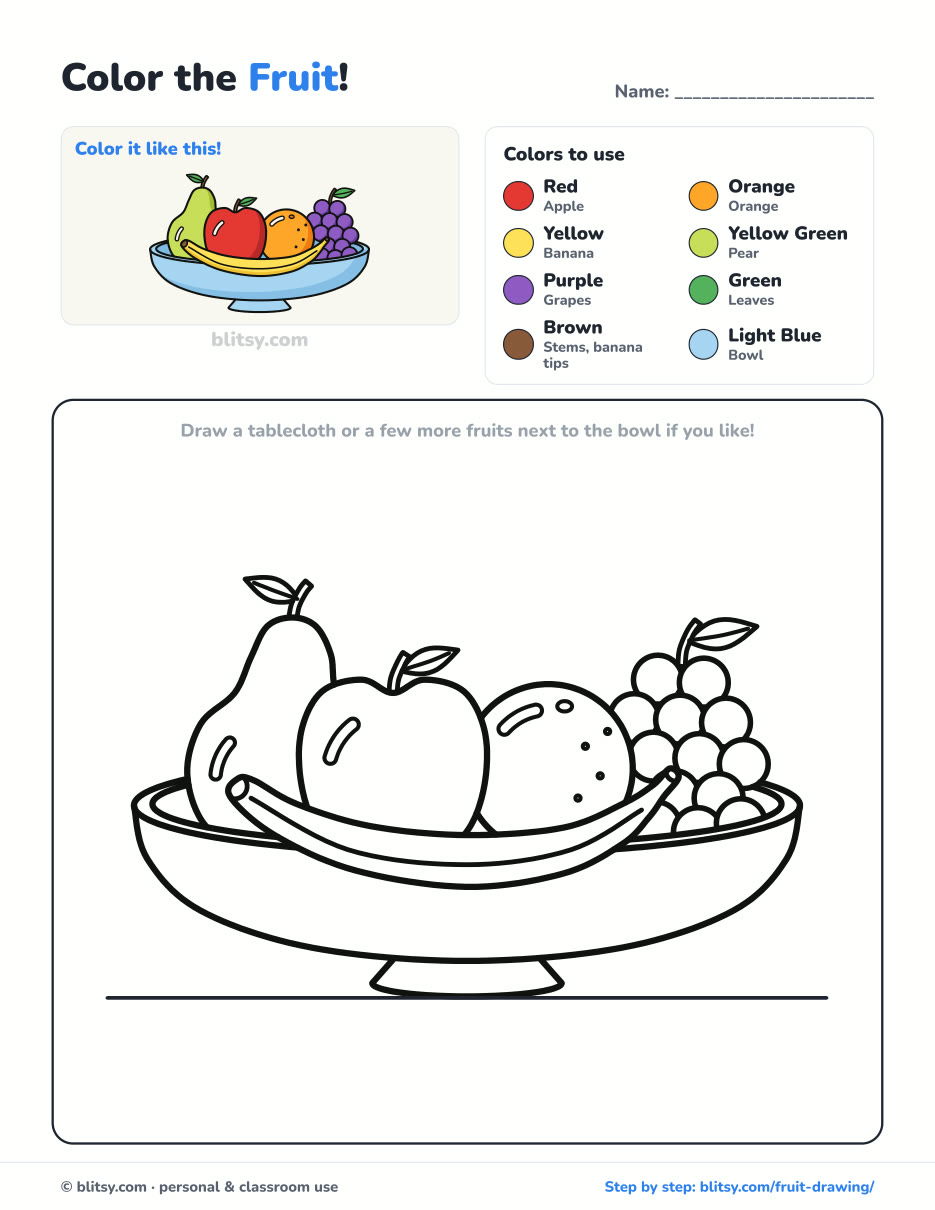
Black outlines with a colored example and the color names at the top. Ready to print and color.
⬇️ Download Coloring PageEvery step picture with its instructions and tips, to keep beside your paper while you draw.
⬇️ Download Drawing Guide📱 On a phone? Tap a download button, then open the file and choose Share → Save to Files or Print. On a computer, the PDF opens or saves straight to your Downloads folder.
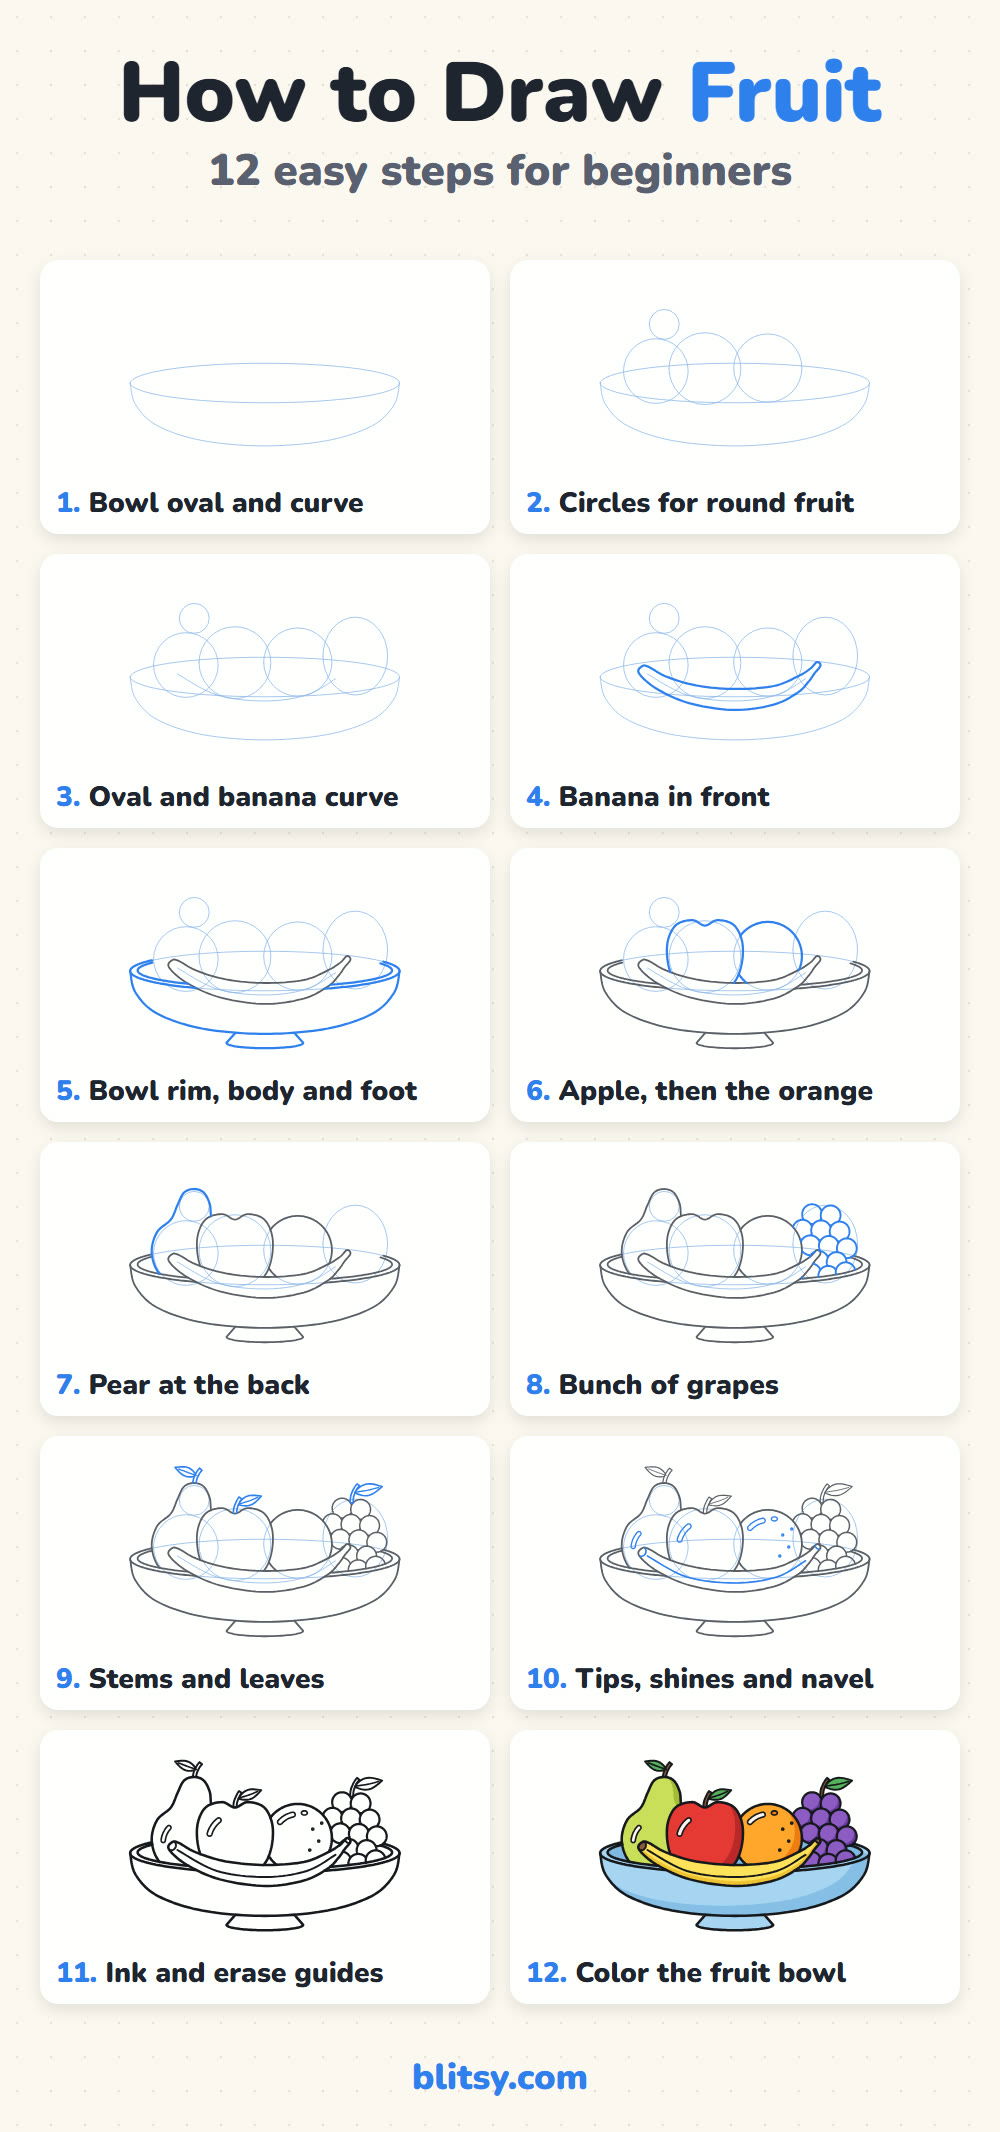
Every Fruit Bowl Step Saved on One Pin
From the Fruit Bowl to the Garden: Tutorials to Try Next
All of these are full step-by-step lessons with a picture per step, many of them with a free coloring page at the end.
- Pineapple Drawing: A golden pineapple with a two-row leafy crown and a round slice beside it fills this pineapple drawing tutorial.
- Plant Drawing: Draw five split monstera leaves in a striped coral pot with this how to draw a plant step by step lesson.
- Flower Drawing: Three easy flowers built from circles, bells and points share one terracotta pot in this flower drawing tutorial.
- Tree Drawing: A broad apple tree with a flared trunk and a cloud-like crown takes 12 calm steps in this tree drawing step by step guide.
- Rose Drawing: Wrap petals around one small spiral to grow a red half-open rose in this how to draw a rose tutorial.
- Strawberry Drawing: A whole berry and a cut half with its pale centre sit side by side in this strawberry drawing tutorial.
- Birthday Cake Drawing: Stack two tiers, drip the frosting and light three candles with this birthday cake drawing step by step lesson.
- Avocado Drawing: Two circles per half give you a sliced avocado with a smiling pit in this avocado drawing tutorial.
- Jack O Lantern Drawing: Overlapping ovals become a carved pumpkin with a warm glow in this how to draw a jack o lantern guide.
- Tulip Drawing: Red, pink and yellow tulips, each a cup of three petals, grow from light ovals in this tulip drawing step by step lesson.
- Oil Pastel Drawing: Layer a glowing sunset behind a palm silhouette and blend it with your finger in this oil pastel drawing tutorial.
- Pizza Drawing: One flat oval turns into a pepperoni pizza with a cheesy slice pulled away in this pizza drawing tutorial.
- Garden Drawing: Draw a sunny flower bed in front of a picket fence and practice overlapping with this garden drawing step by step lesson.
- Magnolia Flower Drawing: An open bloom, a half-closed flower and a fuzzy bud share one knobby branch in this magnolia flower drawing tutorial.
- Grass Drawing: Grow a whole meadow from one bending blade in this how to draw grass step by step guide.
Fruit Drawing Questions I Answer a Lot
What is the easiest fruit to draw?
An orange or an apple, because both start as one circle. The apple only needs a dip at the top and a stem to look right.
How do you draw a bowl of fruit for beginners?
Draw the bowl oval first, then a circle or oval for every fruit inside it. Outline the fruit closest to you first and stop the lines of the fruit behind it.
How long does it take to draw a fruit bowl?
Around 30 to 40 minutes with coloring. The pencil drawing alone takes about 20.
Can young kids draw this fruit bowl?
Yes, with a little help on the overlaps. Kids under 7 can leave out the grapes and pear and draw just the apple and the banana in front.
Set a real apple or orange on the table next to your paper and see how your drawn one compares. 🍎
Related posts:
 How to Draw a Pumpkin Step by Step (Easy Autumn Still Life)
 How to Draw a Peach Step by Step (Whole Fruit + Cut Half)
 How to Draw a Whale Step by Step (Easy for Beginners)
 How to Draw Lungs Step by Step (Easy Science Diagram)
 How to Draw a Plant Step by Step (Easy Potted Monstera)
 How to Draw the Fortnite Llama Step by Step (Easy Fan Art)
 How to Draw a Hoodie Step by Step (Front and Back View)
 How to Draw a Parrot Step by Step (Easy Scarlet Macaw)
 How to Draw a Police Car Step by Step (Easy for Kids)
 How to Draw a Volcano Step by Step (Easy Erupting Volcano)
 How to Draw a Crow Step by Step (Easy for Beginners)
 How to Draw a Tiger Step by Step (Easy Walking Pose)

