
Succulents sit still, forgive the odd missed watering and are built almost entirely from one repeated leaf shape. That's why this page shows you how to draw a succulent step by step in a way that works even if you have never drawn a plant before. We'll make an echeveria, the rosette kind with chubby pointed leaves, and set it in a classic clay pot. I like it as a first plant drawing because once you can draw one leaf, you can draw all twelve.
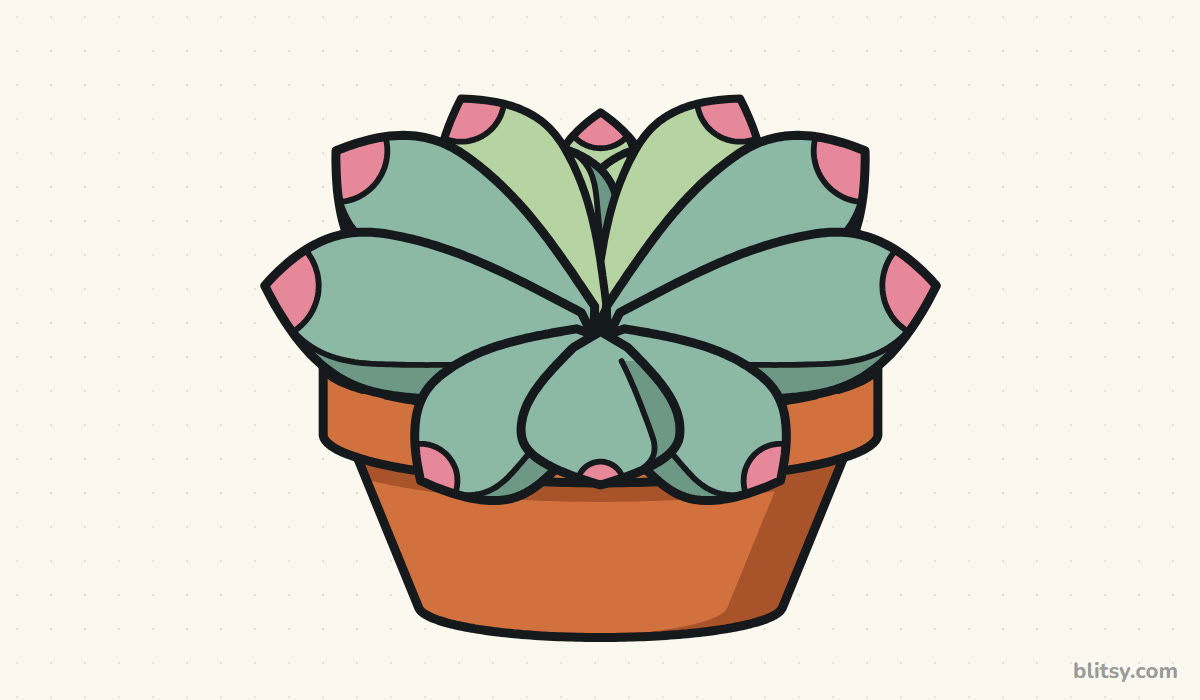
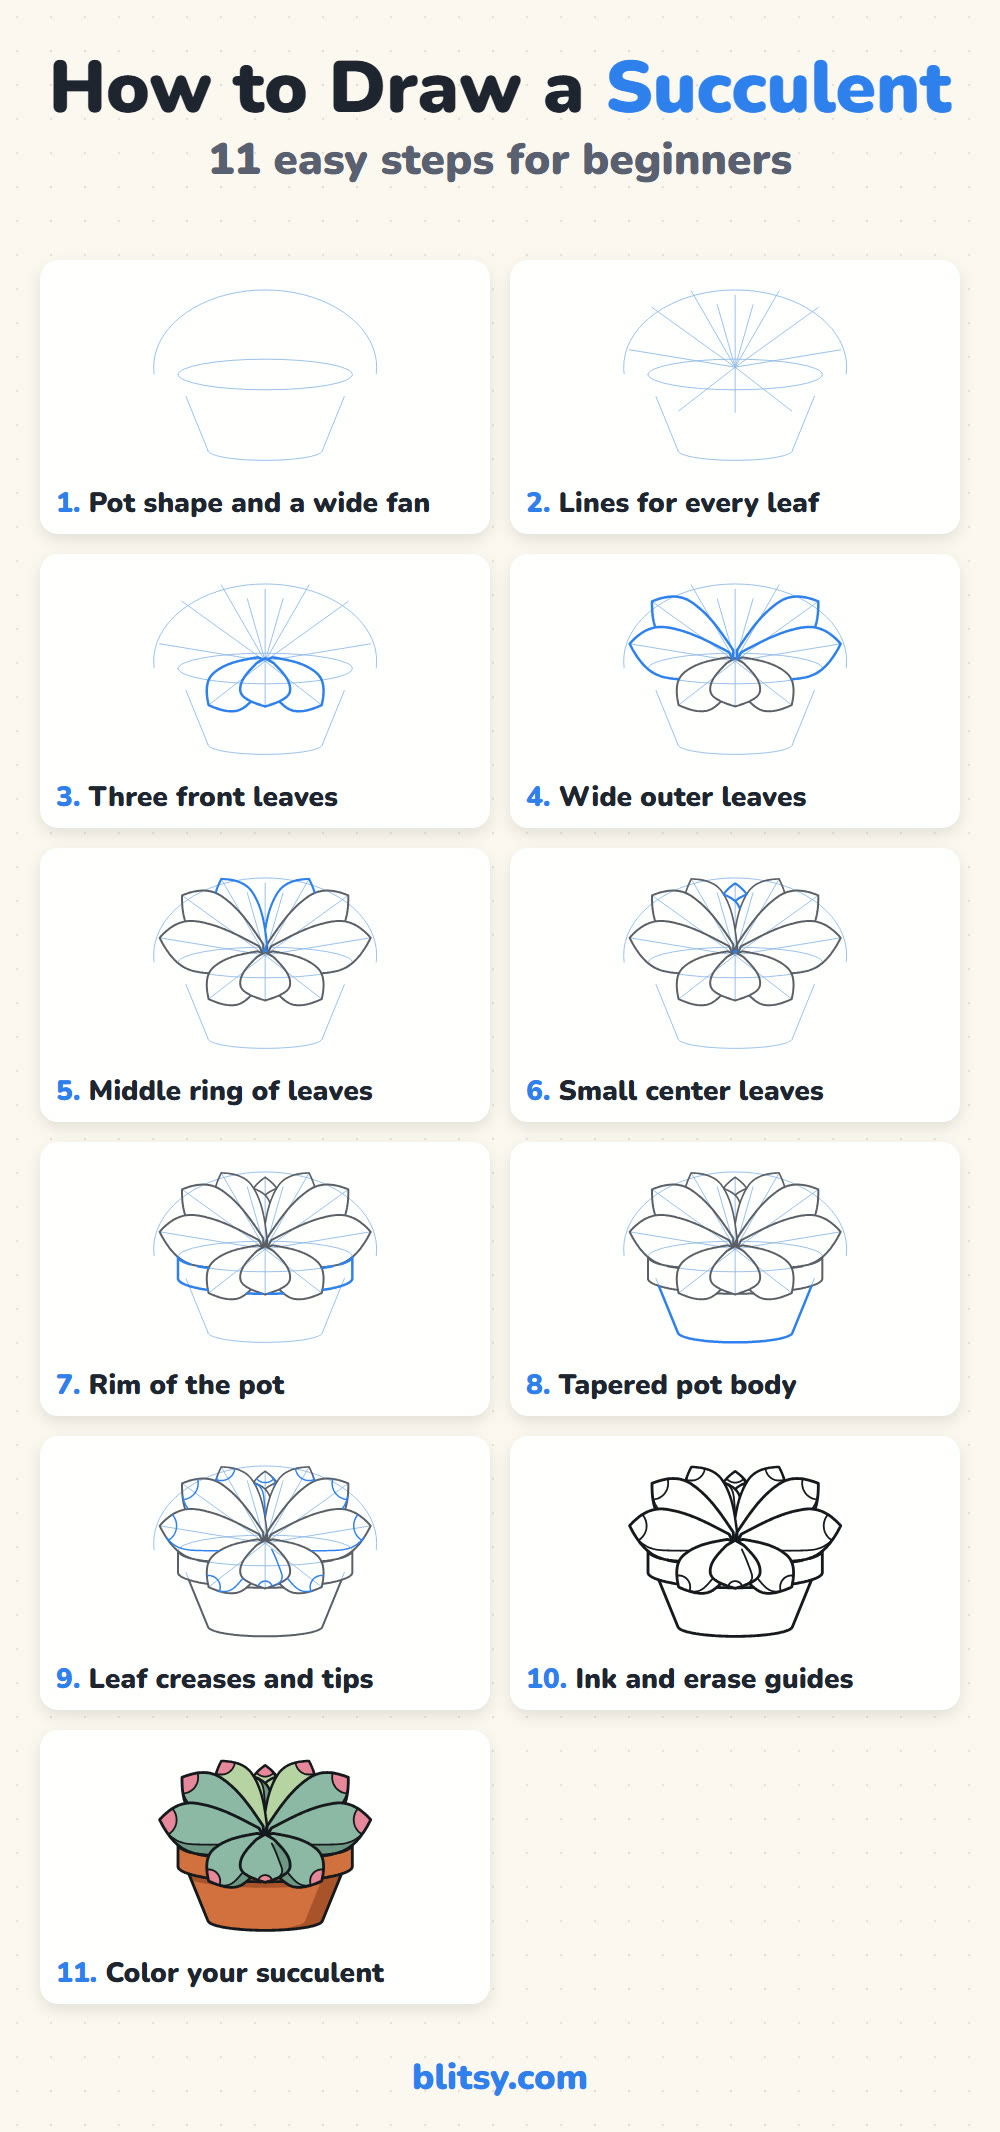
Bright blue marks whatever a step adds. The gray lines are what you already have on your paper from earlier steps. Pale blue guide lines stay light and disappear in step 10, so don't press hard on them.
Quick overview
⏱️ Time: 25 to 35 minutes with coloring
🎯 Level: easy, fine for kids from about 6
✏️ Steps: 11
🪴 You'll draw: an echeveria rosette with pink-tipped leaves in a terracotta pot
Supplies for a Potted Plant Sketch
- A regular pencil (HB is fine) for the light guides
- A soft eraser
- A black marker or fineliner for the final lines
- Colored pencils: sage or blue green, light green, a darker green, pink, orange brown and a reddish brown
- Plain white paper, turned sideways
No sage green in the box? A regular green with a light layer of blue on top gets you very close.
How to Draw a Succulent Step by Step
Step 1: Sketch the pot and a wide fan
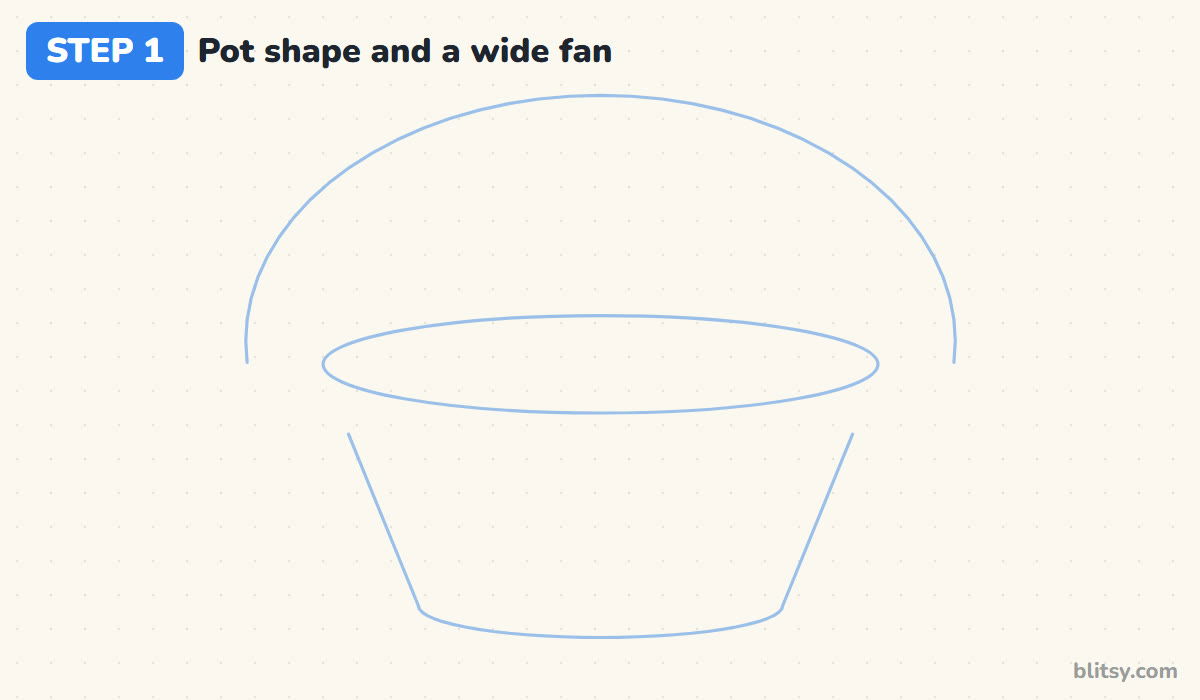
Start low on the page with a flat oval for the top of the pot. Below it, draw two lines that slant inward and join them with a shallow curve; that's the clay pot, wider at the top than the bottom. Then draw a big dome over everything, a little wider than the oval. The leaves will fill that dome.
💡 Tip: Leave at least a thumb's width of paper above the dome so the top leaves have somewhere to go.
Step 2: Add a line for every leaf
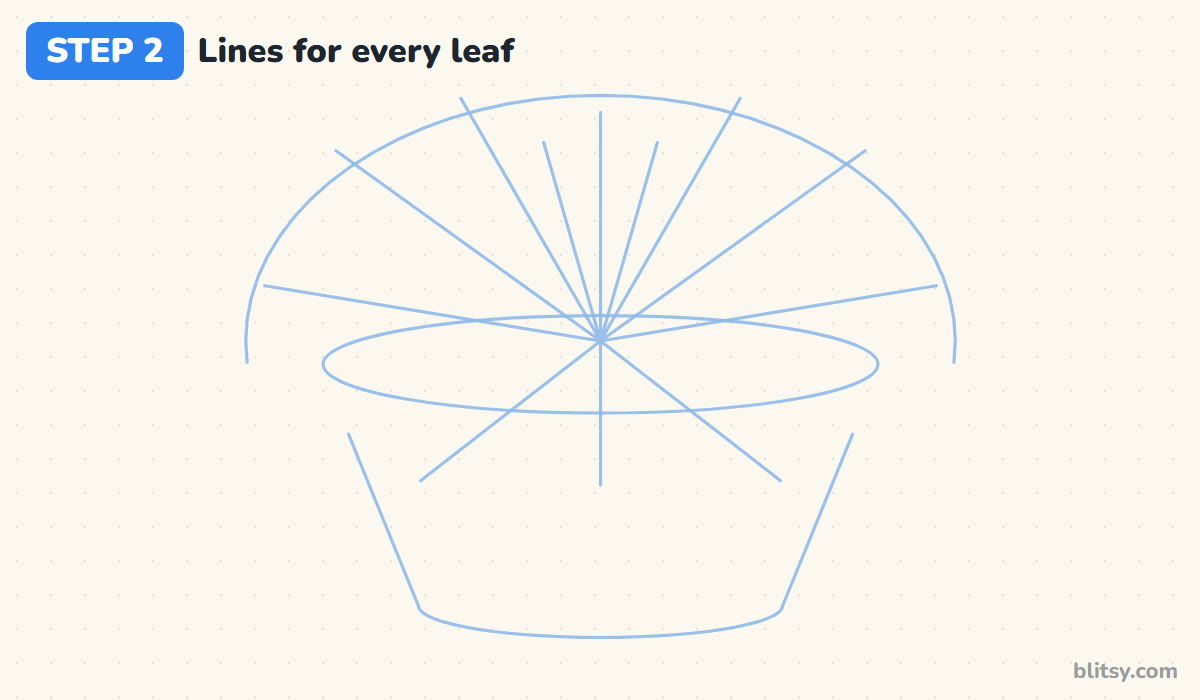
Pick a point in the middle of the oval, a little above its center. From there, draw straight lines out to the dome like the spokes of a wheel: almost flat ones on the left and right, steeper ones in between, and a few pointing down over the front of the pot. Each line marks where one leaf will point.
💡 Tip: Keep the spokes even on both sides. A lopsided set of lines gives you a plant that leans.
Step 3: Draw the three front leaves
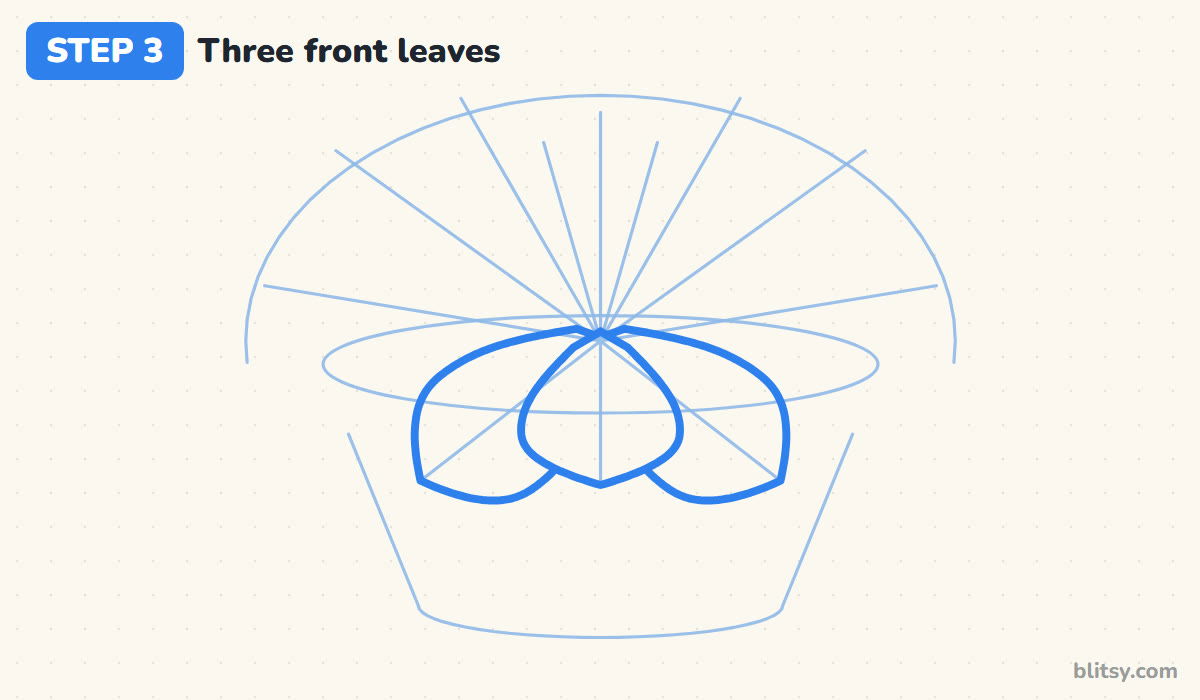
Front leaves come first, because they cover the others. Draw one rounded leaf hanging straight down from the center point, then one on each side tilting down toward the rim. Each leaf is narrow where it starts, swells out like a spoon and ends in a small point. I let these three overlap the rim; that's what makes the plant look like it is spilling out of its pot.




💡 Tip: Make the middle front leaf a bit shorter and rounder than its neighbors, since it points toward you.
Step 4: Add the wide outer leaves
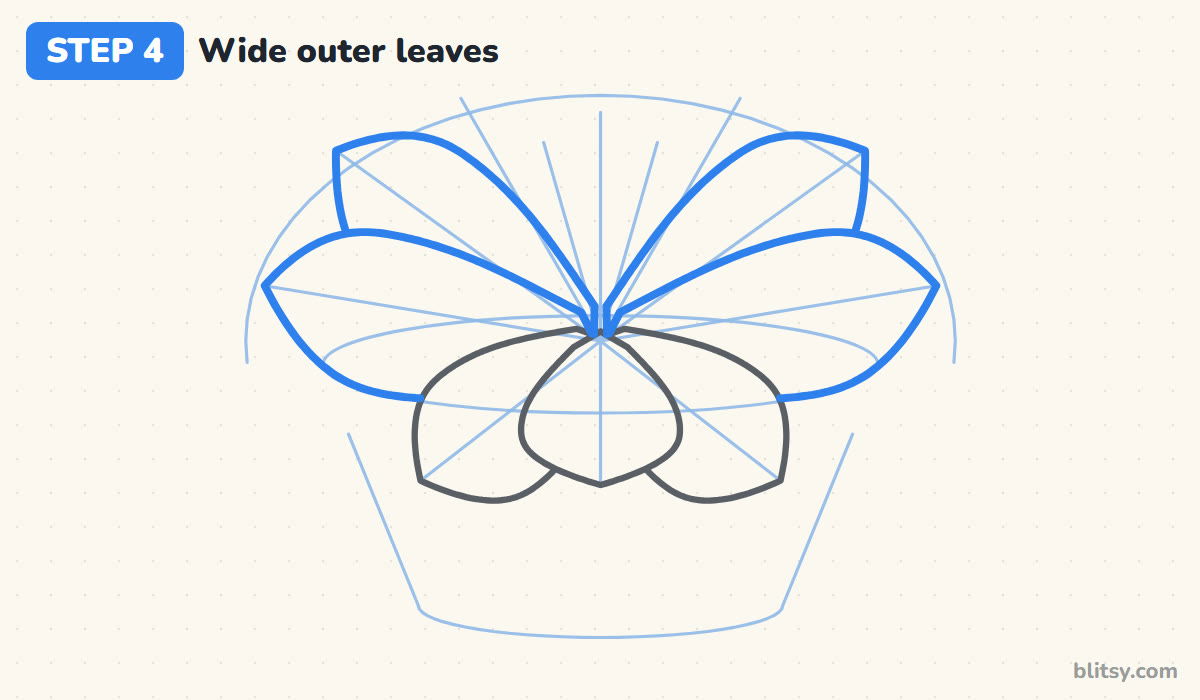
Now the biggest leaves. Follow the flattest spokes and draw a long leaf out to each side, then a second pair angled up at about 45 degrees. Where a new leaf reaches a front leaf, stop the line there instead of drawing through it. Those leaves are behind, so part of them stays hidden.
💡 Tip: Curve the outer tips slightly upward. Echeveria leaves cup toward the sky; drooping tips make the plant look thirsty.
Step 5: Fit in the middle ring
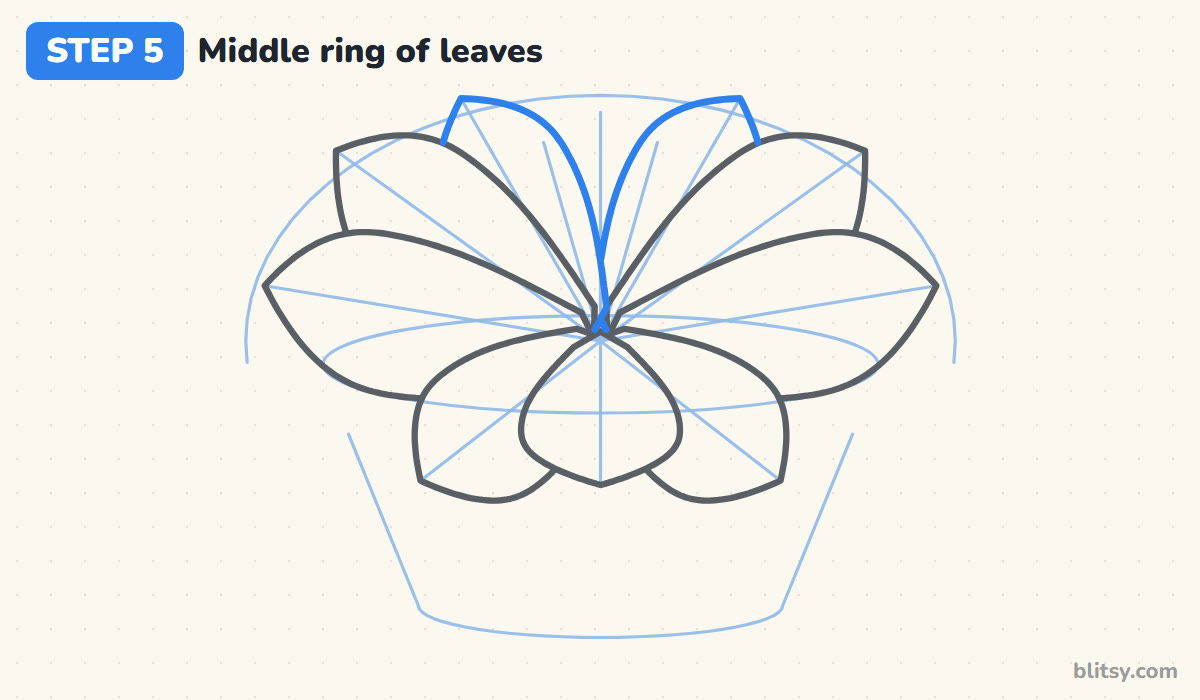
Two more leaves go in the gaps between the upper outer pair and the top of the dome. They're shorter than the outer leaves and stand more upright. Most beginners make every leaf the same size here, and the plant ends up looking like a fan. Shrinking each ring a little as you go inward is what turns it into a rosette.
💡 Tip: Compare each new leaf with the one below it. Roughly four fifths of its length looks right.
Step 6: Tuck in the small center leaves
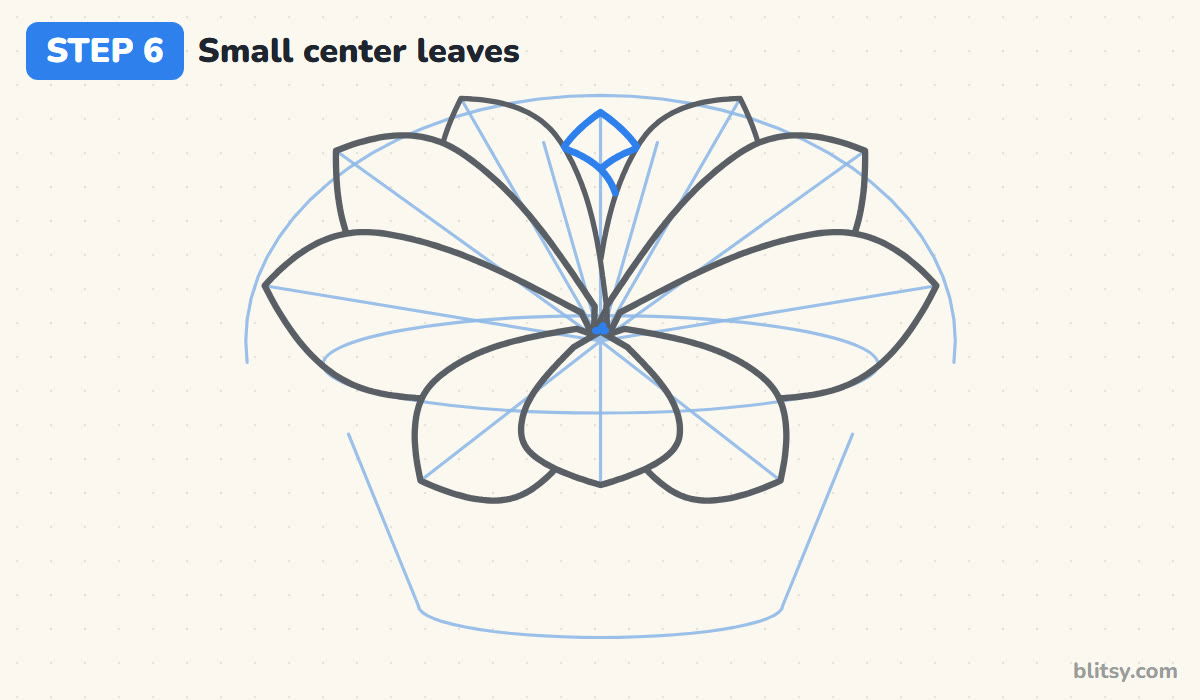
At the very top, add the youngest leaves: two small ones leaning apart and a tiny pointed bud peeking out between them. Only their tips show, because the larger leaves hide their lower parts. Keep them small. If the center gets big, the whole succulent looks like an artichoke.
💡 Tip: A tiny upside-down V between the two small leaves is enough for the bud. No need for detail there.
Step 7: Draw the rim of the pot
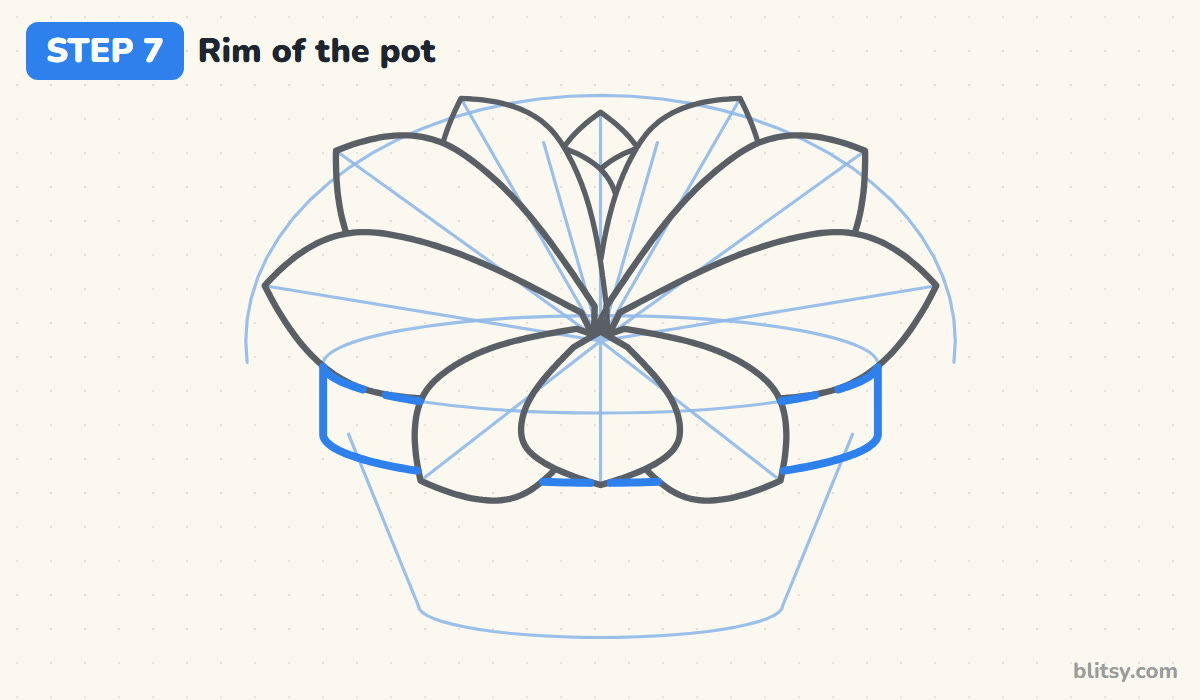
Clay pots have a thick lip at the top. Go over the visible parts of the oval, then draw a matching curve a short distance below it and connect the two with tiny upright lines at the sides. You'll only see bits of the rim between the leaves, and that's fine. I stop every rim line wherever a leaf crosses it.




💡 Tip: Keep the band about a quarter of the pot's height. Thin rims make the pot look like a cup.
Step 8: Shape the tapered pot body
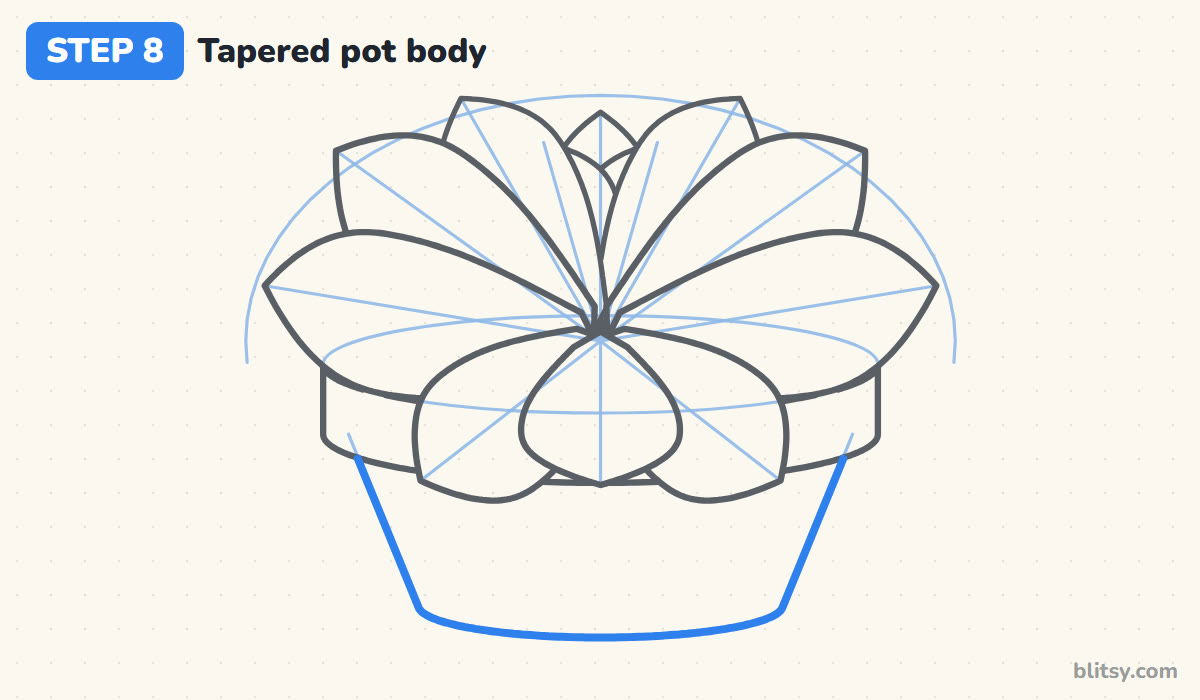
Under the rim, trace your slanted guide lines down to the base and finish with the gentle bottom curve. The pot narrows toward the bottom, which keeps it from looking like a bucket. Check that it's a little narrower than the spread of the leaves; a slightly small pot makes the plant look healthy and full.
💡 Tip: Bend the base of the pot downward, not up. A smile shape at the base means you're looking at it from the front.
Step 9: Add leaf creases and pink tips
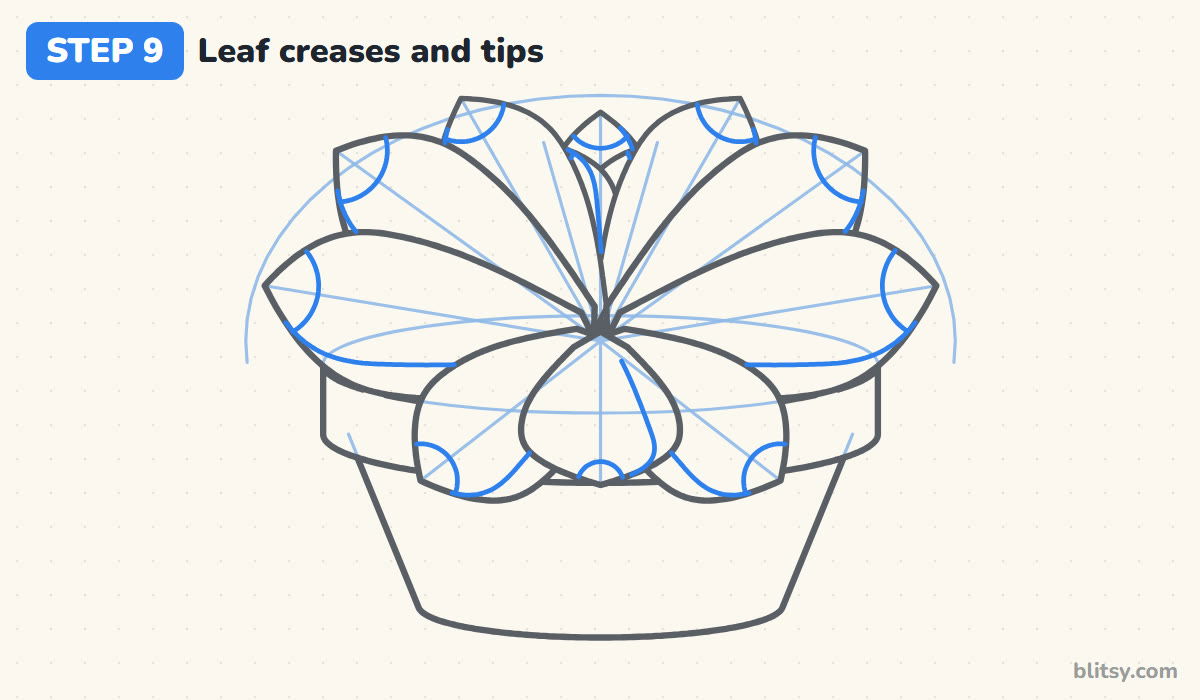
Echeveria leaves are thick, and a single curved line along the lower edge of each one shows that. Start the line partway along the leaf and let it meet the edge near the tip. Then draw a small curve across every leaf tip to mark the pink area. Honestly, these little caps are what people recognize first.
💡 Tip: Put the crease on the same side of each leaf (the lower side), so the light seems to come from one direction.
Step 10: Ink the lines and erase the guides
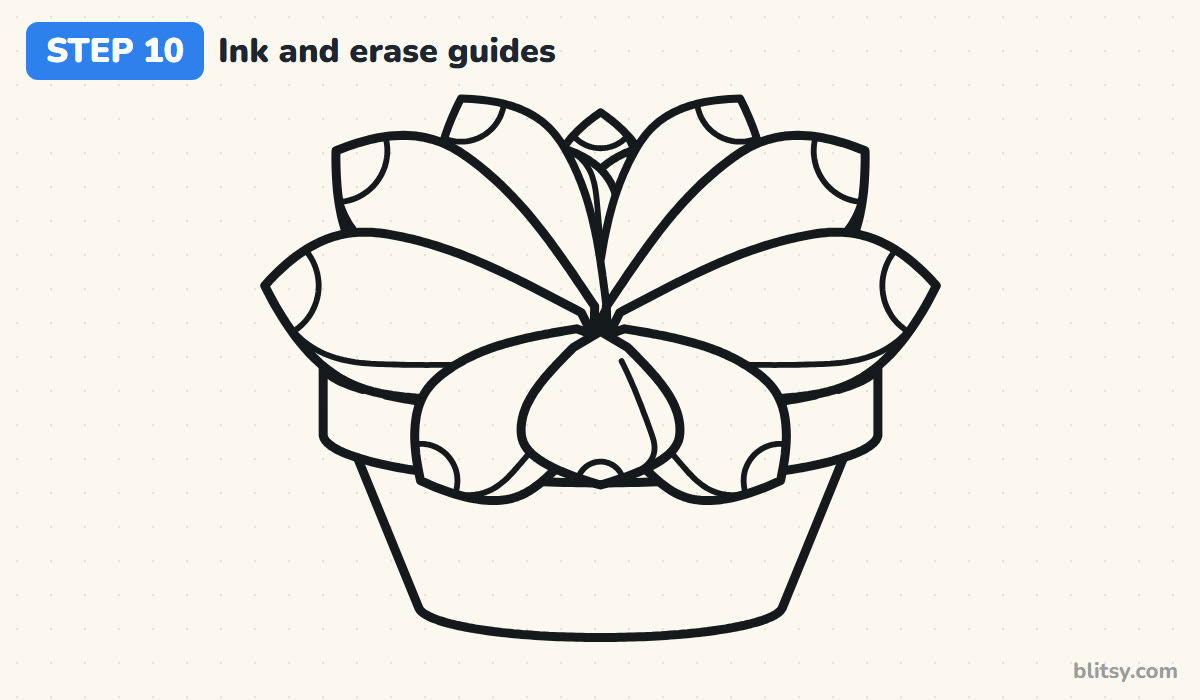
Trace your keeper lines with the black marker: the leaves, the creases, the tip curves, the rim and the pot. A thicker line on the outside edges and a thinner one on the creases gives the drawing depth. Let the ink dry for a minute, then erase the dome, the spokes and the pot guides.
💡 Tip: Ink the front leaves first. If your hand smudges anything, it'll be the parts you have not inked yet.
Step 11: Color your succulent
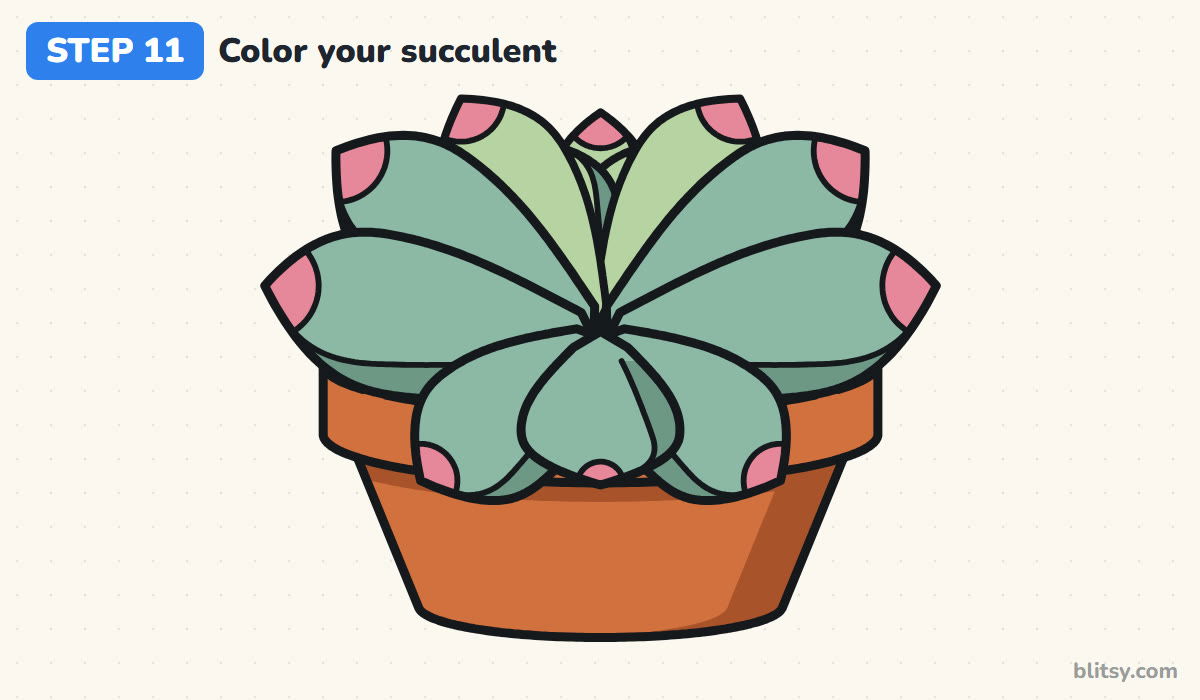
Color the outer and front leaves sage green and the inner ones a lighter green. Fill the narrow strips under each crease with a darker green so the leaves look plump. Add pink to every tip. For the pot, I use orange brown with a reddish brown down its right side and in the shadow just under the rim, plus a lighter orange on the top of the lip.




💡 Tip: Blend the pink gently into the green with light strokes. Real tips fade rather than stop at a hard line.
Where Succulent Sketches Tend to Go Wrong
- Drawing the leaves back to front. Starting in the center means erasing lines later. Draw the front leaves first and add the hidden ones behind them.
- Every leaf the same size. A rosette shrinks toward the middle. Make each ring a bit smaller than the one outside it.
- Leaves shaped like petals. Round tips turn the succulent into a daisy. Give each leaf a small sharp point.
- A pot that is too wide. When the pot is wider than the leaves, the plant looks lost inside it. Keep the leaves spilling a little past the rim.
- Coloring the leaves flat green. One even green makes it look plastic. Add the darker strip under each crease and the pink tips.
Other Ways to Pot Your Succulent
Once the rosette feels easy, change the pot: a striped ceramic one, a teacup, or a square wooden planter all work with the same leaves. You can also try a frosty blue echeveria with purple tips, or draw three small rosettes side by side in a long tray. If you'd like to try other greenery, the potted plant drawing tutorial is a natural next step, and kids who prefer spikes to leaves can color one of these cactus coloring pages.
Free Succulent Coloring Page and Step Guide PDF
Want this away from the screen? The succulent coloring page has a small colored version and the color key at the top, with a big inked outline below. The step-by-step guide PDF puts all 11 steps and tips on paper, two steps to a page. Both print on Letter or A4.
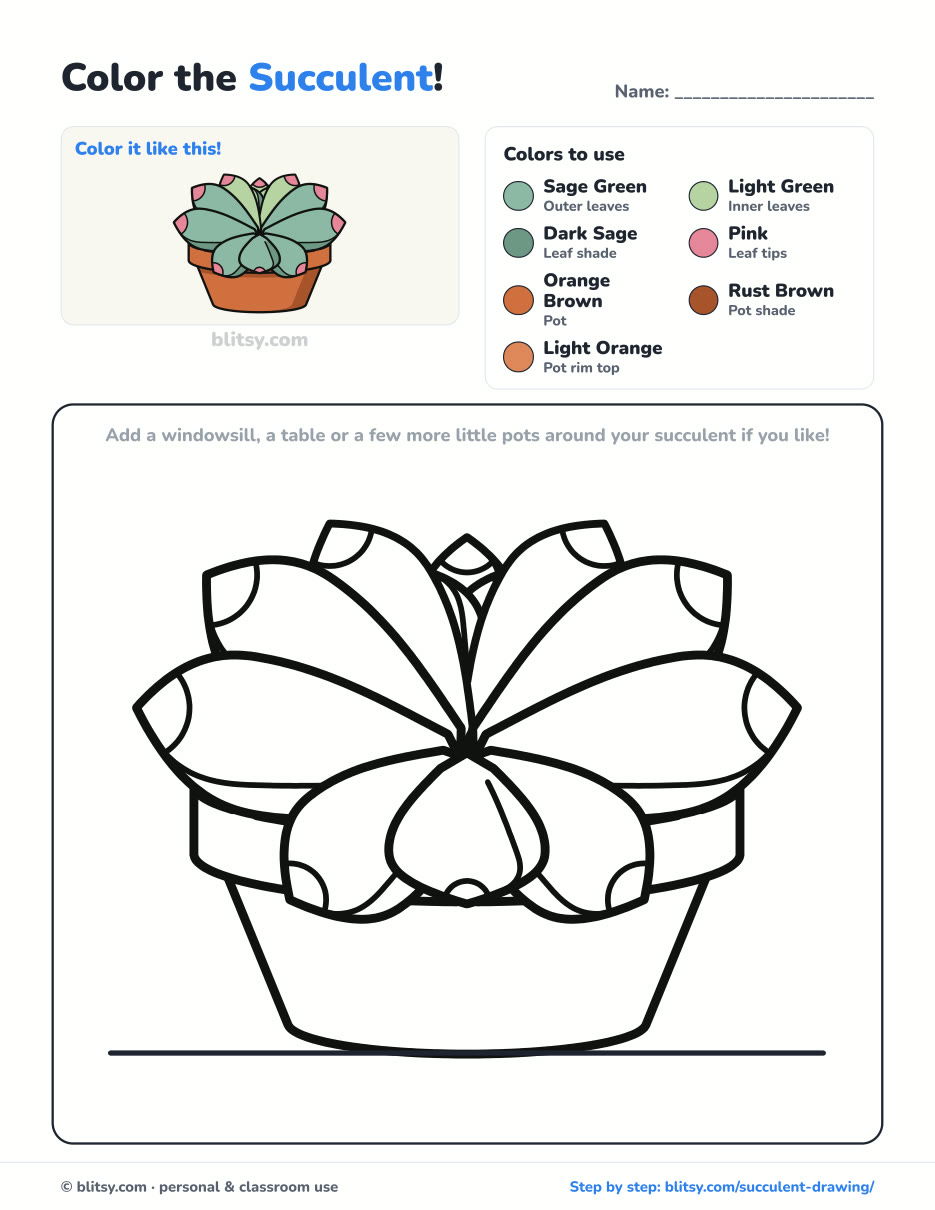
Black outlines with a colored example and the color names at the top. Ready to print and color.
⬇️ Download Coloring PageEvery step picture with its instructions and tips, to keep beside your paper while you draw.
⬇️ Download Drawing Guide📱 On a phone? Tap a download button, then open the file and choose Share → Save to Files or Print. On a computer, the PDF opens or saves straight to your Downloads folder.
Pin These Succulent Steps for Later
Succulent Potted? More Plants, Flowers and Treats to Draw
Each link is a step-by-step tutorial, mostly flowers and plants, with a few fruits and treats mixed in.
- Grass Drawing: Learning how to draw grass step by step grows a whole meadow patch from one bending blade.
- Pineapple Drawing: The pineapple drawing tutorial pairs a golden fruit under its leafy crown with a fresh slice.
- Fruit Drawing: Set up a still life with the fruit drawing step by step lesson: five fruits in a blue bowl.
- Plant Drawing: Stay with houseplants in this easy plant drawing tutorial, a potted monstera with five split leaves.
- Cell Drawing: For science class, try how to draw a cell. It covers an animal cell with its nucleus, Golgi stack and mitochondria.
- Hibiscus Drawing: Five red petals spin around a maroon eye in the hibiscus drawing tutorial.
- Rose Drawing: The how to draw a rose step by step lesson uses a spiral method and adds a rosebud and two leaves.
- Strawberry Drawing: Draw a whole berry next to a cut half in this strawberry drawing tutorial.
- Avocado Drawing: Both cut halves appear in how to draw an avocado, one of them with a smiling pit.
- Jack O Lantern Drawing: Five plump ribs and a candlelit grin start from a single oval in the jack o lantern drawing tutorial.
- Birthday Cake Drawing: The birthday cake drawing step by step guide builds two frosted tiers with sprinkles and three little flames.
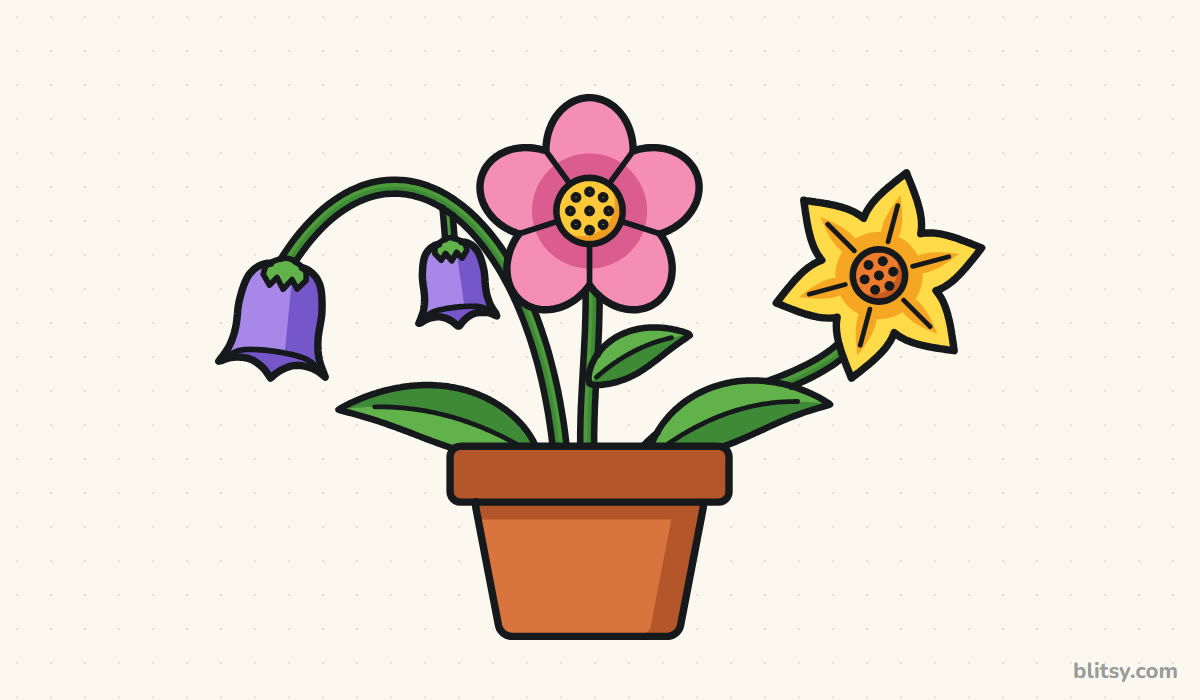
- Flower Drawing: For a mixed pot, follow how to draw a flower step by step: a pink bloom, two bluebells and a yellow star flower.
- Tree Drawing: The tree drawing tutorial ends with a leafy apple tree, a knothole and apples ready to pick.
- Tulip Drawing: Three tulips leaning in different directions make up the tulip drawing step by step lesson.
- Magnolia Flower Drawing: Draw an open saucer magnolia, a half-closed flower and a furry bud with how to draw a magnolia flower.
Questions Beginners Ask About Drawing Succulents
What is the easiest succulent to draw?
A rosette type like echeveria. Every leaf is the same spoon shape, only bigger or smaller, so you repeat one idea instead of learning many.
How do you draw succulent leaves?
Start narrow at the center, widen the leaf like a spoon, then finish with a small point. A curved line near one edge shows how thick the leaf is.
How long does it take to draw a succulent?
About 25 to 35 minutes with coloring. Without color, many beginners finish in around 15 minutes.
Can young kids draw this succulent?
Yes, children from about 6 can follow it. Younger ones can skip the creases and the middle ring and still end up with a plant that looks right.
Find a sunny windowsill, sharpen your pencil and give your paper succulent a pot of its own. 🪴
Related posts:
 How to Draw a Plant Step by Step (Easy Potted Monstera)
 How to Draw a Flower Step by Step (Easy Potted Bouquet)
 How to Draw a Whale Step by Step (Easy for Beginners)
 How to Draw Lungs Step by Step (Easy Science Diagram)
 How to Draw the Fortnite Llama Step by Step (Easy Fan Art)
 How to Draw a Hoodie Step by Step (Front and Back View)
 How to Draw a Parrot Step by Step (Easy Scarlet Macaw)
 How to Draw a Police Car Step by Step (Easy for Kids)
 How to Draw a Volcano Step by Step (Easy Erupting Volcano)
 How to Draw a Crow Step by Step (Easy for Beginners)
 How to Draw a Tiger Step by Step (Easy Walking Pose)
 How to Draw a Heart Step by Step (Even, Symmetric Shape)

