
Biology homework often asks for a labeled cell, and the blank page is the scary part. If you learn how to draw a cell step by step, the job shrinks to an oval, a circle and a handful of small shapes you already know. This tutorial makes an animal cell, the kind most textbooks show first. I name every organelle as we draw it, so you'll know what each little shape does by the time you color it.
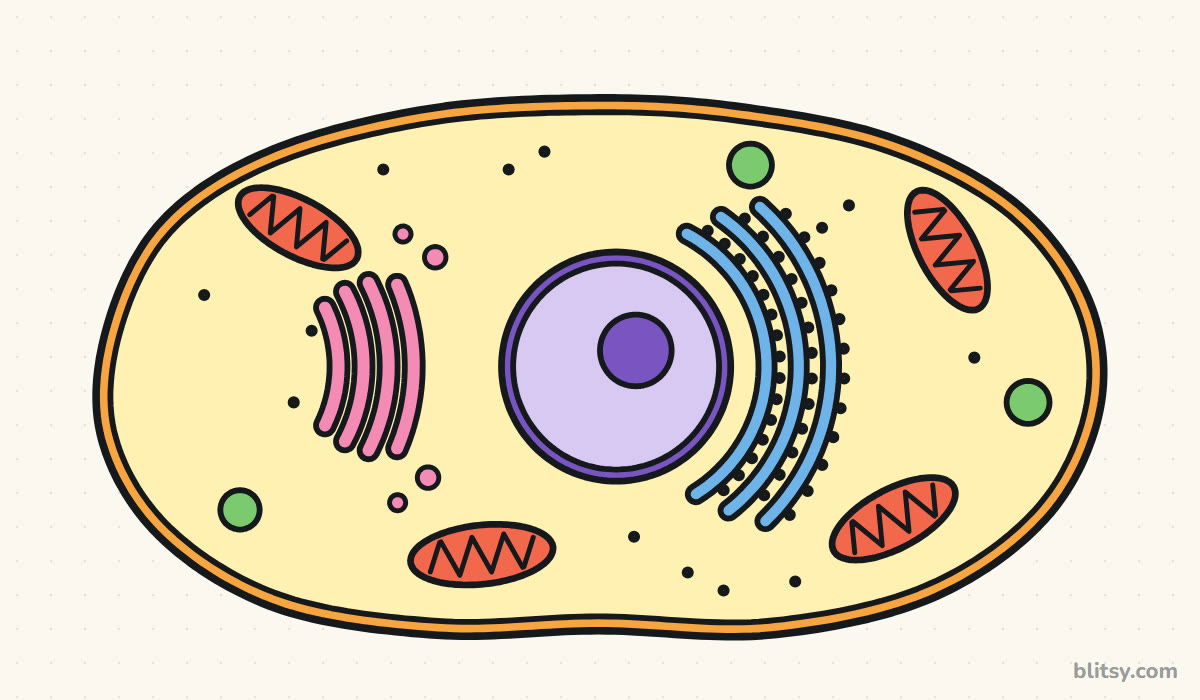
Blue marks what's new. Gray lines are from earlier steps, so you can see exactly where the new shape fits.
Quick overview
⏱️ Time: around 35 minutes, plus 15 to color
🎯 Level: beginner, good for ages 9 and up
✏️ Steps: 12
🔬 You'll draw: an animal cell diagram with eight kinds of parts, ready to label
Pencil Case Check Before the Cell
- A light HB pencil for the guide shapes
- A soft eraser
- A black fineliner or thin felt pen
- Colored pencils in light yellow, orange, two purples, blue, pink, red and green
- Plain paper in landscape position, so the oval has room
- A coin or a round lid if your circles tend to wobble
Nothing special is needed; a school pencil case and eight colors do the job.
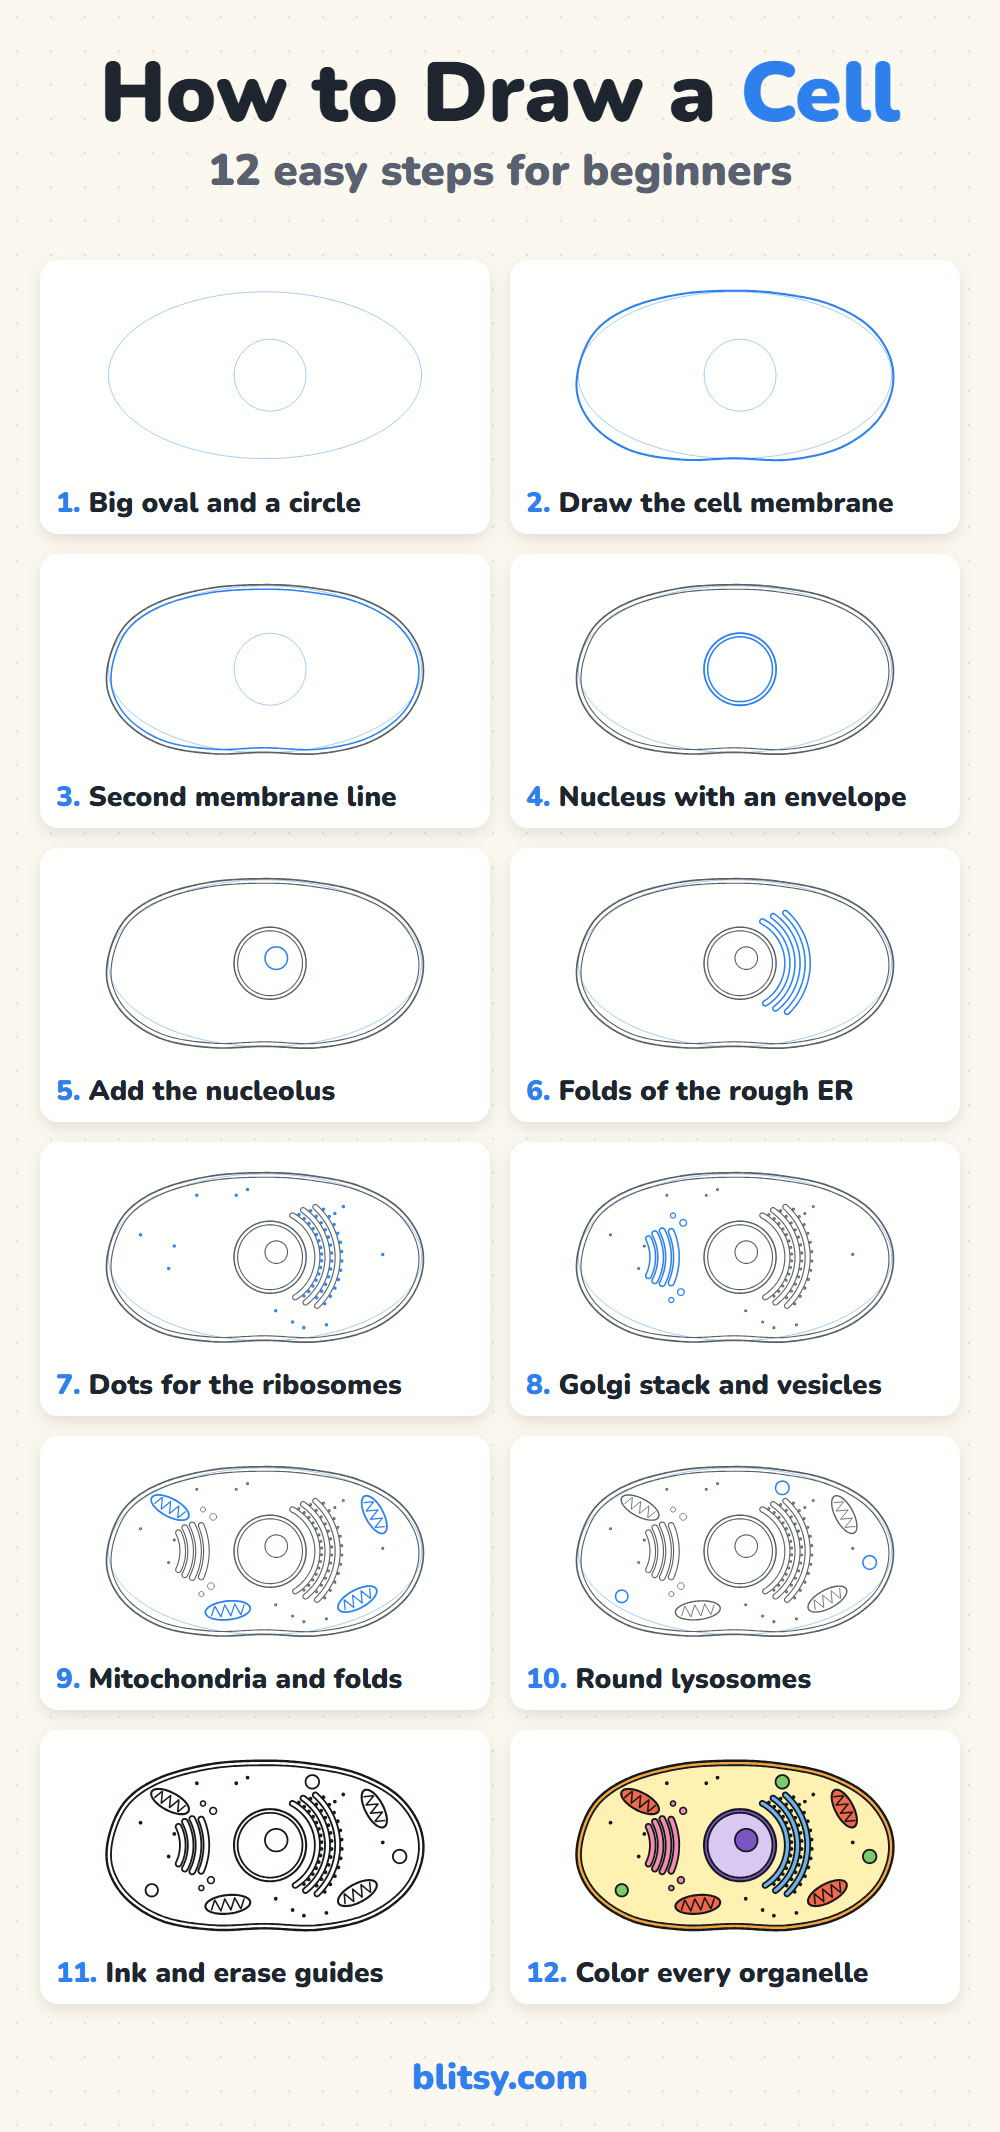
How to Draw a Cell Step by Step
Step 1: Sketch a big oval and a circle
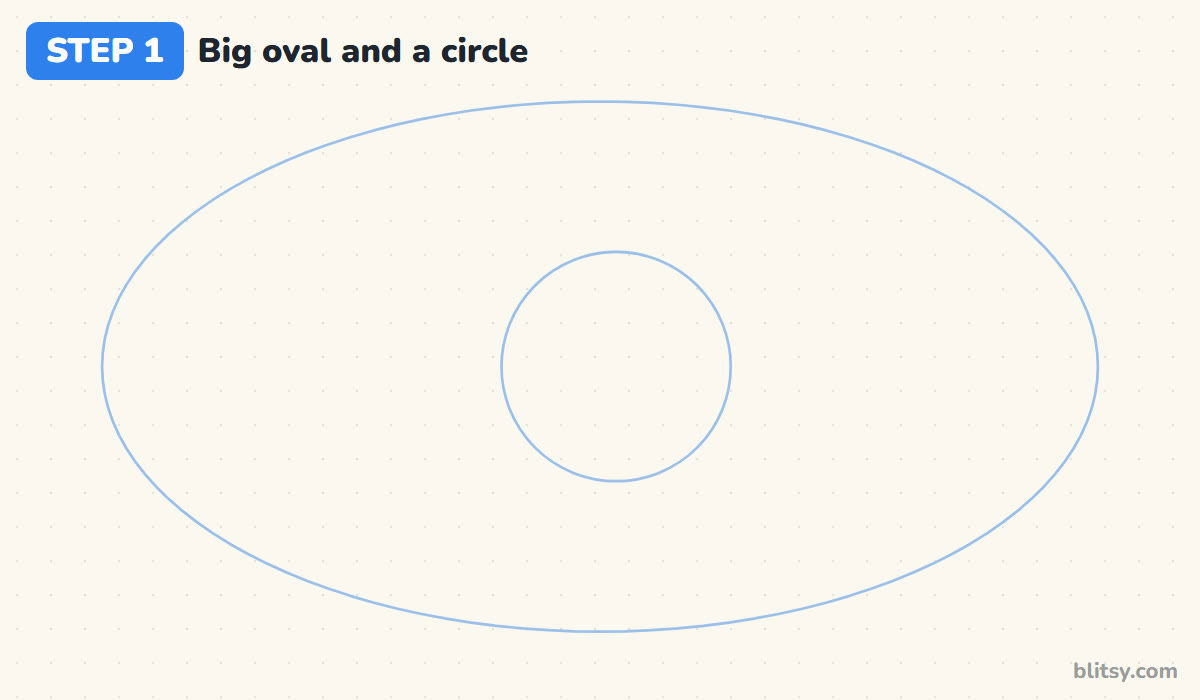
Turn the paper sideways and draw a wide oval that fills most of the page, leaving a finger's width of margin on every side. Then sketch a circle a little right of center, about a fifth as wide as the oval. That circle becomes the nucleus. Keep both shapes faint, because they're only there to guide you.
💡 Tip: Rest your little finger on the paper and pivot from it. Ovals come out rounder that way.
Step 2: Draw the cell membrane
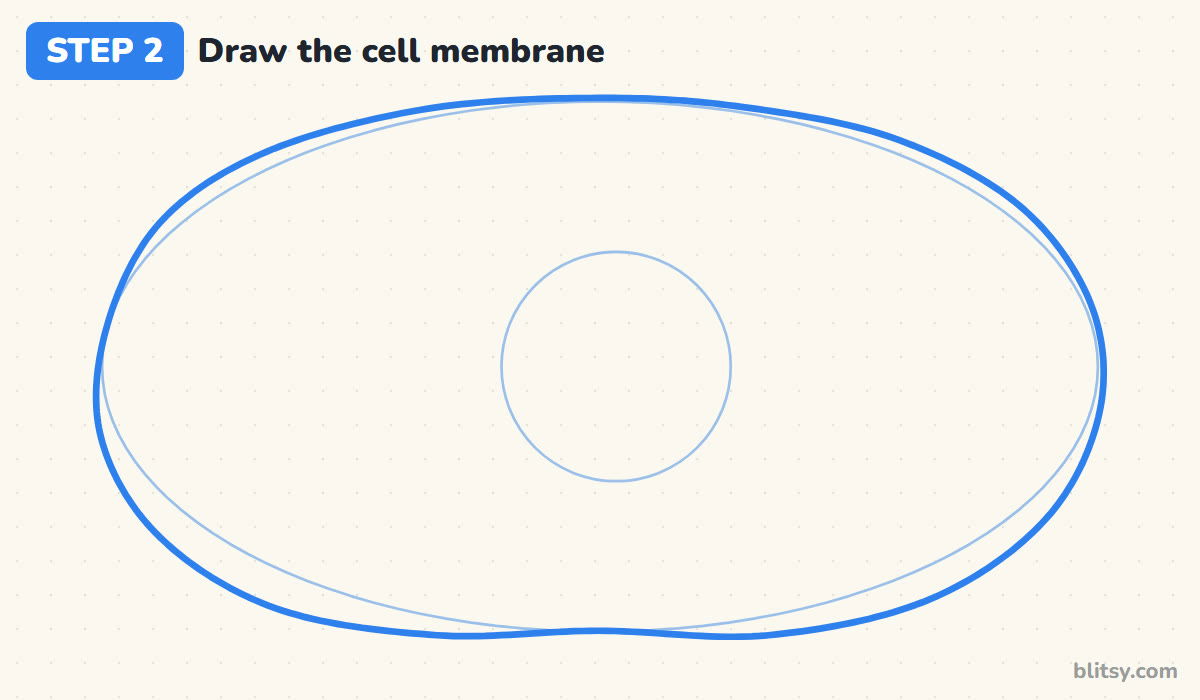
Go around the oval with a firmer, slightly uneven line. Animal cells have no stiff wall, so their edge is soft and a little lumpy. I let the bottom sag inward a touch and the right side bulge out. This outline is the cell membrane, the thin skin that decides what gets into the cell and what leaves.
💡 Tip: Draw the membrane in four quarter curves rather than one long sweep. It's easier to control.
Step 3: Add a second membrane line
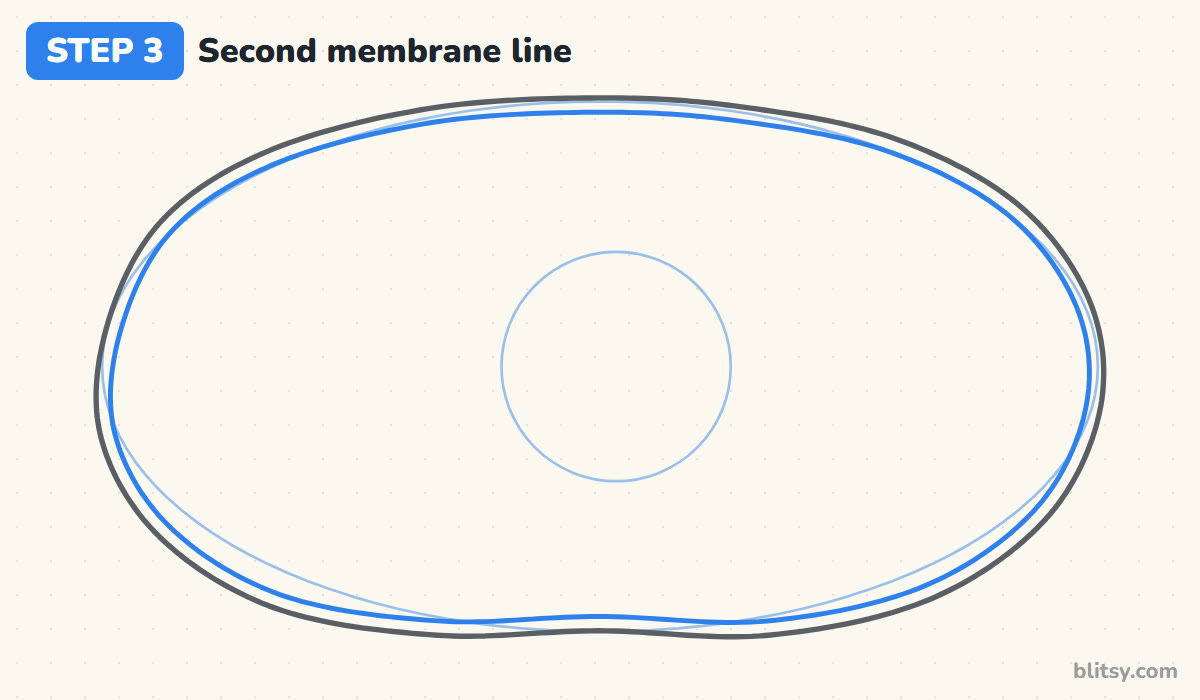
Just inside the first line, draw another one that follows it all the way round. Keep the gap narrow and even, about the width of a pencil lead. A double line is how diagrams show that the membrane has thickness. Everything inside it is cytoplasm, the jelly-like fluid where all the organelles float.




💡 Tip: If the gap gets wide in one spot, fix it now. Uneven bands are hard to color neatly later.
Step 4: Draw the nucleus and its envelope
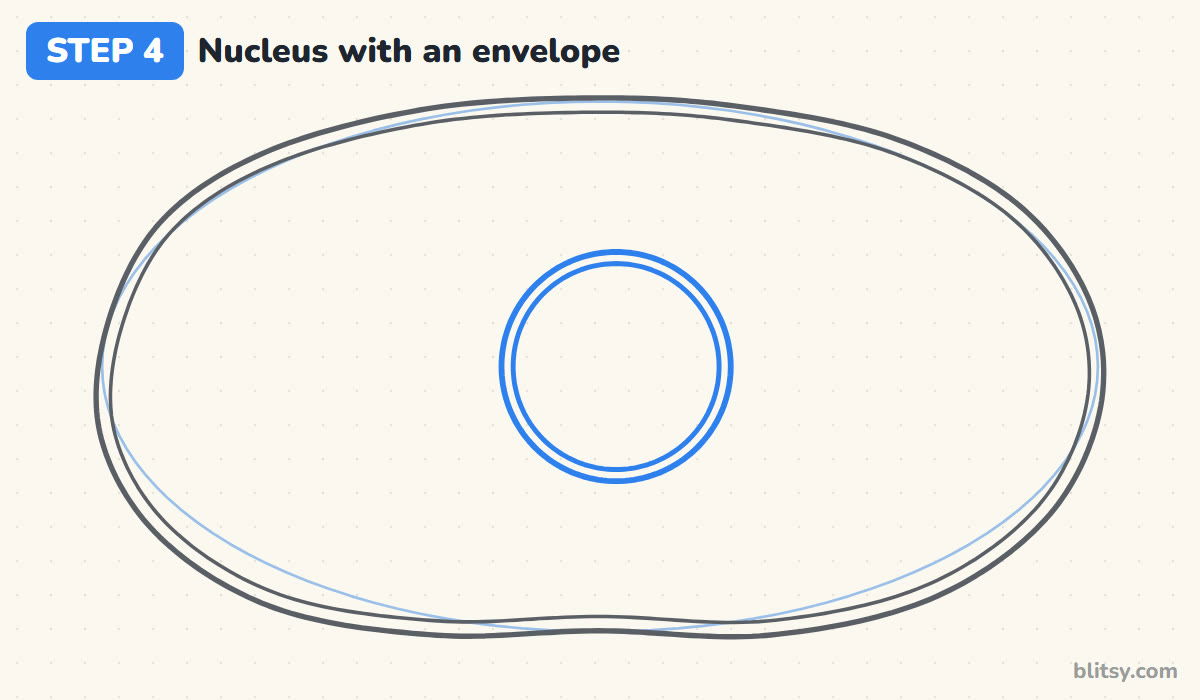
Trace over the guide circle with a clean line, then draw a second circle just inside it. Those two rings are the nuclear envelope, a double membrane around the nucleus. Real envelopes have tiny holes called pores, but most school diagrams leave them out. The nucleus is the control center, and it holds the cell's DNA.
💡 Tip: Trace around a coin or a jar lid here if freehand circles frustrate you.
Step 5: Add the nucleolus
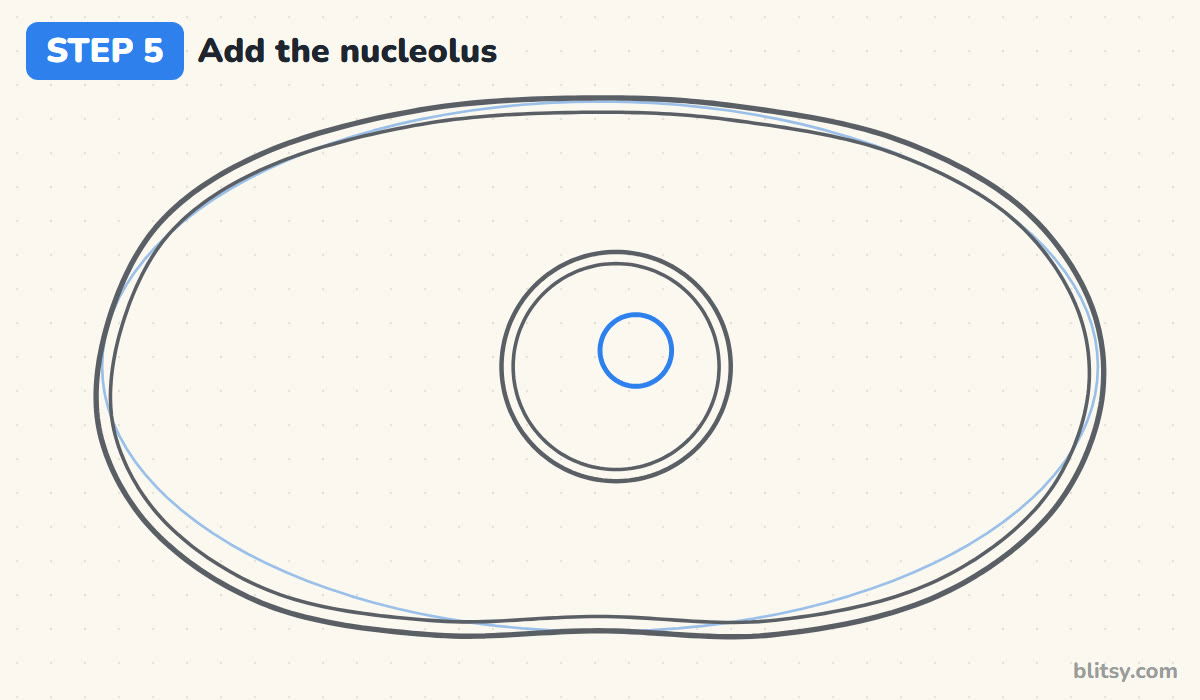
Inside the nucleus, slightly up and to the right of its center, draw a small solid-looking circle about a third as wide as the nucleus. This is the nucleolus. It builds the parts that ribosomes are made from. Placing it off center makes the diagram look more natural than a perfect bull's-eye.
💡 Tip: Small and dark reads better than large and pale for this one.
Step 6: Fold the rough ER around the nucleus
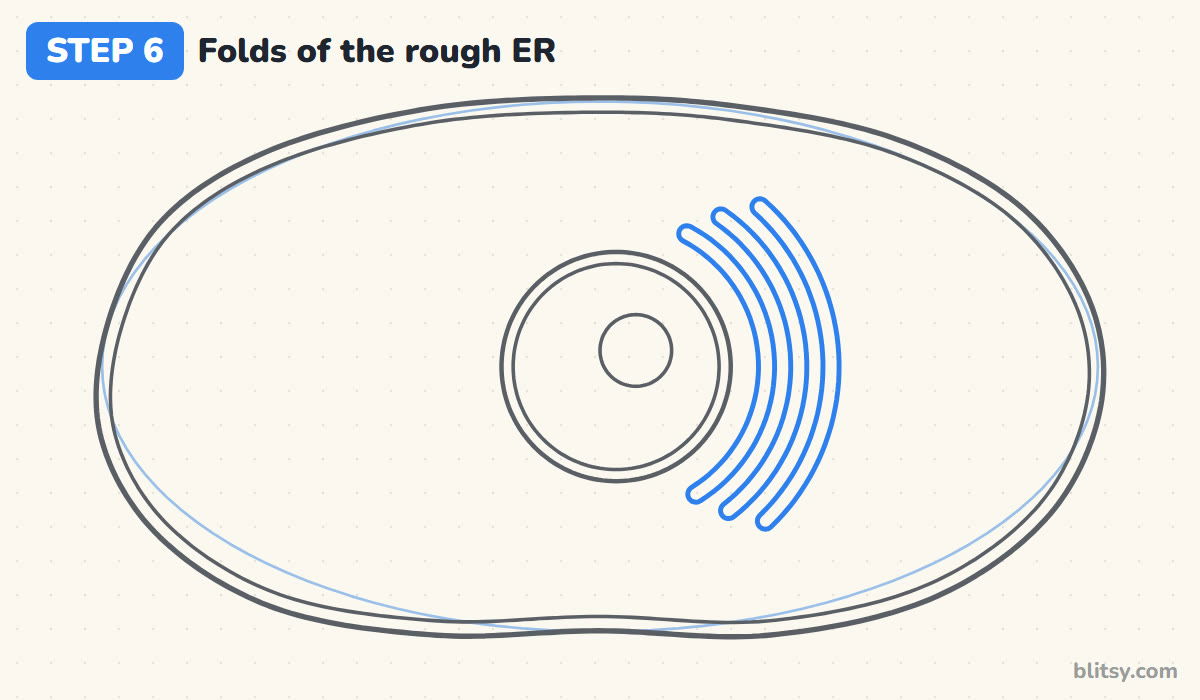
On the right side of the nucleus, draw three long curved tubes that hug it like rainbow arcs, each one a bit bigger than the last. Give every tube rounded ends and an even width. This is the rough endoplasmic reticulum, or rough ER, a network of folded membranes. In a real cell it connects to the nuclear envelope; I leave a hairline gap so the diagram stays easy to read.
💡 Tip: Draw the inner arc first, then copy its curve for the next two. They'll stay parallel.
Step 7: Dot the ribosomes
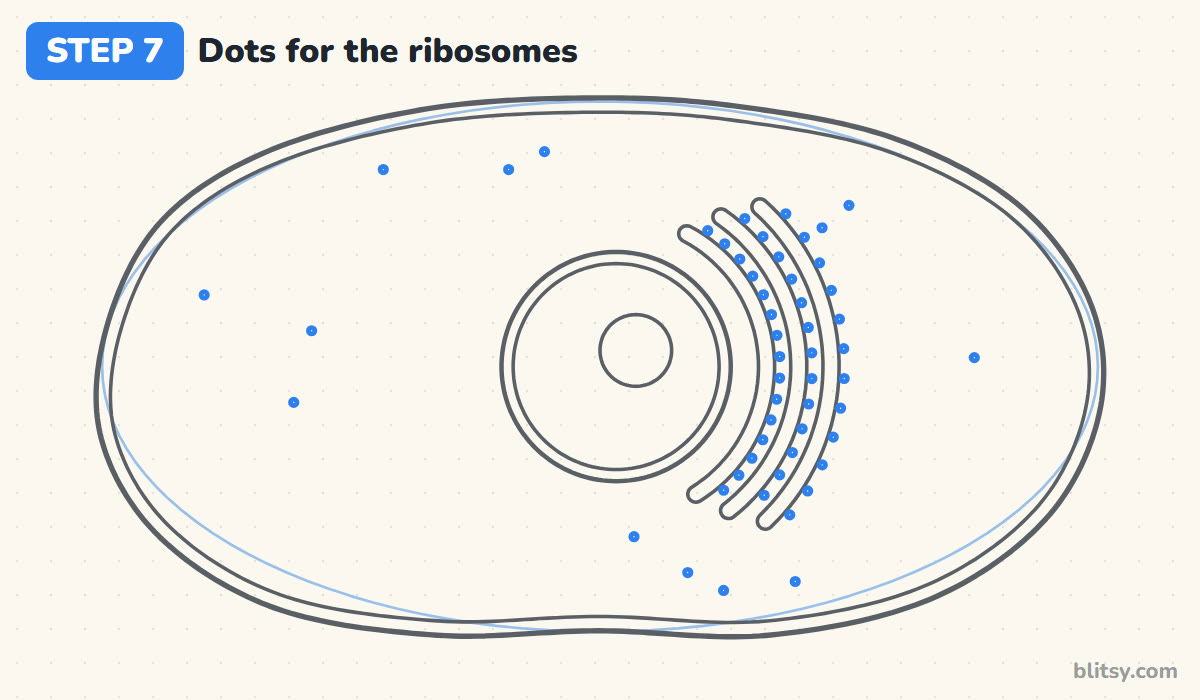
Ribosomes are what make the rough ER rough. Press small dots along the outer edge of each ER arc, spaced about a dot's width apart. Then scatter ten or so loose dots across the cytoplasm, because many ribosomes float freely too. Both kinds build proteins. Keep the free ones spread out instead of clumped together.




💡 Tip: Tap the pencil straight down for each dot. Dragging it turns dots into commas.
Step 8: Draw the Golgi stack and vesicles
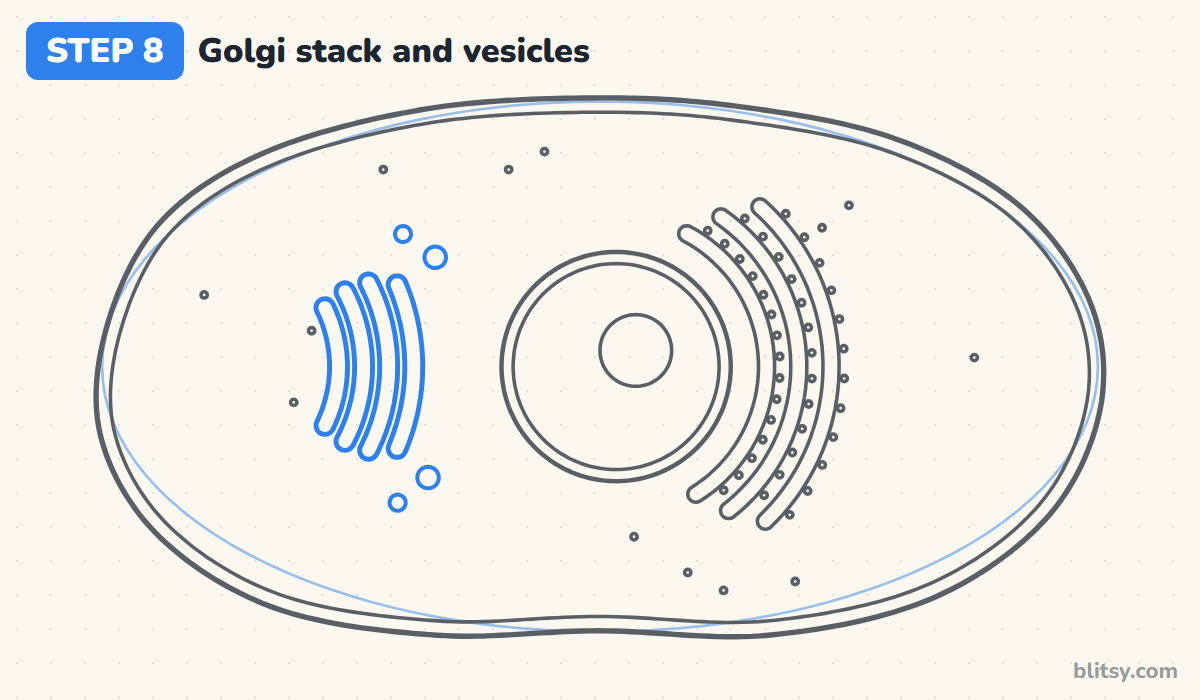
Left of the nucleus, draw four curved, flattened sacs stacked side by side, bulging toward the nucleus like a set of parentheses. Make the middle ones the longest. This stack is the Golgi apparatus, which sorts and packages proteins. Near its top and bottom, add a few tiny circles for vesicles, the little bubbles that carry those packages around the cell.
💡 Tip: Leave a clear gap between the sacs. Touching sacs look like one blob after inking.
Step 9: Add the mitochondria with their folds
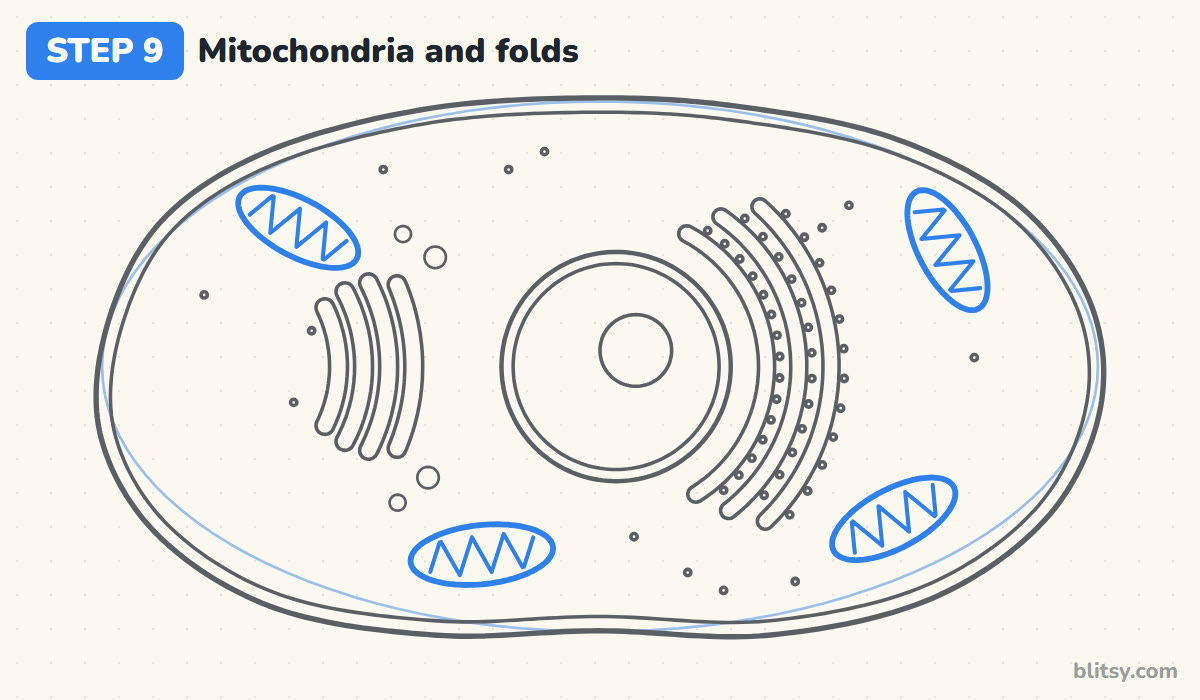
Draw four bean-shaped ovals in the open corners of the cell, each tilted a different way. They're the mitochondria, where the cell releases energy from food. Inside each bean, draw a zigzag line from end to end. Those folds are the cristae, the inner membrane folded up to fit more of it inside. I keep every zigzag away from the outline so the bean shape stays clear.
💡 Tip: Tilt each bean differently. Four in a row at one angle look like they're marching.
Step 10: Place a few lysosomes
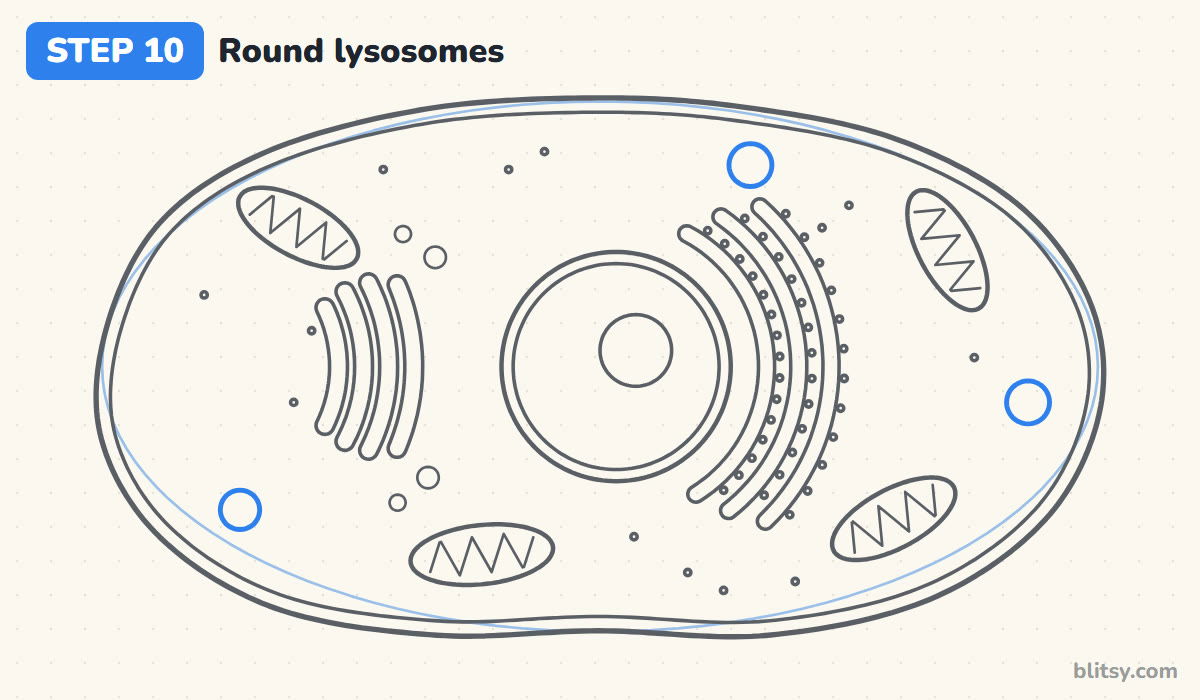
Lysosomes are small round sacs full of enzymes that break down waste and worn-out parts. Draw three plain circles in the empty spaces left over: one near the top, one bottom left and one on the right edge. Keep them bigger than the vesicles but far smaller than a mitochondrion.
💡 Tip: Fill gaps with lysosomes last. They're the easiest part to move around.
Step 11: Ink the diagram and erase the guides
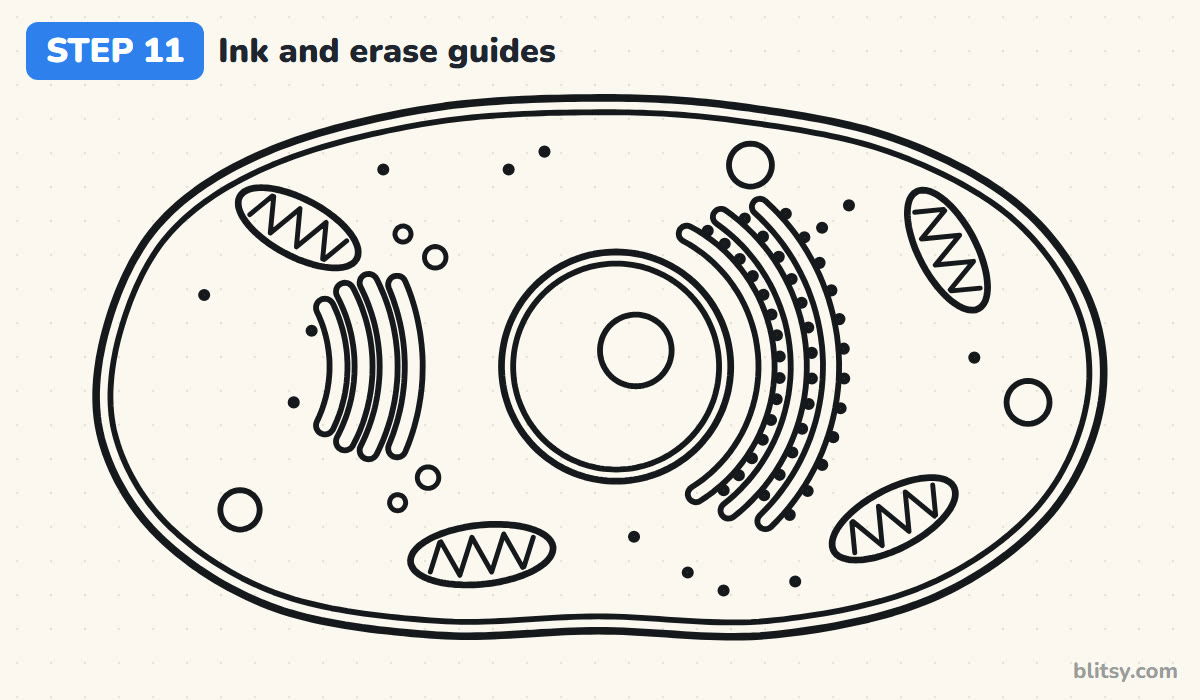
Go over every keeper line with the fineliner. Most beginners start with the tiny dots, but I ink the long membrane lines first while my hand is steady, then the nucleus, then the organelles. Let the ink dry fully. After that, erase the faint guide oval and circle until only crisp black lines remain.




💡 Tip: Count to thirty before erasing. Fresh fineliner ink smears more than you'd expect.
Step 12: Color every organelle
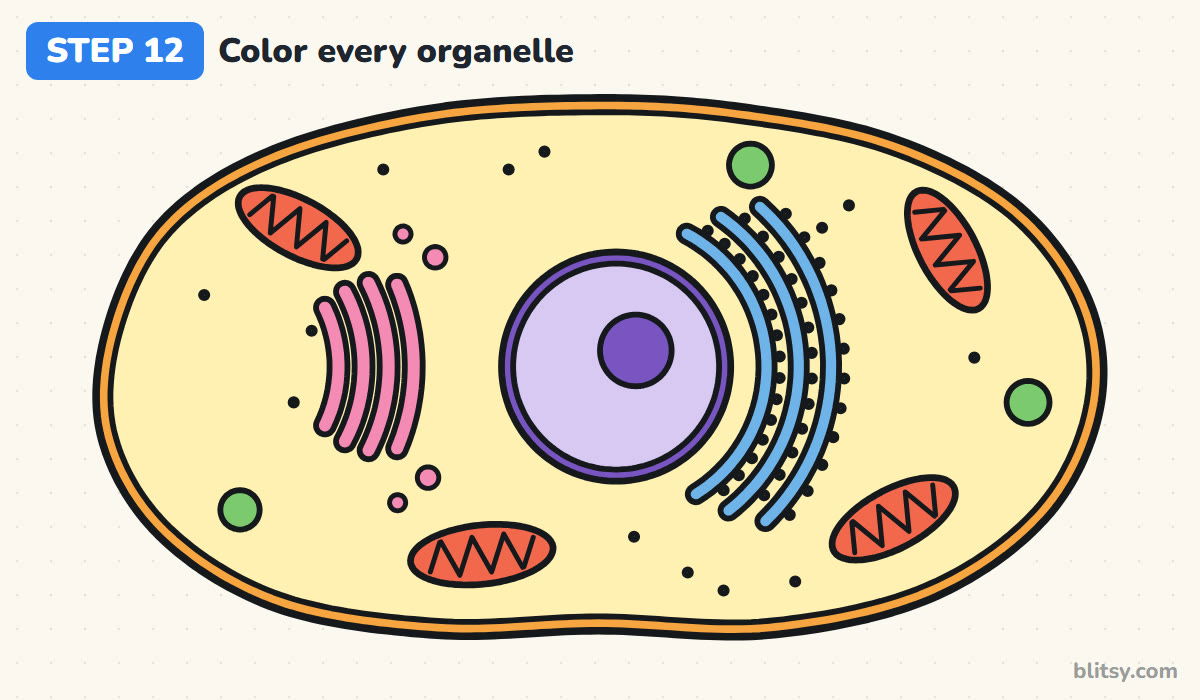
Fill the cytoplasm with light yellow and the membrane band with orange. Give the nucleus light purple, then use dark purple for the envelope ring and the nucleolus. Color the rough ER blue and the Golgi with its vesicles pink. Finish with red mitochondria and green lysosomes. Each part gets its own color, so labeling later is a breeze.
💡 Tip: Color the big yellow area first with light pressure, then the small organelles on top of it.
Cell Diagram Errors Teachers Spot First
- Adding a cell wall or chloroplasts. Those belong to plant cells. An animal cell has only a membrane at its edge and no green chloroplasts inside.
- Squeezing the nucleus into a corner. Keep it near the middle and fairly large. A tiny nucleus makes the whole diagram look unbalanced.
- Drawing every organelle the same size. Mitochondria should be clearly bigger than lysosomes, and vesicles smaller still. Size differences help readers tell the parts apart.
- Crowding the cytoplasm. Leave some empty yellow between parts. Labels need space for their leader lines.
- Forgetting the ribosomes on the rough ER. Without the dots it's just ER. The dots are what make it rough.
Ways to Grow Your Cell Into a Science Project
For a labeled diagram, draw straight leader lines with a ruler out to the margin and write the names there: cell membrane, cytoplasm, nucleus, nuclear envelope, nucleolus, rough ER, ribosomes, Golgi apparatus, vesicles, mitochondria and lysosomes. Older students can add smooth ER as wavy tubes without dots, or a pair of tiny centrioles near the nucleus. Want a plant cell next? Swap the soft oval for a rectangle with a thick cell wall outside the membrane, add a big central vacuole and some green chloroplasts. To zoom out from cells to whole organs, try the human heart drawing tutorial or the lungs drawing tutorial.
Free Animal Cell Coloring Page and PDF Guide
The cell coloring page has a colored example at the top and a key that pairs each color with its organelle, then a large outline below with room for labels. The step-by-step PDF guide holds all 12 steps with pictures and tips. Both print on Letter or A4 paper.
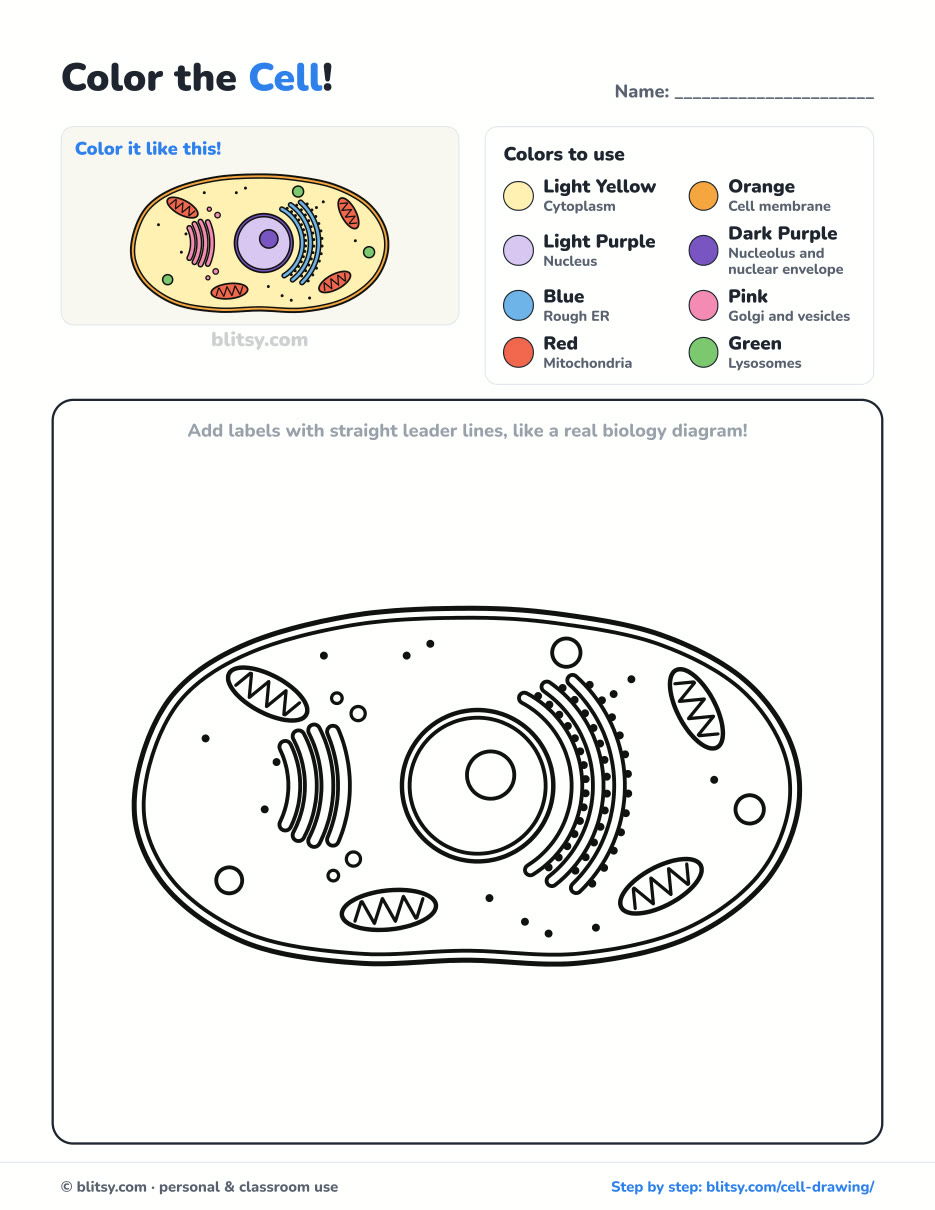
Black outlines with a colored example and the color names at the top. Ready to print and color.
⬇️ Download Coloring PageEvery step picture with its instructions and tips, to keep beside your paper while you draw.
⬇️ Download Drawing Guide📱 On a phone? Tap a download button, then open the file and choose Share → Save to Files or Print. On a computer, the PDF opens or saves straight to your Downloads folder.
Pin This Cell for the Next Biology Test
Cell Diagram Done? Try Flowers, Fruit and Plants
All of these are full step-by-step tutorials, and many of them reuse the round shapes and soft outlines you just practiced.
- Rose Drawing: A tight spiral opens into a red rose, with a bud on its own branch, in this how to draw a rose step by step lesson.
- Strawberry Drawing: Draw a whole berry and a cut half with its flower and leaf in the strawberry drawing tutorial.
- Avocado Drawing: Two circles turn into two cut halves, one with a smiling pit, in this cute avocado drawing tutorial.
- Birthday Cake Drawing: The birthday cake drawing step by step guide builds a two-tier cake with pink frosting, sprinkles and three little flames.
- Hibiscus Drawing: Five red petals spin around a maroon eye in the hibiscus drawing tutorial, with a bud waiting on the left.
- Jack O Lantern Drawing: Start with one oval and finish with a carved grin full of candlelight using how to draw a jack o lantern.
- Mushroom Drawing: Twelve small steps take you to a storybook toadstool scene in this mushroom drawing tutorial.
- Sunflower Drawing: The sunflower drawing step by step lesson gives you a big bloom, a younger one beside it and a bee looping in.
- Tulip Drawing: Draw three tulips in red, pink and yellow, plus a twisting leaf, with this easy tulip drawing tutorial.
- Oil Pastel Drawing: Blend glowing sky bands behind a sinking sun and a dark palm in the oil pastel sunset tutorial.
- Pizza Drawing: Golden crust, red sauce and one slice pulled away are where the how to draw a pizza guide ends.
- Pumpkin Drawing: Three pumpkins resting on golden hay come from a few light ovals in this pumpkin drawing tutorial.
- Garden Drawing: A sunflower, a fence and a watering can fill the flower bed in the garden drawing step by step lesson.
- Dandelion Drawing: Draw the yellow flower and the fluffy seed head side by side with the dandelion drawing tutorial.
- Succulent Drawing: Sage leaves with pink tips sit in a clay pot at the end of this potted succulent drawing tutorial.
Biology Class Questions About Drawing Cells
What is the easiest way to draw an animal cell?
Start with a big oval and a circle for the nucleus. Add a double membrane line, then the organelles one kind at a time, largest first.
What is the difference between drawing a plant cell and an animal cell?
A plant cell is boxy, with a thick cell wall, a large central vacuole and chloroplasts. An animal cell is rounded, has only a membrane and has no chloroplasts.
Which parts should a school cell diagram include?
Usually the cell membrane, cytoplasm, nucleus, nucleolus, ribosomes, rough ER, Golgi apparatus, mitochondria and lysosomes. Check your worksheet, since some teachers ask for fewer.
How long does it take to draw a cell?
About 35 minutes for the lines and 15 more for coloring. The ribosome dots take longer than you'd think.
One oval, one circle and a few beans and dots: sharpen that pencil and give your own cell a try. 🔬✏️
Related posts:
 How to Draw Lungs Step by Step (Easy Science Diagram)
 How to Draw the Solar System Step by Step (Easy Diagram)
 How to Draw a Cow Step by Step (Easy Farm Animal)
 How to Draw a Whale Step by Step (Easy for Beginners)
 How to Draw a Plant Step by Step (Easy Potted Monstera)
 How to Draw the Fortnite Llama Step by Step (Easy Fan Art)
 How to Draw a Hoodie Step by Step (Front and Back View)
 How to Draw a Parrot Step by Step (Easy Scarlet Macaw)
 How to Draw a Police Car Step by Step (Easy for Kids)
 How to Draw a Volcano Step by Step (Easy Erupting Volcano)
 How to Draw a Crow Step by Step (Easy for Beginners)
 How to Draw a Tiger Step by Step (Easy Walking Pose)

