
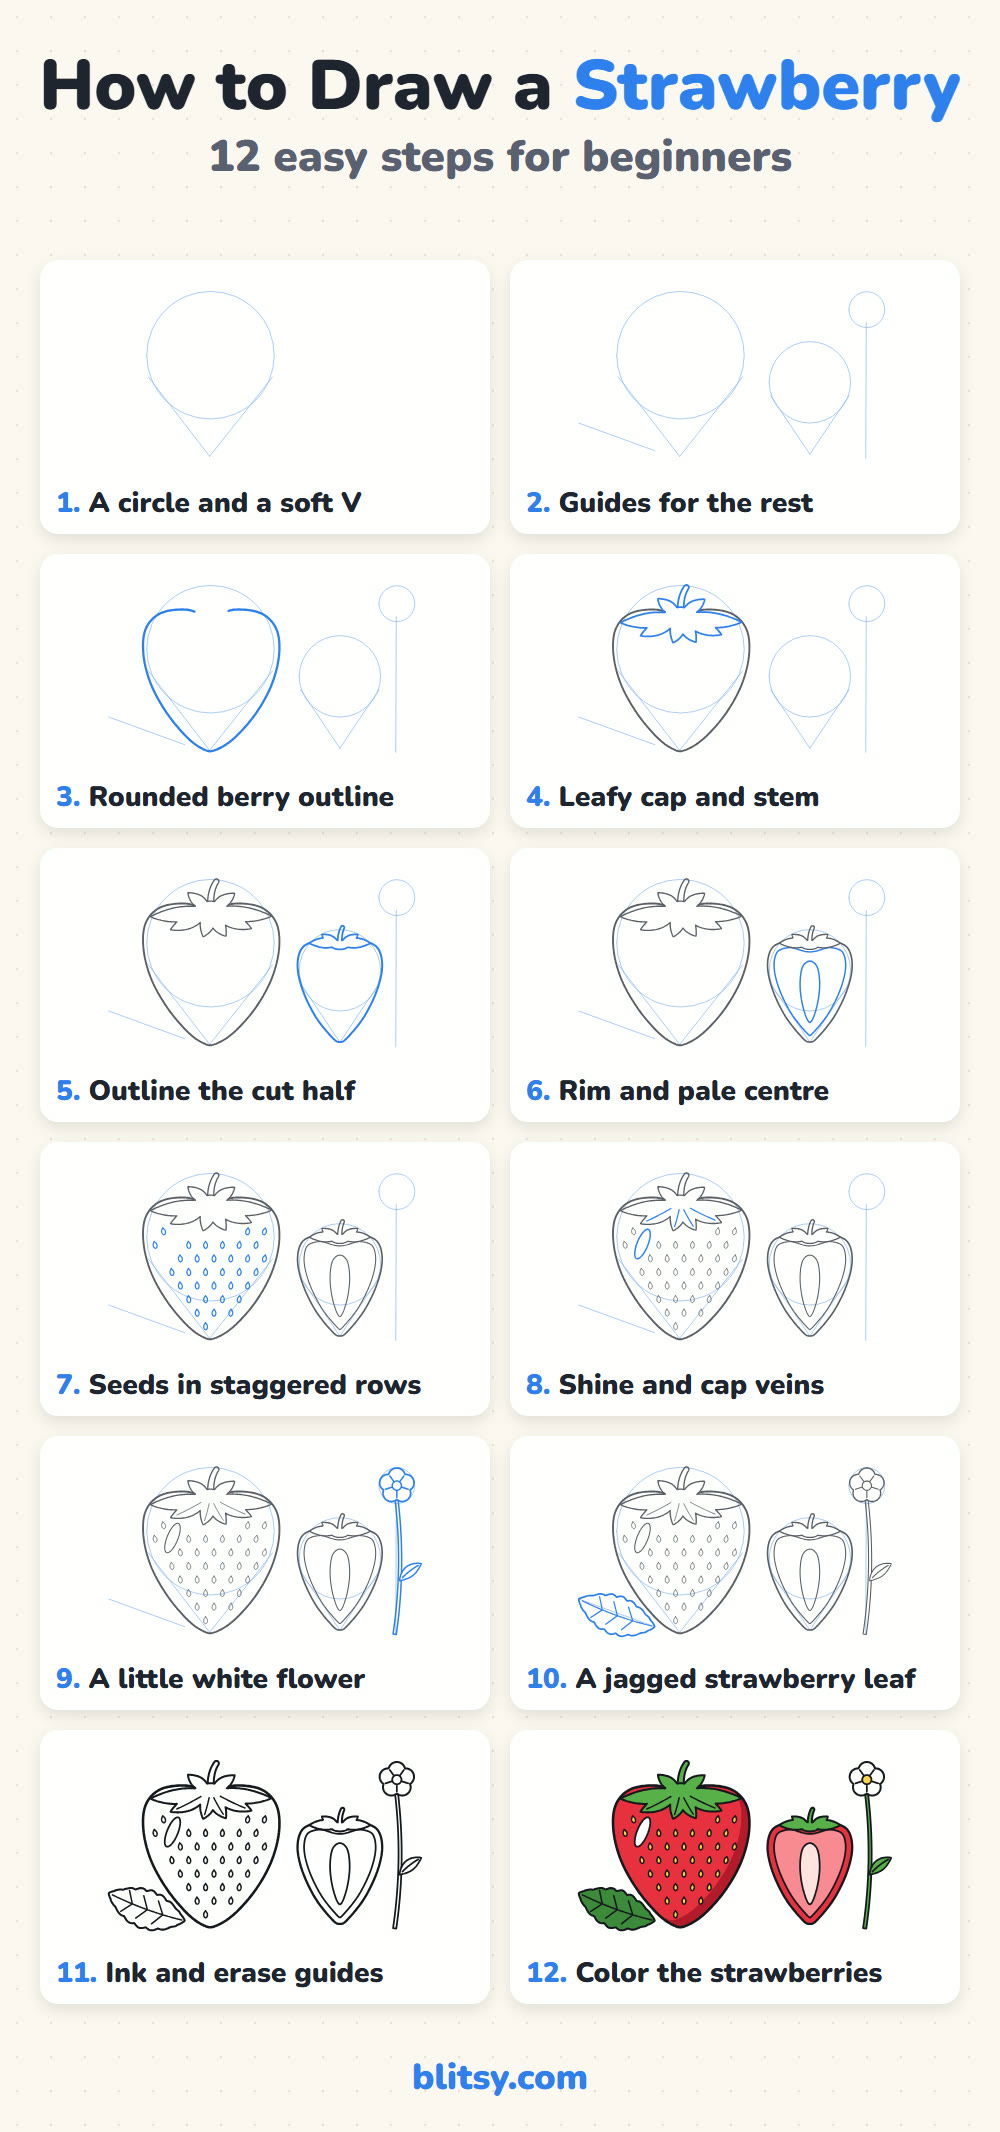
Strawberries look tricky because of all those seeds, yet the shape underneath is one of the friendliest in drawing. In this lesson you'll learn how to draw a strawberry step by step, starting from a plain circle with a V hanging under it. Then we add a leafy cap, seeds that wrap around the fruit, and a second berry sliced open to show the pink inside.
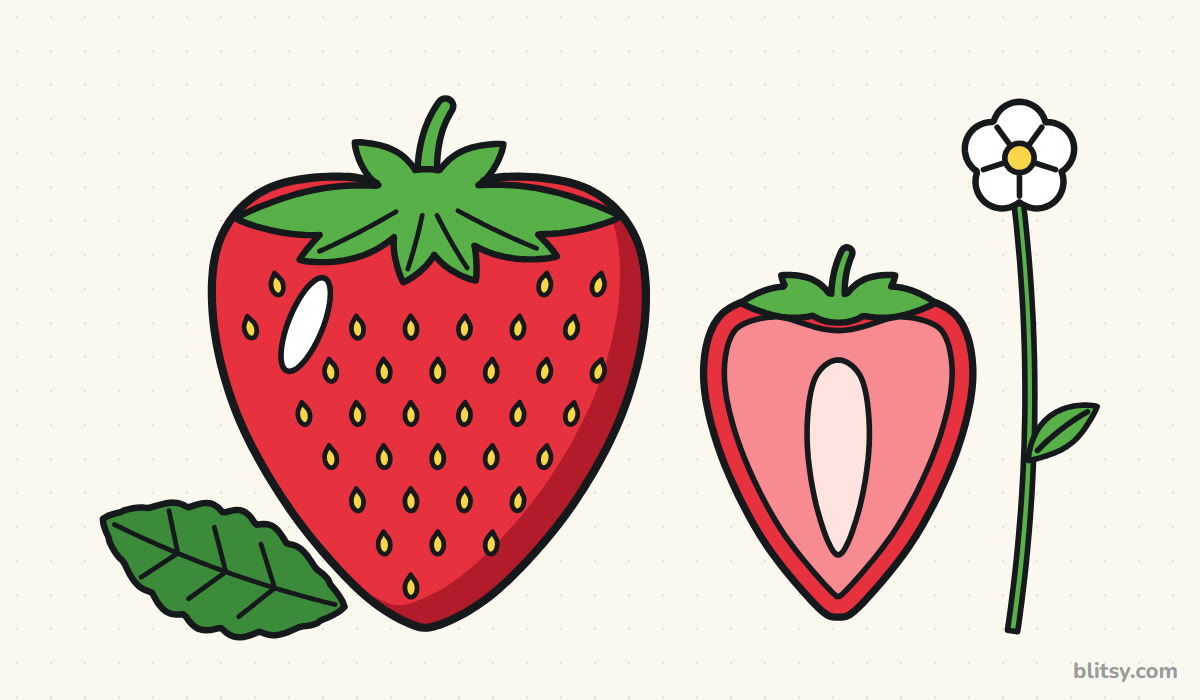
Look for the blue lines in every picture, because they show what you add in that step. Anything gray was drawn earlier. The very light blue circles and lines are helpers only, so keep your pencil soft on them; we rub them out in step 11.
Quick overview
⏱️ Time: about 20 to 30 minutes
🎯 Level: easy, good for kids from around 6
✏️ Steps: 12
🍓 You'll draw: a whole strawberry with seeds and a shine, a cut half, a strawberry flower and a leaf
Berry Drawing Kit: Pencil, Pen and Reds
- A pencil you can press lightly with
- An eraser that won't smudge
- A black fineliner or felt-tip pen
- Colored pencils or markers: red, dark red, pink, light pink, yellow, green, dark green
- Plain white paper, turned sideways
The shine and the flower petals stay white, so you won't need a white pencil at all.
How to Draw a Strawberry Step by Step
Step 1: Sketch a circle with a soft V below it
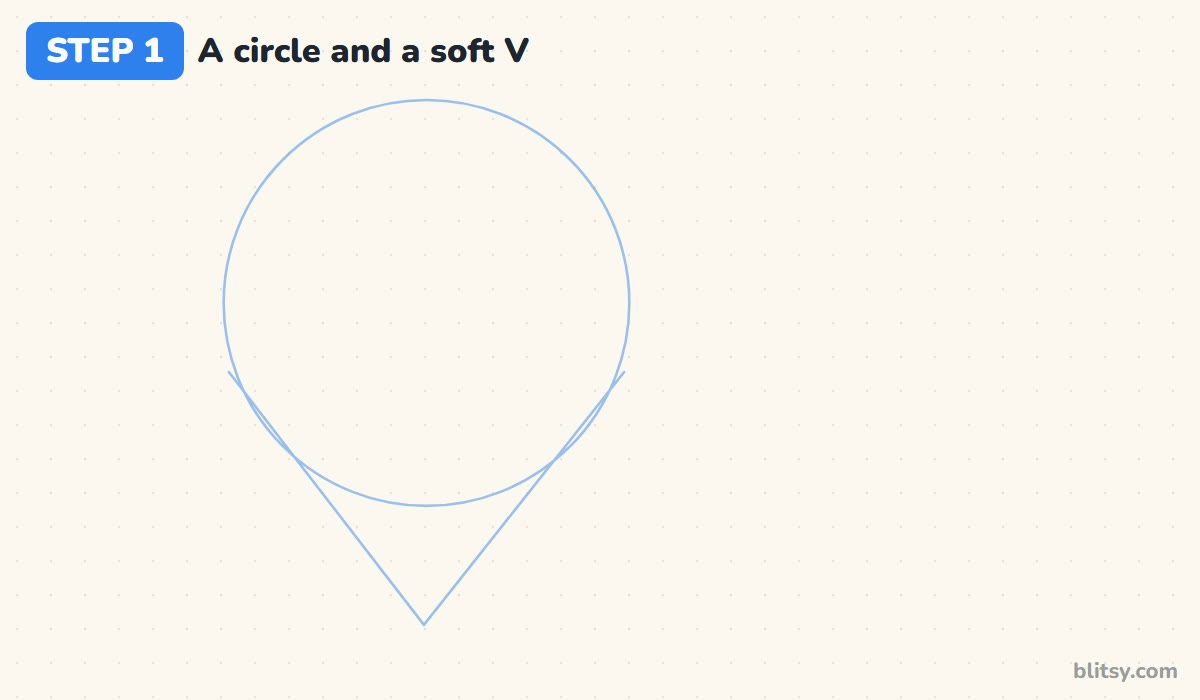
On the left half of your paper, draw a large circle. From both lower sides of the circle, run two straight lines down until they meet in a point well below it. That funnel shape is the whole strawberry in disguise. I place the point about half a circle's height under the circle, because a shorter V gives you a round tomato and a longer one gives you a carrot.
💡 Tip: Press so lightly that you can barely see the lines. They are only scaffolding.
Step 2: Add guides for the half, flower and leaf
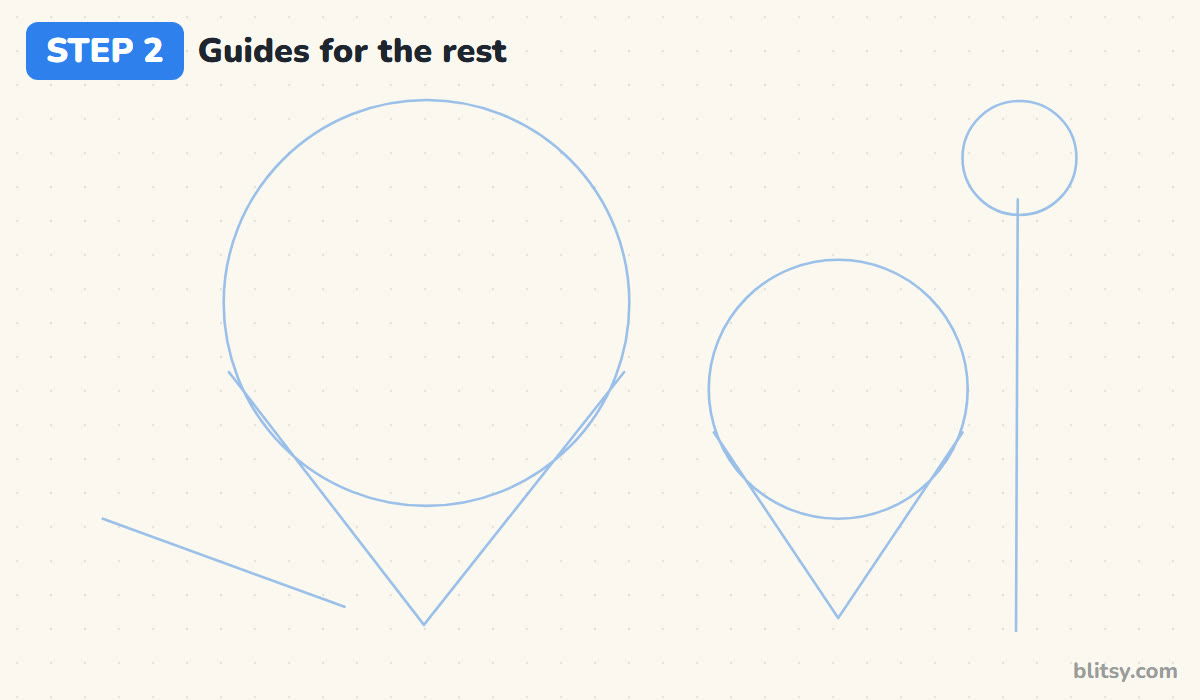
To the right, draw a smaller circle with its own V for the cut strawberry. Further right, sketch a little circle near the top for the flower and a long upright line under it for the stem. Last, put one slanting line at the bottom left where the leaf will lie. I leave a clear gap between shapes so nothing gets crowded.
💡 Tip: Plan the whole page now. Moving a shape later means erasing half your work.
Step 3: Draw the rounded berry outline
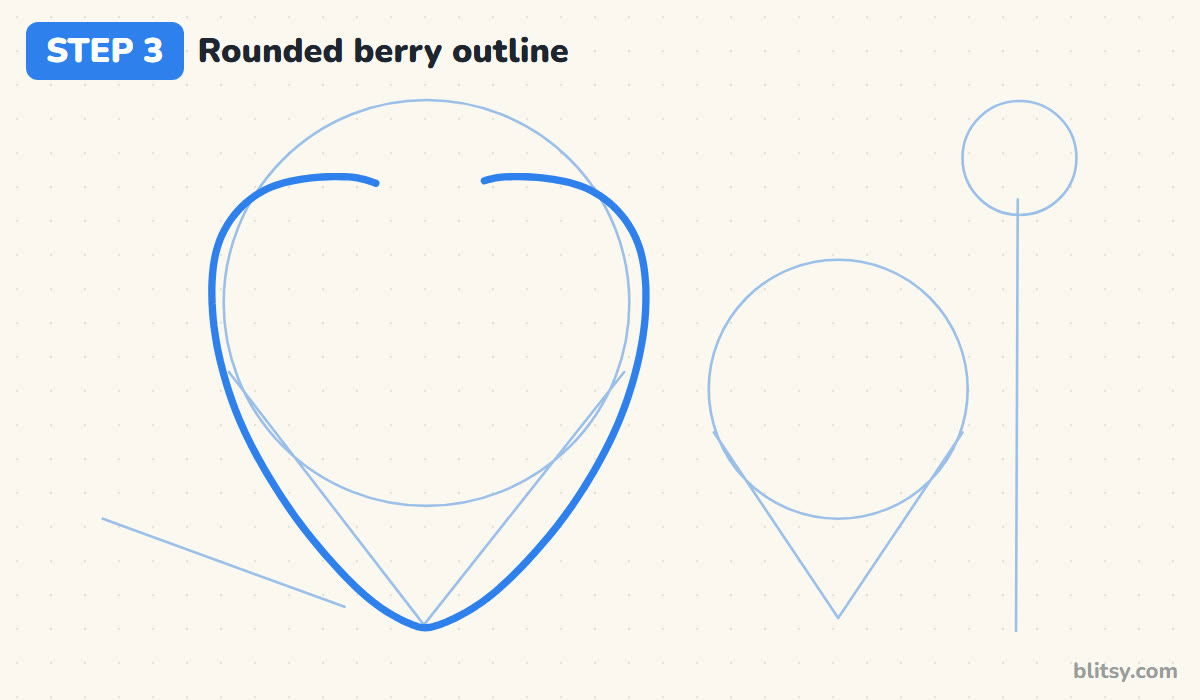
Now trace the real outline of the big berry. Start at the top, swing out a little past the circle for wide shoulders, and curve down into the point of the V. Round the very tip slightly so it isn't sharp like a pencil. Leave a gap at the top middle, since the leafy cap will cover it in the next step.


💡 Tip: Draw the left side, then the right, and compare them before you go on.
Step 4: Give it a leafy cap and a stem
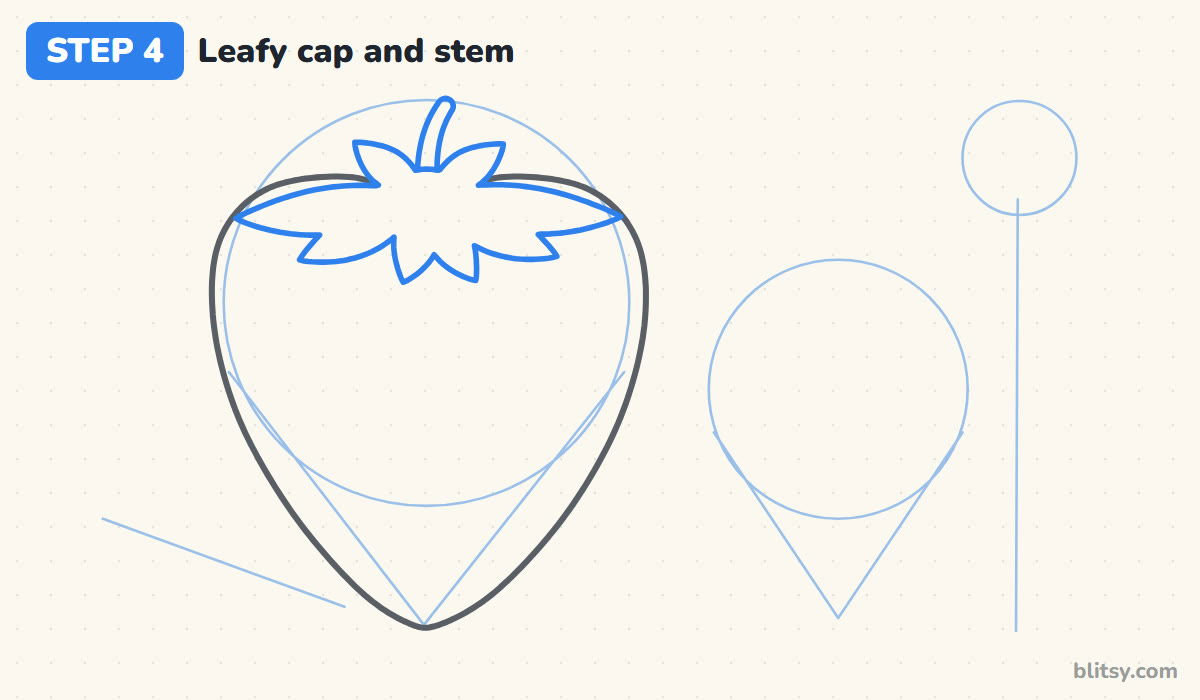
From the middle of the top edge, draw pointed leaves that fan outward like a star. Let the front leaves hang down over the berry and the side ones droop over the shoulders, with two shorter leaves poking up at the back. Above the middle, add a short stem that bends a little to one side. I keep the stem short, because a tall one makes the berry look like a lollipop.
💡 Tip: Vary the leaf lengths a bit. Identical points look like a paper crown.
Step 5: Outline the cut half
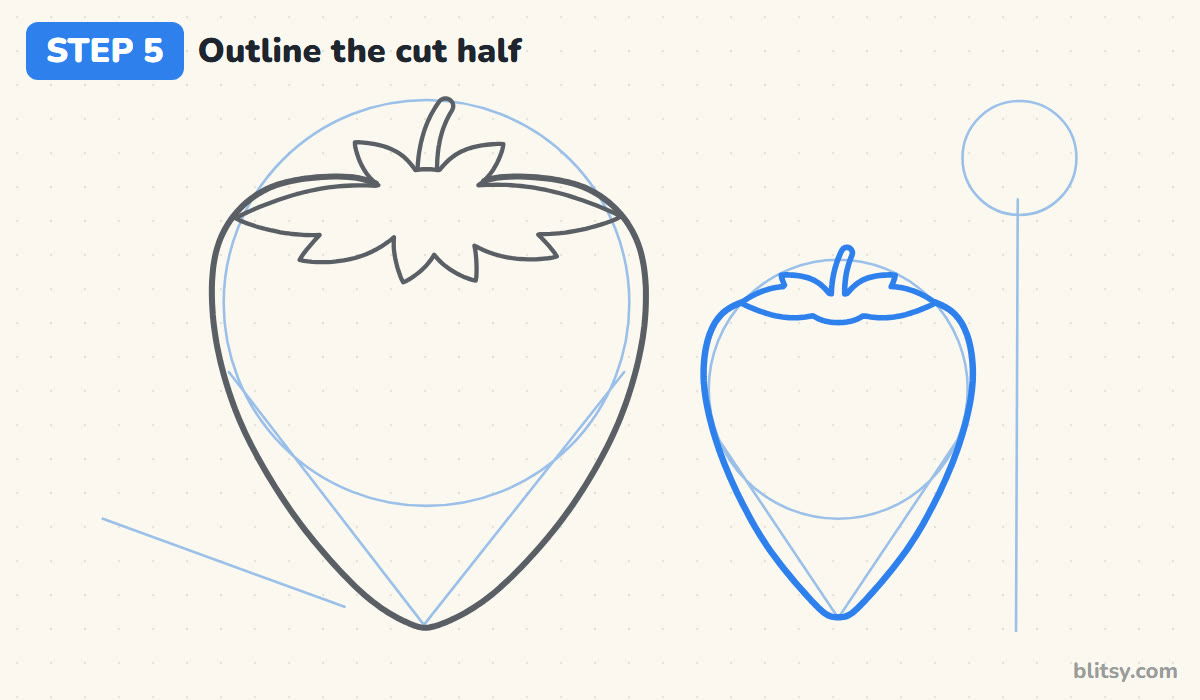
Use the second circle and V to draw a strawberry shape again, only this time make the top flatter, because it's a slice seen from the front. Add a small cap of four leaves that flare out sideways along the top edge, plus a tiny stem stub in the middle.
💡 Tip: Keep the top edge almost straight. That flat line is what says 'cut'.
Step 6: Draw the rim and the pale centre
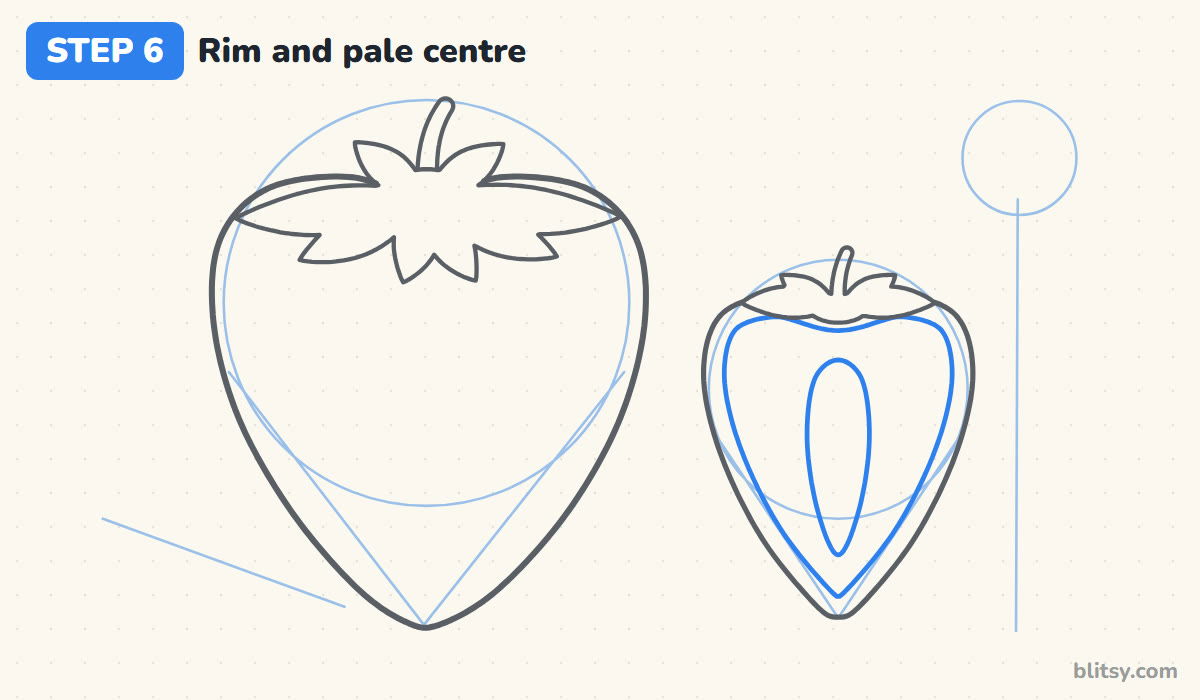
Inside the half, draw a second outline that follows the first one about a finger's width in. The thin band between the two lines becomes the red skin. Then draw a long, narrow oval down the middle for the pale heart of the fruit. When I cut a real strawberry, that light centre always runs from near the top almost to the tip, so stretch yours the same way.
💡 Tip: Keep the band the same thickness all the way round, even at the point.
Step 7: Place the seeds in staggered rows
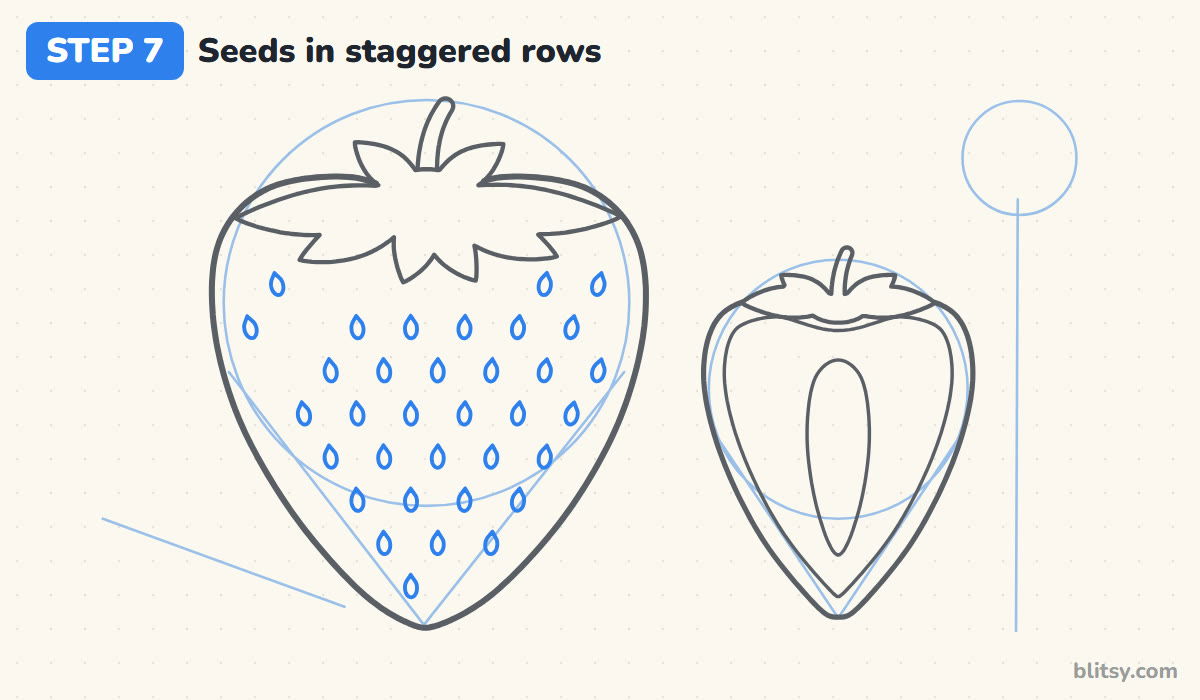
Draw them as tiny teardrops, pointy end up, in rows across the berry. Shift every second row half a space sideways, like bricks in a wall. Near the edges, tilt the seeds so they lean with the curve; that small tilt makes the fruit look round. Skip a small patch on the upper left for the shine.


💡 Tip: Start the middle row first, then fill in above and below it.
Step 8: Add a shine and veins on the cap
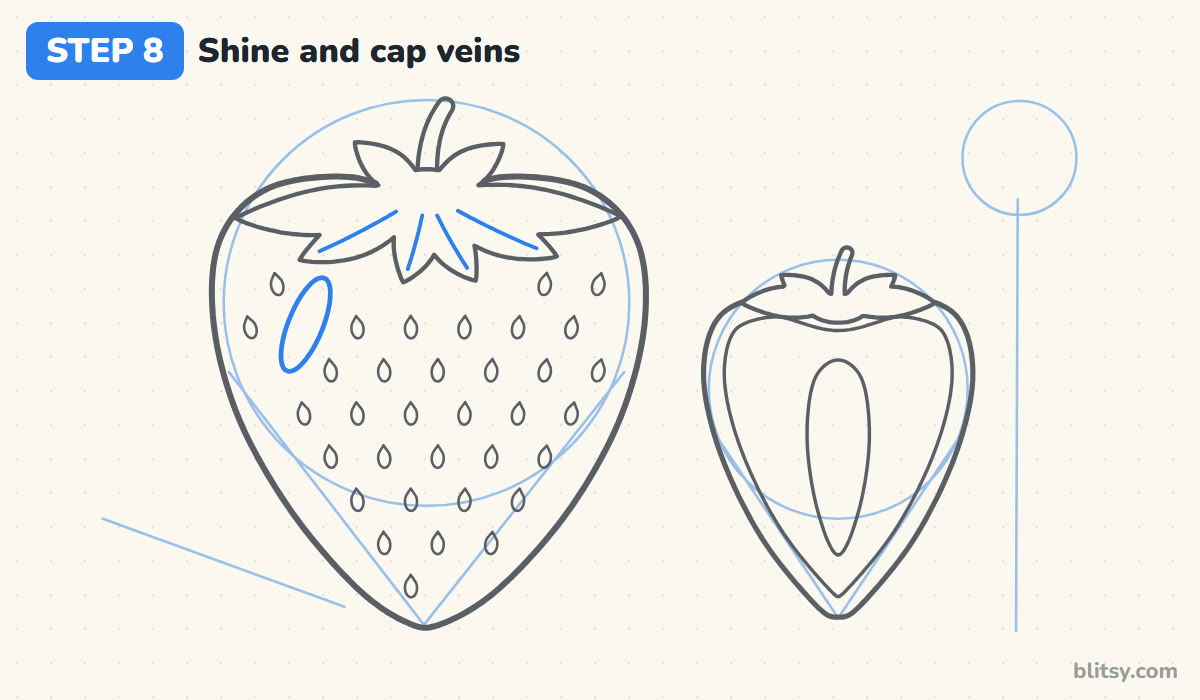
In the empty patch on the upper left, draw a slim tilted oval. This is the shine, the spot where light hits the shiny skin, and it stays white forever. On the front cap leaves, draw one thin line down the middle of each as a vein. I keep the veins short, so they don't touch the leaf tips.
💡 Tip: Put the shine on the same side every time you draw fruit, so the light makes sense.
Step 9: Draw a little white flower on a stem
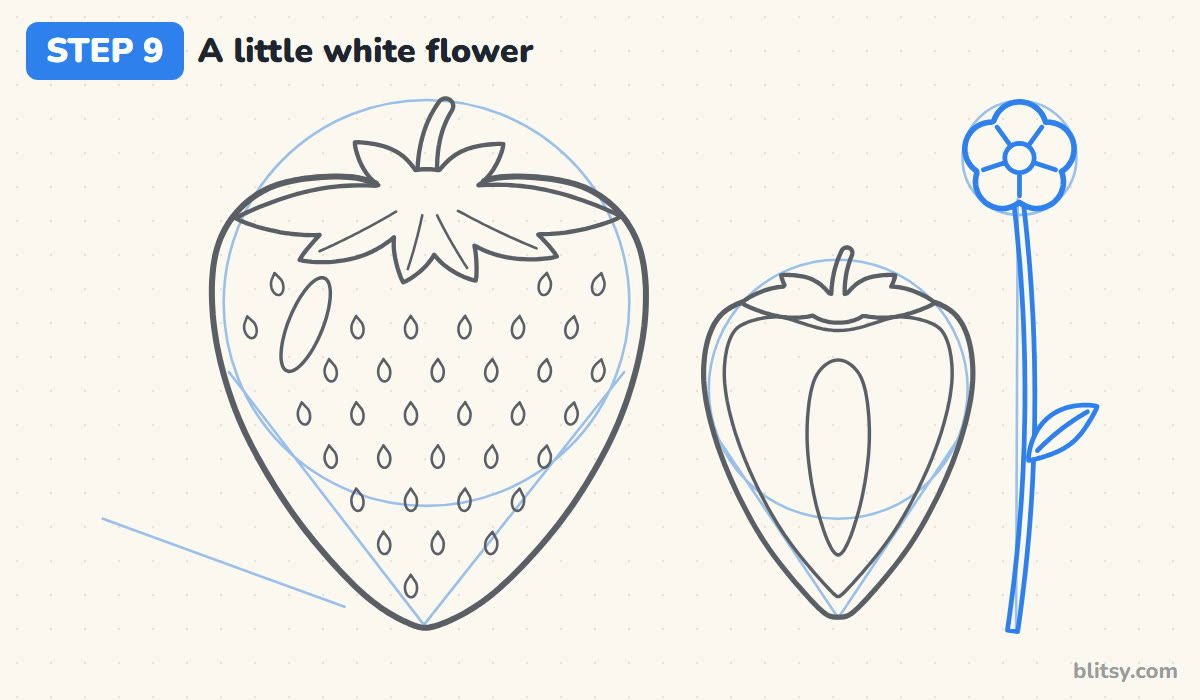
Strawberry plants have small white flowers with five round petals. Inside the little guide circle, draw a small centre dot and five bumpy petals around it, then add short lines between the petals. Go over the stem guide with two close parallel lines and stick a small pointed leaf on one side. Most beginners make the stem too thick, so keep the two lines nearly touching.
💡 Tip: Draw the top petal first, then space the other four around it.
Step 10: Lay a jagged leaf behind the berry
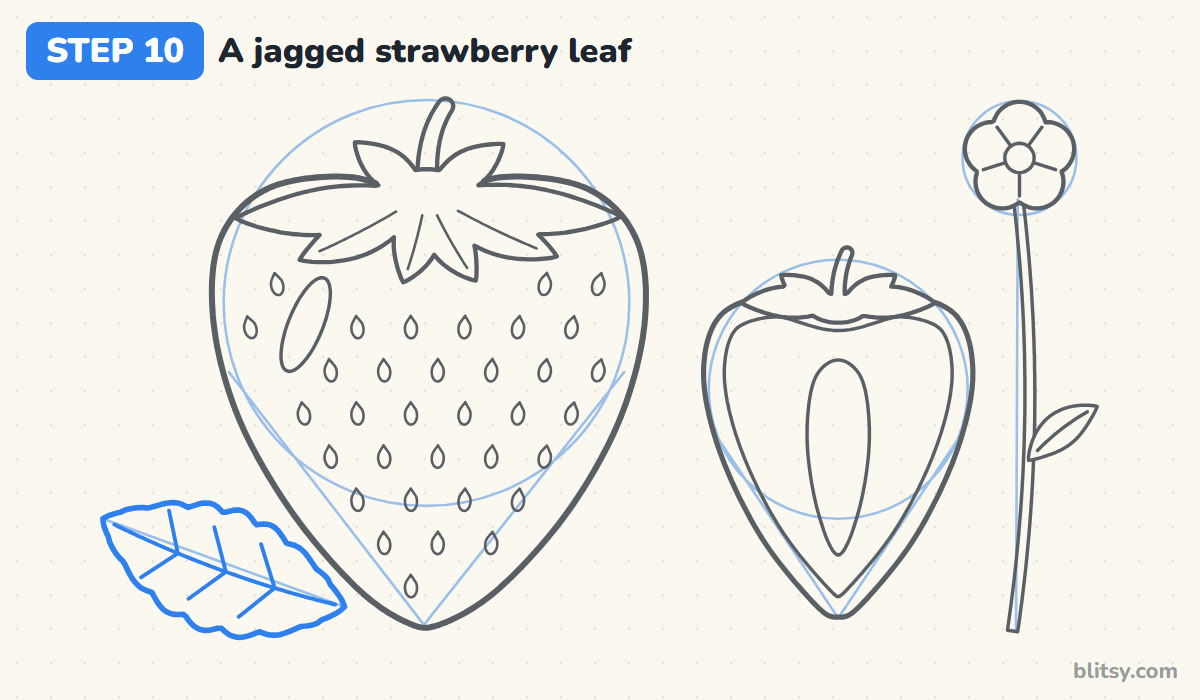
Along the slanted guide at the bottom left, draw a long leaf with a saw-tooth edge. Its right end tucks behind the big berry, so stop the outline where it meets the fruit. Add a centre line and a few side veins that point toward the tip. Real strawberry leaves have these little teeth.
💡 Tip: Make the teeth small and even. Big spikes turn the leaf into a holly leaf.
Step 11: Ink the lines and erase the guides
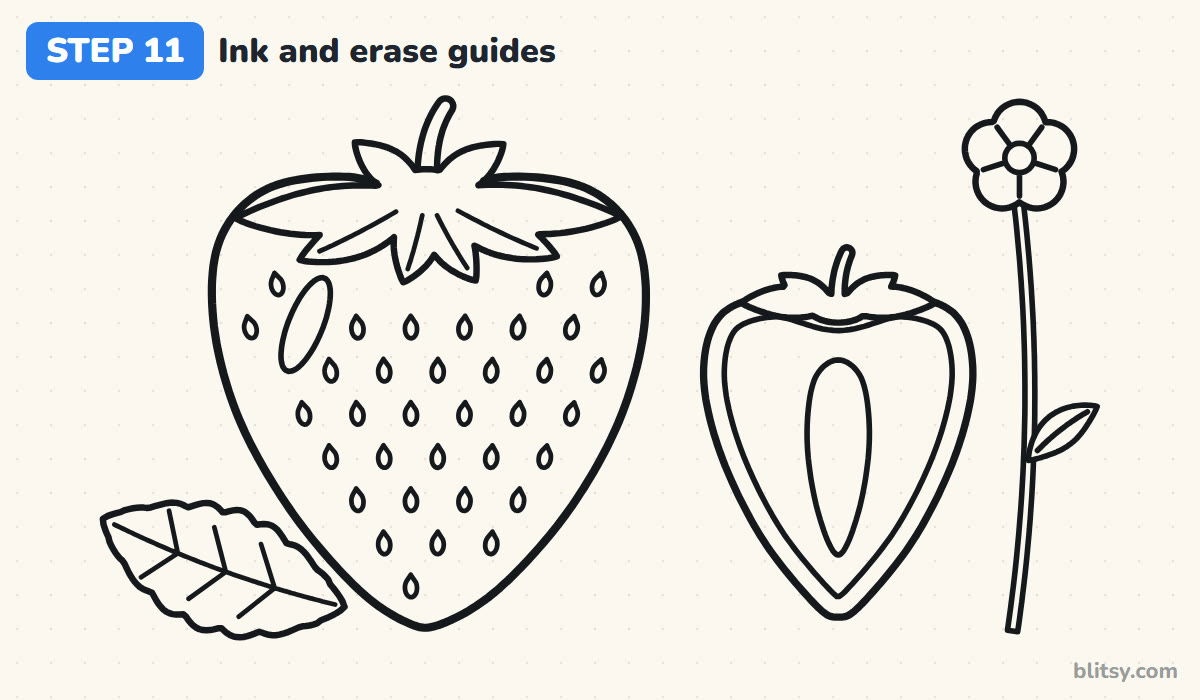
Trace every keeper line with your black pen: both berries, the caps, every seed, the flower and the leaves. Wait a minute for the ink to dry completely. Then erase the circles, the V lines and the stem guide. My favorite moment: with the helpers gone, the berry already looks finished.




💡 Tip: Turn the paper as you ink curves so your hand always pulls the pen toward you.
Step 12: Color the strawberries
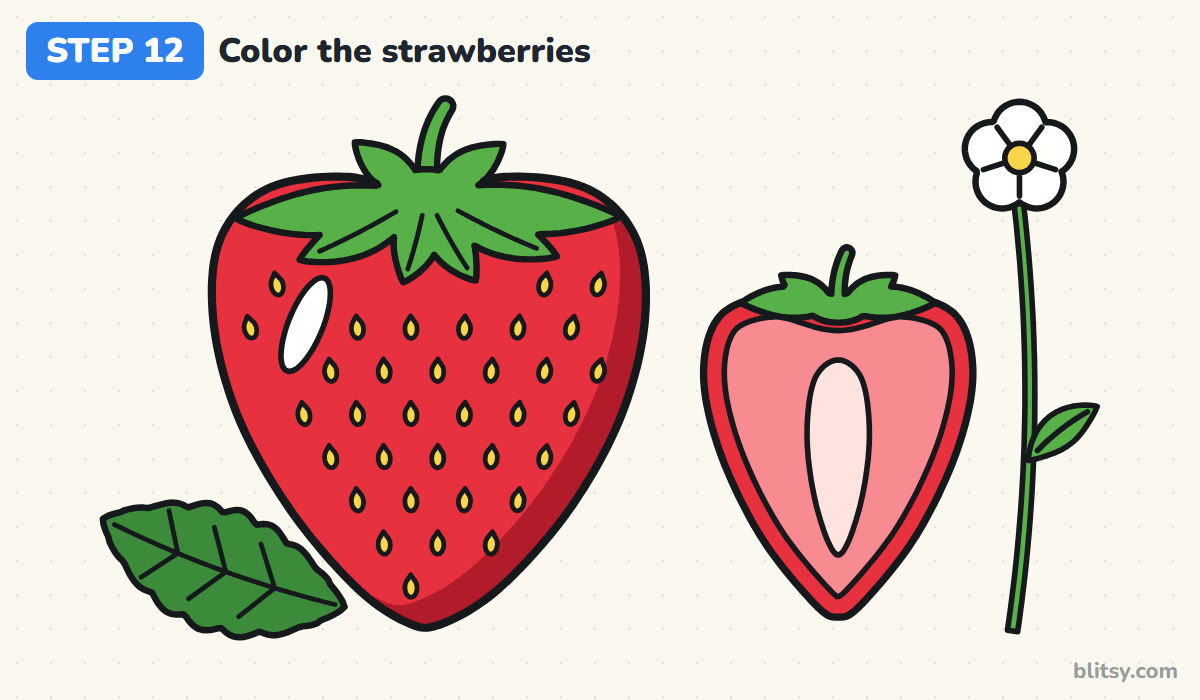
Fill the big berry and the rim of the half with red, leaving the shine white. Add dark red along the right side and the bottom of the big berry for shade. Color the inside of the half pink and its centre light pink. The seeds and the flower middle get yellow, the caps and stems green, and the big leaf dark green.
💡 Tip: Color the seeds before the red, so the red pencil doesn't smear over them.
Strawberry Slip-Ups I See Most Often
- A shape like a perfect heart. A strawberry has round shoulders and a soft point, not a dip at the top. Let the cap sit where a heart's dip would be.
- Seeds in straight grid lines. Square rows make the berry look like graph paper. Stagger every second row.
- Seeds that are too big. Large seeds turn the fruit into a pinecone. Keep them about the size of a grain of rice on the page.
- Coloring over the shine. Once it's red, the shine is gone. Outline it first and color around it.
- A cut half with a round top. A rounded top hides the slice. Flatten the top edge so it reads as cut open.
Fresh Twists on Your Strawberry Picture
Once the circle and V feel easy, try changing the scene. Draw three berries in a small bowl, dip one halfway into brown chocolate, or give a berry two dots for eyes and a little smile for a cute sticker. When you want another fruit to practise on, this fruit drawing tutorial is a good next step, and these fruit coloring pages keep little artists busy.
Free Strawberry Coloring Page and Printable Steps
Want something to hand out at the table? The strawberry coloring page has a small colored example and a key that names each color at the top, with a big outline underneath ready for crayons. The step-by-step guide PDF collects all 12 steps with their tips, so you can draw away from a screen. Both fit Letter and A4 paper.
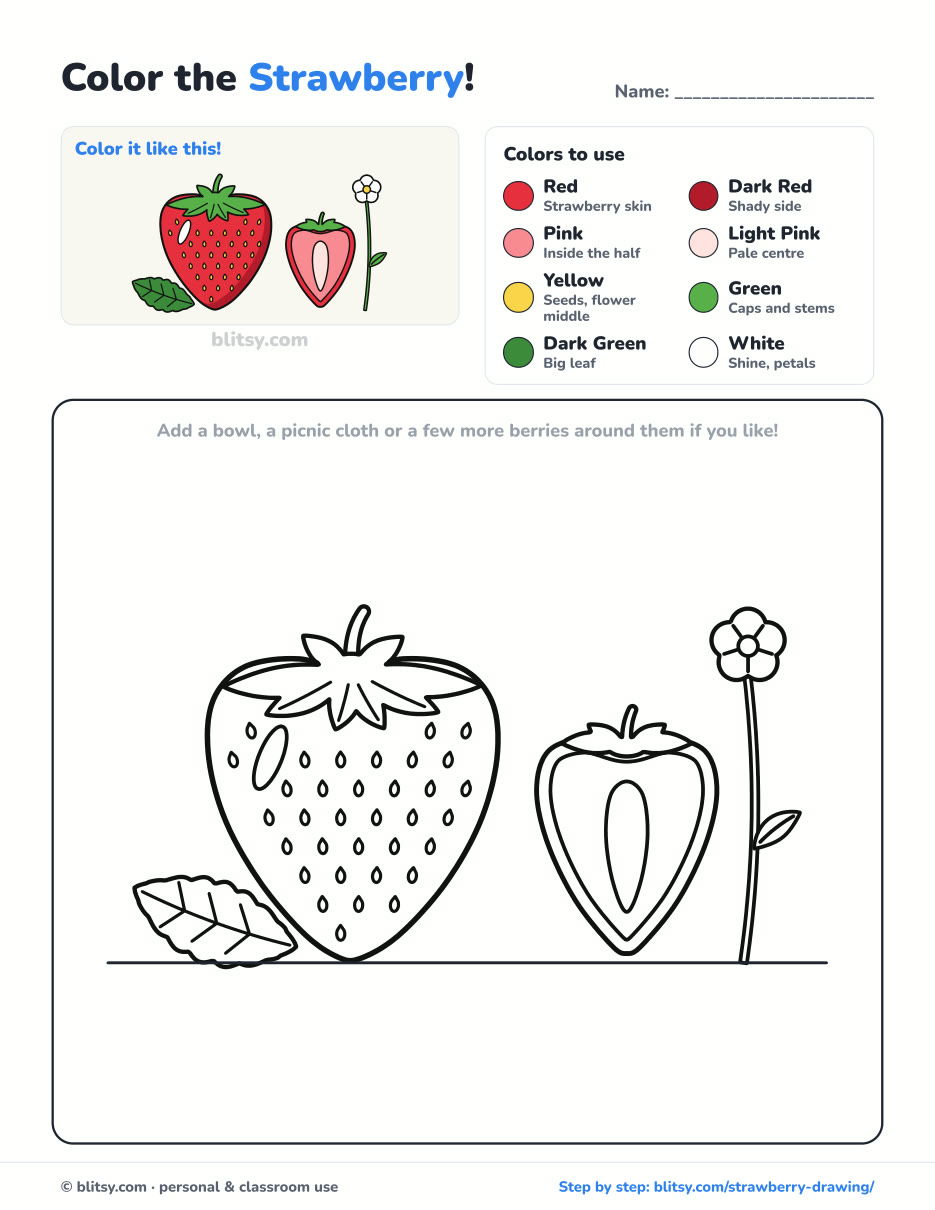
Black outlines with a colored example and the color names at the top. Ready to print and color.
⬇️ Download Coloring PageEvery step picture with its instructions and tips, to keep beside your paper while you draw.
⬇️ Download Drawing Guide📱 On a phone? Tap a download button, then open the file and choose Share → Save to Files or Print. On a computer, the PDF opens or saves straight to your Downloads folder.
Keep the Berry Steps on Your Pinterest Board
Strawberry Patch Over? Draw More Fruit and Flowers
All of these are step-by-step tutorials with pictures for every stage, mostly fruit, flowers and plants to keep your berry company.
- Jack O Lantern Drawing: Start with one oval and finish a ribbed pumpkin with a candlelit grin in this jack o lantern drawing tutorial.
- Tulip Drawing: Draw three tulips in red, pink and yellow, plus a twisting leaf, with the how to draw a tulip step by step lesson.
- Oil Pastel Drawing: The oil pastel drawing tutorial builds a sunset with glowing sky bands and a dark palm tree.
- Pizza Drawing: Golden crust and a cheesy slice pulling away are waiting in this pizza drawing step by step guide.
- Tree Drawing: Learn how to draw a tree with a leafy crown, a knothole in the trunk and apples ready to pick.
- Dandelion Drawing: This dandelion drawing tutorial shows the yellow flower and the seed head side by side.
- Cell Drawing: For science class, the animal cell drawing step by step lesson labels the nucleus, Golgi stack and mitochondria in color.
- Succulent Drawing: Draw a sage echeveria with pink tips in a clay pot using this succulent drawing tutorial.
- Hibiscus Drawing: Five red petals spin around a maroon eye in the how to draw a hibiscus guide, with a bud on the side.
- Garden Drawing: A sunflower, a fence and a watering can make up the flower bed in this garden drawing step by step lesson.
- Flower Drawing: The easy flower drawing tutorial fills one pot with a pink flower, two bluebells and a yellow star flower.
- Magnolia Flower Drawing: Draw an open saucer magnolia, a half-closed bloom and a furry bud with this magnolia flower drawing tutorial.
- Grass Drawing: One bending blade grows into a three-layer meadow in the how to draw grass step by step guide.
- Rose Drawing: Use the spiral method in this rose drawing tutorial to open a red rose next to a bud and two leaves.
- Avocado Drawing: Another fruit with a cut half: the avocado drawing step by step lesson gives the pit a little smile.
Strawberry Sketching Questions Answered
What is the easiest way to draw a strawberry?
Start with a circle and a V under it, then trace one smooth outline around both. Add a star-shaped cap on top and small seeds, and you have a strawberry.
How do you draw strawberry seeds so they look right?
Draw tiny teardrops in staggered rows, like bricks. Tilt the ones near the edges to follow the curve, which makes the berry look round.
How long does it take to draw a strawberry?
The whole picture takes about 20 to 30 minutes with coloring. A single berry on its own takes closer to 10.
Can young children draw this strawberry?
Yes. Kids around 6 can follow every step, and younger ones can draw only the big berry and skip the cut half and the flower.
Grab a red pencil and see how many seeds your berry ends up with. 🍓
Related posts:
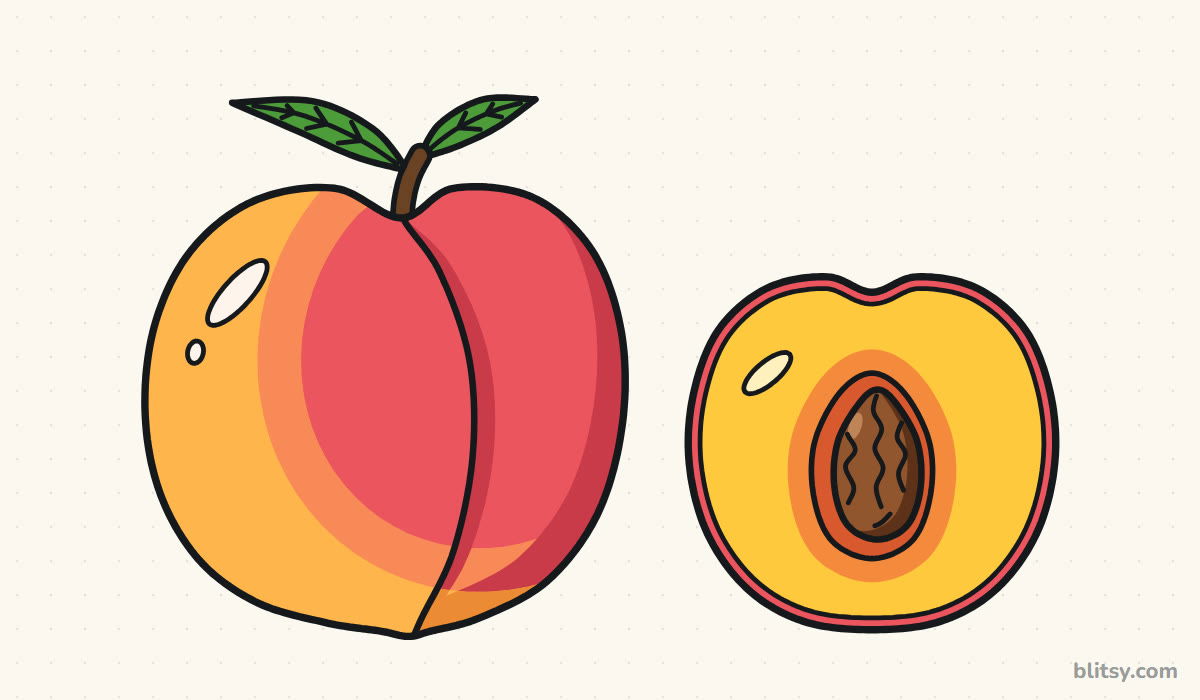 How to Draw a Peach Step by Step (Whole Fruit + Cut Half)
 How to Draw an Avocado Step by Step (Cute Cut Halves)
 How to Draw a Whale Step by Step (Easy for Beginners)
 How to Draw Lungs Step by Step (Easy Science Diagram)
 How to Draw a Plant Step by Step (Easy Potted Monstera)
 How to Draw the Fortnite Llama Step by Step (Easy Fan Art)
 How to Draw a Hoodie Step by Step (Front and Back View)
 How to Draw a Parrot Step by Step (Easy Scarlet Macaw)
 How to Draw a Police Car Step by Step (Easy for Kids)
 How to Draw a Volcano Step by Step (Easy Erupting Volcano)
 How to Draw a Crow Step by Step (Easy for Beginners)
 How to Draw a Tiger Step by Step (Easy Walking Pose)

