
A plain pumpkin is one of the friendliest things to draw in the fall, and it teaches more than you'd expect. Here you'll learn how to draw a pumpkin step by step as a small still life: one big round pumpkin, a taller one behind it and a tiny cream one up front. No carving, no face. The trick is in the ribs, and once you see them as curved slices that meet under the stem, every pumpkin gets easier.
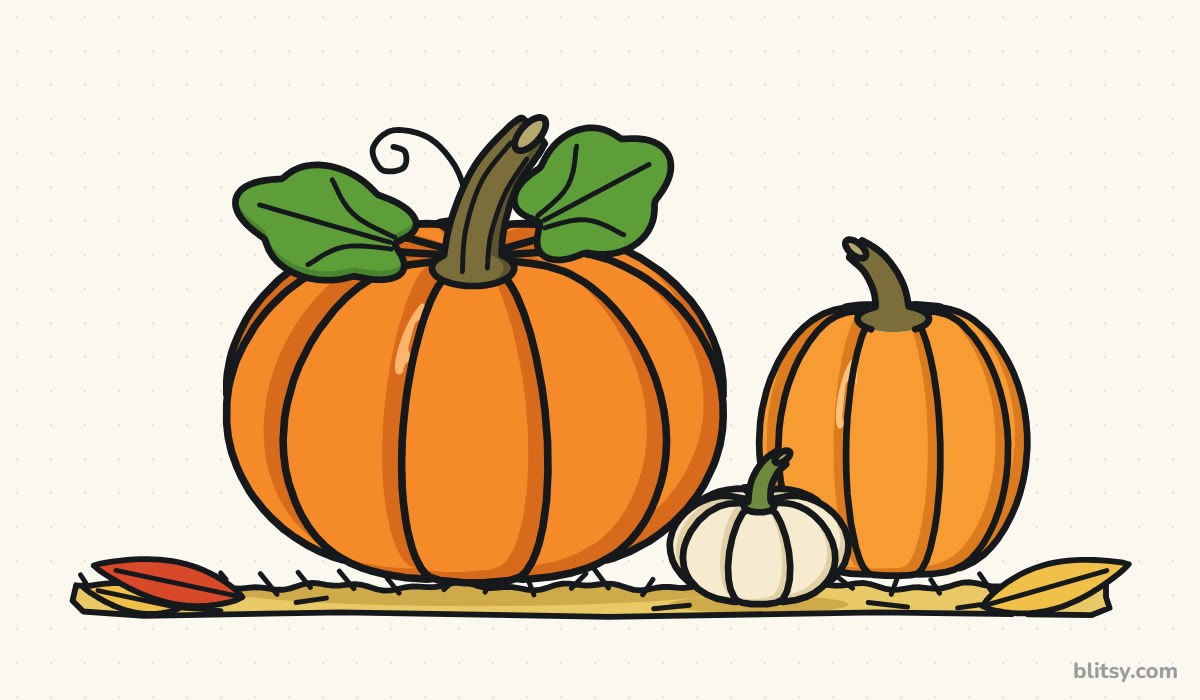
Watch the color of the lines: whatever a step adds shows up blue, and older work turns gray. The pale blue ovals and ground line are helpers, so keep them soft. They disappear in step 11.
Quick overview
⏱️ Time: about 30 to 40 minutes with coloring
🎯 Level: easy to medium, good for kids around 8 and up
✏️ Steps: 12
🎃 You'll draw: a big ribbed pumpkin, a tall pumpkin, a tiny cream pumpkin, leaves, a tendril and a hay line
Two Oranges, a Cream and a Soft Eraser
- An HB pencil for light guide lines
- A soft eraser
- A black fineliner or marker
- Colored pencils in orange, dark orange, cream, brown, green, red and golden yellow
- Paper turned sideways, since the group is wide
If you don't own a cream pencil, leave the tiny pumpkin white and shade its ribs with a very light touch of tan or yellow.
How to Draw a Pumpkin Step by Step
Step 1: Sketch light ovals and a ground line
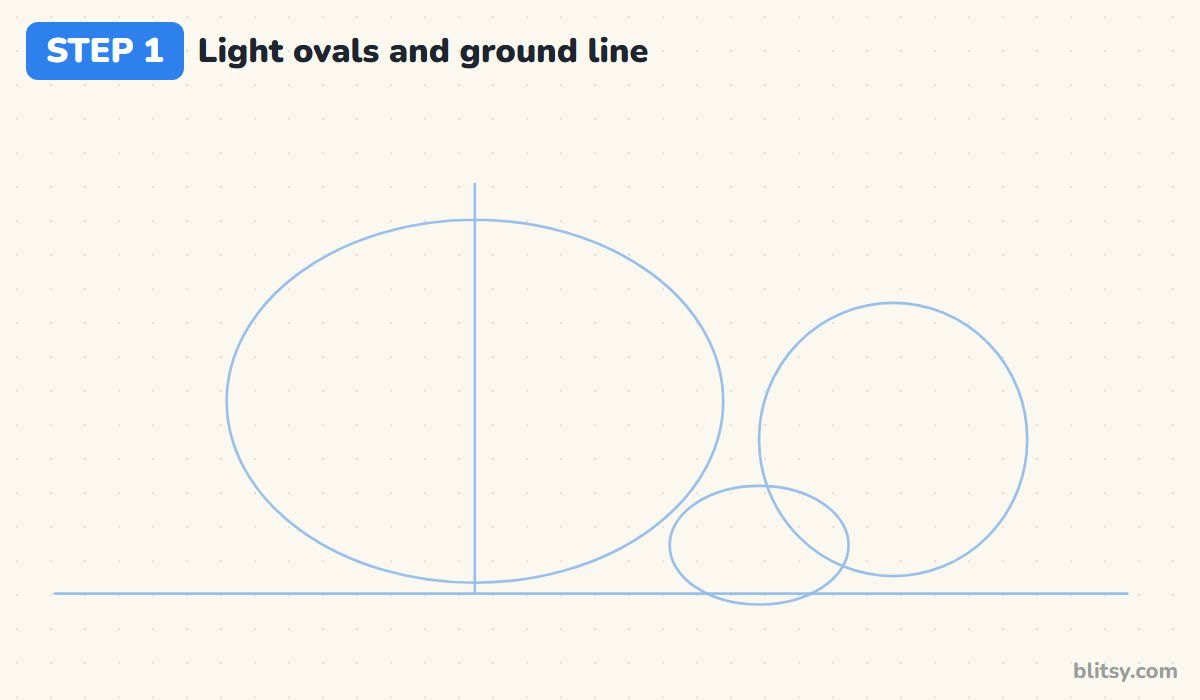
Draw a long, flat line near the bottom of the page for the ground. Above it, sketch a wide oval on the left with a light line down its middle. To the right, add a tall circle that sits a bit higher, then a small oval in front of both, touching the ground. These shapes set each pumpkin's size before you commit.
💡 Tip: Keep the guide ovals faint enough that you could barely photocopy them.
Step 2: Draw the tiny pumpkin up front
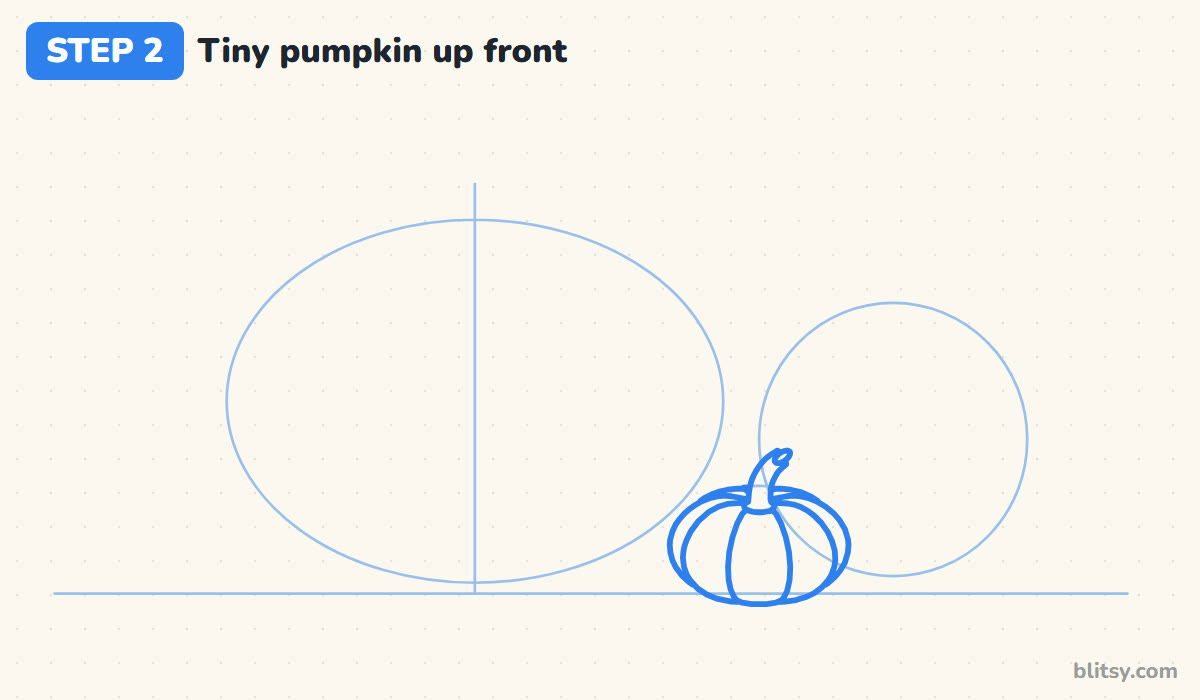
Start with the pumpkin closest to you. Inside the small oval, draw a narrow front slice, two rounder slices hugging it, then a thin sliver on each edge. Add a short stem. I draw the nearest object first in any still life, because everything behind it simply stops at its edge and you never erase overlaps.
💡 Tip: Squash this pumpkin a bit. Small ones are usually flatter than big ones.
Step 3: Add a thick curved stem
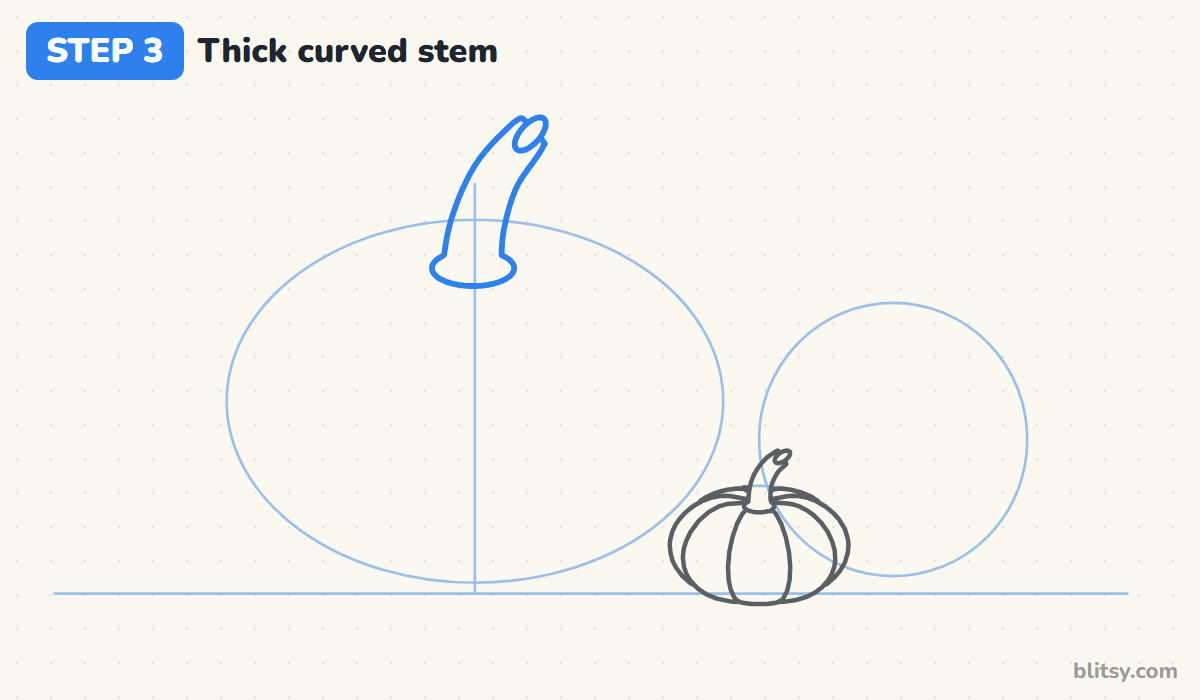
On the center line, near the top of the big oval, draw a flat oval for the stem base. From it, pull up a thick stem that bends right as it rises, and cap it with a small slanted oval where it was cut. Make it chunky; a thin stem makes a big pumpkin look like a toy.



💡 Tip: Draw both sides of the stem in one smooth pass each, not in short scratchy strokes.
Step 4: Draw two leaves and a curly tendril
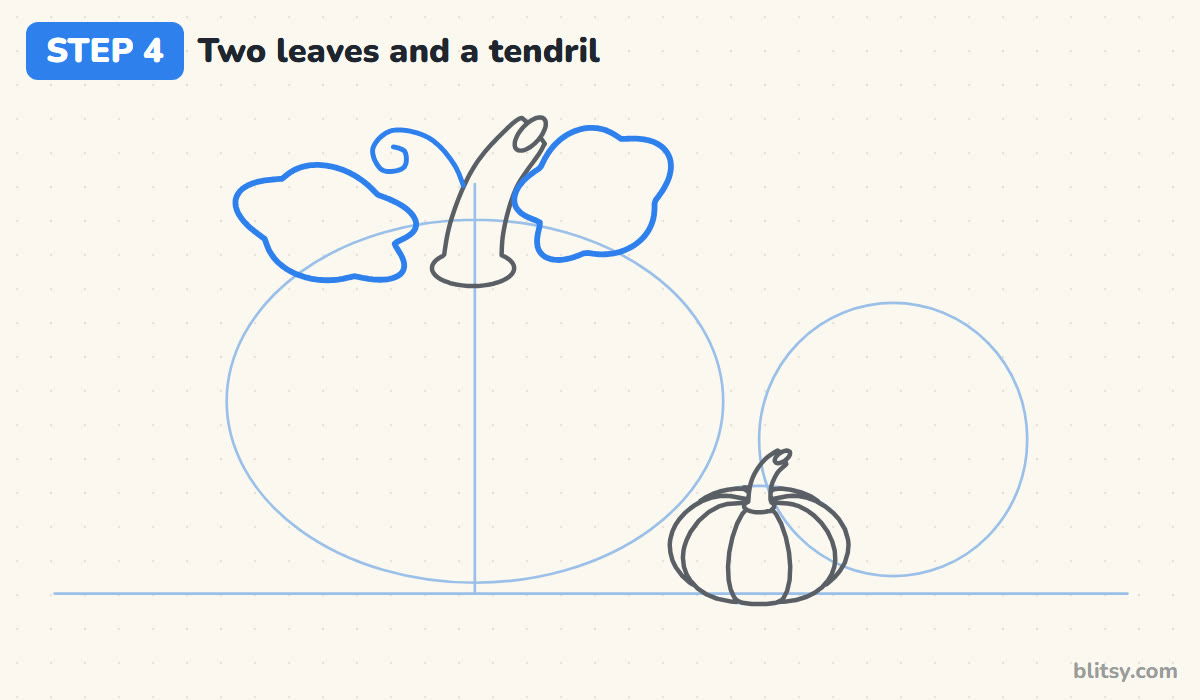
Pumpkin leaves are broad, with soft wavy bumps instead of points. Lay one on the left shoulder so it covers part of the top, and let the other rise behind the stem on the right. Between the left leaf and the stem, draw a thin vine that twists into a spiral. These come before the body because they sit in front of it.
💡 Tip: Bumpy edges look more natural when the bumps are slightly different sizes.
Step 5: Draw the front slice under the stem
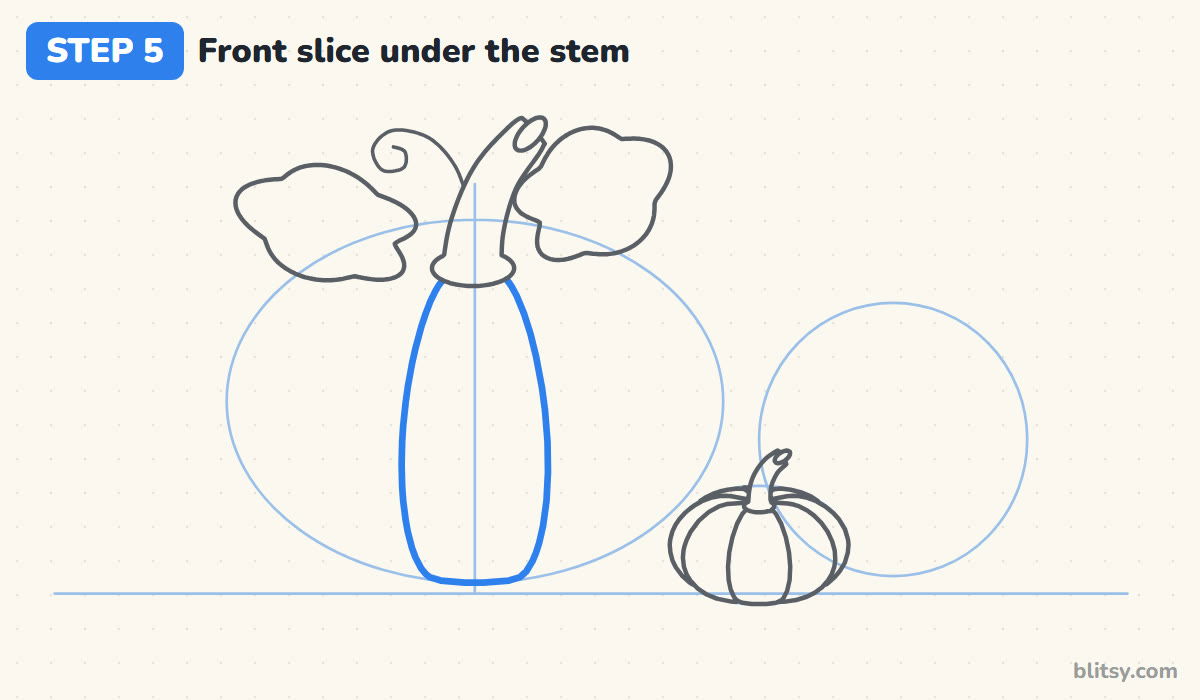
Here's the heart of the lesson. Start right under the stem base and draw a long, narrow slice that swells a little in the middle and rounds off just above the ground. Think of an orange segment standing on its end. It faces you straight on, so it's the narrowest slice of all.
💡 Tip: Use the center line to keep the slice even on both sides.
Step 6: Add a slice on each side
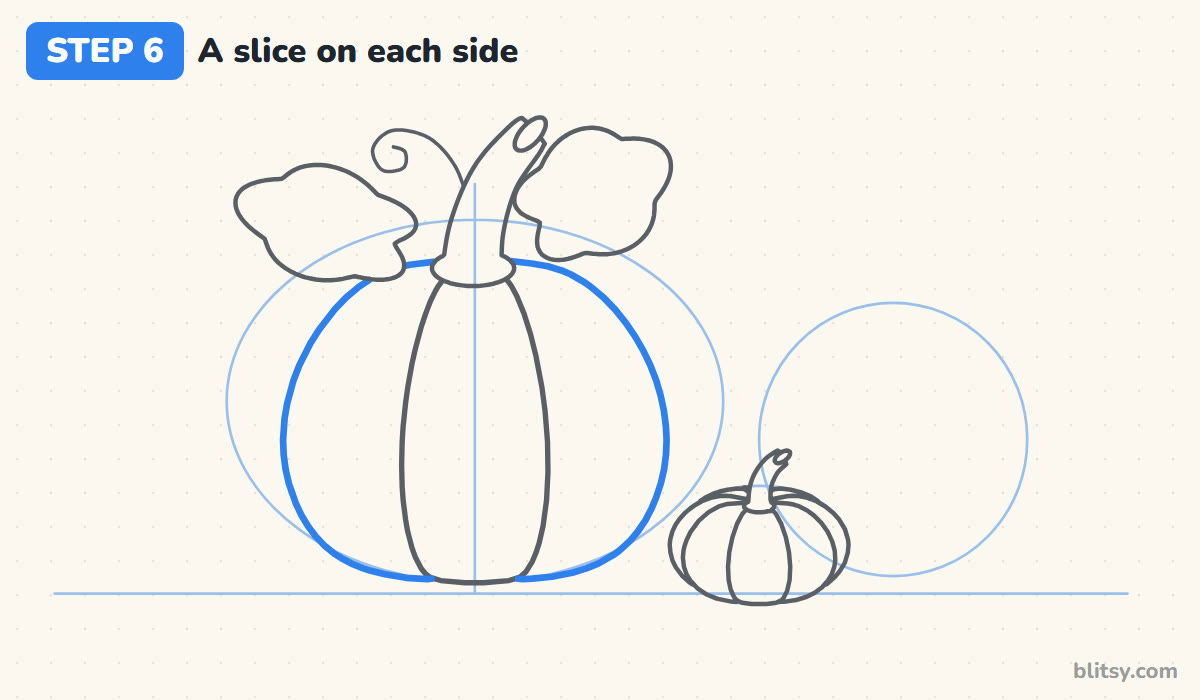
Starting at the stem again, curve a line out to the left, swing it wide and bring it back to the bottom of the front slice. Repeat on the right. These slices are wider because they bend away from you. When I demonstrate this, I stop each line where it meets the leaf, since the leaf lies on top.
💡 Tip: Every rib line should begin under the stem. That's what makes the pumpkin look round.
Step 7: Round it off with the outer slices
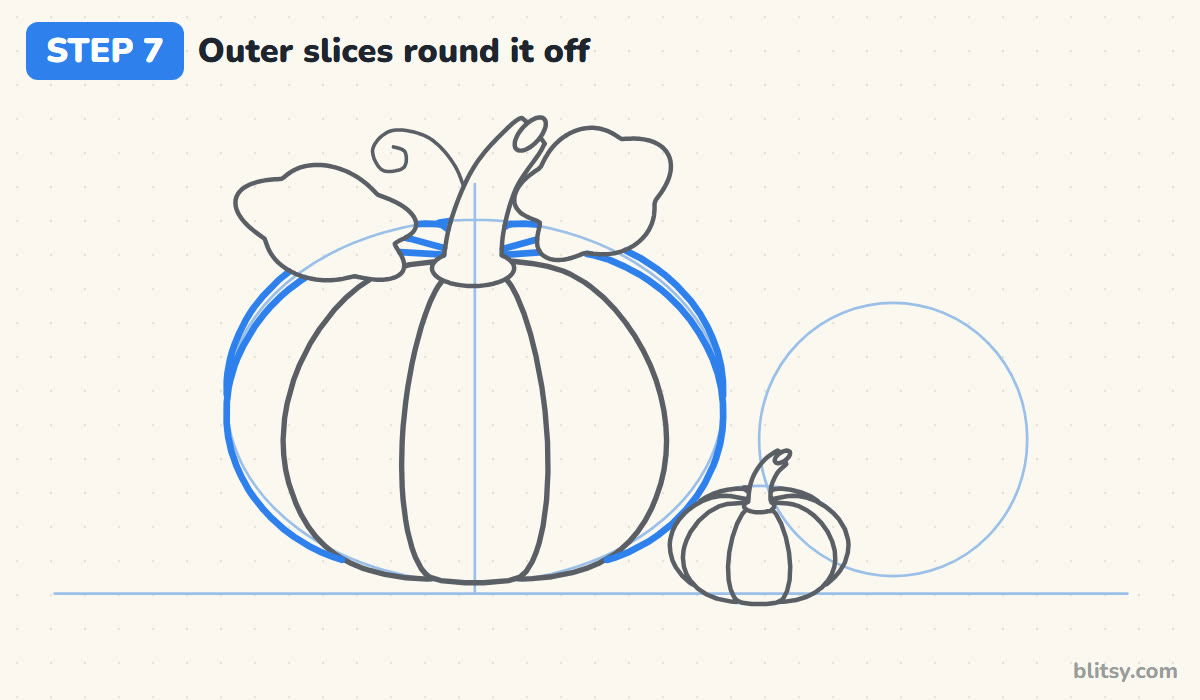
Along the far left and right edges, draw one more curve just outside each side slice. Keep them thin, because they're turning around the back. Near the top, add a couple of short lines peeking out beside the stem; those are ribs on the far side.




💡 Tip: Follow the guide oval for the outer edge, then let the line wobble slightly at each rib.
Step 8: Draw the tall pumpkin behind
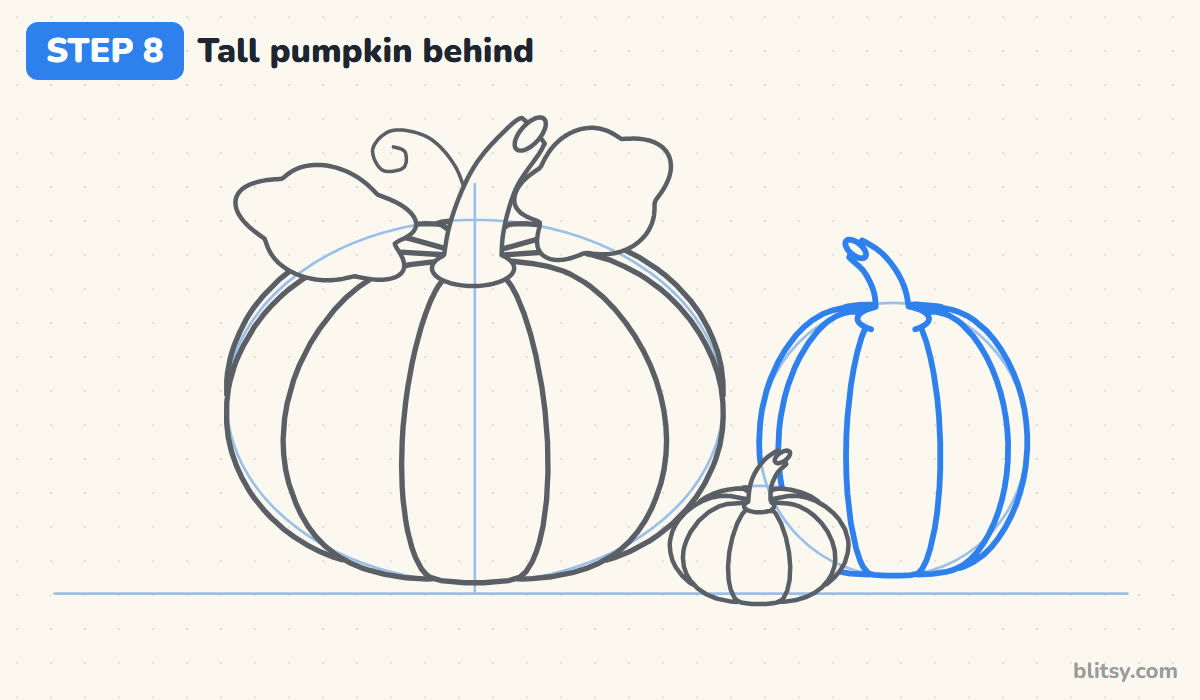
Inside the right circle, repeat the slice method: a narrow front slice, wider sides and thin outer ones, stretched upward since this pumpkin is tall. Its left side disappears behind the other two, which tells the eye it's further back. Top it with a slim stem leaning left.
💡 Tip: A stem leaning the other way keeps the two pumpkins from looking like copies.
Step 9: Add the hay and fallen leaves
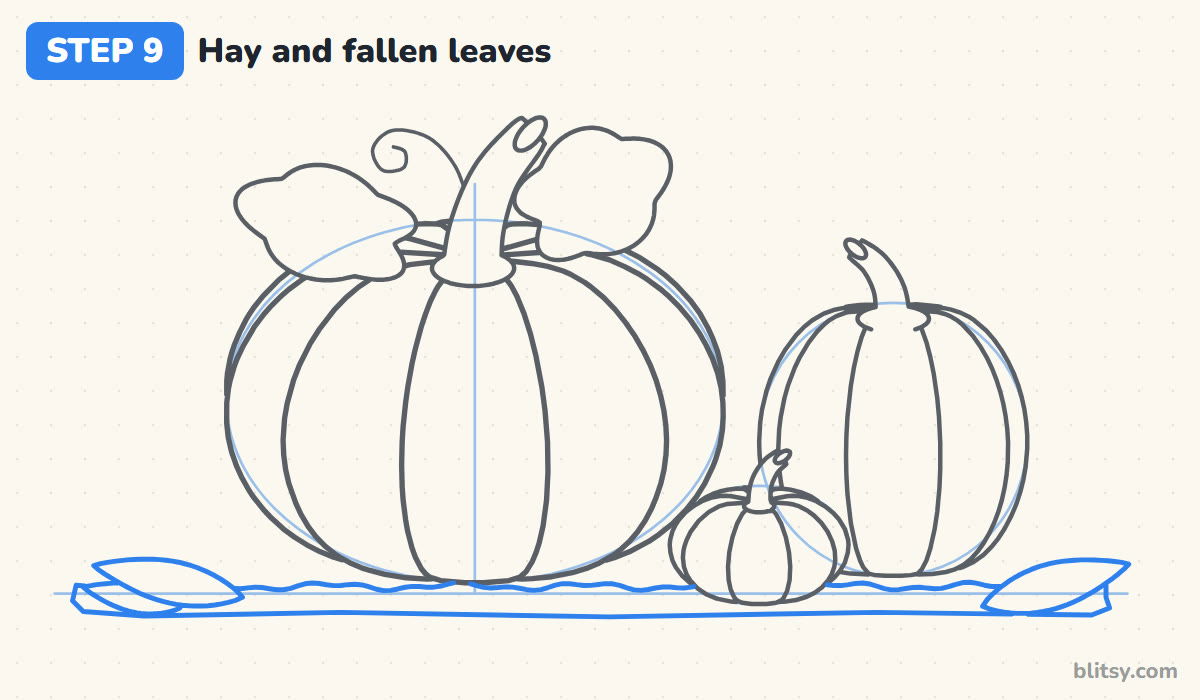
Draw a loose, wavy strip along the ground line for hay, stopping at the pumpkins' edges. On the left, draw two long fallen leaves, one overlapping the other, and add a single leaf on the right. Keep them flatter than the leaves on the pumpkin, since they're lying down.
💡 Tip: Lying leaves look flat when you draw them wider than they are tall.
Step 10: Add veins, stem lines and straw
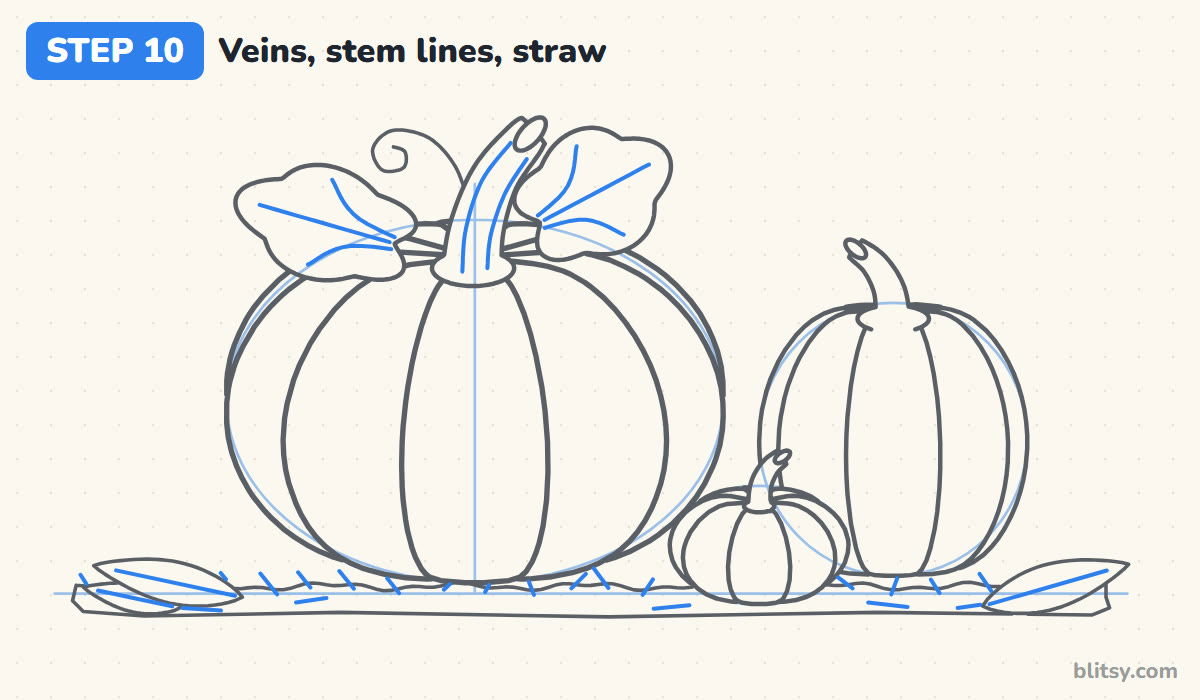
Draw a few curved veins in each big leaf, all starting near the stem, and one straight vein down every fallen leaf. Add two grooves along the big stem, then short straw strokes poking up from the hay. My rule is that small details go last, so they don't get erased by accident.
💡 Tip: Make detail lines thinner than outlines, or the drawing gets busy fast.
Step 11: Ink the lines and erase the guides
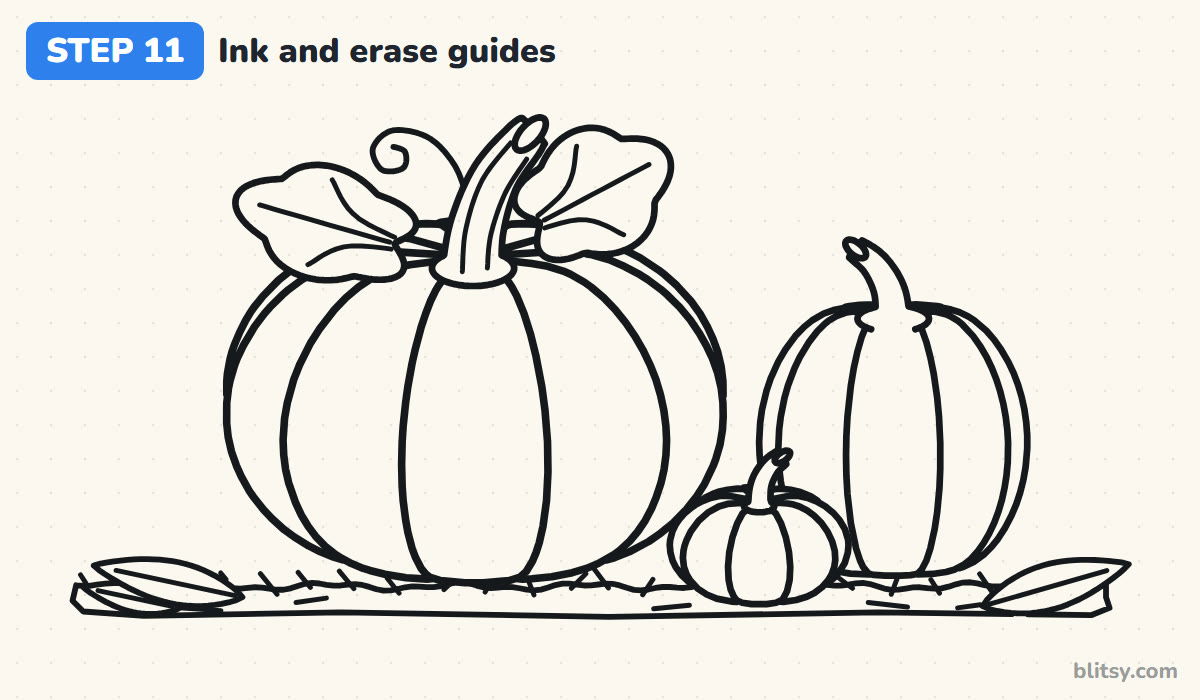
Go over every line you want to keep with the black marker, working top to bottom so your hand stays out of wet ink. Let it dry, then erase the ovals, the center line and the ground line. If a slice line ran under a leaf while sketching, erase that bit too.




💡 Tip: Press a little harder on the outer edges of each pumpkin for a bolder outline.
Step 12: Color the pumpkins
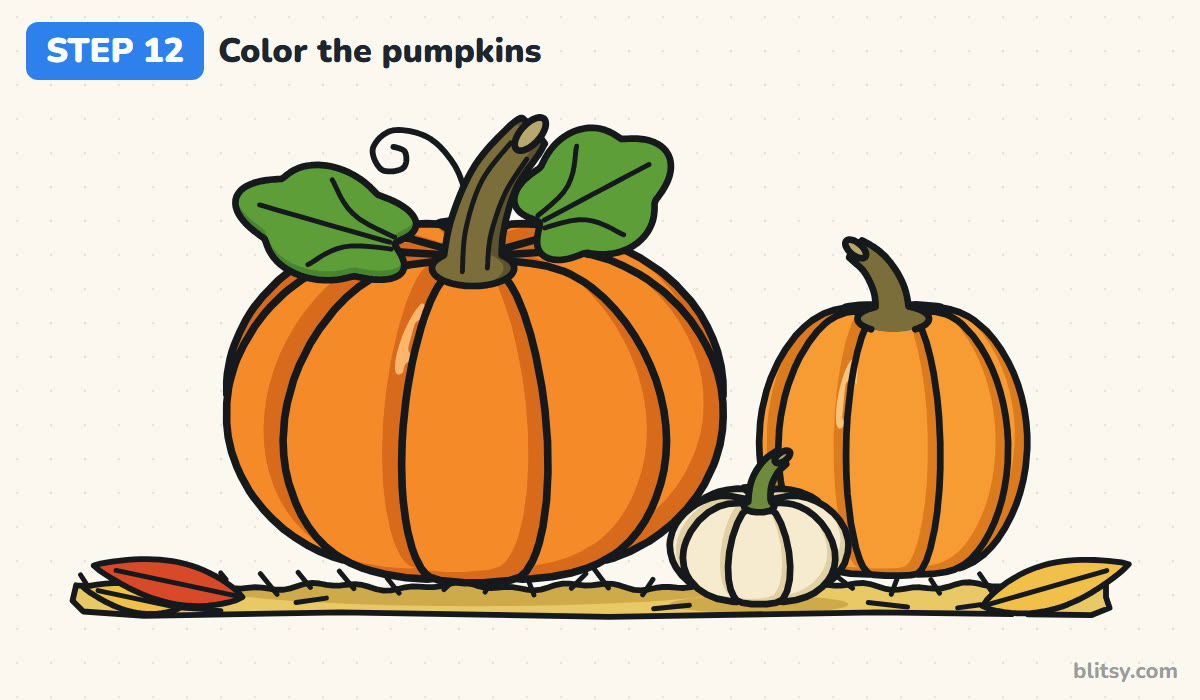
Color the big and tall pumpkins orange, then add dark orange along the right edge of every slice; that stripe makes the ribs pop. Leave a pale streak on the upper left for shine. Color the tiny pumpkin cream, the stems brown and the leaves green, then finish with golden hay, one red leaf and two yellow ones.
💡 Tip: Shade every slice on the same side, so the light seems to come from one place.
Why a Pumpkin Sketch Ends Up Looking Like a Ball
- Rib lines that start anywhere. When the slices don't meet under the stem, the pumpkin looks striped instead of round. Start every rib at the stem base.
- All slices the same width. Keep the front slice narrow, the side slices wide and the outer ones thin. The changing width is what shows the curve.
- Drawing the back pumpkin first. You'll end up erasing its lines where the front pumpkins overlap. Draw the nearest shapes first and stop the rest at their edges.
- A pumpkin floating above the ground. Let the bottom touch the hay line, and add a darker patch of hay right under it.
- Coloring with one flat orange. Without a darker stripe on each slice, the ribs vanish. Shade one side of every slice, even lightly.
Ideas for Changing Your Pumpkin Still Life
Once the slice method clicks, you can change almost everything else. Try a warty green pumpkin, a stack of small ones or a white pumpkin with pale green ribs. Swap the hay for a wooden crate if you like. If you'd rather give your pumpkin a face, the Jack-o'-Lantern drawing tutorial is the natural next step, and the fall leaf drawing tutorial helps you fill the ground.
Free Pumpkin Coloring Page and Printable Drawing Steps
Want to skip straight to coloring? The pumpkin coloring page has the whole still life in thick lines, with a small colored sample and the color names at the top. The step-by-step guide PDF puts all 12 steps and tips on paper, two per page. Both print on Letter or A4.
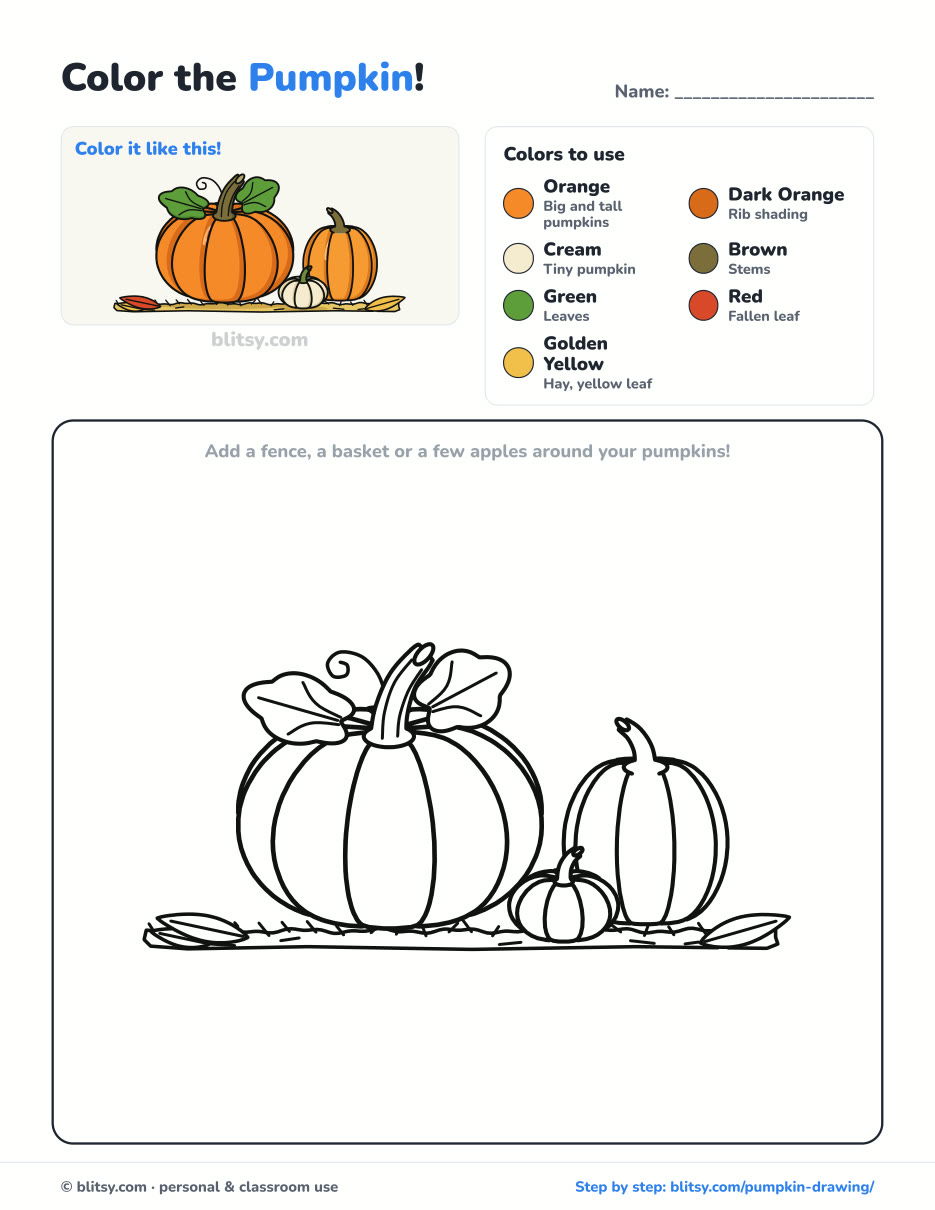
Black outlines with a colored example and the color names at the top. Ready to print and color.
⬇️ Download Coloring PageEvery step picture with its instructions and tips, to keep beside your paper while you draw.
⬇️ Download Drawing Guide📱 On a phone? Tap a download button, then open the file and choose Share → Save to Files or Print. On a computer, the PDF opens or saves straight to your Downloads folder.
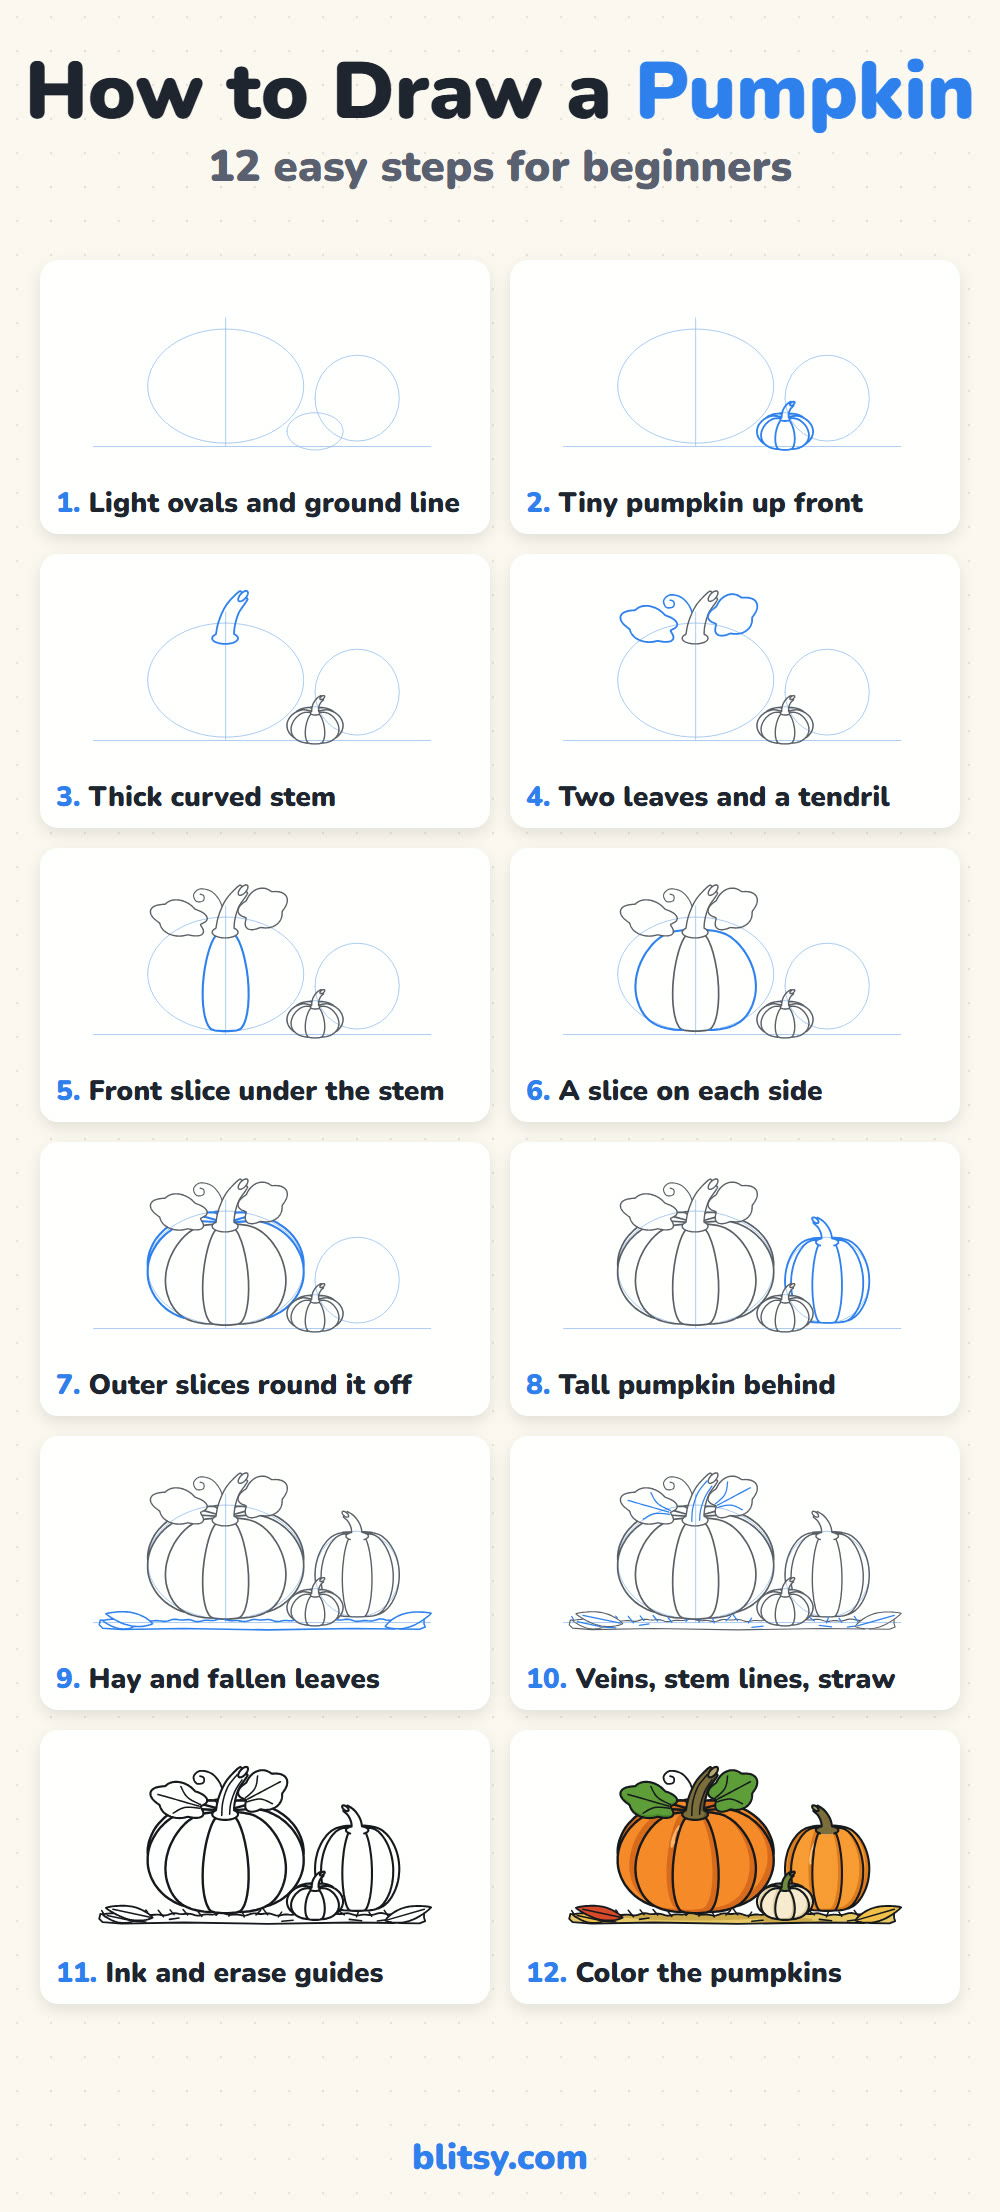
Pin the Three Pumpkin Lesson for Later
Pumpkin Drawing Questions I Hear Every Fall
What is the easiest way to draw a pumpkin?
Draw a wide oval, add a stem on top, then draw curved slices that all start under the stem: a narrow one in the middle and wider ones on each side. That's a pumpkin.
How do you make a pumpkin drawing look 3D?
Make the slices change width as they go around, and shade the same side of every slice a darker orange. A small light streak on the opposite side helps too.
How many ribs should a pumpkin have in a drawing?
Five to seven visible slices is plenty. Real pumpkins have more, but beginners get a cleaner result with fewer lines.
Is this pumpkin drawing good for kids?
Yes, for children around 8 and up. Younger kids can draw just the big pumpkin with its stem and one leaf, and skip the hay and the extra pumpkins.
Draw your own little pumpkin patch, then fill the empty space with whatever autumn looks like where you live. 🍂
Related posts:
 How to Draw Fruit Step by Step (Easy Fruit Bowl Still Life)
 How to Draw a Jack O Lantern Step by Step (Easy Pumpkin)
 How to Draw a Whale Step by Step (Easy for Beginners)
 How to Draw Lungs Step by Step (Easy Science Diagram)
 How to Draw a Pineapple Step by Step (Easy Crown and Slice)
 How to Draw Iron Man Step by Step (Easy Chibi for Kids)
 How to Draw a Dress Step by Step (Easy Party Dress)
 How to Draw a Chicken Step by Step (Easy for Beginners)
 How to Draw a UFO Step by Step (Cute Alien Saucer)
 How to Draw Flames Step by Step (Easy Campfire Drawing)
 How to Draw a Crow Step by Step (Easy for Beginners)
 How to Draw a Tiger Step by Step (Easy Walking Pose)

