
Braids scare a lot of people off, because real hair seems to twist in every direction at once. Look closer, though, and a braid is one small shape repeated down a line, left, right, left, right. In this lesson you'll learn how to draw a braid step by step, using a zig-zag guide that tells you exactly where each segment starts. Once the pattern clicks, you can put braids on any character you draw.
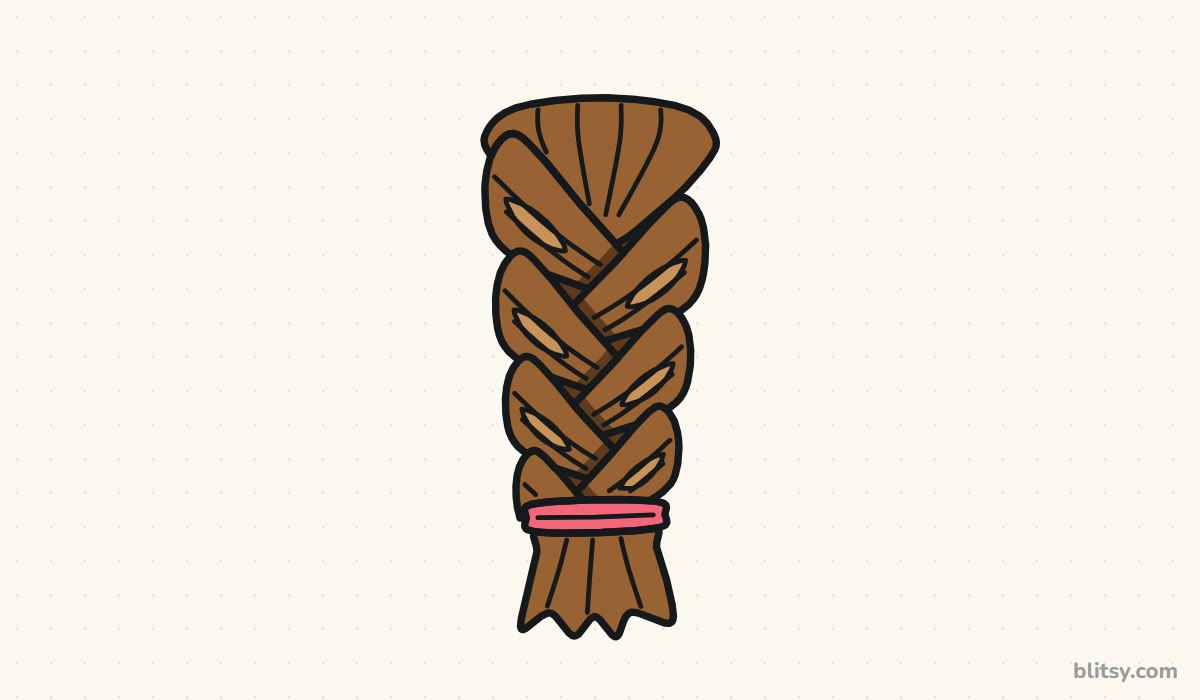
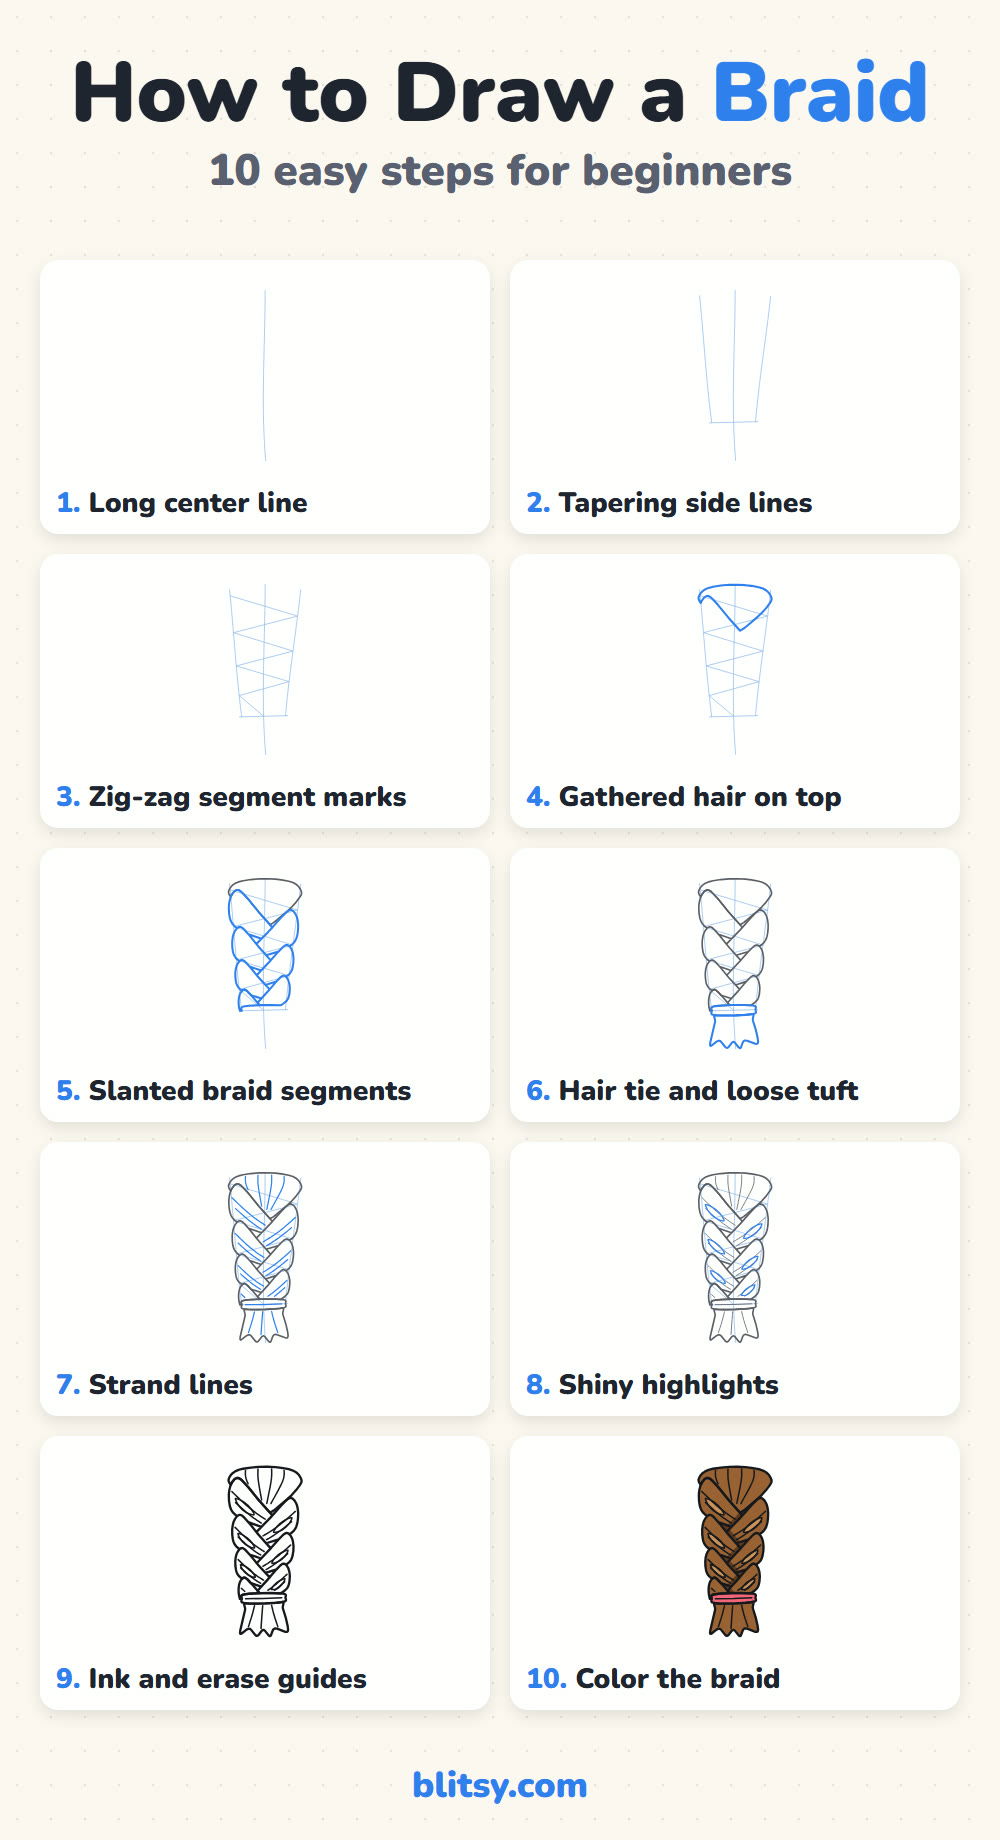
Each picture shows only the new work for that step in blue. Anything gray was drawn in an earlier step. Those pale blue construction lines are temporary, so sketch them softly; they disappear in step 9.
Quick overview
⏱️ Time: about 20 minutes
🎯 Level: easy, fine for kids from about 7
✏️ Steps: 10
💇 You'll draw: one classic three-strand braid with a hair tie and a loose tuft
Pencils and Colors for a Neat Braid
- A pencil (HB is ideal, because it erases easily)
- A soft eraser
- A black fineliner or marker for inking
- Coloring pencils in brown, light brown, dark brown and pink
- Plain paper, held upright
- A ruler, only if you want a perfectly straight center line
Any hair color works, so use what you have; the shapes matter far more than the exact shade.
How to Draw a Braid Step by Step
Step 1: Draw a long center line
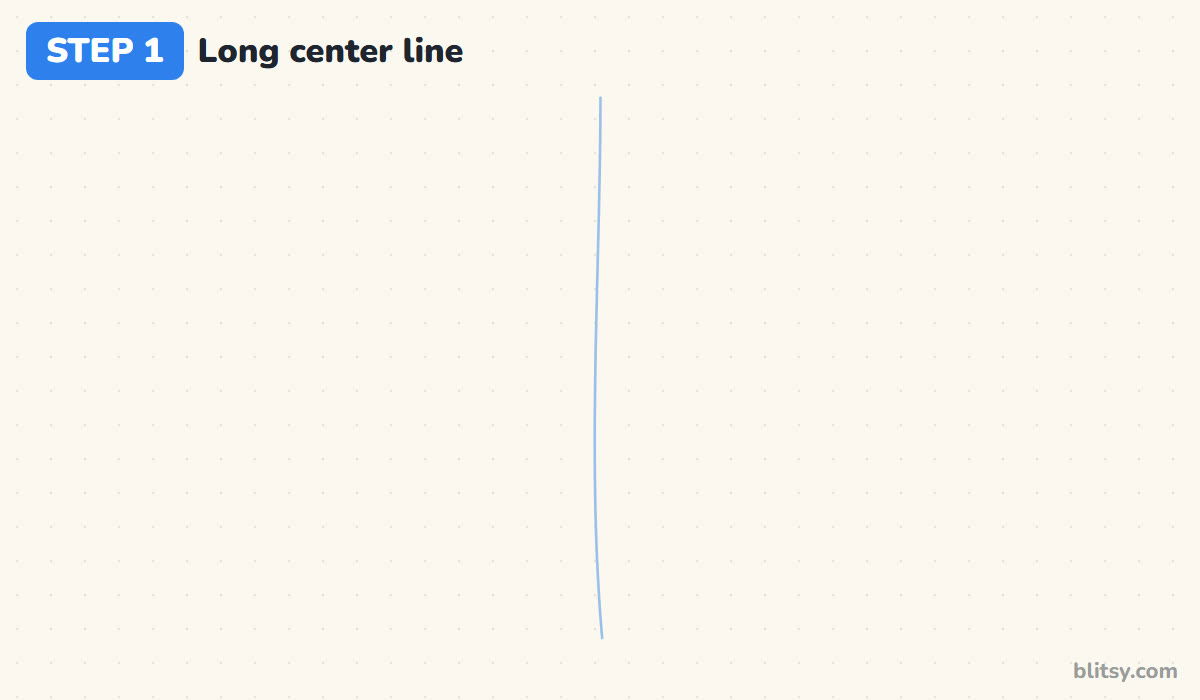
Hold your paper upright and draw one light line from near the top edge almost to the bottom. Every segment of the braid will meet on this line, so it's the backbone of the whole drawing. A tiny wobble is fine. I let mine lean a little, because real braids rarely hang dead straight.
💡 Tip: Press so lightly that you can barely see the line. It gets erased later.
Step 2: Add two tapering side lines
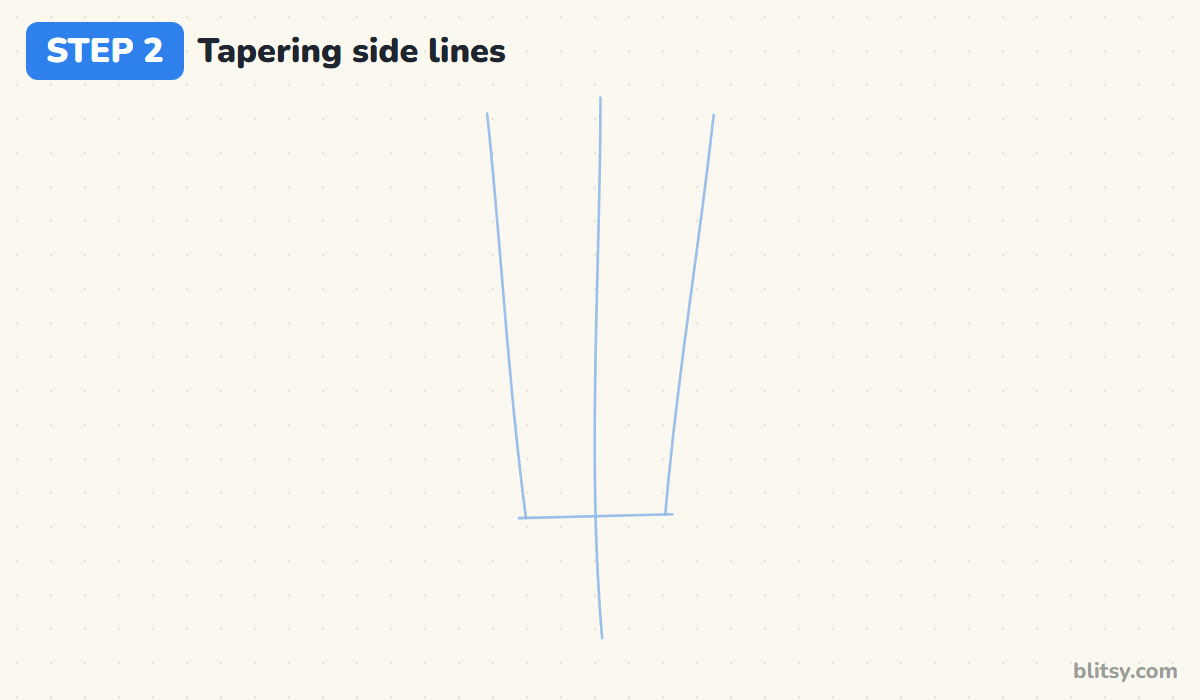
Draw one line on each side of the center line. Start them wide apart at the top, then bring them slowly closer as they go down, because a braid gets thinner toward the end. Stop both lines about three quarters of the way down. Join their bottom ends with a short line across: that's where the hair tie will sit.
💡 Tip: At the top, the gap on each side should be roughly as wide as your thumb is long.
Step 3: Mark the segments with a zig-zag
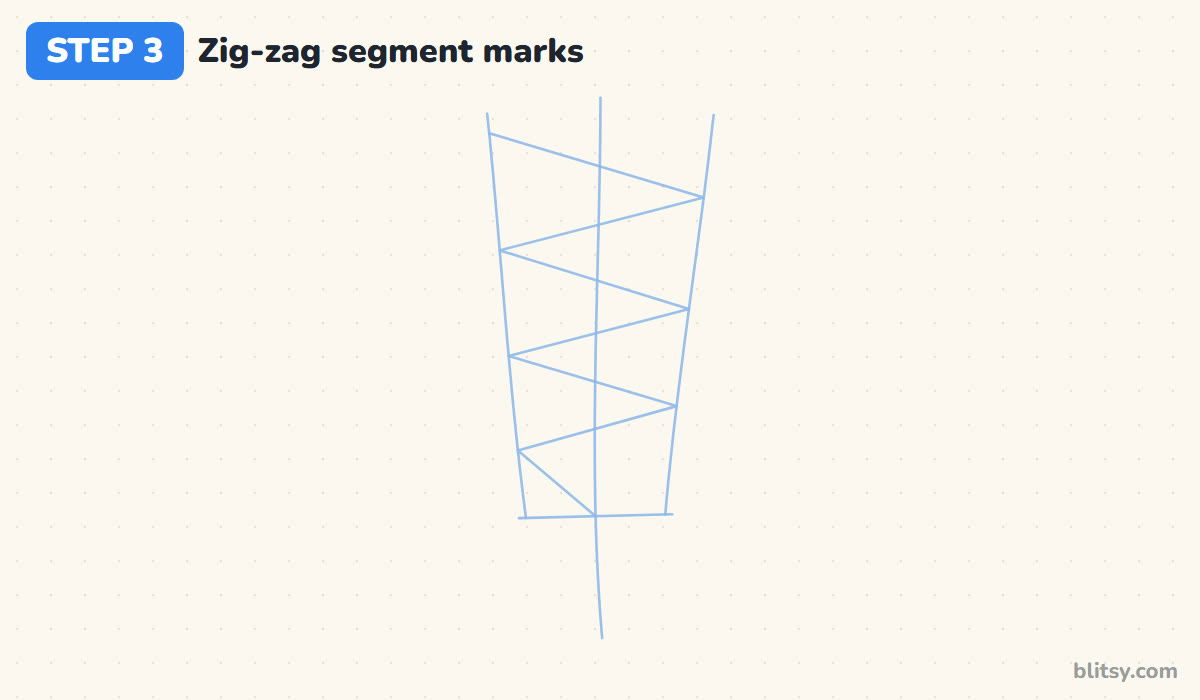
This is the secret of the whole braid. Starting at the top left, draw a slanted line down to the right side line, then back to the left, then right again, like a lightning bolt bouncing between two walls. Each corner marks where one braid segment begins. Make the zig-zag steps a bit shorter as the braid narrows.




💡 Tip: Count your corners on each side. Four or five per side looks full without crowding.
Step 4: Draw the gathered hair on top
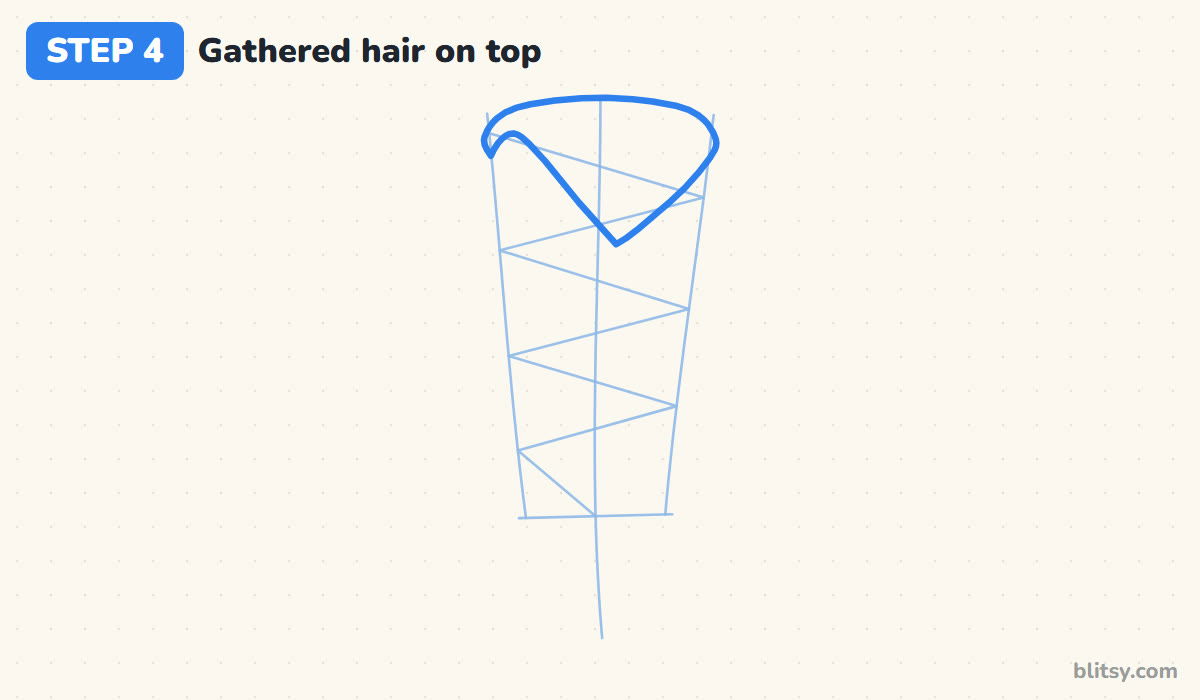
Above the first zig-zag line, draw a wide rounded top that curves down on both sides into a soft point on the center line. Picture a fan, or a scoop of ice cream upside down. This is the hair being pulled together before the braiding begins, and it gives the braid somewhere to come from.
💡 Tip: Make the top piece a little wider than the braid so it looks gathered, not glued on.
Step 5: Draw the slanted braid segments
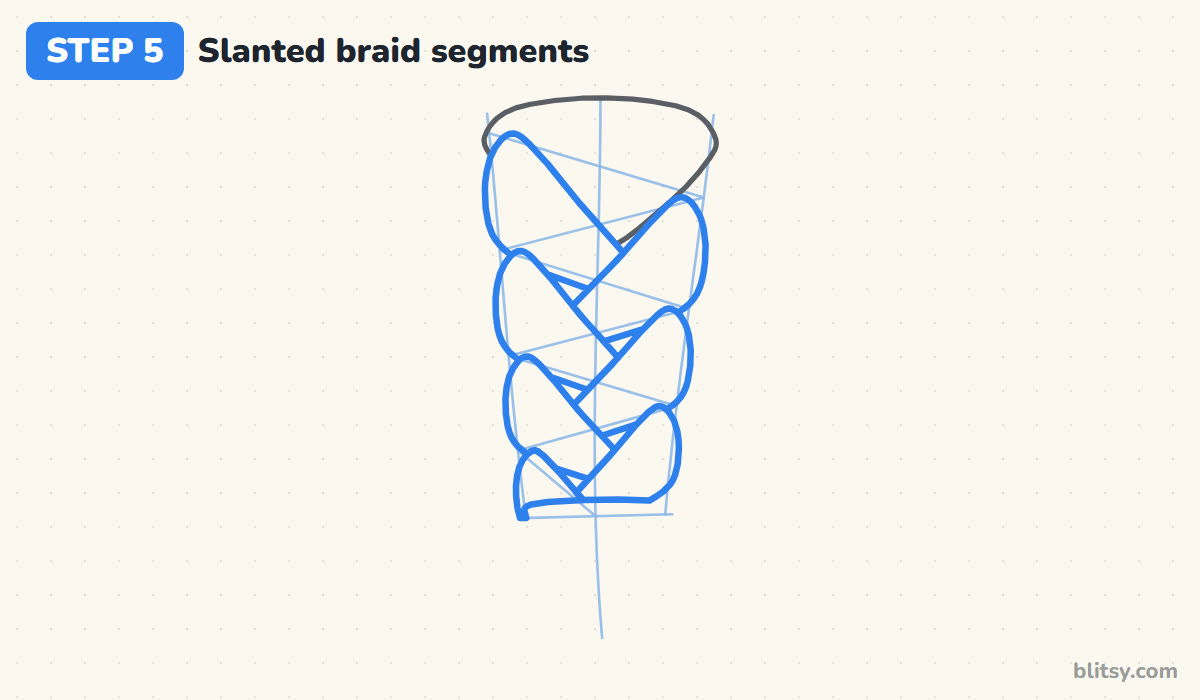
Now draw one segment at every zig-zag corner, working from the top down and switching sides each time. Each one has a rounded outer side that bulges just past the side line, then slants down and inward to a tip just across the center line. That tip slips under the next segment, so stop your line where it meets the segment below. When I teach this, I tell students to think of a row of leaves leaning toward the middle.
💡 Tip: Keep every segment slanted at the same angle, or the braid looks tangled.
Step 6: Add a hair tie and a loose tuft
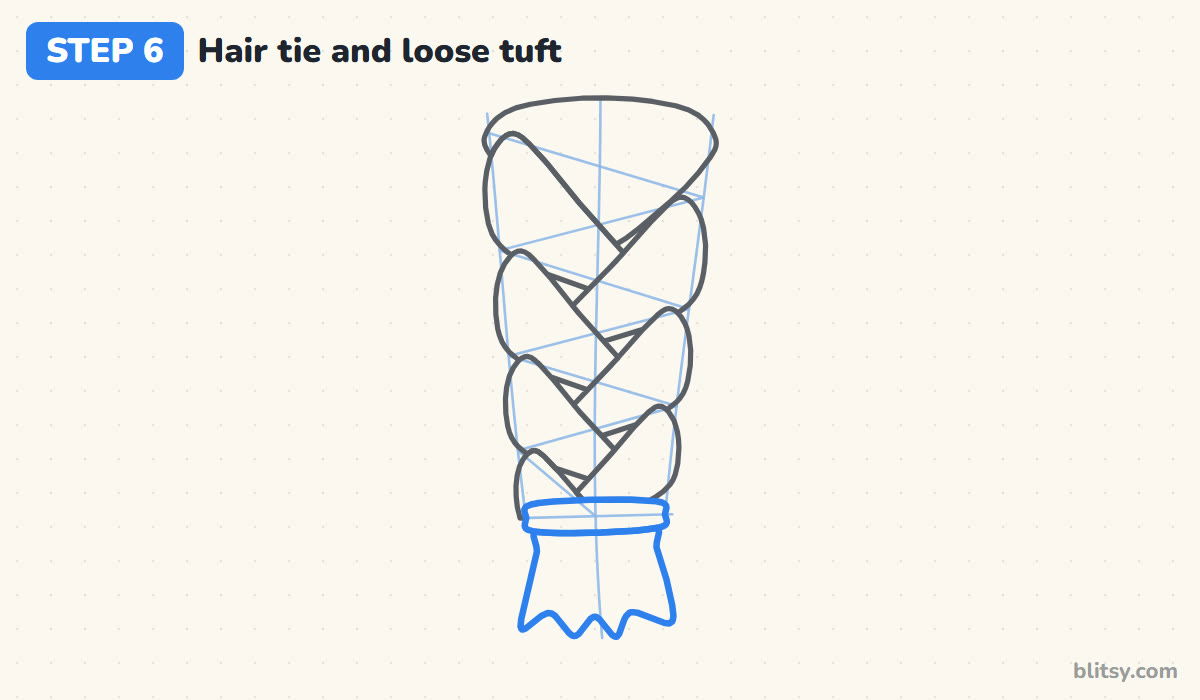
On the short cross line at the bottom, draw a narrow band with rounded ends that sticks out slightly past both sides of the braid. Under it, draw the tuft: two sides that flare outward a little, finished with a wavy, pointed bottom edge. A tuft that spreads looks like real loose hair; one that stays straight looks like a paintbrush.
💡 Tip: Give the bottom edge three or four uneven points instead of a neat row.
Step 7: Draw the strand lines
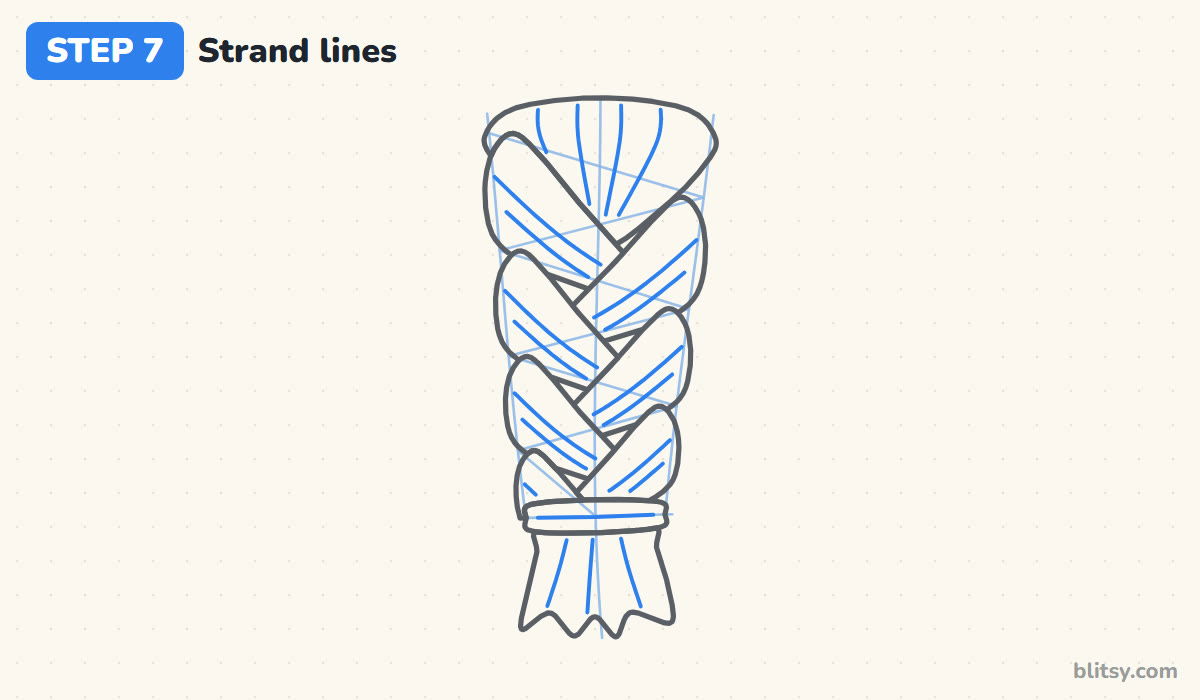
Inside every segment, add two thin lines that follow its slant, one near the upper edge and one near the lower edge. Then draw a few lines in the top piece that curve together toward its point, and a few more in the tuft that spread apart. These lines tell the eye that the shapes are made of hair.



💡 Tip: Leave a gap between each strand line and the outline. Touching lines look busy.
Step 8: Add shiny highlights
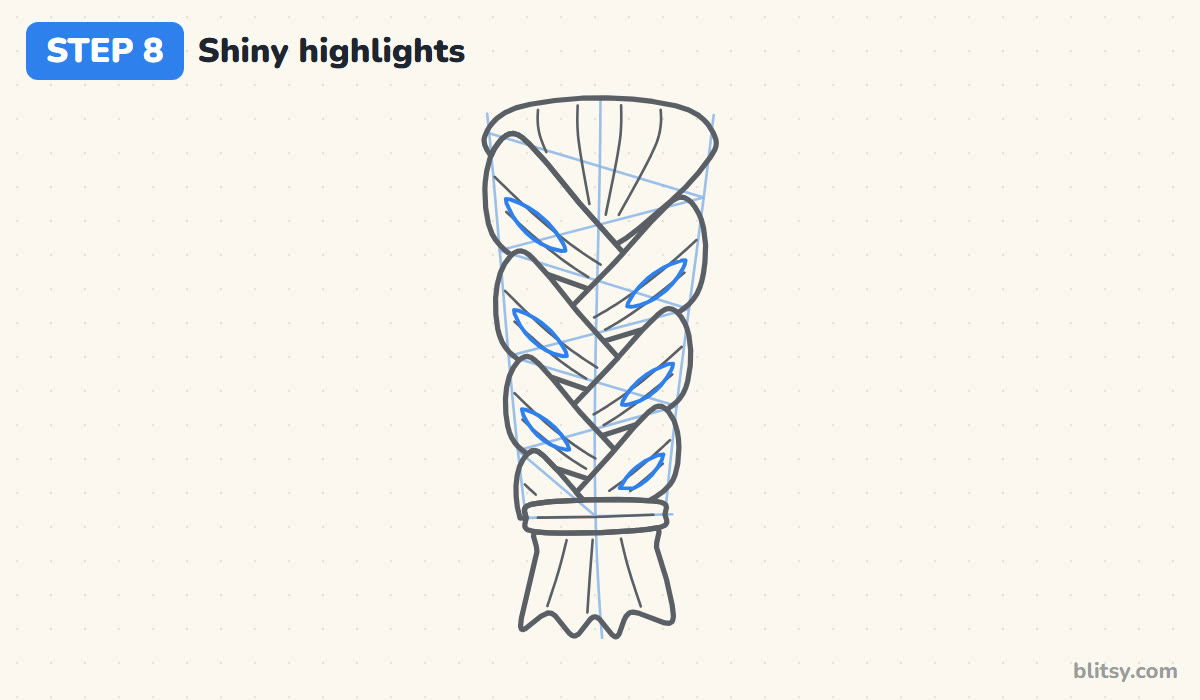
In the middle of each segment, between the two strand lines, draw a long thin shape with pointed ends, like a stretched grain of rice. Tilt it the same way as the segment. Honestly, this small step is what makes the hair look glossy instead of flat, so don't skip it.
💡 Tip: Draw each highlight with one quick stroke out and one stroke back.
Step 9: Ink the braid and erase the guides
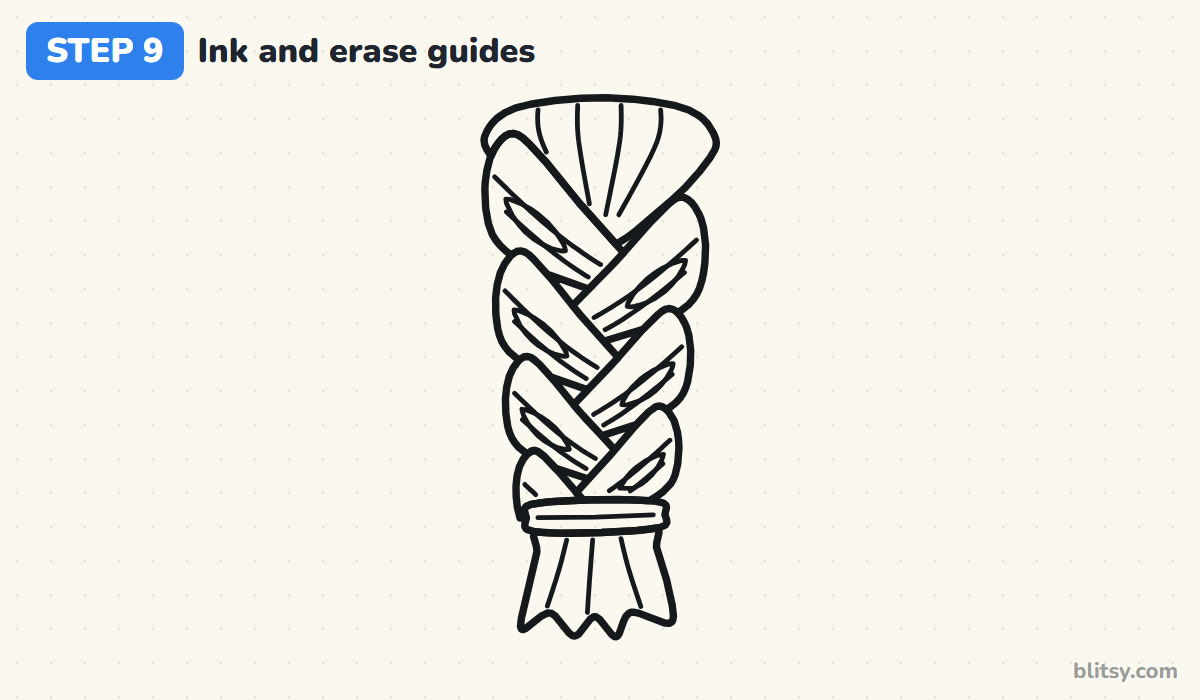
Go over every keeper line with your black pen: the top piece, all the segments, the tie, the tuft, the strand lines and the highlights. Use a firmer line for the outer edges and a lighter touch for the strand lines inside. Let the ink dry fully, then erase the center line, the side lines and the zig-zag.
💡 Tip: Wait a full minute before erasing. Wet ink smears across the whole braid.
Step 10: Color the braid
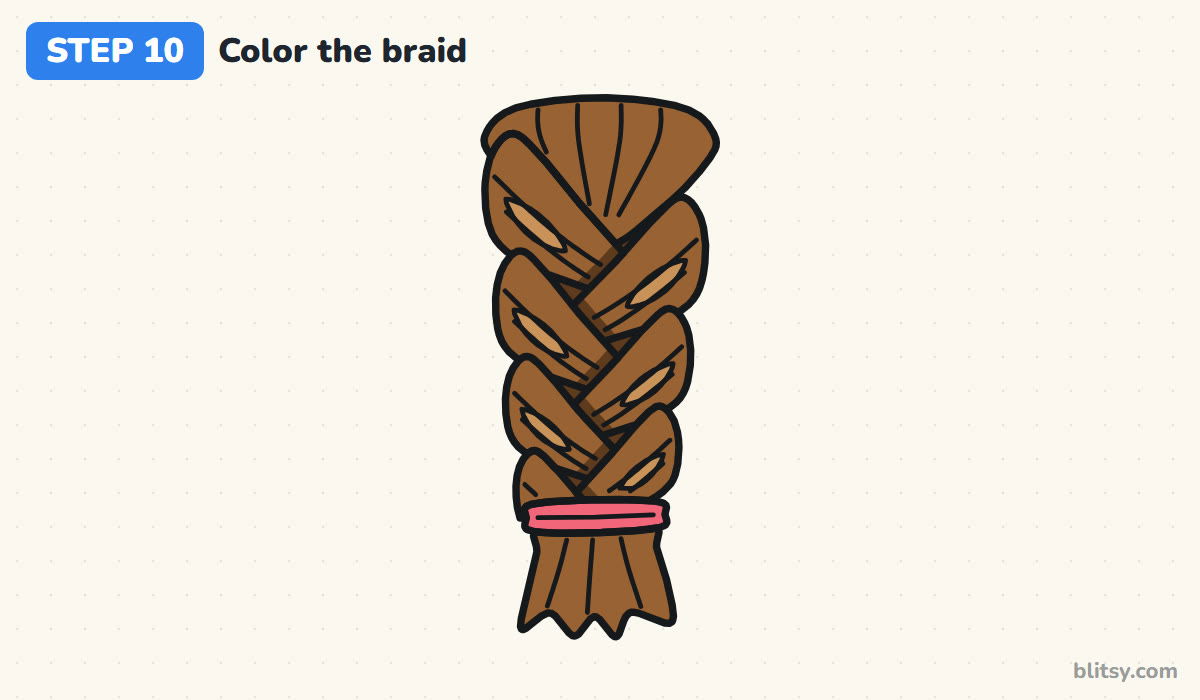
Fill the segments, the top piece and the tuft with brown. Press harder with dark brown in the small gaps between segments and along each edge where a tip tucks under, since those spots sit in shadow. Color the highlights light brown and the hair tie pink. I always color in the direction the strands run, which keeps the texture looking like hair.
💡 Tip: Leave a hair-thin strip of paper white inside each highlight for extra shine.
Where Braid Drawings Start to Look Like Rope
- Drawing every segment the same size. A braid that never narrows looks like a rope. Shrink the segments a little as you go down, the way the zig-zag already does.
- Drawing whole ovals. If you close each segment into a full oval, they look stacked instead of woven. Stop each tip where it meets the next segment.
- Segments that lean different ways. Mixed angles make the hair look messy. Every left segment slants the same way, and every right one mirrors it.
- No dark gaps. Without the dark brown pockets between segments, the braid looks flat. A few firm dark strokes add instant depth.
- A tuft drawn as a straight block. Let the end flare out and finish in uneven points so it reads as loose hair.
From One Braid to Pigtails and Box Braids
Once the zig-zag method feels easy, change the details. Swap the brown for blonde, black or red, or add a bow above the hair tie. Two shorter braids, one on each side of a face, become pigtails. Box braids work the same way, just smaller: draw several narrow braids side by side, each starting from its own little square section of hair, and give each one a quick zig-zag with tiny segments. For box braids that are only a few millimeters wide, simple slanted V marks between two lines are enough, and beads or gold cuffs at the ends look great. To give your braid a person to belong to, try this woman drawing tutorial, or practice a sweet scene with the mother and daughter drawing tutorial.
Braid Coloring Page and a Printable Drawing Guide
Want to practice away from the screen? The braid coloring page has a small colored example at the top with a key that shows which brown goes where, and a big bold outline below to color. The step-by-step guide PDF holds all 10 steps and tips, ready to print on Letter or A4 paper.
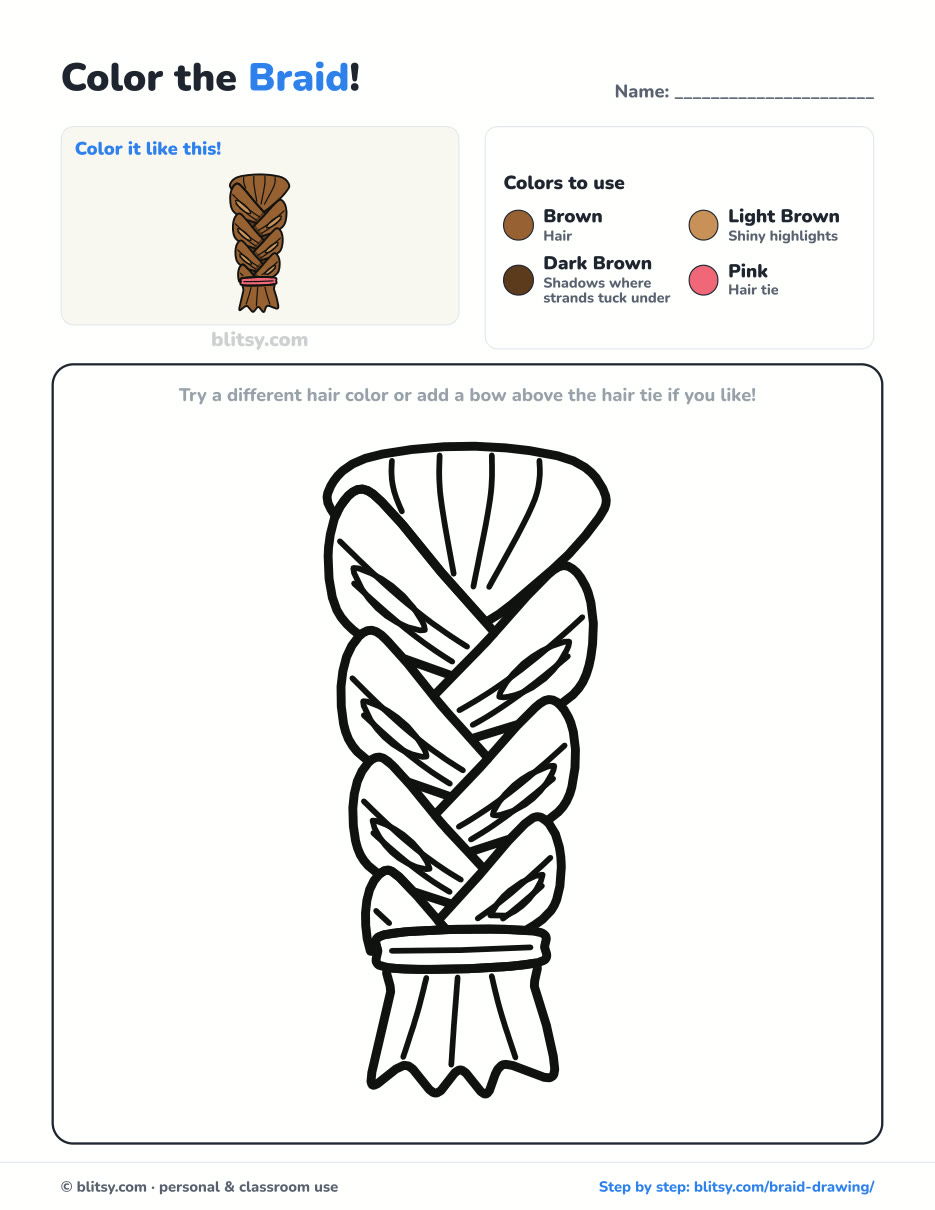
Black outlines with a colored example and the color names at the top. Ready to print and color.
⬇️ Download Coloring Page
Every step picture with its instructions and tips, to keep beside your paper while you draw.
⬇️ Download Drawing Guide📱 On a phone? Tap a download button, then open the file and choose Share → Save to Files or Print. On a computer, the PDF opens or saves straight to your Downloads folder.
Pin the Whole Braid Lesson in One Picture
Hair, Faces and People: Your Next Few Lessons
Each one is a complete step-by-step tutorial, so the braid you just drew can find a face, a family or a sidewalk to sit on.
- Chalk Art: Take your lines outside with this chalk art step by step tutorial, which builds a hopscotch grid, a rainbow and a smiling sun.
- Family Drawing: Draw four people, a puppy and a red balloon from one body recipe in this family drawing tutorial.
- Emoji Drawing: Three yellow faces, from a sweet smile to tears of joy, share the same circles in this emoji drawing step by step lesson.
- Human Heart Drawing: For a school science page, this human heart drawing tutorial builds the organ from one tilted oval and a few tubes.
- Woman Drawing: A standing woman with a hair bun and a handbag is measured six heads tall in this how to draw a woman step by step guide.
- Male Face Drawing: Short hair, a squarer jaw and steady eyes all sit on guide lines in this male face drawing tutorial.
- Mother and Daughter Drawing: Draw a mom and daughter holding hands under a red heart with this mother and daughter drawing step by step lesson.
- Heart Drawing: Two circles and a V make an even, glossy love heart in this heart drawing tutorial.
- Tooth Drawing: A grinning molar with its own toothbrush is a quick, cheerful lesson in this how to draw a tooth tutorial.
- Realistic Drawing: The same strand shading you used here grows into full light and shadow in this realistic drawing tutorial on a shiny apple.
- Lungs Drawing: The windpipe, airways and lobes sit in the right places in this lungs drawing step by step diagram lesson.
- Ghost Drawing: A friendly waving ghost, its baby and a pumpkin take ten steps in this easy ghost drawing tutorial.
- Side Profile Drawing: Try a low ponytail on a head seen from the side with this how to draw a side profile lesson.
- Hands Drawing: An open palm with joints and palm lines starts from a mitten shape in this hands drawing tutorial.
- Skull Drawing: Draw a front-view skull with deep sockets and two marigolds in this skull drawing step by step guide.
Braid Drawing Questions, Answered
What is the easiest way to draw a braid?
Use a center line, two side lines and a zig-zag between them. Each corner of the zig-zag is where one slanted segment begins, so you never have to guess the spacing.
How do you draw a braid on a person?
Start the gathered top piece where the hair meets at the back of the head or behind the ear, then let the center line follow the shoulder and hang down. The segments follow that curve.
How long does it take to draw a braid?
About 20 minutes for this full version with color. A quick sketch without highlights or coloring takes less than 10 once you know the zig-zag.
Can kids draw this braid?
Yes. Children from about 7 can follow the zig-zag well. Younger kids can draw the segments and skip the strand lines and highlights.
Grab a pencil and draw one more braid, then try the same zig-zag twice to give a friend two pigtails. ✏️
Related posts:
 How to Draw Hair Step by Step (Long Wavy Hair for Beginners)
 How to Draw a Car Step by Step (Easy Drawing for Beginners)
 How to Draw a Whale Step by Step (Easy for Beginners)
 How to Draw a Rat Step by Step (Easy for Beginners)
 How to Draw an Arctic Fox Step by Step (Easy for Beginners)
 How to Draw Olaf Step by Step (Easy for Beginners)
 How to Draw a Ladybug Step by Step (Easy for Beginners)
 How to Draw a Dog Step by Step (Easy Side View for Beginners)
 How to Draw a Leopard Step by Step (Easy for Beginners)
 How to Draw a Light Bulb Step by Step (Easy for Beginners)
 How to Draw a Crow Step by Step (Easy for Beginners)
 How to Draw an Eagle Step by Step (Easy for Beginners)

