
Two pink sponges and an upside-down tree: that's really all a pair of lungs is on paper. Once you know where the windpipe splits and why the two sides aren't twins, how to draw lungs step by step becomes a calm, tidy job instead of a guessing game. We'll make a clean front view, the kind you'd find in a science book. I name the parts as we go, so the finished page can go straight into a biology notebook.

Look for blue: those lines are new in that step. Gray work is already done, and it shows you where the new part should start and stop.
Quick overview
⏱️ Time: about 30 minutes, plus 10 for coloring
🎯 Level: easy, fine for ages 8 and up
✏️ Steps: 11
🫁 You'll draw: a simple anatomical pair of lungs with the trachea and bronchi
Pencils and Paper for a Lung Diagram
- An HB pencil for light sketching
- A clean eraser that won't smudge
- A black fineliner or felt pen
- Colored pencils: pink, dark pink, light blue and a very pale pink
- A sheet of plain paper turned sideways
- A ruler for the windpipe (optional)
A normal school pencil case usually covers it.
How to Draw Lungs Step by Step
Step 1: Sketch a center line and two tall ovals
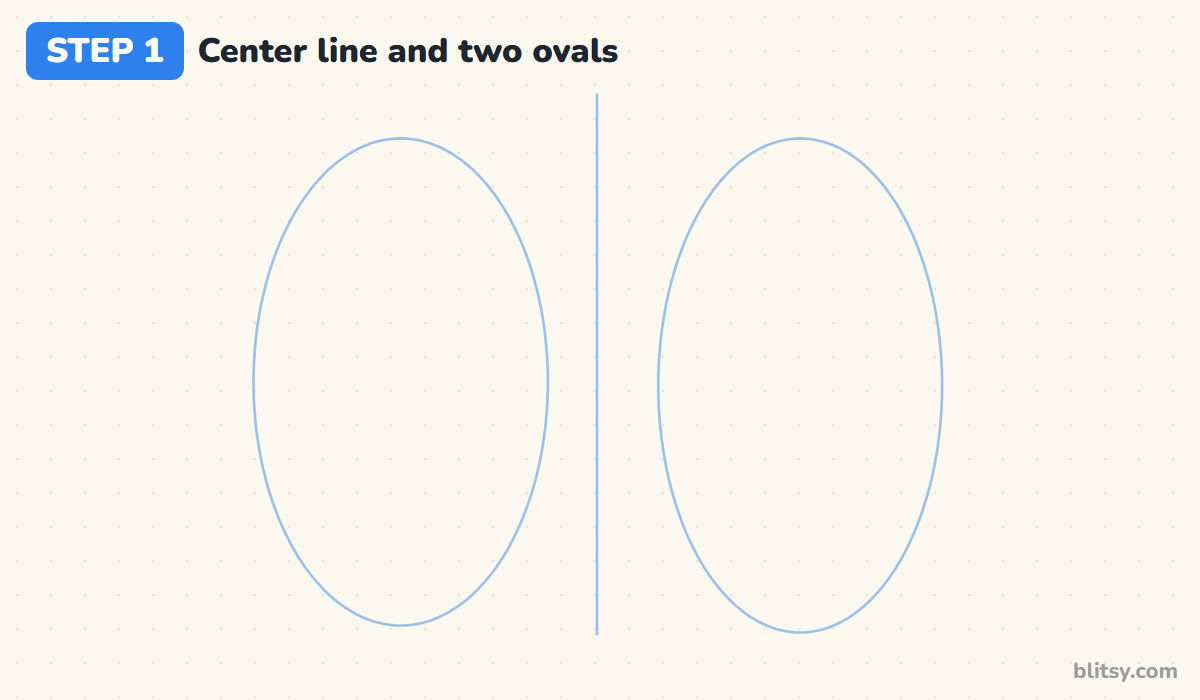
Draw a light vertical line down the middle of the page. On each side, sketch a tall oval, a bit taller than it is wide, with a gap between them about as wide as your thumb. The gap matters, because the windpipe runs down it and the heart sits low in the middle. Keep both ovals about the same size for now.
💡 Tip: Hold the pencil far back from the tip. That makes faint lines almost automatic.
Step 2: Add guide lines for the airways
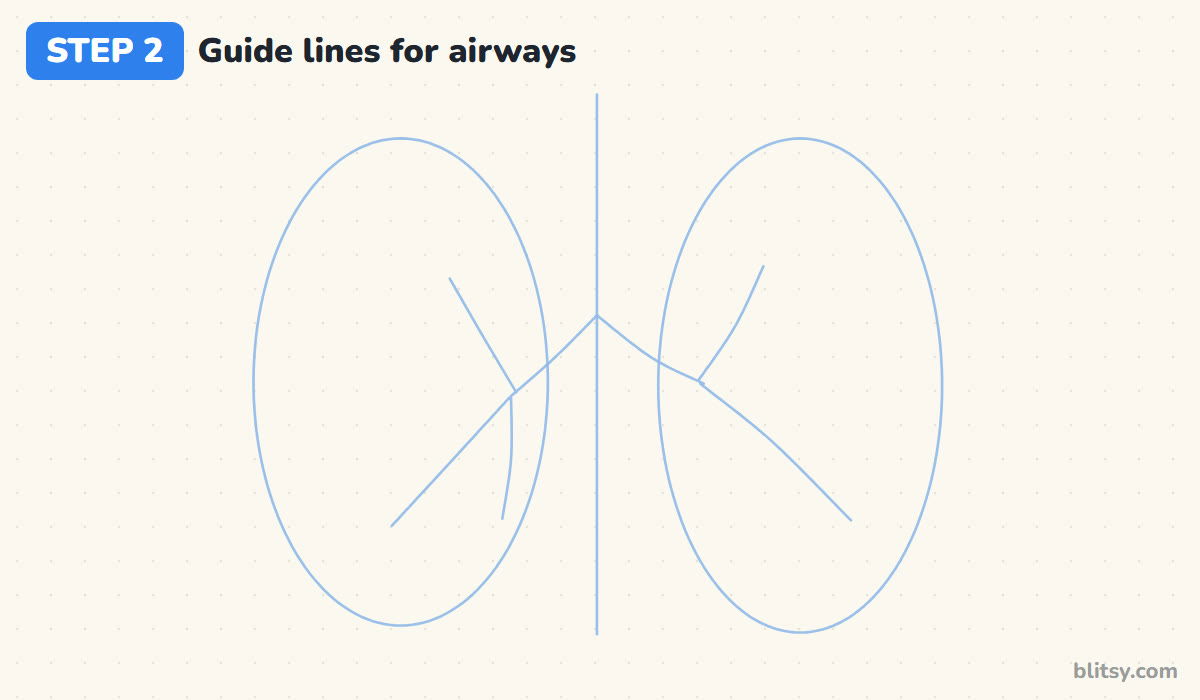
Starting about a third of the way down the center line, draw two lines slanting out like an upside-down V. The one going left is steeper and shorter; the one going right is flatter and longer. From the end of each, add two or three loose lines spreading into the ovals like tree branches. These sticks show where every tube goes later.
💡 Tip: Don't worry about neat sticks. Their only job is to show direction.
Step 3: Outline the right lung
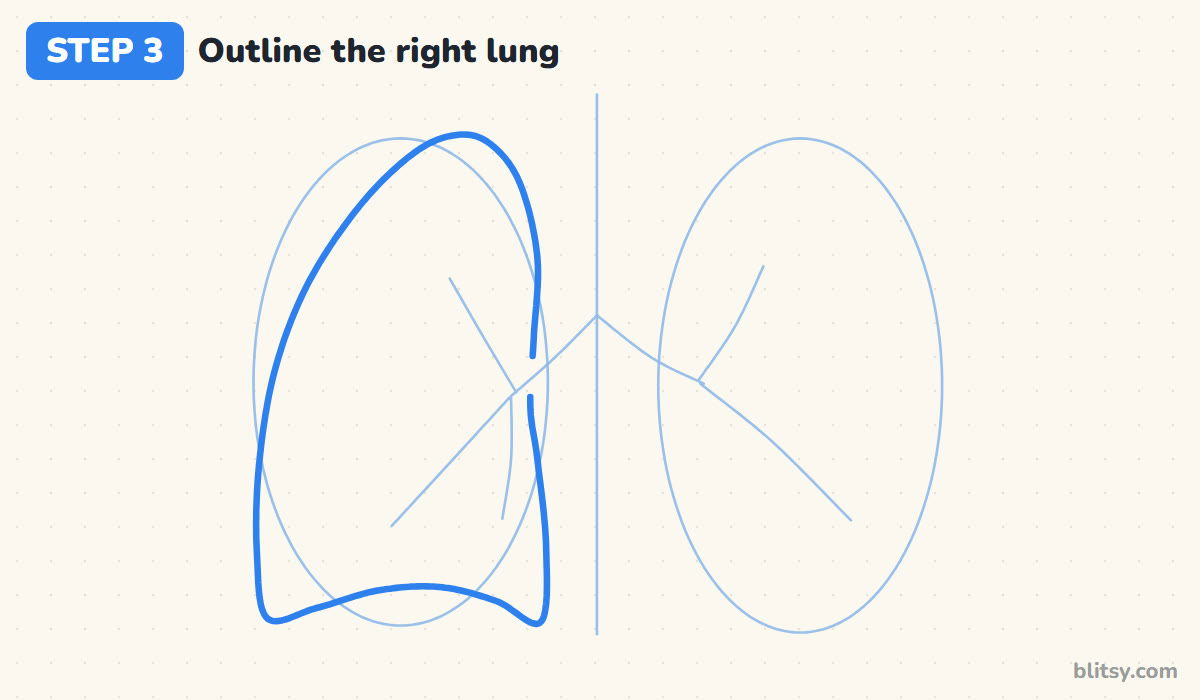
Here's the part that confuses everyone: the lung on the LEFT of your page is the person's right lung, because you're facing them. Draw it over the left oval with a rounded peak at the top, a long curved outer side and a bottom that dips upward in the middle, where the dome of the diaphragm pushes on it. Keep the inner side fairly straight and leave a small gap where the airway guide crosses it.



💡 Tip: Write a tiny R inside the left oval so you never mix the sides up.
Step 4: Draw the left lung with its cardiac notch
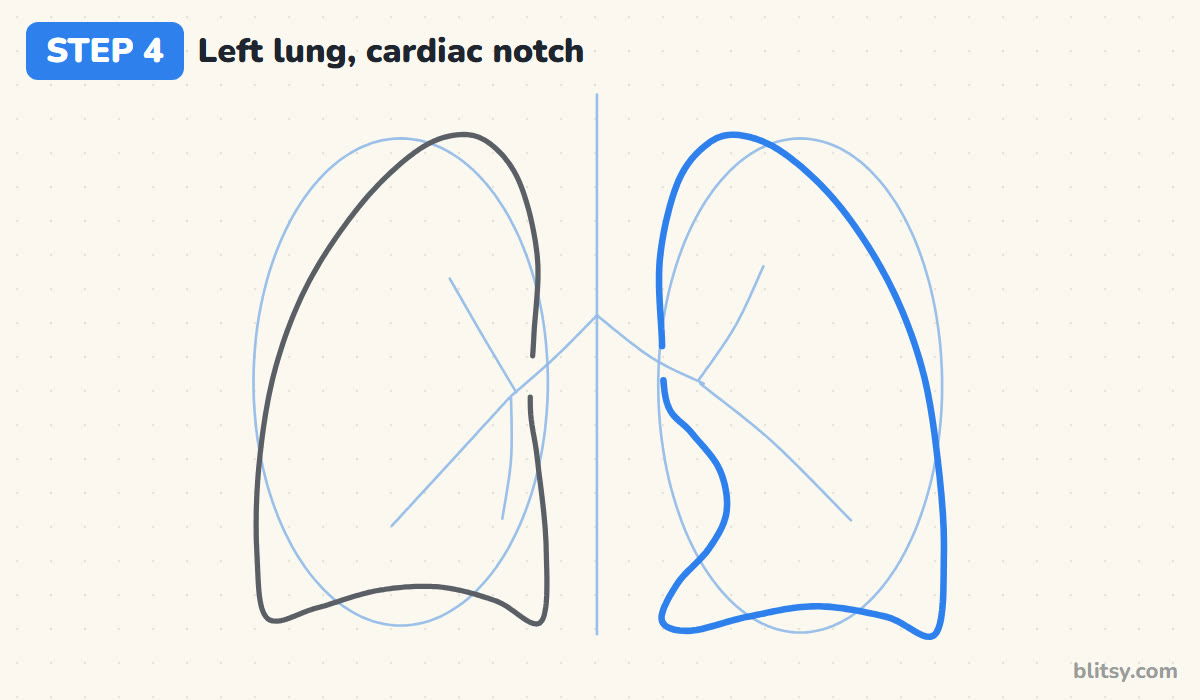
The left lung is a little narrower and slightly taller. Copy the rounded top and the long outer side, but on the inner edge, about halfway down, swing the line outward into a scooped dent. That dent is the cardiac notch, the space the heart leans into. Below it, bring the line back in to make a small tongue of lung called the lingula, then finish the bottom.
💡 Tip: Make the notch deep enough to see from across the room. A shy dent looks like a mistake.
Step 5: Draw the trachea
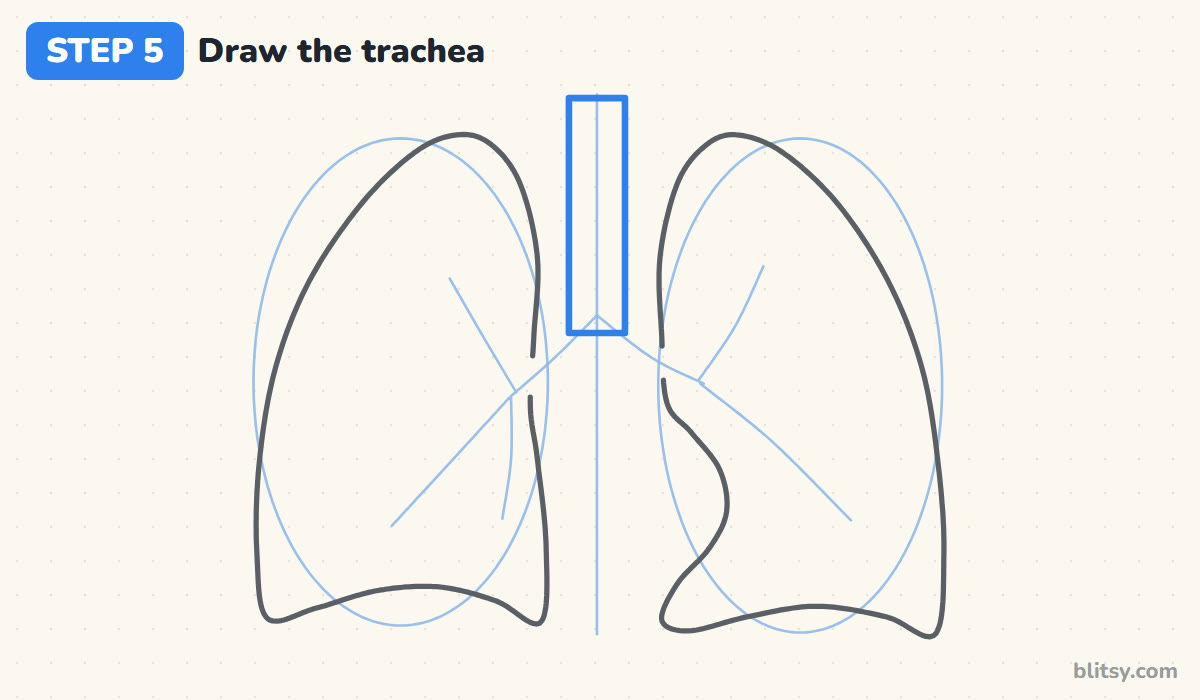
Turn the top of the center line into a narrow upright tube, about as wide as a finger on your page. Start it above both lungs and stop it just below their tops, where the guide lines split. I draw the two long sides first and cap the top with a flat line, the way diagrams cut it off. Leave the bottom open.
💡 Tip: A ruler is welcome here. A wobbly windpipe stands out more than any other line.
Step 6: Add the rings on the trachea
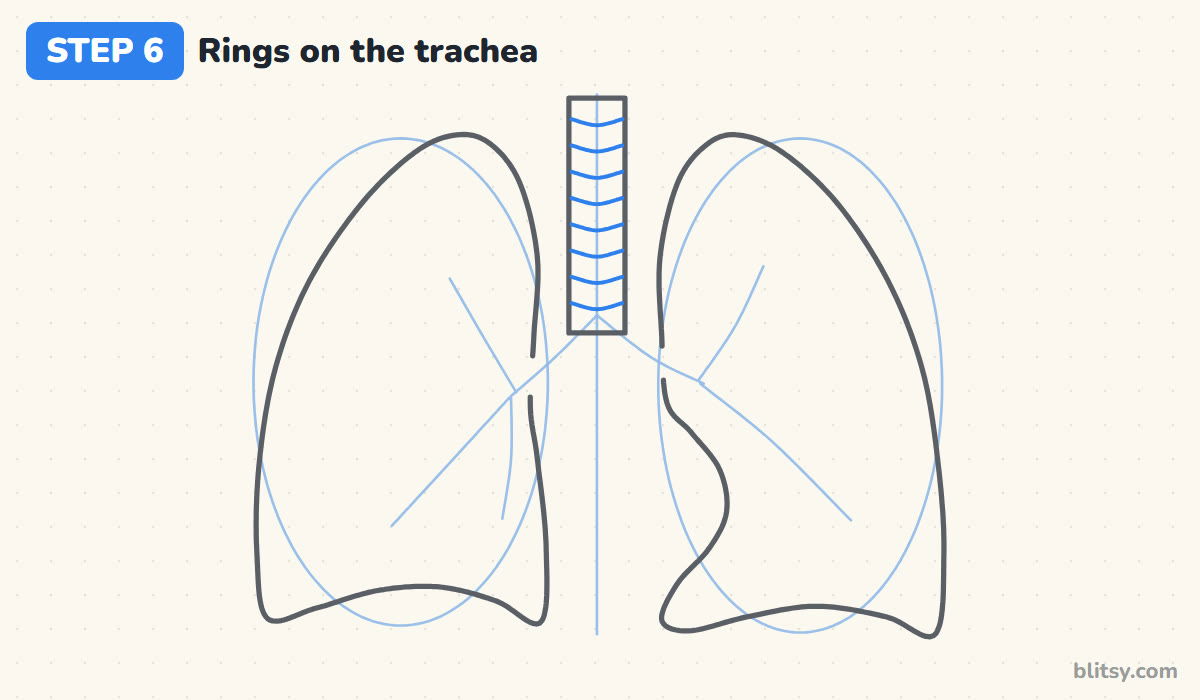
Inside the tube, draw a stack of short, slightly curved lines from the top down to the bottom. Each one is a ring of cartilage, a stiff band that keeps the windpipe from collapsing when you breathe in. Space them evenly and let every curve sag a little in the middle. Seven or eight rings look right at this size.
💡 Tip: Mark the spacing with tiny dots down one side first, then draw the curves.
Step 7: Draw the two main bronchi
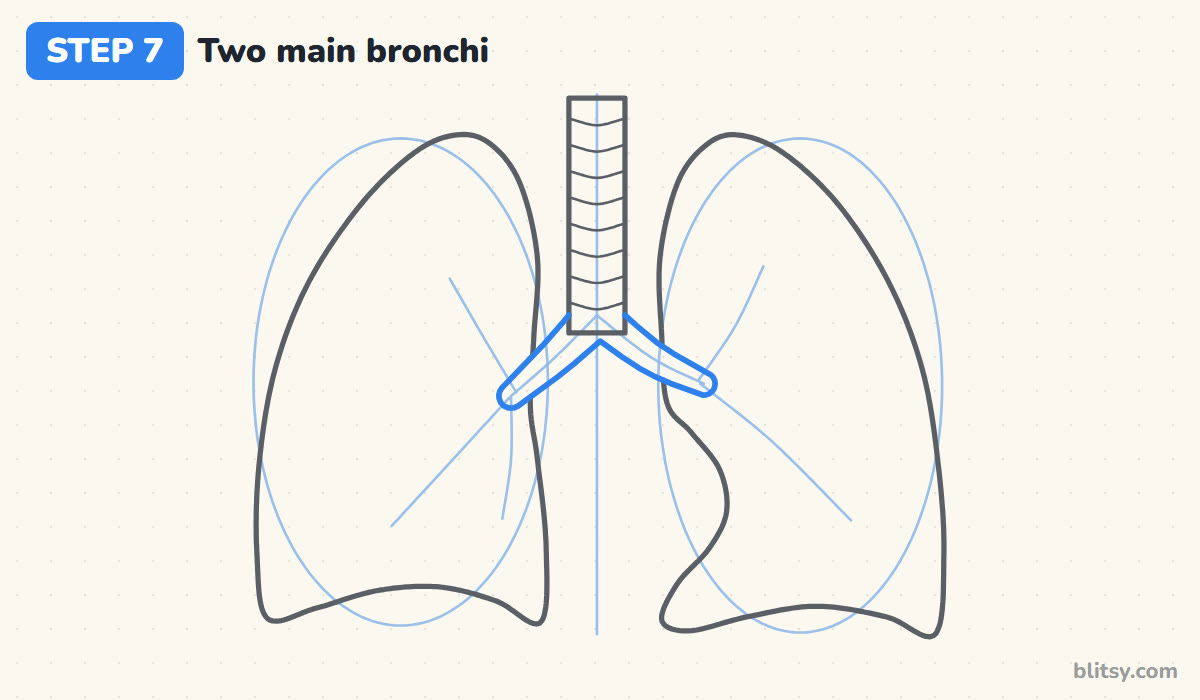
At the bottom of the trachea, the airway splits into two tubes called the main bronchi. Follow your V guide: the right bronchus (left on the page) is wider and steeper, the left one is longer and lies flatter, since it has to pass the heart. Let both tubes get a little thinner as they go, and round off their ends just inside the lungs.



💡 Tip: Keep the split point sharp. A rounded U at the top looks like a pair of pants.
Step 8: Branch out the bronchioles
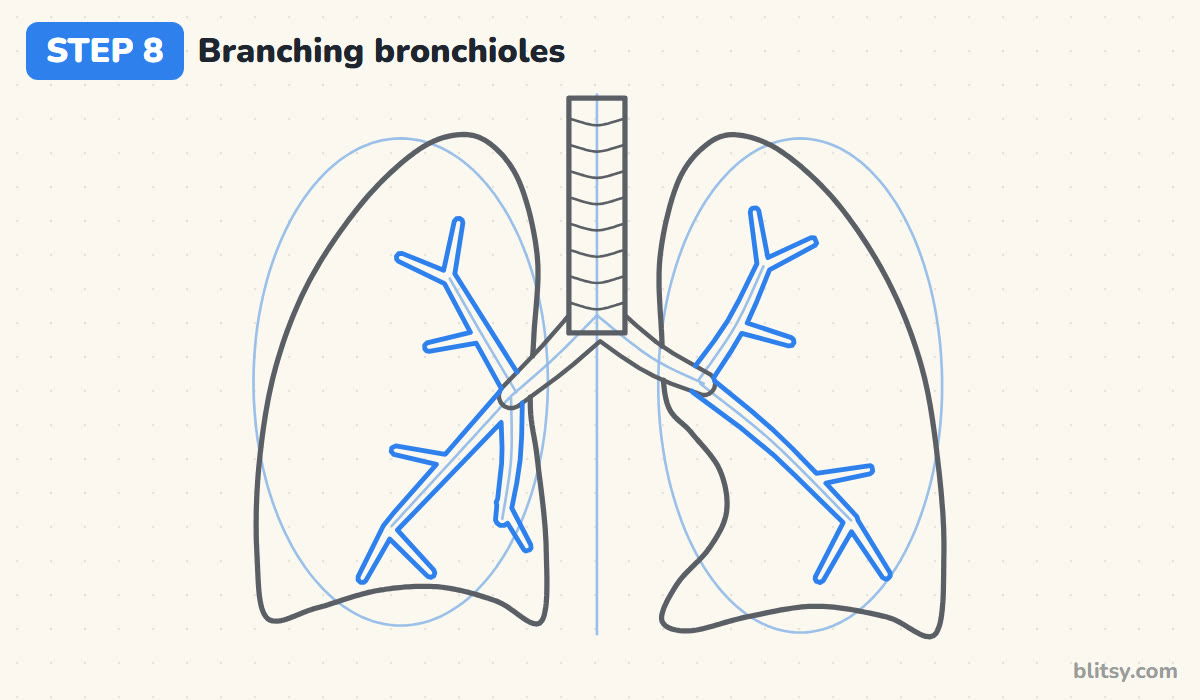
Now grow the tree. From the end of each bronchus, draw thinner tubes along your branch guides: three on the right side, one for each lobe, and two on the left. Then add a few short twigs off those, each one narrower again. Stop well inside the lung outline. A handful is plenty for a clear diagram.
💡 Tip: Every branch should be thinner than the one it grows from. That rule alone makes it look real.
Step 9: Add the lobe lines and shine marks
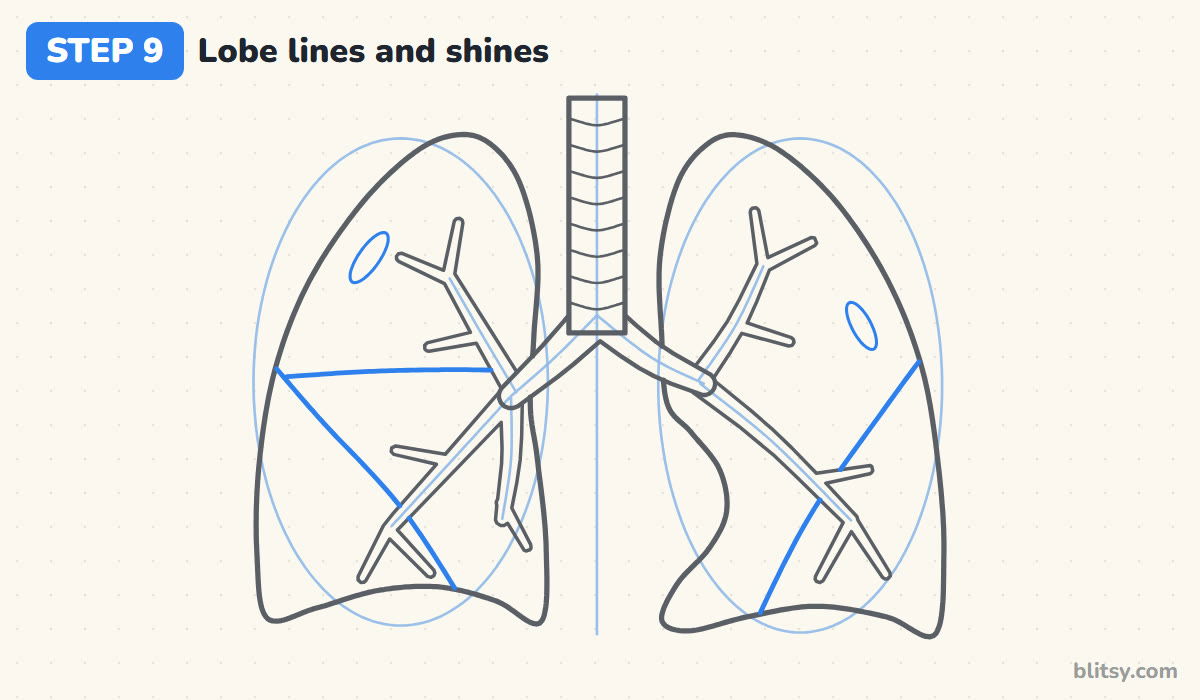
Lobes are the big sections each lung is divided into. In the right lung, draw a slanted line from high on the outer edge down toward the inner bottom corner, then a level line from that slant across to the inner edge. That gives three lobes. The left lung gets only one slanted line, so it has two. Finish with a small oval of shine near the top of each lung.
💡 Tip: Stop a lobe line where it meets an airway, so the tubes still look like they sit in front.
Step 10: Ink the lines and erase the guides
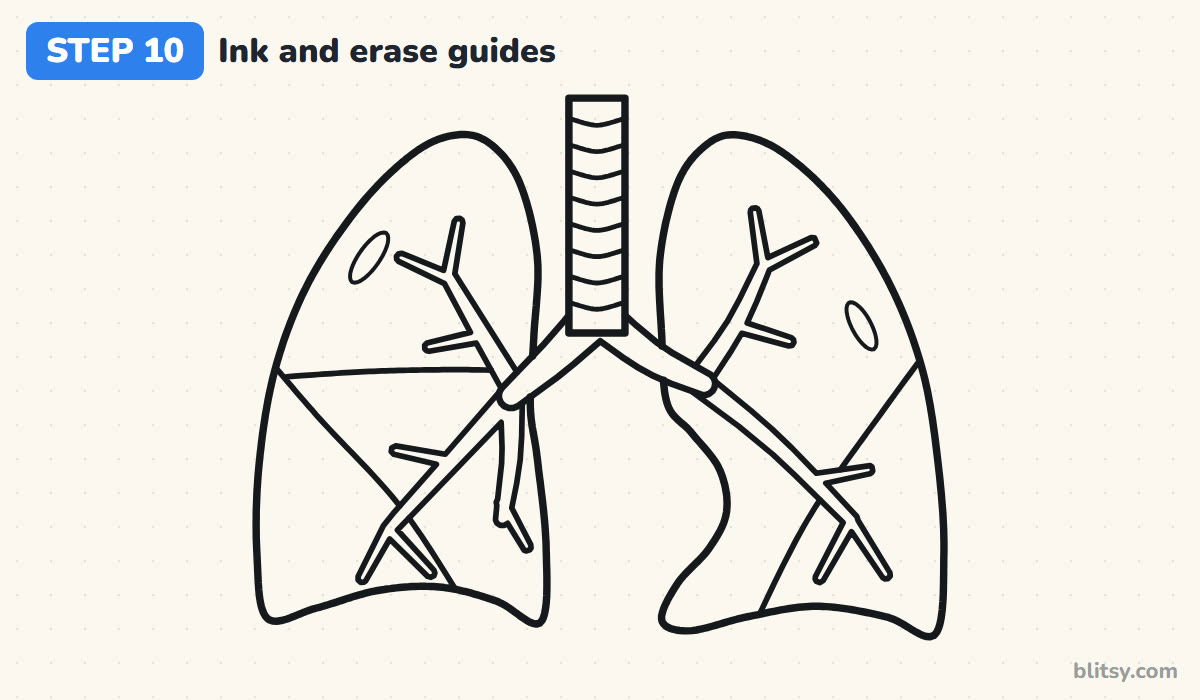
Go over every keeper line with the fineliner. I do the big lung outlines first while my hand is fresh, then the tubes, and the rings and lobe lines last because they're thinner. Wait for the ink to dry completely. Then erase the ovals, the center line and the branch sticks until only the clean diagram is left.
💡 Tip: Turn the paper as you ink, so each curve is pulled toward you instead of pushed away.
Step 11: Color the lungs
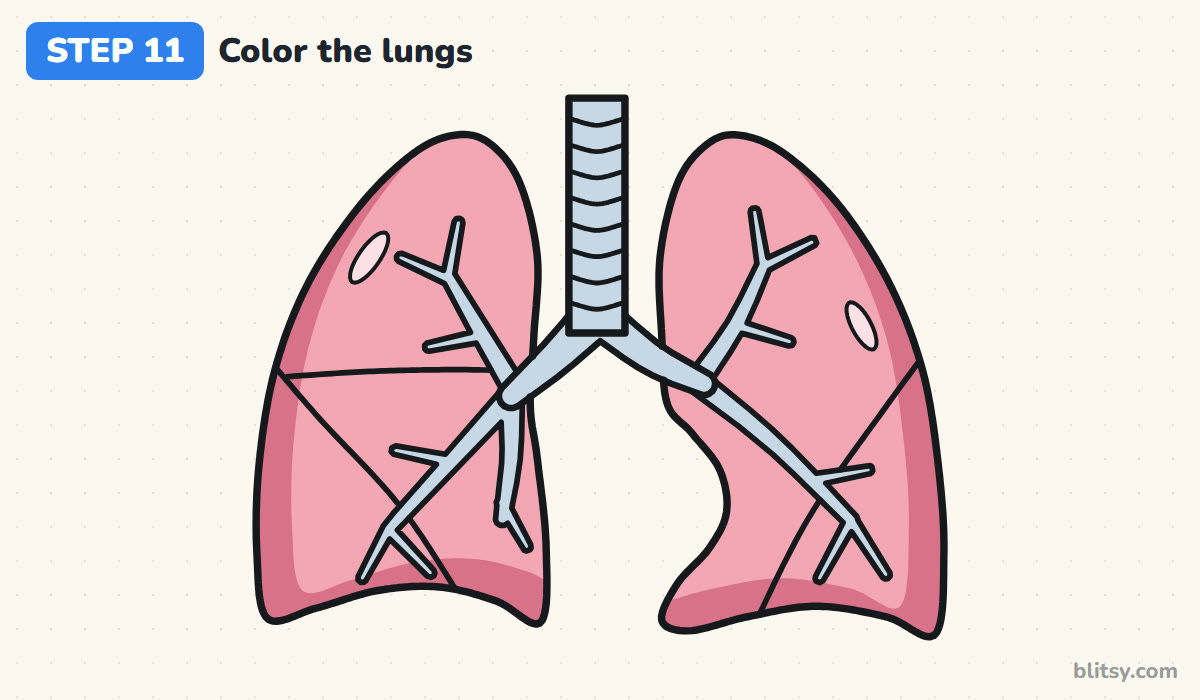
Color both lungs with an even layer of pink. Along the outer sides and the bottom, add dark pink in a soft band, which gives the lungs a rounded, spongy look. Leave the little ovals very pale pink for shine. Color the trachea, the bronchi and every branch light blue, so the airways stand out clearly against the lungs.



💡 Tip: Blend the dark pink inward with light circles, not straight strokes, to avoid stripes.
Lung Diagram Slip-Ups and How to Fix Them
- Drawing two identical lungs. The right lung is wider with three lobes, and the left one is narrower with two lobes and a notch. Mirror copies are the first thing a science teacher circles.
- Swapping the sides. In a front view the person's right lung appears on the left of your page. Label from the body's point of view, not yours.
- Forgetting the cardiac notch. Without it, the left lung loses the space where the heart sits. Scoop the inner edge clearly.
- Airways that poke out of the lungs. Branches should end inside the outline. If a twig runs past the edge, shorten it before inking.
- Flat bottoms. The base of each lung curves up over the diaphragm. A straight bottom edge makes them look like loaves of bread.
Turning Your Lungs Into a Science Project
For homework, add leader lines and labels: trachea, cartilage rings, right and left main bronchus, bronchioles, upper, middle and lower lobes, cardiac notch and diaphragm. A curved line under both lungs makes a simple diaphragm, and a few blue arrows pointing down the trachea can show air coming in. Older students can draw a tiny grape bunch at one twig tip to show the alveoli, the air sacs. Younger kids can skip the lobe lines and keep only the tree. The heart sits right in that notch, so this human heart drawing tutorial makes a good next page, and the rib cage around everything is waiting in the skeleton drawing tutorial.
Free Lungs Coloring Page and Printable Steps
The lungs coloring page shows a colored example at the top with a key that matches each shade to its part, and a big outline underneath with space for labels. The step-by-step PDF guide holds all 11 steps with their pictures and tips. Both fit Letter and A4 paper.
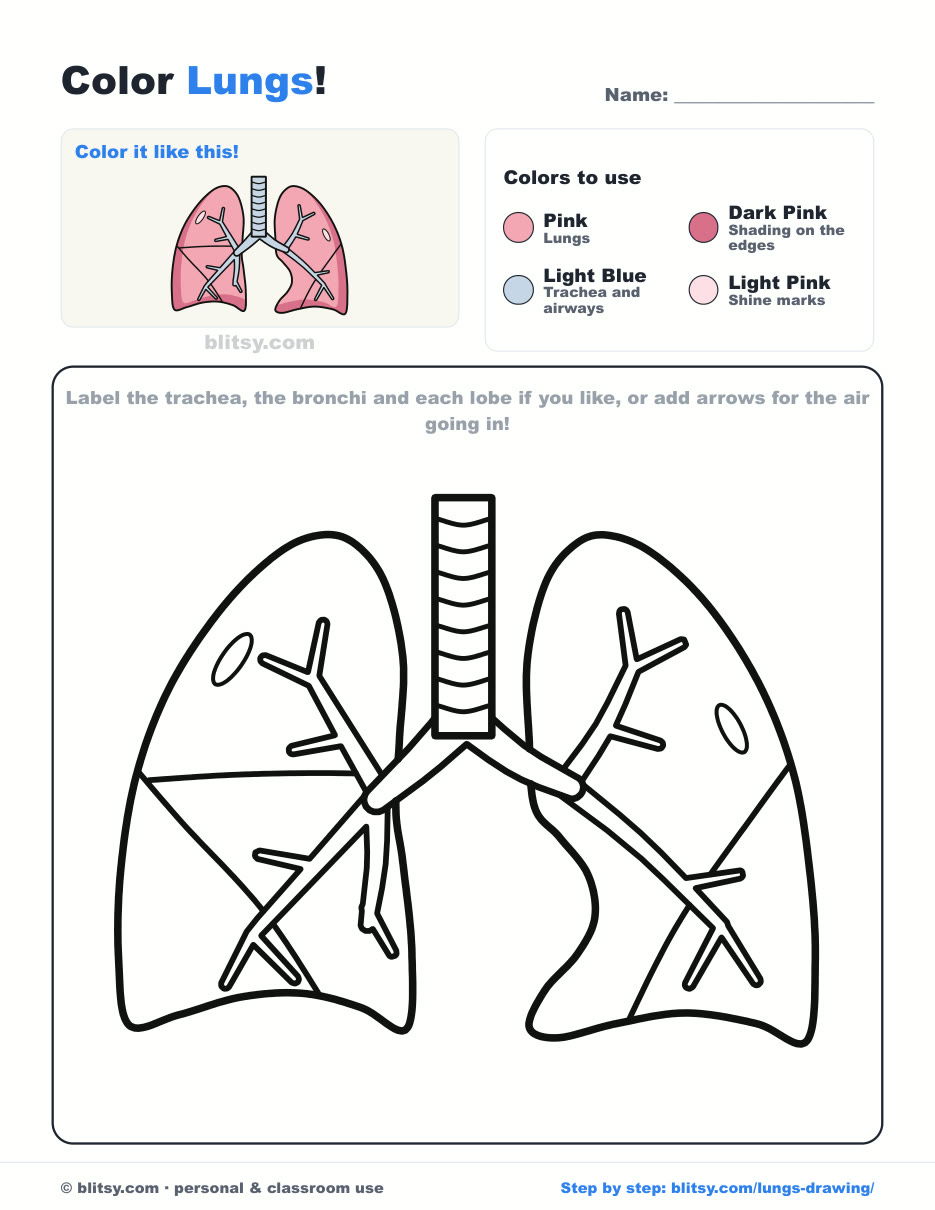
Black outlines with a colored example and the color names at the top. Ready to print and color.
⬇️ Download Coloring PageEvery step picture with its instructions and tips, to keep beside your paper while you draw.
⬇️ Download Drawing Guide📱 On a phone? Tap a download button, then open the file and choose Share → Save to Files or Print. On a computer, the PDF opens or saves straight to your Downloads folder.
Keep This Breathing Diagram for Biology Class
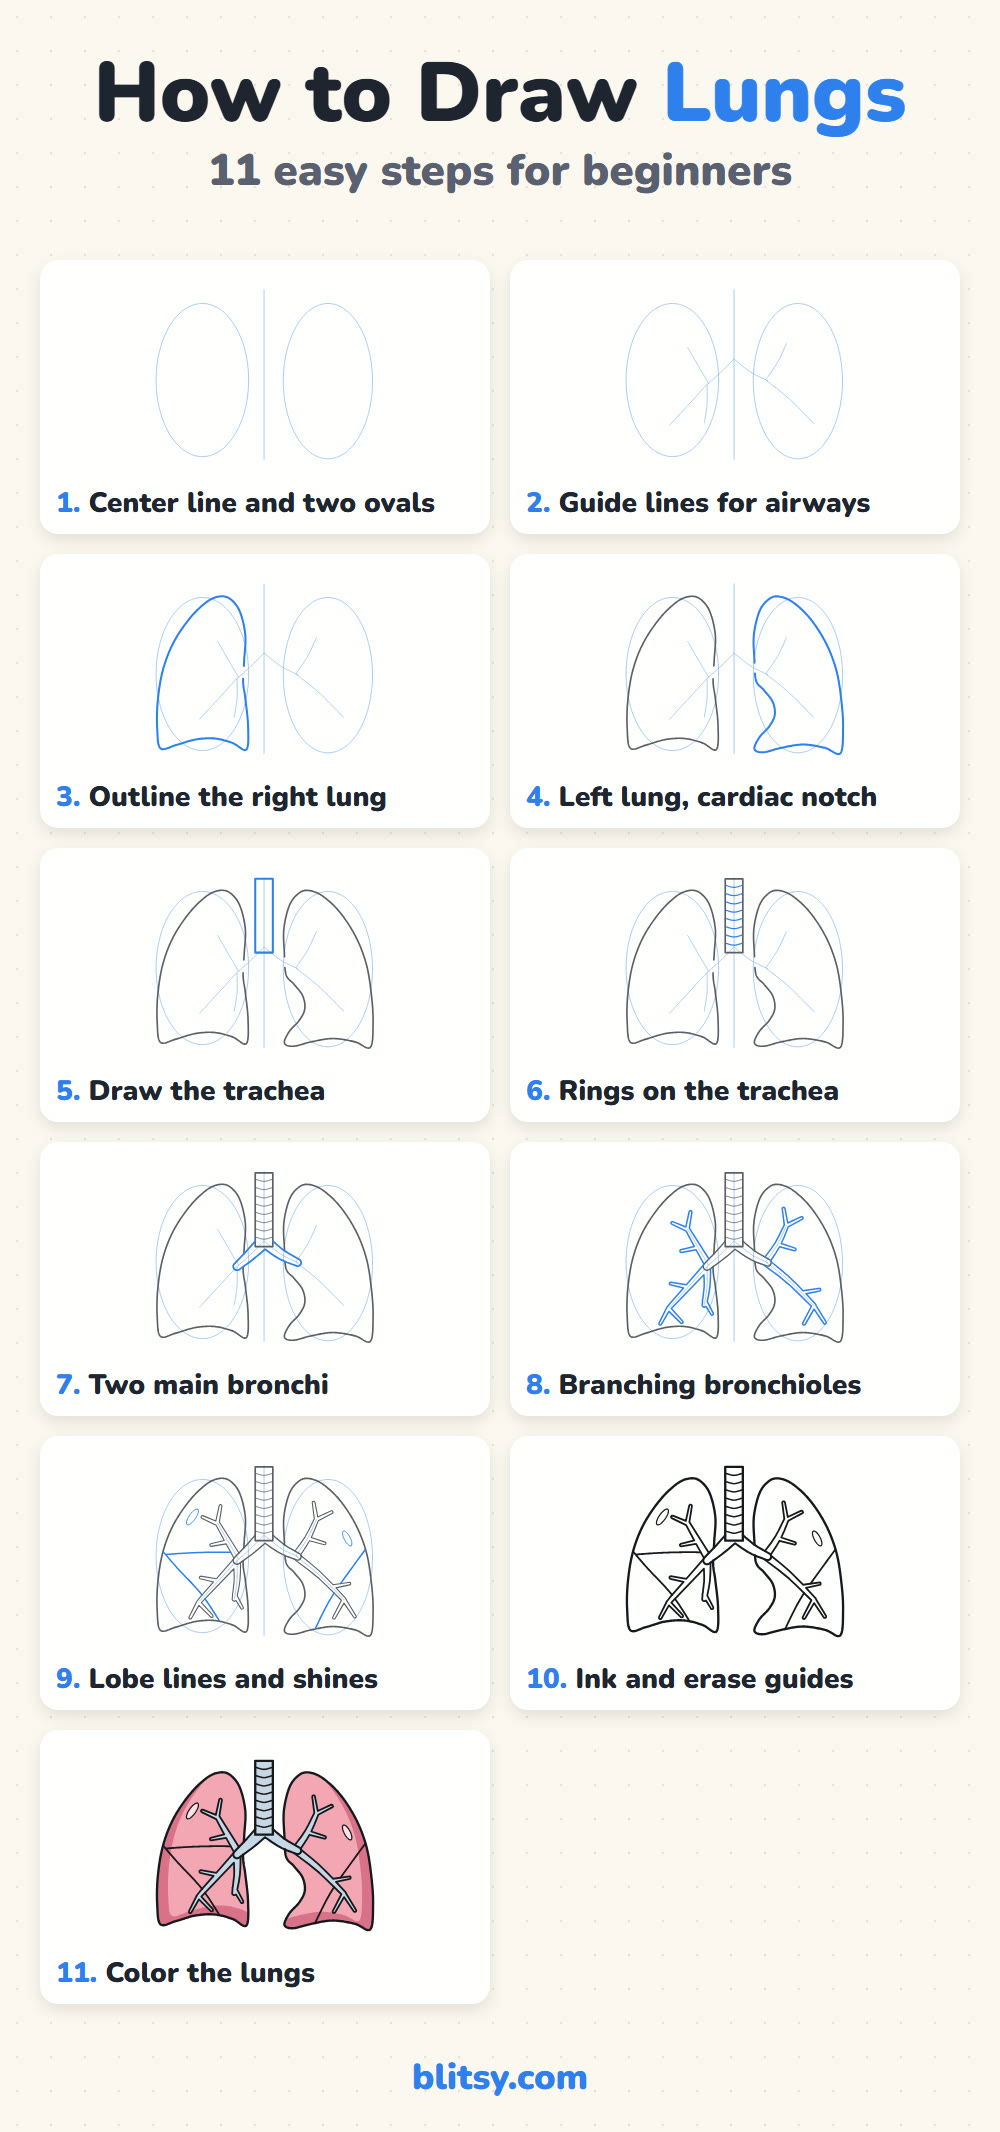
Lungs Labeled? Practice Faces, Bodies and More
Each link opens one step-by-step tutorial with its own pictures for every stage, so you can keep practicing after this diagram.
- Ghost Drawing: A big waving ghost, a baby ghost and a pumpkin all start from one circle in this cute ghost drawing tutorial.
- Smile Drawing: Learn how to draw a smile with teeth and lips, then try the closed smile, the open laugh and the lopsided grin.
- Chalk Art: Take your drawing outside with this chalk art step by step guide for a hopscotch, a rainbow on two clouds and a sun.
- Tooth Drawing: Since you already know some anatomy, the easy tooth drawing tutorial gives you a grinning molar with a toothbrush in 10 steps.
- Realistic Drawing: Shade one shiny apple under a single lamp with the realistic drawing lesson, following every value around its round form.
- Male Face Drawing: Every feature sits on a guide line in this male face drawing tutorial, from the squarer jaw to the steady brown eyes.
- Family Drawing: Four people, a puppy and a red balloon come from a handful of shapes in the how to draw a family guide.
- Mother and Daughter Drawing: Draw the pair hand in hand under a heart with this mother and daughter drawing tutorial, built from circles and ovals.
- Emoji Drawing: Three yellow faces, smiling, in love and giggling, share the same three circles in the emoji drawing step by step lesson.
- Woman Drawing: Mark six head lengths first, then build the figure on them with this how to draw a woman tutorial.
- Skull Drawing: Cream bone, dark sockets and two small marigolds are the goal of the front view skull drawing tutorial.
- Heart Drawing: The how to draw a heart step by step lesson shows an even red heart plus three small friends, one of them with wings.
- Side Profile Drawing: Measuring lines do most of the work in this side profile drawing tutorial, which starts from a plain circle.
- Hands Drawing: Draw one open palm with five digits and three palm lines using the easy hand drawing tutorial.
Student Questions About Drawing the Lungs
What is the easiest way to draw lungs?
Start with two tall ovals and a center line. Shape the outlines, add the windpipe and its two branches, then a few thinner twigs inside each lung.
Why does the left lung have only two lobes?
The heart leans toward the left side of the chest and takes up room, so the left lung is smaller and has two lobes instead of three.
Which lung goes on which side of the drawing?
In a front view you face the person, so their right lung, the one with three lobes, goes on the left of your paper.
How long does a lung drawing take?
About 30 minutes for the lines and another 10 to color. The airway branches need the most patience.
Two ovals, one upside-down tree and a notch for the heart: that's the whole secret, so grab a pencil and give your lungs a go. 🫁✏️
Related posts:
 How to Draw a Cell Step by Step (Easy Animal Cell Diagram)
 How to Draw the Solar System Step by Step (Easy Diagram)
 How to Draw a Whale Step by Step (Easy for Beginners)
 How to Draw a Woman Step by Step (Easy Body Proportions)
 How to Draw a Plant Step by Step (Easy Potted Monstera)
 How to Draw the Fortnite Llama Step by Step (Easy Fan Art)
 How to Draw a Hoodie Step by Step (Front and Back View)
 How to Draw a Parrot Step by Step (Easy Scarlet Macaw)
 How to Draw a Police Car Step by Step (Easy for Kids)
 How to Draw a Volcano Step by Step (Easy Erupting Volcano)
 How to Draw a Crow Step by Step (Easy for Beginners)
 How to Draw a Tiger Step by Step (Easy Walking Pose)

