
Few things get a room of kids drawing faster than the word "eruption." Here you'll learn how to draw a volcano step by step, starting from a plain trapezoid and ending with glowing lava, flying rocks and a heavy cloud of ash. The secret is that a volcano is mostly one shape: a wide cone with its tip sliced off. Everything exciting happens around that cone, and we'll add it one piece at a time.
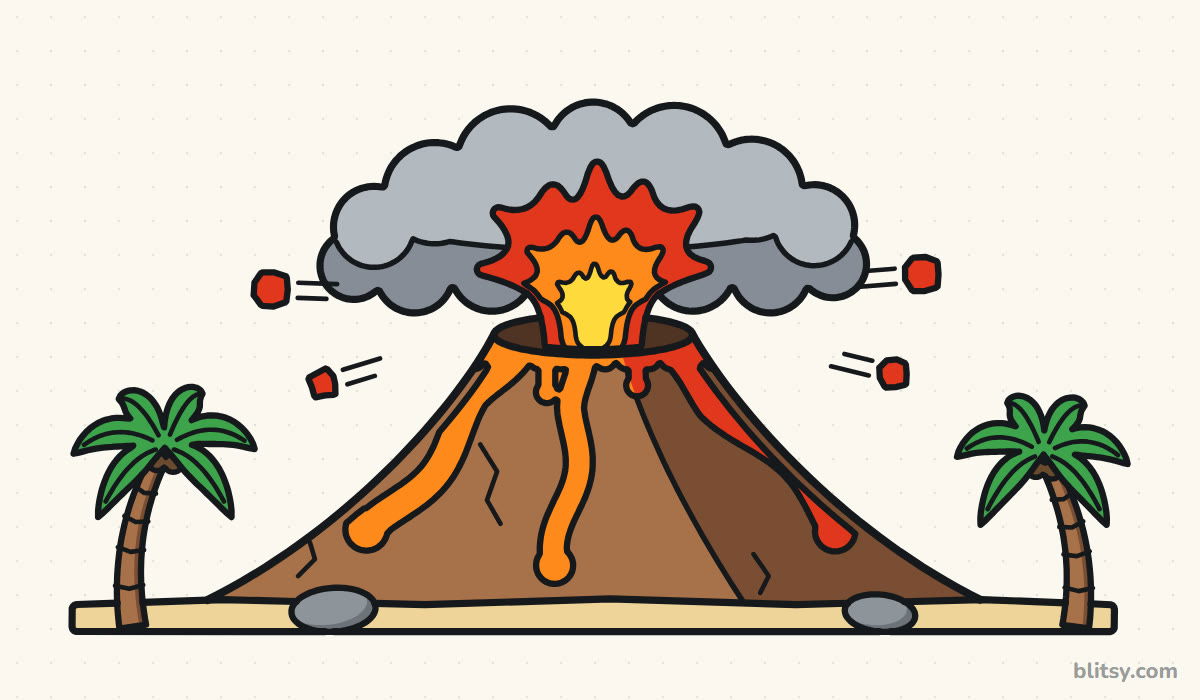
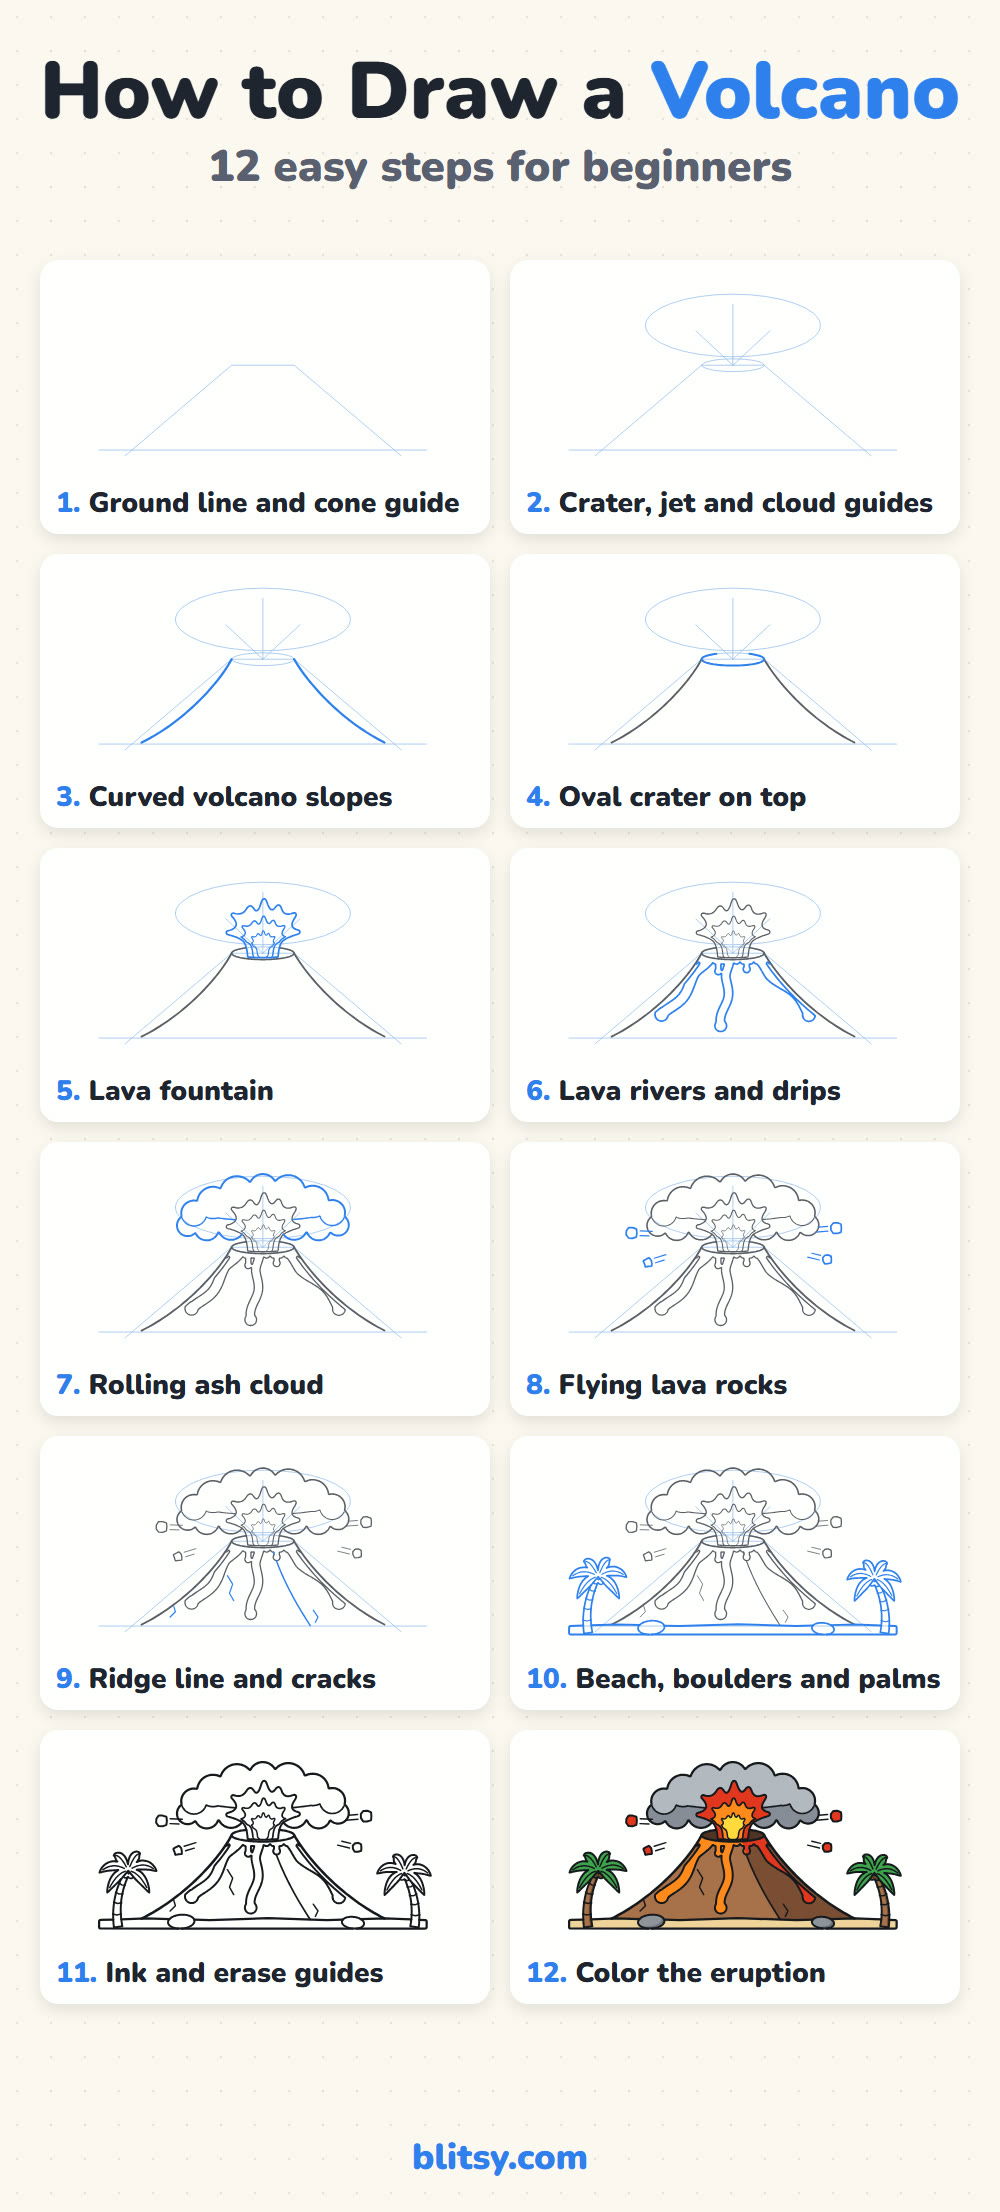
Every picture shows the newest lines in blue, so you know exactly what to add. Anything in gray is already on your paper. The thin pale shapes at the start are helpers, so sketch them faintly and plan to rub them out after inking.
Quick overview
⏱️ Time: about 30 to 35 minutes with coloring
🎯 Level: easy, good for kids from around 7
✏️ Steps: 12
🌋 You'll draw: an erupting volcano on a beach with two palm trees
Gear for Your Lava-Filled Sketch
- A pencil with a fairly light lead, such as HB
- A clean eraser
- A black marker or felt-tip pen for inking
- Coloring pencils or markers in two browns, red, orange, yellow and gray, plus green and tan
- A sheet of paper turned sideways
- A ruler for the ground line (optional)
No tan for the sand? A pale yellow works fine, and crayons are good for the big brown slopes.
How to Draw a Volcano Step by Step
Step 1: Sketch a ground line and a cone guide
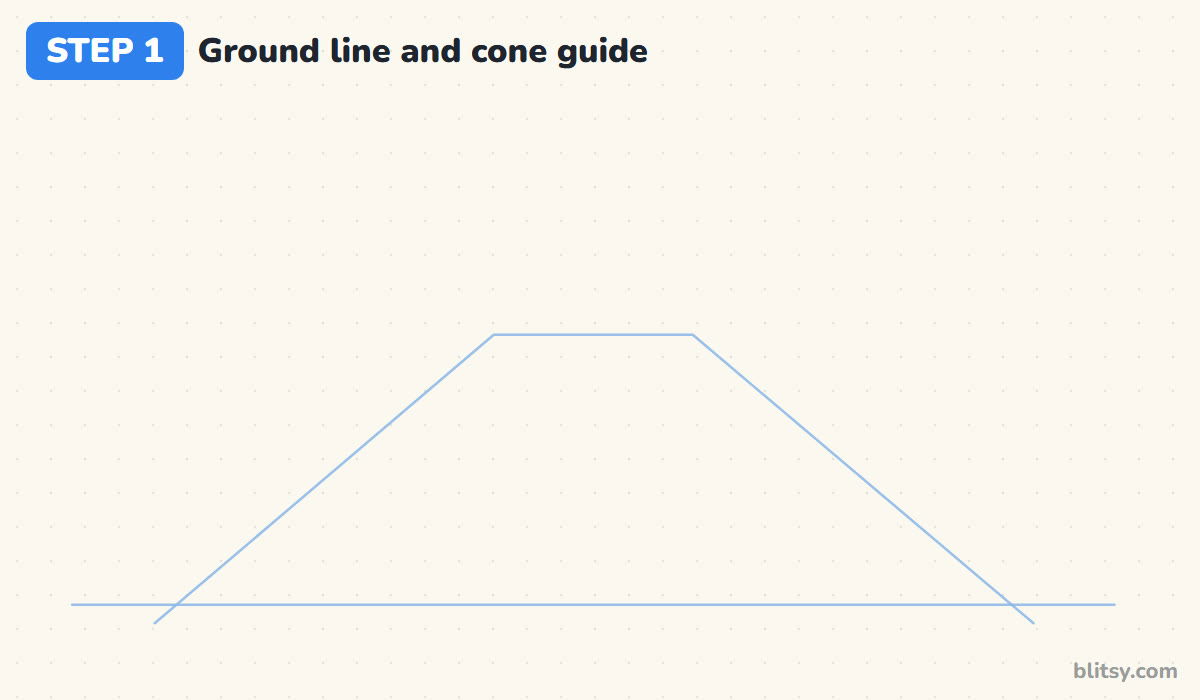
Turn your paper sideways and draw a long, straight line across the lower part of the page. On top of it, sketch a wide trapezoid: two slanted sides that lean toward each other and stop at a short flat top. A base about four times wider than the top makes the volcano look huge.
💡 Tip: Leave a big empty band above the trapezoid for the smoke later.
Step 2: Add guides for the crater and cloud
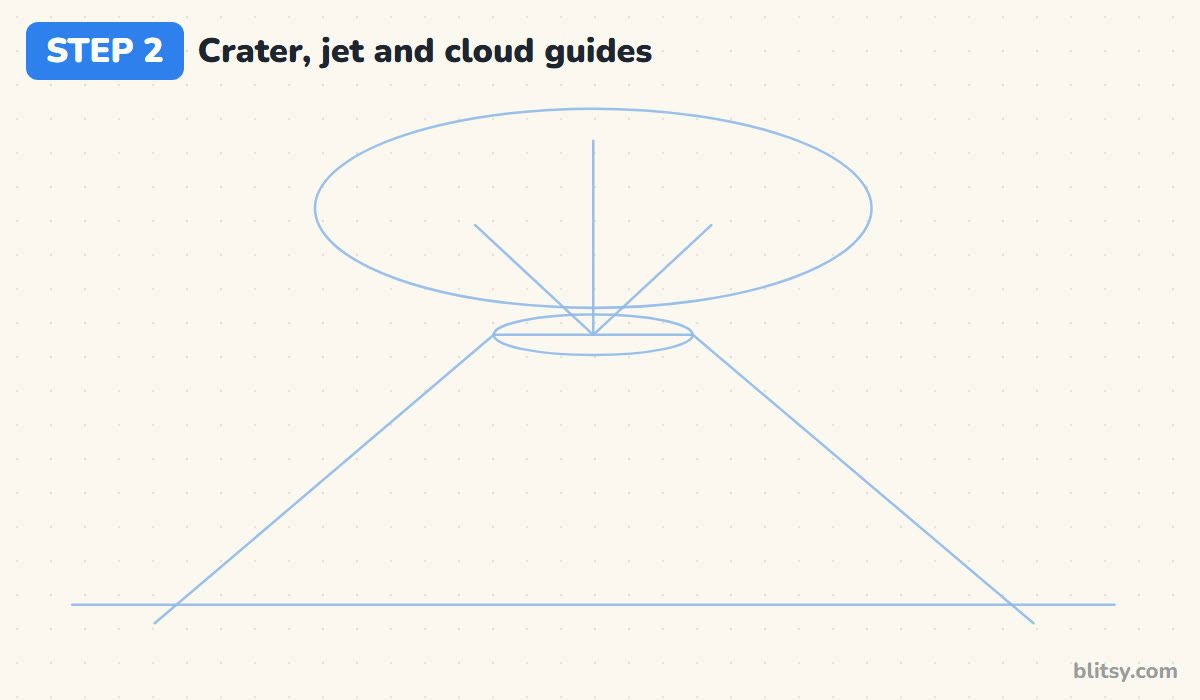
Across the flat top, draw a thin oval that pokes out a little past both ends. From the middle of that oval, draw three short straight lines fanning upward like a crow's foot; they show where the lava will shoot. Then sketch one big oval above everything for the ash cloud, much wider than the crater.
💡 Tip: Draw guides with the side of the pencil tip so they stay faint.
Step 3: Draw the curved volcano slopes
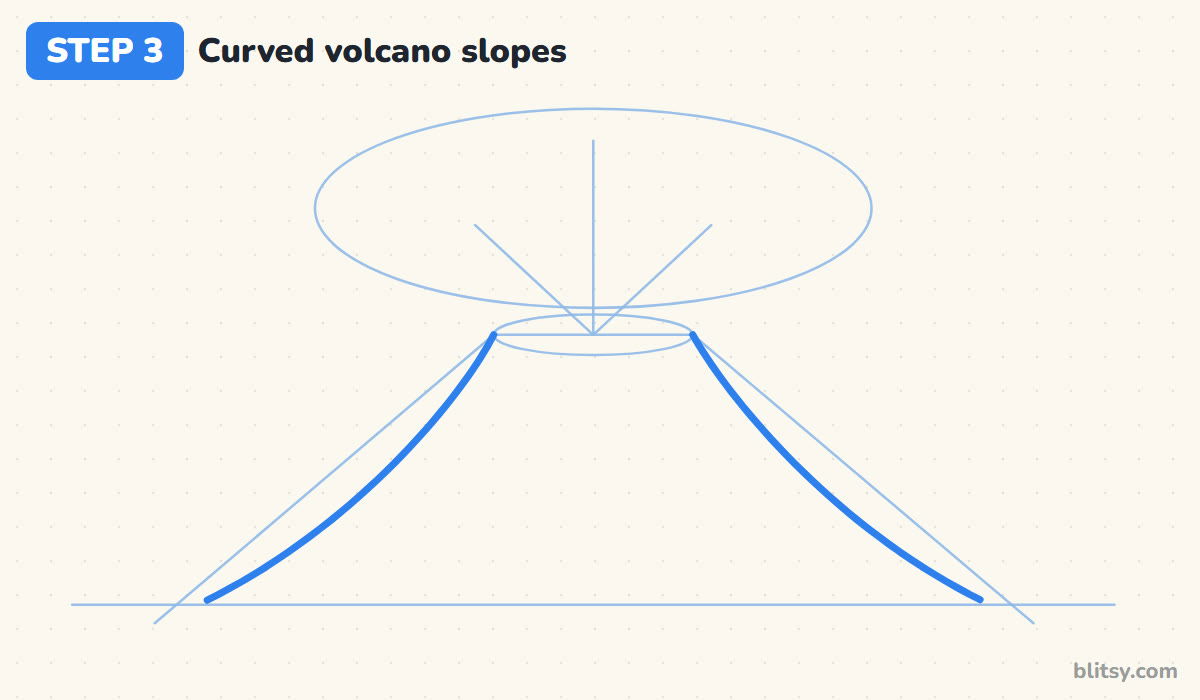
Now replace the straight sides with curves. Start at each end of the crater oval and come down steeply first, then let the line bend outward and flatten as it reaches the ground. I like this curve because it stops the shape from looking like a plain triangle. Stop both lines at the ground guide.



💡 Tip: Hold the page at arm's length to see if both slopes bend the same amount.
Step 4: Outline the oval crater
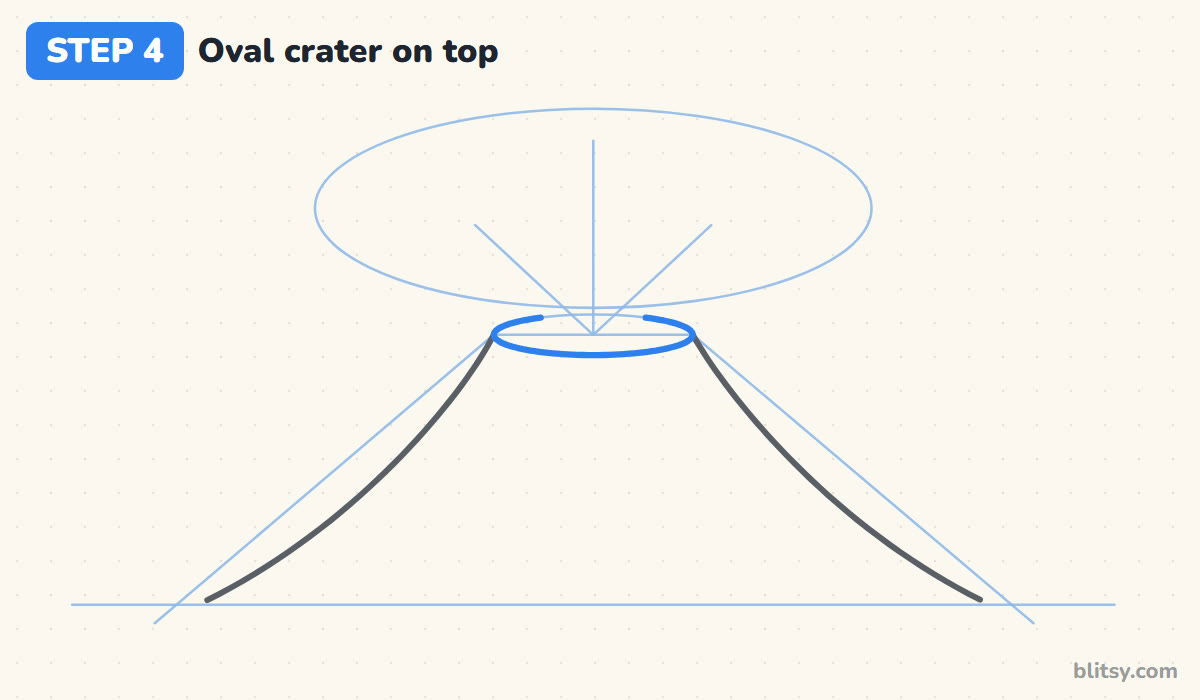
Go over the crater guide with a confident line. I keep this opening flat on purpose. If it gets too round, the volcano looks like a cup seen from above. A flat oval says you're looking at the mountain from the side.
💡 Tip: Make the oval about five times wider than it is tall.
Step 5: Shoot a lava fountain out of the crater
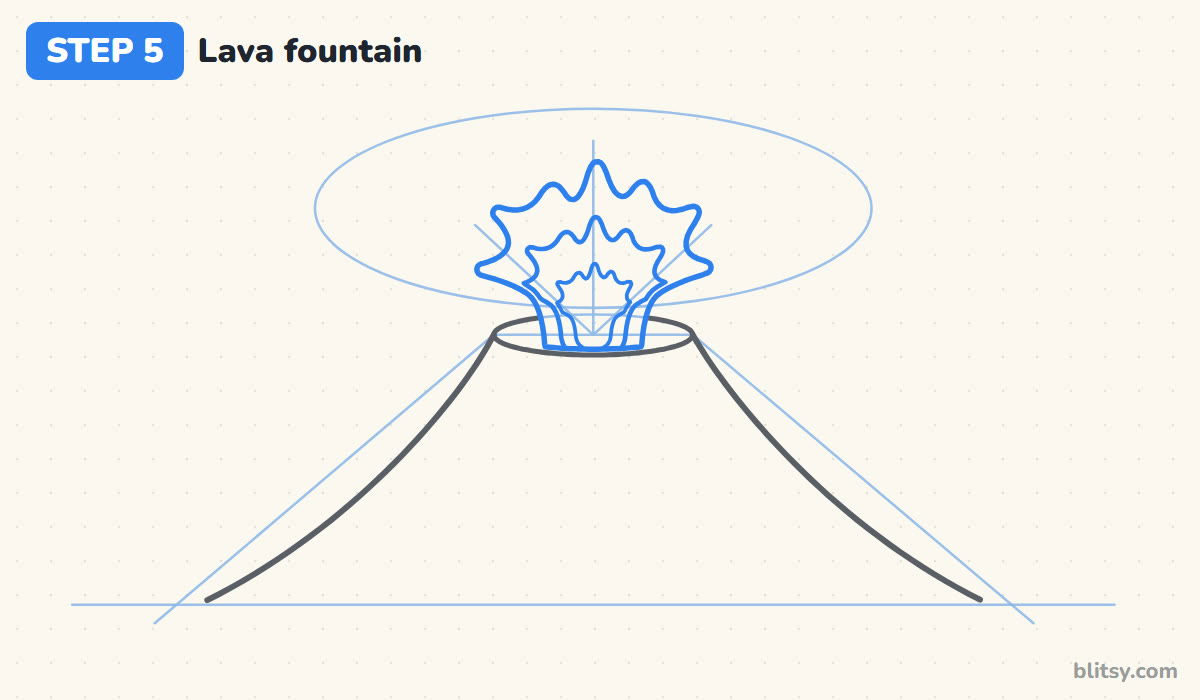
From inside the crater, draw two lines that rise and spread out like a vase. At the top, break the edge into wavy, flame-like tongues that splash outward, with the tallest tongue in the middle. When I demonstrate this part, I draw a smaller copy inside it, and inside that one, a little spiky shape for the hottest part. Most beginners make it too narrow at the top, so let it burst wide.
💡 Tip: Start the fountain inside the crater rim, never on top of the front edge.
Step 6: Let lava rivers run down the slopes
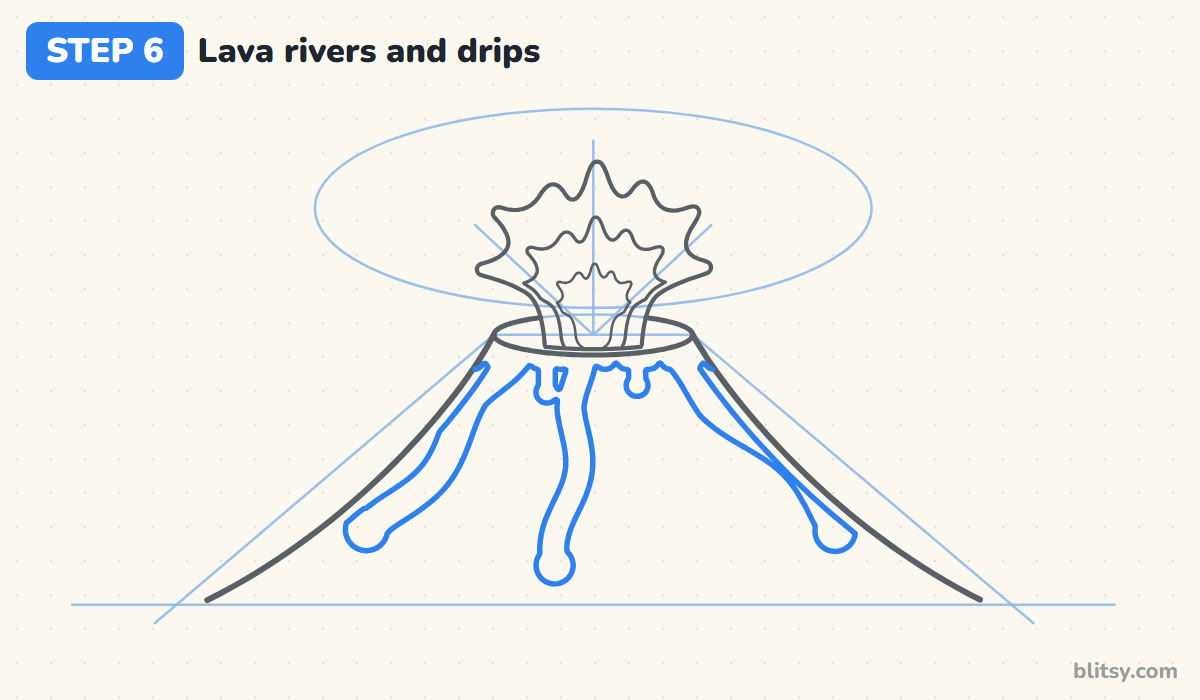
Lava spilling over the rim forms a wavy band around the top of the cone with a couple of short drips hanging down. From that band, draw three rivers: one curving down the left slope, one down the middle, one sliding toward the right. Make them wiggle gently and end each with a round drop, like paint running down a wall.
💡 Tip: Give each river a slightly different length so they don't look copied.
Step 7: Build the rolling ash cloud
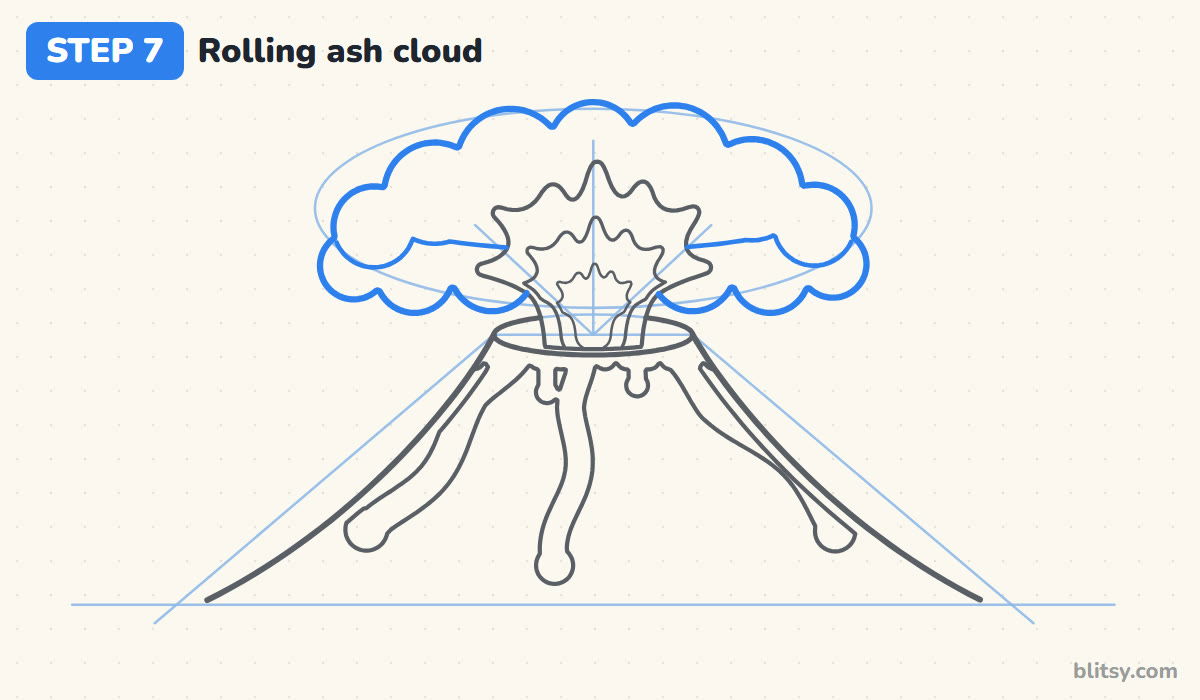
Using the big oval, draw a row of bumps along the top, like the top of a cauliflower, with the biggest bump near the middle. Then draw a second, smaller row of bumps along the bottom. Stop at the fountain's edge so the lava sits in front. Last, add a wavy line between the two rows, which turns one flat cloud into stacked puffs.



💡 Tip: Vary the bump sizes; perfect half circles look like a cartoon sheep.
Step 8: Throw some lava rocks
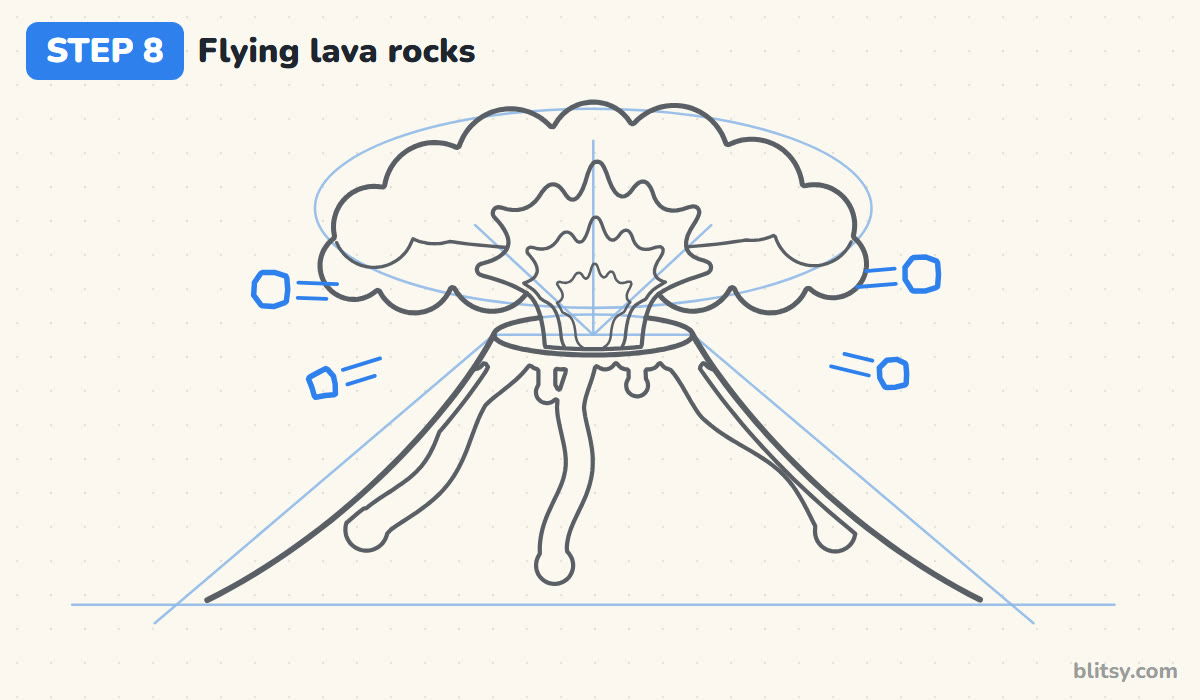
Real eruptions can throw lava blobs high into the air. Draw four small, lumpy rounded shapes around the volcano, two near the cloud and two lower down. Behind each rock, add two short parallel lines pointing back toward the crater. Those speed lines tell the eye which way the rock is flying.
💡 Tip: Keep the rocks lumpy, not round, or they'll read as balls.
Step 9: Add a ridge line and a few cracks
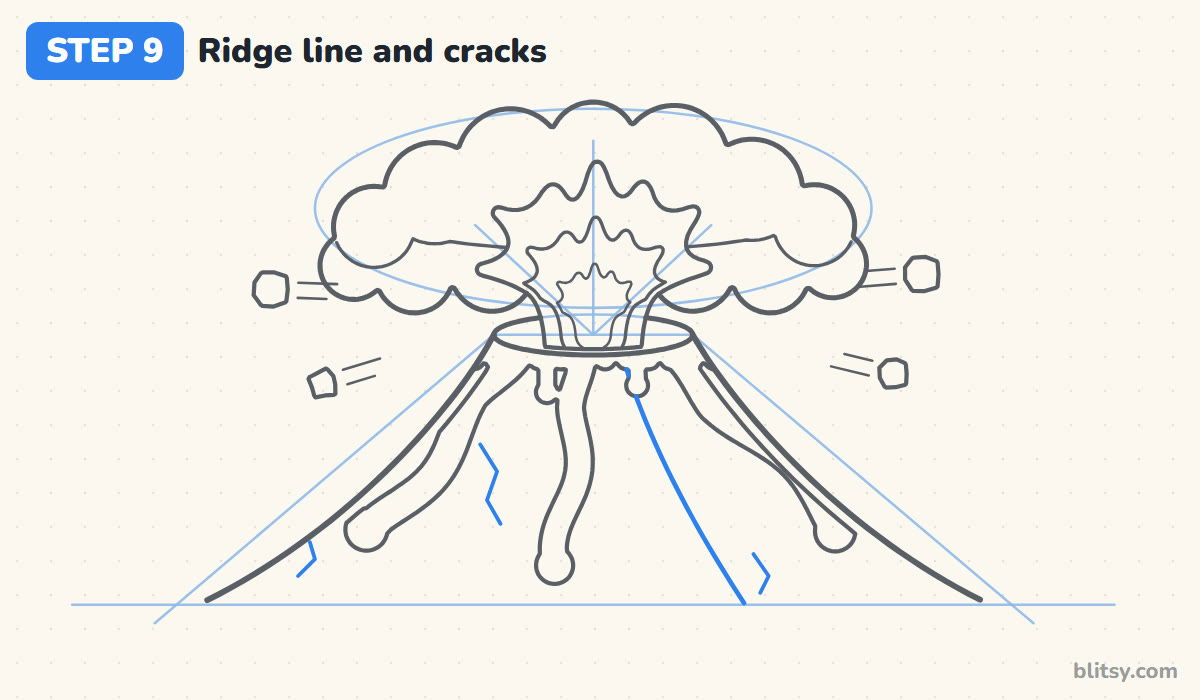
Starting just right of the crater's front edge, draw a long curve down to the ground. This ridge splits the volcano into a sunny left side and a shady right side, and it's the reason the cone will look round instead of flat. Add a couple of short zigzag cracks on the slopes, keeping them small.
💡 Tip: Stop the ridge wherever it meets a lava river.
Step 10: Draw a sandy beach with palm trees
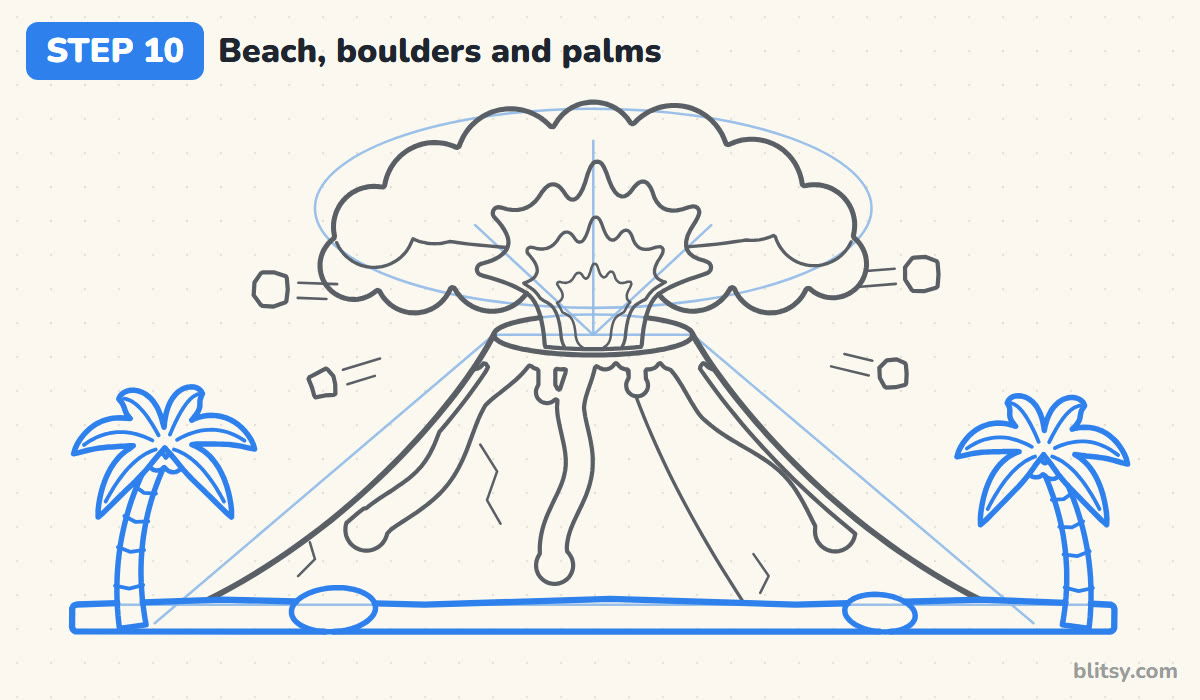
Turn the ground guide into a narrow sandy strip with a slightly bumpy top edge. Put two flat oval boulders on it. Near each end, draw a palm tree: a curved trunk that's thicker at the bottom, a few short curved lines across it, and six pointed leaves drooping from the top. Small kids can draw banana-shaped leaves.
💡 Tip: Keep the palms small so the volcano still looks enormous.
Step 11: Ink the keeper lines and erase guides
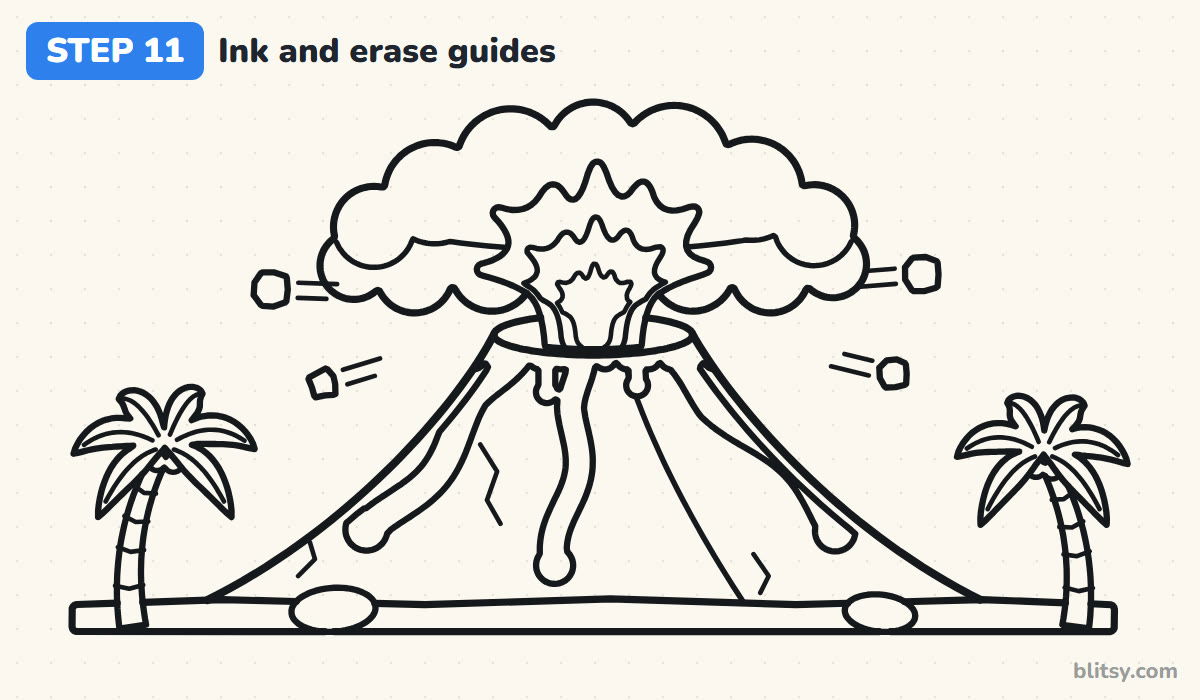
Trace every line you want to keep with the black marker: slopes, crater, all three fountain layers, lava, cloud, rocks, ridge and cracks, plus the beach and palms. I always wait until the ink is fully dry. Then erase the trapezoid, the ovals, the jet lines and the ground guide.




💡 Tip: Use a thicker stroke for the outer slopes than for the cracks.
Step 12: Color the eruption
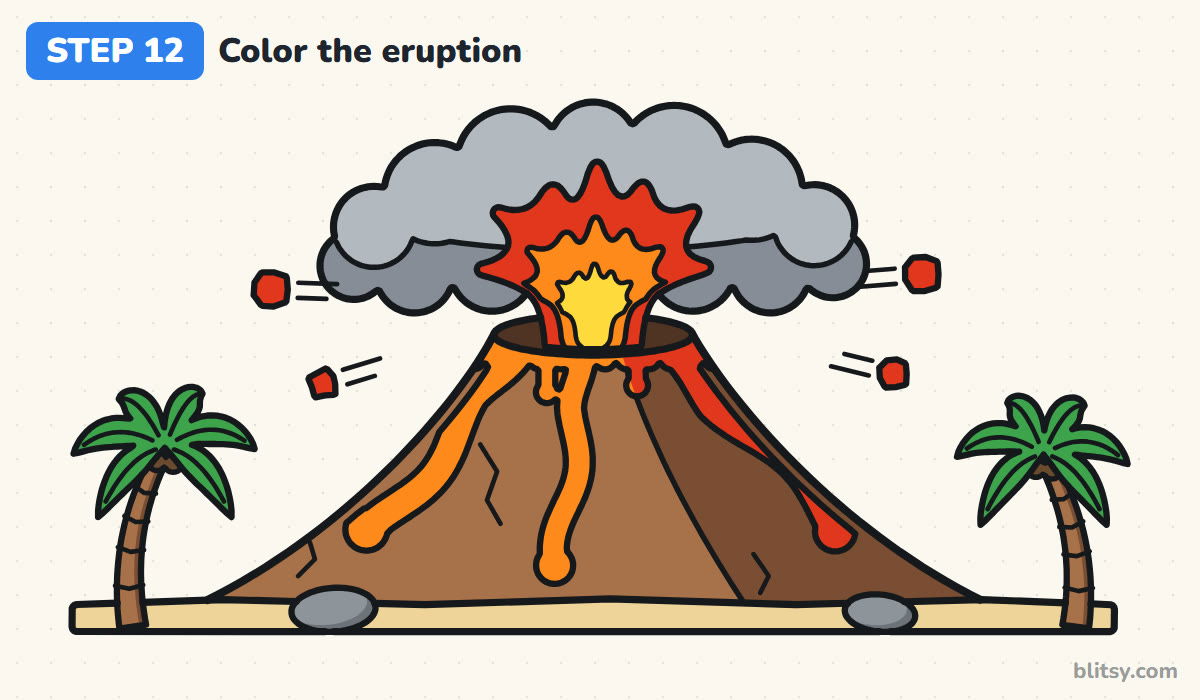
Color the left side of the cone medium brown and the right side darker brown, with the crater opening darkest of all. The lava rivers are orange, turning red where they cross the shady side. Paint the fountain red on the outside, orange in the middle and yellow in the center. The cloud gets light gray on top and darker gray underneath. Finish with red rocks, tan sand, gray boulders, brown trunks and green leaves.
💡 Tip: Color the yellow first, then work out to orange and red.
Volcano Slip-Ups That Turn It Into a Plain Hill
- A pointy top. Without a flat top and an opening, it reads as an ordinary mountain. Cut the tip off and draw a flat oval crater.
- Ruler-straight slopes. Straight sides make a stiff triangle. Curve the slopes so they are steep near the crater and spread out at the ground.
- Lava painted on top of the outline. Rivers that cross the edge of the cone look stuck on. Keep them inside the slopes and let them end in round drops.
- A tiny smoke puff. A small cloud makes the eruption feel weak. Let the ash cloud spread wider than the crater on both sides.
- All one brown. A single brown flattens the cone. Use a darker brown on the side away from the light.
Island Eruption Variations to Try Next
Once you've drawn it once, change the scene. Leave out the fountain and add a thin wisp of steam for a sleeping volcano, or draw it at night with a dark blue sky so the lava glows. A blue sea at the base turns it into a proper island. If you want calmer peaks to practice on, try the mountain drawing tutorial, and if the lava fountain was your favorite part, the flames drawing tutorial will help you shape fire with more confidence.
Volcano Coloring Page and Step Guide to Print
Want something for a rainy afternoon? Print the volcano coloring page. It has a colored sample and a color key at the top, plus a big bold outline. The step-by-step PDF guide holds all 12 steps and their tips, and both print on Letter or A4 paper.
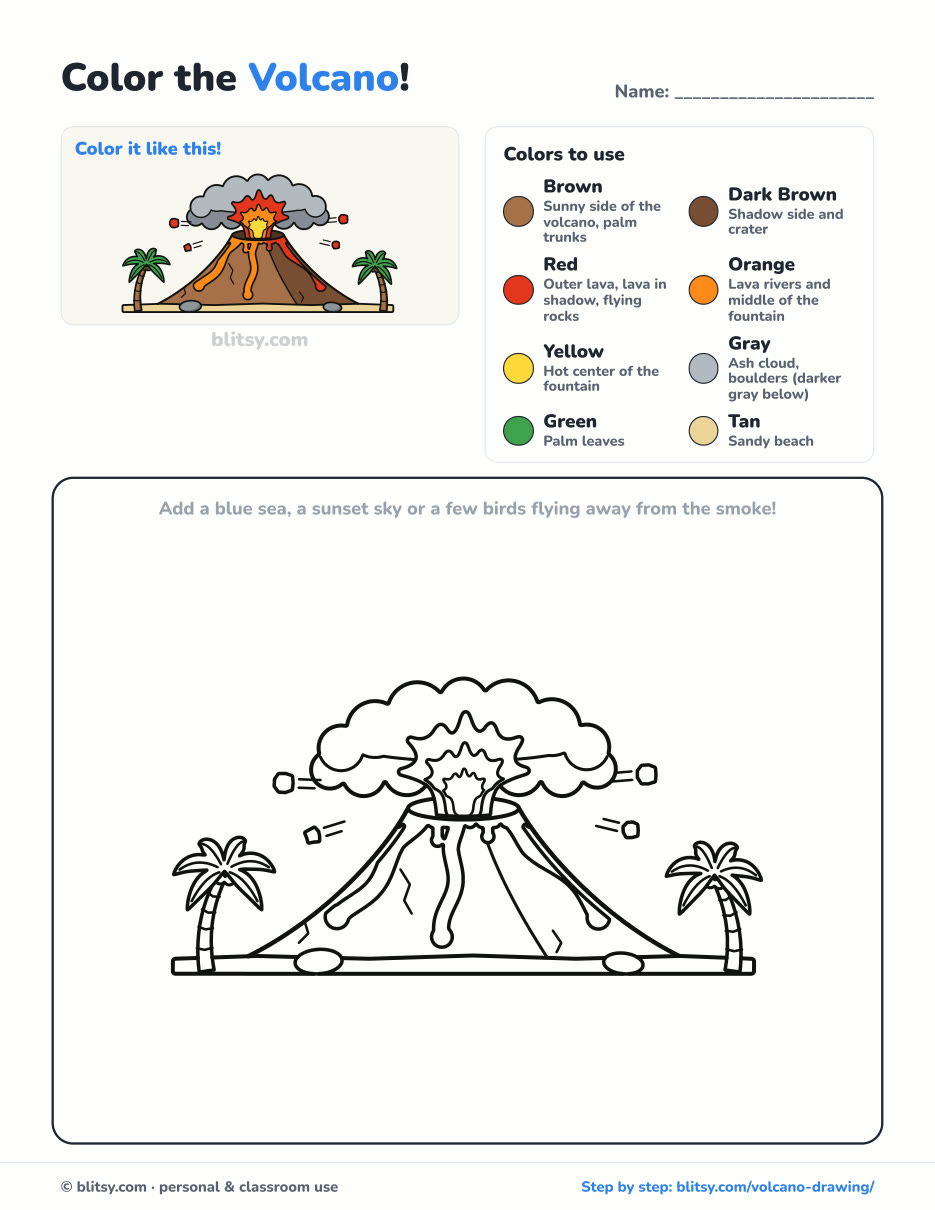
Black outlines with a colored example and the color names at the top. Ready to print and color.
⬇️ Download Coloring PageEvery step picture with its instructions and tips, to keep beside your paper while you draw.
⬇️ Download Drawing Guide📱 On a phone? Tap a download button, then open the file and choose Share → Save to Files or Print. On a computer, the PDF opens or saves straight to your Downloads folder.
Pin the Volcano Steps for Later
Eruption Over? Pick Another Scene or Object
These are step-by-step tutorials with a picture for each stage, covering objects, vehicles and full scenes.
- Diamond Drawing: Learn how to draw a diamond step by step with straight lines, two small gems and a few sparkles.
- School Drawing: A brick schoolhouse with a bell tower and a clock is what you build in the school drawing tutorial.
- Realistic Drawing: The realistic apple shading tutorial teaches five kinds of light on one round fruit.
- Police Car Drawing: Lights on and star polished, the patrol car takes 11 short steps in this police car drawing tutorial.
- Halloween Drawing: Draw a cute haunted house with glowing windows using the Halloween drawing step by step lesson.
- Room Drawing: Set one vanishing point and a whole bedroom follows in how to draw a room in one-point perspective.
- Race Car Drawing: Two circles turn into a red number 7 racer in the race car drawing tutorial.
- Solar System Drawing: Line up the planets from the Sun to Neptune with the solar system drawing step by step guide.
- Fire Truck Drawing: A fire truck with its ladder up top and a hose reel on the side comes from this fire truck drawing tutorial.
- Summer Drawing: The beach scene drawing tutorial fills the sand with toys and an umbrella in front of the sea.
Volcano Drawing Questions From Curious Kids
What is the easiest way to draw a volcano?
Draw a triangle, erase the top point, and add a flat oval in its place. A few wavy orange lines coming out of the oval are enough to show an eruption.
Is it lava or magma in a volcano drawing?
Both, depending on where it is. Melted rock is called magma while it's still underground and lava once it comes out of the volcano. So everything you color orange and red on the outside is lava.
How do you draw a volcano for kids?
Keep the cone, the crater and one lava fountain, and skip the cracks, the ridge and the palm trees. Young kids can draw the ash cloud as three or four big bumps.
What color is volcano smoke?
The dark cloud above an erupting volcano is mostly ash, which is made of tiny bits of rock and volcanic glass. That's why gray works better than white, with a darker gray underneath.
That's your volcano erupting on paper. Next time, try drawing one at night with the lava glowing against a dark sky. 🌋
Related posts:
 How to Draw a Whale Step by Step (Easy for Beginners)
 How to Draw Lungs Step by Step (Easy Science Diagram)
 How to Draw a Pineapple Step by Step (Easy Crown and Slice)
 How to Draw Iron Man Step by Step (Easy Chibi for Kids)
 How to Draw a Dress Step by Step (Easy Party Dress)
 How to Draw a Chicken Step by Step (Easy for Beginners)
 How to Draw a UFO Step by Step (Cute Alien Saucer)
 How to Draw Flames Step by Step (Easy Campfire Drawing)
 How to Draw a Crow Step by Step (Easy for Beginners)
 How to Draw a Tiger Step by Step (Easy Walking Pose)
 How to Draw a Heart Step by Step (Even, Symmetric Shape)
 How to Draw a Jellyfish Step by Step (Cute, Easy Guide)

