
Pineapples look complicated at first glance, with all those diamonds and spiky leaves, but they're really just a tall oval wearing a crisscross pattern and a hat. Here you'll learn how to draw a pineapple step by step, starting from a light oval and a circle and ending with a golden fruit and a sunny slice. The pattern on the skin is the part people worry about, so I've split it into two easy passes. You don't need any art experience, only a pencil and a bit of patience for the middle steps.

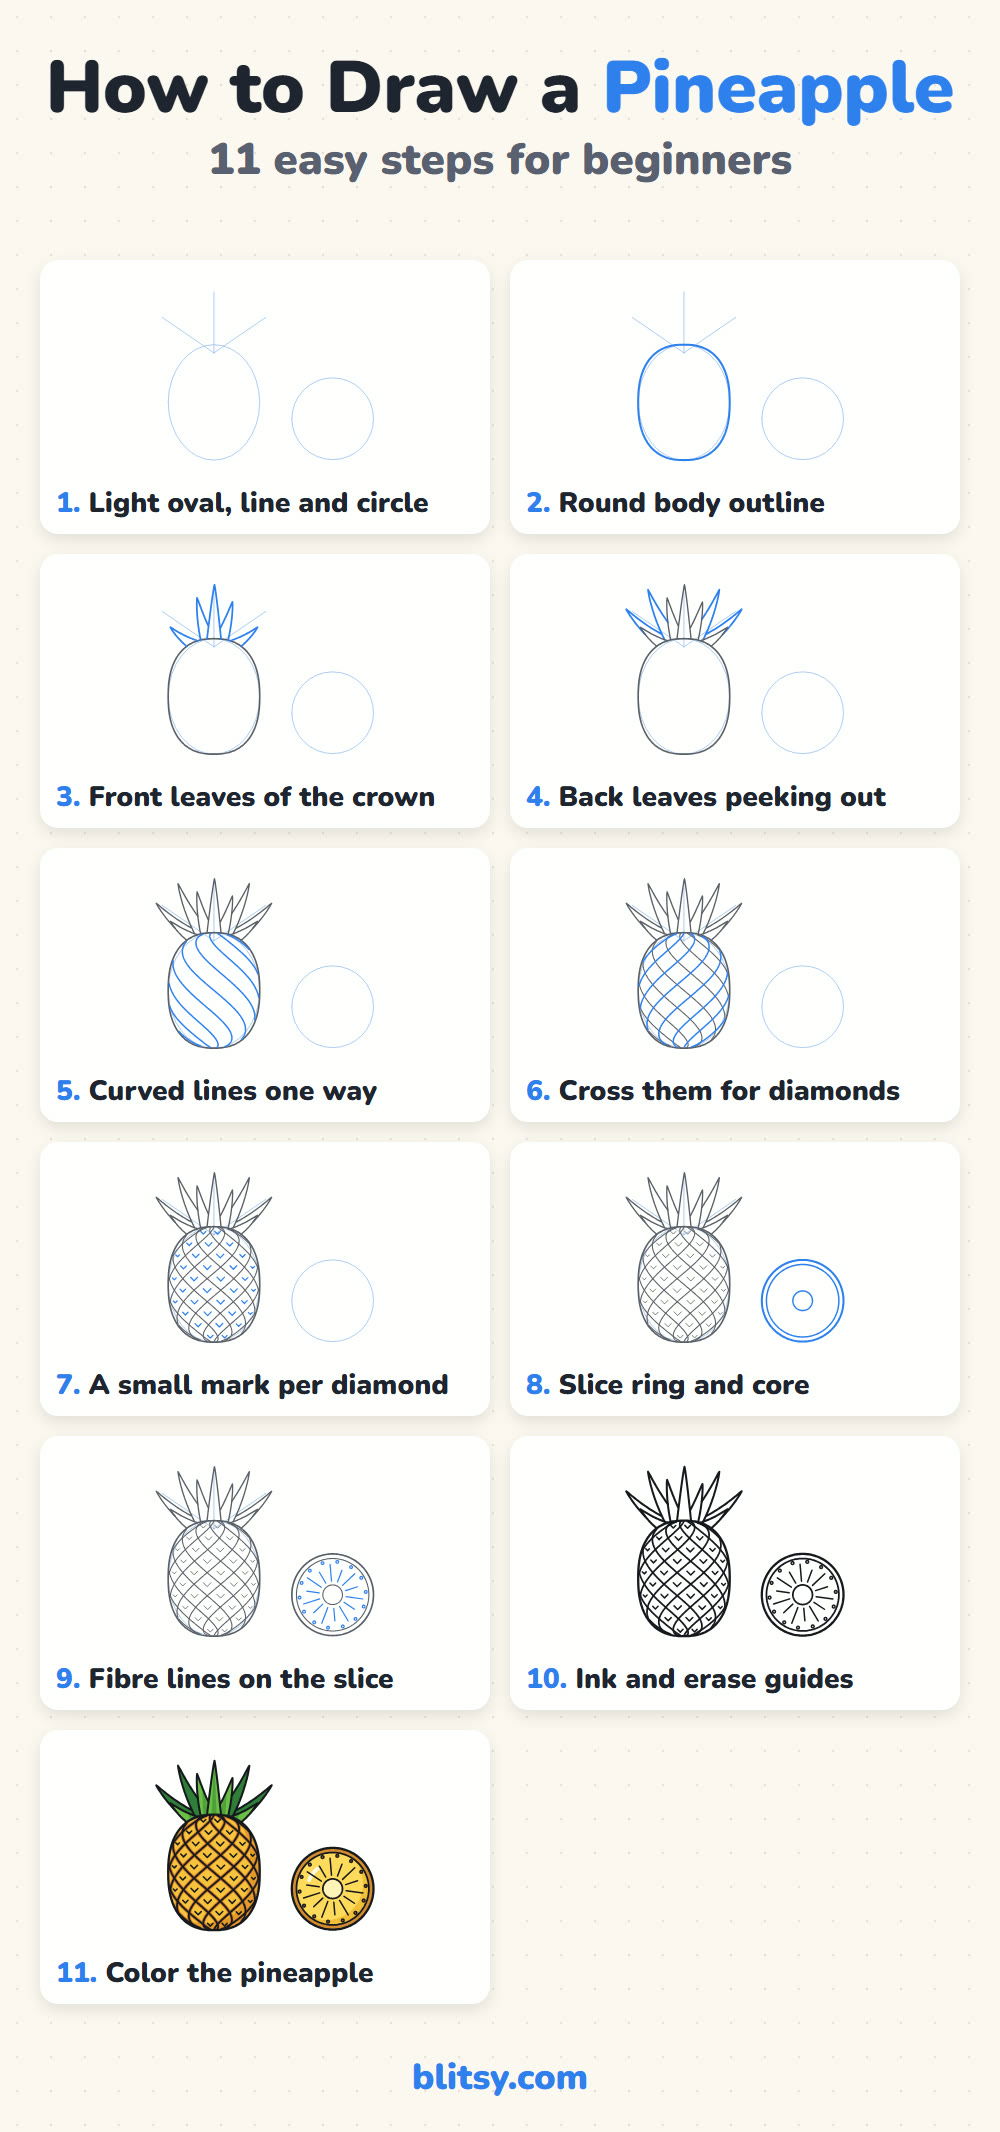
In each picture, the lines you add in that step are blue and everything from before is gray. Pale blue shapes are helper guides, so sketch them with almost no pressure; they get erased in step 10 once the real lines are inked.
Quick overview
⏱️ Time: about 20 to 30 minutes with coloring
🎯 Level: easy, good for kids from about 6 and up
✏️ Steps: 11
🍍 You'll draw: a whole pineapple with a leafy crown and a round slice beside it
Gathering Supplies for a Pineapple Sketch
- A regular pencil (HB is fine) for light guide lines
- An eraser that doesn't smudge
- A black marker or fineliner for inking
- Colored pencils or markers in golden yellow, orange brown, dark green, light green and cream
- A sheet of paper turned sideways so the slice has room
No orange brown in your box? A brown pencil pressed lightly gives almost the same color.
How to Draw a Pineapple Step by Step
Step 1: Sketch an oval, a crown line and a circle
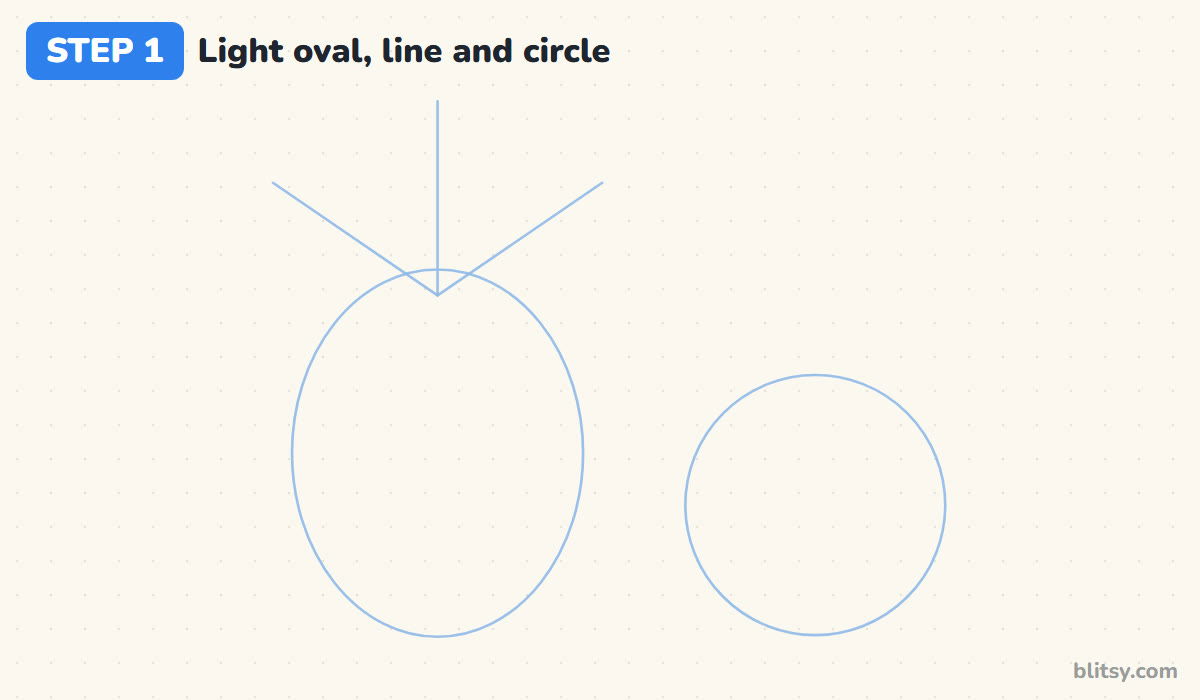
On the left half of the page, draw a tall oval about one and a half times as high as it is wide. From the top of it, add one straight line going up and two slanted lines fanning out like a V; they show how far the leaves will reach. On the right, draw a circle a bit smaller than the oval's width for the slice. Keep every line faint.
💡 Tip: Make the crown lines about as long as the oval is wide. Shorter, and the pineapple looks bald.
Step 2: Draw the round body outline
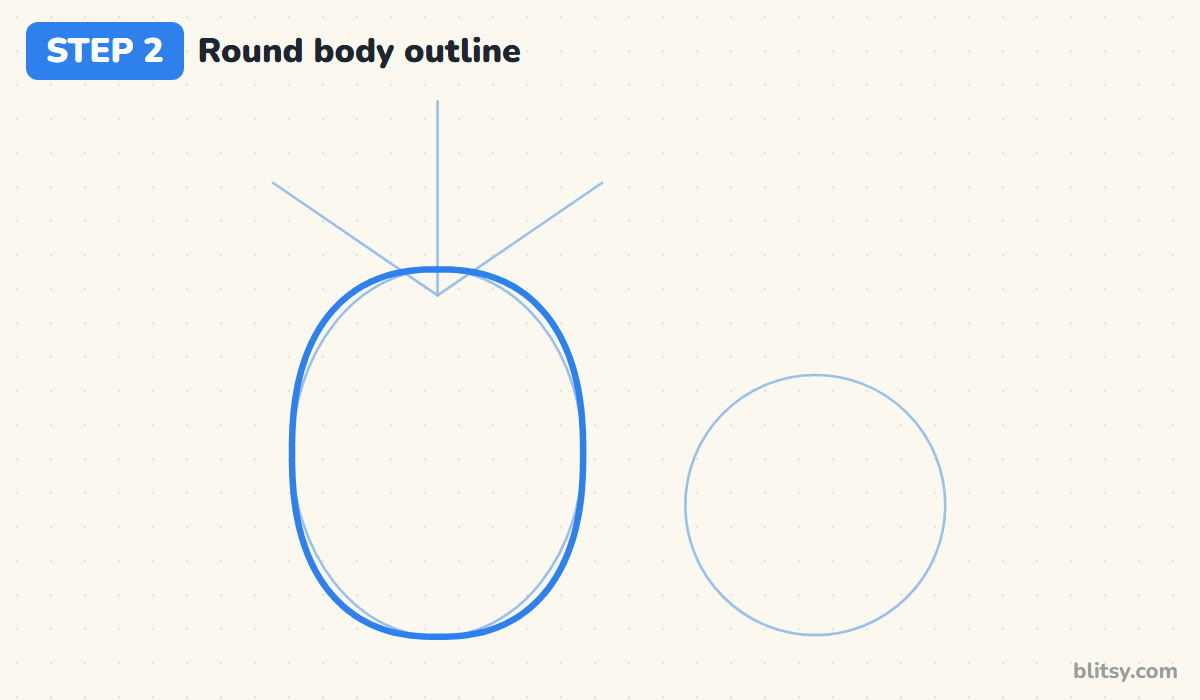
Trace over the oval with a firm line, but let the sides bulge out a little more than the guide so the body looks fuller, almost like a barrel. A real pineapple is quite square-shouldered, and a perfect egg shape makes it look more like a lemon. Flatten the bottom slightly too, because the fruit stands on it.
💡 Tip: Draw the left and right sides as two separate curves, then join them at the top and bottom.
Step 3: Add the front leaves of the crown
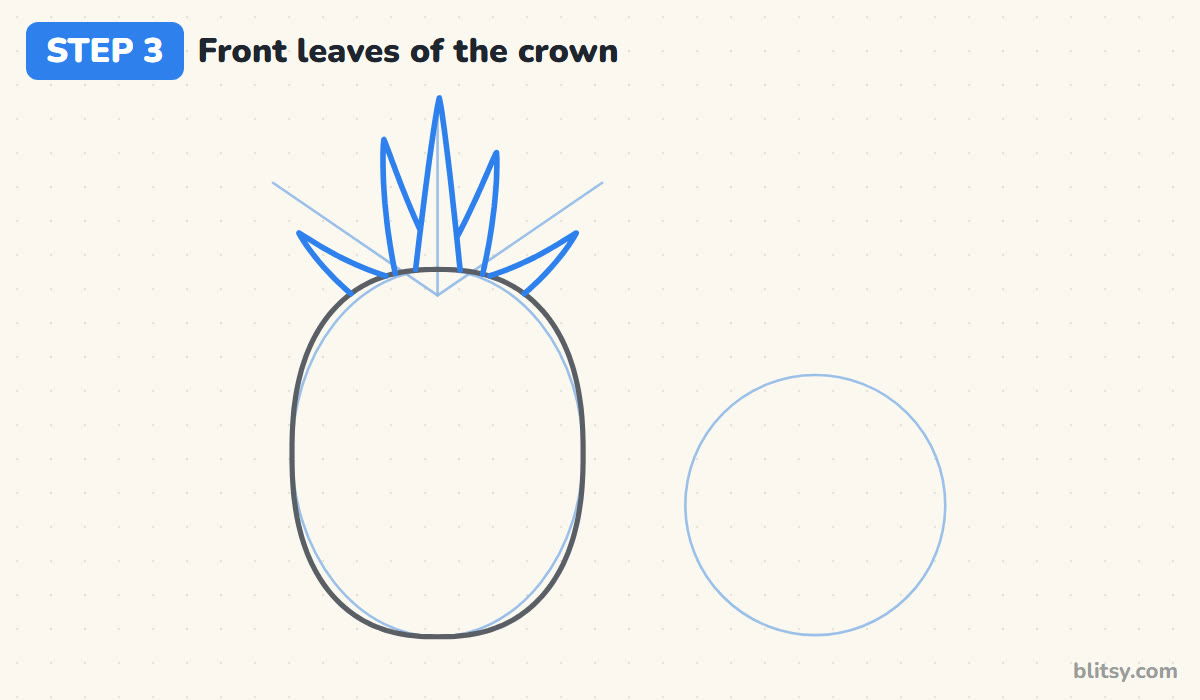
Start with the tallest leaf, right in the middle on the crown line, shaped like a long narrow triangle with slightly curved sides. Put two shorter leaves on either side of it, leaning outward. Then add two low leaves that bend out sideways near the top of the body. I draw the front row first, because it's easier to tuck the back leaves behind finished shapes than to erase overlaps later.



💡 Tip: Let every leaf get wider at the bottom and disappear behind the body's top edge.
Step 4: Fill gaps with back leaves
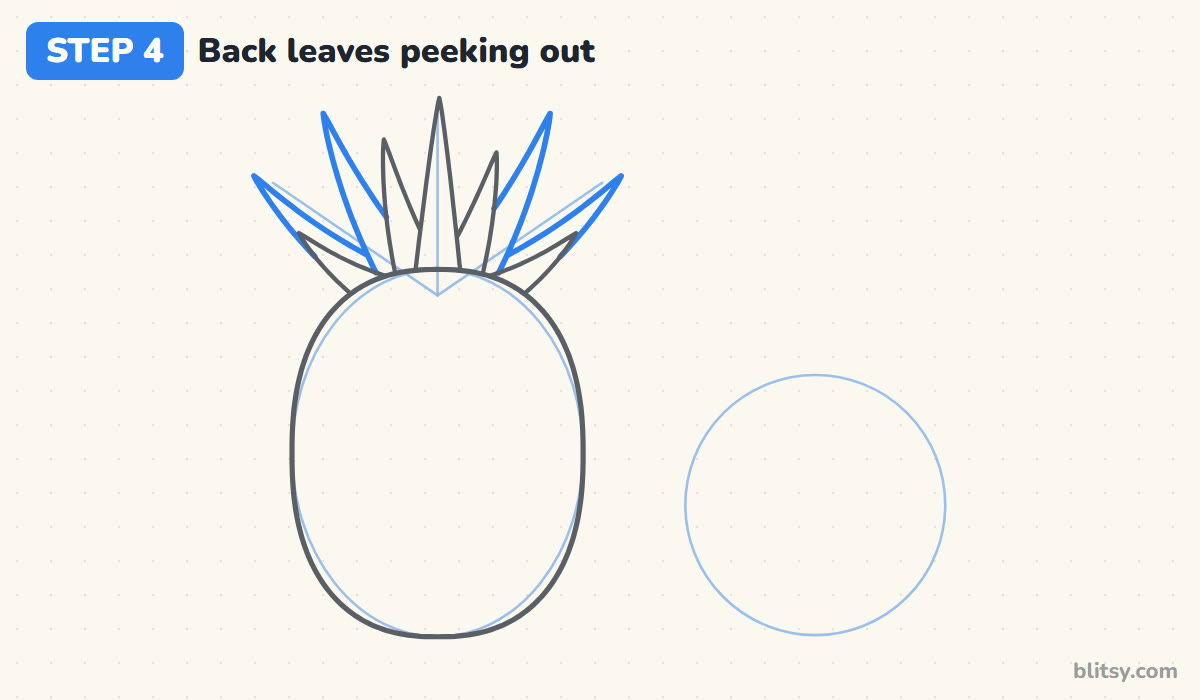
Now add longer leaves behind the front row, following the slanted guide lines. Only draw the parts you can see: start each line where it comes out from behind a front leaf and stop at the tip. Four back leaves is plenty. This layering is what makes the crown look thick and spiky instead of flat like a paper fan.
💡 Tip: Point the back leaves farther out than the front ones so they peek around them.
Step 5: Draw curved lines going one way
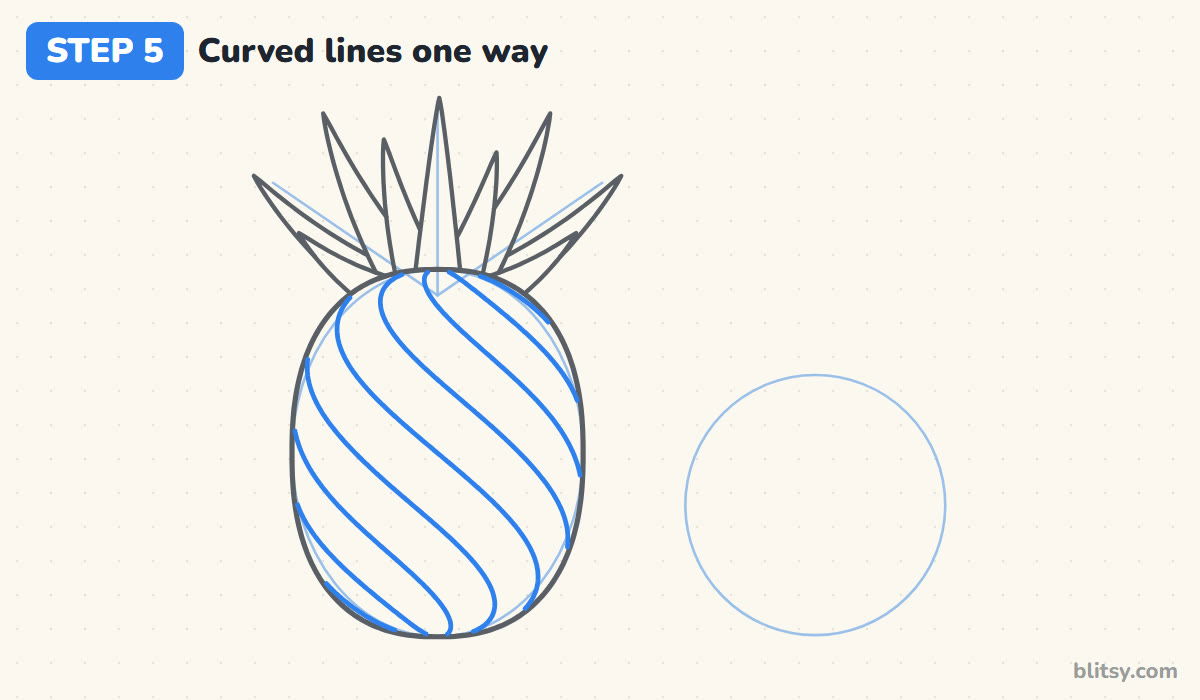
Inside the body, draw a set of evenly spaced lines that slant from the lower left to the upper right. Here's the trick: curve each one gently, like a stripe wrapped around a ball. Near the left and right edges the lines bend more steeply, which tells the eye the fruit is round. Space them about a finger width apart.
💡 Tip: Begin with the line through the middle, then work out to each side so the spacing stays even.
Step 6: Cross them to make diamonds
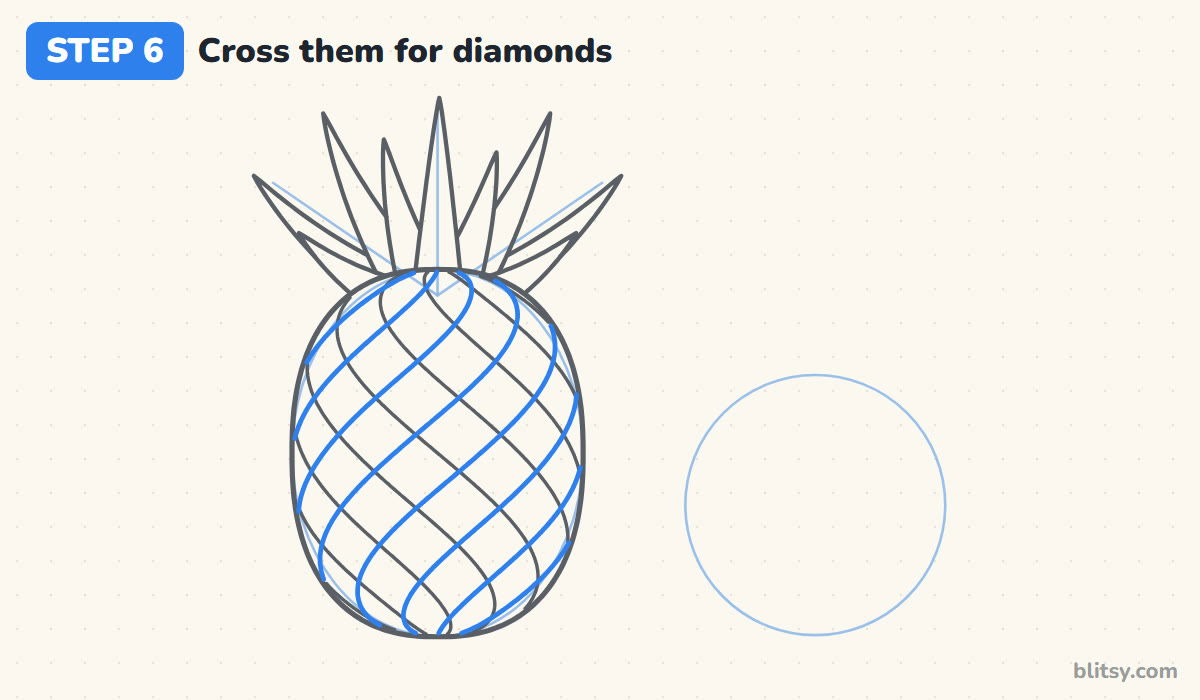
Add a second set of curved lines slanting the other way, from the lower right to the upper left, using the same spacing. Where the two sets cross, you'll see rows of diamonds appear all over the skin. Most beginners panic here because it looks busy. Keep going; it settles down once the marks and colors go in.
💡 Tip: Turn the paper so you're always pulling your pencil in the direction your hand likes best.
Step 7: Put a small mark in each diamond
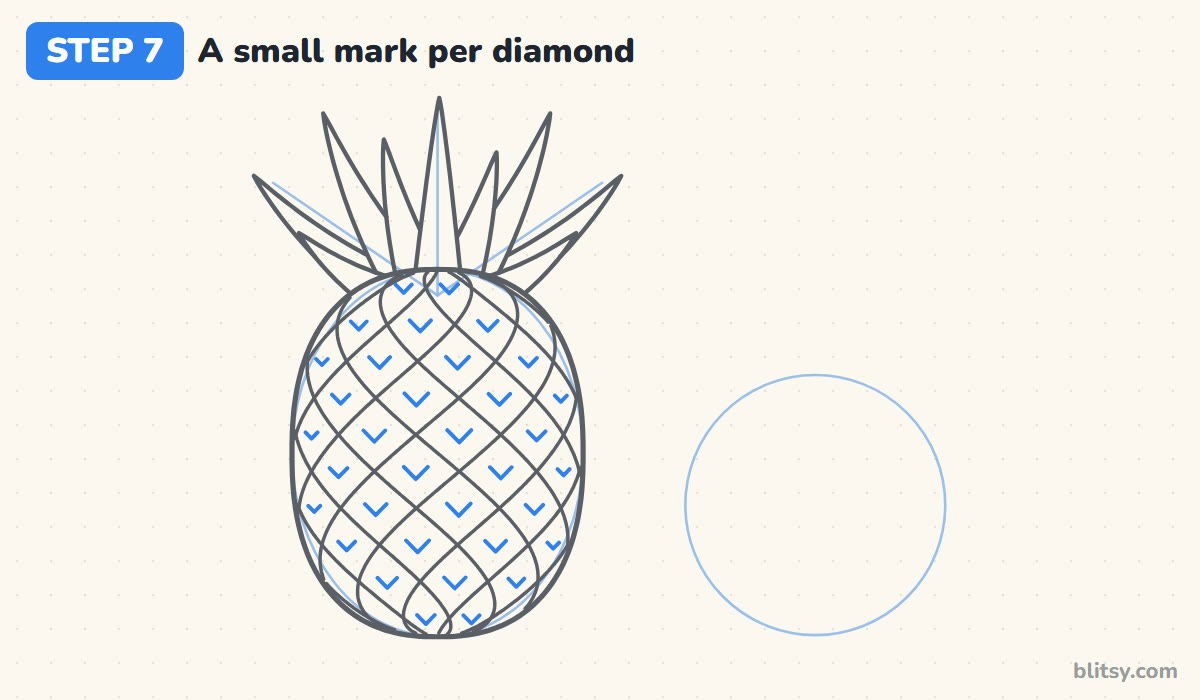
In the middle of every whole diamond, draw a tiny V shape. These are the little prickly points real pineapples have on each segment. Make the marks smaller near the edges and the top, where the diamonds get squeezed. Skip any diamond that's cut in half by the outline, since a mark there would look crowded.




💡 Tip: Keep all the V shapes pointing the same way. Mixed directions look messy fast.
Step 8: Turn the circle into a slice
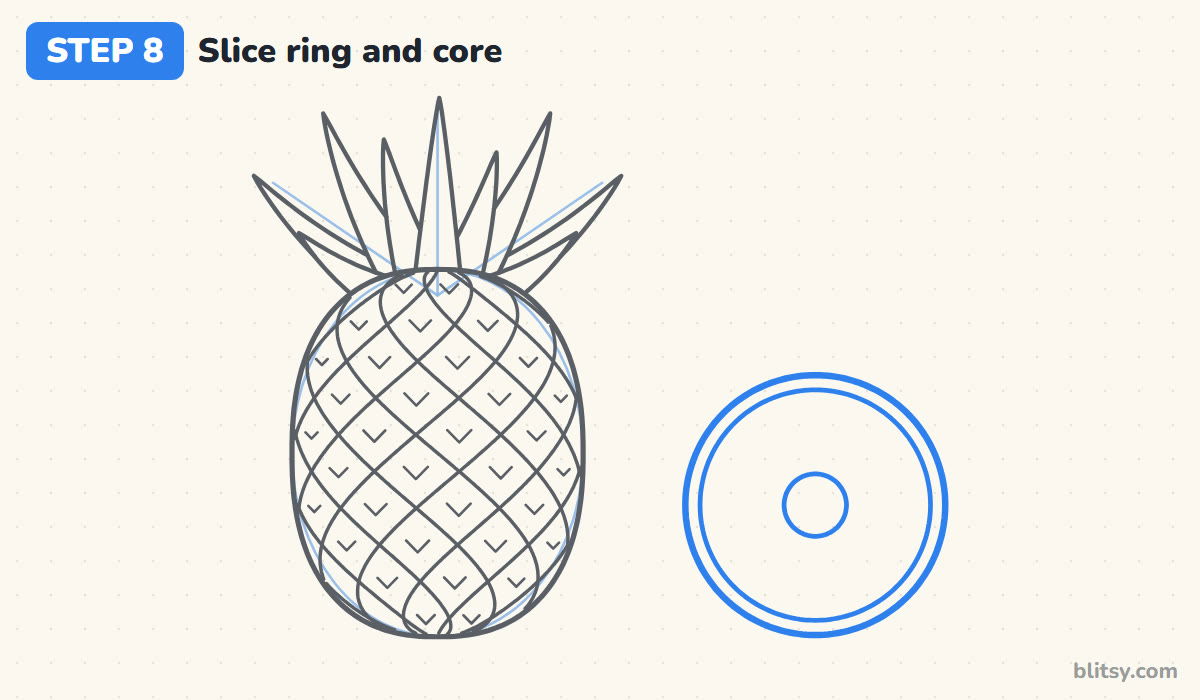
Go over the circle on the right with a firm line. Just inside it, draw a second circle close to the edge; that thin band is the skin. Then put a small circle in the very center for the core, about a quarter as wide as the slice. A slice explains the fruit from the inside, and it fills the empty side of the page nicely.
💡 Tip: Spin the paper slowly while you draw circles. Your hand stays in its comfortable spot.
Step 9: Draw fibre lines and little eyes
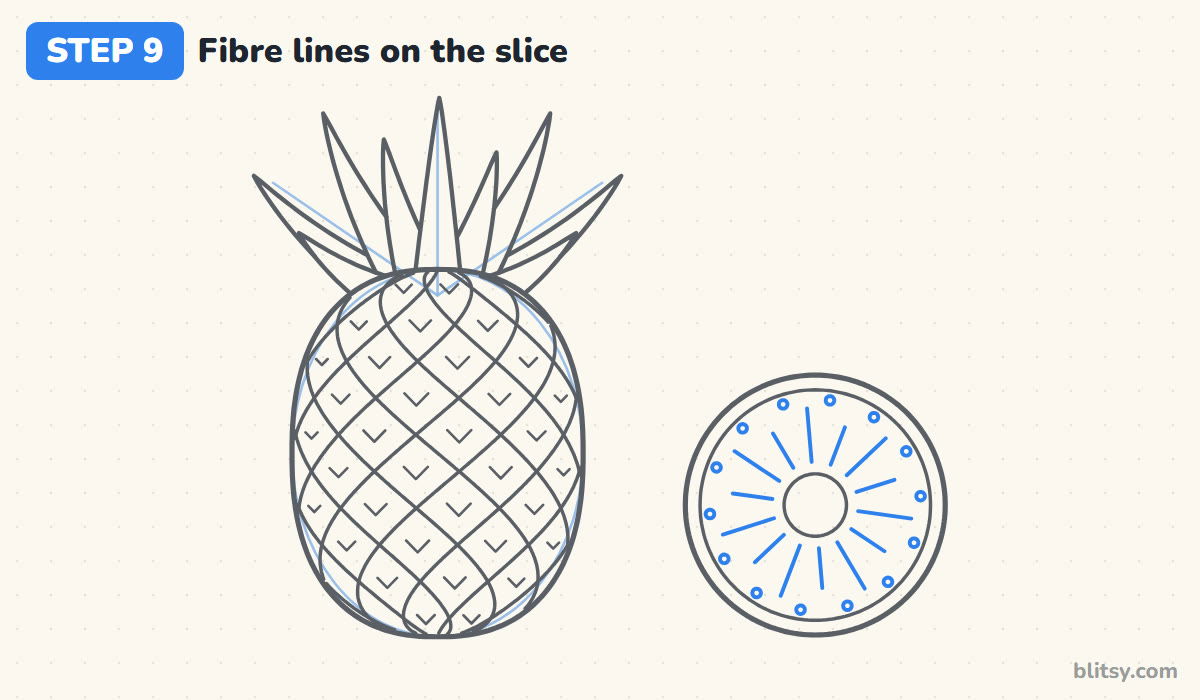
From the core, draw short straight lines pointing outward like the spokes of a wheel, stopping well before the skin. Alternate a long one and a short one so they don't look stiff. Then add a ring of tiny circles just inside the skin band. Those are the eyes you'd cut away when you peel a real pineapple.
💡 Tip: Draw opposite spokes in pairs, top then bottom, left then right. They'll stay balanced.
Step 10: Ink the lines and erase the guides
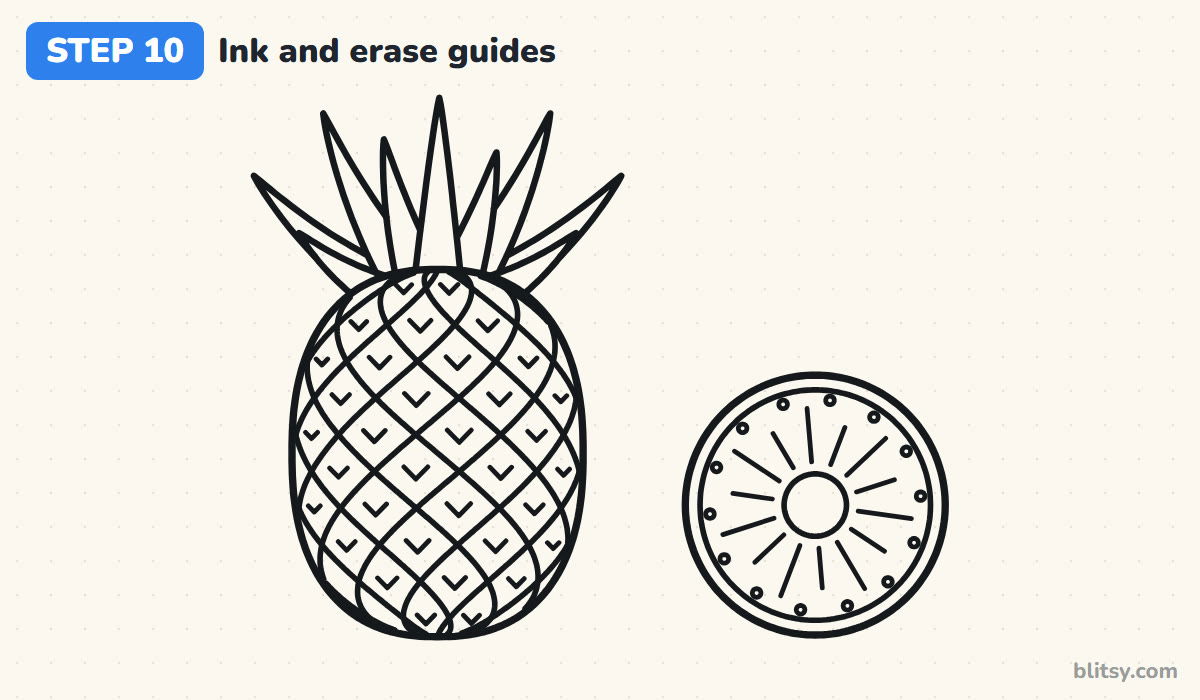
With your black marker, trace every line you want to keep: the body, the leaves, both sets of diagonals, the marks and the slice. Wait a minute for the ink to dry. Then erase the oval guide, the crown lines and the circle underneath. What's left is a clean line drawing you can color or copy.
💡 Tip: Ink the outer outlines a bit thicker than the diamond lines. It keeps the shape readable.
Step 11: Color the pineapple
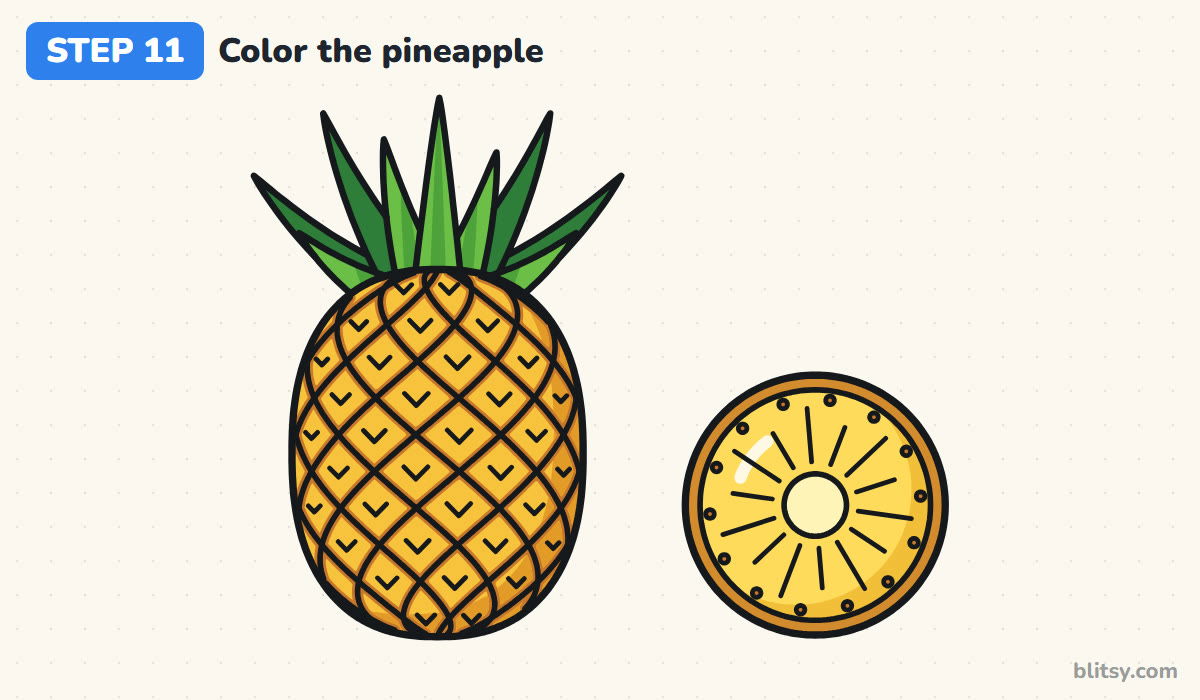
Color the back leaves dark green and the front leaves light green, adding a darker stripe down the middle of each front leaf. Fill each diamond with golden yellow and run orange brown along the crossing lines. A slightly deeper yellow on the right side of the body makes it look round. For the slice, use orange for the skin, bright yellow for the flesh and cream for the core.




💡 Tip: Leave a small white streak on the slice's upper left. It looks shiny and juicy.
Pineapple Problems I Spot Most Often
- Straight diagonal lines. Ruler-straight lines make the pineapple look like a flat waffle. Curve them so they bend more near the edges.
- Diamonds that are far too small. Dozens of tiny diamonds turn into a gray blur. Bigger diamonds, about a finger wide, read much better.
- A crown that's too short. If the leaves are tiny, the fruit looks unfinished. Aim for a crown roughly as tall as half the body.
- Leaves floating above the body. Every leaf should come out from behind the top edge, so let their bases disappear into it.
- One flat yellow everywhere. Without orange brown along the lines, the pattern vanishes. Two colors on the skin make it pop.
Sunglasses, Halves and Other Pineapple Spins
Once you're comfortable with the basic fruit, try giving it sunglasses and a smile for a summery character, or cut the pineapple in half lengthwise and show the pale center running down the middle. You can also stack three slices like coins or turn the crown into a party hat. If you'd like to keep drawing fruit, the fruit bowl drawing tutorial is a good next stop, and how to draw a strawberry step by step uses a similar seed pattern on a smaller shape.
Free Pineapple Coloring Page and Step Guide PDF
Need something for a rainy afternoon or a quiet classroom moment? The pineapple coloring page shows a small colored example at the top with each color named, and a large outline below with thick lines that are easy to stay inside. The step-by-step guide PDF collects all 11 steps with their tips, two per page. Both print well on Letter or A4 paper.
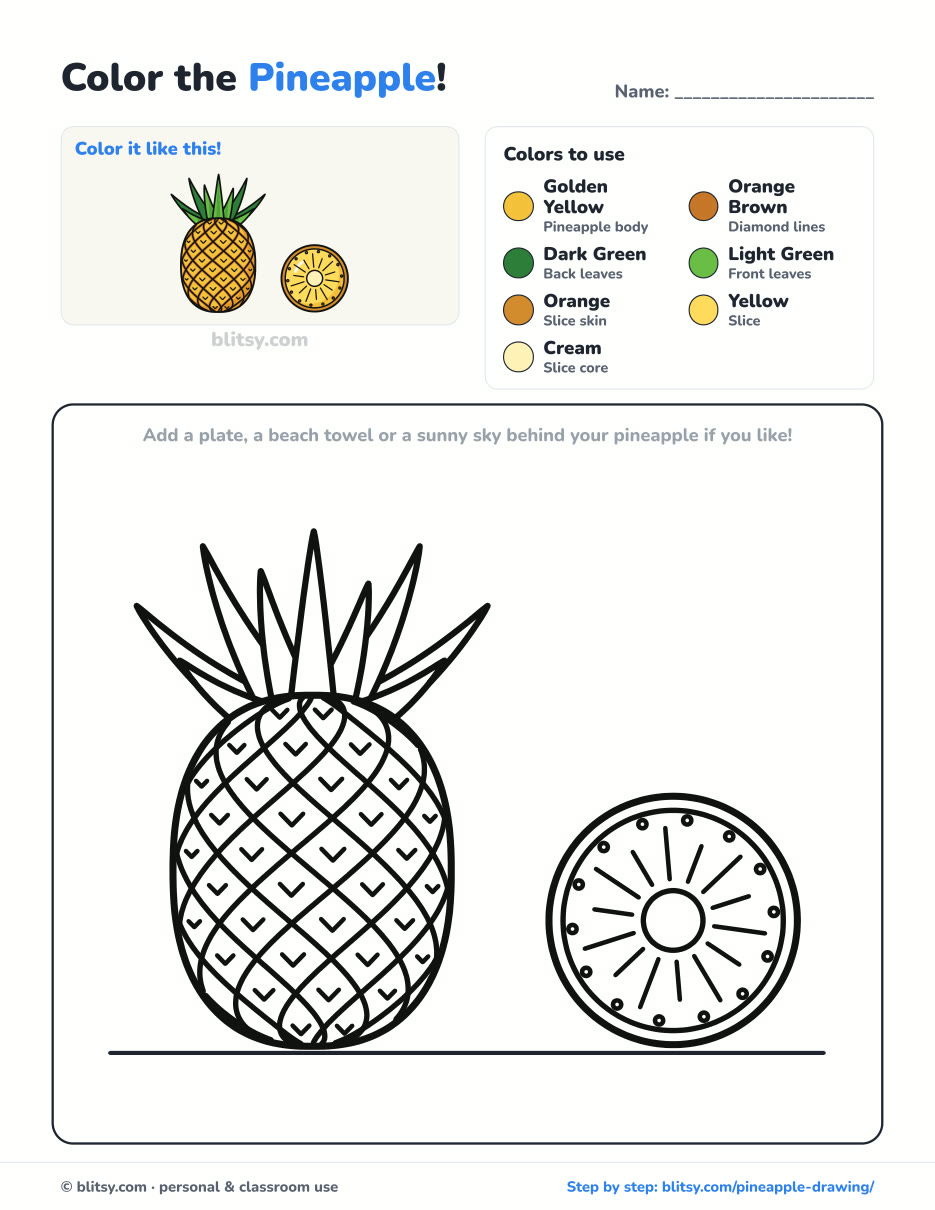
Black outlines with a colored example and the color names at the top. Ready to print and color.
⬇️ Download Coloring PageEvery step picture with its instructions and tips, to keep beside your paper while you draw.
⬇️ Download Drawing Guide📱 On a phone? Tap a download button, then open the file and choose Share → Save to Files or Print. On a computer, the PDF opens or saves straight to your Downloads folder.
Eleven Pineapple Steps on a Single Pin
Pineapple Drawn? Fruit, Flowers and More to Try
These are all step-by-step tutorials, with flowers, fruit and a couple of art-supply lessons in the mix.
- Rose Drawing: Learn the spiral method in how to draw a rose step by step, finished with a bud and two leaves.
- Strawberry Drawing: The strawberry drawing tutorial puts a seed pattern on a whole berry and a cut half.
- Magnolia Flower Drawing: Draw one wide-open magnolia with a younger flower and a bud in this magnolia flower drawing tutorial.
- Grass Drawing: Grow a whole meadow from a single blade with grass drawing step by step.
- Flower Drawing: Learn how to draw a flower with one pot holding a pink bloom, bluebells and a yellow star flower.
- Fruit Drawing: Keep the fruit theme going with the fruit drawing tutorial, a bowl still life with a banana over the rim.
- Garden Drawing: The garden drawing step by step lesson builds a sunny flower bed with a sunflower, a fence and a watering can.
- Dandelion Drawing: Draw a yellow flower and a seed head side by side with how to draw a dandelion.
- Cell Drawing: For school, the cell drawing tutorial shows an animal cell with a purple nucleus and red mitochondria.
- Succulent Drawing: The succulent drawing step by step guide draws a potted echeveria with pink-tipped leaves.
- Hibiscus Drawing: Try a tropical flower with five red petals in the hibiscus drawing tutorial.
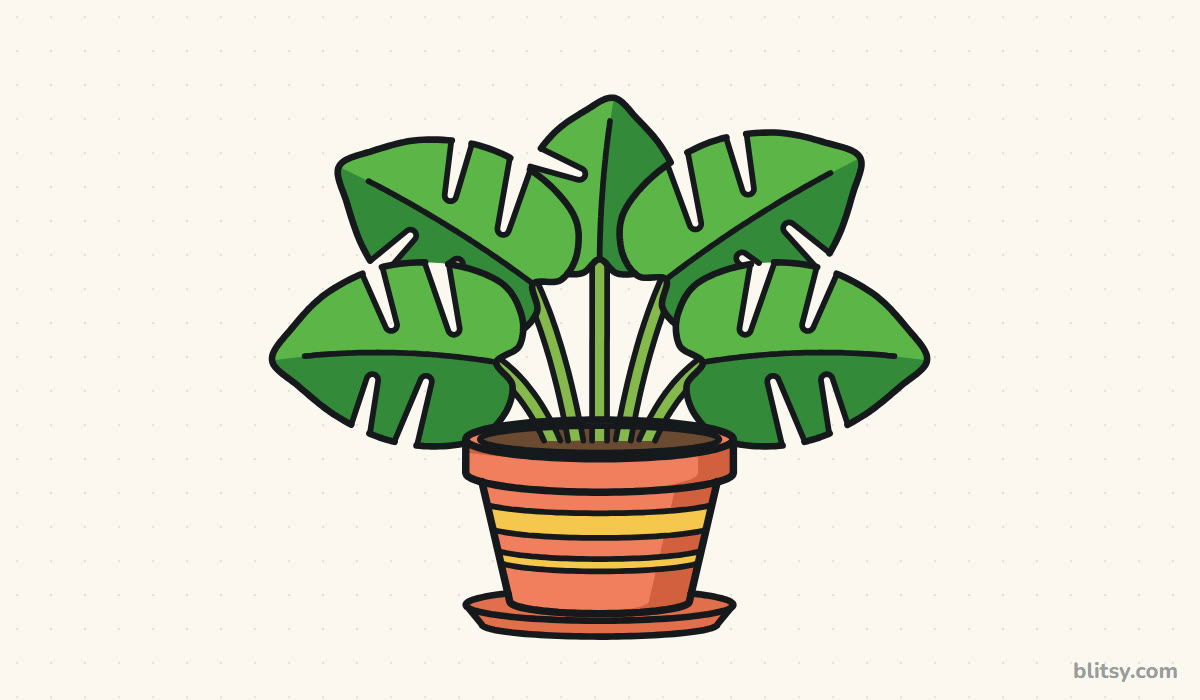
- Plant Drawing: A coral pot of monstera leaves waits in how to draw a plant step by step.
- Tree Drawing: The easy tree drawing tutorial ends with an apple tree and a knothole in the trunk.
- Chalk Art: Take your colors outside: how to do chalk art step by step draws a hopscotch grid and a rainbow.
- Oil Pastel Drawing: Blend a glowing sunset behind a dark palm in the oil pastel drawing tutorial.
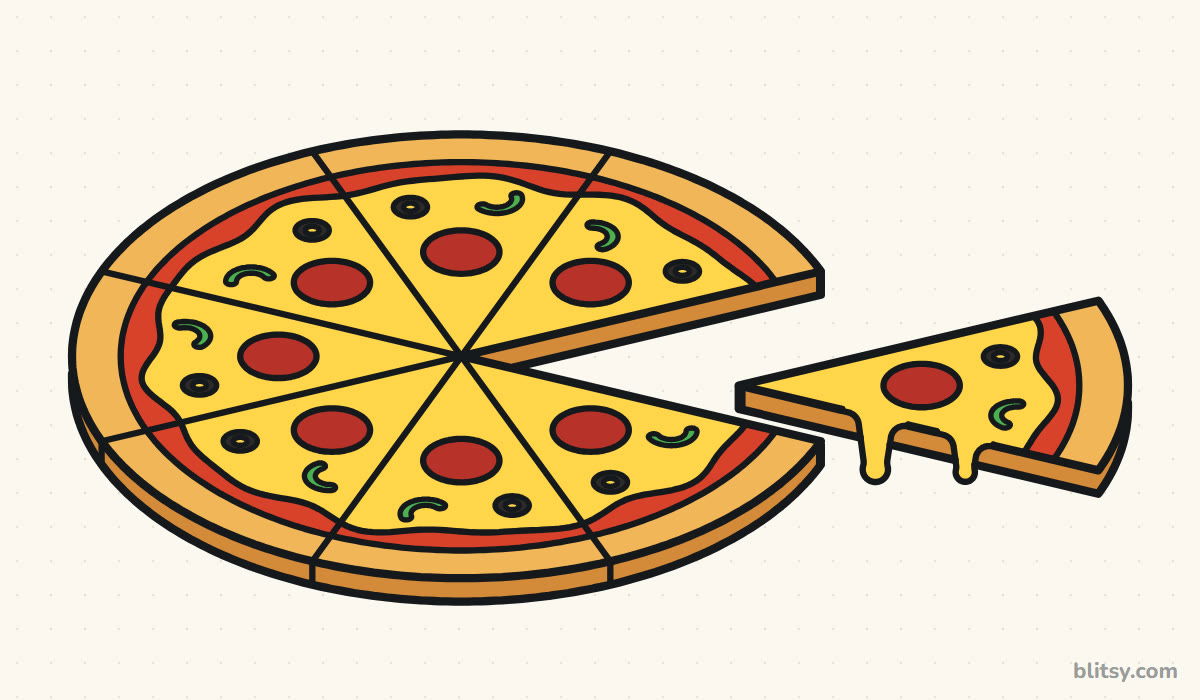
- Pizza Drawing: Finish with more food. Learn how to draw a pizza, with one cheesy slice pulled away.
Pineapple Drawing Questions Parents and Kids Ask
What is the easiest way to draw a pineapple?
Draw a tall oval, cover it with crossing diagonal lines to make diamonds, and add a fan of pointed leaves on top. That's the whole fruit in three moves.
How do you draw a pineapple pattern?
Draw one set of curved lines slanting one way, then a second set slanting the other way with the same spacing. A small V in each diamond finishes it.
What colors do I need for a pineapple?
Golden yellow and orange brown for the skin, plus a dark and a light green for the leaves. A cream color is handy for the core of a slice.
Is a pineapple hard to draw for kids?
Not really. Younger kids can use straight crossing lines and skip the slice. The leaves and the oval are simple enough for most six-year-olds.
Grab a pencil, sketch that first oval and see how fast your pineapple grows its crown. 🍍
Related posts:
 How to Draw a Pizza Step by Step (Easy, with a Cheesy Slice)
 How to Draw a Whale Step by Step (Easy for Beginners)
 How to Draw Lungs Step by Step (Easy Science Diagram)
 How to Draw a Plant Step by Step (Easy Potted Monstera)
 How to Draw the Fortnite Llama Step by Step (Easy Fan Art)
 How to Draw a Hoodie Step by Step (Front and Back View)
 How to Draw a Parrot Step by Step (Easy Scarlet Macaw)
 How to Draw a Police Car Step by Step (Easy for Kids)
 How to Draw a Volcano Step by Step (Easy Erupting Volcano)
 How to Draw a Crow Step by Step (Easy for Beginners)
 How to Draw a Tiger Step by Step (Easy Walking Pose)
 How to Draw a Heart Step by Step (Even, Symmetric Shape)

