
Roses scare a lot of beginners because all those petals look like a tangle. The secret is that a rose grows from the inside out, and you can draw it the same way. Below I show you how to draw a rose step by step with the spiral method: one small spiral first, then petals that wrap around it, one layer at a time. Each new petal starts and ends on a line you've already drawn, so you never have to guess where it goes.
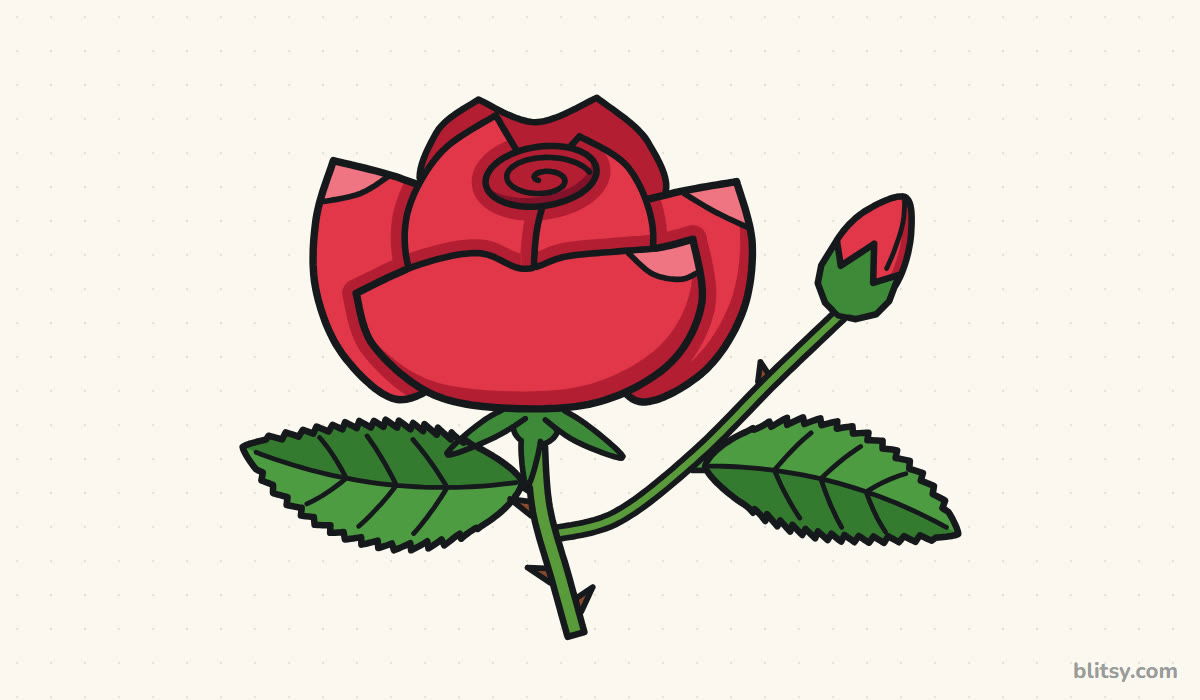
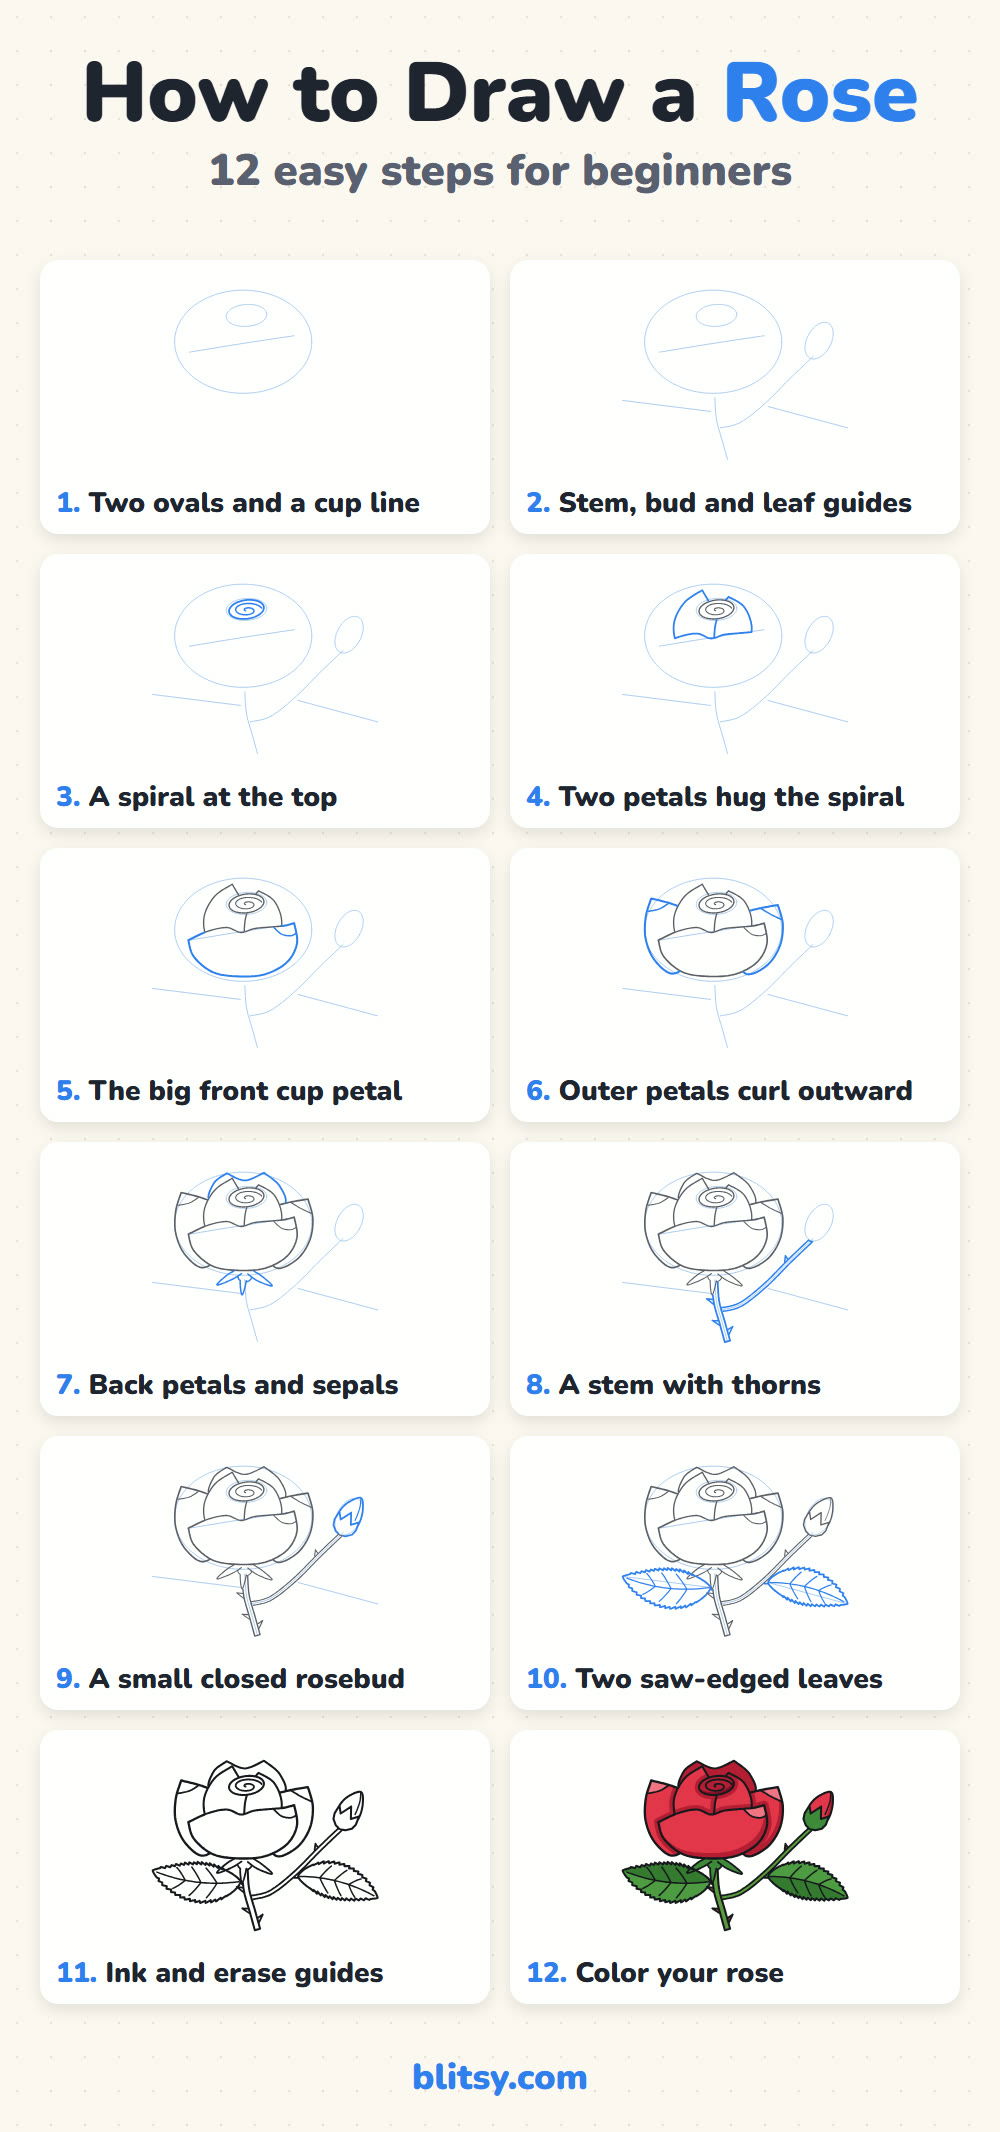
In each picture, the bright blue lines are the ones to add in that step. Anything gray is already on your paper from earlier. Pale blue shapes are construction guides, so keep them faint; they disappear in step 11.
Quick overview
⏱️ Time: around 40 minutes, coloring included
🎯 Level: easy to medium, fine for kids from about 9
✏️ Steps: 12
🌹 You'll draw: a half-open red rose with thorns, a closed rosebud and two serrated leaves
Rose Sketching Supplies From Pencil to Red
- A sharp HB pencil for light guide lines
- A clean eraser
- A black fineliner for the final outline
- Colored pencils: red, dark red, maroon, a soft pink, two greens and a little brown
- Plain drawing paper, turned sideways
Any red works, though having one lighter and one darker red makes the petals look rounded instead of flat.
How to Draw a Rose Step by Step
Step 1: Draw two ovals and a cup line
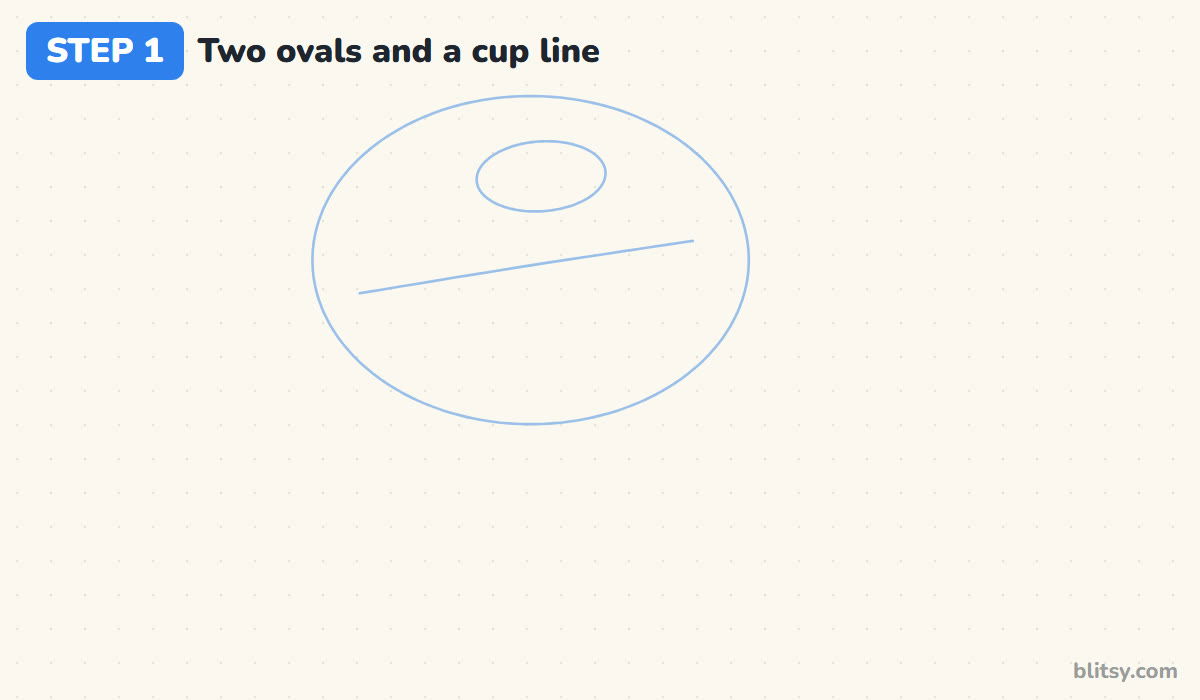
Start with a wide oval a little left of centre; this holds the whole bloom. Near the top of it, draw a much smaller oval, about a quarter as wide. Then add one gently slanted line across the middle of the big oval. That line marks the top edge of the front petal later on.
💡 Tip: Hold the pencil far back from the tip so your guide lines stay faint and easy to erase.
Step 2: Add guides for the stem, bud and leaves
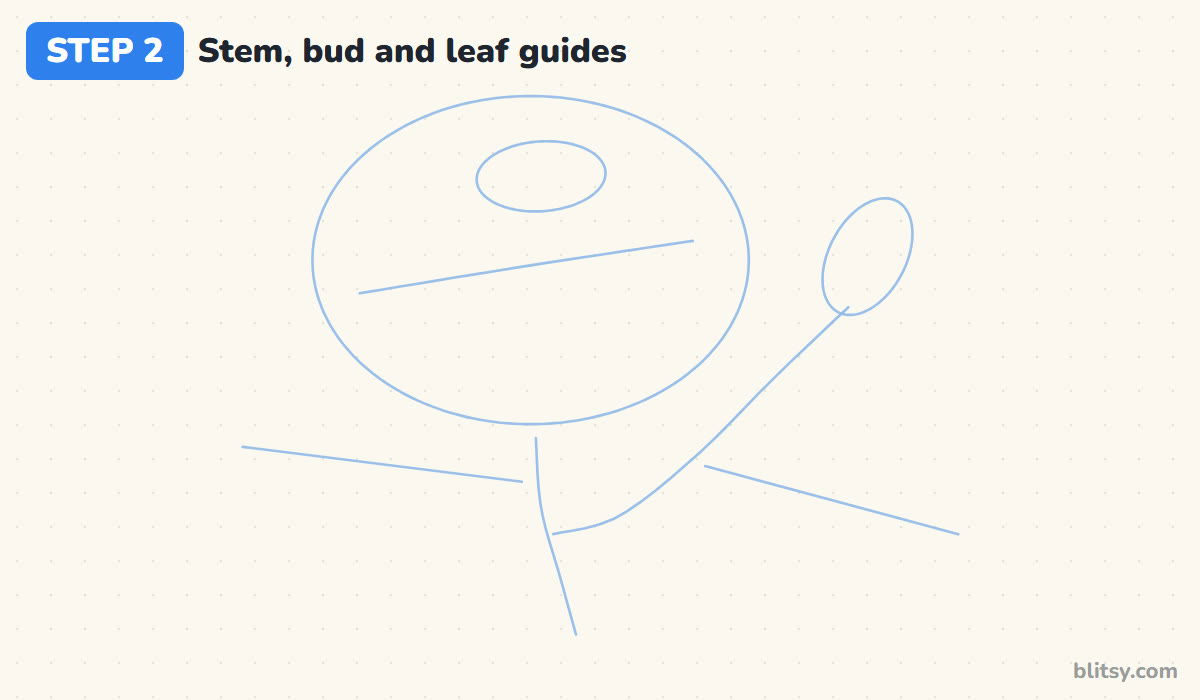
From under the big oval, draw a long stem line that leans slightly to the right as it goes down. About two thirds of the way down, branch a second line up to the right and end it with a small tilted oval for the bud. Two straight lines, one on each side of the stem, mark where the leaves will sit.
💡 Tip: Keep the bud oval no bigger than the small oval in the bloom, or it will compete with the main flower.
Step 3: Draw a spiral at the top
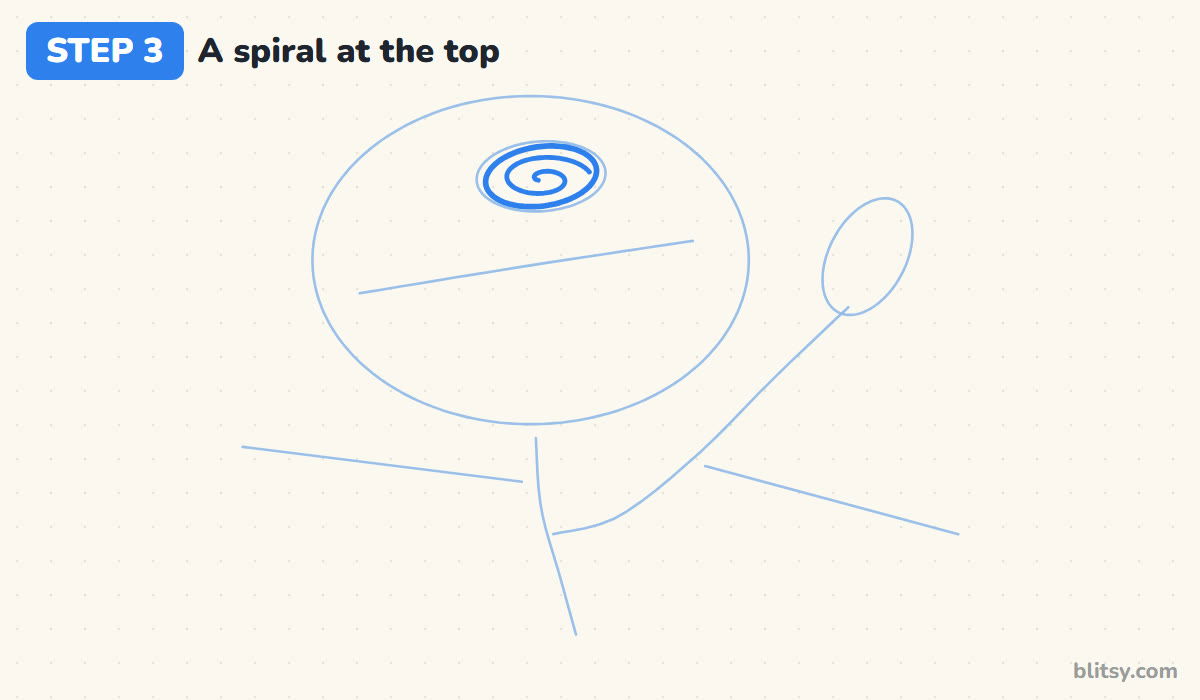
Here's the heart of the spiral method. Trace the small oval as a real line, then draw a loose spiral inside it, starting in the middle and turning outward about one and a half times. I keep the spiral flatter than a circle, because we're looking down at the rose from an angle.




💡 Tip: Leave a little space between the spiral's turns; tight loops blur into a dark blob once inked.
Step 4: Wrap two petals around the spiral
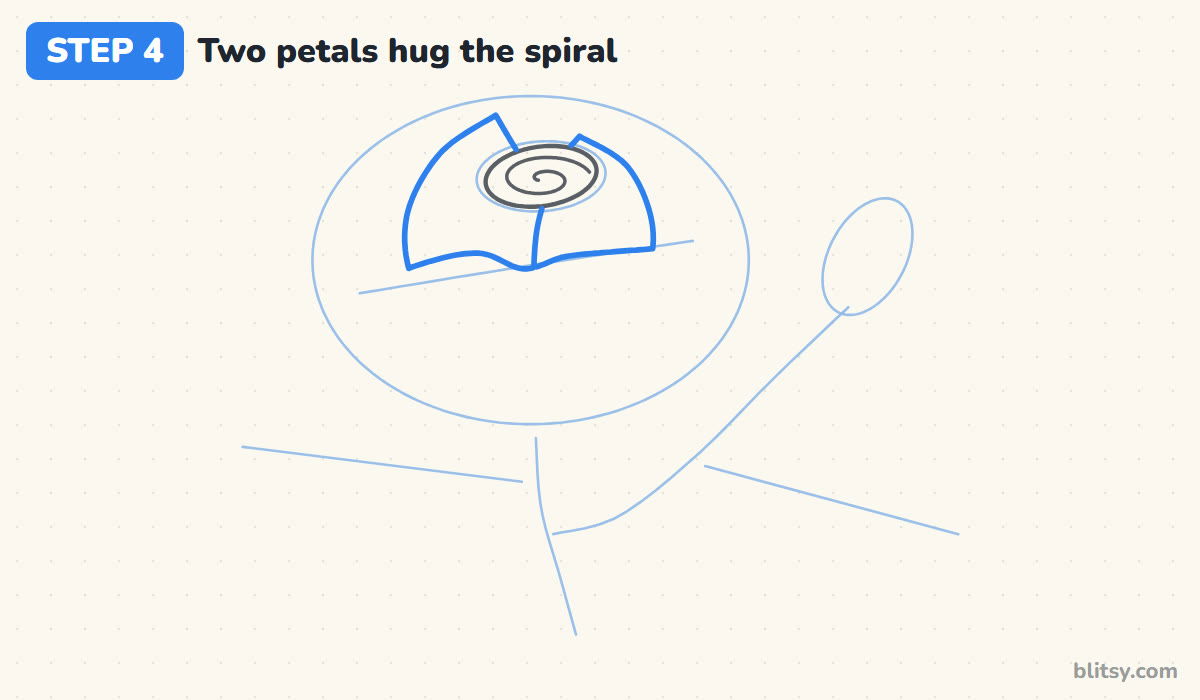
On the left, draw a tall petal that hugs the side of the spiral and rises to a small point above it. On the right, draw a shorter one that overlaps the first in the middle. Close both petals at the bottom with a wavy line that follows the cup guide. This wrapping is what makes a spiral look like a rose.
💡 Tip: Give each petal tip a slight point, since real rose petals fold back at the edge.
Step 5: Draw the big front cup petal
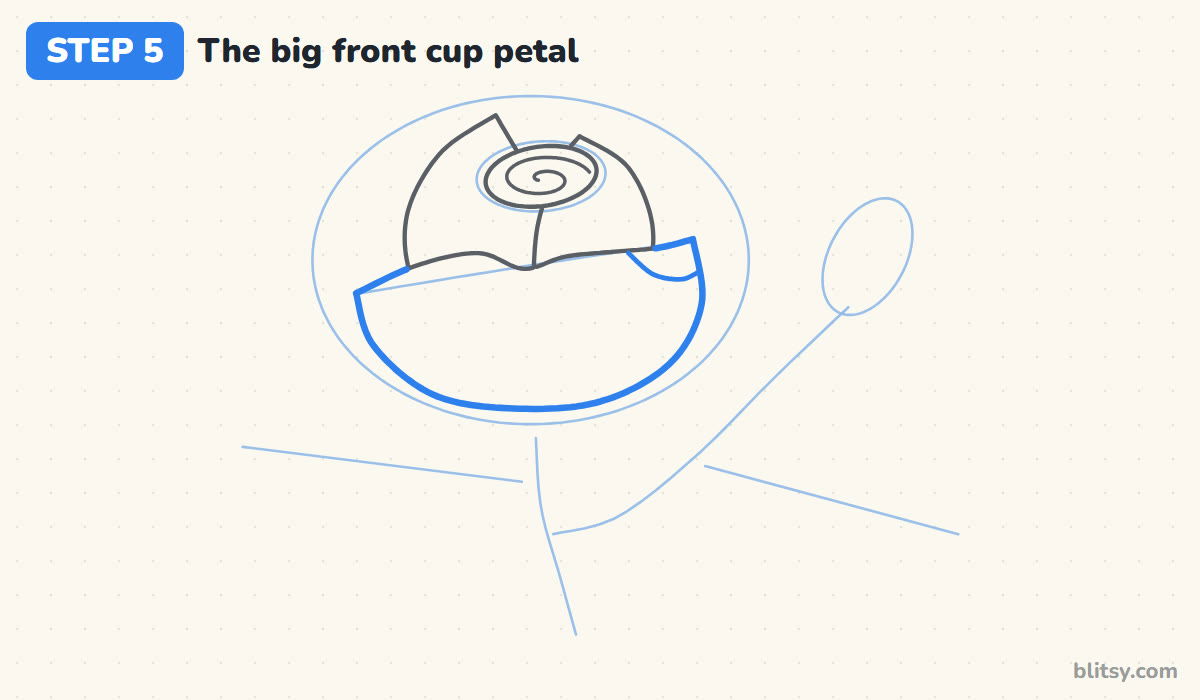
Hang a large rounded bowl shape from the wavy line you just made, filling the lower part of the big oval. Let its left corner stick out a little. At the right end, add a short curved fold so that corner looks rolled back. This petal is the closest one to you, which is why it's the biggest.
💡 Tip: Draw the bottom curve in one slow sweep instead of short scratchy strokes.
Step 6: Curl the outer petals outward
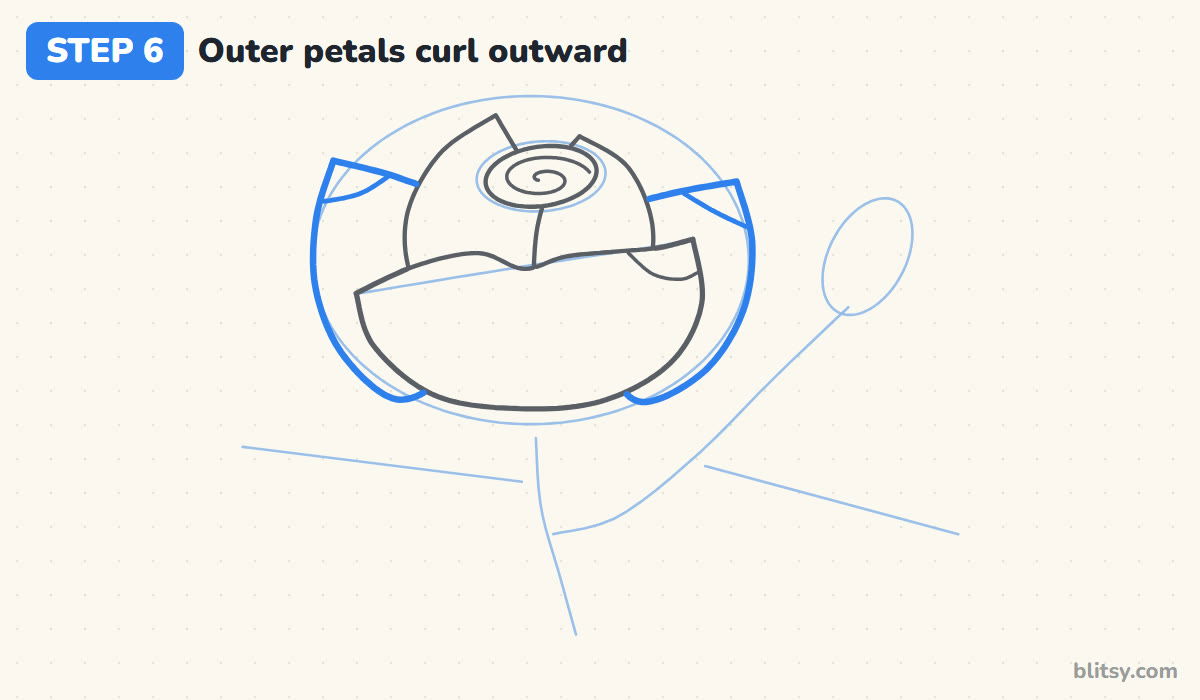
Behind the cup, draw one tall petal on each side of the bloom. They start at the wrap petals, swing out to the edge of the big oval, and come back in at the bottom. Each has a pointed top corner with a small fold line across it. Those folds show the petals opening away from the centre.
💡 Tip: Make the left and right petals slightly different heights; perfect symmetry looks stiff.
Step 7: Add the back petals and sepals
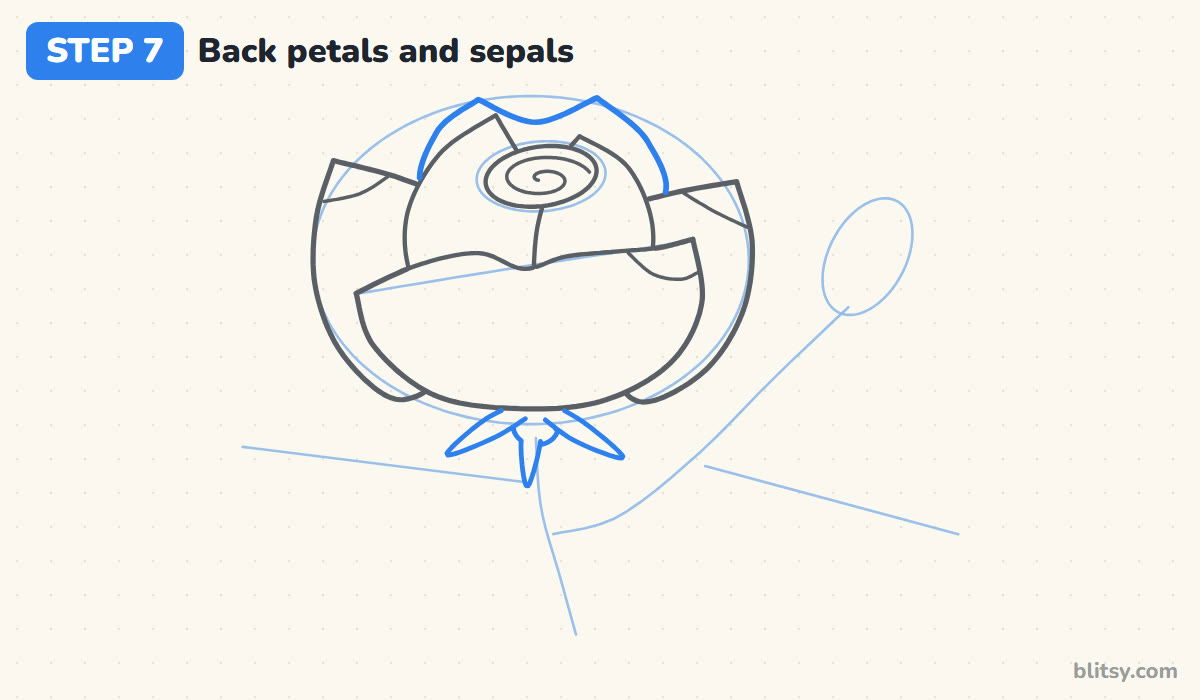
Above the wrap petals, draw a wavy edge with two soft points, peeking up behind the spiral. These are the back petals. Under the cup, draw three thin pointed leaflets called sepals, with a small round knob between them where the stem joins. Only bits of them show, which is exactly right.



💡 Tip: Stop every back-petal line where it meets a front petal and never cross over it.
Step 8: Draw a stem with thorns
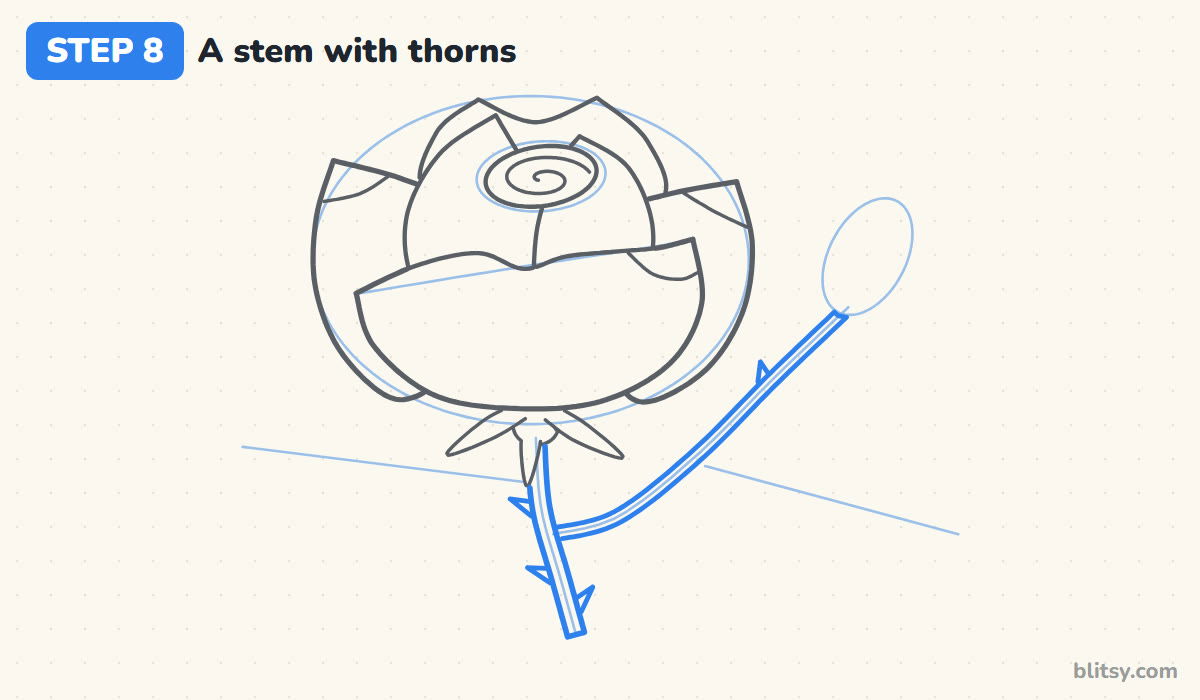
Follow the stem guide with two parallel lines, then do the same, a little thinner, along the branch. Add a few small triangle thorns on the outer edges, spaced unevenly. My rule is that thorns point up toward the flower, because that's how they grow on a real rose bush.
💡 Tip: Three or four thorns are enough; a dozen makes the stem look like barbed wire.
Step 9: Draw a small closed rosebud
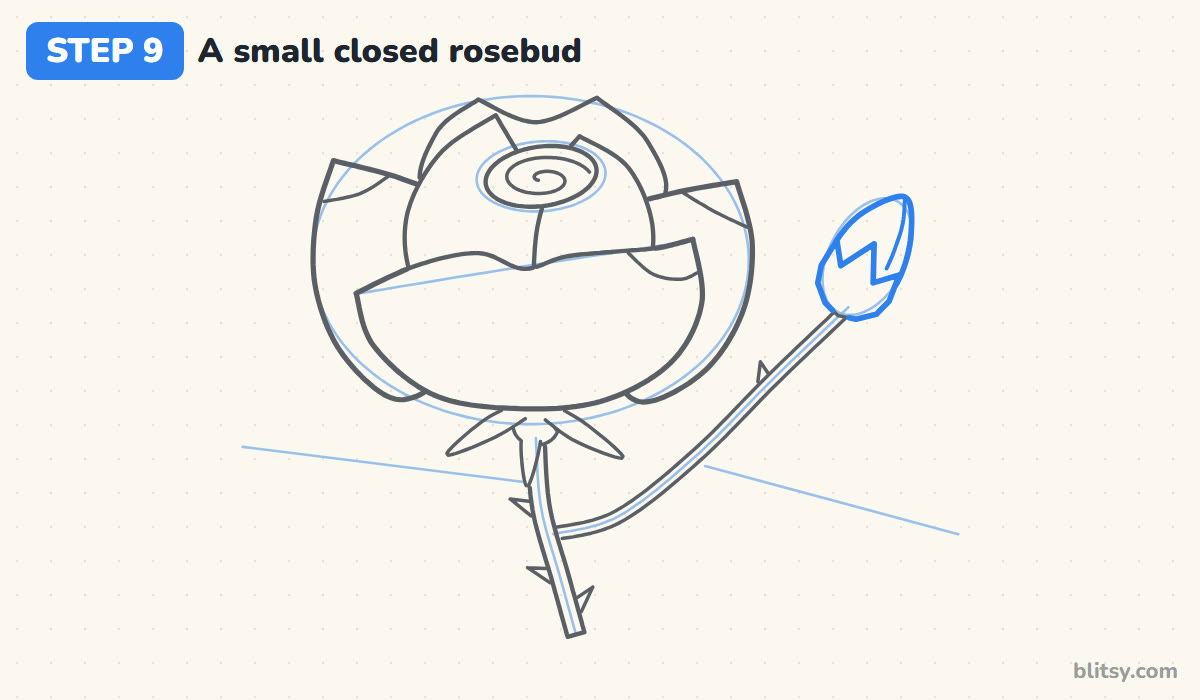
Inside the bud oval, draw a teardrop with its point at the top. Over the bottom half, draw a green cup with three sharp tips reaching up the sides. Finish with one curved line from the tip down the right side, which shows a petal still wrapped tightly around the bud.
💡 Tip: Kids who want a quicker drawing can skip the bud and the branch completely.
Step 10: Draw two saw-edged leaves
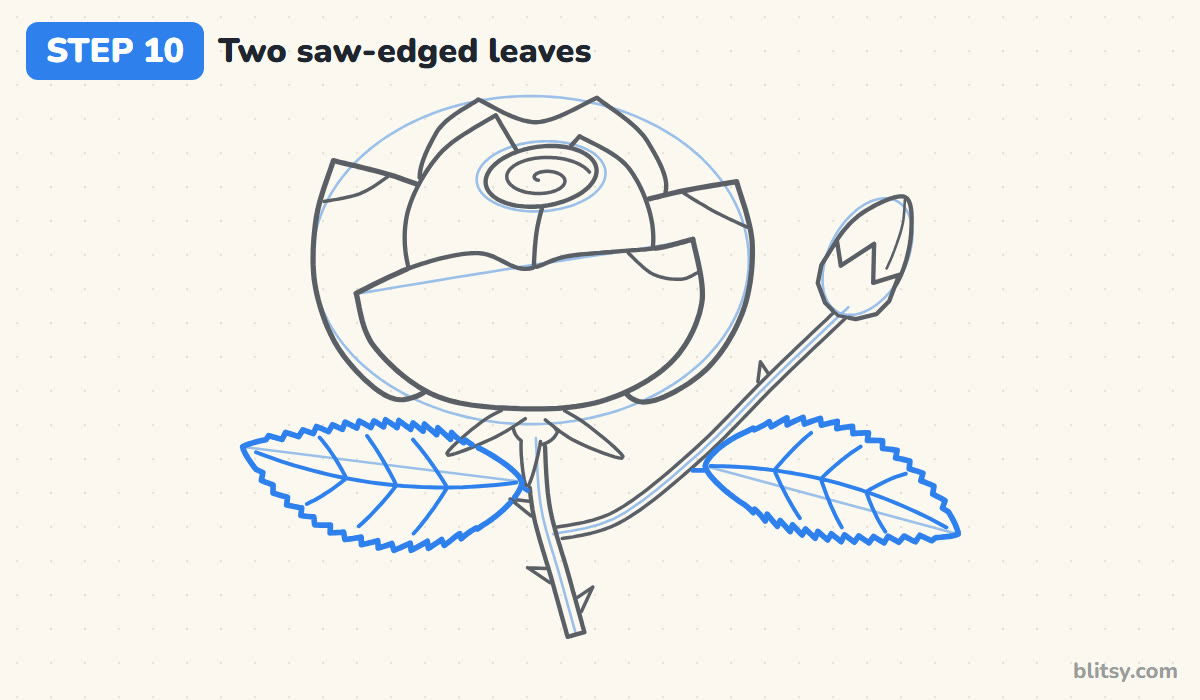
Along each leaf guide, draw an oval leaf with a sharp tip. Rose leaves have fine teeth, so make the edge a row of tiny zigzags instead of a smooth curve. Connect each leaf to the stem with a short stalk. Then draw a centre vein and a few side veins that slant toward the tip.
💡 Tip: Turn your paper so you're always pulling the zigzag toward yourself; it keeps the teeth even.
Step 11: Ink the lines and erase the guides
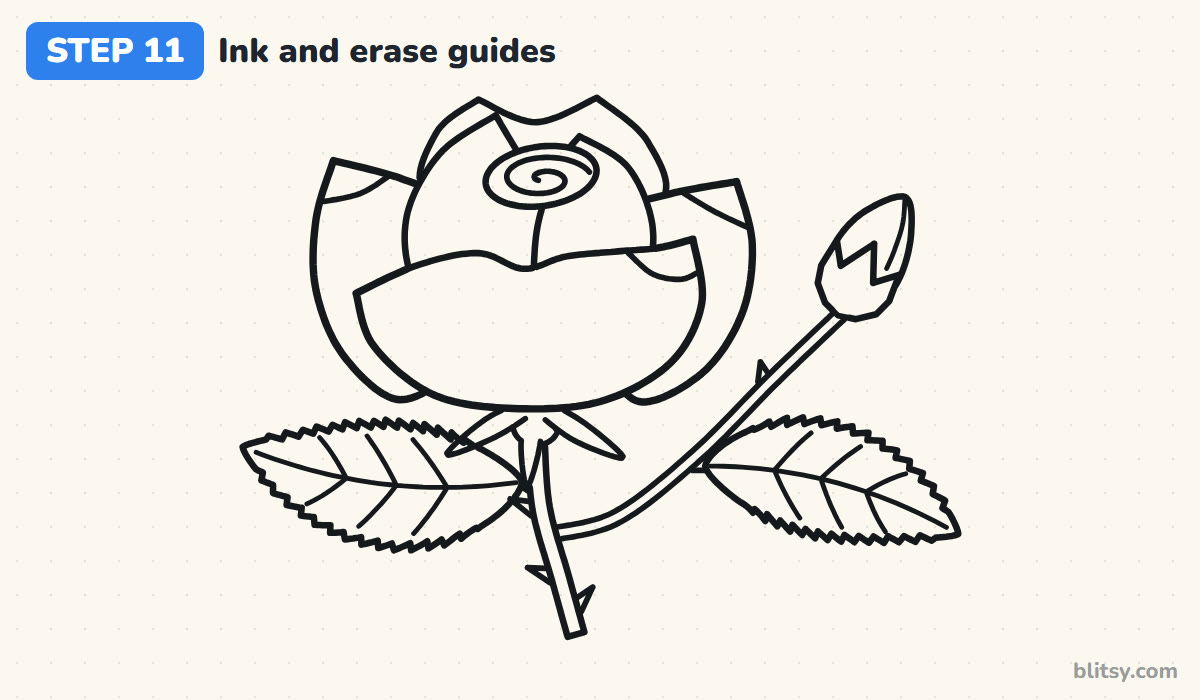
Go over every keeper line with the fineliner. I ink the spiral and the petals first, then the stem and leaves, working from top to bottom so my hand never rests on wet ink. Once it's fully dry, erase all the guide ovals and lines.


💡 Tip: Press the eraser gently in one direction; scrubbing can lift fresh ink and wrinkle thin paper.
Step 12: Color your rose
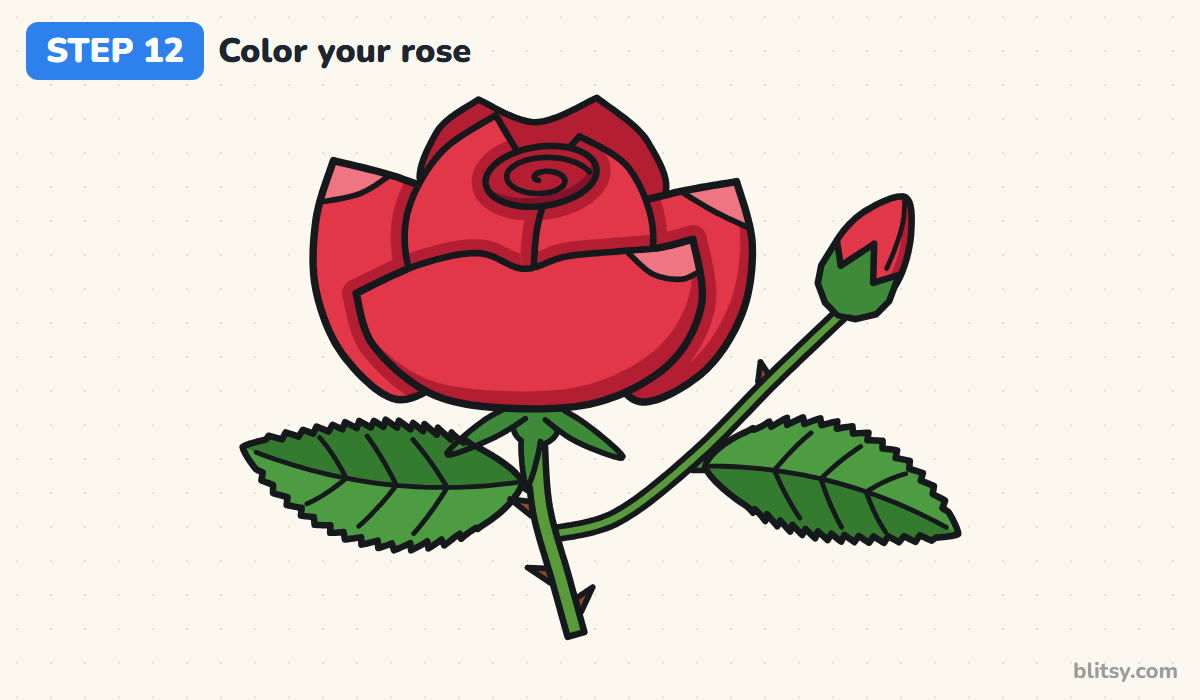
Color all the petals red. Then go back with dark red along every edge where one petal tucks behind another, and along the bottom right of the cup. Use maroon on the rim around the spiral, pink inside the folded tips, and green on the stem, sepals and leaves, with dark green on one half of each leaf.
💡 Tip: Color in small circles rather than straight strokes so the red looks smooth and velvety.
Why a Rose Drawing Ends Up Looking Like a Cabbage
- Drawing every petal the same size. Keep inner petals small and let them grow as you work outward.
- A spiral that's a full circle. Flatten it into an oval so the top of the rose tilts toward you.
- Petal lines that cross each other. Start and end each new petal on a line that's already there.
- Round, soft petal tips everywhere. Add a few pointed, folded-back corners; that's what reads as rose.
- Thorns pointing down. Angle them up toward the flower.
Rose Colors and Bouquet Ideas to Try Next
Red is the classic, but the same lines work for a yellow rose with orange shading, a pale pink one, or a white rose shaded with light gray. For a bouquet, draw three blooms at different sizes and let their stems cross near the bottom, then tie them with a ribbon. A single rose with a long stem also makes a sweet card for Mother's Day. For a different flower with big petals, try the magnolia flower drawing tutorial, or turn your roses into something you can hold with this DIY paper flower guide.
Printable Rose Coloring Page and Step Guide PDF
Grab the free rose coloring page for a quiet coloring session. At the top there's a small colored rose with a key that names each color and where it goes, and underneath is a large clean outline. The PDF drawing guide collects all 12 steps with their tips, ready for Letter or A4 paper.
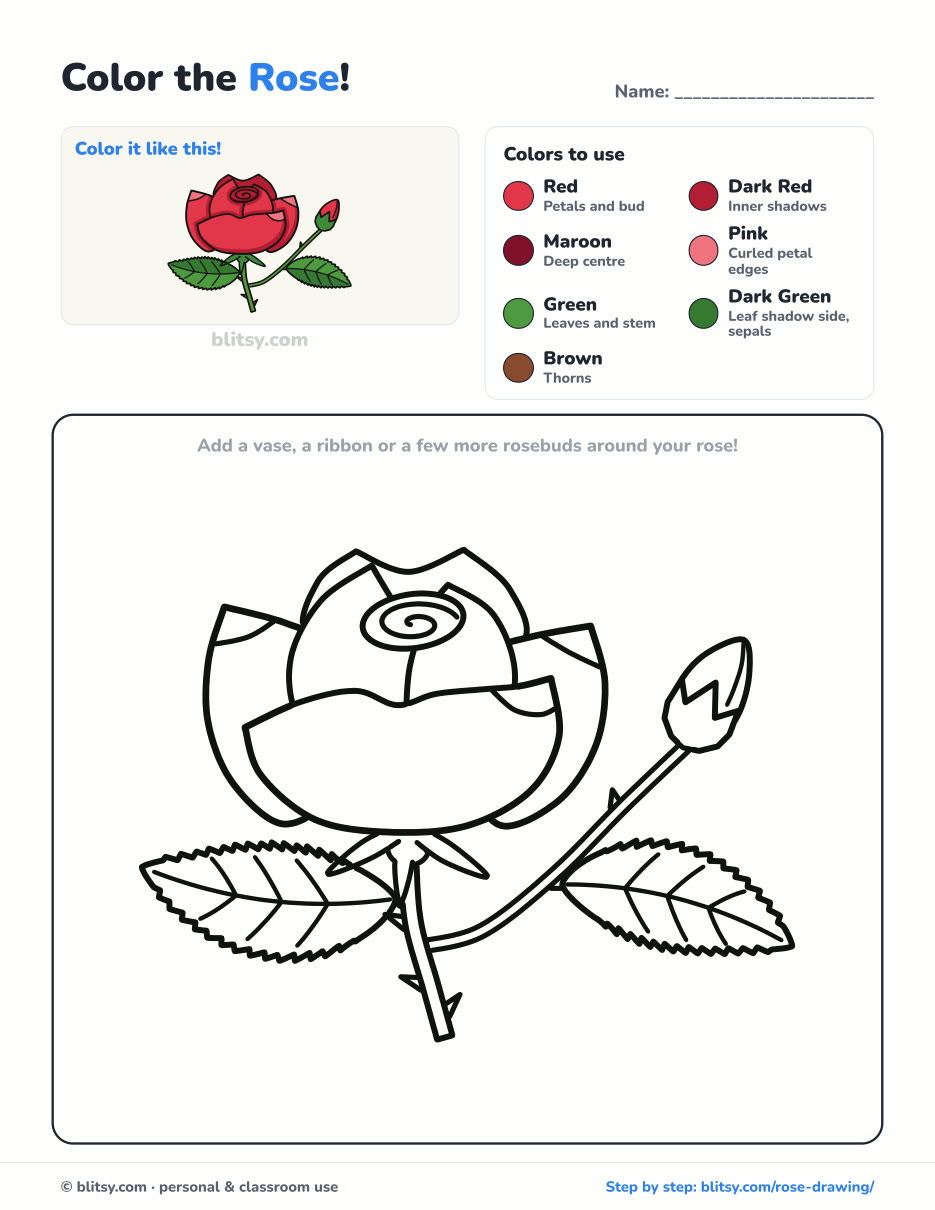
Black outlines with a colored example and the color names at the top. Ready to print and color.
⬇️ Download Coloring PageEvery step picture with its instructions and tips, to keep beside your paper while you draw.
⬇️ Download Drawing Guide📱 On a phone? Tap a download button, then open the file and choose Share → Save to Files or Print. On a computer, the PDF opens or saves straight to your Downloads folder.
Keep These Rose Steps on a Pinterest Board
Rose Complete? Grow Your Garden With These Lessons
Here are more step-by-step tutorials from the garden and the kitchen, each taught one small stage at a time.
- Pineapple Drawing: Draw a golden pineapple under its leafy crown, with a slice beside it, in this pineapple drawing tutorial.
- Fruit Drawing: Five fruits in a blue bowl, a banana leaning over the rim, make up the fruit bowl still life tutorial.
- Plant Drawing: Learn how to draw a plant step by step with five split monstera leaves in a striped coral pot.
- Birthday Cake Drawing: The easy birthday cake drawing tutorial stacks two tiers with pink frosting, sprinkles and three candles.
- Avocado Drawing: One half keeps the smiling pit and the other shows the hollow in the avocado drawing step by step lesson.
- Jack O Lantern Drawing: Five plump ribs, a curly stem and a candlelit grin come from a single oval in this jack o lantern drawing tutorial.
- Chalk Art: Move outdoors with how to do chalk art step by step, drawing a hopscotch, a rainbow and a sun on the pavement.
- Magnolia Flower Drawing: An open saucer magnolia, a half-closed flower and a furry bud share one branch in the magnolia flower drawing tutorial.
- Tree Drawing: Build a leafy apple tree, knothole and all, with the tree drawing step by step guide.
- Dandelion Drawing: A yellow bloom and a seed head ready for a wish sit side by side in this dandelion drawing tutorial.
- Cell Drawing: For a science page, the animal cell drawing tutorial walks you through the membrane, nucleus, Golgi stack and mitochondria.
- Succulent Drawing: Follow how to draw a succulent for a potted echeveria with sage leaves and pink tips.
- Hibiscus Drawing: Another big red flower waits in the easy hibiscus drawing tutorial, five petals around a maroon eye.
- Strawberry Drawing: Draw a whole strawberry and a cut half, with a flower on the stem, using the strawberry drawing step by step lesson.
- Grass Drawing: One bending blade grows into a whole meadow patch in this grass drawing tutorial, with dark, mid and light greens.
- Flower Drawing: The how to draw a flower guide fills one pot with a pink five-petal flower, two bluebells and a yellow star flower.
Rose Drawing Questions Beginners Often Ask
What is the easiest way to draw a rose?
Draw a small spiral, then wrap two or three curved petals around it, each one a bit bigger than the last. Add a stem and two leaves and you have a recognizable rose.
How do you draw a rose for kids?
Use only the spiral, the two wrap petals and the front cup, then a straight stem with two leaves. Leave out the bud, the thorns and the folded tips.
What colors do you need to color a rose?
A middle red for the petals and a darker red for the shadows, plus maroon for the centre. Green works for the leaves and stem, with a darker green for shade.
How long does it take to draw a rose?
Plan on about 40 minutes including coloring. The petal layers take the longest, and the leaves go quickly once you get the zigzag rhythm.
Draw a second rose right next to the first one, and you'll notice the spiral already feels easier. 🌹
Related posts:
 How to Draw a Chibi Step by Step (Easy 2-Head Method)
 How to Draw a Car Step by Step (Easy Drawing for Beginners)
 How to Draw a Whale Step by Step (Easy for Beginners)
 How to Draw a Rat Step by Step (Easy for Beginners)
 How to Draw an Arctic Fox Step by Step (Easy for Beginners)
 How to Draw Olaf Step by Step (Easy for Beginners)
 How to Draw a Ladybug Step by Step (Easy for Beginners)
 How to Draw a Dog Step by Step (Easy Side View for Beginners)
 How to Draw a Leopard Step by Step (Easy for Beginners)
 How to Draw a Light Bulb Step by Step (Easy for Beginners)
 How to Draw a Crow Step by Step (Easy for Beginners)
 How to Draw an Eagle Step by Step (Easy for Beginners)

