
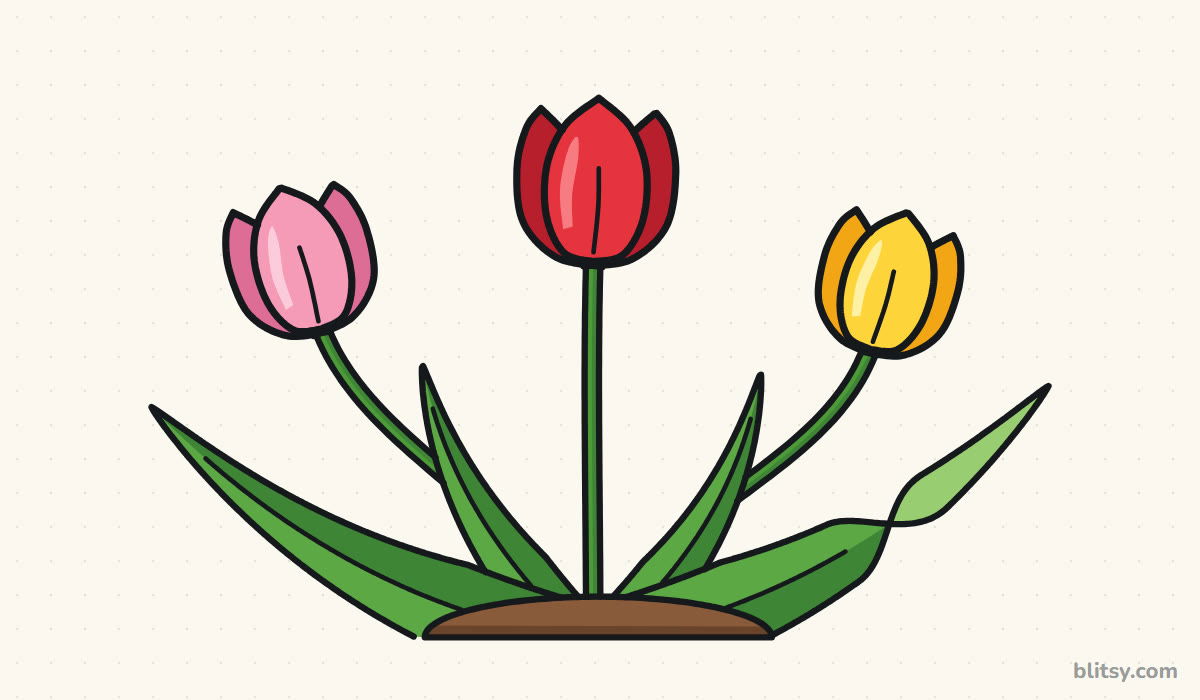
Tulips are one of the friendliest flowers to start with, because each bloom is really just a cup with three pointed tips. Once you can draw that cup, you can draw a whole spring border. In this lesson I'll show you how to draw a tulip step by step, with three flowers of different heights growing from a little mound of soil. No art training is needed; if you can draw an oval and a U, you're ready.
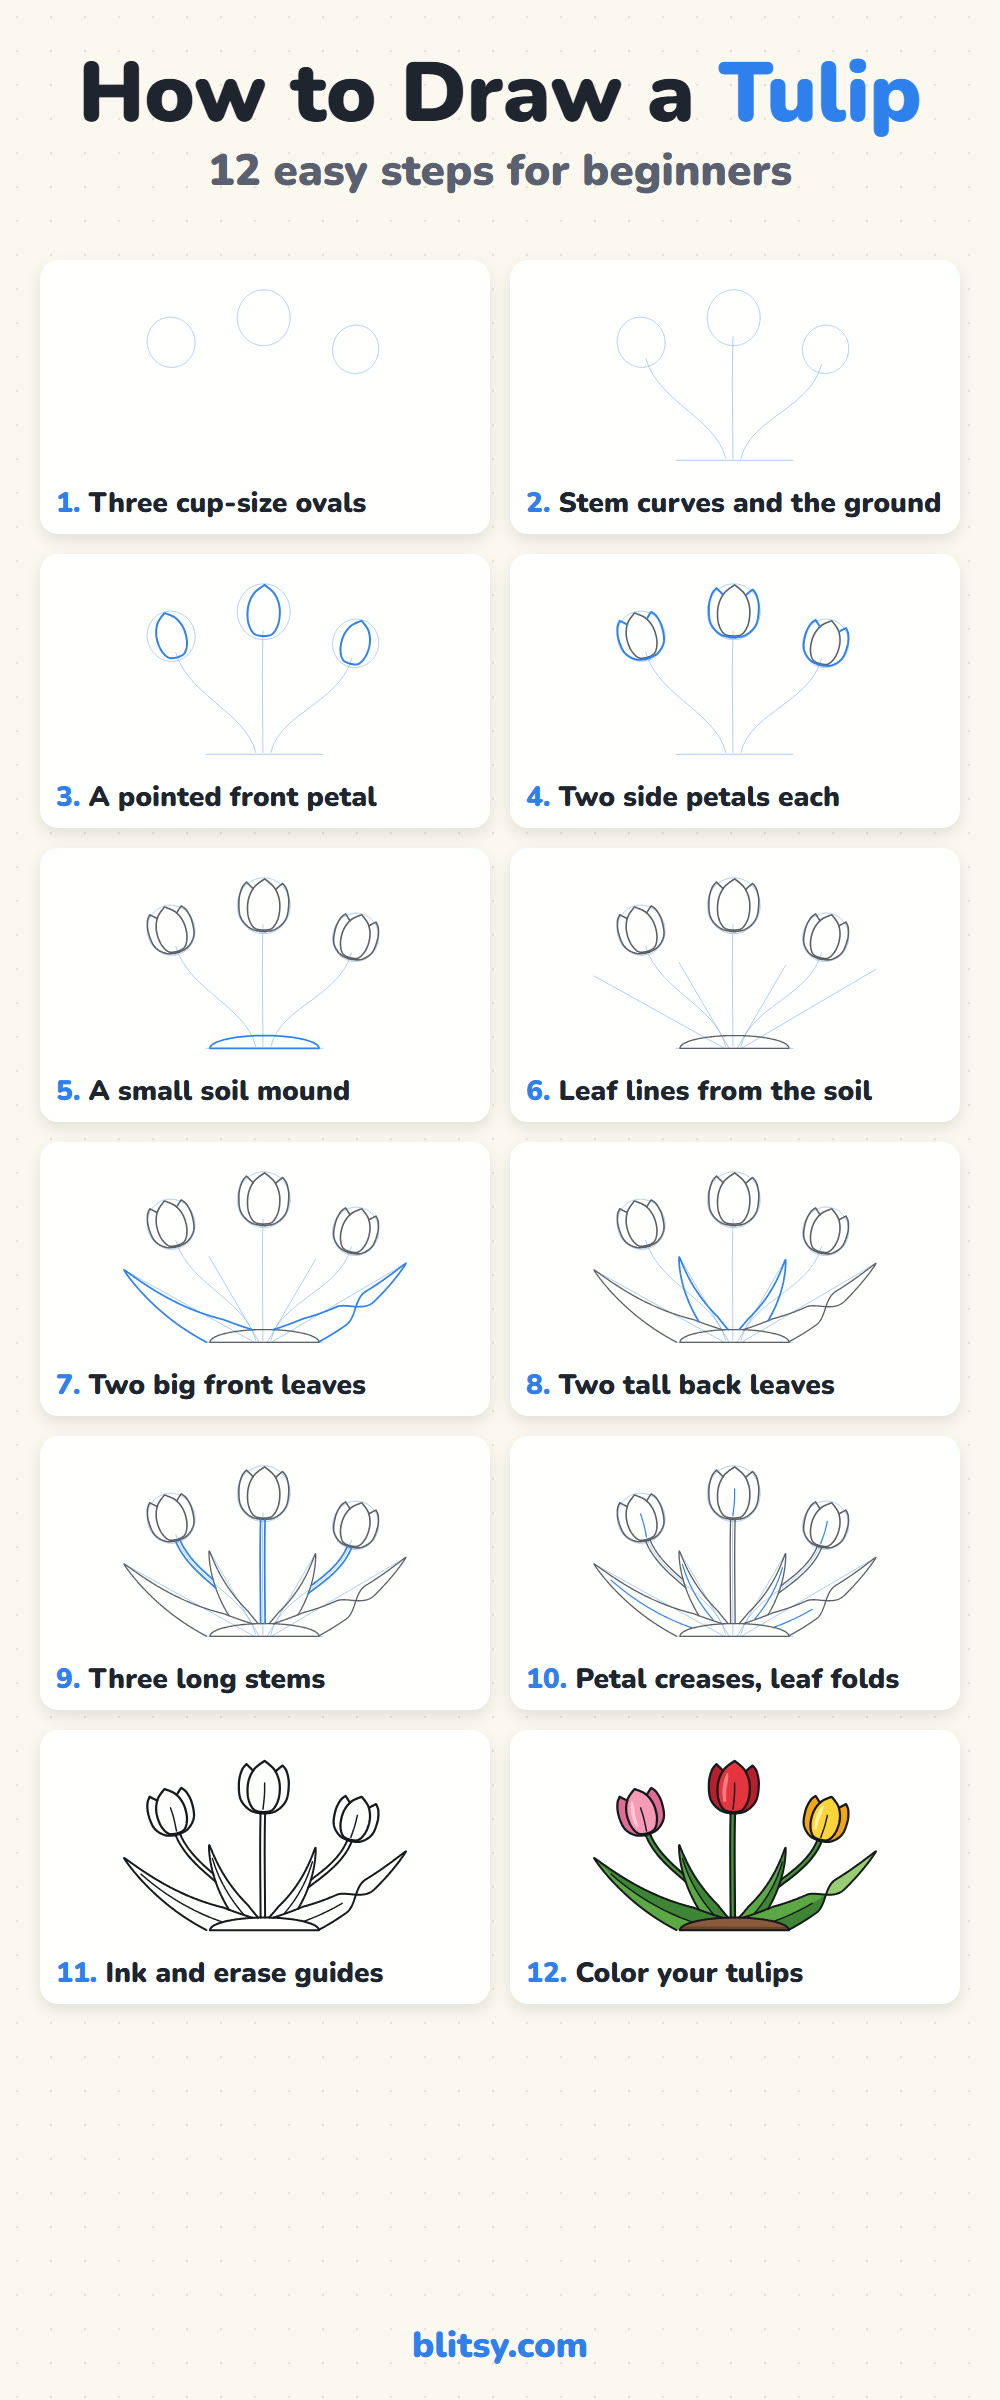
Follow the blue: in every picture, the newest lines are bright blue. The gray lines are the parts you finished in earlier steps, and the pale blue shapes are construction guides. Draw those guides very lightly so they're easy to erase in step 11.
Quick overview
⏱️ Time: about 30 minutes, coloring included
🎯 Level: easy, fine for kids from about 6 with a little help
✏️ Steps: 12
🌷 You'll draw: three tulips in red, pink and yellow with long stems, four leaves and a soil mound
Tulip Drawing Supplies for a Spring Bunch
- A regular HB pencil
- A clean eraser
- A black fineliner or thin marker
- Colored pencils or markers in red, pink, yellow, orange, two greens and brown
- A sheet of paper turned sideways
Any paper works, but a sideways sheet gives the long leaves enough room to spread.
How to Draw a Tulip Step by Step
Step 1: Draw three ovals for the flower cups
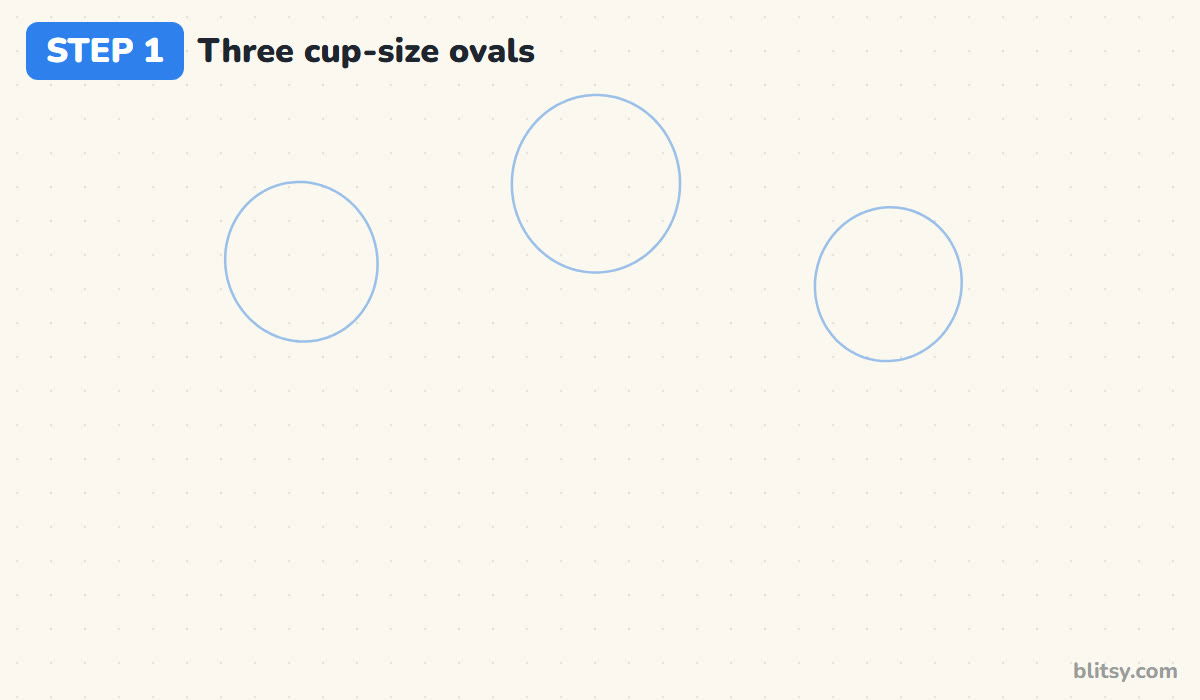
Sketch three small ovals across the upper half of the page. Put the biggest one in the middle and highest, then one lower on the left and one lower still on the right. These ovals only set the size of each flower head. Different heights matter more than you'd think, because three tulips in a straight row look stiff.
💡 Tip: Press so lightly that you can barely see the line; these ovals disappear later.
Step 2: Add the stem curves and a ground line
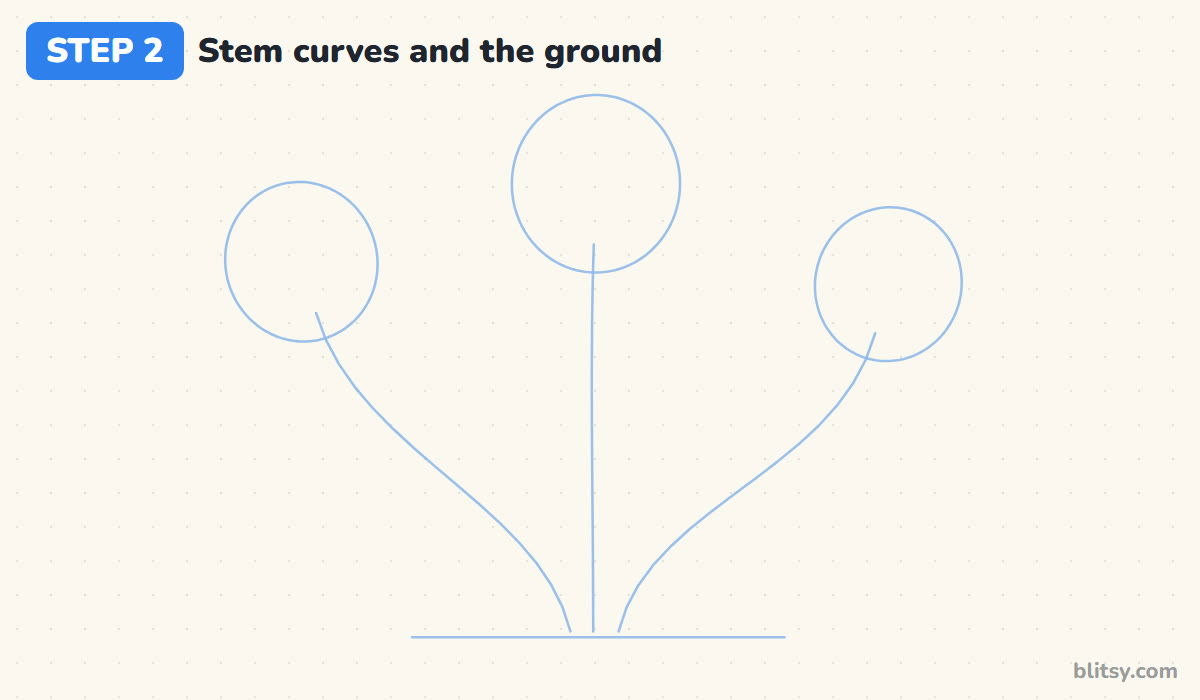
Draw a short flat line near the bottom of the page for the ground. From the bottom of each oval, pull a line down to the middle of that ground line. The middle stem stays almost straight, while the outer two bend in a soft S. All three should meet close together, as if they grow from one spot.
💡 Tip: Start each stem line at the flower and pull your hand toward you; curves come out smoother that way.
Step 3: Draw a pointed front petal in each oval
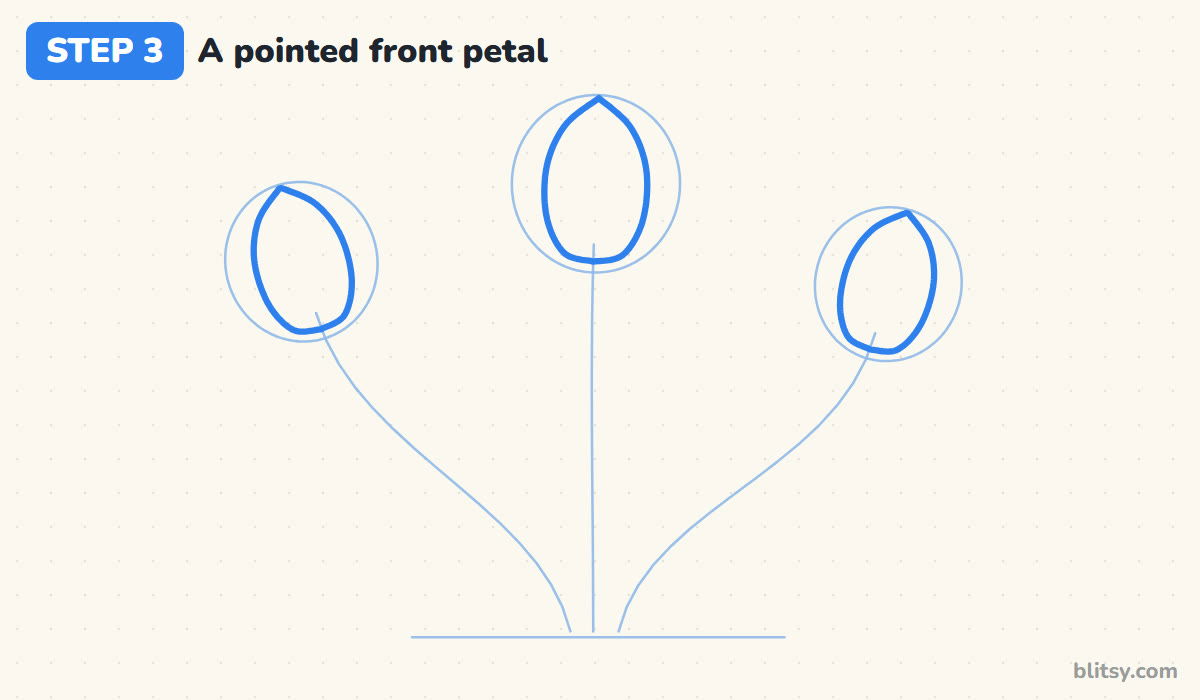
This is the shape that makes a tulip. Inside each oval, draw a U with a rounded bottom, then bring both sides up to meet in a single point at the top. It looks a bit like an upside down raindrop. Keep it narrower than the oval, because the side petals still need room on both sides.




💡 Tip: If the point comes out lopsided, tilt your paper so your hand moves in its most natural direction.
Step 4: Add two side petals to each tulip
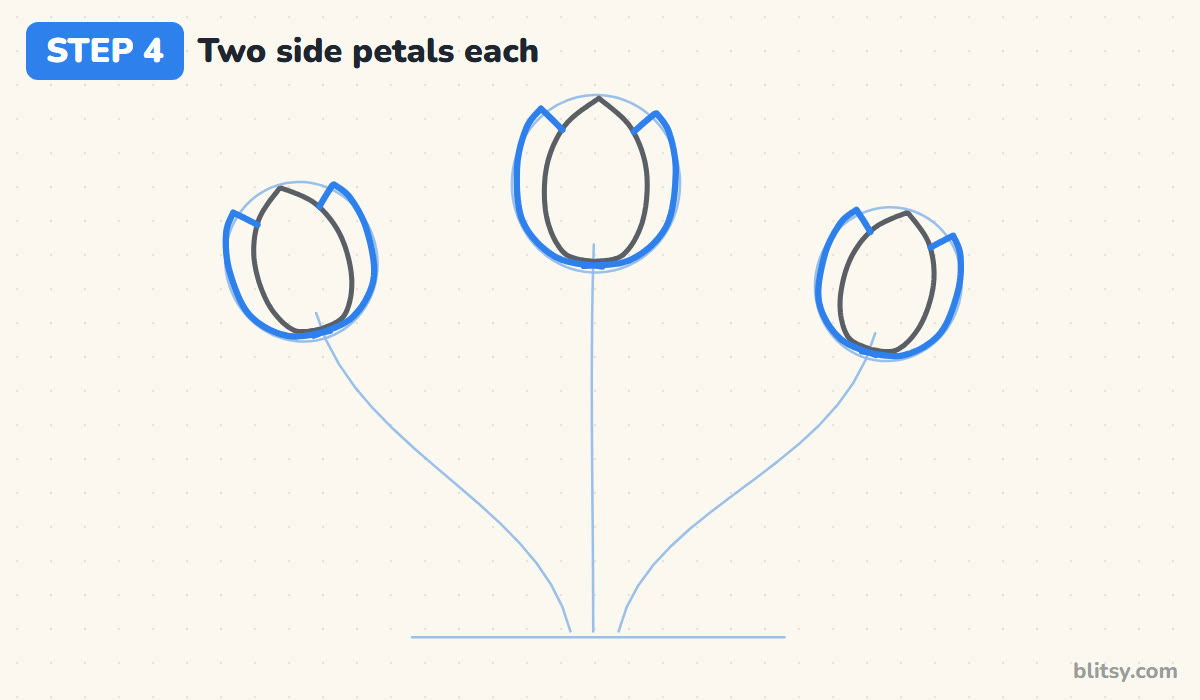
Now hug the front petal with a side petal on the left and one on the right. Each starts at the bottom of the cup, swells out past the front petal and ends in its own point just below the top tip. I stop the inner edge of each side petal where it meets the front petal. That little V notch between the tips is what tells everyone it's a tulip.
💡 Tip: Keep the side points a bit lower than the middle point so the cup looks open, not flat.
Step 5: Draw a small soil mound
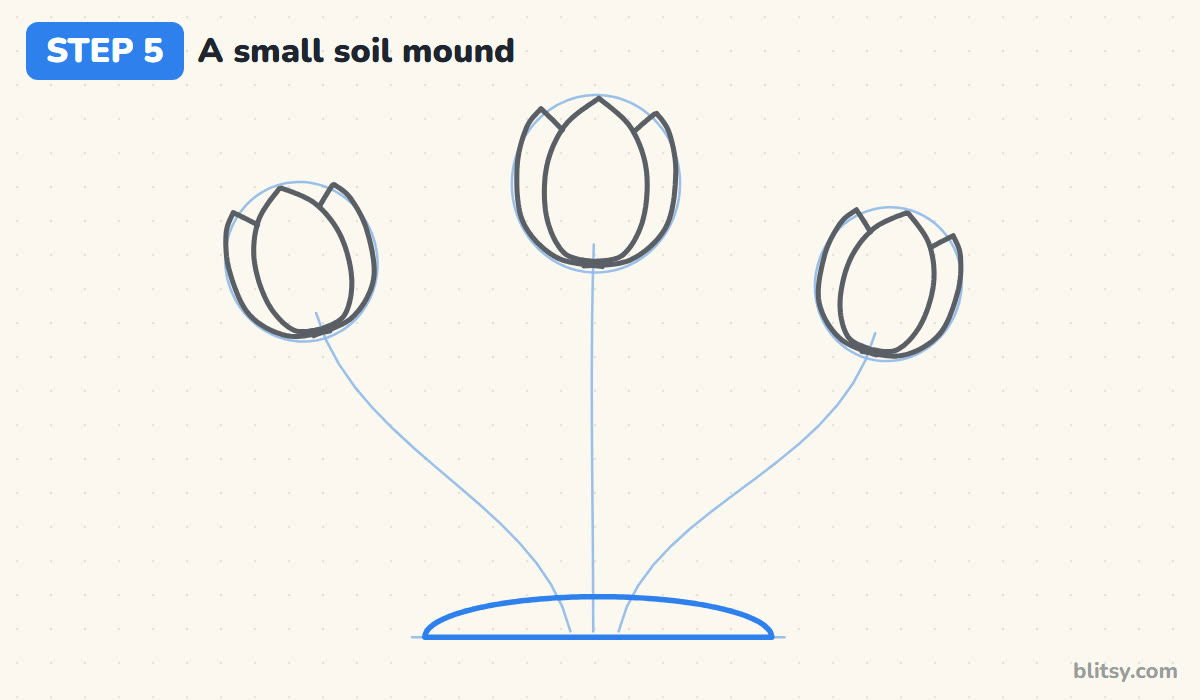
Over the ground line, draw a wide, low dome where the stems meet. Close it with a straight line underneath. The mound gives the bunch something to stand on and hides the crowded spot where the stems and leaves meet, which is hard to draw neatly.
💡 Tip: Make the mound about as wide as the space between the two outer flowers.
Step 6: Sketch four lines for the leaves
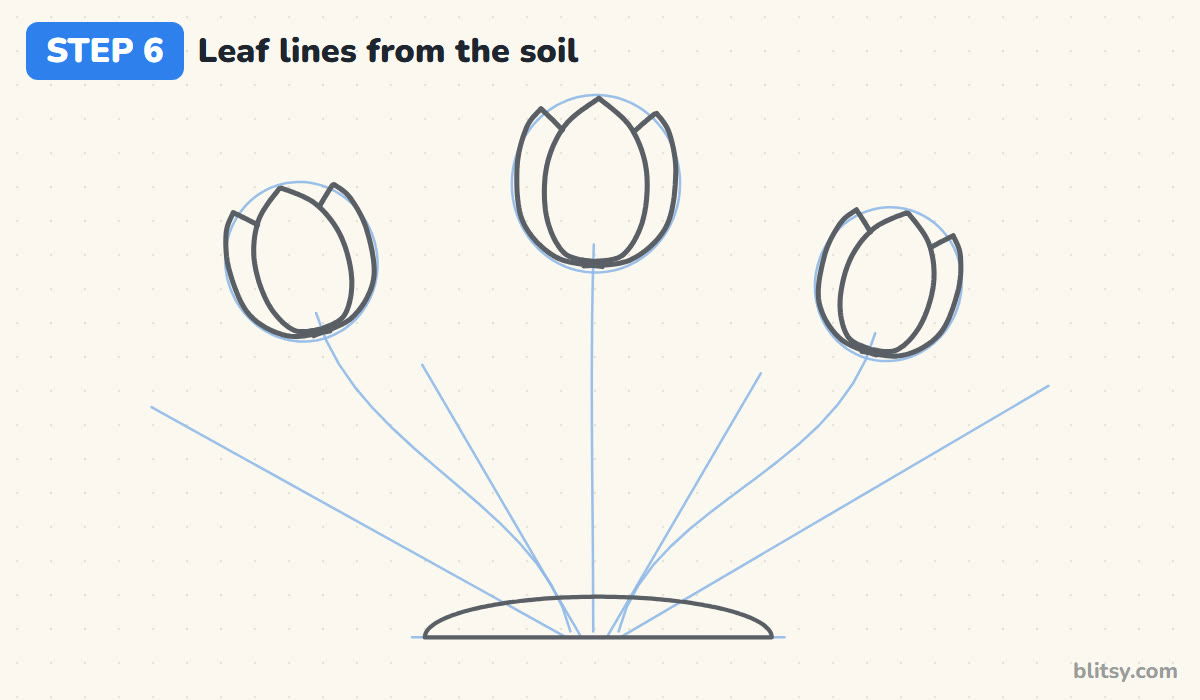
From the top of the mound, draw four straight guide lines fanning outward. Two long ones go out low to the left and right. Two shorter ones rise more steeply between the stems. Spacing them like the fingers of a spread hand stops the leaves from piling on top of each other.
💡 Tip: Check that no leaf line runs straight into a flower head.
Step 7: Draw the two big front leaves
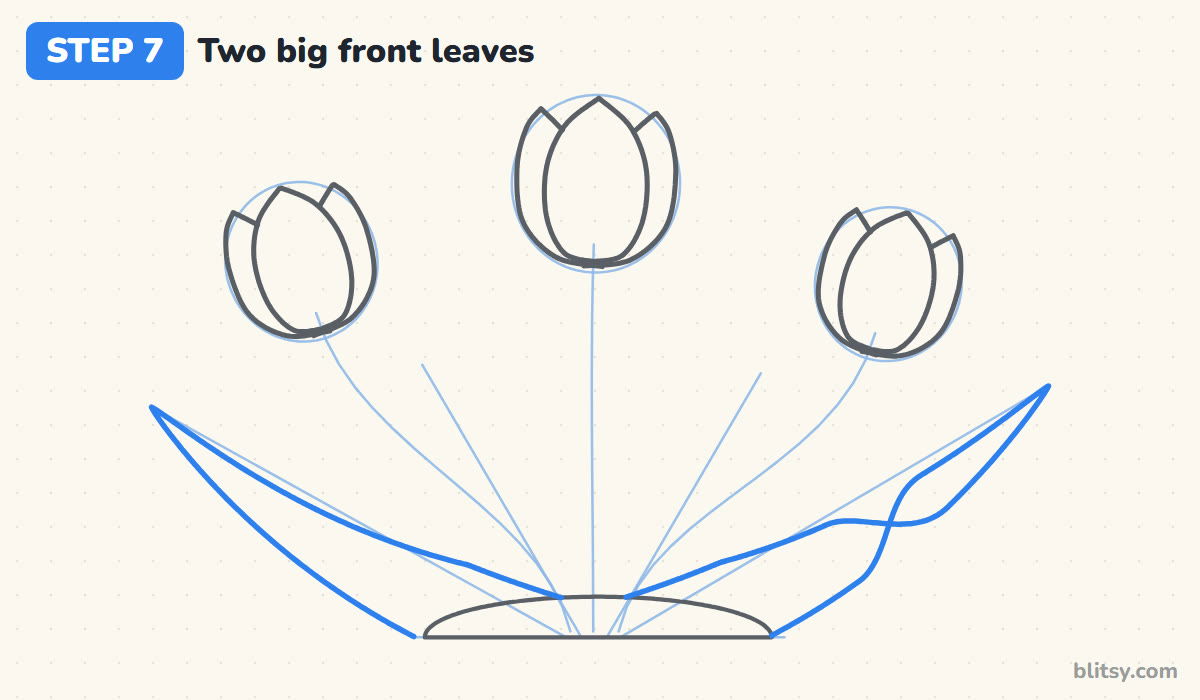
Tulip leaves are wide at the bottom and taper into a long sharp point. Draw the left one along the low left guide, curving gently upward at the tip. For the right leaf, I add a twist about halfway along: let the two edges narrow and cross each other, then open out again into the pointed tip. Younger kids can draw a plain leaf instead.




💡 Tip: Draw the twist as a soft X, not a knot; two gentle crossing curves are all it needs.
Step 8: Add the two tall back leaves
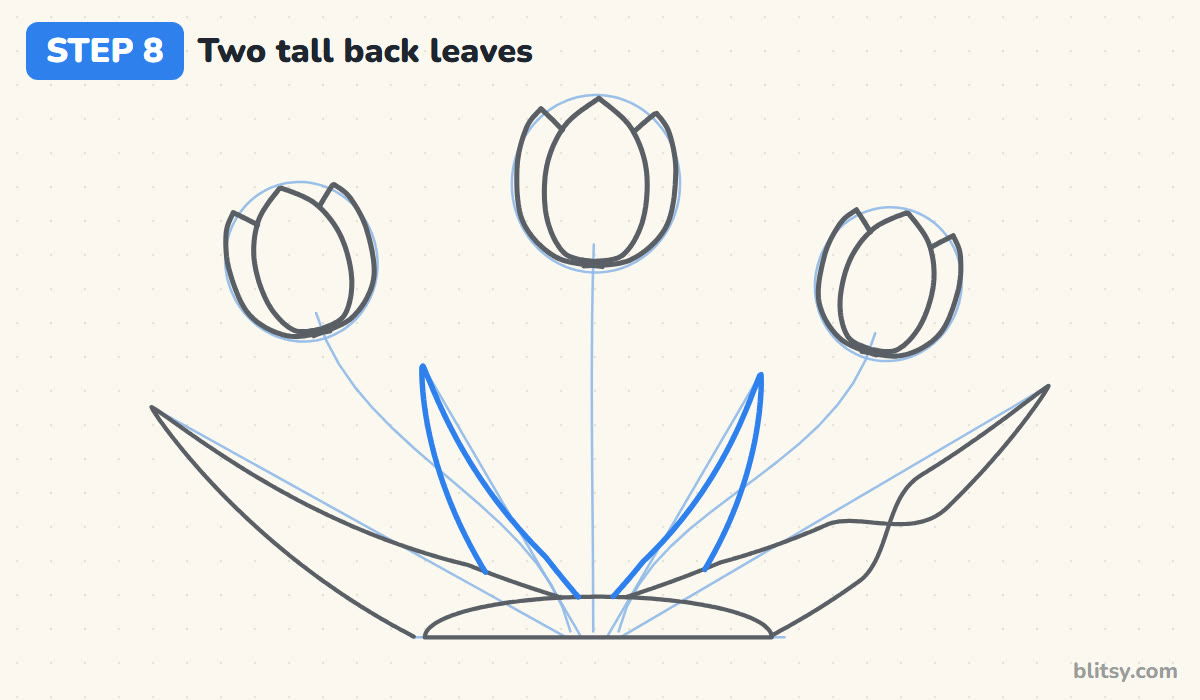
Along the two steeper guides, draw narrower leaves that point upward. They sit behind the big front leaves, so start each one where it peeks out above a front leaf. Leave out any line that a front leaf would cover. These upright leaves fill the gaps between the stems and make the bunch look full.
💡 Tip: Keep the back leaves shorter than the stems so the flowers still stand above everything.
Step 9: Draw three long stems
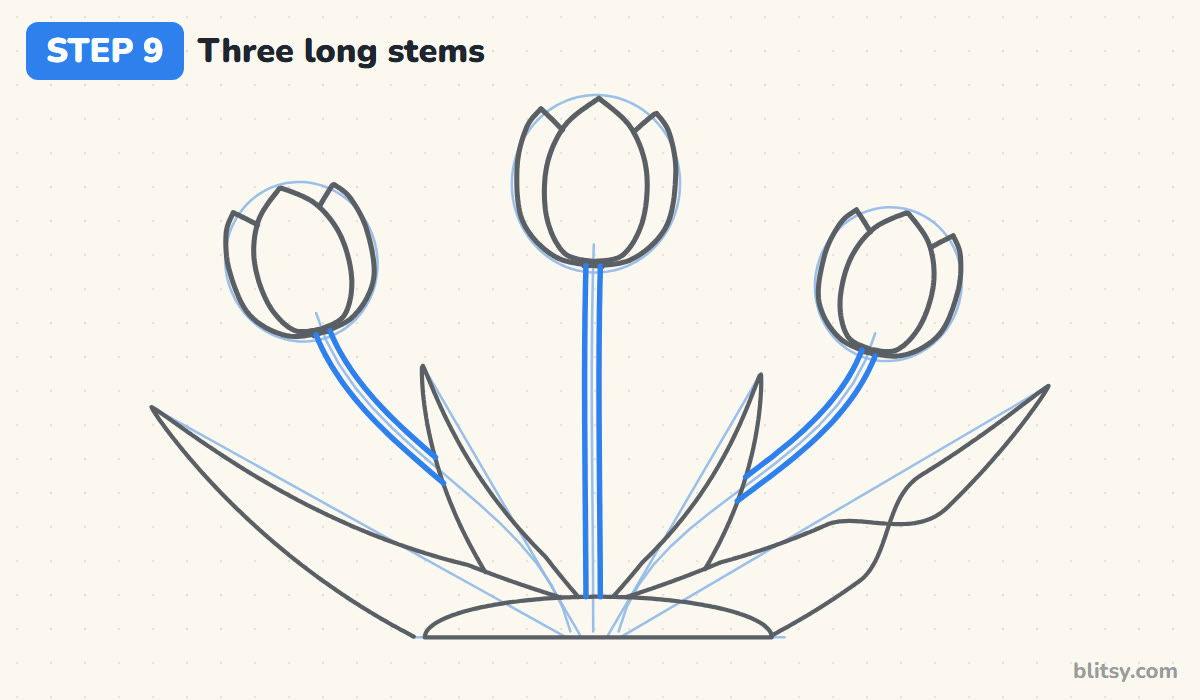
Trace each stem guide on both sides to turn it into a thin tube of even width. Start right under each cup and stop wherever a leaf crosses in front. Real tulip stems are thick and strong, so I draw them a little wider than feels natural.
💡 Tip: Thin wobbly stems make the flowers look like they'll droop; steady, parallel lines fix that.
Step 10: Add petal creases and leaf fold lines
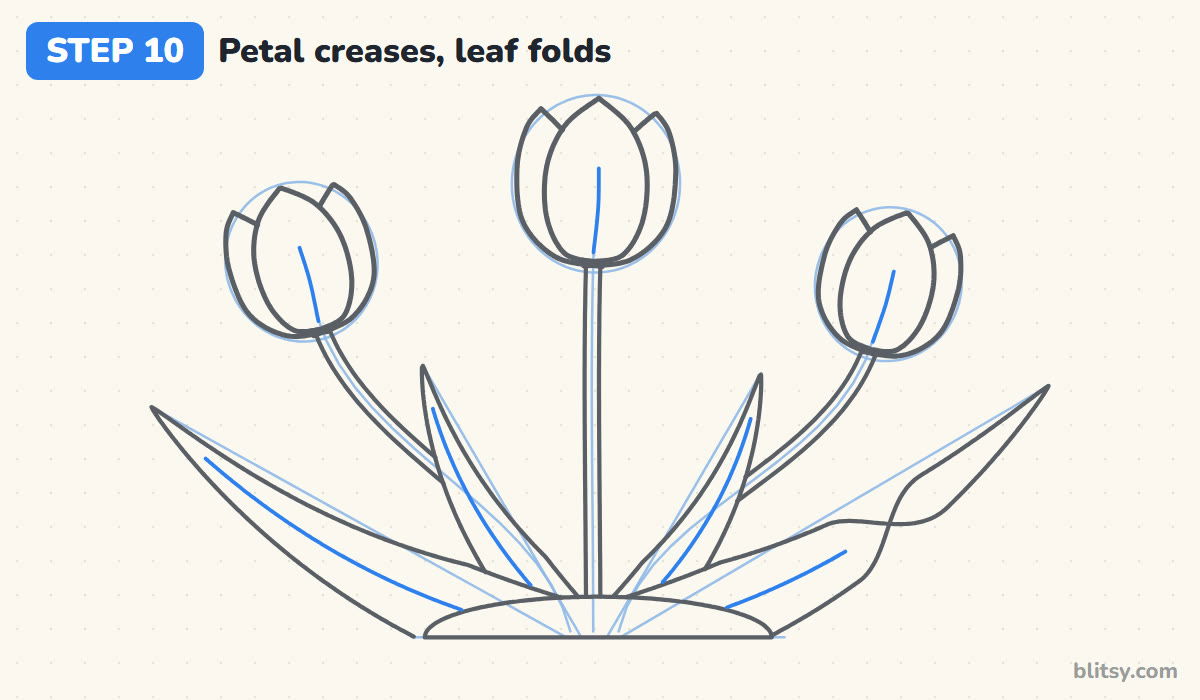
Down the middle of each front petal, draw a short curved line from the base about halfway up. It shows that the petal is gently folded, not flat. On each leaf, draw a thin line along the middle from the base toward the tip. Stop it before the end so the tip stays sharp and clean.
💡 Tip: Lift the pencil off the paper at the end of each crease so the line fades out softly.
Step 11: Ink the drawing and erase the guides
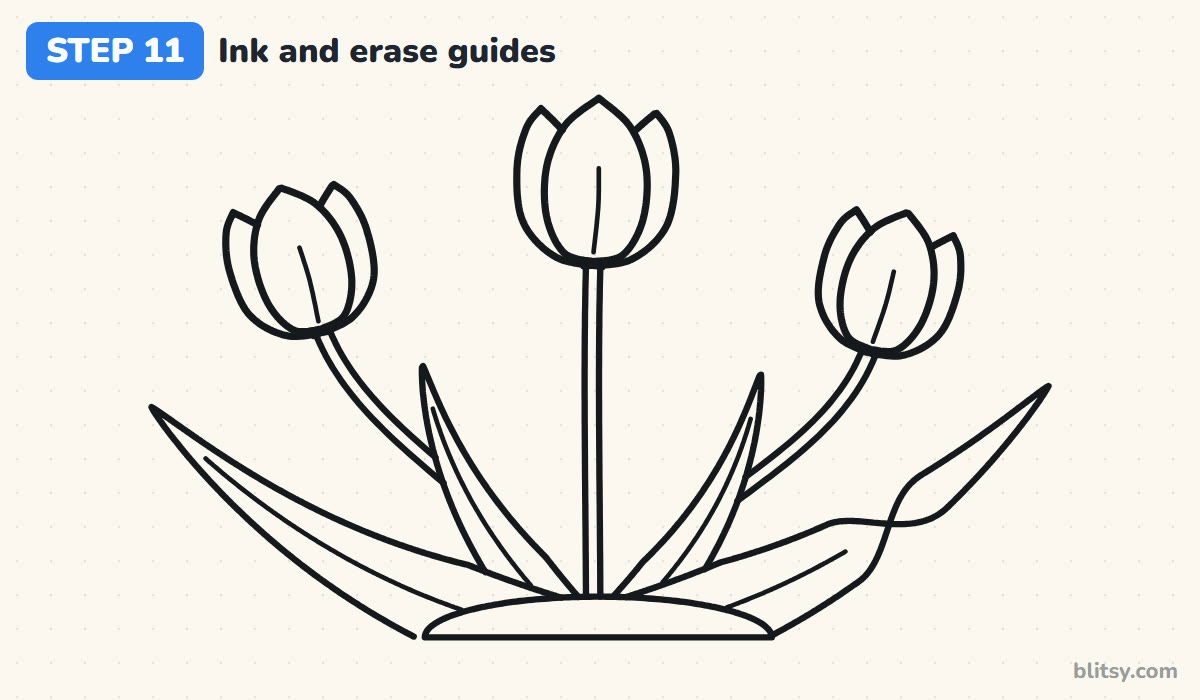
Go over every keeper line with your black pen: petals first, then the stems, leaves and mound. Skip the ovals, the stem guides and the leaf lines. Give the ink a minute to dry, then erase all the pencil underneath. The tulips will suddenly look crisp and finished.




💡 Tip: Turn the page as you ink the curved petals instead of twisting your wrist.
Step 12: Color your tulips
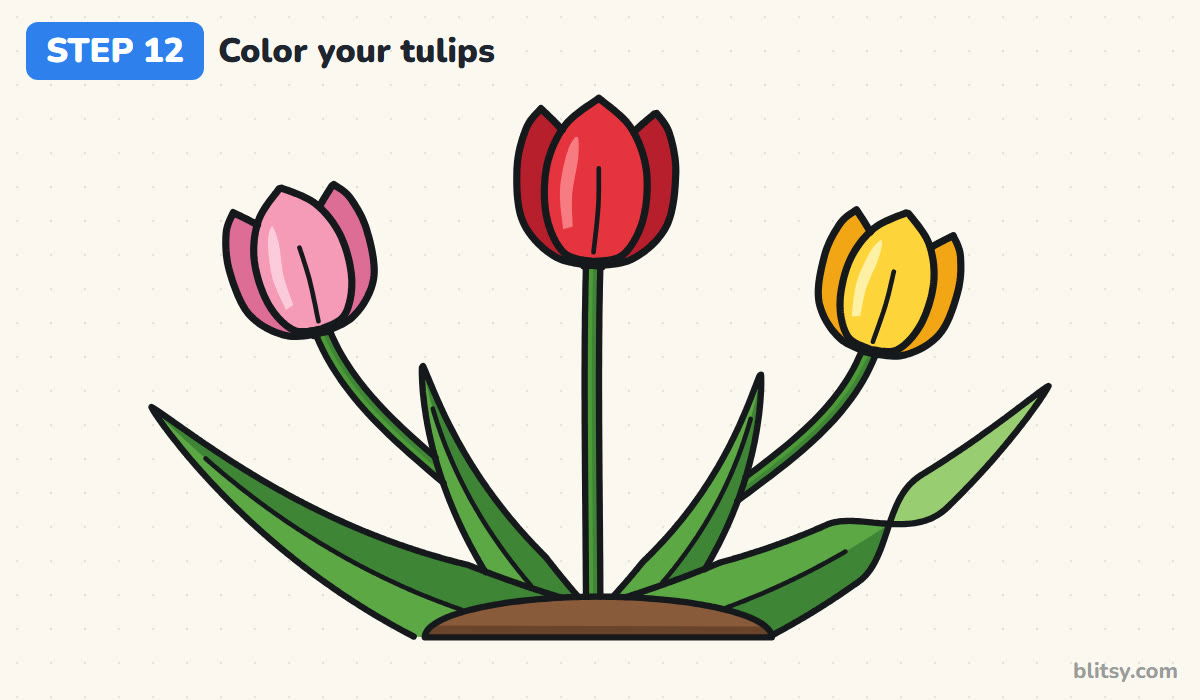
Color each front petal in its main color: red in the middle, pink on the left, yellow on the right. Use a deeper shade for the side petals, like dark red, dark pink or orange, since they turn away from the light. Leave a thin pale streak on each front petal for shine. Color stems and leaves green, with the lower half of each leaf darker, the twisted leaf tip light green and the mound brown.
💡 Tip: Color the darker side petals first, then the front petal, so the light shade stays clean.
Where Tulip Sketches Tend to Slip
- A round top on the cup. Without pointed tips, the flower reads as a balloon or an egg. Bring every petal to a clear point.
- Side petals as tall as the front petal. The cup looks like a crown. Keep the side tips a little lower than the middle tip.
- Leaves shaped like ovals. Tulip leaves are long and narrow at the end. Make them wide at the base and taper them to a sharp tip.
- Thin, spidery stems. The flower heads look too heavy. Draw the stems as firm tubes with even width.
- Three flowers in a straight line. Change the heights and let the outer two lean outward.
Fresh Tulip Variations to Try Next
Tulips come in almost every color, so try purple, white or deep orange petals, or a striped tulip with red flames painted over yellow. You can draw a single tall tulip in a small pot, a row of them along a fence, or a bunch tied with a ribbon. A half open tulip is just a narrower cup with the tips almost touching. When you want a flower with more petals, the hibiscus drawing tutorial is a nice next challenge, and this dandelion drawing step by step lesson makes a fun meadow partner for your tulips.
Spring Tulip Coloring Page and Step Guide PDF
Print the free tulip coloring page for a spring craft table. A small colored version at the top shows which color goes where, with a key that names each one, and the big outline below is ready for crayons or markers. The PDF drawing guide holds all 12 steps with tips and prints on Letter or A4 paper.
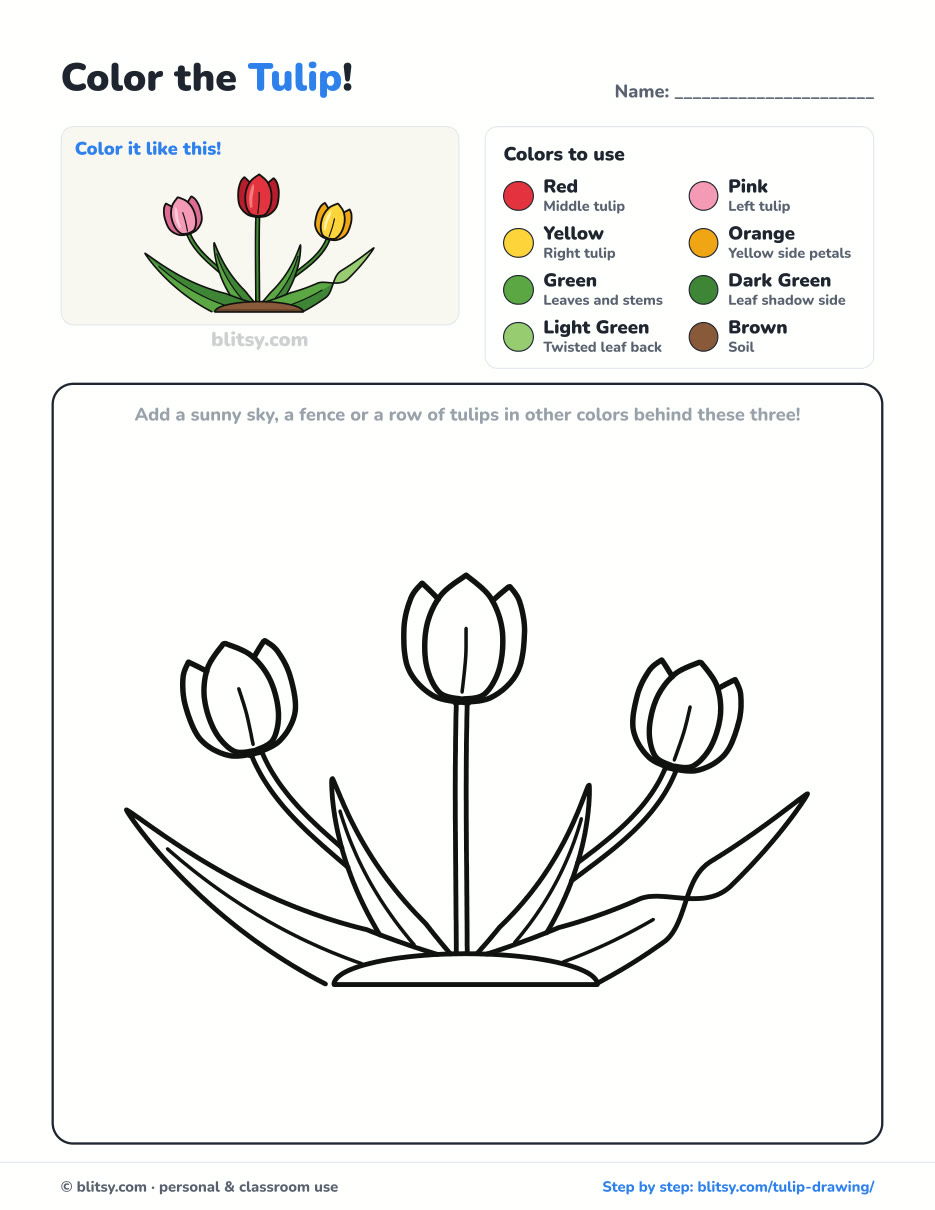
Black outlines with a colored example and the color names at the top. Ready to print and color.
⬇️ Download Coloring PageEvery step picture with its instructions and tips, to keep beside your paper while you draw.
⬇️ Download Drawing Guide📱 On a phone? Tap a download button, then open the file and choose Share → Save to Files or Print. On a computer, the PDF opens or saves straight to your Downloads folder.
Keep the Tulip Steps on Your Spring Board
Spring Flowers, Fruit and Garden Lessons for After Your Tulips
Each link opens a step-by-step tutorial with one picture per stage, so you can keep the same calm pace you used for the tulips.
- Fruit Drawing: Five fruits in a blue bowl, with a banana leaning over the rim, make up this fruit drawing tutorial for beginners.
- Plant Drawing: A leafy monstera in a coral pot grows from a few centre lines in this plant drawing step by step lesson.
- Pizza Drawing: Draw a whole pepperoni pizza from slightly above, with one slice pulled out, in this how to draw a pizza tutorial.
- Pineapple Drawing: Start with one oval and a circle, then add the leafy crown and a slice, in this pineapple drawing tutorial.
- Flower Drawing: A five-petal flower, two bluebells and a star flower share a little pot in this flower drawing step by step guide.
- Tree Drawing: Light and dark leaf clusters and a few apples finish the tree in this how to draw a tree lesson.
- Chalk Art: Move to the sidewalk with a hopscotch grid and a rainbow on two clouds in this chalk art tutorial.
- Birthday Cake Drawing: A two-tier cake with dripping frosting and three lit candles is built from ovals in this birthday cake drawing tutorial.
- Garden Drawing: Put flowers in front of a picket fence, with a sunflower and a watering can, in this garden drawing step by step lesson.
- Dandelion Drawing: A yellow flower and its white seed clock stand on two curved stems in this dandelion drawing tutorial.
- Grass Drawing: Layer short, middle and tall clumps into a meadow with a ladybug in this grass drawing tutorial.
- Magnolia Flower Drawing: Draw a pink and white magnolia, a half-open flower and a fuzzy bud with this how to draw a magnolia flower guide.
- Avocado Drawing: A cut avocado, one half with a smiling pit, takes eleven calm steps in this avocado drawing step by step lesson.
- Jack O Lantern Drawing: Five plump ribs, a curly stem and a gap-toothed grin come together in this jack o lantern drawing tutorial.
- Oil Pastel Drawing: Learn light-to-dark layering on a sunset with a palm tree in this oil pastel drawing step by step lesson.
Tulip Questions Beginners Often Ask
What is the easiest way to draw a tulip?
Draw a U with a pointed top, add a pointed side petal on each side, then a straight stem and one long leaf. That's a recognizable tulip in four lines.
How do you draw a tulip for kids?
Use one flower instead of three, skip the twist on the leaf and leave out the creases. A bright cup on a green stem is plenty for young artists.
What colors do you need to draw tulips?
A main color for each flower plus a darker shade of it for the side petals. Add two greens for stems and leaves and a brown for the soil.
How long does it take to draw a tulip?
About 30 minutes for this bunch with coloring. A single tulip takes closer to ten.
When your three tulips are finished, try a second bunch in colors you'd never see in a shop, like blue or black. 🌷
Related posts:
 How to Draw a Whale Step by Step (Easy for Beginners)
 How to Draw Lungs Step by Step (Easy Science Diagram)
 How to Draw a Pineapple Step by Step (Easy Crown and Slice)
 How to Draw the Fortnite Llama Step by Step (Easy Fan Art)
 How to Draw a Hoodie Step by Step (Front and Back View)
 How to Draw a Parrot Step by Step (Easy Scarlet Macaw)
 How to Draw a Police Car Step by Step (Easy for Kids)
 How to Draw a Volcano Step by Step (Easy Erupting Volcano)
 How to Draw a Crow Step by Step (Easy for Beginners)
 How to Draw a Tiger Step by Step (Easy Walking Pose)
 How to Draw a Heart Step by Step (Even, Symmetric Shape)
 How to Draw a Jellyfish Step by Step (Cute, Easy Guide)

