
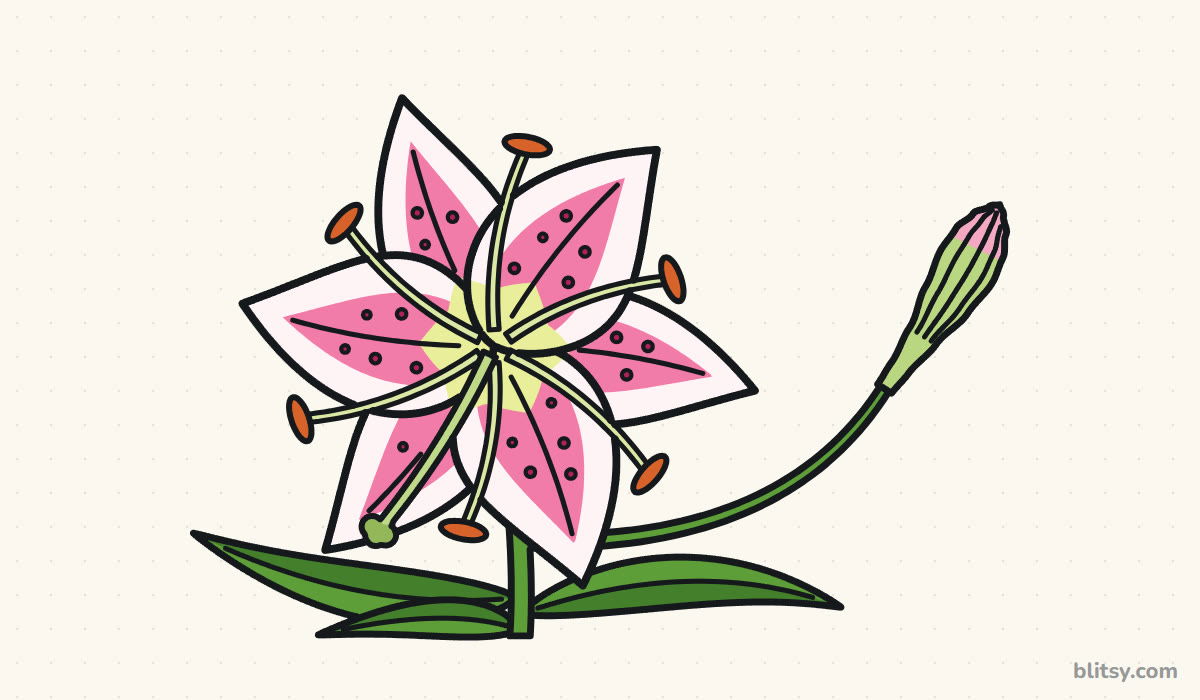
Lilies look fancy on a florist's shelf, yet the whole bloom grows out of six pointed petals around one middle point. In this lesson you'll learn how to draw a lily step by step, starting with a light circle and ending with a speckled pink stargazer lily that has a closed bud waiting on a side stem. If you can draw a long leaf shape, you can draw this flower.
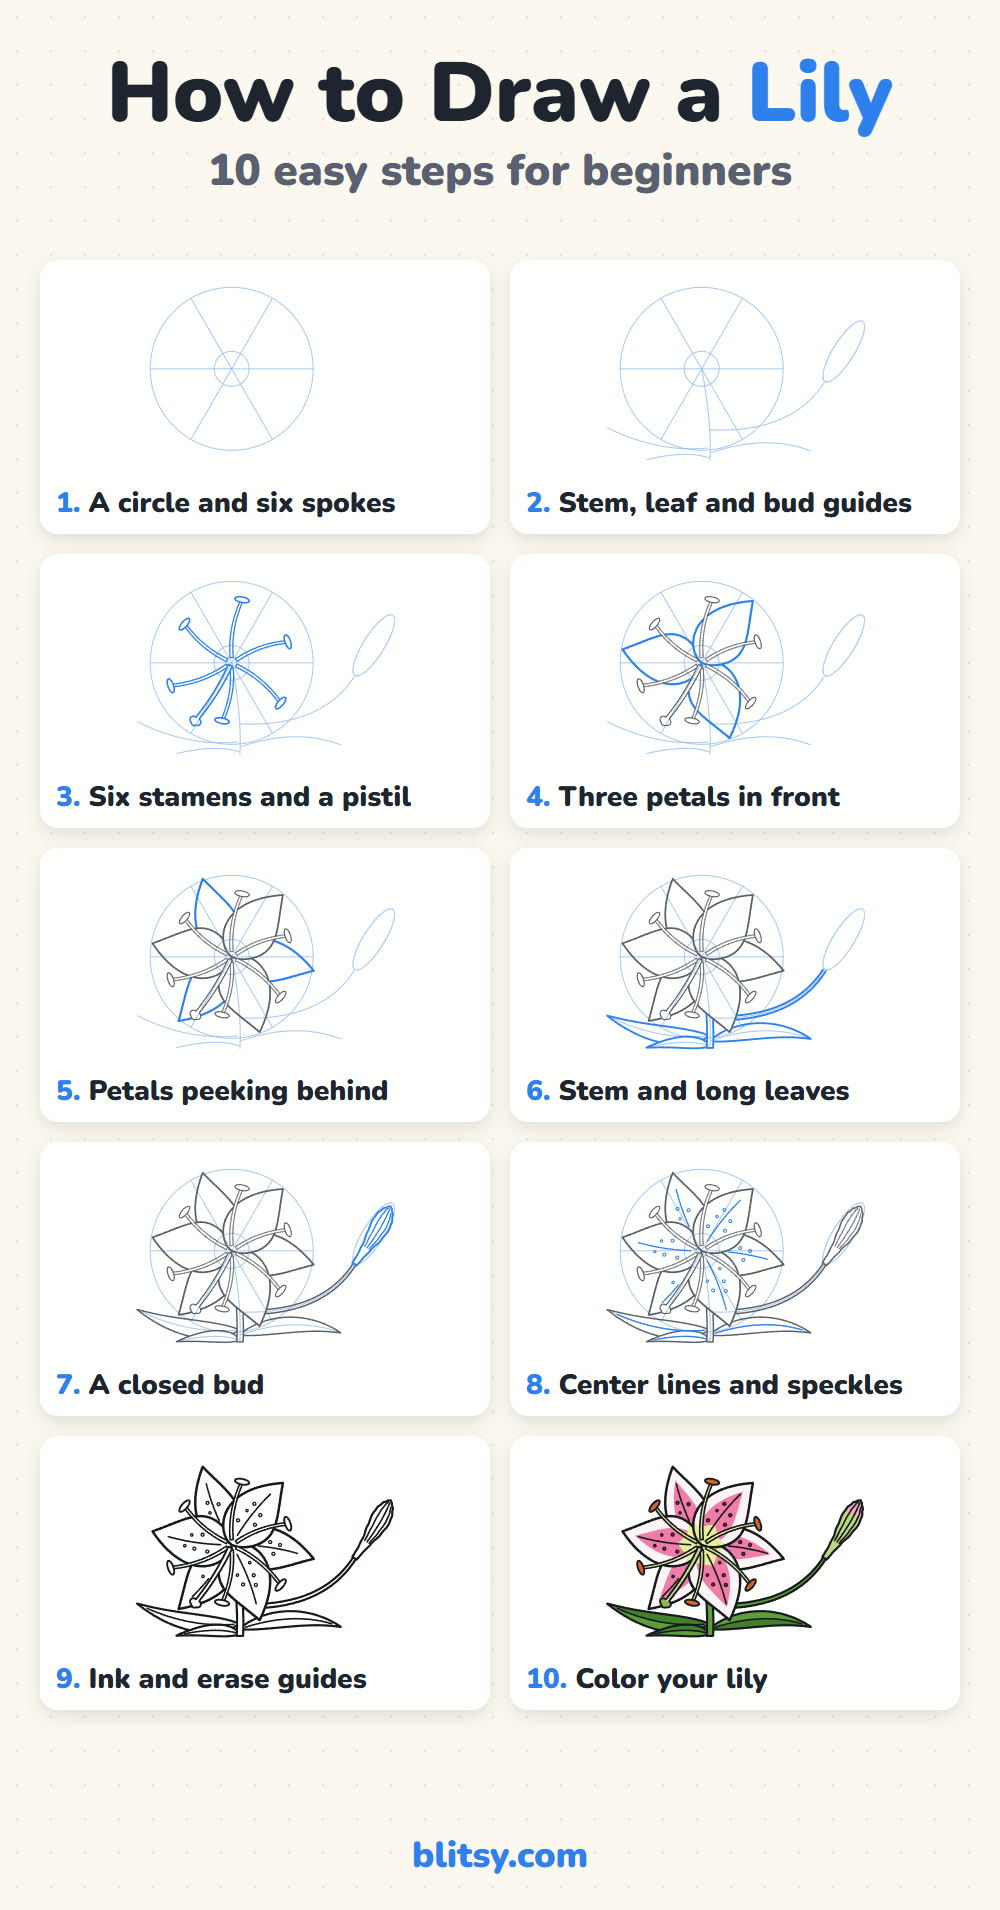
Blue ink in a picture marks what that step adds to your lily. Gray means you drew it earlier. Copy only the blue part, compare, and move to the next one.
Quick overview
⏱️ Time: about 30 to 35 minutes with coloring
🎯 Level: easy, fine for kids from about 8
✏️ Steps: 10
🌸 You'll draw: an open stargazer lily with a bud and leaves
Stargazer Supplies From Pencil to Pink
- A pencil you can use with a light touch (HB works)
- A soft eraser that won't smear
- A black fineliner or thin marker for the outline
- Colored pencils or markers in pink, dark pink, orange, light green and two greens
- Plain white paper, turned sideways
Leave the white of the paper for the petal edges instead of coloring them, since that pale rim is what makes a stargazer look like one.
How to Draw a Lily Step by Step
Step 1: Draw a circle with six spokes
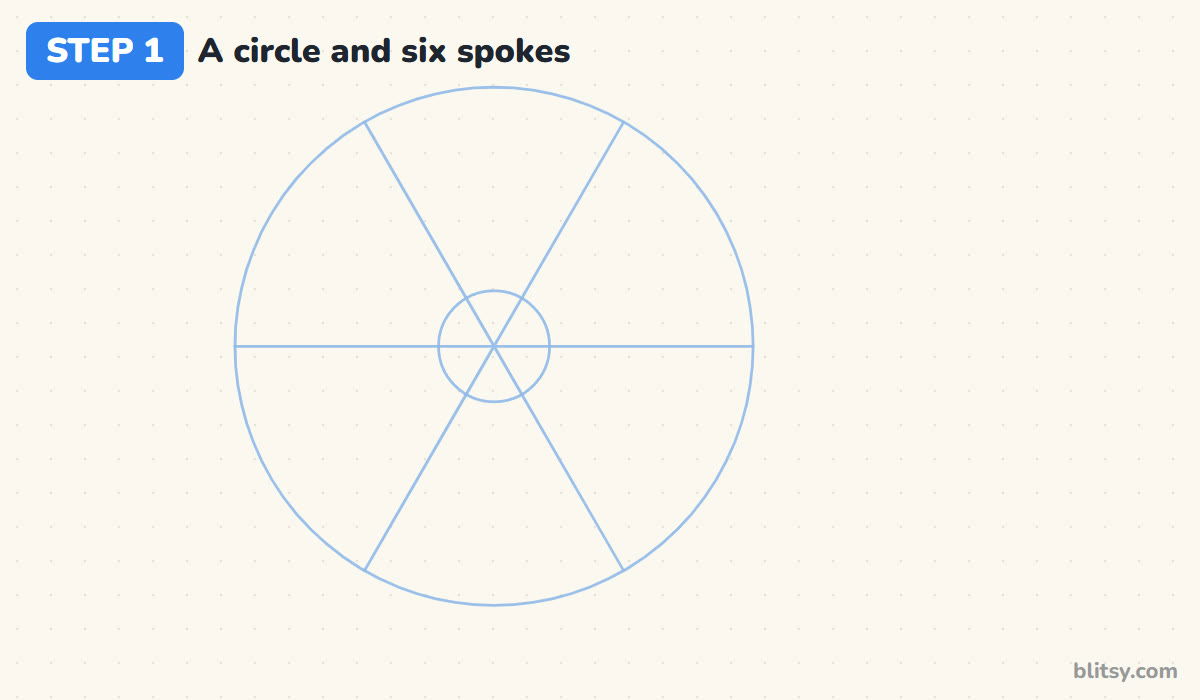
Draw a big light circle a little left of the middle of the page, and a small circle in its center. Then draw three straight lines through the center so they cut the circle into six even slices, like a pie. Each spoke marks where one petal will point.
💡 Tip: Draw the flat line across first. The other two then cross it at the same slant, one tipping each way.
Step 2: Sketch guides for the stem, leaves and bud
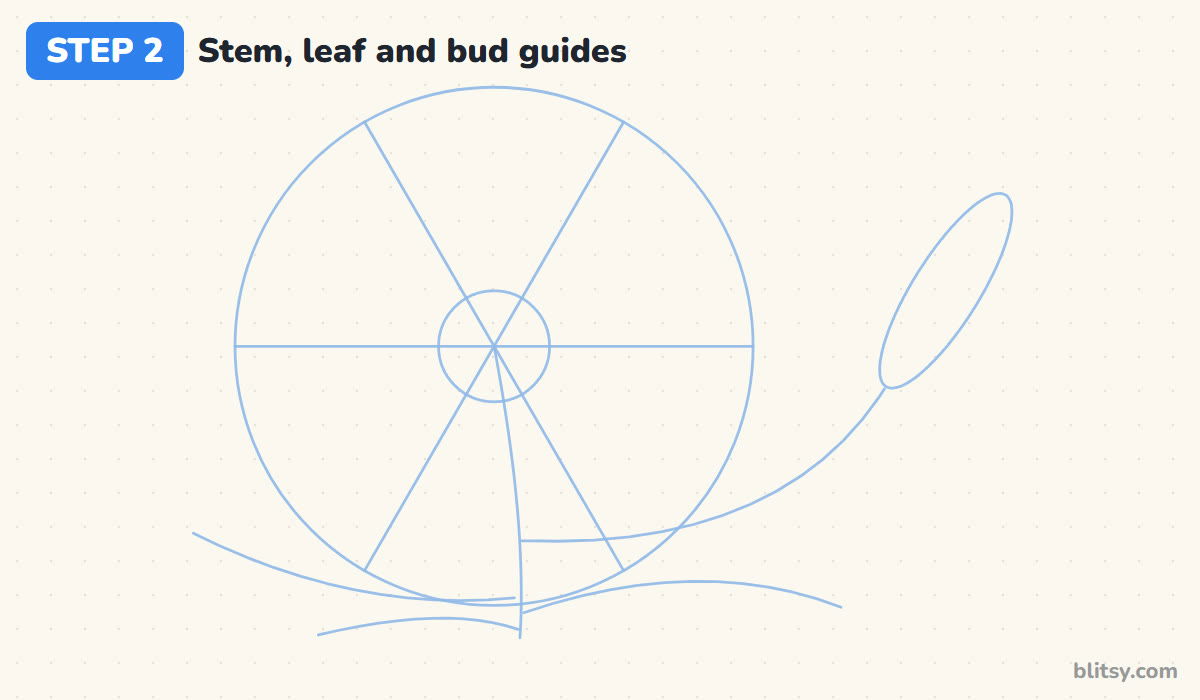
From the center, let a gently curved line run down past the circle to the bottom of the page. That's the stem. Near the bottom, draw two long sweeping lines going out to the left and right, plus a short one on the left, for the leaves. Last, curve a thinner line out of the stem toward the upper right and end it in a slim tilted oval for the bud.
💡 Tip: Keep the bud well away from the circle. If it touches the petals the picture feels crowded.
Step 3: Draw six stamens and the pistil
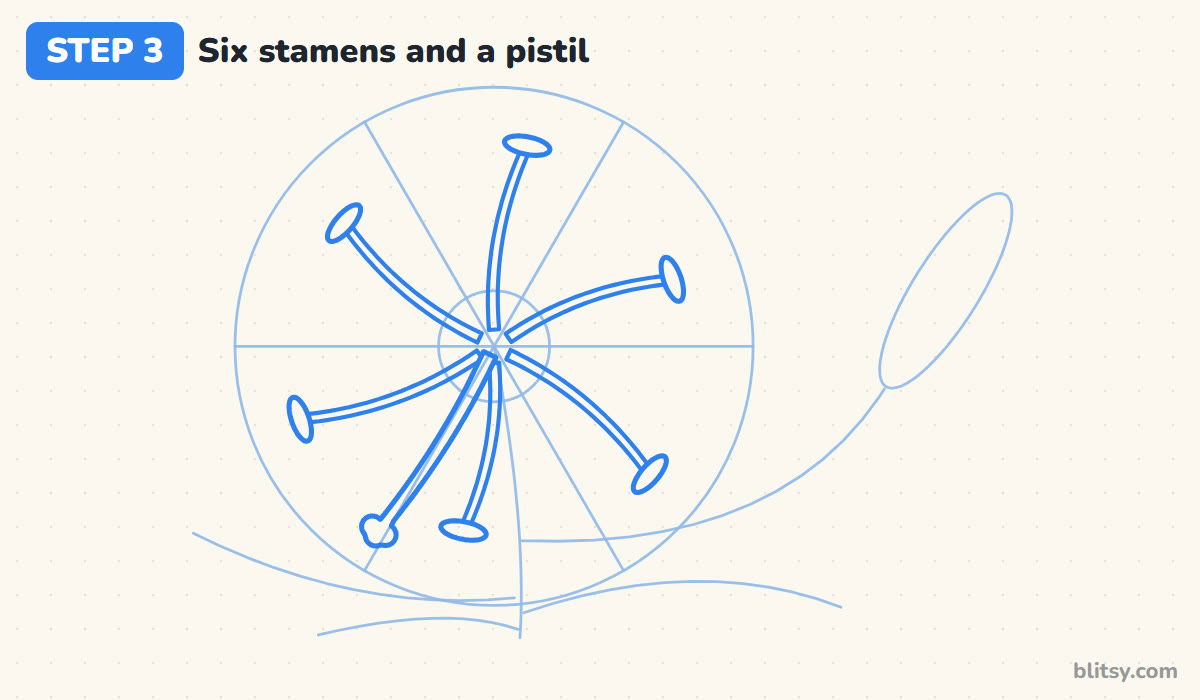
Stamens go in the gaps between the spokes, not on them. Draw six long, thin stalks from the small center circle out to the edge of the big circle, curving each one slightly, and lay a small oval across the tip of each for the anther. Then add one slightly thicker stalk toward the lower left with a little three-bump knob on the end. That's the pistil. I draw these before the petals because they sit on top, so the petal lines can simply stop when they meet them.
💡 Tip: Draw each stalk as two close lines. One single line looks like a wire once you color it.




Step 4: Add the three front petals
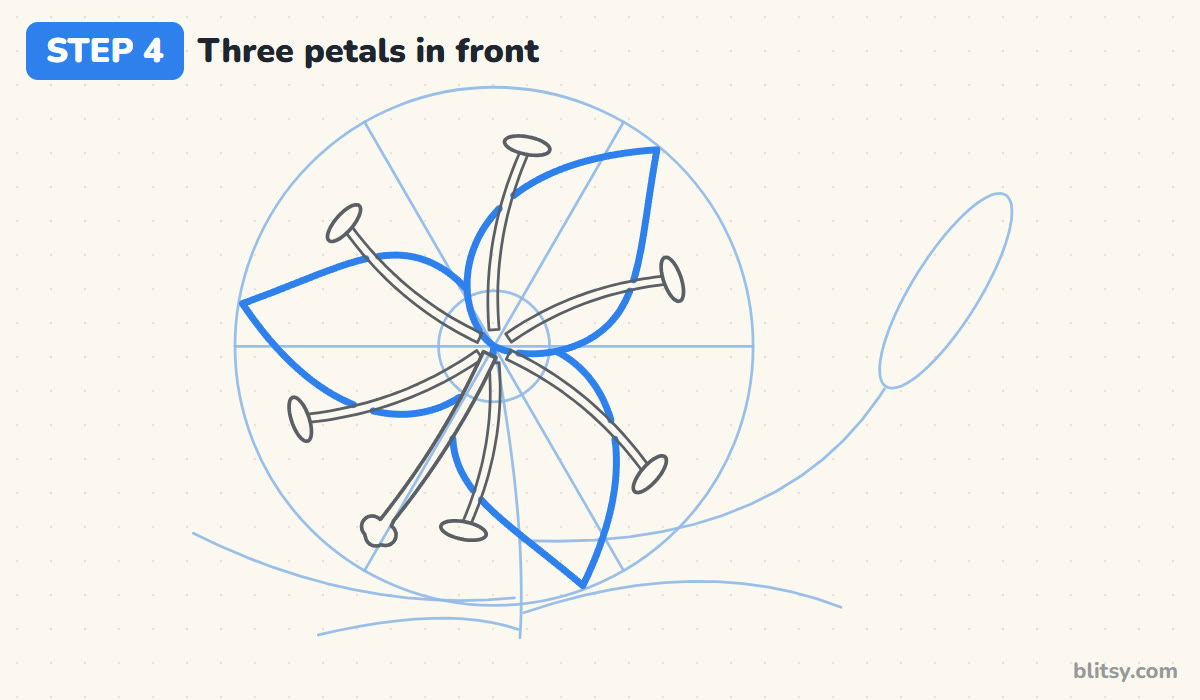
Pick every other spoke: the one pointing up and right, the one pointing left and the one pointing down and right. Around each, draw a long pointed petal that starts narrow at the center, gets widest about a third of the way out and ends in a sharp tip. Let the tip bend a tiny bit to the side so the petals look like they're opening. Stop the line wherever a stamen crosses it.
💡 Tip: Make the two sides of a petal slightly different. A perfectly even petal looks like a cut-out.
Step 5: Draw three petals peeking behind
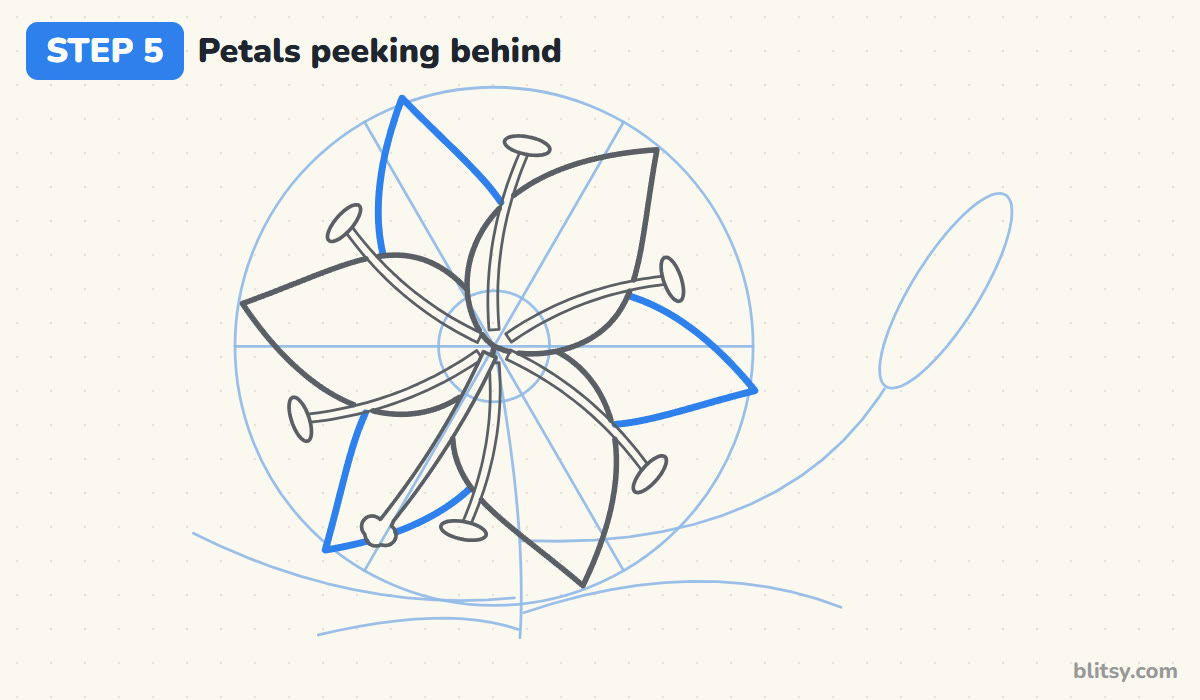
The three spokes that are left get the back petals. They're the same pointed shape, just a little longer and narrower. Only draw the parts you can actually see in the gaps between the front petals, which is mostly the outer half and the tip. This overlap is what gives the flower depth.
💡 Tip: If you're not sure where a back petal ends, sketch it whole very lightly, then erase the part hiding behind the front petal.
Step 6: Draw the stem and long leaves
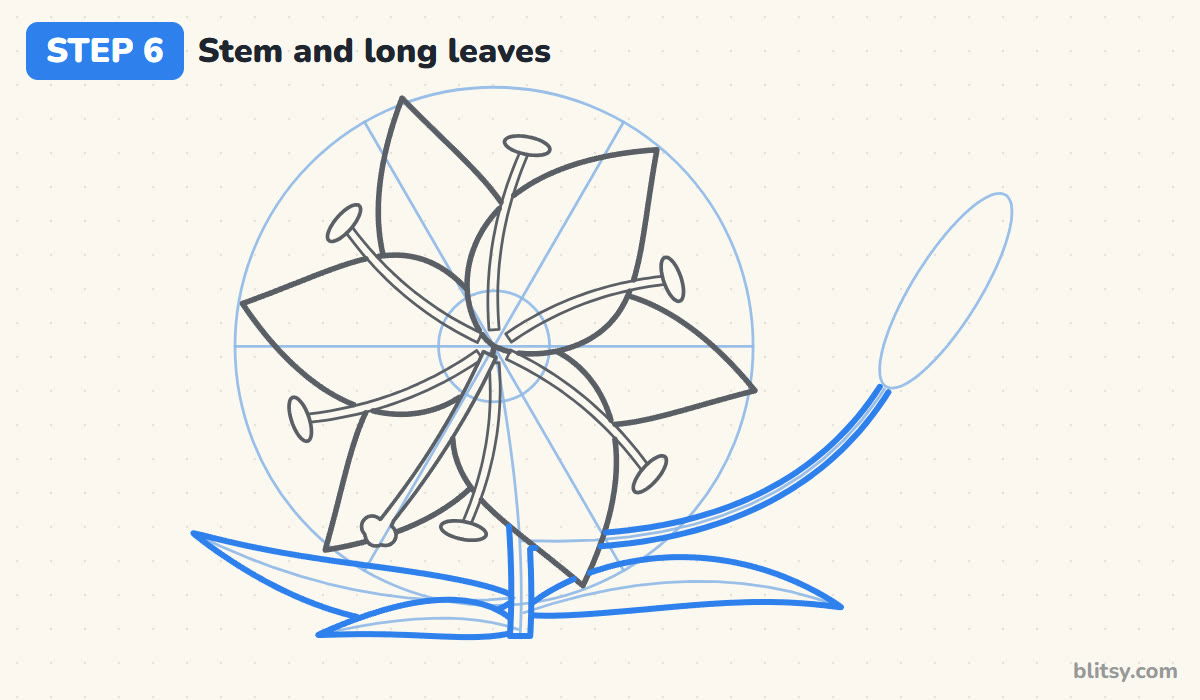
Follow the stem guide with two lines a finger width apart, starting where the stem shows below the petals, and cut it off flat at the bottom. Do the same along the side stem toward the bud, only thinner. Lily leaves are long and narrow, pointed at both ends, so stretch each one out along its guide and let it arch a little. Start each leaf right at the stem.
💡 Tip: Narrow leaves are what tell people this is a lily and not a tulip. Keep them slim.
Step 7: Add a closed bud
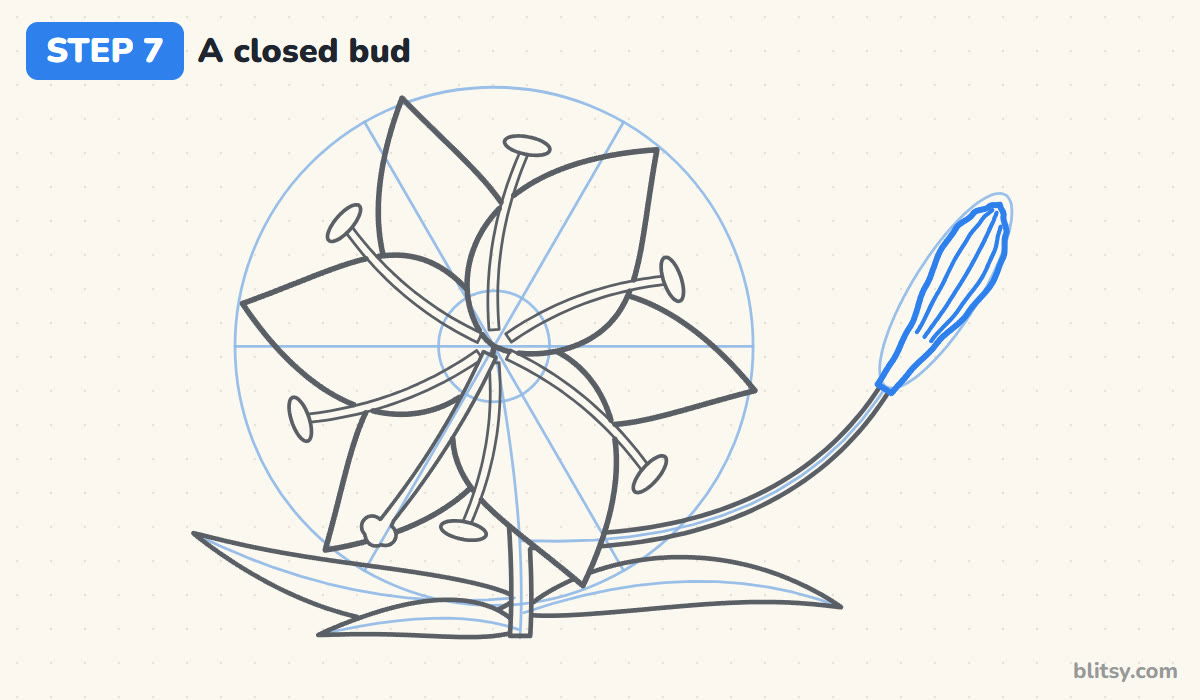
Over the oval at the end of the side stem, draw a bud shaped like a long club: thin where it joins the stem, swelling in the upper half, then closing to a point. Add three lines running along its length. Those are the edges of petals still folded tight.
💡 Tip: Let the bud lean the same way the side stem curves, so it looks like it grew there.


Step 8: Draw center lines and speckles
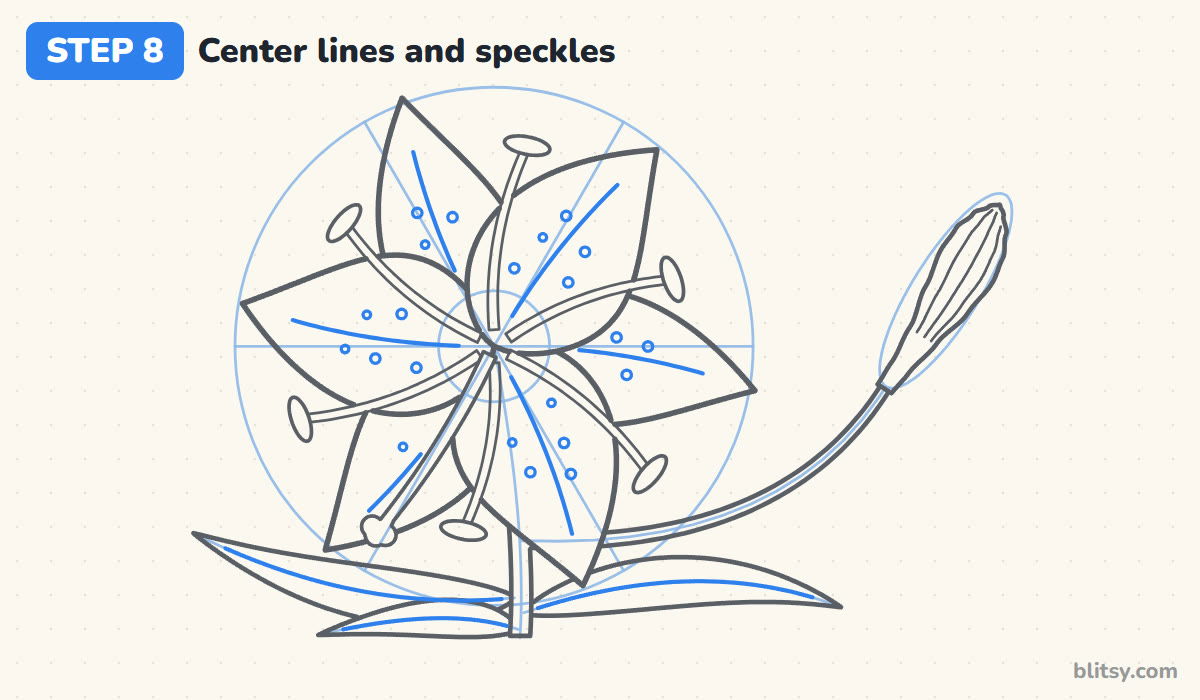
Run a thin line down the middle of each petal, starting near the center and stopping before the tip. Then sprinkle small dots on the inner half of every petal, a few on each side of the line. Stargazers have their spots near the middle, so leave the outer part of the petals clean. Finish with one center line in each leaf.
💡 Tip: Keep the dots tiny and a little uneven in spacing. Big round dots in neat rows look like polka dots, not a flower.
Step 9: Ink the lily and erase the guides
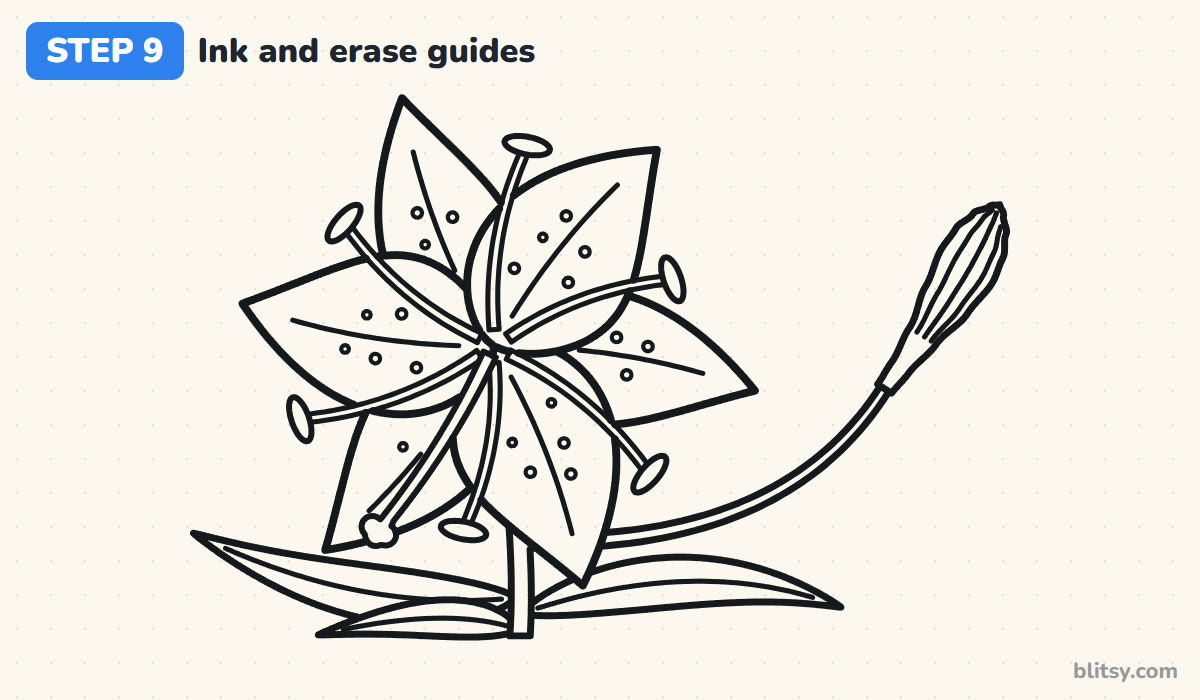
Trace every keeper line with the fineliner. I start with the stamens while my hand is steady and work outward to the petals, leaving the stem and leaves for last. Skip the circle, the spokes and the guide curves. Wait a minute for the ink to dry, then erase all the pencil.
💡 Tip: Go over the speckles last with a light tap of the pen. Dragging it makes commas instead of dots.
Step 10: Color your lily
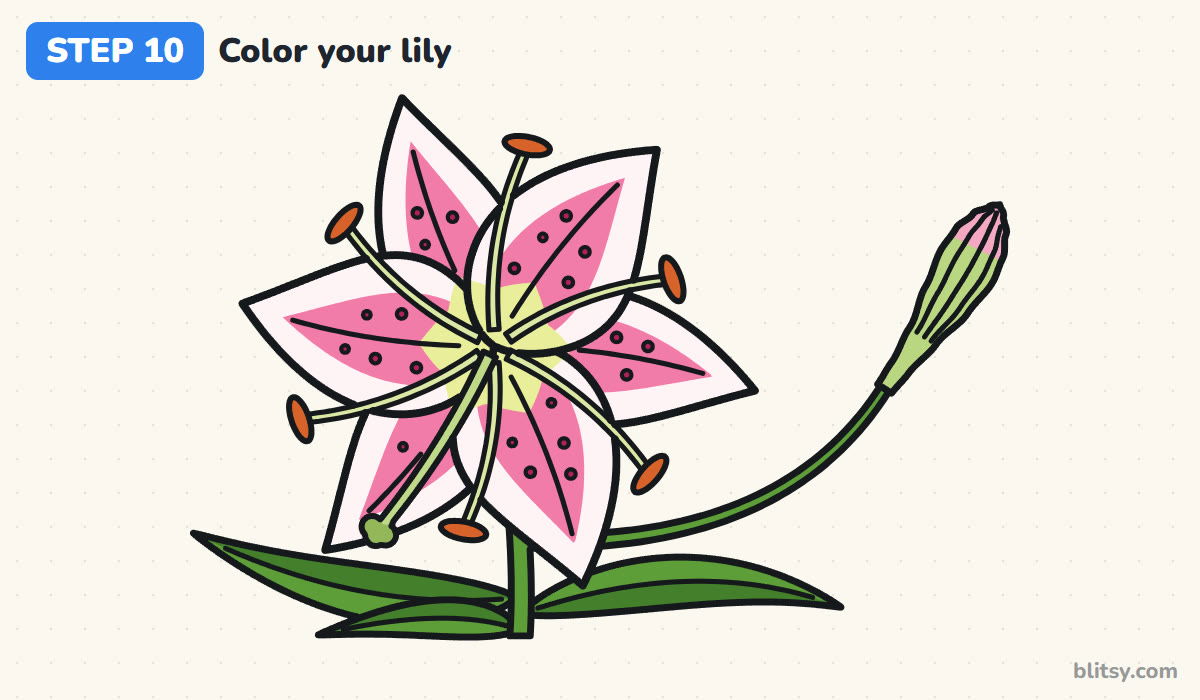
Color a pink stripe down the middle of each petal and leave a white rim around it. Make the speckles dark pink and the very center a pale yellow-green. Use light green on the stamens and the bud (the pistil too), orange on the anthers, and the bud gets a pink blush at its tip. Use green for the stem and leaves, with a darker green on one half of each leaf.
💡 Tip: Color the pink from the center outward and press lighter as you near the white rim, so the two blend softly.
Lily Petals That End Up Looking Like a Starfish
- Petals that are too wide and round. Wide, blunt petals turn the lily into a daisy. Keep them long, with a sharp point at the end.
- All six petals drawn as one flat star. Without the front and back layers the flower looks like a starfish. Draw three petals in front first, then tuck three behind.
- Short or missing stamens. The long stamens with orange tips are one of the first things people notice on a lily. Let them reach almost to the petal tips.
- Speckles everywhere. Dots spread over the whole petal look like a rash. Keep them small and on the inner half.
- Wide leaves. Broad leaves belong on tulips and roses. Lily leaves are long, slim and pointed.
Tiger Lilies, White Lilies and Other Twists
Color the petals orange with dark brown speckles and you have a tiger lily. For a white lily, skip the pink, add a soft yellow center and keep the green throat. Three lilies at different angles make a nice bouquet, and younger kids can leave out the bud and the speckles. If you liked the layered petals here, the magnolia flower drawing tutorial is my favorite next step, since it uses the same pink and white look on a branch. For a flower that curls instead of points, try the rose drawing tutorial, and the hibiscus drawing step by step lesson has a long pistil a lot like this one.
Lily Coloring Page and Printable Step Sheet
The free lily coloring page has a colored lily at the top as a guide, a color key for each part and a large outline to fill in. The step-by-step PDF puts all 10 steps on paper with their pictures and tips, which helps when you want to draw away from a screen. Both fit Letter and A4.
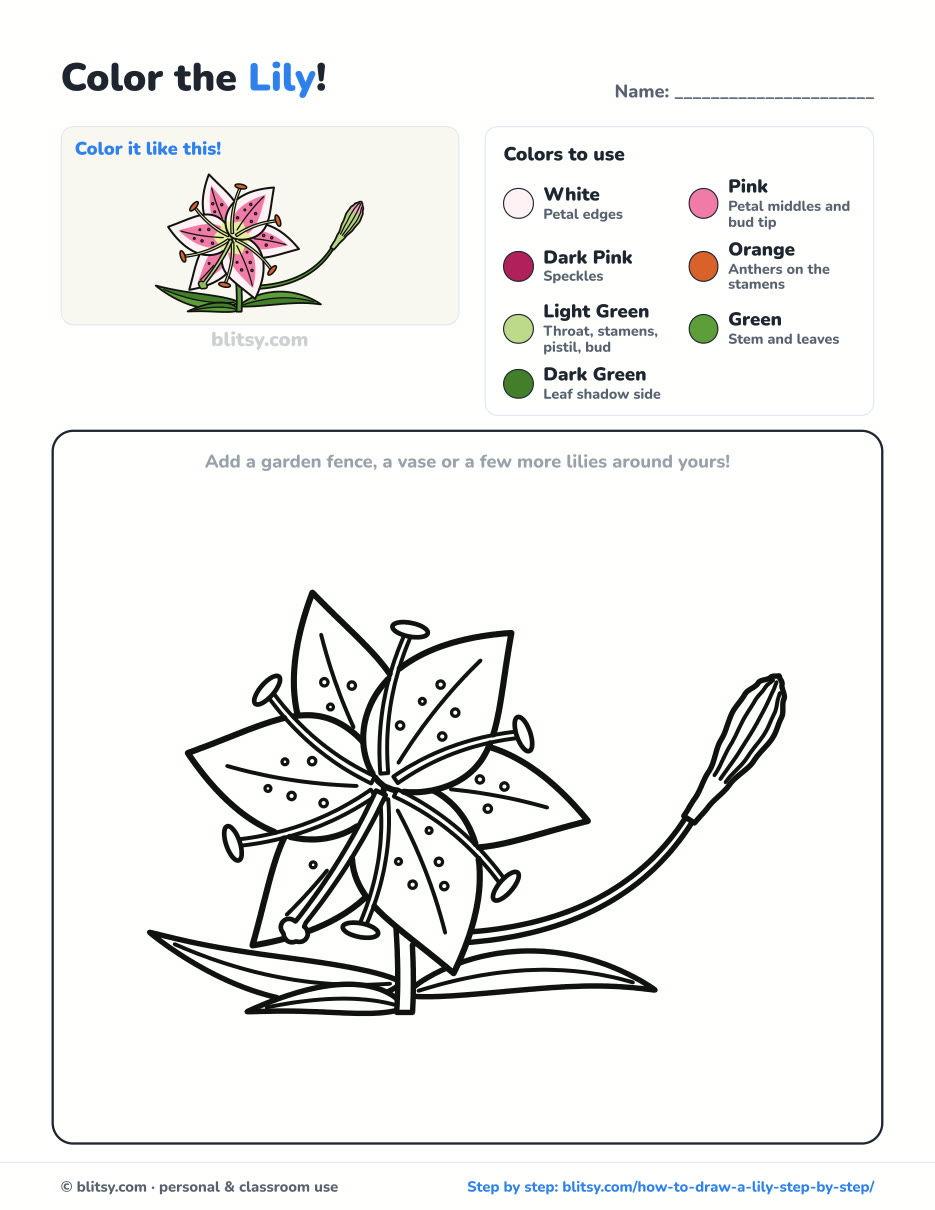
Black outlines with a colored example and the color names at the top. Ready to print and color.
⬇️ Download Coloring PageEvery step picture with its instructions and tips, to keep beside your paper while you draw.
⬇️ Download Drawing Guide📱 On a phone? Tap a download button, then open the file and choose Share → Save to Files or Print. On a computer, the PDF opens or saves straight to your Downloads folder.


Ten Lily Steps on One Tall Pin
More Flowers to Draw After Your Lily
Every link below is a full step-by-step lesson with a picture for each stage, so the same method carries over.
- Magnolia Drawing: A pink and white magnolia, a half-open bloom and a fuzzy bud grow along a knobby branch in the magnolia flower drawing tutorial.
- Rose Drawing: A red half-open rose starts from one small spiral in how to draw a rose step by step.
- Tulip Drawing: Three tulips in red, pink and yellow, each a cup of three petals, fill the tulip drawing tutorial.
- Hibiscus Drawing: A red hibiscus with a long pollen column and saw-edged leaves comes from one circle and five spokes in the hibiscus drawing tutorial.
- Flower Drawing: Three easy flowers made from circles, bells and points sit in a terracotta pot in the flower drawing step by step lesson.
Lily Drawing Questions From the Art Table
How do you draw a simple lily for kids?
Draw a small circle, then six long pointed petals around it like a star, three in front and three behind. Add a few lines with dots on the ends for stamens, a stem and two narrow leaves.
How many petals does a lily have?
A lily has six petals: three outer ones and three inner ones. Drawing them in two layers of three is what makes a lily look real.
What colors is a stargazer lily?
Stargazer lilies are deep pink in the middle of each petal with white edges and dark pink speckles. The center is light green, and the pollen on the stamens is orange-brown.
How do you draw a tiger lily?
Use the same steps, but color the petals orange and add dark brown spots. Real tiger lily petals curl back a lot, so you can bend the tips further outward.
Next time you pass a lily in a garden or a shop window, count the petals and look for the speckles. You'll know exactly how it's built. 🌸✏️
Related posts:
 How to Draw a Car Step by Step (Easy Drawing for Beginners)
 How to Draw a Whale Step by Step (Easy for Beginners)
 How to Draw an Arctic Fox Step by Step (Easy for Beginners)
 How to Draw a Chicken Step by Step (Easy for Beginners)
 How to Draw a Snowman Step by Step (Easy for Beginners)
 How to Draw an Airplane Step by Step (Easy Jet for Beginners)
 How to Draw a Mouse Step by Step (Easy for Beginners)
 How to Draw a T-Rex Step by Step (Easy for Beginners)
 How to Draw a Pig Step by Step (Easy for Beginners)
 How to Draw a Minion Step by Step (Easy for Beginners)
 How to Draw a Yorkie Step by Step (Easy for Beginners)
 How to Draw a Notebook Step by Step (Easy for Beginners)

